- 2009 Toyota Corolla Owners Manuals
- Toyota Corolla Owners Manuals
- 2010 Toyota Corolla Owners Manuals
- Toyota Corolla Owners Manuals
- 2004 Toyota Corolla Owners Manuals
- Toyota Corolla Owners Manuals
- 1999 Toyota Corolla Owners Manuals
- Toyota Corolla Owners Manuals
- 2001 Toyota Corolla Owners Manuals
- Toyota Corolla Owners Manuals
- 1996 Toyota Corolla Owners Manuals
- Toyota Corolla Owners Manuals
- 2015 Toyota Corolla Owners Manuals
- Toyota Corolla Owners Manuals
- 2013 Toyota Corolla Owners Manuals
- Toyota Corolla Owners Manuals
- 2007 Toyota Corolla Owners Manuals
- Toyota Corolla Owners Manuals
- 2000 Toyota Corolla Owners Manuals
- Toyota Corolla Owners Manuals
- 2012 Toyota Corolla Owners Manuals
- Toyota Corolla Owners Manuals
- 1998 Toyota Corolla Owners Manuals
- Toyota Corolla Owners Manuals
- 1997 Toyota Corolla Owners Manuals
- Toyota Corolla Owners Manuals
- 2003 Toyota Corolla Owners Manuals
- Toyota Corolla Owners Manuals
- 2019 Toyota Corolla Owners Manuals
- Toyota Corolla Owners Manuals
- Download PDF Manual
-
COROLLA_TMMMS_TMMC_U (OM12F00U)
356
5-19. Bluetooth® phone (Multimedia system)
Sound setting
Display the “Phone/Message Settings” screen. (P. 355) Select “Sound Settings” on the “Phone/Message Settings” screen.
13
incoming
the desired
Set the desired ringtone. Adjust the ringtone volume. Adjust the message readout volume. Set SMS/MMS tone. Adjust the incoming SMS/ MMS tone volume. Set the incoming e-mail tone. Adjust the incoming e-mail tone volume. Adjust the default volume of the other party's voice.
■To return to the default volume settings
Select “Default”, and then “Yes”.
COROLLA_TMMMS_TMMC_U (OM12F00U)
5-19. Bluetooth® phone (Multimedia system)
357
Contact/Call History Settings The contact can be transferred from a Bluetooth® phone to the sys- tem. The contact also can be added, edited and deleted. The call history can be deleted and contact and favorites can be changed.
PBAP
to update contacts
Display the “Phone/Message Settings” screen. (P. 355) Select “Contact/Call History Settings”. Select the desired item to be set. For compatible Bluetooth® phones, select to set automatic contact/history transfer on/off. When set to on, the phone’s contact data and history are automatically transferred. Select from the connected phone. (P. 358) Select to sort contacts by the first name or last name field. Select to add contacts to the favorites list. (P. 362) Select to delete contacts from the favorites list. (P. 364) Select to display contact images. Select to clear contacts from the call history.* Select to add new contacts to the contact list.* (P. 360) Select to edit contacts in the contact list.* (P. 361) Select to delete contacts from the contact list.* (P. 362) Select to reset all setup items.*
10
11
*: For PBAP compatible Bluetooth® phones only, this function is available
when “Automatic Contact/History Transfer” is set to off. (P. 357)
COROLLA_TMMMS_TMMC_U (OM12F00U)
358
5-19. Bluetooth® phone (Multimedia system)
Update contacts from phone Operation methods differ between PBAP compatible and PBAP incompatible but OPP compatible Bluetooth® phones. If your cellular phone is neither PBAP nor OPP compatible, the con- tacts cannot be transferred. ■ For PBAP Compatible Bluetooth® Phones
Select “Update Contacts from Phone”. Check that a confirmation screen is displayed when the opera- tion is complete. This operation may be unnecessary depending on the type of cellular phone. Depending on the type of cellular phone, OBEX authentication may be required when the Bluetooth® phone. If another Bluetooth® device is connected when transferring contact data, depending on the phone, the connected Bluetooth® device may need to be disconnected. Depending on the type of Bluetooth® phone being connected, it may be necessary to perform additional steps on the phone.
transferring contact data. Enter “1234”
into
COROLLA_TMMMS_TMMC_U (OM12F00U)
5-19. Bluetooth® phone (Multimedia system)
359
Incompatible but OPP compatible Bluetooth®
■ For PBAP
Phones
Select “Update Contacts from Phone”. Transfer the contact data to the system using a Bluetooth® phone. This operation may be unnecessary depending on the type of cellular phone. Depending on the type of cellular phone, OBEX authentication may be required when the Bluetooth® phone. To cancel this function, select “Cancel”. Select “Done” when it appears on the screen. Check that a confirmation screen is displayed when the opera- tion is complete.
transferring contact data. Enter “1234”
into
■ Updating the contacts in a different way (From the “Call His-
tory” screen) For PBAP compatible Bluetooth® phones, this function is available when “Automatic Contact/History Transfer” is set to off. (P. 357)
Display the phone screen. (P. 338) Select the “Call History” tab and select a contact not yet regis- tered in the contact list. Select “Update Contact”. Select the desired contact. Select a phone type for the phone number.
COROLLA_TMMMS_TMMC_U (OM12F00U)
360
5-19. Bluetooth® phone (Multimedia system)
Registering a new contact to the contact list New contact data can be registered. Up to 4 numbers per person can be registered. For PBAP compatible Bluetooth® phones, this function is available when “Automatic Contact/History Transfer” is set to off. (P. 357)
Select “New Contact”. Enter the name and select “OK”. Enter the phone number and select “OK”. Select the phone type for the phone number. To add another number to this contact, select “Yes”.
■ Registering a new contact in a different way (From the “Call
History” screen)
Display the phone screen. (P. 338) Select the “Call History” tab and select a contact not yet regis- tered in the contact list. Select “Add to Contacts”. Follow the steps in “Registering a new contact to the contacts list” from “STEP 3”. (P. 360)
COROLLA_TMMMS_TMMC_U (OM12F00U)
5-19. Bluetooth® phone (Multimedia system)
361
Editing the contact data For PBAP compatible Bluetooth® phones, this function is available when “Automatic Contact/History Transfer” is set to off. (P. 357)
Select “Edit Contact”. Select the desired contact. Select
corresponding to the desired name or number.
For editing the name
Follow the steps in “Registering a new contact to the contacts list” from “STEP 3”. (P. 360)
For editing the number
Follow the steps in “Registering a new contact to the contacts list” from “STEP 4”. (P. 360)
■ Editing the contacts in a different way (From the “Contact
Details” screen)
Display the phone screen. (P. 338) Select the “Contacts”, “Call History” tab or the “Favorites” tab and select the desired contact. Select “Edit Contact”. “E-mail Addresses”: Select to display all registered e-mail addresses for the contact. Follow the steps in “Editing the contact data” from “STEP 4”. (P. 361)
COROLLA_TMMMS_TMMC_U (OM12F00U)
362
5-19. Bluetooth® phone (Multimedia system)
Deleting the contact data For PBAP compatible Bluetooth® phones, this function is available when “Automatic Contact/History Transfer” is set to off. (P. 357)
Select “Delete Contacts”. Select the desired contact and select “Delete”. Select “Yes” when the confirmation screen appears.
13
■ Deleting the contact in a different way (From the “Contact
Details” screen)
Display the phone screen. (P. 338) Select the “Contacts”, “Call History” tab or the “Favorites” tab and select the desired contact. Select “Edit Contact”. Select “Yes” when the confirmation screen appears.
Favorites list setting Up to 15 contacts (maximum of 4 numbers per contact) can be regis- tered in the favorites list. ■ Registering the contacts in the favorites list
Select “Add Favorite”. Select the desired contact to add to the favorites list. Dimmed contacts are already stored as a favorite. Check that a confirmation screen is displayed when the opera- tion is complete.
COROLLA_TMMMS_TMMC_U (OM12F00U)
5-19. Bluetooth® phone (Multimedia system)
363
When 15 contacts have already been registered to the favorites list When 15 contacts have already been registered to the favorites list, a registered contact needs to be replaced. Select “Yes” when the confirmation screen appears to replace a contact. Select the contact to be replaced. Check that a confirmation screen is displayed when the opera- tion is complete.
Registering contacts in the favorites list in a different way (from the
“Contacts” screen)
Display the phone screen. (P. 338) Select the “Contacts” tab. Select registered in the favorites list. When selected, the favorites list.
is changed to
at the beginning of the desired contact list name to be
, and the contact is registered in
Registering contacts in the favorites list in a different way (from the
“Contact Details” screen)
Display the phone screen. (P. 338) Select the “Contacts” tab or the “Call History” tab and select the desired contact. Select “Add Favorite”. Check that a confirmation screen is displayed when the opera- tion is complete.
COROLLA_TMMMS_TMMC_U (OM12F00U)
364
5-19. Bluetooth® phone (Multimedia system)
■ Deleting the contacts in the favorites list
Select “Remove Favorite”. Select the desired contacts and select “Remove”. Select “Yes” when the confirmation screen appears. Check that a confirmation screen is displayed when the opera- tion is complete.
Deleting contacts in the favorites list in a different way (from the
“Contacts” screen)
Display the phone screen. (P. 338) Select the “Contacts” tab. Select from the favorites. list. When selected, list.
is changed to
at the beginning of the contact list name to be deleted
, and the data is deleted from the
Deleting contacts in the favorites list in a different way (from the
“Contact Details” screen)
Display the phone screen. (P. 338) Select the “Contacts”, “Call History” tab or the “Favorites” tab and select the desired contact to delete. Select “Remove Favorite”. Select “Yes” when the confirmation screen appears. Check that a confirmation screen is displayed when the opera- tion is complete.
COROLLA_TMMMS_TMMC_U (OM12F00U)
5-19. Bluetooth® phone (Multimedia system)
365
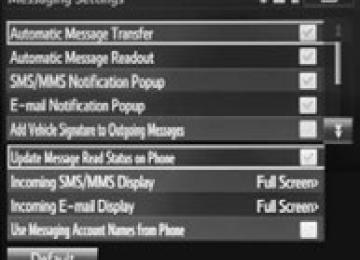
Message Settings
Display the “Phone/Message Settings” screen. (P. 355) Select “Messaging Settings”. Select the desired item to be set. automatic message
automatic message
the e-mail notification
Set transfer on/off. Set readout on/off. Set the SMS/MMS notifica- tion popup on/off. Set popup on/off. Set adding the vehicle signa- ture to outgoing messages on/off. Set updating message read status on phone on/off. Change the incoming SMS/MMS display. “Full Screen”: When an SMS/MMS message is received, the incoming SMS/MMS display screen is displayed and can be operated on the screen. “Drop-Down”: When an SMS/MMS message is received, a message is displayed on the upper side of the screen. Change the incoming e-mail display. “Full Screen”: When an e-mail is received, the incoming e-mail display screen is the displayed and can be operated on the screen. “Drop-Down”: When an e-mail is received, a message is displayed on the upper side of the screen. Set display of messaging account names on the inbox tab on/off. When set to on, messaging account names used on the cellular phone will be displayed.
■To return to the default volume settings
Select “Default”, and then “Yes”.
COROLLA_TMMMS_TMMC_U (OM12F00U)
366
5-19. Bluetooth® phone (Multimedia system)
■ Displaying the “Messaging Settings” screen in a different way
Display the phone screen. (P. 338) Select Select “Settings”.
Phone Display Settings
Display the “Phone/Message Settings” screen. (P. 355) Select “Phone Display Settings”. Select the desired item to be set. incoming call
the
Change display. “Full Screen”: When a call is received, the hands-free screen is displayed and can be oper- ated on the screen. “Drop-Down”: A message is dis- played on the upper side of the screen. Set display of the contact/ history transfer completion message on/off.
COROLLA_TMMMS_TMMC_U (OM12F00U)
5-19. Bluetooth® phone (Multimedia system)
367
What to do if... (Troubleshooting) If there is a problem with the hands-free system or a Bluetooth® device, first check the table below. When using the hands-free system with a Bluetooth® device The hands-free system or Bluetooth® device does not work. The connected device may not be a compatible Bluetooth® cellular phone. For a list of specific devices which operation has been confirmed on this system, check with your Toyota dealer or the following web- site: http://www.toyota.com/entune.html
The Bluetooth version of the connected cellular phone may be older than the specified version. Use a cellular phone with Bluetooth version 2.0 or higher (recom-
mended: Ver. 3.0 with EDR or higher). (P. 371)
COROLLA_TMMMS_TMMC_U (OM12F00U)
368
5-19. Bluetooth® phone (Multimedia system)
When registering/connecting a cellular phone A cellular phone cannot be registered. An incorrect passcode was entered on the cellular phone. Enter the correct passcode on the cellular phone. The registration operation has not been completed on the cellular phone side. Complete the registration operation on the cellular phone (approve
registration on the phone).
Old registration information remains on either this system or the cellular phone. Delete the existing registration information from both this system and the cellular phone, then register the cellular phone you wish to connect to this system. (P. 328)
A Bluetooth® connection cannot be made. Another Bluetooth® device is already connected. Manually connect the cellular phone you wish to use to this sys-
tem. (P. 330)
Bluetooth® function is not enabled on the cellular phone. Enable the Bluetooth® function on the cellular phone. “Please check your device settings.” message is displayed. Bluetooth® function is not enabled on the cellular phone. Enable the Bluetooth® function on the cellular phone. Old registration information remains on either this system or the cellular phone. Delete the existing registration information from both this system and the cellular phone, then register the cellular phone you wish to connect to this system. (P. 328)
When making/receiving a call A call cannot be made/received. Your vehicle is in a “Out of cellular service area. Please try again later.” area. Move to where “Out of cellular service area. Please try again later.”
no longer appears on the display.
COROLLA_TMMMS_TMMC_U (OM12F00U)
5-19. Bluetooth® phone (Multimedia system)
369
When using the phonebook Phonebook data cannot be transferred manually/automatically. The profile version of the connected cellular phone may not be compatible with transferring phonebook data. For a list of specific devices which operation has been confirmed on this system, check with your Toyota dealer or the following web- site: http://www.toyota.com/entune.html
Automatic phonebook transfer function on this system is set to off. Set automatic phonebook transfer function on this system to on.
(P. 357)
Passcode has not been entered on the cellular phone. Enter the passcode on the cellular phone if requested (default pass-
code: 1234).
Transfer operation on the cellular phone has not completed. Complete transfer operation on the cellular phone (approve trans-
fer operation on the phone).
Phonebook data cannot be edited. Automatic phonebook transfer function on this system is set to on. Set automatic phonebook transfer function on this system to off.
(P. 357)
When using the Bluetooth® message function Messages cannot be viewed. Message transfer is not enabled on the cellular phone. Enable message transfer on the cellular phone (approve message
transfer on the phone).
Automatic transfer function on this system is set to off. Set automatic transfer function on this system to on. (P. 365) New message notifications are not displayed. Notification of SMS/MMS/E-mail reception on this system is set to off. Set notification of SMS/MMS/E-mail reception on this system to on.
(P. 365)
Automatic message transfer function is not enabled on the cellular phone. Enable automatic transfer function on the cellular phone.
COROLLA_TMMMS_TMMC_U (OM12F00U)
370
5-19. Bluetooth® phone (Multimedia system)
In other situations Even though all conceivable measures have been taken, the symptom sta- tus does not change. The cellular phone is not close enough to this system. Bring the cellular phone closer to this system. The cellular phone is the most likely cause of the symptom. Turn the cellular phone off, remove and reinstall the battery pack, Enable the cellular phone’s Bluetooth® connection. Stop the cellular phone’s security software and close all applica-
and then restart the cellular phone.
Before using an application installed on the cellular phone, care- fully check its source and how its operation might affect this sys- tem.
tions.
COROLLA_TMMMS_TMMC_U (OM12F00U)
5-20.Bluetooth® (Multimedia system)
371
Bluetooth®
■When using the Bluetooth® audio system
●In the following conditions, the system may not function.
• If the portable audio player is turned off • If the portable audio player is not connected • If the portable audio player’s battery is low
●There may be a delay if a cellular phone connection is made during
Bluetooth® audio play.
●Depending on the type of portable audio player that is connected to the sys- tem, operation may differ slightly and certain functions may not be available.
■When using the hands-free system
●The multimedia system is muted when making a call. ●If both parties speak at the same time, it may be difficult to hear. ●If the received call volume is overly loud, an echo may be heard.
If the Bluetooth® phone is too close to the system, quality of the sound may deteriorate and connection status may deteriorate.
●In the following circumstances, it may be difficult to hear the other party:
• When driving on unpaved roads • When driving at high speeds • If a roof or window is open • If the air conditioning is blowing directly on the microphone • If there is interference from the network of the cellular phone
■Conditions under which the system will not operate
●If using a cellular phone that does not support Bluetooth® ●If the cellular phone is turned off ●If you are outside of cellular phone service coverage ●If the cellular phone is not connected ●If the cellular phone’s battery is low ●When outgoing calls are controlled, due to heavy traffic on telephone lines,
etc.
●When the cellular phone itself cannot be used ●When transferring contact data from the cellular phone
COROLLA_TMMMS_TMMC_U (OM12F00U)
5-20. Bluetooth® (Multimedia system)
372
■Bluetooth® antennaThe antenna is built into the display. If the portable audio player is behind the seat or in the glove box or console box, or is touching or covered by metal objects, the connection status may deteriorate. If the cellular phone is behind the seat or in the console box, or touching or covered by metal objects, the connection status may deteriorate.
■Battery charge/signal status
●This display may not correspond exactly with the portable audio player or
cellular phone itself.
●This system does not have a charging function. ●The portable audio player or cellular phone battery will be depleted quickly
when the device is connected to Bluetooth®.
■When using the Bluetooth® audio and hands-free system at the same
time The following problems may occur. ●The Bluetooth® audio connection may be interrupted. ●Noise may be heard during Bluetooth® audio playback.
■About the contact in this system
The following data is stored for every registered cellular phone. When another phone is connecting, you cannot read the registered data. ●Contact data ●Call history ●Favorite ●Message When removing a Bluetooth® phone from the system, the above-mentioned data is also deleted.
COROLLA_TMMMS_TMMC_U (OM12F00U)
5-20. Bluetooth® (Multimedia system)
373
■Compatible models
The Bluetooth® audio system supports portable audio players with the follow- ing specifications ●Bluetooth® specifications:
Ver. 2.0, or higher (Recommended: Ver. 3.0+EDR or higher)
●Profiles:
• A2DP (Advanced Audio Distribution Profile) Ver. 1.0, or higher
(Recommended: Ver. 1.2 or higher) This is a profile to transmit stereo audio or high quality sound to the multi- media system.
• AVRCP (Audio/Video Remote Control Profile) Ver. 1.0 or higher
(Recommended: Ver. 1.4 or higher) This is a profile to allow remote control the A/V equipment.
However, please note that some functions may be limited depending on the type of portable audio player connected. The hands-free system supports cellular phones with the following specifica- tions. ●Bluetooth® specification:
Ver. 2.0 or higher (Recommended: Ver. 3.0+EDR or higher)
●Profiles:
• HFP (Hands Free Profile) Ver. 1.0 or higher (Recommended: Ver. 1.6 or
higher) This is a profile to allow hands-free phone calls using a cellular phone or head set. It has outgoing and incoming call functions.
• OPP (Object Push Profile) Ver. 1.1 or higher (Recommended: Ver. 1.2)
This is a profile to transfer contact data. When a Bluetooth® compatible cellular phone has both PBAP and OPP, OPP cannot be used.
• PBAP (Phone Book Access Profile) Ver. 1.0 or higher (Recommended:
Ver. 1.1) This is a profile to transfer contact data.
• MAP (Message Access Profile) Ver.1.0 or higher
This is a profile to using phone message.
If the cellular phone does not support HFP, you cannot register it with the hands-free system. OPP, PBAP or MAP services must be selected individu- ally.
COROLLA_TMMMS_TMMC_U (OM12F00U)
374
5-20. Bluetooth® (Multimedia system)
■Certification
NOTE: This device complies with part 15 of the FCC Rules. Operation is subject to the following two conditions: (1) This device may not cause harmful interfer- ence, and (2) this device must accept any interference received, including interference that may cause undesired operation. FCC WARNING: Changes or modifications not expressly approved by the party responsible for compliance could void the user's authority to operate the equipment. CAUTION: Radio Frequency Radiation Exposure This equipment complies with FCC radiation exposure limits set forth for uncontrolled equipment and meets the FCC radio frequency (RF) Exposure Guidelines in Supplement C to OET65. This equipment has very low levels of RF energy that it deemed to comply without maximum permissive exposure evaluation (MPE). But it is desirable that it should be installed and operated with at least 20 cm and more between the radiator and person's body (excluding extremities: hands, wrists, feet and ankles). Co-location: This transmitter must not be co-located or operated in conjunction with any other antenna or transmitter.
■Reconnecting the portable audio player
If the portable audio player is disconnected due to poor reception when the engine switch is in ACCESSORY or IGNITION ON mode, the system auto- matically reconnects the portable audio player. If you have switched off the portable audio player yourself, follow the instruc- tions below to reconnect: ●Select the portable audio player again ●Enter the portable audio player
■When you sell your car
Be sure to delete your personal data. (P. 291)
COROLLA_TMMMS_TMMC_U (OM12F00U)
5-20. Bluetooth® (Multimedia system)
375
CAUTION
■While driving
Do not use the portable audio player, cellular phone or connect a device to the Bluetooth® system.
■Caution regarding interference with electronic devices
●Your audio unit is fitted with Bluetooth® antennas. People with implantable cardiac pacemakers, cardiac resynchronization therapy-pacemakers or implantable cardioverter defibrillators should maintain a reasonable dis- tance between themselves and the Bluetooth® antennas. The radio waves may affect the operation of such devices.
●Before using Bluetooth® devices, users of any electrical medical device other than implantable cardiac pacemakers, cardiac resynchronization therapy-pacemakers or implantable cardioverter defibrillators should con- sult the manufacturer of the device for information about its operation under the influence of radio waves. Radio waves could have unexpected effects on the operation of such medical devices.
NOTICE
■When leaving the vehicle
Do not leave your portable audio player or cellular phone in the vehicle. The inside of the vehicle may become hot, causing damage to the portable audio player or cellular phone.
COROLLA_TMMMS_TMMC_U (OM12F00U)
376
5-21.Using the voice command system (Multimedia system)
Voice command system The voice command system enables the hands-free system to be operated using voice commands. Operations of the voice command system can be performed by selecting the menu corresponding to each function on the screen. Even if any menu is selected, commands displayed on all menus can be operated.
Using the voice command system
Press the talk switch. To cancel the voice command sys- tem, press and hold the talk switch.
After a beep sounds, say the desired command. On the list screen, you can select the desired command.
■Microphone
P. 339
■When using the microphone
●It is unnecessary to speak directly into the microphone when giving a com-
mand.
●When “Voice Prompt Interrupt” set to on, it is not necessary to wait for the
confirmation beep before speaking a command. (P. 295)
●Voice commands may not be recognized if:
• Spoken too quickly. • Spoken at a low or high volume. • The roof or windows are open. • Passengers are talking while voice commands are spoken. • The air conditioning speed is set high. • The air conditioning vents are turned towards the microphone.
●In the following conditions, the system may not recognize the command
properly and using voice commands may not be possible: • The command is incorrect or unclear. Note that certain words, accents or
speech patterns may be difficult for the system to recognize.
• There is excessive background noise, such as wind noise.
COROLLA_TMMMS_TMMC_U (OM12F00U)
5-21. Using the voice command system (Multimedia system)
377
Casual speech recognization Due to natural language speech recognition technology, this system enables recognition of a command when spoken naturally. However, the system cannot recognize every variation of each command. In some situations, it is possible to omit the command for the proce- dure and directly state the desired operation. Not all voice commands are displayed in the short cut menu. This function is available in English, Spanish and French. ■ Expression examples for each function
Command
“Call (type)”
(name)
“Dial (number)”
Expression examples
Get me (Robert Brown). I need to call (Robert Brown) at (Work) right away. Please dial the number (3334445555). Ring (3334445555).
COROLLA_TMMMS_TMMC_U (OM12F00U)
378
5-21. Using the voice command system (Multimedia system)
Command list Some recognizable voice commands and their actions are shown below as examples. Basic
Command
Action
“Help”
“Go Back” Phone
Command
“Redial”
“Call Back”
Recent
“Show Calls” “Dial (phone num- ber)” “Call (phonetypes)”
(contacts)
Prompts voice guidance to offer examples of com- mands or operation methods Returns to the previous screen
Action
Places a call to the phone number of the latest outgo- ing call Places a call to the phone number of latest incoming call
Displays the call history screen
Places a call to the said phone number
Place a call to the said phone type of the contact from the phone book
COROLLA_TMMMS_TMMC_U (OM12F00U)
379
Interior features
6-1. Using the air conditioning
system and defogger Manual air conditioning system ............................ 380
Automatic air conditioning system ........ 3866-2. Using the interior lights
Interior lights list ................ 395
• Front interior light/ personal lights............... 396
• Rear interior light .......... 3976-3. Using the storage
features List of storage features ..... 398
• Glove box...................... 399
• Console box.................. 399
• Bottle holders................ 400
• Cup holders .................. 4016-4. Other interior features
Other interior features ....... 403
• Sun visors..................... 403
• Vanity mirrors................ 403
• Clock............................. 403
• Outside temperature display........................... 404
• Power outlet.................. 405
• Assist grips ................... 406
Compass........................... 407
Seat heaters...................... 411COROLLA_TMMMS_TMMC_U (OM12F00U)
380
6-1. Using the air conditioning system and defogger
Manual air conditioning system
Air conditioning controls
Heater
Air conditioning system
■ Adjusting the temperature setting Heater
To adjust the temperature setting, turn the increase the temperature.
dial clockwise to
Air conditioning system
To adjust the temperature setting, turn the (warm) or counterclockwise (cool).
dial clockwise
is not pressed, the system will blow ambient temperature air or
If heated air.
■ Fan speed setting
To adjust the fan speed, turn the counterclockwise (decrease). Turning the dial to “0” turns off the fan.
■ Change the airflow mode
dial clockwise (increase) or
To select the air outlets, set the
dial to the desired position.
: If equipped
COROLLA_TMMMS_TMMC_U (OM12F00U)
6-1. Using the air conditioning system and defogger
381
Other functions ■ Switching between outside air and recirculated air modes
Press
The mode switches between outside air mode (indicator off) and recir-
culated air mode (indicator on) each time
is pressed.
■ Defogging the windshield
Defoggers are used to defog the windshield and front side win- dows. Set the air outlet selector dial to the
position.
Set the outside/recirculated air mode button to outside air mode if the recirculated air mode is used. (It may switch automatically.) To defog the windshield and the side windows early, turn the air flow and temperature up.
Vehicles with the air conditioning system: If the dehumidification
function is not operating, press
to operate the dehumidifica-
tion function.
■ Defogging the rear window and outside rear view mirrors Vehicles without outside rear view mirror defoggers
Defoggers are used to defog the rear window.
Press
The defoggers will automatically turn off after a period of time.
Vehicles with outside rear view mirror defoggers
Defoggers are used to defog the rear window, and to remove rain- drops, dew and frost from the outside rear view mirrors.
Press
The defoggers will automatically turn off after a period of time.
COROLLA_TMMMS_TMMC_U (OM12F00U)
382
6-1. Using the air conditioning system and defogger
Air outlets ■ Location of air outlets
The air outlets and air volume changes according the selected airflow mode.
to
: Some models
■ Adjusting the position of and opening and closing the air out-
lets
Front center outlets Direct air flow to the left or right, up or down.
COROLLA_TMMMS_TMMC_U (OM12F00U)
6-1. Using the air conditioning system and defogger
383
Front side outlets Direct air flow to the left or right, up or down.
Close the vent Sliding the knob to the most outer position. Open the vent
COROLLA_TMMMS_TMMC_U (OM12F00U)
384
6-1. Using the air conditioning system and defogger
■For quick cooling (vehicles with air conditioning system)
Turn the mode.
dial to the “MAX A/C” position and select the recirculated air
■Fogging up of the windows
●Vehicles with the
button: The windows will easily fog up when the
humidity in the vehicle is high. Turning the outlets and defog the windshield effectively.
on will dehumidify the air from
●Vehicles with the
button: If you turn
off, the windows may fog
up more easily.
●The windows may fog up if the recirculated air mode is used.
■Outside/recirculated air mode
When driving on dusty roads such as tunnels or in heavy traffic, set the out- side/recirculated air mode button to the recirculated air mode. This is effective in preventing outside air from entering the vehicle interior. During cooling operation, setting the recirculated air mode will also cool the vehicle interior effectively.
■When the outside temperature is low (vehicles with the
button)
The air conditioning system may not operate even when
is pressed.
■Ventilation and air conditioning odors
●To let fresh air in, set the air conditioning system to the outside air mode. ●During use, various odors from inside and outside the vehicle may enter into and accumulate in the air conditioning system. This may then cause odor to be emitted from the vents.
●To reduce potential odors from occurring:
It is recommended that the air conditioning system be set to outside air mode prior to turning the vehicle off.
■Air conditioning filter
P. 461
COROLLA_TMMMS_TMMC_U (OM12F00U)
6-1. Using the air conditioning system and defogger
385
CAUTION
■To prevent the windshield from fogging up
●Do not set the air outlet selector dial to
during cool air operation in extremely humid weather. The difference between the temperature of the outside air and that of the windshield can cause the outer surface of the windshield to fog up, blocking your vision.
●Do not place anything on the instrument panel which may cover the air outlets. Otherwise, air flow may be obstructed, preventing the windshield defoggers from defogging.
■To prevent burns (vehicles with outside rear view mirror defoggers)
Do not touch the rear view mirror surfaces when the outside rear view mirror defoggers are on.
NOTICE
■To prevent battery discharge
Do not leave the air conditioning system on longer than necessary when the engine is stopped.
COROLLA_TMMMS_TMMC_U (OM12F00U)
386
6-1. Using the air conditioning system and defogger
Automatic air conditioning system
Air outlets and fan speed are automatically adjusted according to the temperature setting.
Air conditioning controls
■ Adjusting the temperature setting
To adjust the temperature setting, turn
clockwise to increase
the temperature and turn temperature.
counterclockwise to decrease the
: If equipped
COROLLA_TMMMS_TMMC_U (OM12F00U)
6-1. Using the air conditioning system and defogger
387
■ Fan speed setting
Press “” on
to increase the fan speed.
Press “” on
to decrease the fan speed.
■ Change the airflow mode
To change the airflow, press “” or “” on
The air outlets used are switched each time either side of the button is pressed.
■ Other functions
● Switching between outside air and recirculated air modes
(P. 381)
● Defogging the windshield (P. 381) ● Defogging the rear window and outside rear view mirrors
(P. 381)
COROLLA_TMMMS_TMMC_U (OM12F00U)
388
6-1. Using the air conditioning system and defogger
Using automatic mode
Press
The dehumidification function begins to operate. Air outlets and fan speed are automatically adjusted according to the temperature set- ting. Adjust the temperature setting.
■ Automatic mode indicator
If the fan speed setting or air flow modes are operated, the auto- matic mode indicator goes off. However, automatic mode for func- tions other than that operated are maintained.
Other functions ■ Switching between outside air and recirculated air modes
Press
The mode switches between outside air mode (indicator off) and recir-
culated air mode (indicator on) each time
is pressed.
■ Defogging the windshield
Defoggers are used to defog the windshield and front side win- dows.
Press
The dehumidification function operates and fan speed increases. Set the outside/recirculated air mode button to the outside air mode if the recirculated air mode is used. (It may switch automatically.) To defog the windshield and the side windows early, turn the air flow and temperature up. To return to the previous mode, press defogged.
again when the windshield is
COROLLA_TMMMS_TMMC_U (OM12F00U)
6-1. Using the air conditioning system and defogger
389
■ Defogging the rear window and outside rear view mirrors
Defoggers are used to defog the rear window, and to remove rain- drops, dew and frost from the outside rear view mirrors.
Press
The defoggers will automatically turn off after a period of time.
COROLLA_TMMMS_TMMC_U (OM12F00U)
390
6-1. Using the air conditioning system and defogger
Air outlets ■ Location of air outlets
The air outlets and air volume changes according the selected airflow mode.
to
: Some models
■ Adjusting the position of and opening and closing the air out-
lets
Front center outlets
Direct air flow to the left or right, up or down.
Front side outlets
Direct air flow to the left or right, up or down.
COROLLA_TMMMS_TMMC_U (OM12F00U)
6-1. Using the air conditioning system and defogger
391
Close the vent Sliding the knob to the most outer position. Open the vent
■Operation of the air conditioning system in Eco drive mode (if equipped) In Eco drive mode, the air conditioning system is controlled as follows to pri- oritize fuel efficiency: ●Engine speed controlled to restrict heating/cooling capacity. ●Outside/recirculated air mode may automatically switch depending on the
temperature setting or the inside temperature.
●Fan speed restricted when automatic mode is selected To improve air conditioning performance, perform the following operations: ●Adjust the fan speed. ●Turn off Eco drive mode. (P. 175)
■Using automatic mode
Fan speed is adjusted automatically according to the temperature setting and the ambient conditions. Therefore, the fan may stop for a while until warm or cool air is ready to flow
immediately after
is pressed.
COROLLA_TMMMS_TMMC_U (OM12F00U)
392
6-1. Using the air conditioning system and defogger
■Fogging up of the windows
●The windows will easily fog up when the humidity in the vehicle is high.
Turning shield effectively.
on will dehumidify the air from the outlets and defog the wind-
●If you turn
off, the windows may fog up more easily.
●The windows may fog up if the recirculated air mode is used.
■Outside/recirculated air mode
●When driving on dusty roads such as tunnels or in heavy traffic, set the out- side/recirculated air mode button to recirculated air mode. This is effective in preventing outside air from entering the vehicle interior. During cooling oper- ation, setting the recirculated air mode will also cool the vehicle interior effectively.
●Outside/recirculated air mode may automatically switch depending on the
temperature setting or the inside temperature.
COROLLA_TMMMS_TMMC_U (OM12F00U)
6-1. Using the air conditioning system and defogger
393
■When the outside temperature exceeds 75°F (24°C) and the air condition-
ing system is on ●In order to reduce the air conditioning power consumption, the air condition- ing system may switch to recirculated air mode automatically. This may also reduce fuel consumption.
Vehicles without a smart key system ●Recirculated air mode is selected as a default mode when the engine switch
is turned to the “ON” position.
Vehicles with a smart key system ●Recirculated air mode is selected as a default mode when the engine switch
is turned to IGNITION ON mode.
●It is possible to switch to outside air mode at any time by pressing
■When the outside temperature is low
The dehumidification function may not operate even when
is pressed.
■Ventilation and air conditioning odors
●To let fresh air in, set the air conditioning system to the outside air mode. ●During use, various odors from inside and outside the vehicle may enter into and accumulate in the air conditioning system. This may then cause odor to be emitted from the vents.
●To reduce potential odors from occurring:
• It is recommended that the air conditioning system be set to outside air
mode prior to turning the vehicle off.
• The start timing of the blower may be delayed for a short period of time immediately after the air conditioning system is started in automatic mode.
■Air conditioning filter
P. 461
■Customization that can be configured at Toyota dealer
Settings (e.g. air conditioning setting) can be changed. (Customizable features P. 570)
COROLLA_TMMMS_TMMC_U (OM12F00U)
394
6-1. Using the air conditioning system and defogger
CAUTION
■To prevent the windshield from fogging up
●Do not use
during cool air operation in extremely humid weather. The difference between the temperature of the outside air and that of the windshield can cause the outer surface of the windshield to fog up, block- ing your vision.
●Do not place anything on the instrument panel which may cover the air outlets. Otherwise, air flow may be obstructed, preventing the windshield defoggers from defogging.
■To prevent burns
Do not touch the rear view mirror surfaces when the outside rear view mirror defoggers are on.
NOTICE
■To prevent battery discharge
Do not leave the air conditioning system on longer than necessary when the engine is stopped.
COROLLA_TMMMS_TMMC_U (OM12F00U)
6-2. Using the interior lights
395
Interior lights list
Front interior light/personal lights (P. 396) Rear interior light (P. 397) Engine switch light (vehicles with a smart key system)
COROLLA_TMMMS_TMMC_U (OM12F00U)
396
6-2. Using the interior lights
Front interior light/personal lights ■ Front interior light Type A
Type B
Off Door position On
■ Personal lights Type A
Type B
On/off
On Off
When a light is on due to its door link switch, the light will not turn off even if the lens is pressed.
COROLLA_TMMMS_TMMC_U (OM12F00U)
6-2. Using the interior lights
397
Rear interior light
On Door position Off
■Illuminated entry system
Vehicles without a smart key system When the interior light switch is in the door position, the interior light automat- ically turns on/off according to the engine switch position, whether the doors are locked/unlocked and whether the doors are open/closed. Vehicles with a smart key system When the interior light switch is in the door position, the interior light and engine switch light automatically turn on/off according to engine switch mode, the presence of the electronic key, whether the doors are locked/unlocked and whether the doors are open/closed.
■To prevent battery discharge
The following lights will go off automatically after 20 minutes: ●Front interior light/personal lights ●Rear interior light ●Trunk light
■Customization
Setting (e.g. the time elapsed before lights turn off) can be changed. (Customizable features: P. 570)
COROLLA_TMMMS_TMMC_U (OM12F00U)
398
6-3. Using the storage features
List of storage features
Glove box Bottle holders
(P. 399) (P. 400)
Console box Cup holders
(P. 399) (P. 401)
CAUTION
■Items that should not be left in the storage spaces
Do not leave glasses, lighters or spray cans in the storage spaces, as this may cause the following when cabin temperature becomes high: ●Glasses may be deformed by heat or cracked if they come into contact
with other stored items.
●Lighters or spray cans may explode. If they come into contact with other stored items, the lighter may catch fire or the spray can may release gas, causing a fire hazard.
■When driving or when the storage compartments are not in use
Keep the lids closed. In the event of sudden braking or sudden swerving, an accident may occur due to an occupant being struck by an open lid or the items stored inside.
COROLLA_TMMMS_TMMC_U (OM12F00U)
6-3. Using the storage features
399
Glove box Pull up the lever to open the glove box.
Console box Console box Lift the lid while pulling up the knob on the right side.
Upper level box Lift the lid while pulling up the knob on the left side.
COROLLA_TMMMS_TMMC_U (OM12F00U)
400
6-3. Using the storage features
Bottle holders ■ Front
■ Rear
■When using the holder as a bottle holder
●When storing a bottle, close the cap. ●The bottle may not be stored depending on its size or shape.
CAUTION
■Items unsuitable for the bottle holder
Do not place anything other than a bottle in the bottle holders. Other items may be thrown out of the holders in the event of an accident or sudden braking and cause injury.
NOTICE
■Items that should not be stowed in the bottle holders
Put the cap on before stowing a bottle. Do not place open bottles in the bot- tle holders, or glass or paper cups containing liquid. The contents may spill and glass cups may break.
COROLLA_TMMMS_TMMC_U (OM12F00U)
6-3. Using the storage features
401
Cup holders ■ Front
■ Rear With console box
With armrest (if equipped)
Pull the lid to open.
Pull the armrest down.
COROLLA_TMMMS_TMMC_U (OM12F00U)
402
6-3. Using the storage features