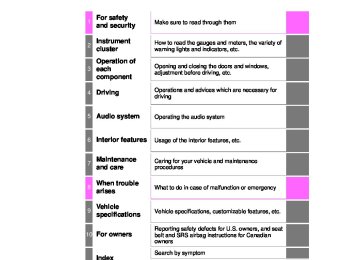
- 2009 Toyota Corolla Owners Manuals
- Toyota Corolla Owners Manuals
- 2010 Toyota Corolla Owners Manuals
- Toyota Corolla Owners Manuals
- 2004 Toyota Corolla Owners Manuals
- Toyota Corolla Owners Manuals
- 1999 Toyota Corolla Owners Manuals
- Toyota Corolla Owners Manuals
- 2001 Toyota Corolla Owners Manuals
- Toyota Corolla Owners Manuals
- 1996 Toyota Corolla Owners Manuals
- Toyota Corolla Owners Manuals
- 2015 Toyota Corolla Owners Manuals
- Toyota Corolla Owners Manuals
- 2013 Toyota Corolla Owners Manuals
- Toyota Corolla Owners Manuals
- 2007 Toyota Corolla Owners Manuals
- Toyota Corolla Owners Manuals
- 2000 Toyota Corolla Owners Manuals
- Toyota Corolla Owners Manuals
- 2012 Toyota Corolla Owners Manuals
- Toyota Corolla Owners Manuals
- 1998 Toyota Corolla Owners Manuals
- Toyota Corolla Owners Manuals
- 1997 Toyota Corolla Owners Manuals
- Toyota Corolla Owners Manuals
- 2003 Toyota Corolla Owners Manuals
- Toyota Corolla Owners Manuals
- 2019 Toyota Corolla Owners Manuals
- Toyota Corolla Owners Manuals
- Download PDF Manual
-
If the vehicle reaches a speed of 12 mph (20 km/h), the buzzer sounds once. If the seat belt is still unfastened after 30 seconds, the buzzer will sound intermittently for 10 seconds. Then, if the seat belt is still unfas- tened, the buzzer will sound in a different tone for 20 more seconds. Front passenger’s seat belt buzzer: The front passenger’s seat belt buzzer sounds to alert the front passenger that his or her seat belt is not fastened. The buzzer sounds once if the vehicle reaches a speed of 12 mph (20 km/h). If the seat belt is still unfas- tened after 30 seconds, the buzzer will sound intermittently for 10 seconds. Then, if the seat belt is still unfastened, the buzzer will sound in a different tone for 20 more seconds.
*6: If equipped *7: Refer to the separate “Scheduled Maintenance Guide” or “Owner’s Manual
Supplement” for the maintenance interval applicable to your vehicle.
COROLLA_TMMMS_TMMC_U (OM12F00U)
496
8-2. Steps to take in an emergency
Follow the correction procedures. (vehicles with a smart key system and with a drive monitor display) After taking the specified steps to correct the suspected problem, check that the warning light turns off.
Interior buzzer
Exterior buzzer
Warning
light
Warning light/Details/Action
Continuous
Continuous
(Flashes in yel-
low)
Once
3 times
(Flashes in yel-
low)
Smart key system indicator light (except vehicles with a manual transmission)
The electronic key was carried outside the vehicle and the driver’s door was opened and closed while any shift position other than P was selected without turning off the engine switch.
Change the shift position to P. Bring the electronic key back into the vehi-
cle.
Smart key system indicator light (except vehicles with a manual transmission)
The electronic key was carried outside the vehicle and the driver’s door was opened and closed while the shift position P was selected without turning off the engine switch.
Turn the engine switch off or bring the
electronic key back into the vehicle.
Smart key system indicator light
Indicates that a door other than the driver’s door has been opened and closed with the engine switch in any mode other than off and the electronic key outside of the detection area.
Confirm the location of the electronic key.
COROLLA_TMMMS_TMMC_U (OM12F00U)
8-2. Steps to take in an emergency
497
Interior buzzer
Exterior buzzer
Warning
light
Warning light/Details/Action
Once Continuous (5 seconds)
(Flashes in yel-
low)
Once
9 times
Once
Once
(Flashes in yel- low for 15 sec-
onds)
(Flashes in yel-
low)
(Flashes in yel- low for 15 sec-
onds)
(Flashes quickly in green for 15
seconds)
Once
(Flashes in yel- low for 30 sec-
onds)
Smart key system indicator light
An attempt was made to exit the vehicle with the electronic key and lock the doors without first turning the engine switch off.
Turn the engine switch off and lock the
doors again.
Smart key system indicator light
Indicates that the electronic key is not present when attempting to start the engine.
Confirm the location of the electronic key. Smart key system indicator light
An attempt was made to drive when the regu- lar key was not inside the vehicle.
Confirm that the electronic key is inside
the vehicle.
Smart key system indicator light
Indicates that the electronic key battery is low.
Replace the battery.
(P. 463)
Smart key system indicator light
Indicates that the steering lock has not been released.
Release the steering lock. (P. 169) Smart key system indicator light
• When the doors were unlocked with the mechanical key and then the engine switch was pressed, the electronic key could not be detected in the vehicle.
• The electronic key could not be detected in the vehicle even after the engine switch was pressed two consecutive times.
Vehicles with a continuously variable transmission: Touch the electronic key to the engine switch while depressing the brake pedal. Vehicles with a manual transmission: Touch the electronic key to the engine switch while depressing the clutch pedal.
COROLLA_TMMMS_TMMC_U (OM12F00U)
498
8-2. Steps to take in an emergency
■SRS warning light
This warning light system monitors the airbag sensor assembly, front impact sensors, side impact sensors (front door), side impact sensors (front), side impact sensors (rear), driver’s seat belt buckle switch, front passenger occu- pant classification system, “AIR BAG ON” indicator light, “AIR BAG OFF” indi- cator light, front passenger’s seat belt buckle switch, seat belt pretensioners (front), airbags, interconnecting wiring and power sources. (P. 35)
■Front passenger detection sensor, seat belt reminder and warning
buzzer If luggage is placed on the front passenger seat, the front passenger detec- tion sensor may cause the warning light to flash and the warning buzzer to sound even if a passenger is not sitting in the seat.
■If the malfunction indicator lamp comes on while driving
First check the following: ●Is the fuel tank empty?
If it is, fill the fuel tank immediately.
●Is the fuel tank cap loose?
If it is, tighten it securely.
The light will go off after several driving trips. If the light does not go off even after several trips, contact your Toyota dealer as soon as possible.
■When the tire pressure warning light comes on (vehicles with a tire
pressure warning system) Check the tire inflation pressure and adjust to the appropriate level. Push- ing the tire pressure warning reset switch will not turn off the tire pressure warning light.
■The tire pressure warning light may come on due to natural causes
(vehicles with a tire pressure warning system) The tire pressure warning light may come on due to natural causes such as natural air leaks and tire inflation pressure changes caused by temper- ature. In this case, adjusting the tire inflation pressure will turn off the warning light (after a few minutes).
COROLLA_TMMMS_TMMC_U (OM12F00U)
8-2. Steps to take in an emergency
499
■When a tire is replaced with a spare tire (vehicles with a tire pressure
warning system) The compact spare tire is not equipped with a tire pressure warning valve and transmitter. If a tire goes flat, the tire pressure warning light will not turn off even though the flat tire has been replaced with the spare tire. Replace the spare tire with the repaired tire and adjust the tire inflation pressure. The tire pressure warning light will go off after a few minutes.
■Conditions that the tire pressure warning system may not function
properly (vehicles with a tire pressure warning system) The tire pressure warning system will be disabled in the following condi- tions: (When the condition becomes normal, the system will work properly.) ●If tires not equipped with tire pressure warning valves and transmitters
are used
●If the ID code on the tire pressure warning valves and transmitters is not
registered in the tire pressure warning computer
●If the tire inflation pressure is 73 psi (500 kPa, 5.1 kgf/cm2 or bar) or
higher
The tire pressure warning system may be disabled in the following condi- tions: (When the condition becomes normal, the system will work properly.) ●If electronic devices or facilities using similar radio wave frequencies are
nearby
●If a radio set at similar frequency is in use in the vehicle ●If a window tint that affects the radio wave signals is installed ●If there is a lot of snow or ice on the vehicle, in particular around the
wheels or wheel housings
●If non-genuine Toyota wheels are used (Even if you use Toyota wheels, the tire pressure warning system may not work properly with some types of tires.)
●If tire chains are used
■If the tire pressure warning light frequently comes on after blinking
for 1 minute (vehicles with a tire pressure warning system) If the tire pressure warning light frequently comes on after blinking for 1
minute when the engine switch is turned on, have it checked by your Toyota dealer.■Warning buzzer
In some cases, the buzzer may not be heard because of noisy place or an audio sound.
■Electric power steering system warning light (warning buzzer)
When the battery charge becomes insufficient or the voltage temporarily drops, the electric power steering system warning light may come on and the warning buzzer may sound.
COROLLA_TMMMS_TMMC_U (OM12F00U)
500
8-2. Steps to take in an emergency
CAUTION
■If both the ABS and the brake system warning lights remain on
Stop your vehicle in a safe place immediately and contact your Toyota dealer. The vehicle will become extremely unstable during braking, and the ABS system may fail, which could cause an accident resulting in death or serious injury.
■When the electric power steering system warning light comes on
The steering wheel may become extremely heavy. If the steering wheel becomes heavier than usual when operating, hold firmly and operate using more force than usual.
■If the tire pressure warning light comes on (vehicles with a tire
pressure warning system) Be sure to observe the following precautions. Failure to do so could cause a loss of vehicle control and result in death or serious injury. ●Stop your vehicle in a safe place as soon as possible. Adjust the tire
inflation pressure immediately.
●If the tire pressure warning light comes on even after tire inflation pres- sure adjustment, it is probable that you have a flat tire. Check the tires. If a tire is flat, change it with the spare tire and have the flat tire repaired by the nearest Toyota dealer.
●Avoid abrupt maneuvering and braking. If the vehicle tires deteriorate,
you could lose control of the steering wheel or the brakes.
■If a blowout or sudden air leakage should occur (vehicles with a tire
pressure warning system) The tire pressure warning system may not activate immediately.
COROLLA_TMMMS_TMMC_U (OM12F00U)
8-2. Steps to take in an emergency
501
CAUTION
■Maintenance of the tires
Each tire, including the spare (if provided), should be checked monthly when cold and inflated to the inflation pressure recommended by the vehicle manufacturer on the vehicle placard or tire inflation pressure label (tire and load information label). (If your vehicle has tires of a dif- ferent size than the size indicated on the vehicle placard or tire inflation pressure label [tire and load information label], you should determine the proper tire inflation pressure for those tires.) As an added safety feature, your vehicle has been equipped with a tire pressure monitoring system (TPMS-tire pressure warning system) that illuminates a low tire pressure telltale (tire pressure warning light) when one or more of your tires is significantly under-inflated. Accordingly, when the low tire pressure telltale (tire pressure warning light) illumi- nates, you should stop and check your tires as soon as possible, and inflate them to the proper pressure. Driving on a significantly under- inflated tire causes the tire to overheat and can lead to tire failure. Under-inflation also reduces fuel efficiency and tire tread life, and may affect the vehicle’s handling and stopping ability. Please note that the TPMS (tire pressure warning system) is not a sub- stitute for proper tire maintenance, and it is the driver’s responsibility to maintain correct tire pressure, even if under-inflation has not reached the level to trigger illumination of the TPMS low tire pressure telltale (tire pressure warning light). Your vehicle has also been equipped with a TPMS (tire pressure warn- ing system) malfunction indicator to indicate when the system is not operating properly. The TPMS (tire pressure warning system) malfunc- tion indicator is combined with the low tire pressure telltale (tire pressure warning light). When the system detects a malfunction, the telltale will flash for approximately one minute and then remain continuously illumi- nated. This sequence will continue upon subsequent vehicle start-ups as long as the malfunction exists. When the malfunction indicator is illu- minated, the system may not be able to detect or signal low tire pres- sure as intended. TPMS (tire pressure warning system) malfunctions may occur for a vari- ety of reasons, including the installation of replacement or alternate tires or wheels on the vehicle that prevent the TPMS (tire pressure warning system) from functioning properly. Always check the TPMS (tire pres- sure warning system) malfunction telltale after replacing one or more tires or wheels on your vehicle to ensure that the replacement or alter- nate tires and wheels allow the TPMS (tire pressure warning system) to continue to function properly.
COROLLA_TMMMS_TMMC_U (OM12F00U)
502
8-2. Steps to take in an emergency
NOTICE
■To ensure the tire pressure warning system operates properly
(vehicles with a tire pressure warning system) Do not install tires with different specifications or makers, as the tire pressure warning system may not operate properly.
COROLLA_TMMMS_TMMC_U (OM12F00U)
8-2. Steps to take in an emergency
503
If a warning message or indicator is displayed (vehicles with a multi-information display)
If a warning is shown on the multi-information display, stay calm and perform the following actions:
Master warning light The master warning light also comes on or flashes in order to indicate that a message is cur- rently being displayed on the multi- information display. Multi-information display
If any of the warning message or indicator comes on again after the following actions have been performed, contact your Toyota dealer.
Warning message and warning buzzer list
Warning message
Details/Actions
Indicates that one or more of the doors is not fully closed.
The system also indicates which doors are not fully closed. If the vehicle reaches a speed of 3 mph (5 km/ h), a buzzer sounds to indicate that the door(s) are not yet fully closed.
Make sure that all the doors are closed. Indicates that the trunk is not fully closed.
If the vehicle reaches a speed of 3 mph (5 km/ h), a buzzer sounds to indicate that the trunk is not yet fully closed. Close the trunk.
Indicates that the vehicle is being driven at 3 mph (5 km/h) or more with the parking brake still engaged.
A buzzer also sounds.
Release the parking brake.
(U.S.A.)
(Canada)
(Flashes)
COROLLA_TMMMS_TMMC_U (OM12F00U)
504
8-2. Steps to take in an emergency
Warning message
Details/Actions
Indicates a malfunction in the vehicle’s charging system. Immediately stop the vehicle in a safe place and contact your Toyota dealer. Continuing to drive the vehicle may be dangerous.
Indicates a malfunction in the smart key system (if equipped).
A buzzer also sounds.
Have the vehicle inspected by your Toyota
dealer.
(Flashes)
(Flashes)
Indicates a malfunction in the cruise control sys- tem (if equipped).
• Press the “ON-OFF” button once to deacti- vate the system, and then press the button again to reactivate the system.
• A buzzer also sounds.
Have the vehicle inspected by your Toyota
dealer.
Indicates abnormal engine oil pressure.
The warning message is shown if the engine oil pressure is too low.
Immediately stop the vehicle in a safe place and contact your Toyota dealer. Continuing to drive the vehicle may be dangerous.
Vehicles without a smart key system: Indicates that the engine switch is turned off or turned to the “ACC” position mode and the driver’s door is opened while the lights are turned on.
A buzzer also sounds.
Turn the lights off. Vehicles with a smart key system: Indicates that the engine switch is turned off or turned to ACCESSORY mode and the driver’s door is opened while the lights are turned on.
A buzzer also sounds.
Turn the lights off.
COROLLA_TMMMS_TMMC_U (OM12F00U)
8-2. Steps to take in an emergency
505
Warning message
Details/Actions
Indicates that the moon roof is not fully closed (with the engine switch off, and the driver’s door open)
A buzzer also sounds. Close the moon roof.
Indicates that the washer fluid level is low. Add washer fluid.
Indicates that all maintenance according to the driven distance on the maintenance schedule* should be performed soon. Comes on approximately 4500 miles (7200 km) after the maintenance data has been reset. If necessary, perform maintenance. Indicates that all maintenance is required to cor- respond to the driven distance on the mainte- nance schedule*. Comes on approximately 5000 miles (8000 km) after the maintenance data has been reset. (The indicator will not work properly unless the maintenance data has been reset.) Perform
the necessary maintenance. Please reset the maintenance data after the maintenance is performed (P. 421)
(Flashes)
(If equipped)
(If equipped)
(U.S.A. only)
(U.S.A. only)
*: Refer to the separate “Scheduled Maintenance Guide” or “Owner’s Manual
Supplement” for the maintenance interval applicable to your vehicle.
■Warning buzzer
P. 499
COROLLA_TMMMS_TMMC_U (OM12F00U)
506
8-2. Steps to take in an emergency
Have the malfunction repaired immediately. (vehicles with a smart key system) After taking the specified steps to correct the suspected problem, check that the warning message and light go off.
Interior buzzer
Exterior buzzer
Warning message
Details/Actions
Con- tinu- ous
Con- tinu- ous
Contin- uous
(Flashes)
(Vehicles with a continuously variable
transmission)
(Displayed alternately)
(Flashes)
(Vehicles with a continuously variable
transmission)
The driver’s door was opened while any shift lever other than P was selected without turning off the engine switch. Shift the shift lever to P.
The driver’s door was opened and closed while the electronic key was not in the vehicle, the shift lever was not in P and the engine switch was not turned off. Shift the shift lever to P. Bring the electronic key
back into the vehicle.
COROLLA_TMMMS_TMMC_U (OM12F00U)
8-2. Steps to take in an emergency
507
Interior buzzer
Exterior buzzer
Warning message
Details/Actions
Once
3 times
(Flashes)
Once
Contin- uous (5 sec- onds)
(Displayed alternately)
(Flashes)
(Vehicles with a continuously variable
transmission)
The electronic key was carried outside the vehicle and a door other than the driver’s door was opened and closed while the engine switch was in a mode other than off. Bring the electronic key
back into the vehicle.
The driver’s door was opened and closed while the electronic key was not in the vehicle, the shift lever was in P (vehicles with a continuously variable transmission) and the engine switch was not turned off. Turn the engine switch off. Bring the electronic key
back into the vehicle.
An attempt was made to exit the vehicle with the electronic key and lock the doors without first turning the engine switch off when the shift lever was in P. Turn the engine switch off
and lock the doors again.
Once
(Flashes)
The electronic key is not detected when an attempt is made to start the engine. Start the engine with the
electronic key present.
COROLLA_TMMMS_TMMC_U (OM12F00U)
508
8-2. Steps to take in an emergency
Interior buzzer
Exterior buzzer
Warning message
Details/Actions
times
Contin- uous (5 sec- onds)
Once
Contin- uous (5 sec- onds)
Once
(Flashes)
(Flashes)
(Flashes)
An attempt was made to drive when the regular key was not inside the vehicle. Confirm that
the elec- tronic key is inside the vehicle.
An attempt was made to lock the doors using the smart key system while the electronic key was still inside the vehicle. Retrieve the electronic key from the vehicle and lock the doors again.
An attempt was made to lock either front door by opening a door and putting the inside lock button into the lock position, then closing the door by pulling on the outside door handle with the electronic key still inside the vehicle. Retrieve the electronic key from the vehicle and lock the doors again.
The electronic key has a low battery. Replace the electronic key
battery. (P. 463)
COROLLA_TMMMS_TMMC_U (OM12F00U)
8-2. Steps to take in an emergency
509
Interior buzzer
Exterior buzzer
Warning message
Details/Actions
switch
engine
The steering lock could not be released within 3 seconds of the being pressed. Press the engine switch while depressing the brake the pedal and moving steering wheel left and right.
switch
engine
The steering lock could not be released within 3 seconds of the being pressed. Press the engine switch while the clutch pedal and moving the steering wheel left and right.
depressing
Once
Once
(Flashes)
(Vehicles with a continuously variable
transmission)
(Flashes)
(Vehicles with a manual transmission)
COROLLA_TMMMS_TMMC_U (OM12F00U)
510
8-2. Steps to take in an emergency
Interior buzzer
Exterior buzzer
Warning message
Details/Actions
• When
the
doors were unlocked with the mechanical key and the engine switch was pressed, the elec- tronic key could not be detected in the vehicle.
then
the
• The electronic key could not be detected in the vehicle even after the engine switch was pressed two consecu- tive times.
Touch the electronic key to the engine switch while depressing brake pedal. • When
doors were unlocked with the mechanical key and the engine switch was pressed, the elec- tronic key could not be detected in the vehicle.
then
the
• The electronic key could not be detected in the vehicle even after the engine switch was pressed two consecu- tive times.
Touch the electronic key to the engine switch while depressing clutch pedal.
the
(Flashes)
(Vehicles with a continuously variable
transmission)
Once
(Flashes)
(Vehicles with a manual transmission)
COROLLA_TMMMS_TMMC_U (OM12F00U)
8-2. Steps to take in an emergency
511
Interior buzzer
Exterior buzzer
Warning message
Details/Actions
Once
(Flashes)
(Vehicles with a continuously variable
transmission)
The driver’s door was opened and closed with the engine switch turned off and then the engine switch was put in ACCESSORY or IGNITION ON mode twice without the engine being started. Press the engine switch while depressing the brake pedal.
During an engine starting pro- cedure in the event that the electronic key was not function- ing properly (P. 528), the engine switch was touched with the electronic key. Press the engine switch while depressing the brake pedal within 10 seconds of the buzzer sounding.
The driver’s door was opened and closed with the engine switch turned off and then the engine switch was put in ACCESSORY or IGNITION ON mode twice without the engine being started. Press the engine switch the
depressing
while clutch pedal.
Once
(Flashes)
(Vehicles with a manual transmission)
During an engine starting pro- cedure in the event that the electronic key was not function- ing properly (P. 528), the engine switch was touched with the electronic key. Press the engine switch while the clutch pedal within 10 sec- onds of the buzzer sound- ing.
depressing
COROLLA_TMMMS_TMMC_U (OM12F00U)
512
8-2. Steps to take in an emergency
Interior buzzer
Exterior buzzer
Warning message
Details/Actions
An attempt was made to start the engine with the shift lever in an incorrect position. Shift the shift lever to P
and start the engine.
The engine switch has been turned off with the shift lever in a position other than P or N. Shift the shift lever to P.
After the engine switch has been turned off with the shift lever in a position other than P, the shift lever has been shifted to P. Turn the engine switch off.
Power was turned off due to the automatic power off function. Next time when starting the engine, increase the engine speed slightly and maintain for approximately 5 minutes to recharge the battery.
level
that
Once
Once
Once
■Warning buzzer
P. 499
(Flashes)
(Vehicles with a continuously variable
transmission)
(Flashes)
(Vehicles with a continuously variable
transmission)
(Flashes)
(Vehicles with a continuously variable
transmission)
(Vehicles with a continuously variable
transmission)
COROLLA_TMMMS_TMMC_U (OM12F00U)
8-2. Steps to take in an emergency
513
If you have a flat tire
Your vehicle is equipped with a spare tire. The flat tire can be replaced with the spare tire. For details about tires: P. 448
CAUTION
■If you have a flat tire
Do not continue driving with a flat tire. Driving even a short distance with a flat tire can damage the tire and the wheel beyond repair, which could result in an accident.
Before jacking up the vehicle ● Stop the vehicle on a hard, flat surface. ● Set the parking brake. ● Shift the shift lever to P (automatic transmission or continuously
variable transmission) or R (manual transmission).
● Stop the engine. ● Turn on the emergency flashers. (P. 482)
COROLLA_TMMMS_TMMC_U (OM12F00U)
514
8-2. Steps to take in an emergency
Location of the spare tire, jack and tools
Luggage floor cover Wheel nut wrench Jack handle Jack attachment*
Jack Spare tire Tool tray
*: The jack attachment is used when raising your vehicle with a floor jack.
(P. 433)
COROLLA_TMMMS_TMMC_U (OM12F00U)
8-2. Steps to take in an emergency
515
CAUTION
■Using the tire jack
Observe the following precautions. Improper use of the tire jack may cause the vehicle to suddenly fall off the jack, leading to death or serious injury. ●Do not use the tire jack for any purpose other than replacing tires or
installing and removing tire chains.
●Only use the tire jack that comes with this vehicle for replacing a flat
tire. Do not use it on other vehicles, and do not use other tire jacks for replacing tires on this vehicle.
●Put the jack properly in its jack point. ●Do not put any part of your body under the vehicle while it is supported
by the jack.
●Do not start the engine or drive the vehicle while the vehicle is sup-
ported by the jack.
●Do not raise the vehicle while someone is inside. ●When raising the vehicle, do not put an object on or under the jack. ●Do not raise the vehicle to a height greater than that required to
replace the tire.
●Use a jack stand if it is necessary to get under the vehicle. ●When lowering the vehicle, make sure that there is no-one near the vehicle. If there are people nearby, warn them vocally before lowering.
Taking out the jack
Remove cover.
the
luggage
floor
COROLLA_TMMMS_TMMC_U (OM12F00U)
516
8-2. Steps to take in an emergency
Take out the jack. For tightening For loosening
Taking out the spare tire
Remove the luggage floor cover. (P. 515) Remove the tool tray.
Loosen the center fastener that secures the spare tire.
CAUTION
■When storing the spare tire
Be careful not to catch fingers or other body parts between the spare tire and the body of the vehicle.
COROLLA_TMMMS_TMMC_U (OM12F00U)
8-2. Steps to take in an emergency
517
Replacing a flat tire
Chock the tires.
Flat tire Left-hand side Right-hand side Left-hand side Right-hand side
Wheel chock positions
Behind the rear right-hand side tire Behind the rear left-hand side tire In front of the front right-hand side tire In front of the front left-hand side tire
Front
Rear
For vehicles with steel wheels, remove the wheel ornament using the wrench. To protect the wheel ornament, place a rag between the wrench and the wheel ornament, as shown in the illustration.
Slightly loosen the wheel nuts (one turn).
COROLLA_TMMMS_TMMC_U (OM12F00U)
518
8-2. Steps to take in an emergency
Turn the tire jack portion “A” by hand until the notch of the jack is in contact with the jack point. The jack point guides are located under the rocker panel. They indicate the jack point positions.
Raise the vehicle until the tire is slightly raised off the ground.
Remove all the wheel nuts and the tire. When resting the tire on the ground, place the tire so that the wheel design faces up to avoid scratching the wheel surface.
COROLLA_TMMMS_TMMC_U (OM12F00U)
8-2. Steps to take in an emergency
519
CAUTION
■Replacing a flat tire
●Do not touch the disc wheels or the area around the brakes immedi-
ately after the vehicle has been driven. After the vehicle has been driven the disc wheels and the area around the brakes will be extremely hot. Touching these areas with hands, feet or other body parts while changing a tire, etc. may result in burns.
●Failure to follow these precautions could cause the wheel nuts to
loosen and the tire to fall off, resulting in death or serious injury. • Have the wheel nuts tightened with a torque wrench to 76 ft•lbf (103
N•m, 10.5 kgf•m) as soon as possible after changing wheels.
• Do not attach a heavily damaged wheel ornament, as it may fly off
the wheel while the vehicle is moving.
• When installing a tire, only use wheel nuts that have been specifi-
cally designed for that wheel.
• If there are any cracks or deformations in the bolt screws, nut threads or bolt holes of the wheel, have the vehicle inspected by your Toyota dealer.
• When installing the wheel nuts, be sure to install them with the
tapered ends facing inward. (P. 460)
COROLLA_TMMMS_TMMC_U (OM12F00U)
520
8-2. Steps to take in an emergency
Installing the spare tire
Remove any dirt or foreign mat- ter from the wheel contact sur- face. If foreign matter is on the wheel contact surface, the wheel nuts may loosen while the vehicle is in motion, causing the tire to come off.
Install the tire and loosely tighten each wheel nut by hand by approximately the same amount. When replacing a steel wheel with a compact spare tire, tighten the wheel nuts until the into tapered portion comes loose contact with the disc wheel seat.
Tapered portion
Disc wheel seat
When replacing an aluminum wheel with a compact spare tire, tighten the wheel nuts until the tapered portion comes into loose contact with the disc wheel seat.
Lower the vehicle.
Tapered portion
Disc wheel seat
COROLLA_TMMMS_TMMC_U (OM12F00U)
8-2. Steps to take in an emergency
521
Firmly tighten each wheel nut two or three times in the order shown in the illustration. Tightening torque: 76 ft•lbf (103 N•m, 10.5 kgf•m)
Stow the flat tire, tire jack and all tools.
COROLLA_TMMMS_TMMC_U (OM12F00U)
522
8-2. Steps to take in an emergency
■The compact spare tire
●The compact spare tire is identified by the label “TEMPORARY USE
ONLY” on the tire sidewall. Use the compact spare tire temporarily, and only in an emergency.
●Make sure to check the tire inflation pressure of the compact spare tire.
(P. 552)
■When the compact spare tire is equipped
The vehicle becomes lower when driving with the compact spare tire compared to when driving with standard tires.
■After completing the tire change (vehicles with a tire pressure warn-
ing system) The tire pressure warning system must be reset. (P. 450)
■When using the compact spare tire (vehicles with a tire pressure
warning system) As the compact spare tire is not equipped with a tire pressure warning valve and transmitter, low inflation pressure of the spare tire will not be indicated by the tire pressure warning system. Also, if you replace the compact spare tire after the tire pressure warning light comes on, the light remains on.
■If you have a flat front tire on a road covered with snow or ice
Install the compact spare tire on one of the rear wheels of the vehicle. Perform the following steps and fit tire chains to the front tires:
Replace a rear tire with the compact spare tire. Replace the flat front tire with the tire removed from the rear of the vehi- cle. Fit tire chains to the front tires.
■When reinstalling the wheel ornament (vehicles with steel wheels)
Align the cutout of the wheel ornament with the valve stem as shown the illus- tration.
COROLLA_TMMMS_TMMC_U (OM12F00U)
8-2. Steps to take in an emergency
523
CAUTION
■When using the compact spare tire
●Remember that the compact spare tire provided is specifically designed for use with your vehicle. Do not use your compact spare tire on another vehicle.
●Do not use more than one compact spare tires simultaneously. ●Replace the compact spare tire with a standard tire as soon as possi-
ble.
●Avoid sudden acceleration, abrupt steering, sudden braking and shift-
ing operations that cause sudden engine braking.
■When the compact spare tire is attached
The vehicle speed may not be correctly detected, and the following sys- tems may not operate correctly: • ABS & Brake assist • VSC • TRAC • Cruise control (if equipped)
• EPS • Rear view monitor system (if
• Navigation system (if equipped)
equipped)
■Speed limit when using the compact spare tire
Do not drive at speeds in excess of 50 mph (80 km/h) when a compact spare tire is installed on the vehicle. The compact spare tire is not designed for driving at high speeds. Fail- ure to observe this precaution may lead to an accident causing death or serious injury.
■After using the tools and jack
Before driving, make sure all the tools and jack are securely in place in their storage location to reduce the possibility of personal injury during a collision or sudden braking.
COROLLA_TMMMS_TMMC_U (OM12F00U)
524
8-2. Steps to take in an emergency
NOTICE
■Be careful when driving over bumps with the compact spare tire
installed on the vehicle. The vehicle becomes lower when driving with the compact spare tire compared to when driving with standard tires. Be careful when driving over uneven road surfaces.
■Driving with tire chains and the compact spare tire
Do not fit tire chains to the compact spare tire. Tire chains may damage the vehicle body and adversely affect driving performance.
■When replacing the tires (vehicles with a tire pressure warning sys-
tem) When removing or fitting the wheels, tires or the tire pressure warning valve and transmitter, contact your Toyota dealer as the tire pressure warning valve and transmitter may be damaged if not handled correctly. ■To avoid damage to the tire pressure warning valves and transmit-
ters (vehicles with a tire pressure warning system) When a tire is repaired with liquid sealants, the tire pressure warning valve and transmitter may not operate properly. If a liquid sealant is used, contact your Toyota dealer or other qualified service shop as soon as possible. Make sure to replace the tire pressure warning valve and transmitter when replacing the tire. (P. 449)
COROLLA_TMMMS_TMMC_U (OM12F00U)
8-2. Steps to take in an emergency
525
If the engine will not start
If the engine will not start even though correct starting proce- dures are being followed (P. 161, 164), consider each of the fol- lowing points:
The engine will not start even though the starter motor operates normally. One of the following may be the cause of the problem: ● There may not be sufficient fuel in the vehicle’s tank.
Refuel the vehicle.
● The engine may be flooded.
Try to restart the engine again following correct starting procedures. (P. 164)
● There may be a malfunction in the engine immobilizer system.
(P. 66)
The starter motor turns over slowly, the interior lights and head- lights are dim, or the horn does not sound or sounds at a low volume. One of the following may be the cause of the problem: ● The battery may be discharged. (P. 531) ● The battery terminal connections may be loose or corroded.
The starter motor does not turn over (vehicles with a smart key system) The engine starting system may be malfunctioning due to an electrical problem such as electronic key battery depletion or a blown fuse. However, an interim measure is available to start the engine. (P. 526)
COROLLA_TMMMS_TMMC_U (OM12F00U)
526
8-2. Steps to take in an emergency
The starter motor does not turn over, the interior lights and head- lights do not turn on, or the horn does not sound. One of the following may be the cause of the problem: ● One or both of the battery terminals may be disconnected. ● The battery may be discharged. (P. 531) ● There may be a malfunction in the steering lock system (vehicles
with a smart key system). Contact your Toyota dealer if the problem cannot be repaired, or if repair procedures are unknown.
Emergency start function (vehicles with a smart key system) When the engine does not start, the following steps can be used as an interim measure to start the engine if the engine switch is functioning normally:
Set the parking brake. Shift the shift lever to P (continuously variable transmission) or N (manual transmission). Turn the engine switch to ACCESSORY mode. Press and hold the engine switch for about 15 seconds while depressing the brake pedal and clutch pedal (manual transmission) firmly.
Even if the engine can be started using the above steps, the system may be malfunctioning. Have the vehicle inspected by your Toyota dealer.
COROLLA_TMMMS_TMMC_U (OM12F00U)
8-2. Steps to take in an emergency
527
If the shift lever cannot be shifted from P (except vehicles with a manual transmission)
If the shift lever cannot be shifted with your foot on the brake pedal, there may be a problem with the shift lock system (a sys- tem to prevent accidental operation of the shift lever). Have the vehicle inspected by your Toyota dealer immediately. The following steps may be used as an emergency measure to ensure that the shift lever can be shifted:
Set the parking brake. Vehicles without a smart key system: Turn the engine switch to the “ACC” position. Vehicles with a smart key system: Turn the engine switch to ACCESSORY mode. Depress the brake pedal. Pry the cover up with a flathead screwdriver or equivalent tool. To prevent damage to the cover, cover the tip of the screwdriver with a rag.
Press the shift lock override button. The shift lever can be shifted while the button is pressed.
COROLLA_TMMMS_TMMC_U (OM12F00U)
528
8-2. Steps to take in an emergency
If the electronic key does not operate properly (vehicles with a smart key system)
If communication between the electronic key and vehicle is interrupted (P. 115) or the electronic key cannot be used because the battery is depleted, the smart key system and wire- less remote control cannot be used. In such cases, the doors can be opened and the engine can be started by following the procedure below.
Locking and unlocking the doors
Use the mechanical key (P. 93) in order to perform the following operations: Locks all the doors Unlocks the door Turning rearward unlocks the driver’s door. Turn- ing the key once again within 5
seconds unlocks the other doors.key
the
COROLLA_TMMMS_TMMC_U (OM12F00U)
8-2. Steps to take in an emergency
529
Starting the engine
the electronic key
Continuously variable transmission: Ensure that the shift lever is in P and depress the brake pedal. Manual transmission: Shift the shift lever to N and depress the clutch pedal. Touch the Toyota emblem side of the electronic key to the engine switch. is When detected, a buzzer sounds and the engine switch will turn to IGNITION ON mode. When the smart key system is deactivated in customization set- ting, the engine switch will turn to ACCESSORY mode. Vehicles with a drive monitor display: Firmly depress the brake pedal (continuously variable transmission) or clutch pedal (manual transmission) and check that the smart key system indicator light (green) turns on. Vehicles with a multi-information display: Firmly depress the brake pedal (continuously variable transmission) or clutch pedal (manual
transmission) and check that tion display. Press the engine switch.
is shown on the multi-informa-
In the event that the engine still cannot be started, contact your Toyota dealer.
COROLLA_TMMMS_TMMC_U (OM12F00U)
530
8-2. Steps to take in an emergency
■Stopping the engine
Shift the shift lever to P (continuously variable transmission) or N (manual transmission) and press the engine switch as you normally do when stopping the engine.
■Replacing the key battery
As the above procedure is a temporary measure, it is recommended that the electronic key battery be replaced immediately when the battery is depleted. (P. 463)
■Changing engine switch modes
Release the brake pedal (continuously variable transmission) or clutch pedal (manual transmission) and press the engine switch in step The engine does not start and modes will be changed each time the switch is pressed. (P. 166)
above.
■When the electronic key does not work properly
●Make sure that the smart key system has not been deactivated in the cus-
tomization setting. If it is off, turn the function on. (Customizable features P. 570)
●Check if battery-saving mode is set. If it is set, cancel the function.
(P. 114)
COROLLA_TMMMS_TMMC_U (OM12F00U)
8-2. Steps to take in an emergency
531
If the vehicle battery is discharged
The following procedures may be used to start the engine if the vehicle’s battery is discharged. You can also call your Toyota dealer or a qualified repair shop.
If you have a set of jumper (or booster) cables and a second vehicle with a 12-volt battery, you can jump start your vehicle by following the steps below.
Open the hood. (P. 431) Remove the engine cover. Raise the rear of the engine cover to remove the two rear clips, and then raise the front of the engine cover to remove the two front clips.
COROLLA_TMMMS_TMMC_U (OM12F00U)
532
8-2. Steps to take in an emergency
Connect the jumper cables according to the following procedure:
Connect a positive jumper cable clamp to the positive (+) battery terminal on your vehicle. Connect the clamp on the other end of the positive cable to the positive (+) battery terminal on the second vehicle. Connect a negative cable clamp to the negative (-) battery termi- nal on the second vehicle. Connect the clamp at the other end of the negative cable to a solid, stationary, unpainted metallic point away from the battery and any moving parts, as shown in the illustration.
COROLLA_TMMMS_TMMC_U (OM12F00U)
8-2. Steps to take in an emergency
533
Start the engine of the second vehicle. Increase the engine speed slightly and maintain at that level for approximately 5 minutes to recharge the battery of your vehicle. Vehicles with a smart key system: Open and close any of the doors of your vehicle with the engine switch off. Vehicles without a smart key system: Maintain the engine speed of the second vehicle and turn the engine switch to the “ON” position, then start the vehicle's engine. Vehicles with a smart key system: Maintain the engine speed of the second vehicle and turn the engine switch to IGNITION ON mode, then start the vehicle's engine. Once the vehicle’s engine has started, remove the jumper cables in the exact reverse order from which they were connected.
Once the engine starts, have the vehicle inspected at your Toyota dealer as soon as possible.