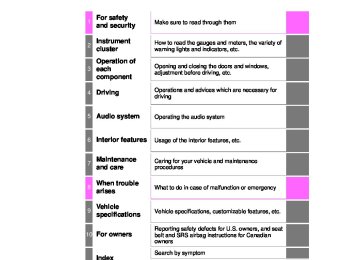
- 2009 Toyota Corolla Owners Manuals
- Toyota Corolla Owners Manuals
- 2010 Toyota Corolla Owners Manuals
- Toyota Corolla Owners Manuals
- 2004 Toyota Corolla Owners Manuals
- Toyota Corolla Owners Manuals
- 1999 Toyota Corolla Owners Manuals
- Toyota Corolla Owners Manuals
- 2001 Toyota Corolla Owners Manuals
- Toyota Corolla Owners Manuals
- 1996 Toyota Corolla Owners Manuals
- Toyota Corolla Owners Manuals
- 2015 Toyota Corolla Owners Manuals
- Toyota Corolla Owners Manuals
- 2013 Toyota Corolla Owners Manuals
- Toyota Corolla Owners Manuals
- 2007 Toyota Corolla Owners Manuals
- Toyota Corolla Owners Manuals
- 2000 Toyota Corolla Owners Manuals
- Toyota Corolla Owners Manuals
- 2012 Toyota Corolla Owners Manuals
- Toyota Corolla Owners Manuals
- 1998 Toyota Corolla Owners Manuals
- Toyota Corolla Owners Manuals
- 1997 Toyota Corolla Owners Manuals
- Toyota Corolla Owners Manuals
- 2003 Toyota Corolla Owners Manuals
- Toyota Corolla Owners Manuals
- 2019 Toyota Corolla Owners Manuals
- Toyota Corolla Owners Manuals
- Download PDF Manual
-
Parking the vehicle/starting the engine
Reversing Neutral
Normal driving* Engine braking
Maximum engine braking
*: To improve fuel efficiency and reduce noises, set the shift lever in D for
normal driving.
Eco drive mode (if equipped) Press the switch.
to
Suitable for enhancing the fuel economy, because the torque cor- responding the accelerator pedal depression amount can be generated more smoothly than it is in normal conditions and the oper- ation of the air conditioning system (heating/cooling) will be minimized. Press the switch again to return to normal mode.
■When driving with cruise control activated
Even when performing the following actions with the intent of enabling engine braking, engine braking will not activate while downshifting to S because cruise control will not be canceled. (P. 197) ■If the shift lever cannot be shifted from P
P. 527
CAUTION
■When driving on slippery road surfaces
Be careful of downshifting and sudden acceleration, as this could result in the vehicle skidding to the side or spinning.
COROLLA_TMMMS_TMMC_U (OM12F00U)
176
4-2. Driving procedures
Continuously variable transmission (vehi- cles with paddle shift switches)
Shifting the shift lever
Vehicles without a smart key system: While the engine switch is in the “ON” position, depress the brake pedal and move the shift lever. Vehicles with a smart key system: While the engine switch is in IGNITION ON mode, depress the brake pedal and move the shift lever. When shifting the shift lever between P and D, make sure that the vehicle is completely stopped.
: If equipped
COROLLA_TMMMS_TMMC_U (OM12F00U)
4-2. Driving procedures
177
Shift position purpose
Shift position
Objective or function
Parking the vehicle/starting the engine
Reversing Neutral
Normal driving*1
7-speed sport sequential shiftmatic mode driving*2
(P. 178)
*1: To improve fuel efficiency and reduce noises, set the shift lever in D for
normal driving.
*2: Selecting gear step using the M position achieves suitable engine braking
forces by operating the shift lever.
Sport mode Press the switch.
For powerful acceleration and driv- ing in mountainous regions. Press the switch again to return to normal mode.
Temporarily engaged gear steps selection mode in the D posi- tion To drive in temporary gear steps selection mode, operate the “-” and “+” paddle shift switches. The gear steps can then be selected by operating the “-” and “+” paddle shift switches. By selecting gear step using paddle shift switches, you can control engine braking forces.
Upshifting Downshifting The selected gear step, from D1 to D7, will be displayed in the meter. To return to normal D position driv- ing, the “+” paddle shift switch must be held down for a period of time.
COROLLA_TMMMS_TMMC_U (OM12F00U)
178
4-2. Driving procedures
Changing gear steps in the M position To enter 7-speed sport sequential shiftmatic mode, shift the shift lever to M. Gear steps can then be selected by operating the shift lever, allowing you to drive in the gear step of your choosing.
Upshifting Downshifting The gear changes once every time the shift lever is operated. The selected gear step, from M1 to M7, will be displayed in the meter.
However, even when in the M position, the gear steps will be auto- matically changed if the engine speed is too high, or too low.
■Gear step functions
●You can choose from 7 levels of engine braking force. ●A lower gear step will provide greater engine braking force than a higher
gear step, and the engine speed will also increase.
■If the “M” indicator flashes or a buzzer beeps after shifting the shift lever
to M This may indicate a malfunction in the continuously variable transmission system. Have the vehicle inspected by your Toyota dealer immediately. (In this situation, the transmission will operate in the same manner as when the shift lever is in D.)
■When the vehicle comes to a stop with the shift lever in the M position
●The transmission will automatically downshift to M1 once the vehicle is
stopped.
●After a stop, the vehicle will start off in M1. ●When the vehicle is stopped, the transmission is set at M1.
COROLLA_TMMMS_TMMC_U (OM12F00U)
4
4-2. Driving procedures
179
■When driving with cruise control activated
Even when performing the following actions with the intent of enabling engine braking, engine braking will not activate because cruise control will not be canceled. ●While driving in D or 7-speed sport sequential shiftmatic mode, downshifting
to 6, 5 or 4. (P. 178)
●When switching the driving mode to sport mode while driving in D position.
(P. 177)
■Downshifting restrictions warning buzzer
To help ensure safety and driving performance, downshifting operation may sometimes be restricted. In some circumstances, downshifting may not be possible even when the shift lever is operated. (A buzzer will sound twice.)
■Sport mode automatic deactivation
Sport mode is automatically deactivated if the engine switch is turned off after driving in sport mode.
■If the shift lever cannot be shifted from P
P. 527
CAUTION
■When driving on slippery road surfaces
Be careful of downshifting and sudden acceleration, as this could result in the vehicle skidding to the side or spinning.
COROLLA_TMMMS_TMMC_U (OM12F00U)
180
4-2. Driving procedures
Manual transmission
Shifting the shift lever
Fully depress the clutch pedal before operating the shift lever, and then release it slowly.
Shifting the shift lever to R Shift the shift lever to R while lift- ing up the ring section.
: If equipped
COROLLA_TMMMS_TMMC_U (OM12F00U)
4-2. Driving procedures
181
■Maximum allowable speeds
Observe the following maximum allowable speeds in each gear when maxi- mum acceleration is necessary.
mph (km/h)
Maximum speed
Shift position
Vehicles with 15-inch and
16-inch tires
Vehicles with 17-inch tires
NOTICE
30 (49) 56 (91) 82 (133) 111 (179)
30 (49) 56 (90) 82 (132) 111 (179)
■To prevent damage to the transmission ●Do not shift the shift lever to R without
depressing the clutch pedal.
●Do not lift up the ring section except when shifting the lever to R. ●Shift the shift lever to R only when the vehicle is stationary.
COROLLA_TMMMS_TMMC_U (OM12F00U)
182
4-2. Driving procedures
Turn signal lever
Operating instructions
Right turn Lane change to the right (move the lever partway and release it) The right hand signals will flash 3
times. Lane change to the left (move the lever partway and release it) The left hand signals will flash 3
times. Left turn■Turn signals can be operated when Vehicles without a smart key system The engine switch is in the “ON” position. Vehicles with a smart key system The engine switch is in IGNITION ON mode.
■If the indicator flashes faster than usual
Check that a light bulb in the front or rear turn signal lights has not burned out.
■Customization
The number of times the turn signals flash during a lane change can be changed. (Customizable feature P. 570)
COROLLA_TMMMS_TMMC_U (OM12F00U)
Parking brake
Operating instructions
To set the parking brake, fully pull the parking brake lever while depressing the brake pedal. To release the parking brake, slightly raise lever and lower it completely while press- ing the button.
the
*1: For U.S.A. *2: For Canada
4-2. Driving procedures
183
*1
*2
■Parking brake engaged warning buzzer
A buzzer will sound if the vehicle is driven at a speed of approximately 3 mph (5 km/h) or more with the parking brake engaged. (P. 491, 503)
■Usage in winter time
P. 216
NOTICE
■Before driving
Fully release the parking brake. Driving the vehicle with the parking brake set will lead to brake components overheating, which may affect braking performance and increase brake wear.
COROLLA_TMMMS_TMMC_U (OM12F00U)
184
4-3. Operating the lights and wipers
Headlight switch
The headlights can be operated manually or automatically.
Operating instructions Turning the end of the lever turns on the lights as follows: Type A
running
The daytime lights turn on. The side marker, park- ing, tail, license plate, daytime running lights and instrument panel lights turn on. The headlights and all the lights listed above (except daytime run- ning lights) turn on. The daytime lights turn off.
running
*: Vehicles with a multi-information
display
COROLLA_TMMMS_TMMC_U (OM12F00U)
4-3. Operating the lights and wipers
185
Type B
running
The daytime lights turn on The side marker, park- ing, tail, license plate, daytime running lights and instrument panel lights turn on. The headlights and all the lights listed above (except daytime run- ning lights) turn on.
*: Vehicles with a multi-information
display
COROLLA_TMMMS_TMMC_U (OM12F00U)
186
4-3. Operating the lights and wipers
Type C
key the
The headlights and all the lights listed below turn on and off auto- matically. (Vehicles without a system: smart When engine switch is in the “ON” position) (Vehicles with a smart key system: When the is engine switch in IGNITION ON mode) The side marker, park- ing, tail, license plate, daytime running lights and instrument panel lights turn on. The headlights and all the lights listed above (except day- time running lights) turn on. The daytime running lights turn off.
*: Vehicles with a multi-information display
COROLLA_TMMMS_TMMC_U (OM12F00U)
4
Type D
4-3. Operating the lights and wipers
187
key the
The headlights and all the lights listed below turn on and off auto- matically. (Vehicles without a system: smart When engine switch is in the “ON” position) (Vehicles with a smart key system: When the is engine switch in IGNITION ON mode) The side marker, park- ing, tail, license plate, daytime running lights and instrument panel lights turn on. The headlights and all the lights listed above (except day- time running lights) turn on. The daytime running lights turn on.
*: Vehicles with a multi-information display
COROLLA_TMMMS_TMMC_U (OM12F00U)
188
4-3. Operating the lights and wipers
Turning on the high beam headlights
With the headlights on, push the lever away from you to turn on the high beams. Pull the lever toward you to the center position to turn the high beams off. Pull the lever toward you and release it to flash the high beams once. You can flash the high beams with the headlights on or off.
■Daytime running light system
●To make your vehicle more visible to other drivers, the headlights turn on automatically (at a reduced intensity) whenever the engine is started and the parking brake is released. Daytime running lights are not designed for use at night. For the U.S.A.: Daytime running lights can be turned off by operating the switch.
●Compared to turning on the headlights, the daytime running light system offers greater durability and consumes less electricity, so it can help improve fuel economy.
■Headlight control sensor (if equipped) The sensor may not function properly if an object is placed on the sensor, or anything that blocks the sensor is affixed to the windshield. Doing so the sensor detecting the level of ambient light and may cause the automatic headlight sys- tem to malfunction.
interferes with
COROLLA_TMMMS_TMMC_U (OM12F00U)
4
4-3. Operating the lights and wipers
189
■Automatic light off system
Vehicles without a smart key system ●When the headlights are on: The headlights and tail lights turn off 30 sec- onds after the engine switch is turned to the “ACC” or “LOCK” position and a door is opened and closed. (Vehicles with a wireless remote control: The lights turn off immediately if on the key is pressed after all the doors are locked.)
●When only the tail lights are on: The tail lights turn off automatically if the engine switch is turned to the “ACC” or “LOCK” position and the driver’s door is opened.
or
To turn the lights on again, turn the engine switch to “ON” position, or turn the light switch off once and then back to If any of the doors or trunk lid is kept open, the lights automatically turn off after 20 minutes. Vehicles with a smart key system ●When the headlights are on: The headlights and tail lights turn off 30 sec- onds after the engine switch is turned to ACCESSORY mode or turned off and a door is opened and closed. (The lights turn off immediately if on the key is pressed after all the doors are locked.)
●When only the tail lights are on: The tail lights turn off automatically if the engine switch is turned to ACCESSORY mode or turned off and the driver’s door is opened.
To turn the lights on again, turn the engine switch to IGNITION ON mode, or turn the light switch off once and then back to If any of the doors or trunk lid is kept open, the lights automatically turn off after 20 minutes.
or
■Light reminder buzzer
Vehicles without a smart key system A buzzer sounds when the engine switch is turned to “LOCK” position and the driver's door is opened while the lights are turned on. Vehicles with a smart key system A buzzer sounds when the engine switch is turned off or turned to ACCES- SORY mode and the driver's door is opened while the lights are turned on.
COROLLA_TMMMS_TMMC_U (OM12F00U)
190
4-3. Operating the lights and wipers
■Battery-saving function
In the following conditions, the headlights and the other remaining lights will go off automatically after 20 minutes in order to prevent the vehicle battery from being discharged: ●The headlights and/or tail lights are on. ●Vehicles without a smart key system: The engine switch is in the “ACC” or
“LOCK” position.
●Vehicles with a smart key system: The engine switch is turned to ACCES-
SORY mode or turned off.
This function will be canceled in any of the following situations: ●Vehicles without a smart key system: When the engine switch is turned to
the “ON” position.
●Vehicles with a smart key system: When the engine switch is turned to IGNI-
TION ON mode.
●When the light switch is operated ●When the door or trunk is opened or closed
■Customization
Settings (e.g. light sensor sensitivity) can be changed. (Customizable features: P. 570)
NOTICE
■To prevent battery discharge
Do not leave the lights on longer than necessary when the engine is not running.
COROLLA_TMMMS_TMMC_U (OM12F00U)
4-3. Operating the lights and wipers
191
Fog light switch
The fog lights secure excellent visibility in difficult driving con- ditions, such as in rain and fog.
*2
*1 or Turns the front fog lights off Turns the front fog lights on *1: For U.S.A. *2: For Canada
■Fog lights can be used when
The headlights are on in low beam.
: If equipped
COROLLA_TMMMS_TMMC_U (OM12F00U)
192
4-3. Operating the lights and wipers
Windshield wipers and washer
Operating the wiper lever The wiper operation is selected by moving the lever as follows. When intermittent windshield wiper operation is selected, the wiper interval can be also adjusted.
*2
*2
*1 or Intermittent windshield wiper operation *1 or Low speed windshield wiper operation *1 or High speed windshield wiper operation *1 or Temporary operation
*2
*2
*1: For U.S.A. *2: For Canada Wiper intervals can be adjusted when intermittent operation is selected.
Increases the intermittent wind- shield wiper frequency*3
Decreases windshield wiper frequency*3intermittent
the
*3: The interval adjuster may not be equipped depending on the grade.
COROLLA_TMMMS_TMMC_U (OM12F00U)
4-3. Operating the lights and wipers
193
Washer/wiper dual operation Wipers will automatically operate a couple of times after the washer squirts.
■The windshield wiper and washer can be operated when
Vehicles without a smart key system The engine switch is in the “ON” position. Vehicles with a smart key system The engine switch is in IGNITION ON mode.
■If no windshield washer fluid sprays
Check that the washer nozzles are not blocked if there is washer fluid in the windshield washer fluid reservoir.
CAUTION
■Caution regarding the use of washer fluid
When it is cold, do not use the washer fluid until the windshield becomes warm. The fluid may freeze on the windshield and cause low visibility. This may lead to an accident, resulting in death or serious injury.
NOTICE
■When the windshield is dry
Do not use the wipers, as they may damage the windshield.
■When the washer fluid tank is empty
Do not operate the switch continually as the washer fluid pump may over- heat.
■When a nozzle becomes blocked
In this case, contact your Toyota dealer. Do not try to clear it with a pin or other object. The nozzle will be damaged.
COROLLA_TMMMS_TMMC_U (OM12F00U)
194
4-4. Refueling
Opening the fuel tank cap
Perform the following steps to open the fuel tank cap:
Before refueling the vehicle ● Close all the doors and windows, and turn the engine switch off. ● Confirm the type of fuel.
■Fuel types
Unleaded gasoline (Octane rating 87 [Research Octane Number 91] or higher)
CAUTION
■When refueling the vehicle
Observe the following precautions while refueling the vehicle. Failure to do so may result in death or serious injury. ●After exiting the vehicle and before opening the fuel door, touch an unpainted metal surface to discharge any static electricity. It is important to discharge static electricity before refueling because sparks resulting from static electricity can cause fuel vapors to ignite while refueling.
●Always hold the grips on the fuel tank cap and turn it slowly to remove it. A whooshing sound may be heard when the fuel tank cap is loosened. Wait until the sound cannot be heard before fully removing the cap. In hot weather, pressurized fuel may spray out the filler neck and cause injury.
●Do not allow anyone that has not discharged static electricity from their
body to come close to an open fuel tank.
●Do not inhale vaporized fuel.
Fuel contains substances that are harmful if inhaled.
●Do not smoke while refueling the vehicle.
Doing so may cause the fuel to ignite and cause a fire.
●Do not return to the vehicle or touch any person or object that is statically
charged. This may cause static electricity to build up, resulting in a possible ignition hazard.
■When refueling
Observe the following precautions to prevent fuel overflowing from the fuel tank: ●Securely insert the fuel nozzle into the fuel filler neck. ●Stop filling the tank after the fuel nozzle automatically clicks off. ●Do not top off the fuel tank.
COROLLA_TMMMS_TMMC_U (OM12F00U)
4-4. Refueling
195
NOTICE
■Refueling
Do not spill fuel during refueling. Doing so may damage the vehicle, such as causing the emission control system to operate abnormally or damaging fuel system components or the vehicle’s painted surface.
Opening the fuel tank cap
Pull up the opener to open the fuel filler door.
Turn the fuel tank cap slowly to remove it and hang it on the back of the fuel filler door.
COROLLA_TMMMS_TMMC_U (OM12F00U)
196
4-4. Refueling
Closing the fuel tank cap After refueling, turn the fuel tank cap until you hear a click. Once the cap is released, it will turn slightly in the opposite direction.
CAUTION
■When replacing the fuel tank cap
Do not use anything but a genuine Toyota fuel tank cap designed for your vehicle. Doing so may cause a fire or other incident which may result in death or serious injury.
COROLLA_TMMMS_TMMC_U (OM12F00U)
4
4-5. Using the driving support systems
197
Cruise control
Summary of functions Use the cruise control to maintain a set speed without depressing the accelerator pedal.
Indicators Cruise control switch
Setting the vehicle speed
Press the “ON-OFF” button to activate the cruise control. Cruise control indicator will come on. Press the button again to deacti- vate the cruise control.
Accelerate or decelerate the vehicle to the desired speed, and push the lever down to set the speed. “SET” indicator will come on. The vehicle speed at the moment the lever is released becomes the set speed.
: If equipped
COROLLA_TMMMS_TMMC_U (OM12F00U)
198
4-5. Using the driving support systems
Adjusting the set speed To change the set speed, operate the lever until the desired set speed is obtained.
Increases the speed Decreases the speed Fine adjustment: Momentarily move the lever in the desired direc- tion. Large adjustment: Hold the lever in the desired direction.
The set speed will be increased or decreased as follows: Fine adjustment: By approximately 1 mph (1.6 km/h) each time the lever is operated. Large adjustment: The set speed can be increased or decreased continu- ally until the lever is released.
Canceling and resuming the constant speed control
Pulling the lever toward you cancels the constant speed control. The speed setting is also canceled when the brakes are applied or the clutch pedal (manual transmission) is depressed. Pushing the lever up resumes the constant speed control. Resuming is available when the vehicle speed is more than approx- imately 25 mph (40 km/h).
COROLLA_TMMMS_TMMC_U (OM12F00U)
4
4-5. Using the driving support systems
199
■Cruise control can be set when
Vehicles with an automatic transmission ●The shift lever is in the D or range 3. ●Vehicle speed is above approximately 25 mph (40 km/h). Vehicles with a continuously variable transmission (without paddle shift
switches)
●The shift lever is in the D or S. ●Vehicle speed is above approximately 25 mph (40 km/h). Vehicles with a continuously variable transmission (with paddle shift
switches)
●The shift lever is in the D or range 4 or higher of M has been selected. ●Range 4 or higher has been selected by using the paddle shift. ●Vehicle speed is above approximately 25 mph (40 km/h). Vehicles with a manual transmission Vehicle speed is above approximately 25 mph (40 km/h).
■Accelerating after setting the vehicle speed
●The vehicle can be accelerated normally. After acceleration, the set speed
resumes.
●Even without canceling the cruise control, the set speed can be increased by first accelerating the vehicle to the desired speed and then pushing the lever down to set the new speed.
■Automatic cruise control cancelation
Cruise control will stop maintaining the vehicle speed in any of the following situations. ●Actual vehicle speed falls more than approximately 10 mph (16 km/h) below
the preset vehicle speed. At this time, the memorized set speed is not retained.
●Actual vehicle speed is below approximately 25 mph (40 km/h). ●VSC is activated.
■If the cruise control indicator light comes on in yellow (vehicles with a
drive monitor display) Press the “ON-OFF” button once to deactivate the system, and then press the button again to reactivate the system. If the cruise control speed cannot be set or if the cruise control cancels imme- diately after being activated, there may be a malfunction in the cruise control system. Have the vehicle inspected by your Toyota dealer.
COROLLA_TMMMS_TMMC_U (OM12F00U)
200
4-5. Using the driving support systems
■If the warning message for the cruise control is shown on the multi-
information display (vehicles with a multi-information display) Press the “ON-OFF” button once to deactivate the system, and then press the button again to reactivate the system. If the cruise control speed cannot be set or if the cruise control cancels imme- diately after being activated, there may be a malfunction in the cruise control system. Have the vehicle inspected by your Toyota dealer.
CAUTION
■To avoid operating the cruise control by mistake
Switch the cruise control off using the “ON-OFF” button when not in use.
■Situations unsuitable for cruise control
Do not use cruise control in any of the following situations. Doing so may result in loss of control and could cause an accident resulting in death or serious injury. ●In heavy traffic ●On roads with sharp bends ●On winding roads ●On slippery roads, such as those covered with rain, ice or snow ●On steep hills
Vehicle speed may exceed the set speed when driving down a steep hill.
●During emergency towing
COROLLA_TMMMS_TMMC_U (OM12F00U)
4
4-5. Using the driving support systems
201
Rear view monitor system The rear view monitor system assists the driver by displaying guide lines and an image of the view behind the vehicle while backing up, for example while parking. The screen illustrations used in this text are intended as examples, and may differ from the image that is actually displayed on the screen.
Vehicles without a smart key sys- tem: The rear view image is dis- played when the shift position is in R and the engine switch is in the “ON” position. Vehicles with a smart key system: The rear view image is displayed when the shift position is in R and the engine switch is in IGNITION ON mode.
The rear view monitor system will be deactivated when the shift lever is in any position other than R.
: If equipped
COROLLA_TMMMS_TMMC_U (OM12F00U)
202
4-5. Using the driving support systems
Using the rear view monitor system ■ Screen description
Vehicle width guide lines The line indicates a guide path when the vehicle is being backed straight up. The displayed width is wider than the actual vehicle width. Vehicle center guide lines These lines indicate the estimated vehicle center on the ground. Distance guide line The line shows points approximately 1.5 ft. (0.5 m) (red) from the center of the edge of the bumper. Distance guide line The line shows distance behind the vehicle, a point approximately 3 ft. (1 m) (blue) from the edge of the bumper.
COROLLA_TMMMS_TMMC_U (OM12F00U)
4-5. Using the driving support systems
203
Rear view monitor system precautions ■ Area displayed on screen
The rear view monitor system displays an image of the view from the bumper of the rear area of the vehicle. To adjust the image on the rear view monitor system screen. (P. 294) • The area displayed on
the screen may vary according to vehicle orientation conditions.
• Objects which are close to either corner of the bumper or under the bumper cannot be seen on the screen.
• The camera uses a special lens. The distance of the image that appears on the screen differs from the actual distance.
by the monitor.
Corners of bumper
• Items which are located higher than the camera may not be displayed
COROLLA_TMMMS_TMMC_U (OM12F00U)
204
4-5. Using the driving support systems
■ Rear view monitor system camera
The camera for the rear view monitor system located is above the license plate.
● Using the camera
If the camera lens becomes dirty, it cannot transmit a clear image. If water droplets, snow or mud adhere to the lens, rinse it with water and wipe with a soft cloth. If the lens is extremely dirty, wash it with a mild cleanser and rinse.
■ Differences between the screen and the actual road
The distance guide lines and the vehicle width guide lines may not actually be parallel with the dividing lines of the parking space, even when they appear to be so. Be sure to check visually. The distances between the vehicle width guide lines and the left and right dividing lines of the parking space may not be equal, even when they appear to be so. Be sure to check visually. The distance guide lines give a distance guide for flat road sur- faces. In any of the following situations, there is a margin of error between the fixed guide lines on the screen and the actual dis- tance/course on the road.
COROLLA_TMMMS_TMMC_U (OM12F00U)
4
4-5. Using the driving support systems
205
● When the ground behind the vehicle slopes up sharply
The distance guide lines will appear to be closer to the vehi- cle than the actual distance. Because of this, objects will appear to be farther away than they actually are. In the same way, there will be a margin of error between the guidelines and the actual distance/course on the road.
● When the ground behind the vehicle slopes down sharply
The distance guide lines will appear to be further from the vehicle than the actual dis- tance. Because of this, objects will appear to be closer than they actually are. In the same way, there will be a margin of error between the guidelines and the actual distance/course on the road.
COROLLA_TMMMS_TMMC_U (OM12F00U)
206
4-5. Using the driving support systems
● When any part of the vehicle sags
When any part of the vehicle sags due to the number of pas- sengers or the distribution of the load, there is a margin of error between the fixed guide lines on the screen and the actual distance/course on the road.
A margin of error
■ When approaching three-dimensional objects
The distance guide lines are displayed according to flat surfaced objects (such as the road). It is not possible to determine the posi- tion of three-dimensional objects (such as vehicles) using the dis- tance guide lines. When approaching a three-dimensional object that extends outward (such as the flatbed of a truck), be careful of the following.
● Distance guidelines
Visually check the surroundings and the area behind the vehi- cle. On the screen, it appears that a truck is parked at point . However, in reality if you back up to point , you will hit the truck. On the screen, it is closest and appears that is furthest away. However, in reality, the distance to and is farther than
is the same, and
and
COROLLA_TMMMS_TMMC_U (OM12F00U)
4-5. Using the driving support systems
207
■ Vehicle width guide lines
Visually check the surroundings and the area behind the vehicle. In the case shown below, the truck appears to be outside of the vehi- cle width guide lines and the vehicle does not look as if it hits the truck. However, the rear body of the truck may actually cross over the vehicle width guide lines. In reality if you back up as guided by the vehicle width guide lines, the vehicle may hit the truck. Vehicle width guide lines
COROLLA_TMMMS_TMMC_U (OM12F00U)
208
4-5. Using the driving support systems
Things you should know ■ If you notice any symptoms
If you notice any of the following symptoms, refer to the likely cause and the solution, and re-check. If the symptom is not resolved by the solution, have the vehicle inspected by your Toyota dealer.
Likely cause
Solution
The image is difficult to see • The vehicle is in a dark area • The temperature around the lens
is either high or low
• The outside temperature is low • There are water droplets on the
camera
• It is raining or humid • Foreign matter
adhering to the camera
(mud etc.)
is
• There are scratches on the cam-
• Sunlight or headlights are shining
directly into the camera
• The vehicle is under fluorescent lights, mercury
lights, sodium lights etc.
era
If this happens due to these causes, it does not indicate a malfunction. Back up while visually checking the vehicle’s surroundings. (Use the monitor again once conditions have been improved.) To adjust the image on the rear view monitor system screen. (P. 294)
The image is blurry
Dirt or foreign matter (such as water droplets, snow, mud etc.) is adher- ing to the camera.
Rinse the camera lens with water and wipe it clean with a soft cloth. Wash with a mild soap if the dirt is stubborn.
The image is out of alignment Have the vehicle inspected by your The camera or surrounding area has Toyota dealer. received a strong impact. The fixed guide lines are very far out of alignment • The vehicle is tilted (there is a heavy load on the vehicle, tire pressure is low due to a tire punc- ture, etc.)
If this happens due to these causes, it does not indicate a malfunction. Back up while visually checking the vehicle's surroundings.
• The vehicle is used on an incline. The camera position is out of align- ment.
Have the vehicle inspected by your Toyota dealer.
COROLLA_TMMMS_TMMC_U (OM12F00U)
4
4-5. Using the driving support systems
209
CAUTION
■When using the rear view monitor system
The rear view monitor system is a supplemental device intended to assist the driver when backing up. When backing up, be sure to check visually behind and all around the vehicle before proceeding. Observe the following precautions to avoid an accident that could result in death or serious injuries. ●Never depend on the rear view monitor system entirely when backing up. The image and the position of the guide lines displayed on the screen may differ from the actual state. Use caution, just as you would when backing up any vehicle.
●Be sure to back up slowly, depressing the brake pedal to control vehicle
speed.
●The instructions given are only guidelines.
When and how much to turn the steering wheel will vary according to traf- fic conditions, road surface conditions, vehicle condition, etc. when park- ing. It is necessary to be fully aware of this before using the rear view monitor system.
●When parking, be sure to check that the parking space will accommodate
your vehicle before maneuvering into it.
●Do not use the rear view monitor system in the following cases:
• On icy or slick road surfaces, or in snow • When using tire chains or the compact spare tire • When the trunk lid is not closed completely • On roads that are not flat or straight, such as curves or slopes.
●In low temperatures, the screen may darken or the image may become faint. The image could distort when the vehicle is moving, or you may become unable to see the image on the screen. Be sure to check direct visually and with the mirrors all around the vehicle before proceeding.
●If the tire sizes are changed, the position of the fixed guide lines displayed
on the screen may change.
●The camera uses a special lens. The distances between objects and pedestrians that appear in the image displayed on the screen will differ from the actual distances. (P. 204)
COROLLA_TMMMS_TMMC_U (OM12F00U)
210
4-5. Using the driving support systems
NOTICE
■How to use the camera
●The rear view monitor system may not operate properly in the following
cases. • If the back of the vehicle is hit, the position and mounting angle of the
camera may change.
• As the camera has a water proof construction, do not detach, disassem-
ble or modify it. This may cause incorrect operation.
• Do not strongly rub the camera lens. If the camera lens is scratched, it
cannot transmit a clear image.
• Do not allow organic solvent, car wax, window cleaner or glass coat to
adhere to the camera. If this happens, wipe it off as soon as possible.
• If the temperature changes rapidly, such as when hot water is poured
on the vehicle in cold weather, the system may not operate normally.
• When washing the vehicle, do not apply intensive bursts of water to the camera or camera area. Doing so may result in the camera malfunc- tioning.
• When the camera is used under fluorescent lights, sodium light or mer- cury light etc., the lights and the illuminated areas may appear to flicker. ●Do not expose the camera to strong impact as this could cause a malfunc- tion. If this happens, have the vehicle inspected by your Toyota dealer as soon as possible.
COROLLA_TMMMS_TMMC_U (OM12F00U)
4-5. Using the driving support systems
211
Driving assist systems
To help enhance driving safety and performance, the following systems operate automatically in response to various driving situations. Be aware, however, that these systems are supple- mentary and should not be relied upon too heavily when operat- ing the vehicle.
◆ ABS (Anti-lock Brake System)
Helps to prevent wheel lock when the brakes are applied suddenly, or if the brakes are applied while driving on a slippery road surface
◆ Brake assist
Generates an increased level of braking force after the brake pedal is depressed when the system detects a panic stop situation
◆ VSC (Vehicle Stability Control)
Helps the driver to control skidding when swerving suddenly or turning on slippery road surfaces
◆ TRAC (Traction Control)
Helps to maintain drive power and prevent the drive wheels from spinning when starting the vehicle or accelerating on slippery roads
◆ EPS (Electric Power Steering)
Employs an electric motor to reduce the amount of effort needed to turn the steering wheel
COROLLA_TMMMS_TMMC_U (OM12F00U)
212
4-5. Using the driving support systems
When the TRAC or VSC system is operating The slip indicator light will flash while the TRAC or VSC system is operating.
Disabling the TRAC system If the vehicle gets stuck in mud, dirt or snow, the TRAC system may
reduce power from the engine to the wheels. Pressing to turn the system off may make it easier for you to rock the vehicle in order to free it. To turn the TRAC system off,
quickly press and release
The “TRAC OFF” indicator light will come on.
again to turn the system
Press back on.
COROLLA_TMMMS_TMMC_U (OM12F00U)
4-5. Using the driving support systems
213
■Turning off both TRAC and VSC systems
To turn the TRAC and VSC systems off, press and hold seconds while the vehicle is stopped. The “TRAC OFF” indicator light and VSC OFF indicator light will come on.
for more than 3
Press
again to turn the systems back on.
■When the “TRAC OFF” indicator light comes on even if the VSC OFF
switch has not been pressed TRAC cannot be operated. Contact your Toyota dealer.
■Sounds and vibrations caused by the ABS, brake assist, TRAC and VSC
systems ●A sound may be heard from the engine compartment when the engine is started or just after the vehicle begins to move. This sound does not indicate that a malfunction has occurred in any of these systems.
●Any of the following conditions may occur when the above systems are
operating. None of these indicates that a malfunction has occurred. • Vibrations may be felt through the vehicle body and steering. • A motor sound may be heard after the vehicle comes to a stop. • The brake pedal may pulsate slightly after the ABS is activated. • The brake pedal may move down slightly after the ABS is activated.
■EPS operation sound
When the steering wheel is operated, a motor sound (whirring sound) may be heard. This does not indicate a malfunction.
■Automatic reactivation of TRAC and VSC systems
After turning the TRAC and VSC systems off, the systems will be automati- cally re-enabled in the following situations: ●Vehicles without a smart key system: When the engine switch is turned to
the “LOCK” position Vehicles with a smart key system: When the engine switch is turned off
●If only the TRAC system is turned off, the TRAC will turn on when vehicle
speed increases If both the TRAC and VSC systems are turned off, automatic re-enabling will not occur when vehicle speed increases.
■Reduced effectiveness of the EPS system
The effectiveness of the EPS system is reduced to prevent the system from overheating when there is frequent steering input over an extended period of time. The steering wheel may feel heavy as a result. Should this occur, refrain from excessive steering input or stop the vehicle and turn the engine off. The EPS system should return to normal within 10 minutes.
COROLLA_TMMMS_TMMC_U (OM12F00U)
214
4-5. Using the driving support systems
CAUTION
■The ABS does not operate effectively when
●The limits of tire gripping performance have been exceeded (such as
excessively worn tires on a snow covered road).
●The vehicle hydroplanes while driving at high speed on wet or slick roads. ■Stopping distance when the ABS is operating may exceed that of nor-
mal conditions The ABS is not designed to shorten the vehicle’s stopping distance. Always maintain a safe distance from the vehicle in front of you, especially in the following situations: ●When driving on dirt, gravel or snow-covered roads ●When driving with tire chains ●When driving over bumps in the road ●When driving over roads with potholes or uneven surfaces
■TRAC may not operate effectively when
Directional control and power may not be achievable while driving on slip- pery road surfaces, even if the TRAC system is operating. Drive the vehicle carefully in conditions where stability and power may be lost.
■When the VSC is activated
The slip indicator light flashes. Always drive carefully. Reckless driving may cause an accident. Exercise particular care when the indicator light flashes.
■When the TRAC or VSC system is turned off
Be especially careful and drive at a speed appropriate to the road condi- tions. As these are the systems help ensure vehicle stability and driving force, do not turn the TRAC or VSC system off unless necessary.
COROLLA_TMMMS_TMMC_U (OM12F00U)
4-5. Using the driving support systems
215
CAUTION
■Replacing tires
Make sure that all tires are of the specified size, brand, tread pattern and total load capacity. In addition, make sure that the tires are inflated to the recommended tire inflation pressure level. The ABS, TRAC and VSC systems will not function correctly if different tires are installed on the vehicle. Contact your Toyota dealer for further information when replacing tires or wheels.
■Handling of tires and the suspension
Using tires with any kind of problem or modifying the suspension will affect the driving assist systems, and may cause a system to malfunction.
COROLLA_TMMMS_TMMC_U (OM12F00U)
216
4-6. Driving tips
Winter driving tips
Carry out the necessary preparations and inspections before driving the vehicle in winter. Always drive the vehicle in a man- ner appropriate to the prevailing weather conditions.
Preparation for winter ● Use fluids that are appropriate to the prevailing outside tempera-
tures. • Engine oil • Engine coolant • Washer fluid
● Have a service technician inspect the condition of the battery. ● Have the vehicle fitted with four snow tires or purchase a set of tire
chains for the front tires.
Ensure that all tires are the same size and brand, and that chains match the size of the tires.
Before driving the vehicle Perform the following according to the driving conditions: ● Do not try to forcibly open a window or move a wiper that is frozen. Pour warm water over the frozen area to melt the ice. Wipe away the water immediately to prevent it from freezing.
● To ensure proper operation of the climate control system fan, remove any snow that has accumulated on the air inlet vents in front of the windshield.
● Check for and remove any excess ice or snow that may have accu- mulated on the exterior lights, vehicle’s roof, chassis, around the tires or on the brakes.
● Remove any snow or mud from the bottom of your shoes before
getting in the vehicle.
COROLLA_TMMMS_TMMC_U (OM12F00U)
4-6. Driving tips
217
When driving the vehicle Accelerate the vehicle slowly, keep a safe distance between you and the vehicle ahead, and drive at a reduced speed suitable to road con- ditions.
When parking the vehicle Park the vehicle and move the shift lever to P (automatic transmission or continuously variable transmission), 1 or R (manual transmission) without setting the parking brake. The parking brake may freeze up, preventing it from being released. If necessary, block the wheels to prevent inadvertent sliding or creeping.
Selecting tire chains Vehicles with 15-inch tires Use the tire chains of correct size and type.
Use SAE Class “S” type radial tire chains except radial cable chains or V-bar type chains.
Vehicles with 16-inch and 17-inch tires Use the correct tire chain size when mounting the snow chains. Chain size is regulated for each tire size. Side chain:
0.12 in. (3 mm) in diameter 0.39 in. (10 mm) in width 1.18 in. (30 mm) in length
Cross chain:
0.16 in. (4 mm) in diameter 0.55 in. (14 mm) in width 0.98 in. (25 mm) in length
Regulations on the use of tire chains Regulations regarding the use of tire chains vary depending on loca- tion and type of road. Always check local regulations before installing chains.
COROLLA_TMMMS_TMMC_U (OM12F00U)
218
4-6. Driving tips
■Tire chain installation
Observe the following precautions when installing and removing chains: ●Install and remove tire chains in a safe location. ●Install tire chains on the front tires. Do not install tire chains on the rear tires. ●Install tire chains on front tires as tightly as possible. Retighten chains after
driving 1/4 1/2 mile (0.5 1.0 km).
●Install tire chains following the instructions provided with the tire chains.
CAUTION
■Driving with snow tires
Observe the following precautions to reduce the risk of accidents. Failure to do so may result in a loss of vehicle control and cause death or serious injury. ●Use tires of the size specified. ●Maintain the recommended level of air pressure. ●Do not drive in excess of 75 mph (120 km/h), regardless of the type of
snow tires being used.
●Use snow tires on all, not just some wheels.
■Driving with tire chains
Observe the following precautions to reduce the risk of accidents. Failure to do so may result in the vehicle being unable to be driven safely, and may cause death or serious injury. ●Do not drive in excess of the speed limit specified for the tire chains being
used, or 30 mph (50 km/h), whichever is lower.
●Avoid driving on bumpy road surfaces or over potholes. ●Avoid sudden acceleration, abrupt steering, sudden braking and shifting
operations that cause sudden engine braking.
●Slow down sufficiently before entering a curve to ensure that vehicle con-
trol is maintained.
NOTICE
■Repairing or replacing snow tires (vehicles with a tire pressure warn-
ing system) Request repairs or replacement of snow tires from Toyota dealers or legiti- mate tire retailers. This is because the removal and attachment of snow tires affects the opera- tion of the tire pressure warning valves and transmitters.
■Fitting tire chains (vehicles with a tire pressure warning system)
The tire pressure warning valves and transmitters may not function correctly when tire chains are fitted.
COROLLA_TMMMS_TMMC_U (OM12F00U)
219
Audio system
5-1. Basic Operations
Audio system types........... 222
Steering wheel audio switches .......................... 226
AUX port/USB port............ 2275-2. Using the audio system Optimal use of the audio system ............................ 228
5-3. Using the radio
Radio operation................. 230
5-4. Playing audio CDs and
MP3/WMA discs CD player operation .......... 232
5-5. Using an external device
Listening to an iPod .......... 241
Listening to a USB memory device ............... 248
Using the AUX port ........... 2545-6. Using Bluetooth® devices
Bluetooth® audio/phone .................... 255
Using the steering wheel switches .......................... 260
Registering a Bluetooth® device ............................. 261COROLLA_TMMMS_TMMC_U (OM12F00U)
220
5-7. “SET UP” menu
Using the “SET UP” menu (“Bluetooth” menu).......... 262
Using the “SET UP” menu (“Phone” menu)............... 2675-8. Bluetooth® Audio
Operating a Bluetooth® enabled portable player .............................. 272
5-9. Bluetooth® Phone
Making a phone call .......... 275
Receiving a phone call...... 278
Speaking on the phone ..... 2795-10. Bluetooth®
Bluetooth®........................ 281
5-11.Basic Operations
(Multimedia system) Multimedia system ............ 283
Steering wheel audio switches .......................... 285
USB port/AUX port............ 286
Basic audio operations...... 287COROLLA_TMMMS_TMMC_U (OM12F00U)
5-12.Setup
(Multimedia system) Setup menu....................... 289
General settings................ 290
Audio settings ................... 292
Display settings................. 294
Voice settings.................... 2955-13.Using the Multimedia
system Selecting the audio source ............................. 296
List screen operation......... 297
Optimal use of the multimedia system .......... 2995-14.Using the radio
(Multimedia system) Radio operation................. 300
5-15.Playing an audio CD and
MP3/WMA/AAC discs (Multimedia system) CD player operation .......... 302
5-16.Using an external device
(Multimedia system) Listening to an iPod .......... 308
Listening to a USB memory device ............... 313
Using the AUX port ........... 317
Vehicle information ........... 318221
Audio system
5-17.Connecting Bluetooth®
5-19.Bluetooth® phone
(Multimedia system) Preparations to use wireless communication................ 320
Registering a Bluetooth® audio player for the first time .................... 324
Registering a Bluetooth® phone for the first time .......................... 325
Registering a Bluetooth® device.............................. 326
Connecting a Bluetooth® device.............................. 329
Displaying a Bluetooth® device details .................. 332
Detailed Bluetooth® system settings ............... 3345-18.Bluetooth® Audio
(Multimedia system) Listening to Bluetooth® Audio............................... 336
(Multimedia system) Using a Bluetooth® Phone ............................. 338
Making a call ..................... 341
Receiving a call................. 344
Speaking on the phone ..... 345
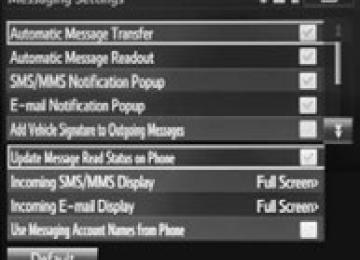
Bluetooth® phone message function............ 349
Using the steering wheel switches................ 354
Bluetooth® phone settings ........................... 355
Contact/Call History Settings........................... 357
What to do if... (Troubleshooting)............ 3675-20.Bluetooth®
(Multimedia system) Bluetooth®......................... 371
5-21.Using the voice
command system (Multimedia system) Voice command system ............................ 376
COROLLA_TMMMS_TMMC_U (OM12F00U)
222
5-1. Basic Operations
Audio system types
Without Multimedia system
With Multimedia system P. 283
With navigation system Owners of models equipped with a navigation system should refer to the “Navigation System Owner's Manual”.■Using cellular phones
Interference may be heard through the audio system's speakers if a cellular phone is being used inside or close to the vehicle while the audio system is operating.
■About Bluetooth®
The Bluetooth wordmark and logo are owned by Bluetooth SIG. and permis- sion has been granted to use the trademark of the licensee Panasonic Corporation. Other trademarks and trade names are owned by various differ- ent owners.
: If equipped
COROLLA_TMMMS_TMMC_U (OM12F00U)
5-1. Basic Operations
223
CAUTION
■U.S.A.
FCC ID: ACJ932PTA184
NOTE: This device complies with Part 15 of the FCC Rules. Operation is subject to the following two conditions: (1) this device may not cause harmful interference and (2) this device must accept any interference received, including interferencethat may cause undesired operation.
FCC WARNING: Changes or modifications in construction not expressly approved by the party responsible for compliance could void the user’s authority to operate the equipment. Radio frequency exposure. This device is approved for Mobile Application only and, to comply with applicable FCC radio frequency exposure regula- tions, must be used with a distance of at least 7.9 in. (20 cm) between the antenna and the body of any person at all time during use.
■U.S.A. and Canada
●Part 15 of the FCC Rules
FCC Warning: Any unauthorized changes or modifications to this equipment will void the user’s authority to operate this device.