- 2014 Toyota Tacoma Owners Manuals
- Toyota Tacoma Owners Manuals
- 2005 Toyota Tacoma Owners Manuals
- Toyota Tacoma Owners Manuals
- 2000 Toyota Tacoma Owners Manuals
- Toyota Tacoma Owners Manuals
- 2007 Toyota Tacoma Owners Manuals
- Toyota Tacoma Owners Manuals
- 2016 Toyota Tacoma Owners Manuals
- Toyota Tacoma Owners Manuals
- 2006 Toyota Tacoma Owners Manuals
- Toyota Tacoma Owners Manuals
- 2008 Toyota Tacoma Owners Manuals
- Toyota Tacoma Owners Manuals
- 2009 Toyota Tacoma Owners Manuals
- Toyota Tacoma Owners Manuals
- 2015 Toyota Tacoma Owners Manuals
- Toyota Tacoma Owners Manuals
- 2001 Toyota Tacoma Owners Manuals
- Toyota Tacoma Owners Manuals
- 2012 Toyota Tacoma Owners Manuals
- Toyota Tacoma Owners Manuals
- 2004 Toyota Tacoma Owners Manuals
- Toyota Tacoma Owners Manuals
- 2011 Toyota Tacoma Owners Manuals
- Toyota Tacoma Owners Manuals
- 2003 Toyota Tacoma Owners Manuals
- Toyota Tacoma Owners Manuals
- 2002 Toyota Tacoma Owners Manuals
- Toyota Tacoma Owners Manuals
- 2010 Toyota Tacoma Owners Manuals
- Toyota Tacoma Owners Manuals
- Download PDF Manual
-
prompts.
368
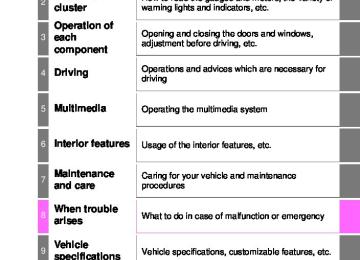
5-11. Using the voice command system
369
Interior features
6-1. Using the air conditioning
system Manual air conditioning system............................. 370
Automatic air conditioning system............................. 376
Seat heaters...................... 3836-2. Using the interior lights
Interior lights list ................ 385
• Interior light ................... 386
• Front personal lights ..... 386
• Cargo lamp main switch............................ 3876-3. Using the storage features
List of storage features ..... 388
• Glove box...................... 389
• Front console box ......... 390
• Overhead console......... 390
• Cup holders .................. 391
• Bottle holders................ 392
• Storage boxes............... 393
Luggage compartment features........................... 3966-4. Other interior features
Other interior features ....... 406
• Sun visors..................... 406
• Vanity mirrors................ 406
• Clock............................. 407
• Power outlets (12 V DC)...................... 408
• Power outlet (120 V AC).................... 409
• Wireless charger........... 414
• Assist grips ................... 419
• Camera mounting bracket.......................... 420
Garage door opener.......... 421
Compass........................... 428370
6-1. Using the air conditioning system
Manual air conditioning system
Air conditioning controls
■ Adjusting the temperature setting
To adjust the temperature set- ting, turn the temperature con- trol dial clockwise (warm) or counterclockwise (cool).
If is not pressed, the sys- tem will blow ambient tempera- ture air or heated air. For quick cooling, turn the tem- perature control dial to the “MAX A/C” position. The air conditioning will automatically turn on and the air intake selector will be set to recirculated air mode.
: If equipped
6-1. Using the air conditioning system
371
■ Fan speed setting
To adjust the fan speed, turn the fan speed control dial clock- wise (increase) or counterclock- wise (decrease).
Turning the dial to “OFF” turns off the fan.
■ Change the airflow mode
To select the airflow, set the air outlet selector dial the desired position.
to
The positions between the air outlet selections can also be selected for more delicate adjustment.
■ Other functions
● Switching between outside air and recirculated air modes
(P. 372)
● Defogging the windshield (P. 372) ● Defogging the outside rear view mirrors (P. 372)
372
6-1. Using the air conditioning system
Other functions ■ Switching between outside air and recirculated air modes
Press The mode switches between outside air mode (introduces air from outside the vehicle) (indicator off) and recirculated air mode (recy- cles air inside the vehicle) (indicator on) each time the button is pressed.
■ Defogging the windshield
Defoggers are used to defog the windshield and front side win- dows. Set the air outlet selector dial to Set the outside/recirculated air mode button to outside air mode if the recir- culated air mode is used. (It may switch automatically.) To defog the windshield and the side windows early, turn the air flow and temperature up.
position.
■ Defogging the outside rear view mirrors
Defogger is used to defog to remove raindrops, dew and frost from the outside rear view mirrors. Press The defogger will automatically turn off after approximately 15 minutes.
6-1. Using the air conditioning system
373
Air outlets ■ Location of air outlets
Air outlets and air volume changes according the selected airflow mode.
to
*: Double Cab models only
■ Adjusting the position and opening and closing the air outlets
Direct air flow to the left or right, up or down.
Open the vent Close the vent
374
6-1. Using the air conditioning system
■Fogging up of the windows
●The windows will easily fog up when the humidity in the vehicle is high. on will dehumidify the air from the outlets and defog the wind-
Turning shield effectively.
●If you turn
off, the windows may fog up more easily.
●The windows may fog up if the recirculated air mode is used.
■Outside/recirculated air mode
When driving on dusty roads such as tunnels or in heavy traffic, set the out- side/recirculated air mode button to the recirculated air mode. This is effective in preventing outside air from entering the vehicle interior. During cooling operation, setting the recirculated air mode will also cool the vehicle interior effectively.
■When the outside temperature exceeds 75F (24C) and air conditioning
system is on ●In order to reduce the air conditioning power consumption, the air condition- ing system may switch to recirculated air mode automatically. This may also reduce fuel consumption.
●Recirculated air mode is selected as a default mode when the engine switch is in the “ON” position (vehicles without a smart key system) or IGNITION ON mode (vehicles with a smart key system).
●It is possible to switch to outside air mode at any time by pressing
■When the outside temperature falls to nearly 32F (0C) The dehumidification function may not operate even when
is pressed.
■Ventilation and air conditioning odors
●To let fresh air in, set the air conditioning system to the outside air mode. ●During use, various odors from inside and outside the vehicle may enter into and accumulate in the air conditioning system. This may then cause odor to be emitted from the vents.
●To reduce potential odors from occurring:
It is recommended that the air conditioning system be set to outside air mode prior to turning the vehicle off.
■Air conditioning filter
P. 478
6-1. Using the air conditioning system
375
WARNING
■To prevent the windshield from fogging up
●Do not use
during cool air operation in extremely humid weather. The difference between the temperature of the outside air and that of the wind- shield can cause the outer surface of the windshield to fog up, blocking your vision.
●Do not place anything on the instrument panel which may cover the air outlets. Otherwise, air flow may be obstructed, preventing the windshield defoggers to defog.
■To prevent burns
Do not touch the rear view mirror surfaces when the outside rear view mirror defoggers are on.
NOTICE
■To prevent battery discharge
Do not leave the air conditioning system on longer than necessary when the engine is stopped.
376
6-1. Using the air conditioning system
Automatic air conditioning system
Air outlets and fan speed are automatically adjusted according to the temperature setting.
Air conditioning controls
■ Adjusting the temperature setting
To adjust the temperature set- ting, turn the temperature con- trol dial clockwise (warm) or counterclockwise (cool).
The air conditioning system switches between individual and simultaneous mode each time
is pressed. (P. 378)
: If equipped
6-1. Using the air conditioning system
377
■ Fan speed setting
To adjust the fan speed, turn the fan speed control dial clock- wise (increase) or counterclock- wise (decrease). Press
to turn the fan off.
■ Change the airflow mode
To change the airflow, press
The air outlets used are switched each time the button is pressed.
Air flows to the upper body Air flows to the upper body and feet Air flows to the feet Air flows to the feet and the windshield defogger operates
■ Other functions
● Switching between outside air and recirculated air modes
(P. 379)
● Defogging the windshield (P. 379) ● Defogging the outside rear view mirrors (P. 379)
378
6-1. Using the air conditioning system
Using by automatic mode
Press
Adjust the temperature setting.
To stop the operation, press ■ Automatic mode indicator
If the fan speed setting or air flow modes are operated, the auto- matic mode indicator goes off. However, automatic mode for func- tions other than that operated is maintained.
■ Adjusting the temperature for driver and passenger seats sep-
is pressed.
arately (“SYNC” mode) The air conditioning system switches between individual and simul- taneous mode each time Simultaneous mode (the indicator on The driver’s side temperature control dial can be used to adjust the temperature for driver’s and front passenger’s side. At this time, operate the front passenger’s side temperature control dial to enter individual mode. Individual mode (the indicator on The temperature for the driver’s and front passenger’s side can be adjusted separately.
is on):
is off):
6-1. Using the air conditioning system
379
Other functions ■ Switching between outside air and recirculated air modes
Press The mode switches between outside air mode (introduces air from outside the vehicle) (indicator off) and recirculated air mode (recy- cles air inside the vehicle) (indicator on) each time the button is pressed.
■ Defogging the windshield
Defoggers are used to defog the windshield and front side win- dows. Press Set the outside/recirculated air mode button to outside air mode if the recir- culated air mode is used. (It may switch automatically.) To defog the wind- shield and the side windows early, turn the air flow and temperature up. To return to the previous mode, press again when the windshield is defogged.
■ Defogging the outside rear view mirrors
Defogger is used to defog to remove raindrops, dew and frost from the outside rear view mirrors. Press The defogger will automatically turn off after approximately 15 minutes.
380
6-1. Using the air conditioning system
Air outlets ■ Location of air outlets
Air outlets and air volume changes according the selected airflow mode.
to
*: Double Cab models only
■ Adjusting the position of and opening and closing the air out-
lets Direct air flow to the left or right, up or down.
Open the vent Close the vent
6-1. Using the air conditioning system
381
■Using automatic mode
Fan speed is adjusted automatically according to the temperature setting and the ambient conditions. Therefore, the fan may stop for a while until warm or cool air is ready to flow immediately after
is pressed.
■Fogging up of the windows
●The windows will easily fog up when the humidity in the vehicle is high. on will dehumidify the air from the outlets and defog the
Turning windshield effectively.
●If you turn ●The windows may fog up if the recirculated air mode is used.
off, the windows may fog up more easily.
■Outside/recirculated air mode
●When driving on dusty roads such as tunnels or in heavy traffic, set the out- side/recirculated air mode button to the recirculated air mode. This is effec- tive in preventing outside air from entering the vehicle interior. During cooling operation, setting the recirculated air mode will also cool the vehicle interior effectively.
●Outside/recirculated air mode may automatically switch depending on the
temperature setting or the inside temperature.
■When the outside temperature exceeds 75°F (24°C) and the air condition-
ing system is on ●In order to reduce the air conditioning power consumption, the air condition- ing system may switch to recirculated air mode automatically. This may also reduce fuel consumption.
●Recirculated air mode is selected as a default mode when the engine switch is in the “ON” position (vehicles without a smart key system) or IGNITION ON mode (vehicles with a smart key system).
●It is possible to switch to outside air mode at any time by pressing
■When the outside temperature falls to nearly 32F (0C) The dehumidification function may not operate even when
is selected.
382
6-1. Using the air conditioning system
■Ventilation and air conditioning odors
●To let fresh air in, set the air conditioning system to the outside air mode. ●During use, various odors from inside and outside the vehicle may enter into and accumulate in the air conditioning system. This may then cause odor to be emitted from the vents.
●To reduce potential odors from occurring:
• It is recommended that the air conditioning system be set to outside air
mode prior to turning the vehicle off.
• The start timing of the blower may be delayed for a short period of time immediately after the air conditioning system is started in automatic mode.
■Air conditioning filter
P. 478
WARNING
■To prevent the windshield from fogging up
●Do not use
during cool air operation in extremely humid weather. The difference between the temperature of the outside air and that of the windshield can cause the outer surface of the windshield to fog up, block- ing your vision.
●Do not place anything on the instrument panel which may cover the air outlets. Otherwise, air flow may be obstructed, preventing the windshield defoggers to defog.
■To prevent burns
Do not touch the rear view mirror surfaces when the outside rear view mirror defoggers are on.
NOTICE
■To prevent battery discharge
Do not leave the air conditioning system on longer than necessary when the engine is stopped.
6-1. Using the air conditioning system
383
Seat heaters
WARNING
■Burns
●Use caution when seating the following persons in a seat with the seat
heater on to avoid the possibility of burns: • Babies, small children, the elderly, the sick and the physically chal-
lenged
• Persons with sensitive skin • Persons who are fatigued • Persons who have taken alcohol or drugs that induce sleep (sleeping
drugs, cold remedies, etc.)
●Do not cover the seat with anything when using the seat heater.
Using the seat heater with a blanket or cushion increases the temperature of the seat and may lead to overheating.
●Do not use seat heater more than necessary. Doing so may cause minor
burns or overheating.
NOTICE
■To prevent damage to the seat heaters
Do not put heavy objects that have an uneven surface on the seat and do not stick sharp objects (needles, nails, etc.) into the seat.
■To prevent battery discharge
Turn the seat heaters off when the engine is not running.
: If equipped
384
6-1. Using the air conditioning system
Turns the seat heaters on
Drivers side Front passenger side Each time the switch is pressed, the operation condition changes as follows. Hi (3 segments lit) Mid (2 seg- ments lit) Lo (1 segment lit) Off The level indicator (amber) light up during operation.
■The seat heaters can be used when
Vehicles without a smart key system The engine switch is in the “ON” position. Vehicles with a smart key system The engine switch is in IGNITION ON mode.
■When not in use
Turn the seat heaters off by pressing the button. The indicator light turns off.
6-2. Using the interior lights
385
Interior lights list
interior
light/personal
Front lights Rear interior light (P. 386) Engine switch light (vehicles with a wireless remote control system)
Engine switch light (vehicles with a smart key system) Center tray light Cargo lamp (if equipped)
(P. 387)
386
6-2. Using the interior lights
Interior light ■ Front Off Door position lights The come on when a door is opened. They turn off when the doors are closed. On
personal/interior
■ Rear
personal/interior
Door position lights The come on when a door is opened. They turn off when the doors are closed. On
Front personal lights On/off
6-2. Using the interior lights
387
Cargo lamp main switch (if equipped)
Off Door position The cargo lamp comes on when a door is opened. They turn off when the doors are closed. On
■Illuminated entry system
Vehicles without a smart key system The lights automatically turn on/off according to the engine switch position, whether the doors are locked/unlocked, and whether the doors are opened/ closed. Vehicles with a smart key system The lights automatically turn on/off according to engine switch mode, the presence of the electronic key, whether the doors are locked/unlocked, and whether the doors are opened/closed.
■To prevent battery discharge
If the following lights remain on when the door is not fully closed and the main switch is in the door position, the lights will go off automatically after 20 min- utes: ●Front personal lights ●Interior lights ●Cargo lamp (if equipped)
■Customization that can be configured at Toyota dealer
Settings (e.g. the time elapsed before lights turn off) can be changed. (Customizable features: P. 592)
388
6-3. Using the storage features
List of storage features
(P. 392) Bottle holders Front console box (P. 390) Overhead console (if equipped)
(P. 390)
Glove box Cup holders Storage boxes
(P. 389) (P. 391) (P. 393)
6-3. Using the storage features
389
WARNING
■Items that should not be left in the storage spaces
Do not leave glasses, lighters or spray cans in the storage spaces, as this may result in the following when cabin temperature becomes high: ●Glasses may be deformed by heat or cracked if they come into contact
with other stored items.
●Lighters or spray cans may explode. If they come into contact with other stored items, the lighter may catch fire or the spray can may release gas, causing a fire hazard.
■When driving or when the storage compartments are not in use
Keep the lids closed. In the event of sudden braking or sudden swerving, an accident may occur due to an occupant being struck by an open lid or the items stored inside.
Glove box
Open (pull the lever up) Lock Unlock
390
6-3. Using the storage features
Front console box Lift the lid while pulling up the knob to release the lock.
■Passing a cable from the console box
Overhead console (if equipped) The overhead console is useful for temporarily storing sunglasses and similar small items. Press the lid.
WARNING
■Items unsuitable for storing
Do not store items heavier than 0.4 lb. (0.2 kg). Doing so may cause the overhead console to open and the items inside may fall out, resulting in an accident.
6-3. Using the storage features
391
Cup holders Vehicles with an automatic transmission
Vehicles with a manual transmission
WARNING
■Items unsuitable for the cup holder
Do not place anything other than cups or beverage cans in the cup holders. Other items may be thrown out of the holders in the event of an accident or sudden braking and cause injury. If possible, cover hot drinks to prevent burns.
392
6-3. Using the storage features
Bottle holders Front door
Front console box
Rear door (Double Cab models only)
■When using the holder as a bottle holder
●When storing a bottle, close the cap. ●The bottle may not be stored depending on its size or shape.
6-3. Using the storage features
393
WARNING
■Items unsuitable for the bottle holders
Do not place anything other than a bottle in the bottle holders. Other items may be thrown out of the holders in the event of an accident or sudden braking and cause injury.
NOTICE
■Items that should not be stowed in the bottle holders
Put the cap on before stowing a bottle. Do not place open bottles in the bot- tle holders, or glasses and paper cups containing liquid. The contents may spill and glasses may break.
Storage boxes Rear (Access Cab models [vehicles without rear seats])
Turn the knob counterclockwise and open the lid.
Under the rear seats (Access Cab models [vehicles with rear
seats]) Pull up the lever and raise the bottom cushion up.
394
6-3. Using the storage features
Turn wise.
the knob counterclock-
Open the lid. Press the lid against the bottom of the lower cushion until it is sup- ported by the hook-and-loop fas- tener. Make sure that the lid is supported to prevent it from closing unexpect- edly.
Under the rear seats (Double Cab models)
Swing the bottom cushion up by pulling the lock release strap.
Turn the knob counterclockwise and open the lid.
6-3. Using the storage features
395
WARNING
■Caution while driving
Keep the storage boxes closed and locked. Injuries may result in the event of an accident or sudden braking. ■Storage box (Access cab models [vehicles without rear seat])
Never let anyone sit on the storage box. Doing so may damage the storage box and cause injury. In addition, it may cause death or severe injury in the event of sudden braking, sudden swerving or an accident.
396
6-3. Using the storage features
Luggage compartment features
■ Deck Left side
Right side
Deck hooks (P. 399) Auxiliary boxes (P. 397) Tie-down cleats (P. 397)
■ Tonneau cover (if equipped)
P. 400
Power outlet (if equipped) (P. 409)
■ Behind the rear seat (Double Cab models only)
Grocery bag hooks (P. 404) Storage boxes (P. 405)
6-3. Using the storage features
397
Deck ■ Auxiliary boxes
Turn the knob and open the lid.
■ Tie-down cleats
The deck rail system enables you to insert and move tie-down cleats to their best location along deck rails to secure a load.
Locking plate Thumb wheel Tie-down cleat
0.5 in. (12.7 mm)
398
6-3. Using the storage features
● Installing the tie-down cleat
Loosen the thumb wheel in a counterclockwise motion, and depress the wheel so that the locking plate main- tains 0.5 in. (12.7 mm) gap.
Deck rail Detent Locking plate
Insert the locking plate into the deck rail, rotate the tie- down cleat 90°, and release the thumb wheel.
Slide the cleat to the closest detent in the rail system. You will feel that the locking plate snaps into a detent. When using a tonneau cover, confirm the cleat position will not interfere with its proper closing and latching.
Tighten the thumb wheel in a clockwise motion until the clutch mechanism ratchets.
6-3. Using the storage features
399
Check the tie-down cleat to confirm that it is locked into a detent and securely mounted to the deck rail system.
■ Deck hooks
Deck hooks are provided for securing loose items.
400
6-3. Using the storage features
Tonneau cover (if equipped) ■ Open the tonneau cover
Open the tailgate. (P. 116) Pull the lever and lift to open the rear tonneau cover.
Pull the lever and lift to open the center tonneau cover.
Secure by using the storage straps. Make sure that the buckle is fully engaged by pulling on the strap.
6-3. Using the storage features
401
■ Close the tonneau cover
the straps while
Remove pushing the release lock. Confirm that there is no tie-down cleat in the latch position before closing the tonneau cover.
Close the tonneau cover and push down on the top sur- face (latch position) until it clicks. After closing the tonneau cover, try pulling it up towards you to make sure all latches are securely locked. Confirm cargo and cleats do not interfere with tonneau cover latching and completely closing.
■ Remove and install the tonneau cover
Open the cap and remove the bolt.
STY63BD024
Open the rear and center tonneau cover. Secure by using the storage straps. Pull lift remove the tonneau cover.
lever and
the
to
402
6-3. Using the storage features
When installing, reverse the steps listed. Push down on the top surface (latch position) until it clicks, tighten the bolt, and then close the cap. After closing the tonneau cover, try pulling it up towards you to make sure all latches are securely locked.
WARNING
■Caution while driving
Keep the auxiliary boxes closed and locked. Injuries may result in the event of an accident or sudden braking.
■When the deck hooks are not in use
To avoid injury, always return the deck hooks to their stowed positions.
■Tie-down cleat precautions
●Properly install and tighten the tie-down cleats into the deck rail system.
Failure to properly install and tighten the tie-down cleats can cause cargo to become unsecured. Unsecured cargo can cause injury when the vehi- cle is in motion.
●Properly secure all cargo to prevent shifting or sliding during driving.
Failure to properly secure cargo can cause injury when the vehicle is in motion.
●Applying loads at an angle to the tie-down cleat greater than 45° or loads greater than 220 lb. (100 kg) may cause damage to the deck, deck rail system, tie-down cleat and/or the cargo.
●Do not exceed a total tensile load of 440 lb. (200 kg) per deck rail. ●Do not install more than the following number of tie-down cleats per deck
rail: • Side rail:
Short deck—Max. 3 locations Long deck—Max. 4 locations
●Confirm cargo and cleats do not interfere with tonneau cover latching and
completely closing.
6-3. Using the storage features
403
WARNING
■Caution for the tonneau cover
Observe the following precautions regarding the tonneau cover. Failure to do so may cause death or serious injury. ●Confirm the tonneau cover is securely closed before driving. ●Confirm cargo and cleats do not interfere with tonneau cover latching and
completely closing.
●Do not drive with only the front or only
the rear tonneau cover opened.
●Bolt must be installed and properly tightened.
Tightening torque: 20 ft·lbf (27.3 N·m, 2.8 kgf·m)
●When the tonneau cover is fully opened, make sure that the buckle is
secure by pulling on the storage strap.
●Be careful not to get your hands pinched between the tonneau cover and the deck when opening and closing the tonneau cover, or between the panels when folding.
●Make sure that all latches are securely locked by pulling it upwards. ●Do not stand or sit on the tonneau cover. ●Do not install the tonneau cover backwards, or in any other orientation than indicated (“TACOMA” text should be towards the tailgate, and the safety bolt must be installed and tightened.
404
6-3. Using the storage features
NOTICE
■When using the tonneau cover
●Deck area is not waterproof, so take care when transporting items which
may be damaged by water.
●Do not drive the vehicle with objects on top of the tonneau cover. ●Take care when operating and storing the tonneau cover to avoid scratch- ing its outer surfaces. When stowing, stand it up with the section with stor- age straps facing upward.
●Take care when removing and installing the tonneau cover, as it is heavy. ●To avoid damage, secure the storage straps to the snaps provided. Failure
to do so could result in broken buckle, or damage deck rail.
Behind the rear seat (Double Cab models only) ■ Grocery bag hooks
Grocery bag hook is designed to hang things like grocery bag.
6-3. Using the storage features
405
■ Storage boxes
Storage box is designed to place things like bottles.
Left side
Right side (vehicles without a
sub woofer)
NOTICE
■Grocery bag hook weight capacity
Do not hang any object heavier than 7 lb. (3 kg) on the grocery bag hooks.
406
6-4. Other interior features
Other interior features
Sun visors
To set the visor in the forward position, flip it down. To set the visor in the side posi- tion, flip down, unhook, and swing it to the side. To use the side extender, place the visor in the side position, then slide it backward.
Vanity mirrors (if equipped) Open the cover
The light turns on when the cover is opened.
NOTICE
Do not leave the vanity lights on for extended periods while the engine is stopped.
6-4. Other interior features
407
Clock The clock is displayed on the screen.
■ Setting the clock Vehicles with Entune Audio (Audio system types: P. 280)
P. 290
Vehicles with Entune Audio Plus or Entune Premium Audio
(Audio system types: P. 280) Refer OWNER’S MANUAL”.
the
to
“NAVIGATION AND MULTIMEDIA SYSTEM
■The clock is displayed when
Vehicles without a smart key system The engine switch is in the “ACC” or “ON” position. Vehicles with a smart key system The engine switch is in ACCESSORY or IGNITION ON mode. ■When disconnecting and reconnecting battery terminals
The clock data will be reset.
408
6-4. Other interior features
Power outlets (12 V DC) Please use as a power supply for electronic goods that use less than 12 VDC/10 A (power consumption of 120 W). When using electronic goods, make sure that the power consumption of all the connected power outlets are less than 120 W. Type A (instrument panel)
Open the lid.
Type B (inside of the console box)
Lift the lid while pulling up the knob to release the lock and open the lid.
6-4. Other interior features
409
■The power outlets can be used when Vehicles without a smart key system The engine switch is in the “ACC” or “ON” position. Vehicles with a smart key system The engine switch is in ACCESSORY or IGNITION ON mode.
NOTICE
●Close the power outlet lids when the power outlets are not in use.
Foreign objects or liquids that enter the power outlets may cause a short circuit.
●Do not use the power outlets longer than necessary when the engine is
not running.
Power outlet (120 V AC) (if equipped) The power outlet can be used for electrical appliances. ● Main switch
To use the power outlet, turn on the main switch.
The power supply starts a few seconds after the main switch is pressed.
● Power outlet socket (deck)
Open the lid.
410
6-4. Other interior features
■ Maximum available capacity of the power outlet
● While the vehicle is being driven
The maximum capacity of the power outlet is always 120 V AC/ 100 W.
● When the vehicle is stationary
The maximum capacity of the power outlet varies depending on the following conditions: • The maximum capacity is 120 V AC/100 W when the following
conditions applies: Vehicles with an automatic transmission The shift lever is moved to any positions other than P and N. Vehicles with a manual transmission The clutch pedal is depressed.
• The maximum capacity is 120 V AC/400 W when the following
conditions applies: Vehicles with an automatic transmission The shift lever is in P or N. Vehicles with a manual transmission The shift lever is in N and the clutch pedal is not depressed. The maximum capacity of 400 W can only be restored by turning the power outlet main switch off and then on again under condition described above.
■The power outlet can be used when
The engine is running.
■The indicator light changes according to the maximum available capac-
ity as follows:
120 V AC/400 W 120 V AC/100 W
■When the power outlet is in operation
The sound of the cooling fan may be heard from the front console box. This is normal and does not indicate a malfunction.
6-4. Other interior features
411
■If the engine is started with the power outlet main switch on
The maximum capacity of the power supply may decrease to below the stan- dard, or may be cut off completely, even when the vehicle is stationary.
■The protection circuit may be activated to cut the power supply if any of
the following conditions apply: ●The engine is started with the power outlet main switch on. ●Use of electrical appliances exceeding the maximum capacity is attempted. A sound may be heard when the protection circuit is activated. This is nor- mal and does not indicate a malfunction.
●Electrical appliances, which consume power exceeding 100 W, have been
used continuously for a long time period.
●The total power usage by all electrical features (headlights, air conditioning, etc.) has exceeded the total vehicle maximum for an extended period of time.
■If the protection circuit is activated and the power supply is cut, conduct
the following procedure:
Park the vehicle in a safe place, and then securely apply the parking brake. Check and ensure the following conditions:
Vehicles with an automatic transmission
The shift lever is in P or N.
Vehicles with a manual transmission
The shift lever is in N and the clutch pedal is not depressed. Make sure that the power consumption of the electric appliance is within the maximum capacity of the power outlet and the appliance is not bro- ken. Press the power outlet main switch again.
When the cabin temperature is high, open the windows to cool the tempera- ture down. Once it reaches the normal temperature, turn the power outlet main switch on again. If the power supply does not resume even after the above procedure has been performed, have the vehicle inspected by your Toyota dealer.
412
6-4. Other interior features
WARNING
■Using a power outlet
Observe the following precautions to reduce the risk of injury. ●Use of the power outlet when it is wet with water or snow may result in electrical shocks and is extremely dangerous. The power outlet must be thoroughly dried before use.
●Do not allow children to use or play with the power outlet. ●Be careful not to get any part of your body caught in the power outlet lid. ●When using electrical appliances, strictly follow any cautions and notices
written on their labels and in the manufacturers’ instruction manuals.
●Do not modify, disassemble or repair the power outlet or its inverter in any way. Doing so may result in unexpected malfunctions or accidents, which could cause serious damage or injuries. Contact your Toyota dealer for any necessary repairs.
■To prevent injuries and accidents, secure all electric appliances before
use and do not use any appliances that may do any of the following: ●Distract the driver while driving, or hamper safe driving. ●Result in a fire or burn injuries due to the appliance rolling, falling or over-
heating while driving.
●Emit steam while the windows of the cabin are closed.
■To prevent unexpected accidents, such as electric shocks, do not per-
form any of the following actions: ●Using the power outlet for electric heaters while sleeping. ●Contaminating the power outlet with liquid substances or mud. ●Handling electrical appliance plugs at the power outlet with wet hands or
feet.
●Inserting foreign objects into the power outlet. ●Using malfunctioning electric appliances. ●Inserting inappropriate or badly fitting plugs into the power outlet.
6-4. Other interior features
413
NOTICE
■To avoid damaging the power outlet and the plug
●Close the power outlet lid when not in use. ●Do not allow foreign objects or liquids to enter the power outlet, as this
may cause a short circuit.
●Do not use plug adaptors to connect too many plugs to the power outlet. ●After removing a plug, gently close the power outlet lid.
■To prevent the fuse from being blown
Do not use a 120 V AC appliance that requires more than the maximum capacity of the power outlet. If a 120 V AC appliance that consumes more than the maximum capacity is used, the protection circuit will cut the power supply.
■Appliances that may not operate properly (120 V AC)
The following 120 V AC appliances may not operate even if their power con- sumption is under maximum capacity. ●Appliances with high initial peak wattage ●Measuring devices that process precise data. ●Other appliances that require an extremely stable power supply
■To prevent battery discharge
Turn off all the vehicle’s electronic equipment and accessories, such as the headlights and air conditioning, when electrical appliances that consume in excess of 100 W are used continuously for long periods of time.
■To prevent any damage caused by heat
●Do not use any electrical appliances that give off intense heat, such as toasters, in any locations including the internal or external trim, seats and deck.
●Do not use any electrical appliances that are easily affected by vibration or heat inside the vehicle. Vibration while driving, or the heat of the sun while parking, may result in damage to those electrical appliances.
■If any electrical appliances are to be used while driving
Securely fasten both the appliances and their cables to prevent them from falling or getting caught in any of the power train components.
■If the power outlet is loose when an electrical appliance plug is con-
nected Replace the outlet. Contact your Toyota dealer for any necessary replace- ments.
■If the power outlet gets dirty
Turn the main switch off and use a soft, clean cloth to wipe it gently. Do not use any cleansing materials, such as organic solvents, wax, or compound cleaners, as these may damage the power outlet or cause it to malfunction.
414
6-4. Other interior features
Wireless charger (if equipped) A mobile device can be charged wirelessly on the tray. Vehicles without a smart key system
Charging can only be performed with the engine switch in the “ACC” or “ON” position and only on mobile devices with the “ ” logo.
Vehicles with a smart key system
Charging can only be performed with the engine switch in ACCES- SORY or IGNITION ON mode and only on mobile devices with the “ Press the wireless charger switch.
” logo.
Type A
Type B
Place a mobile device on the tray as shown in the illustration. An amber indicator is illuminated is while charging in progress. When charging is complete, a green indicator will also be illumi- nated. Some phones, cases or cover type wireless chargers may not cause the green indicator to illuminate even though it is fully charged.
When placing the mobile device on the wireless charging surface of the tray, make sure that there are no objects in-between the mobile device and the tray. They may interfere with charging.
6-4. Other interior features
415
■If the wireless charger LED indicators flash
If the wireless charging surface of the tray becomes too hot, the LED indica- tors will flash and charging is canceled. The LED indicators will be illuminated if the surface of the tray cools down. If the LED indicators flash even though the surface of the tray is not hot, the wireless charger may be malfunctioning. Consult your Toyota dealer.
■When charging of the wireless charger stops temporarily
If any of the following operations are performed with the wireless key or elec- tronic key present, charging may stop temporarily. Charging will start again after a while. • Locking/unlocking the doors by touching the door handle
(vehicles with a smart key system)
• Opening/closing the doors • Starting the engine • Locking the doors by pressing the lock button on the wireless key or elec-
tronic key
• When the electronic key is out of the detection area
(vehicles with a smart key system)
■Certification for the wireless charger
For vehicles sold in the U.S.A. This device complies with Part 18 of the FCC Rules. Toyota Motor Sales, U.S.A., Inc. 19001 S. Western Avenue Torrance, CA 90501
For vehicles sold in Canada This ISM device complies with Canadian ICES-001. Cet appareil ISM est conforme à la norme NMB-001 du Canada.416
6-4. Other interior features
6-4. Other interior features
417
WARNING
■Caution regarding interference with electronic devices
●People with implantable cardiac pacemakers, cardiac resynchronization therapy-pacemakers or implantable cardioverter defibrillators should main- tain a reasonable distance between themselves and the wireless charger. The radio waves may affect the operation of such devices.
●Before using the wireless charger, users of any electrical medical device other than implantable cardiac pacemakers, cardiac resynchronization therapy-pacemakers or implantable cardioverter defibrillators should con- sult the manufacturer of the device for information about its operation under the influence of radio waves. Radio waves could have unexpected effects on the operation of such medical devices.
●To avoid interference with other electrical devices, turn the wireless
charger off by turning off the wireless charger switch.
■To prevent damage or fire
Observe the following precautions. Failure to do so may result in the possibility of equipment failure or damage, vehicle fire, burns due to heat, or even electrical shock. ●Do not put any metallic objects between the charging area and the porta-
ble device.
●Do not place anything but a device to be charged on the wireless charger.
It is not designed for use as an auxiliary box.
●Do not apply force or impact to the wireless charger. ●Do not disassemble or modify the wireless charger. ●Do not attempt to charge portable devices which are not compatible with
the Qi wireless charging standard.
●Do not bring magnetized objects close to the wireless charger. ●Do not perform charging if the charging area is dusty. ●Keep foreign objects away from the wireless charger, and do not spill liquid
on the wireless charger.
●Do not cover the wireless charger with a cloth or other object while charg-
ing.
●Do not attach metallic objects, such as aluminum stickers, to the charging
area.
418
6-4. Other interior features
NOTICE
■Conditions in which the wireless charger may not operate correctly In the following situations, the wireless charger may not operate correctly: ●When a portable device is fully charged ●When there is a foreign object between the charging area and portable
device
●When a portable device becomes hot while charging ●When a portable device is placed on the wireless area with its charging
surface facing up
●When a portable device is not centered on the charging area ●When the vehicle is near a TV tower, electric power plant, gas station, radio station, large display, airport or other facility that generates strong radio waves or electrical noise
●When the portable device is in contact with, or is covered by any of the fol-
lowing metallic objects
• Cards to which aluminum foil is attached • Cigarette boxes that have aluminum foil inside • Metallic wallets or bags • Coins • Metal hand warmers • Media such as CDs and DVDs ●When wireless keys (that emit radio waves) other than those of your vehi-
cle are being used nearby.
If in situations other than above the wireless charger does not operate prop- erly or the operation indicator light is blinking, the wireless charger may be malfunctioning. Contact your Toyota dealer.
■To prevent failure or damage to data
●Do not bring magnetic cards, such as a credit card, or magnetic recording media, close to the wireless charger. Otherwise, data may be erased due to the influence of magnetism. Additionally, do not bring precision instruments such as wrist watches, close to the wireless charger, as such objects may malfunction.
●Do not leave portable devices in the cabin. The temperature inside the cabin may become high when parked in the sun, and cause damage to the device.
■To prevent battery discharge
Do not use the wireless charger for a long period of time with the engine is stopped.
6-4. Other interior features
419
Assist grips An assist grip (type A) installed on the pillar can be used when getting in or out of the vehicle and others. An assist grip (type B) installed on the ceiling can be used to support your body while sitting on the seat.
Assist grip (type A) Assist grip (type B)
WARNING
■Assist grip (type B)
Do not use the assist grip when getting in or out of the vehicle or rising from your seat. Doing so could damage the assist grip, or could cause you to injure yourself by falling over.
NOTICE
Do not hang any heavy object or put a heavy load on the assist grip.
420
6-4. Other interior features
Camera mounting bracket Windshield is equipped with a dedicated mounting bracket for use with the GoPro® QRB (Quick Release Buckle) and must be connected directly to the GoPro® camera housing.
■Before using