- 2014 Toyota Tacoma Owners Manuals
- Toyota Tacoma Owners Manuals
- 2005 Toyota Tacoma Owners Manuals
- Toyota Tacoma Owners Manuals
- 2000 Toyota Tacoma Owners Manuals
- Toyota Tacoma Owners Manuals
- 2007 Toyota Tacoma Owners Manuals
- Toyota Tacoma Owners Manuals
- 2016 Toyota Tacoma Owners Manuals
- Toyota Tacoma Owners Manuals
- 2006 Toyota Tacoma Owners Manuals
- Toyota Tacoma Owners Manuals
- 2008 Toyota Tacoma Owners Manuals
- Toyota Tacoma Owners Manuals
- 2009 Toyota Tacoma Owners Manuals
- Toyota Tacoma Owners Manuals
- 2015 Toyota Tacoma Owners Manuals
- Toyota Tacoma Owners Manuals
- 2001 Toyota Tacoma Owners Manuals
- Toyota Tacoma Owners Manuals
- 2012 Toyota Tacoma Owners Manuals
- Toyota Tacoma Owners Manuals
- 2004 Toyota Tacoma Owners Manuals
- Toyota Tacoma Owners Manuals
- 2011 Toyota Tacoma Owners Manuals
- Toyota Tacoma Owners Manuals
- 2003 Toyota Tacoma Owners Manuals
- Toyota Tacoma Owners Manuals
- 2002 Toyota Tacoma Owners Manuals
- Toyota Tacoma Owners Manuals
- 2010 Toyota Tacoma Owners Manuals
- Toyota Tacoma Owners Manuals
- Download PDF Manual
-
at higher inflation pressures than the corre- sponding standard tire The linear distance between the exteriors of the sidewalls of an inflated tire, excluding ele- vations due to labeling, decoration, or protec- tive bands That portion of a tire between the tread and bead The parting of the rubber compound from the cord material in the sidewall
Tire related term
Meaning
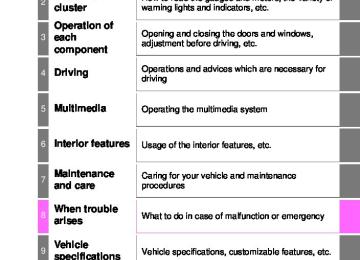
9-1. Specifications
591
A tire that attains a traction index equal to or greater than 110, compared to the ASTM E- 1136 Standard Reference Test Tire, when using the snow traction test as described in ASTM F-1805-00, Standard Test Method for Single Wheel Driving Traction in a Straight Line on Snow-and Ice-Covered Surfaces, and which is marked with an Alpine Symbol ( on at least one sidewall The rim on which a tire is fitted for testing, and may be any rim listed as appropriate for use with that tire That portion of a tire that comes into contact with the road around a tire Pulling away of the tread from the tire carcass The projections within the principal grooves designed to give a visual indication of the degrees of wear of the tread The fixture used to hold the wheel and tire assembly securely during testing
tread section running circumferentially
Snow tire
Test rim
Tread
Tread rib
Tread separation
Treadwear indicators (TWI)
Wheel-holding fixture
*: Table 1 Occupant loading and distribution for vehicle normal load for
various designated seating capacities
Designated seating capacity, Number of
occupants 2 through 4
5 through 10
11 through 15
16 through 20
Vehicle normal load, Number of occupants
Occupant distribution in a normally loaded
vehicle 2 in front
2 in front, 1 in second
seat
2 in front, 1 in second seat, 1 in third seat, 1
in fourth seat
2 in front, 2 in second seat, 2 in third seat, 1
in fourth seat
592
9-2. Customization
Customizable features
Your vehicle includes a variety of electronic features that can be personalized to your preferences. The settings of these features can be changed using the multi-information display, the multi- media system, or at your Toyota dealer.
Customizing vehicle features ■ Changing by using the multimedia system
Press the “APPS” button.
Entune Audio Plus
Entune Premium Audio
Select “Setup” on the “Apps” screen. Select “Vehicle” on the “Setup” screen. Select “Vehicle Customization” on the “Vehicle Settings” screen. “Vehicle Customization” screen will appear. Choose a category displayed on the screen to display the set- tings.
9-2. Customization
593
Select the setting to be changed. Change each setting. For items that can be enabled/disabled, and for items with an operating time that can be changed, select “On” or “Off”, or select the desired operating time. For items with sensor sensitivity that can be changed, select “+” or “-” to choose the desired level, then select “OK”. A message indicating that the settings are being saved will appear. Do not perform any other operations while this message is displayed.
■ Changing by using the multi-information display
using the meter control switch.
Select Select an item and then set it with the center button.
Customizable features Some function settings are changed simultaneously with other func- tions being customized. Contact your Toyota dealer for further details.
Settings that can be changed using the multi-information display. Settings that can be changed using the multimedia system. Settings that can be changed by your Toyota dealer. Definition of symbols: O = Available, — = Not available ■ Gauges, meters and multi-information display*1 (P. 88, 93)
Function*2
Default setting
Language*3
English
Units*3
miles (MPG US)
Customized
setting French Spanish km (km/L)
km (L/100 km)
miles (MPG Impe-
rial)
O O O
O O O
6 of the following
items: P. 94
O — O
594
9-2. Customization
Function*2
Default setting
Customized
setting
Drive information 1
Drive information 2
Drive information 3
Digital speedom-
eter
Distance to empty
Average fuel economy (after
reset)
Current fuel econ-
omy
Trip distance (after reset)
Trip elapsed time
Pop-up display
On
Accent color
Light blue
Off Blue
Orange Yellow
Speed limit display*4
On with the speed limit caution indi- cator (yellow)
enabled
Maintenance tem initialization*5
sys-
Off
On with the speed limit caution indi- cator (yellow) not
enabled
Off
On
*1: Vehicles with a multi-information display *2: For details about each function: P. 96
*3: The default setting varies according to country. *4: Speed limit display may not be available for some regions. *5: For U.S.A. onlyO — O
O — O
O — O
O O O
O — O
O — O
■ Door lock (P. 109, 555)
Function
Default setting
Unlocking using a key
Driver’s door unlocked in one step, all doors unlocked in two
steps
9-2. Customization
595
Customized
setting
All doors unlocked in one step
— — O
— O O
Off
Off
On
than P
Speed-detecting auto- matic door lock function* Shifting gears to position other locks all doors* Shifting gears unlocks all doors* Opening the driver’s door unlocks all doors* *: Vehicles with an automatic transmission ■ Smart key system and wireless remote control* (P. 109)
to P
On
On
On
Off
Off
— O O
— O O
— O O
Function
Default setting
Customized
setting
On
On
Off
Off
— O O
— — O
Operation signal (Emergency flashers) Operation signal (Buzzer) Operation buzzer volume Time elapsed before auto- matic door lock function is activated if door is not opened being unlocked Open buzzer *: If equipped
warning
door
after
Level 5
Off to level 7 O O O
Off
60 seconds
30 seconds
— O O
120 seconds
On
Off
— — O
596
9-2. Customization
■ Smart key system* (P. 109, 121)
Function
Default setting
Customized
setting
On
Smart key system Number of permissible times of continuous smart lock *: If equipped ■ Wireless remote control* (P. 103, 109)
Twice
Off
— — O
Unlimited
— — O
Function
Default setting
Customized
setting
Wireless remote control
On
Off
— — O
Driver’s door unlocked in one step, all doors unlocked in two
steps
All doors unlocked in one step
— O O
On
Off
— — O
0 seconds
60 seconds
30 seconds
— O O
120 seconds
On
On
On
On
Off
Off
Off
Off
— O O
— — O
— — O
— — O
Unlocking operation
Automatic door lock func- tion to be activated if door is not opened after being unlocked
Time elapsed before auto- matic door lock function is activated if door is not opened being unlocked
after
Operation signal (Emergency flashers) Operation signal (Buzzer) Panic function Open reminder door buzzer (When locking the vehicle) *: If equipped
■ Automatic light off system* (P. 203)
Function
Default setting
Level 3
30 seconds
elapsed
Light sensor sensitivity Time before headlights automatically turn off after doors are closed *: If equipped ■ Illumination (P. 385)
9-2. Customization
597
Customized
setting
Level 1 to 5 — O O 0 seconds 60 seconds 90 seconds
— O O
Function
Default setting
Time elapsed before lights turn off
15 seconds
Customized
setting
7.5 seconds 30 seconds
On
On
Operation after the engine is off Operation when the doors are unlocked Operation when you approach the vehicle with the electronic key on your person* *: Vehicles with a smart key system ■ Intuitive parking assist* (P. 220)
On
Off
Off
Off
— O O
— — O
— — O
— — O
Function
Default setting
Customized
setting
Detection distance of the rear center sensor Buzzer Volume
Display setting
*: If equipped
Far
Near
— O O
Level 3
Level 1 to 5 — O O
All sensors displayed
Display off — O O
598
9-2. Customization
■ Seat Belt Reminder Buzzer (P. 512)
Function
Default setting
Customized
setting
Vehicle speed linked seat belt reminder buzzer
■Vehicle customization
On
Off
— — O
●When the speed-detecting automatic door lock function and shift position linked door locking function (shifting gears to a position other than P locks all doors) are both on, the door lock operates as follows. • When shifting the shift lever to any position other than P, all the doors will
be locked.
• If the vehicle is started with all the doors locked, the speed-detecting auto-
matic door lock function would not operate.
• If the vehicle is started with any the door unlocked, the speed-detecting
automatic door lock function will operate.
●When the doors remain closed after unlocking the doors and the automatic door lock function (Time elapsed before the automatic door lock function is activated if a door is not opened after being unlocked) activates, the signals will be generated in accordance with operation signal (buzzers) and the operation signal (emergency flashers) settings.
WARNING
■During customization
As the engine needs to be running during customization, ensure that the vehicle is parked in a place with adequate ventilation. In a closed area such as a garage, exhaust gases including harmful carbon monoxide (CO) may collect and enter the vehicle. This may lead to death or serious health haz- ard.
NOTICE
■During customization
To prevent battery discharge, ensure that the engine is running while cus- tomizing features.
9-3. Items to initialize
599
Items to initialize
The following items must be initialized for normal system opera- tion after such cases as the battery being reconnected, or main- tenance being performed on the vehicle:
Item
When to initialize
Reference
Moon roof*1
light
required Maintenance reminder (vehicles without a multi-information display) or message indicat- ing maintenance is required (vehicles with a multi-infor- mation display)*2
Tire pressure warning sys- tem*1*1: If equipped *2: For U.S.A. only
• After reconnecting or chang-
ing the battery
• After changing a fuse
P. 152
• After the maintenance is per-
formed
P. 441
• When rotating the tires. • When changing the tire size.
P. 464
600
9-3. Items to initialize
601
For owners
10
Reporting safety defects for U.S. owners........................ 602
Seat belt instructions for Canadian owners (in French) ............................... 603
SRS airbag instructions for Canadian owners (in French) .............................. 605
Camper information ................... 613602
Reporting safety defects for U.S. owners
receives similar complaints,
If you believe that your vehicle has a defect which could cause a crash or could cause injury or death, you should immediately inform the National Highway Traffic Safety Administration (NHTSA) in addition to notifying Toyota Motor Sales, U.S.A., Inc. (Toll-free: 1-800-331-4331). If NHTSA it may open an investigation, and if it finds that a safety defect exists in a group of vehicles, it may order a recall and remedy campaign. However, NHTSA cannot become involved in individual problems between you, your dealer, or Toyota Motor Sales, U.S.A., Inc. To contact NHTSA, you may call the Vehicle Safety Hotline toll-free at 1-888-327-4236 (TTY: 1-800-424-9153); go to http://www.safercar.gov ; or write to: Administrator, NHTSA, 1200 New Jersey Ave, S.E., Washington, DC 20590. You can also obtain other information about motor vehicle safety from http://www.safercar.gov.
603
Seat belt instructions for Canadian owners (in French)
The following is a French explanation of seat belt instructions extracted from the seat belt section in this manual. See the seat belt section for more detailed seat belt instructions in English.
Utilisation adéquate des ceintures de sécurité ● Tirez sur la ceinture épaulière jusqu’à ce qu’elle recouvre entièrement l’épaule; elle ne doit cependant pas toucher le cou ni glisser de l’épaule.
● Placez la sangle abdominale de la ceinture de sécurité le plus bas possible sur les hanches.
● Réglez la position du dossier du siège. Asseyez-vous le dos le plus
droit possible et calez-vous bien dans le siège.
● Ne pas vriller la ceinture de sécurité.
Entretien et soin ■ Ceintures de sécurité
Nettoyez avec un chiffon ou une éponge humectée d’eau savonneuse tiède. Par ailleurs, vérifiez régulièrement que les ceintures ne sont pas effilochées, entaillées, ou ne paraissent pas exagérément usées.
10
604
ATTENTION
■Dommages et usure de la ceinture de sécurité
Inspectez les ceintures de sécurité périodiquement. Contrôlez qu’elles ne sont pas entaillées, effilochées, et que leurs ancrages ne sont pas desserrés. Ne pas utiliser une ceinture de sécurité défectueuse avant qu’elle ne soit remplacée. Une ceinture de sécurité défectueuse n’apporte aucune garantie de protection de l’occupant contre des blessures graves, voire mortelles.
605
SRS airbag instructions for Canadian owners (in French)
The following is a French explanation of SRS airbag instructions extracted from the SRS airbag section in this manual. See the SRS airbag section for more detailed SRS airbag instructions in English.
10
606
◆ Coussins gonflables SRS frontaux
Coussins gonflables SRS conducteur/passager avant Participent à la protection de la tête et du thorax du conducteur et du passager avant contre les chocs avec les éléments de l’habitacle Coussins gonflables SRS de genoux Participent à la protection du conducteur et du passager avant
◆ Coussins gonflables SRS latéraux et rideau
Coussins gonflables SRS latéraux Participent à la protection du haut du corps des occupants des sièges avant Coussins gonflables SRS rideau ● Participent principalement à la protection de la tête des
occupants assis dans les sièges des places extérieures
● Peuvent empêcher les occupants d’être éjectés du véhicule en
cas de retournement de celui-ci
Composition du système de coussins gonflables SRS
607
de
“AIR
gonflables
indicateurs
Prétensionneurs de ceintures de sécurité Coussins genoux Témoins BAG ON” et “AIR BAG OFF” Coussin gonflable passager avant Coussins gonflables rideau Coussins gonflables latéraux (sièges avant) Système classification de d’occupant du siège passager avant (ECU et capteurs) Témoin d’alerte SRS
10
11
12
13
14
15
16
latéral
latéral
d’impact
d’impact
Coussin gonflable conducteur Capteur de position du siège conducteur Capteurs (arrière) Capteurs (avant) Contacteur de boucle de ceinture sécurité conducteur Contacteur de boucle de ceinture de sécurité passager avant Capteurs d’impact avant Boîtier électronique coussins gonflables
de
de
Votre véhicule est équipé de COUSSINS GONFLABLES ÉVOLUÉS, dont la conception est basée sur les normes de sécurité des véhicules automobiles américains (FMVSS208). Le boîtier électronique de coussins gonflables (ECU) utilise les informations reçues des capteurs, etc., détaillés dans le schéma ci-dessus de composition du système, pour commander le déploiement des coussins gonflables. Ces informations comprennent des informations sur la gravité de la collision et les occupants. Le déploiement rapide des coussins gonflables est obtenu au moyen d’une réaction chimique dans les dispositifs pyrotechniques, qui produit un gaz inoffensif permettant d’amortir le mouvement des occupants.
10
608
ATTENTION
■Précautions avec les coussins gonflables SRS
Respectez les précautions suivantes concernant les coussins gonflables SRS. À défaut, des blessures graves, voire mortelles, pourraient s’ensuivre. ●Le conducteur et tous les passagers à bord du véhicule doivent porter leur
ceinture de sécurité correctement. Les coussins gonflables SRS sont des dispositifs de protection complémentaires aux ceintures de sécurité.
●Le coussin gonflable SRS conducteur se déploie avec une puissance considérable et peut occasionner des blessures graves, voire mortelles, notamment lorsque le conducteur se trouve très près du coussin gonflable. Conseils de la National Highway Traffic Safety Administration (NHTSA): Sachant que la zone de danger pour le coussin gonflable conducteur se trouve dans les premiers 2 à 3 in. (50 à 75 mm) du déploiement, placez- vous à 10 in. (250 mm) du coussin gonflable conducteur pour garantir une marge de sécurité suffisante. Cette distance est à mesurer entre le moyeu du volant de direction et le sternum. Si vous êtes assis à moins de 10 in. (250 mm), vous pouvez changer votre position de conduite de plusieurs façons: • Reculez votre siège le plus possible, tout en continuant à pouvoir
atteindre confortablement les pédales.
• Inclinez légèrement le dossier du siège.
Bien que les véhicules puissent être différents les uns des autres, la plupart des conducteurs peuvent s’asseoir à une distance de 10 in. (250 mm), même avec le siège conducteur complètement avancé, simplement en inclinant un peu le dossier de siège. Si vous avez des difficultés à voir la route après avoir incliné votre siège, utilisez un coussin ferme et antidérapant pour vous rehausser ou, si votre véhicule est équipé du réglage en hauteur du siège, remontez-le.
• Si votre volant de direction est réglable, inclinez-le vers le bas. Cela vous permet d’orienter le coussin gonflable vers votre buste plutôt que vers la tête et le cou.
Le siège doit être réglé selon les recommandations de la NHTSA ci- dessus, tout en conservant le contrôle des pédales et du volant, et la vue des commandes au tableau de bord.
ATTENTION
■Précautions avec les coussins gonflables SRS
609
les
dite,
●Si vous attachez une rallonge de ceinture de sécurité aux boucles des ceintures de sièges avant, mais pas au la ceinture de sécurité pêne de proprement coussins gonflables SRS frontaux déterminent que le conducteur et le passager avant portent leur ceinture de sécurité, alors même qu’elle n’est pas attachée. Dans ce cas, les coussins gonflables SRS frontaux risquent de ne pas se déployer correctement en cas de collision, causant des blessures graves, voire mortelles. Veillez à porter la ceinture de sécurité avec la rallonge de ceinture de sécurité.
●Le coussin gonflable SRS passager avant se déploie également avec une puissance considérable et peut occasionner des blessures graves, voire mortelles, notamment lorsque le passager avant se trouve très près du coussin gonflable. Le siège du passager avant doit se trouver le plus loin possible du coussin gonflable et le dossier doit être réglé de manière à ce que le passager avant soit assis bien droit.
●Le déploiement d’un coussin gonflable risque d’infliger des blessures graves, voire mortelles, aux bébés et aux enfants mal assis et/ou mal attachés. Installez dans un siège de sécurité enfant les enfants trop jeunes pour pouvoir utiliser la ceinture de sécurité. Toyota recommande vivement que tous les nourrissons et enfants soient installés dans les sièges arrière du véhicule et convenablement attachés. Les sièges arrière sont plus sûrs pour les nourrissons et les enfants que le siège passager avant.
●N’installez jamais un siège de sécurité enfant type dos à la route sur le
siège passager avant, même si le voyant “AIR BAG OFF” est allumé. En cas d’accident, la force exercée par le déploiement rapide du coussin gonflable passager peut causer des blessures graves, voire mortelles à un enfant, si le siège de sécurité enfant type dos à la route est installé sur le siège passager avant.
10
610
ATTENTION
■Précautions avec les coussins gonflables SRS
●Ne pas s’asseoir sur le bord du siège et ne pas s’appuyer contre la planche de bord.
●Ne laissez pas un enfant debout face au coussin gonflable SRS passager avant ni assis sur les genoux d’un passager avant.
●Ne pas laisser les occupants des sièges avant voyager avec un objet sur les genoux.
●Ne pas s’appuyer contre la porte, contre le rail latéral de toit ou contre les montants avant, latéraux et arrière.
●Ne laissez personne s’agenouiller face à la portière sur les sièges du passager ou sortir les mains à l’extérieur du véhicule.
tête ou
la
●Ne fixez ni ne posez aucun objet sur la planche de bord, la garniture centrale du volant de direction et la partie inférieure du tableau de bord. Lors du déploiement des coussins gonflables SRS conducteur, passager avant et de genoux, tout objet risque de se transformer en projectile.
611
ATTENTION
■Précautions avec les coussins gonflables SRS
●Ne rien fixer sur les parties telles que les portes, la vitre de pare-brise, les vitres latérales, les montants avant et arrière, les rails latéraux de toit et les poignées de maintien.
●Ne pas attacher à la clé des objets lourds, pointus ou très durs, comme d’autres clés par exemple. Ces objets risquent d’entraver le déploiement du coussin gonflable SRS de genoux ou d’être projetés en direction du siège conducteur par la force de déploiement, constituant ainsi un danger potentiel.
●Ne suspendez aux crochets à vêtements aucun cintre nu ni aucun objet dur. En cas de déploiement des coussins gonflables SRS rideau, tous ces objets pourraient se transformer en projectiles et causer des blessures graves, voire mortelles.
●Si une housse en vinyle recouvre la partie où le coussins gonflable SRS
de genoux se déploie, veillez à l’enlever.
●N’utilisez aucun accessoire de siège venant recouvrir les zones de déploiement des coussins gonflables SRS latéraux, car il risquerait d’en gêner le déploiement. De tels accessoires peuvent empêcher les coussins gonflables latéraux de fonctionner correctement, désactiver le dispositif ou entraîner le déploiement accidentel des coussins latéraux, entraînant la mort ou des blessures graves.
●Évitez de faire subir des chocs ou des pressions excessives aux zones
renfermant les composants des coussins gonflables SRS. En effet, cela pourrait entraîner un mauvais fonctionnement des coussins gonflables SRS.
●Ne
touchez à aucun composant des coussins gonflables SRS immédiatement après leur déploiement (gonflage), car ils pourraient être chauds.
●Si vous avez des difficultés à respirer après le déploiement des coussins gonflables SRS, ouvrez une porte ou une vitre pour faire entrer de l’air frais, ou bien descendez du véhicule si cela ne présente pas de danger. Retirez tout résidu dès que possible afin d’éviter d’éventuelles irritations de la peau.
10
612
ATTENTION
■Précautions avec les coussins gonflables SRS
●Si les parties renfermant les coussins gonflables SRS, telles que la garniture centrale du volant de direction et les garnitures de montants avant et arrière, apparaissent abîmées ou craquelées, faites-les remplacer par votre concessionnaire Toyota.
●Ne placez aucun objet, par exemple un coussin, sur le siège du passager avant. Cela a pour conséquence de répartir le poids du passager sur toute la surface du siège, ce qui empêche le capteur de détecter normalement le poids du passager. En conséquence, les coussins gonflables SRS frontaux du passager avant peuvent ne pas se déployer en cas de collision.
■Modification et élimination en fin de vie des éléments du système de
coussins gonflables SRS Consultez impérativement votre concessionnaire Toyota si vous avez besoin d’intervenir sur votre véhicule ou de procéder à l’une des modifications suivantes. Les coussins gonflables SRS peuvent ne pas fonctionner correctement ou se déployer (gonfler) accidentellement, provoquant ainsi des blessures graves, voire mortelles. ●Installation, dépose, démontage et réparations des coussins gonflables
SRS
●Réparations, modifications, démontage ou remplacement du volant, du tableau de bord, de la planche de bord, des sièges ou de leur garnissage, des montants avant, latéraux et arrière ou des rails latéraux de toit
●Réparation ou modification des ailes avant, du bouclier avant, ou des
flancs de l’habitacle
●Installation d’un équipement de protection sur la calandre (pare-buffle, pare-kangourou, etc.), d’un chasse-neige, de treuils ou d’une galerie de toit
●Modification des suspensions du véhicule ●Installation d’appareils électroniques, tels qu’un émetteur/récepteur radio
ou lecteur de CD
●Aménagements du véhicule visant à permettre sa conduite par une
personne atteinte d’un handicap physique
613
Camper information
This information has been prepared in accordance with regulation issued by the National Highway Traffic Safety Administration of the U.S. Department of Transportation. It provides the purchasers and/ or prospective purchasers of Toyota vehicles with information on truck-camper loading. Your Toyota dealer will help answer any questions you may have as you read this information.
Center of gravity location The figures given in the illustration indicate the recommended center of gravity zone.
location
Recommended for cargo center of gravity for cargo weight rating Rear end of truck bed
49.9 in. (1267 mm)
36.1 in. (917 mm)
41.1 in. (1045 mm) 41.5 in. (1055 mm)
31.8 in. (807 mm) 27.8 in. (706 mm)
Access Cab models Double Cab models With short deck With long deck
WARNING
■Loading precaution
If a load is too far back, it can cause dangerous handling. If it is too far forward, the front axle may be overloaded.
10
614
Cargo weight rating and proper matching When the truck is used to carry a slide-in camper, the total cargo load of the truck consists of the manufacturer’s camper weight figure, the weight of installed additional camper equipment not included in the manufacturer’s camper weight figure, the weight of camper cargo, and the weight of passengers in the camper. The total cargo load should not exceed the truck’s cargo weight rating and the camper’s center of gravity should fall within the truck’s recommended center of gravity zone when installed.
Camper center of gravity
Recommended gravity location zone
center
of
■ Cargo weight rating
NO. Engine
Trans missi on
Drive
Cab
Bed Grade
V.C.W
Pass enge
10
11
12
13
14
15
162TR 2TR 2GR 2GR 2GR 2GR 2GR 2TR 2TR 2GR 2GR 2GR 2GR 2GR 2GR 2GR
6AT 6AT 6AT 6AT 6AT 6AT 6AT 5MT 6AT 6MT 6AT 6MT 6AT 6AT 6AT 6AT
2WD
4WD
SR5
Access Long SR5
Double Short SR5
Access Long SR5
Double Short Double Short Limited Double Long SR5
Double Long Limited SR5
Access Long SR5
Access Long Access Long SR5
SR5
Access Long Double Short SR5
Double Short SR5
Double Short Limited Double Long SR5
Double Long Limitedlbs 1,500
1,400
1,400
1,200
1,250
1,200
1,200
1,350
1,300
1,100
1,150
950
1,000
1,000
950
950615
Cargo Weig ht Ratin
lbs 900
650
800
450
500
450
450
750
700
500
550
200
250
250
200
200WARNING
■Overloading
Be careful — overloading can cause dangerous braking and handling problems, and can damage your vehicle and its tires.
10
616
Gross axle and vehicle weight ratings Secure loose items to prevent weight shifts that could affect the balance of your vehicle. When the truck camper is loaded, drive to a scale and weigh on the front and on the rear wheels separately to determine axle loads. Individual axle loads should not exceed either of the Gross Axle Weight Ratings (GAWR). The total of the axle loads should not exceed the Gross Vehicle Weight Rating (GVWR). These ratings are given on the vehicle certification label which is located on the door latch post on the left side of the vehicle. (P. 569) If weight ratings are exceeded, move or remove items to bring all weights below the ratings. Gross axle weight rating
Front GAWR
Rear GAWR
Gross vehicle weight rating
Not exceed GVWR
617
Rear
GVWR
GAWR
■ GAWR and GVWR
Model code*
Except GRN310L-PRTSHA/ GRN310L-PRTLHA GRN310L-PRTSHA/ GRN310L-PRTLHA *: The model code is indicated on the Certification Label. (P. 569)
3280 lb. (1490 kg)
5600 lb. (2545 kg)
Front 2910 lb. (1320 kg) 3040 lb. (1380 kg)
10
618
619
Index
What to do if... (Troubleshooting) .................... 620
Alphabetical index ..................... 624to
the
For vehicles with Entune Audio Plus or Entune Premium Audio, refer “NAVIGATION AND MULTIMEDIA SYSTEM OWNER’S MANUAL” for information regarding the multimedia system. Audio system types: P. 280
620
What to do if... (Troubleshooting)
What to do if... (Troubleshooting)
If you have a problem, check the following before contacting your Toyota dealer.
The doors cannot be locked, unlocked, opened or closed
You lose your keys
● If you lose your keys or mechanical keys, new genuine mechanical keys
can be made by your Toyota dealer. (P. 105)
● If you lose your keys or electronic keys, the risk of vehicle theft increases
significantly. Contact your Toyota dealer immediately. (P. 108)
The doors cannot be locked or unlocked
● Is the key battery weak or depleted? (P. 481) ● Vehicles with a smart key system:
Is the engine switch in IGNITION ON mode? When locking the doors, turn the engine switch off. (P. 191)
● Vehicles with a smart key system:
Is the electronic key left inside the vehicle? When locking the doors, make sure that you have the electronic key on your person.
● The function may not operate properly due to the condition of the radio
wave. (P. 124)
The rear door cannot be opened (Double Cab models only)
● Is the child-protector lock set?
The rear door cannot be opened from inside the vehicle when the lock is set. Open the rear door from outside and then unlock the child-protector lock. (P. 113)
What to do if... (Troubleshooting)
621
If you think something is wrong The engine does not start (vehicles without a smart key system)
● Vehicles with an automatic transmission:
Is the shift lever in P? (P. 187)
● Vehicles with a manual transmission:
Do you turn the key with the clutch pedal depressed firmly? (P. 187)
● Is the battery discharged? (P. 557)
The engine does not start (vehicles with a smart key system)
● Did you press the engine switch while firmly depressing the brake pedal?
(P. 190)
● Is the shift lever in P? (P. 192) ● Is the electronic key anywhere detectable inside the vehicle? (P. 122) ● Is the steering wheel unlocked? (P. 192) ● Is the electronic key battery weak or depleted?
In this case, the engine can be started in a temporary way. (P. 555)
● Is the battery discharged? (P. 557)
The shift lever cannot be shifted from P even if you depress the brake pedal (vehicles with an automatic transmission)
● Vehicles without a smart key system:
Is the engine switch in the “ON” position? If you cannot release the shift lever by depressing the brake pedal with the engine switch in the “ON” position. (P. 553)
● Vehicles with a smart key system:
Is the engine switch in IGNITION ON mode? If you cannot release the shift lever by depressing the brake pedal with the engine switch in IGNITION ON mode. (P. 553)
622
What to do if... (Troubleshooting)
The steering wheel cannot be turned after the engine is stopped
● Vehicles without a smart key system:
It is locked to prevent theft of the vehicle if the key is removed from the engine switch. (P. 188)
● Vehicles with a smart key system:
It is locked automatically to prevent theft of the vehicle. (P. 192)
The windows do not open or close by operating the power window switches
● Is the window lock switch pressed?
The power window except for the one at the driver’s seat cannot be oper- ated if the window lock switch is pressed. (P. 145)
The engine switch is turned off automatically (vehicles with a smart key system)
● The auto power off function will be operated if the vehicle is left in ACCES- SORY or IGNITION ON mode (the engine is not running) for a period of time. (P. 192)
A warning buzzer sounds during driving
● The seat belt reminder light is flashing
Are the driver and the front passenger wearing the seat belts? (P. 512)
● The parking brake indicator is on
Is the parking brake released? (P. 202)
Depending on the situation, other types of warning buzzer may also sound. (P. 512, 525)
A warning buzzer sounds when leaving the vehicle (vehicles with a smart key system) ● Is the electronic key left inside the vehicle?
Check the message on the multi-information display. (P. 519)
What to do if... (Troubleshooting)
623
An alarm is activated and the horn sounds (vehicles with an alarm)
● Did anyone inside the vehicle open a door during setting the alarm?
The sensor detects it and the alarm sounds. (P. 78)
● Vehicles without a smart key system:
To stop the alarm, turn the engine switch to the “ON” position or start the engine.
● Vehicles with a smart key system:
To stop the alarm, turn the engine switch to IGNITION ON mode or start the engine.
A warning light turns on (vehicles without a multi-information display)
● When a warning light turns on, refer to P. 519.
A warning light turns on or a warning message or indicator is displayed (vehicles with a multi-information display)
● When a warning light turns on or a warning message or indicator is dis-
played, refer to P. 510, 519.
When a problem has occurred
If you have a flat tire
● Stop the vehicle in a safe place and replace the flat tire with the spare tire.
(P. 536)
The vehicle becomes stuck
● Try the procedure for when the vehicle becomes stuck in mud, dirt, or
snow. (P. 563)
624
Alphabetical index
Alphabetical index
A/C .................................... 370, 376
Air conditioning filter ............. 478
Automatic air conditioningsystem................................ 376
Manual air conditioning
system................................ 370
ABS (Anti-lock Brake System) .................................. 264
Function................................ 264
Warning light......................... 511
Warning message................. 521
Active head restraints............. 129
Active traction control ............ 253
Air conditioning filter .............. 478
Air conditioning system............................ 370, 376
Air conditioning filter ............. 478
Automatic air conditioningsystem................................ 376
Manual air conditioning
system................................ 370
Airbags ....................................... 34
Airbag operating conditions .... 41
Airbag precautionsfor your child......................... 37
Airbag warning light .............. 510
Correct driving posture ........... 26
Curtain shield airbagoperating conditions ............. 41
Curtain shield airbag
precautions........................... 38
Front passenger occupant
classification system............. 45
General airbag precautions .... 37
Locations of airbags................ 34
Modification and disposalof airbags.............................. 40
Side airbag operating
conditions ............................. 41
Side airbag precautions.......... 38Side and curtain shield
airbags operating conditions............................. 41
Side and curtain shield
airbags precautions.............. 38
SRS airbags ........................... 34Alarm
Alarm ...................................... 78
Warning buzzer ............ 510, 519
Anchor brackets........................ 55
Antennas (smart key system) ............... 121
Anti-lock Brake System (ABS)...................................... 264
Function................................ 264
Warning light......................... 511
Warning message................. 521
Assist grips.............................. 419
Audio input* ............................ 285
Audio remote control switches*............................... 284
Audio system*......................... 280
Antenna ................................ 299
Audio input............................ 285
Audio settings....................... 291
AUX port/USB port ............... 285
Bluetooth® audio .................. 328
CD player.............................. 300
Display settings .................... 292
General settings ................... 289
iPod ...................................... 305
MP3/WMA disc..................... 300
Portable music player........... 313
Radio .................................... 298
Setup menu .......................... 288
USB memory ........................ 309
AUTO LSD system................... 248
Automatic light control system.................................... 203Alphabetical index
625
BSM (Blind Spot Monitor)....... 236
Blind Spot Monitor
function............................... 238
Rear Cross Traffic Alert
function............................... 241
Camera mounting bracket...... 420
Camper information ................ 613
Care .................................. 434, 437
Aluminum wheels ................. 434
Exterior ................................. 434
Interior .................................. 437
Seat belts.............................. 438
Cargo capacity......................... 167
Cargo lampLight switch........................... 387
Replacing light bulbs ............ 497
CD player* ............................... 300
Certification label .................... 569
Chains ...................................... 271
Child restraint system............... 51
Booster seats, definition ......... 52
Booster seats, installation....... 62
Convertible seats, definition ... 52
Convertible seats,installation ...................... 60, 61
Front passenger occupant
classification system ............ 45
Infant seats, definition............. 52
Infant seats, installation.......... 60
Installing CRSwith LATCH anchors ...... 58, 59
Installing CRS with seat
belts...................................... 60
Installing CRS
with top tether strap........ 63, 65
Automatic transmission
Automatic transmission......... 195
If the shift lever cannot beshifted from P ..................... 553
S mode ................................. 197
Power mode switch............... 196
AUX port................................... 285
Auxiliary boxes........................ 397Back window............................ 148
Back-up lightsReplacing light bulbs............. 495
Wattage ................................ 578
Battery ...................................... 459If the vehicle battery is
discharged.......................... 557
Preparing and checking
before winter....................... 270
Warning light......................... 510
Warning message................. 520
Blind Spot Monitor (BSM)....... 236
Bluetooth®*Audio system ........................ 328
Hands-free system(for cellular phone) ............. 329
Bottle holders .......................... 392
BrakeFluid...................................... 456
Parking brake........................ 202
Warning buzzer..................... 510
Warning light......................... 510
Warning message................. 519
Brake assist ............................. 264
Break-in tips............................. 156
Brightness controlInstrument panel light
control................................... 90
*: For vehicles with Entune Audio Plus or Entune Premium Audio, refer to the “NAVIGATION AND MULTIMEDIA SYSTEM OWNER’S MANUAL”
626
Alphabetical index
Child safety ................................ 50
Airbag precautions.................. 37
Battery precautions............... 560
Child restraint system ............. 51
How your child shouldwear the seat belt................. 30
Installing child restraints ......... 55
Moon roof precautions.......... 152
Power window lock switch .... 145
Power window precautions... 147
Rear door child-protector...... 113
Removed wireless remotecontrol/electronic key battery precautions............. 483
Seat belt extender
precautions........................... 33
Seat belt precautions.............. 54
Seat heater precautions........ 383
Child-protectors....................... 113
Cleaning ........................... 434, 437
Aluminum wheels.................. 434
Exterior ................................. 434
Interior................................... 437
Seat belts.............................. 438
Clock*....................................... 407
Compass .................................. 428
Condenser................................ 456
Console box............................. 390
Consumption screen........... 94, 98
Cooling system........................ 454
Capacity................................ 573
Checking............................... 454
Engine overheating............... 561
Preparing and checkingbefore winter....................... 270
Crawl Control........................... 259
CRS............................................. 51
Cruise control .......................... 215
Cup holders.............................. 391
Curtain shield airbags............... 35
Customizable features ............ 592Daytime running light system.................................... 205
Deck hooks .............................. 399
DefoggerOutside rear view
mirrors........................ 372, 379
Windshield.................... 372, 379
Differential................................ 574
Dimensions.............................. 566
Dinghy towing.......................... 186
DisplayDrive information .................... 94
Multi-information display......... 93
Warning message................. 519
Do-it-yourself maintenance.... 446
Door lockDoors.................................... 109
Key ....................................... 109
Smart key system................. 110
Wireless remote control........ 109
Doors........................................ 109Automatic door locking
and unlocking system......... 113
Door lock .............................. 111
Door windows....................... 145
Open door warning light ....... 512
Open door warningmessage............................. 524
Outside rear view mirrors ..... 143
Rear door child-protector...... 113
Driving...................................... 154
Break-in tips.......................... 156
Correct driving posture ........... 26
Driving assist system............ 264
Procedures ........................... 154
Winter drive tips.................... 270E
EDR (Event data recorder)........ 10
Electronic key .......................... 102
Battery-saving function ......... 123
If the electronic key doesnot operate properly ........... 555
Replacing the battery............ 481Emergency, in case of
If the electronic key does
not operate properly ........... 555
If the engine will not start...... 551
If the shift levercannot be shifted from P .... 553
If the vehicle battery is
discharged.......................... 557
If the warning buzzer
sounds................................ 510
If the warning light turns
on ....................................... 510
If the warning message
is displayed......................... 519
If you have a flat tire ............. 536
If you think somethingis wrong.............................. 508
If your vehicle becomes