- 2014 Toyota Tacoma Owners Manuals
- Toyota Tacoma Owners Manuals
- 2005 Toyota Tacoma Owners Manuals
- Toyota Tacoma Owners Manuals
- 2000 Toyota Tacoma Owners Manuals
- Toyota Tacoma Owners Manuals
- 2007 Toyota Tacoma Owners Manuals
- Toyota Tacoma Owners Manuals
- 2016 Toyota Tacoma Owners Manuals
- Toyota Tacoma Owners Manuals
- 2006 Toyota Tacoma Owners Manuals
- Toyota Tacoma Owners Manuals
- 2008 Toyota Tacoma Owners Manuals
- Toyota Tacoma Owners Manuals
- 2009 Toyota Tacoma Owners Manuals
- Toyota Tacoma Owners Manuals
- 2015 Toyota Tacoma Owners Manuals
- Toyota Tacoma Owners Manuals
- 2001 Toyota Tacoma Owners Manuals
- Toyota Tacoma Owners Manuals
- 2012 Toyota Tacoma Owners Manuals
- Toyota Tacoma Owners Manuals
- 2004 Toyota Tacoma Owners Manuals
- Toyota Tacoma Owners Manuals
- 2011 Toyota Tacoma Owners Manuals
- Toyota Tacoma Owners Manuals
- 2003 Toyota Tacoma Owners Manuals
- Toyota Tacoma Owners Manuals
- 2002 Toyota Tacoma Owners Manuals
- Toyota Tacoma Owners Manuals
- 2010 Toyota Tacoma Owners Manuals
- Toyota Tacoma Owners Manuals
- Download PDF Manual
-
(Customizable features →P. 583)
380
3-7. Other interior features Power outlets (12V DC)
The power outlets can be used for 12V accessories that run on less than 10A.
■The power outlets can be used when
The engine switch is in the ACC or ON position.
NOTICE
■To avoid damaging the power outlets
Close the power outlets lid when not in use. Foreign objects or liquids that enter the power outlets may cause a short cir- cuit.
■To prevent the fuse from being blown
Do not use an accessory that uses more than 12V/10A.
■To prevent the battery from being discharged
Do not use the power outlets longer than necessary when the engine is not running.
381
3-7. Other interior features Power outlet (120V AC)∗
The power outlet can be used for electrical appliances.
Main switch To use the power outlet, turn on the main switch. The power supply starts a few seconds after the main switch is pressed. Power outlet socket
Maximum available capacity of the power outlet
■ While the vehicle is being driven
The maximum capacity of the power outlet is always 120V AC/ 100W.
■ When the vehicle is stationary
The maximum capacity of the power outlet varies depending on the following conditions. ● The maximum capacity is 120V AC/400W when the following
condition applies: • The shift lever is in P or N. (automatic transmission)
∗: If equipped
382
3-7. Other interior features
• The shift lever is in N and the clutch pedal is not depressed.
(manual transmission)
A maximum capacity of 400W can only be restored by turning the power outlet main switch off and then on again under condi- tion described above.
● The maximum capacity is 120V AC/100W when the following
condition applies: • The shift lever is moved to any positions other than P and N.
(automatic transmission)
• The clutch pedal is depressed. (manual transmission)
■The power outlet can be used when
The engine is started.
■The indicator light changes according the maximum available capacity,
as follows:
Indicates 120V AC/400W Indicates 120V AC/100W
■When the power outlet is in operation
The sound of the cooling fan may be heard from the front console box. This is normal and does not indicate a malfunction.
■If the engine is started with the power outlet main switch on
The maximum capacity of the power supply may decrease to below the stan- dard, or may be cut off completely, even when the vehicle is stationary.
383
3-7. Other interior features
■The protection circuit may be activated to cut the power supply if any
of the following conditions apply: ●The engine is started with the power outlet main switch on. ●Use of electrical appliances exceeding the maximum capacity is
attempted. A sound may be heard when the protection circuit is activated. This is normal and does not indicate a malfunction.
●Electrical appliances, which consume power exceeding 100W, have
been used continuously for a long time period.
●The total power usage by all electrical features (headlights, air condition- ing, etc.) has exceeded the total vehicle maximum for an extended period of time.
■If the protection circuit is activated and the power supply is cut, con-
duct the following procedure:
Park the vehicle in a safe place, and then securely apply the park- ing brake. Check and ensure the following conditions: •The shift lever is in P or N. (automatic transmission) •The shift lever is in N and the clutch pedal is not depressed. (manual transmission) Make sure that the power consumption of the electric appliance is within the maximum capacity of the power outlet and the appliance is not broken. Press the power outlet main switch again.
When the cabin temperature is high, open the windows to cool the tempera- ture down. Once it reaches the normal temperature, turn the power outlet main switch on again. If the power supply is not resumed even after performing the above proce- dure, have the vehicle inspected by a Toyota dealer.
384
3-7. Other interior features
CAUTION
■Using a power outlet
Observe the following precautions to reduce the risk of injury. ●Use of the power outlet when it is wet with rain, drinking water or snow may result in electrical shocks and is extremely dangerous. The power outlet must be thoroughly dried before use.
●Do not allow children to use or play with the power outlet. ●Be careful not to get any part of your body caught in the power outlet lid. ●When using electrical appliances, strictly follow any cautions and notices
written on their labels and in the manufacturers’ instruction manuals.
●Do not modify, disassemble or repair the power outlet or its inverter, in any way. Doing so may result in unexpected malfunctions or accidents, which could cause serious damage or injuries. Contact a Toyota dealer for any necessary repairs.
■To prevent injuries and accidents, securely fix all electric appliances before use and do not use any appliances that may do any of the fol- lowing: ●Distract the driver while driving, or hamper safe driving. ●Result in a fire or burn injuries due to the appliance rolling, falling or over-
heating while driving.
●Emit steam, while the windows of the cabin are closed.
■To prevent unexpected accidents, such as electric shocks, do not per-
form any of the following ●Using the power outlet for electric heaters while sleeping. ●Contaminating the power outlet with liquid substances or mud. ●Handling electrical appliance plugs at the power outlet with wet hands or
feet.
●Inserting foreign objects into the power outlet. ●Using malfunctioning electric appliances. ●Inserting inappropriate or badly fitting plugs into the power outlet.
385
3-7. Other interior features
NOTICE
■To avoid damaging the power outlet and the plug
●Close the power outlet lid when not in use. ●Foreign objects or liquids that enter the power outlet may cause a short
circuit.
●Do not use plug adaptors to connect too many plugs to the power outlet. ●After inserting a plug, gently close the power outlet lid.
■To prevent the fuse from being blown
Do not use a 120V AC appliance that requires more than maximum capacity. If a 120V AC appliance that consumes more than maximum capacity is used, the protection circuit will cut the power supply.
■Appliances that may not operate properly (120V AC)
The following 120V AC appliances may not operate even if their power con- sumption is under maximum capacity. ●Appliances with high initial peak wattage ●Measuring devices that process precise data ●Other appliances that require an extremely stable power supply
■To prevent the battery from being discharged
Turn off all the vehicle’s electronic equipment and accessories, such as the headlights and air conditioning, when electrical appliances that consume in excess of 100W are used continuously for long periods of time.
■To prevent any damage caused by heat
●Do not use any electrical appliances that give off intense heat such as toasters, in any locations including the internal or external trim, seats and deck.
●Do not use any electrical appliances, which are easily affected by vibration
or heat, inside the vehicle. Vibration while driving, or the heat of the sun while parking, may result in damage to those electrical appliances.
386
3-7. Other interior features
NOTICE
■If any electrical appliances are to be used while driving
Securely fasten both the appliances and their cables to prevent them from falling or getting caught any of the power train components.
■If the power outlet is loose when an electrical appliance plug is con-
nected Replace the outlet. Contact a Toyota dealer for any necessary replacements.
■If the power outlet gets dirty
Turn the main switch off and use a soft, clean cloth to wipe it gently. Do not use any cleansing materials, such as organic solvents, wax, or com- pound cleaners, as these may damage the power outlet or cause it to mal- function.
387
3-7. Other interior features Seatback table∗
Front passenger’s seatback can be used as a temporary table only when the vehicle is stopped.
Fold down the front passen- ger’s seat to use the seatback table. (→P. 51)
CAUTION
■Caution while driving
Observe the following precautions to avoid death or serious injury. ●Do not set up the seatback table. ●Do not sit on or place anything on the seatback table.
NOTICE
■To prevent damage to the seatback table
Do not put heavy loads on the table.
388
∗: If equipped
3-7. Other interior features Floor mat
Use only floor mats designed specifically for vehicles of the same model and model year as your vehicle. Fix them securely in place onto the carpet.
the
Insert retaining hooks (clips) into the floor mat eye- lets.
Turn the upper knob of each retaining hook (clip) to secure the floor mats in place. *: Always align the
marks.
The shape of the retaining hooks (clips) may differ from that shown in the illustration.
389
3-7. Other interior features
CAUTION
Observe the following precautions. Failure to do so may cause the driver’s floor mat to slip, possibly interfering with the pedals while driving. An unexpectedly high speed may result or it may become difficult to stop the vehicle, leading to a serious accident. ■When installing the driver’s floor mat
●Do not use floor mats designed for other models or different model year
vehicles, even if they are Toyota Genuine floor mats.
●Only use floor mats designed for the driver’s seat. ●Always install the floor mat securely using the retaining hooks (clips) pro-
vided.
●Do not use two or more floor mats on top of each other. ●Do not place the floor mat bottom-side up or upside-down.
■Before driving
●Check that the floor mat is securely fixed in the correct place with all the provided retaining hooks (clips). Be especially careful to perform this check after cleaning the floor.
●With the engine stopped and the shift lever in P (automatic transmission) or N (manual transmission), fully depress each pedal to the floor to make sure it does not interfere with the floor mat.
390
3-7. Other interior features Luggage compartment features
Behind the rear seat (Double Cab models only)
Cargo net hooks (vehicles with sub woofer) Grocery bag hooks Flashlight holder Storage boxes Deck
Auxiliary boxes Tie-down cleats Deck hooks
391
3-7. Other interior features
Auxiliary boxes
Left side
Turn the knob counterclock- wise. Open the lid.
Right side (vehicles without 120V power outlet)
Turn the knob counterclock- wise. Open the lid.
Right side (vehicles with 120V power outlet)
Turn the knob counterclock- wise. Open the lid.
392
3-7. Other interior features
CAUTION
■Caution while driving
Keep the auxiliary boxes closed and locked. Injuries may result in the event of an accident or sudden braking.
Deck hooks
Deck hooks are provided for securing loose items.
CAUTION
■When not in use
Keep the deck hooks folded.
393
3-7. Other interior features
Tie-down cleats
The deck rail system enables you to insert and move tie-down cleats to their best location along deck rails to secure a load.
Locking plate Thumb wheel Tie-down cleat
■ Installing the tie-down cleat
Loosen the thumb wheel in a counterclockwise motion, and depress the wheel so that the locking plate maintains 0.5 in. (12.7 mm) gap.
0.5 in. (12.7 mm)
Deck rail Detent Locking plate
394
3-7. Other interior features
Insert the locking plate into the deck rail, rotate the tie-down cleat 90°, and release the thumb wheel.
Slide the cleat to the closest detent in the rail system. You will feel that the locking plate snaps into a detent.
Tighten the thumb wheel in a clockwise motion until the clutch mechanism ratchets.
Check the tie-down cleat to con- firm that it is locked into a detent and securely mounted to the deck rail system.
395
3-7. Other interior features
CAUTION
■Tie-down cleat precautions
●Properly install and tighten the tie-down cleats into the deck rail system.
Failure to properly install and tighten the tie-down cleats can cause cargo to become unsecured. Unsecured cargo can cause injury when the vehi- cle is in motion.
●Properly secure all cargo to prevent shifting or sliding during driving.
Failure to properly secure cargo can cause injury when the vehicle is in motion.
●Applying loads at an angle to the tie-down cleat greater than 45° or loads greater than 220 lb. (100 kg) may cause damage to the deck, deck rail system, tie-down cleat and/or the cargo.
●Do not exceed a total tensile load of 440 lb. (200 kg) per deck rail. ●Do not install more than the following number of tie-down cleats per deck
rail: • Side rail:
Short deck—Max. 3 locations Long deck—Max. 4 locations
• Headboard rail: Max. 3 locations
Storage boxes (Double Cab models only)
Storage box is designed to place things like bottles.
Right side (vehicles without sub woofer)
396
3-7. Other interior features
Left side
■Removing the separator
Remove the separator. It can be installed in various positions as required.
Flashlight holder (Double Cab models only)
Flashlight holder is designed to hold the flashlight securely.
397
3-7. Other interior features
■Removing the flashlight holder
Remove the flashlight holder. It can be installed in various positions as required.
Grocery bag hooks (Double Cab models only)
Grocery bag hook is designed to hang things like grocery bag.
NOTICE
■Grocery bag hook weight capacity
Do not hang any object heavier than 7 lb. (3 kg) on the grocery bag hooks.
398
3-7. Other interior features
Cargo net hooks (Double Cab models with sub woofer)
Cargo net hooks are designed to hang the factory-supplied cargo net.
NOTICE
■To prevent damage to the cargo net hook Do not hang items other than the cargo net.
399
3-7. Other interior features Garage door opener∗
The garage door opener can be trained to operate garage doors, gates, entry doors, door locks, home lighting systems, security sys- tems, and other devices. The training procedure is displayed on the inside rear view mirror display screen.
The garage door opener (HomeLink® Universal Transceiver) is manufac- tured under license from HomeLink®.
Training the HomeLink® (for U.S. owners)
The HomeLink® compatible transceiver in your vehicle has 3 buttons which can be trained to operate 3 different devices. Refer to the train- ing method below appropriate for the device.
Indicator light Buttons
400
∗: If equipped
■ Training the HomeLink®
3-7. Other interior features
Point the remote control trans- mitter for the device 1 to 3 in. (25
to 75 mm) from the HomeLink® control buttons.the
Keep the HomeLink® in view while training.
indicator on
Press and hold down one of the buttons on the HomeLink® and the button on the transmitter. When the HomeLink® changes from a slow to a rapid flash, you can release both buttons.
indicator on
the
the HomeLink® button
If the HomeLink® indicator comes on but does not flash, or flashes rapidly for 2 seconds and remains is lit, already trained. Use the other buttons or follow the “Retraining a HomeLink® button” instructions. (→P. 405)
401
3-7. Other interior features
Test the operation of HomeLink® by pressing newly trained button.
the the
the
is of
transmitter
If training a garage door opener, check to see if the garage door opens and closes. If the garage door does not operate, see if your garage the Rolling Code type. Press and trained HomeLink® hold button. The garage door has the rolling code feature if the indicator flashes (on rapidly for 2 seconds and then remains lit. If your transmitter is the Rolling Code type, proceed to the heading “Training a rolling code system”.
the HomeLink®)
Repeat the steps above to train another device for each of the remaining HomeLink® buttons.
402
3-7. Other interior features
■ Training a Rolling Code system (for U.S. owners)
If your device is Rolling Code equipped, follow the steps under the heading “Training the HomeLink®” before proceeding with the steps listed below.
Locate the learn button on the ceiling mounted garage door opener motor. The exact location and color of the button may vary by brand of garage door opener. Refer to the operation manual supplied with the garage door opener for the location of the learning button. Press the learning button. Following this step, you have 30 seconds in which to initiate step 3
below. Press and hold the vehicle’s trained HomeLink® button for 2
seconds and release it. Repeat this step once again. The garage door may open. If the garage door opens, the training process is complete. If the door does not open, press and release the button a third time. This third press and release will complete the training process by opening the garage door. The ceiling mounted garage door opener motor should now recog- nize the HomeLink® transceiver and operate the garage door. Repeat the steps above to train another rolling code system for any of the remaining HomeLink® buttons.403
3-7. Other interior features
■ Training an entry gate (for U.S. owners)/Training a device in
the Canadian market
Place the remote control transmitter 1 to 3 in. (25 to 75 mm) away from the HomeLink® buttons Keep the HomeLink® indicator light in view while training. Press and hold the selected HomeLink® button. Repeatedly press and release (cycle) one of the buttons on the remote control transmitter for 2 seconds at a time until
is completed.
When the HomeLink® indicator light starts to flash rapidly, release the buttons on the HomeLink®. Test the HomeLink® operation by pressing the newly trained button. Check to see if the gate/device operates correctly. Repeat the steps above to train another device for any of the remaining HomeLink® buttons.
■ Training other devices
To train other devices such as home security systems, home door locks and lighting, contact your Toyota dealer for assistance.
■ Retraining a button
The individual HomeLink® buttons cannot be erased but can be retrained. To retrain a button, follow the “Retraining a HomeLink® button” instructions.
404
3-7. Other interior features
Operating HomeLink®
Press the appropriate HomeLink® button. The HomeLink® indicator light should come on.
The HomeLink® compatible transceiver in your vehicle continues to send a signal for up to 20 seconds as long as the button is pressed.
Retraining a HomeLink® button
Press and hold the desired HomeLink® button. After 20 seconds, the HomeLink® indicator light will start flashing slowly. Keep pressing the HomeLink® button and then follow the “Training the HomeLink® (for U.S. owners)” instructions. (→P. 400)
Erasing the entire HomeLink® memory (all three programs)
Press and hold down the 2 out- side buttons for 10 seconds until the indicator flashes.
If you sell your vehicle, be sure to erase the programs stored in the HomeLink® memory.
405
3-7. Other interior features
■Before training
●Install a new battery in the remote control transmitter. ●The battery side of the remote control transmitter must be pointed away
from the HomeLink® button.
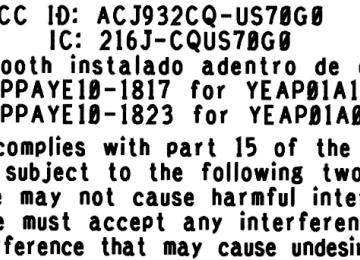
■Certification for the garage door opener
FCC ID: NZLGHSHL4
For vehicles sold in the U.S.A. NOTE: This device complies with Part 15 of the FCC Rules. Operation is subject to the following two conditions: (1) this device may not cause harmful interference, and (2) this device must accept any inter- ference received, including interference that may cause undesired opera- tion. FCC WARNING: Changes or modifications not expressly approved by the party responsi- ble for compliance could void the user’s authority to operate the equip- ment. For vehicles sold in Canada NOTE: Operation is subject to the following two conditions: (1) this device may not cause interference, and (2) this device must accept any interference, including interference that may cause undesired operation of the device.406
3-7. Other interior features
■If the following message is displayed
This message appears when training procedures have not been performed correctly. Follow the instructions on the screen to complete or cancel train- ing.
Pattern A
Pattern B
■When support is necessary
Visit on the web at www.homelink.com or call 1-800-355-3515.
407
3-7. Other interior features
CAUTION
■When training a garage door or other remote control devices
The garage door or other devices may operate, so ensure people and objects are out of danger to prevent potential harm.
■Conforming to federal safety standards
Do not use the HomeLink® compatible transceiver with any garage door opener or device that lacks safety stop and reverse features as required by federal safety standards. This includes any garage door that cannot detect an interfering object. A door or device without these features increases the risk of death or serious injury.
408
3-7. Other interior features Compass (vehicles with auto anti-glare inside rear view mirror)
The compass on the inside rear view mirror indicates the direction in which the vehicle is heading. ■ Location
Type A
Type B
409
3-7. Other interior features
■ Displays and directions
Display
NE SE SW NW
Direction
North
Northeast
East
Southeast
South
Southwest
West
Northwest
410
3-7. Other interior features
Calibrating the compass
The direction display deviates from the true direction determined by the earth’s magnetic field. The amount of deviation varies depending on the geographic position of the vehicle.
If you cross over one of the map boundaries shown in the illustration, the compass will deviate. To obtain higher precision or perfect calibration, refer to “Deviation calibration”.
Turning the compass display on/off
The compass display on the inside rear view mirror can be turned on/off and the country and region settings can be changed.
Type A: Press and hold
to display “Custom Settings
Menu”. Type B: Press
to display “Custom Settings Menu”.
411
3-7. Other interior features
Type A: Press
and select “Compass”, then press and hold
Type B: Press
and select “Compass”, then press
Type A: Press
and select
“Compass Display”.
Type B: Press
and select
“Compass Display”.
and select display on/off.
Type A: Press and hold Type B: Press To leave the “Compass Settings Menu”, select “Back to main menu” to return to the starting screen, then either select “Exit” or wait several seconds without pressing any buttons.
and select display on/off.
Deviation calibration
Stop the vehicle. Type A: Press and hold
to display “Custom Settings
Menu”. Type B: Press
to display “Custom Settings Menu”.
Type A: Press
and select “Compass”, then press and hold
Type B: Press
and select “Compass”, then press
412
3-7. Other interior features
Type A: Press
and select “Zone”, then press and hold Type B: Press
and select press
then
“Zone”,
Type A: The selected country time
changes
each is pressed.
Select the country, then press and hold to confirm.
Type B: The selected country time
changes
each is pressed.
Select the country, then press to confirm.
Type A: The
selected
region time
changes
each is pressed.
Select the region, then press and hold to confirm.
Type B: The
selected
changes
each is pressed.
region time
Select the region, then press to confirm. To leave the “Compass Settings Menu”, select “Back to main menu” to return to the starting screen, then either select “Exit” or wait several seconds without pressing any buttons.
413
3-7. Other interior features
Circling calibration
If “C” appears on the display, circling calibration needs to be per- formed.
Stop the vehicle in a place where it is safe to drive in a circle. to display “Custom Settings Type A: Press and hold
Menu”. Type B: Press
to display “Custom Settings Menu”.
Type A: Press
and select “Compass”, then press and hold
Type B: Press
and select “Compass”, then press
Type A: Press
and select “Calibrate”, then press and hold
Type B: Press
and select “Calibrate”, then press
“C” appears on the display.
414
3-7. Other interior features
Drive the vehicle at 5 mph (8
km/h) or less in a circle until a direction is displayed.If there is not enough space to drive in a circle, drive around the block until a direction is dis- played.
To leave the “Compass Settings Menu”, select “Back to main menu” to return to the starting screen, then either select “Exit” or wait several seconds without pressing any buttons.
■Conditions unfavorable to correct operation
The compass may not show the correct direction in the following conditions: ●The vehicle is stopped immediately after turning. ●The vehicle is on an inclined surface. ●The vehicle is in a place where the earth’s magnetic field is subject to interference by artificial magnetic fields (underground car park/parking lot, under a steel tower, between buildings, roof car park/parking lot, near an intersection, near a large vehicle, etc.).
●The vehicle has become magnetized.
(There is a magnet or metal object near the inside rear view mirror.)
●The battery has been disconnected. ●A door is open.
415
3-7. Other interior features
CAUTION
■While driving the vehicle
Do not adjust the display. Adjust the display only when the vehicle is stopped.
■When doing the circling calibration
Secure a wide space, and watch out for people and vehicles in the vicinity. Do not violate any local traffic rules while performing circling calibration.
NOTICE
■To avoid the compass malfunctions
Do not place magnets or any metal objects near the inside rear view mirror. Doing this may cause the compass sensor to malfunction.
■When doing the circling calibration
●Do not perform a circling calibration of the compass in a place where the earth’s magnetic field is subject to interference by artificial magnetic fields. ●During calibration, do not operate electric systems (power windows, etc.)
as they may interfere with the calibration.
416
4-1. Maintenance and care Cleaning and protecting the vehicle exterior
Perform the following to protect the vehicle and maintain it in prime condition. ● Working from top to bottom, liberally apply water to the vehicle body, wheel wells and underside of the vehicle to remove any dirt and dust. Wash the vehicle body using a sponge or soft cloth, such as a chamois.
● For hard-to-remove marks, use car wash soap and rinse thor-
oughly with water.
● Wipe away any water. ● Wax the vehicle when the waterproof coating deteriorates. If water does not bead on a clean surface, apply wax when the vehicle body is cool.
■Automatic car washes
●Fold the mirrors and remove the detachable pole antenna before wash- ing the vehicle. Start washing from the front of the vehicle. Make sure to re-install the detachable pole antenna and extend the mirrors before driv- ing.
●Brushes used in automatic car washes may scratch the vehicle surface
and harm your vehicle’s paint.
●In certain automatic car washes, the roof antenna (if equipped) may interfere with machine operation. This may prevent the vehicle from being cleaned properly or result in damage to the roof antenna.
■High pressure car washes
Do not allow the nozzles of the car wash to come within close proximity of the windows. Before entering an automatic car wash, check that the fuel filler door on your vehicle is closed properly.
418
4-1. Maintenance and care
■Aluminum or chrome cladded wheels (if equipped)
●Remove any dirt immediately by using a neutral detergent. Do not use hard brushes or abrasive cleaners. Do not use strong or harsh chemical cleaners. Use the same mild detergent and wax as used on the paint.
●Do not use detergent on the wheels when they are hot, for example after
driving for long distance in the hot weather.
●Wash detergent from the wheels immediately after use.
■Bumpers and side moldings
Do not scrub with abrasive cleaners.
CAUTION
■Caution about the exhaust pipe
Exhaust gasses cause the exhaust pipe to become quite hot. When washing the vehicle, be careful not to touch the pipe until it has cooled sufficiently, as touching a hot exhaust pipe can cause burns.
NOTICE
■To prevent paint deterioration and corrosion on the body and compo-
nents (aluminum or chrome cladded wheels etc.) ●Wash the vehicle immediately in the following cases:
• After driving near the sea coast • After driving on salted roads • If you see coal tar or tree sap on the paint surface • If you see dead insects, insect droppings or bird droppings on the paint • After driving in an area contaminated with soot, oily smoke, mine dust,
iron powder or chemical substances
• If the vehicle becomes heavily soiled in dust or mud • If liquids such as benzene and gasoline are spilled on the paint surface
●If the paint is chipped or scratched, have it repaired immediately. ●To prevent the wheels from corroding, remove any dirt and store in a place
with low humidity when storing the wheels.
419
4-1. Maintenance and care
NOTICE
●Clean the drainage hole of the deck
regularly. If the drainage hole is stopped up, the water will not be able to flow, and it will cause rust.
■Cleaning the exterior lights
●Wash carefully. Do not use organic substances or scrub with a hard brush.
This may damage the surfaces of the lights.
●Do not apply wax on the surfaces of the lights.
Wax may cause damage to the lenses.
■Detachable pole antenna installation and removal precautions
●Before driving, ensure that the antenna is installed. ●When the antenna is removed, such as before entering an automatic car wash, make sure to store it in a suitable place so as not to lose it. Also, before driving, make sure to reinstall the antenna in its original position.
420
4-1. Maintenance and care Cleaning and protecting the vehicle interior
The following procedures will help protect your vehicle’s interior and keep it in top condition: ■ Protecting the vehicle interior
Remove dirt and dust using a vacuum cleaner. Wipe dirty sur- faces with a cloth dampened with lukewarm water.
■ Cleaning the leather areas
● Remove dirt and dust using a vacuum cleaner. ● Wipe any excess dirt and dust with a soft cloth dampened with
diluted detergent. Use a diluted water solution of approximately 5% neutral wool deter- gent.
● Wring out any excess water from the cloth and thoroughly
wipe off all remaining traces of detergent.
● Wipe the surface with a dry, soft cloth to remove any remain- ing moisture. Allow the leather to dry in a shaded and venti- lated area.
■ Synthetic leather areas
● Remove loose dirt using a vacuum cleaner. ● Apply a mild soap solution to the synthetic leather using a
sponge or soft cloth.
● Allow the solution to soak in for a few minutes. Remove the
dirt and wipe off the solution with a clean, damp cloth.
■Caring for leather areas
Toyota recommends cleaning the interior of the vehicle at least twice a year to maintain the quality of the vehicle’s interior.
421
4-1. Maintenance and care
■Shampooing the carpets
There are several commercial foaming-type cleaners available. Use a sponge or brush to apply the foam. Rub in overlapping circles. Do not apply water. The excellent results are obtained when keeping the carpet as dry as possible.
■Seat belts
Clean with mild soap and lukewarm water using a cloth or sponge. Also check the belts periodically for excessive wear, fraying or cuts.
CAUTION
■Water in the vehicle
●Do not splash or spill liquid in the vehicle.
Doing so may cause the electrical components etc. to malfunction or catch fire.
●Do not get any of the SRS components or wiring in the vehicle interior wet.
(→P. 90) Electrical malfunction may cause the airbags to deploy or not function properly, resulting in death or severe injury.
■Cleaning the interior (especially instrument panel)
Do not use polish wax or polish cleaner. The instrument panel may reflect off the windshield, obstructing the driver’s view and leading to an accident, resulting in death or serious injury.
422
4-1. Maintenance and care
NOTICE
■Cleaning detergents
●Do not use organic substances such as benzene or gasoline, acidic or alkaline solutions, dye, bleach or other detergent. Doing so may discolor the vehicle interior or cause streaks or damage to painted surfaces.
●Do not use polish wax or polish cleaner. The instrument panel’s or other
interior part’s painted surface may be damaged.
■Preventing damage to leather surfaces
Observe the following precautions to avoid damage to and deterioration of leather surfaces. ●Remove any dust or dirt on leather surfaces immediately. ●Do not expose the vehicle to direct sunlight for extended periods of time.
Park the vehicle in the shade, especially during summer.
●Do not place items made of vinyl, plastic, or that contain wax on the uphol- stery, as they may stick to the leather surface if the vehicle interior heats up significantly.
■Water on the floor
Do not wash the vehicle floor with water. Vehicle systems such as the audio system may be damaged if water comes into contact with electrical components under the floor of the vehicle, and may also cause the body to rust.
423
4-2. Maintenance Maintenance requirements
To ensure safe and economical driving, day-to-day care and regular maintenance is essential. It is the owner’s responsibility to perform regular checks. Toyota recommends the following maintenance. ■ General maintenance
Should be performed on a daily basis. This can be done by your- self or by a Toyota dealer. ■ Scheduled maintenance
Should be performed at specified intervals according to the maintenance schedule. For details about maintenance items and schedules, refer to the “Scheduled Maintenance Guide” or “Owner’s Manual Supplement”.
■ Do-it-yourself maintenance
You can perform some maintenance procedures yourself. Please be aware that do-it-yourself maintenance may affect war- ranty coverage. The use of Toyota Repair Manuals is recommended. For details about warranty coverage, see the separate “Owner’s Warranty Information Booklet”, “Owner’s Manual Supplement”.
■Repair and replacement
It is recommended that genuine Toyota parts be used for repair to ensure performance of each system. If non-Toyota parts are used in replacement or if a repair shop other than Toyota dealer performs repairs, confirm the war- ranty coverage.
424
4-2. Maintenance
■Allow inspection and repairs to be performed by a Toyota dealer
●Toyota technicians are well-trained specialists and are kept up to date with the latest service information. They are well informed about the operations of all systems on your vehicle.
●Keep a copy of the repair order. It proves that the maintenance that has been performed is under warranty coverage. If any problem should arise while your vehicle is under warranty, your Toyota dealer will promptly take care of it.
CAUTION
■Warning in handling of battery
●Engine exhaust, some of its constituents, and a wide variety of automobile components contain or emit chemicals known to the State of California to cause cancer and birth defects and other reproductive harm. Work in a well ventilated area.
●Oils, fuels and fluids contained in vehicles as well as waste produced by component wear contain or emit chemicals known to the State of Califor- nia to cause cancer and birth defects or other reproductive harm. Avoid exposure and wash any affected area immediately.
●Battery posts, terminals and related accessories contain lead and lead compounds which are known to cause brain damage. Wash your hands after handling. (→P. 448)
425
4-2. Maintenance General maintenance
Listed below are the general maintenance items that should be per- formed at the intervals specified in the “Scheduled Maintenance Guide” or “Owner’s Manual Supplement”. It is recommended that any problem you notice should be brought to the attention of your Toyota dealer or qualified service shop for advice.
Engine compartment
Items
Battery Brake fluid Engine coolant Engine oil Exhaust system Power steering fluid
Radiator/condenser/hoses
Washer fluid
Check points
(→P. 448) Maintenance-free. (→P. 444) At the correct level? At the correct level? (→P. 443) At the correct level? (→P. 438) No fumes or strange sounds? At the correct level? (→P. 446) Not blocked with foreign matter? (→P. 444) At the correct level? (→P. 450)
426
4-2. Maintenance
Vehicle interior
Items
Check points
Accelerator pedal
Automatic transmission “Park” mechanism
Brake pedal
Brakes
Clutch pedal
Head restraints
Indicators/buzzers
Lights
Parking brake
Seat belts
Seats
• Moves smoothly (without uneven pedal effort or catching)? • Can the vehicle be hold securely on an incline with the shift lever in P? • Moves smoothly? • Does it have appropriate clear- ance and correct amount of free play? • Not pull to one side when applied? • Loss of brake effectiveness? • Spongy feeling brake pedal? • Pedal almost touches floor? • Moves smoothly? • Does it have correct amount of free play? • Move smoothly and lock securely? • Function properly? • Do all the lights come on? • Headlights aimed correctly? • Moves smoothly? • Can hold the vehicle securely on an incline? • Does the seat belt system oper- ate smoothly? • Are the belts undamaged? • Do the seat controls operate properly?
427
4-2. Maintenance
Items
Steering wheel
Vehicle exterior
Check points
• Moves smoothly? • Has correct free play? • No strange noises?
Doors Engine hood
Fluid leaks
Tire
Items
Check points
• Operate smoothly? • The lock system works properly? • Is there any leakage after park- ing? • Inflation pressure is correct? • Tire surfaces not worn or dam- aged? • Tires rotated according to the maintenance schedule? • Wheel nuts are not loose?
CAUTION
■If the engine is running
Turn the engine off and ensure that there is adequate ventilation before per- forming maintenance checks.
428
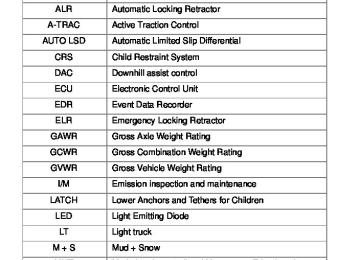
4-2. Maintenance Emission inspection and maintenance (I/M) programs
Some states have vehicle emission inspection programs which include OBD (On Board Diagnostics) checks. The OBD system moni- tors the operation of the emission control system. ■ If the malfunction indicator lamp comes on
The OBD system determines that a problem exists somewhere in the emission control system. Your vehicle may not pass the I/ M test and may need to be repaired. Contact your Toyota dealer to service the vehicle.
■ Your vehicle may not pass the I/M test:
● When the battery is disconnected or discharged
Readiness codes that are set during ordinary driving are erased. Also, depending on your driving habits, the readiness codes may not be completely set.
● When the fuel tank cap is loose
The malfunction indicator lamp comes on as a temporary mal- function and your vehicle may not pass the I/M test.
■ When the malfunction indicator lamp goes off after several
driving trips The error code in the OBD system will not be cleared unless the vehicle is driven 40 or more times.
■ If your vehicle does not pass the I/M test
Contact your Toyota dealer to prepare the vehicle for re-testing.
429
4-3. Do-it-yourself maintenance Do-it-yourself service precautions
If you perform maintenance yourself, be sure to follow the correct procedures as given in these sections.