- Download PDF Manual
-
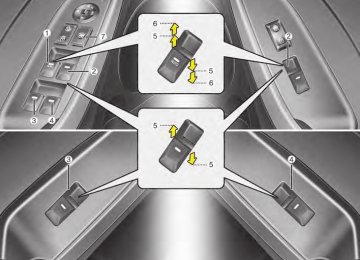
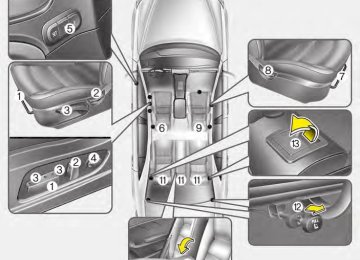
to the original position.
For more details, refer to "Driver Position Memory System" in chapter 3.
Service interval (if equipped) On this mode, you can activate the service interval function with mileage (km or mi.) and period (months). - Off : The service interval function
will be deactivated.
- On :You can set the service interval
(mileage and months).
For more details, refer to "Service Mode" in this chapter.
✽✽ NOTICE If it is not available to set service interval on your vehicle, we recom- mend that you consult an authorized Kia dealer.
YDM USA 4a.QXP 2016-05-03 17:27 Page 71
Warning messages Warning messages appear on the LCD to warn the driver. It is located in the center of the instrument cluster. The warning message may appear differently depending on the type of instrument cluster and some may not show the warning message at all. The warning message is shown in either symbol, symbol and text, or text type only. You can choose the preferred language (for Type B only) by selecting the User setting menu in LCD mode.
Other features (cid:129) Fuel Economy Auto Reset - Off : The average fuel economy will not reset automatically whenever refueling.
- After Ignition : The average fuel economy will reset automatically when driving.
- After Refueling : The average fuel economy will reset automatically when refueling.
(cid:129) Fuel Economy Unit Choose the preferred fuel economy unit. (cid:129) Temperature Unit Choose the preferred temperature unit. (cid:129) Language (if equipped) Choose preferred the language.
Features of your vehicle
Door Open (cid:129) It means that any door is open.
OYD046191
4 71
YDM USA 4a.QXP 2016-05-03 17:27 Page 72
Features of your vehicle
■ Type A
■ Type B
Turn on FUSE SWITCH (if equipped) (cid:129) This warning message illuminates if the fuse switch under the steer- ing wheel is OFF.
(cid:129) It means that you should turn the
fuse switch on.
For more details, refer to “Fuses” in chapter 7.
OYD046193
Trunk (tailgate) Open (cid:129) It means that the trunk (tailgate) is
open.
OYD046250L/OYD046197
Sunroof Open (if equipped) (cid:129) This warning is displayed if you turn off the engine when the sun- roof is open.
72
YDM USA 4a.QXP 2016-05-03 17:27 Page 73
Engine has overheated This warning message illuminates when the engine coolant tempera- ture is above 120°C (248°F). This means that the engine is overheated and may be damaged. If your vehicle is overheated, refer to “Overheating” in chapter 6.
Features of your vehicle
Shift to P (for smart key system and automatic transaxle) (cid:129) This warning message illuminates if you try to turn off the engine without the shift lever in P (Park) position. (cid:129) At this time, the Engine Start/Stop Button turns to the ACC position (If you press the Engine Start/Stop Button once more, it will turn to the ON position).
Press START button while turn steer- ing (for smart key system) (cid:129) This warning message illuminates if the steering wheel does not unlock normally when the Engine Start/Stop Button is pressed.
(cid:129) It means that you should press the Engine Start/Stop Button while turning the steering wheel right and left.
Low Key Battery (for smart key system) (cid:129) This warning message illuminates if the battery of the smart key is discharged when the Engine Start/Stop Button changes to the OFF position.
Steering wheel unlocked (for smart key system) (cid:129) This warning message illuminates if the steering wheel does not lock when the Engine Start/Stop Button changes to the OFF position.
4 73
YDM USA 4a.QXP 2016-05-03 17:27 Page 74
Features of your vehicle
Check Steering Wheel Lock System (for smart key system) (cid:129) This warning message illuminates if the steering wheel does not lock normally when the Engine Start/Stop Button changes to the OFF position.
Press brake pedal to start engine (for smart key system and automatic transaxle) (cid:129) This warning message illuminates if the Engine Start/Stop Button changes to the ACC position twice by pressing the button repeatedly without depressing the brake pedal. (cid:129) It means that you should depress the brake pedal to start the engine.
Press clutch pedal to start engine (for smart key system and manual transaxle) (cid:129) This warning message illuminates if the Engine Start/Stop Button changes to the ACC position twice by pressing the button repeatedly without depressing the clutch pedal. (cid:129) It means that you should depress the clutch pedal to start the engine.
Key not in vehicle (for smart key system) (cid:129) This warning message illuminates if the smart key is not in the vehicle when you press the Engine Start/Stop Button.
(cid:129) It means that you should always
have the smart key with you.
Key not detected (for smart key system) (cid:129) This warning message illuminates if the smart key is not detected when you press the Engine Start/Stop Button.
Press START button again (for smart key system) (cid:129) This warning message illuminates if you can not operate the Engine Start/Stop Button when there is a problem with the Engine Start/Stop Button system.
(cid:129) It means that you could start the engine by pressing the Engine Start/ Stop Button once more.
(cid:129) If the warning illuminates each time you press the Engine Start/Stop Button, we recommend that you have the vehicle inspected by an authorized Kia dealer.
74
YDM USA 4a.QXP 2016-05-03 17:27 Page 75
Press START button with smart key (for smart key system) (cid:129) This warning message illuminates if you press the Engine Start/Stop Button while the warning message “Key not detected” is illuminating. (cid:129) At this time, the immobilizer indica-
tor light blinks.
Check fuse “BRAKE SWITCH” (for smart key system and automatic transaxle/transmission) (cid:129) This warning message illuminates if the brake switch fuse is discon- nected.
(cid:129) It means that you should replace the fuse with a new one. If that is not possible, you can start the engine by pressing the Engine Start/Stop Button for 10 seconds in the ACC position.
Features of your vehicle
Shift to P or N to start engine (for smart key system and automatic transaxle) (cid:129) This warning message illuminates if you try to start the engine with the shift lever not in the P (Park) or N (Neutral) position.
Low Washer Fluid (if equipped) (cid:129) This warning message illuminates on the service reminder mode if the washer fluid level in the reser- voir is nearly empty.
(cid:129) It means that you should refill the
washer fluid.
✽✽ NOTICE You can start the engine with the shift lever in the N (Neutral) position. But, for your safety, we recommend that you start the engine with the shift lever in the P (Park) position.
Low Fuel (cid:129) This warning message illuminates
if the fuel tank is nearly empty. - When the low fuel level warning
light is illuminates.
Add fuel as soon as possible.
4 75
YDM USA 4a.QXP 2016-05-03 17:27 Page 76
Features of your vehicle
WARNING AND INDICATOR LIGHTS Warning lights
Air bag Warning Light
Seat Belt Warning Light
✽✽ NOTICE - Warning lights Make sure that all warning lights are OFF after starting the engine. If any light is still ON, this indicates a situation that needs attention.
This warning light informs the driver that the seat belt is not fastened. For more details, refer to the "Seat Belts" in chapter 3.
This warning light illuminates: (cid:129) Once you set the ignition switch or Engine Start/Stop Button to the ON position. - It illuminates for approximately 6
seconds and then goes off.
(cid:129) When there is a malfunction with
the SRS. In this case, have your vehicle inspected by an authorized Kia dealer.
76
YDM USA 4a.QXP 2016-05-03 17:27 Page 77
Features of your vehicle
Parking Brake & Brake Fluid Warning Light
This warning light illuminates: (cid:129) Once you set the ignition switch or Engine Start/Stop Button to the ON position. - It illuminates for approximately 3
seconds
- It remains on if the parking brake
is applied.
(cid:129) When the parking brake is applied. (cid:129) When the brake fluid level in the
reservoir is low. - If the warning light illuminates with the parking brake released, it indicates the brake fluid level in reservoir is low.
If the brake fluid level in the reservoir is low: 1.Drive carefully to the nearest safe
location and stop your vehicle.
2.With the engine stopped, check the brake fluid level immediately and add fluid as required (For more details, refer to "Brake Fluid" in chapter 7). Then check all brake components for fluid leaks. If any leak on the brake system is still found, the warning light remains on, or the brakes do not operate properly, do not drive the vehicle. In this case, have your vehicle towed to an authorized Kia dealer and inspected.
Dual-diagonal braking system Your vehicle is equipped with dual- diagonal braking systems. This means you still have braking on two wheels even if one of the dual sys- tems should fail. With only one of the dual systems working, more than normal pedal travel and greater pedal pressure are required to stop the vehicle. Also, the vehicle will not stop in as short a distance with only a portion of the brake system working. If the brakes fail while you are driv- ing, shift to a lower gear for addition- al engine braking and stop the vehi- cle as soon as it is safe to do so.
4 77
YDM USA 4a.QXP 2016-05-03 17:27 Page 78
Features of your vehicle
Driving the vehicle with a warning light ON is dangerous. If the Parking Brake & Brake Fluid Warning Light illuminates with the parking brake released, it indicates that the brake fluid level is low. In this case, have your vehicle inspect- ed by an authorized Kia dealer.
78
Electronic Brake force Distribution (EBD) System Warning Light These two warning lights illuminate at the same time while driving: (cid:129) When the ABS and regular brake
system may not work normally. In this case, have your vehicle inspected by an authorized Kia dealer.
Anti-lock Brake System (ABS) Warning Light
This warning light illuminates: (cid:129) Once you set the ignition switch or Engine Start/Stop Button to the ON position. - It illuminates for approximately 3
seconds and then goes off.
(cid:129) When there is a malfunction with the ABS (The normal braking sys- tem will still be operational without the assistance of the anti-lock brake system). In this case, have your vehicle inspected by an authorized Kia dealer.
YDM USA 4a.QXP 2016-05-03 17:27 Page 79
Features of your vehicle
WARNING - ABS/Brake
Light
When both ABS and Parking Brake & Brake Fluid Warning Lights are on, the brake system will not work normally and you may experience an unexpected and dangerous situation during sudden braking thereby increas- ing the risk of a crash or injury. In this case, avoid high speed driving and abrupt braking. Have your vehicle inspected by an authorized Kia dealer as soon as possible.
✽✽ NOTICE - Electronic Brake force Distribution (EBD) System Warning Light
When the ABS Warning Light is on or both ABS and Parking Brake & Brake Fluid Warning Lights are on, the speedometer, odometer, or trip- meter may not work. Also, the EPS Warning Light may illuminate and the steering effort may increase or decrease. In this case, have your vehicle inspect- ed by an authorized Kia dealer as soon as possible.
Electronic Power Steering (EPS) Warning Light (if equipped)
This warning light illuminates: (cid:129) Once you set the ignition switch or Engine Start/Stop Button to the ON position. - It remains on until the engine is
started.
(cid:129) When there is a malfunction with
the EPS. In this case, have your vehicle inspected by an authorized Kia dealer.
4 79
YDM USA 4a.QXP 2016-05-03 17:27 Page 80
Features of your vehicle
Malfunction Indicator Lamp (MIL)
This warning light illuminates: (cid:129) Once you set the ignition switch or Engine Start/Stop Button to the ON position. - It remains on until the engine is
started.
(cid:129) When there is a malfunction with
the emission control system. In this case, have your vehicle inspected by an authorized Kia dealer.
80
Charging System Warning Light
This warning light illuminates: (cid:129) Once you set the ignition switch or Engine Start/Stop Button to the ON position. - It remains on until the engine is
started.
(cid:129) When there is a malfunction with either the alternator or electrical charging system.
CAUTION - Gasoline
Engine
If the Malfunction Indicator Lamp (MIL) illuminates, poten- tial catalytic converter damage is possible which could result in loss of engine power. In this case, have your vehicle inspected by an authorized Kia dealer as soon as possible.
CAUTION - Malfunction
Indicator Lamp (MIL)
Driving with the Malfunction Indicator Lamp (MIL) on may cause damage to the emission control systems which could effect drivability and/or fuel economy.
YDM USA 4a.QXP 2016-05-03 17:27 Page 81
If there is a malfunction with either the alternator or electrical charging system: 1. Drive carefully to the nearest safe
location and stop your vehicle.
2. Turn the engine off and check the alternator drive belt for looseness or breakage. If the belt is adjusted properly, there may be a problem in the electrical charging system. In this case, have your vehicle inspected by an authorized Kia dealer as soon as possible.
Features of your vehicle
CAUTION - Engine damage
If the engine is not stopped immediately after the engine oil pressure warning light is illumi- nated and stays on while the engine is running, serious engine damage may result.
Engine Oil Pressure Warning Light
This warning light illuminates: (cid:129) Once you set the ignition switch or Engine Start/Stop Button to the ON position. - It remains on until the engine is
started.
(cid:129) When the engine oil pressure is low.
If the engine oil pressure is low: 1. Drive carefully to the nearest safe
location and stop your vehicle.
2. Turn the engine off and check the engine oil level (For more details, refer to "Engine Oil" in section 7). If the level is low, add oil as required. If the warning light remains on after adding oil or if oil is not avail- able, have your vehicle inspected by an authorized Kia dealer as soon as possible.
4 81
Low Fuel Level Warning Light
This warning light illuminates: When the fuel tank is nearly empty.
If the fuel tank is nearly empty: Add fuel as soon as possible.
CAUTION - Low Fuel
Level
Driving with the Low Fuel Level warning light on or with the fuel level below can cause the engine to misfire and damage the catalytic converter (if equipped).
YDM USA 4a.QXP 2016-05-03 17:27 Page 82
Features of your vehicle
If the warning light stays on while the engine is running, there may be seri- ous engine damage. In this case, 1. Stop the vehicle as soon as it is
safe to do so.
2. Turn off the engine and check the oil level. If the oil level is low, fill the engine oil to the proper level.
3. Start the engine again. If the warn- ing light stays on after the engine is started, turn the engine off immediately. In this case, have your vehicle inspected by an authorized Kia dealer.
82
YDM USA 4a.QXP 2016-05-03 17:27 Page 83
Low Tire Pressure Warning Light
This warning light illuminates: (cid:129) Once you set the ignition switch or Engine Start/Stop Button to the ON position. - It illuminates for approximately 3
seconds and then goes off.
(cid:129) When one or more of your tires are
significantly underinflated. For more details, refer to "Tire Pressure Monitoring System (TPMS)" in chapter 6.
This warning light remains on after blinking for approximately 60 seconds or repeats blinking and off at the intervals of approximately 3 seconds: (cid:129) When there is a malfunction with
the TPMS. In this case, have your vehicle inspected by an authorized Kia dealer as soon as possible. For more details, refer to "Tire Pressure Monitoring System (TPMS)" in chapter 6.
Features of your vehicle
WARNING - Low tire pressure
(cid:129) Significantly low tire pressure makes the vehicle unstable and can contribute to loss of vehicle control and increased braking distances.
(cid:129) Continued driving or low pres- sure tires will cause the tires to overheat and fail.
The TPMS cannot alert you to severe and sudden tire damage caused by external factors. If you notice any vehicle instability, immediately take your foot off the accelerator pedal, apply the brakes gradually with light force, and slowly move to a safe position off the road.
4 83
YDM USA 4a.QXP 2016-05-03 17:27 Page 84
Features of your vehicle
Door Ajar Warning Light (if equipped)
Adaptive Front Lighting System (AFLS) Warning Light (if equipped)
AFLS
Washer Fluid Warning Light (if equipped)
you
This warning light blinks: (cid:129) Once
the Engine Start/Stop Button to the ON posi- tion. - It illuminates for approximately 3
set
seconds and then goes off.
(cid:129) When there is a malfunction with
the AFLS.
This warning light illuminates: (cid:129) When the washer fluid level in the
reservoir is nearly empty. In this case, you should refill the washer fluid.
If there is a malfunction with the AFLS: 1. Drive carefully to the nearest safe
location and stop your vehicle.
2. Turn the engine off and restart the engine. If the warning light remains on, have your vehicle inspected by an authorized Kia dealer.
This warning light illuminates: When a door is not closed securely.
Trunk (tailgate) Open Warning Light (if equipped)
This warning light illuminates: When the trunk (tailgate) is not closed securely.
84
YDM USA 4a.QXP 2016-05-03 17:27 Page 85
Master Warning Mode (if equipped)
(cid:129) This warning light informs the driv-
er the following situations - Low washer fluid (if equipped) - Blind Spot Detection (BSD) mal-
function (if equipped)
- Service reminder and so on.
The Master Warning Light illumi- nates when more than one of the above warning situations occur. At this time, the LCD Modes Icon will change from ( If the warning situation is solved, the master warning light will be turned off and the LCD Modes Icon will be changed back to its previous icon ( ). (ex : refill the washer fluid)
) to (
).
Features of your vehicle
Indicator Lights Electronic Stability Control (ESC) Indicator Light This indicator light illuminates: (cid:129) Once you set the ignition switch or Engine Start/Stop Button to the ON position. - It illuminates for approximately 3
seconds and then goes off.
(cid:129) When there is a malfunction with
the ESC system. In this case, have your vehicle inspected by an authorized Kia dealer.
Electronic Stability Control (ESC) OFF Indicator Light This indicator light illuminates: (cid:129) Once you set the ignition switch or Engine Start/Stop Button to the ON position. - It illuminates for approximately 3
seconds and then goes off.
(cid:129) When you deactivate the ESC sys- tem by pressing the ESC OFF but- ton.
For more details, refer to "Electronic Stability Control (ESC)" in chapter 5.
This indicator light blinks: While the ESC is operating.
For more details, refer to "Electronic Stability Control (ESC)" in chapter 5.
4 85
YDM USA 4a.QXP 2016-05-03 17:27 Page 86
Features of your vehicle
SPORT Mode Indicator Light (if equipped)
Immobilizer Indicator Light (Without Smart Key) (if equipped)
Immobilizer Indicator Light (With Smart Key) (if equipped)
This indicator light illuminates (cid:129) When you select "SPORT" mode
as drive mode.
For more details, refer to "Drive Mode Integrated Control System" in chapter 5.
ECO Mode Indicator Light (if equipped)
This indicator light illuminates: (cid:129) When the vehicle detects the immobilizer in your key properly while the ignition switch is ON. - At this time, you can start the
engine.
- The indicator light goes off after
starting the engine.
This indicator light illuminates: (cid:129) When you select “ECO” mode as
drive mode.
For more details, refer to “Drive Mode Integrated Control System” in chapter 5.
This indicator light blinks: (cid:129) When there is a malfunction with
the immobilizer system. In this case, have your vehicle inspected by an authorized Kia dealer.
86
This indicator light illuminates for up to 30 seconds: (cid:129) When the vehicle detects the smart key in the vehicle properly while the Engine Start/Stop Button is ACC or ON. - At this time, you can start the
engine.
- The indicator light goes off after
starting the engine.
This indicator light blinks for a few seconds: (cid:129) When the smart key is not in the
vehicle. - At this time, you can not start the
engine.
YDM USA 4a.QXP 2016-05-03 17:27 Page 87
Features of your vehicle
This indicator light illuminates for 2
seconds and goes off: (cid:129) When the vehicle can not detect the smart key which is in the vehi- cle while the Engine Start/Stop Button is ON. In this case, have your vehicle inspected by an authorized Kia dealer.This indicator light blinks: (cid:129) When the battery of the smart key
is weak. - At this time, you can not start the engine. However, you can start the engine if you press the Engine Start/Stop Button with the smart key. (For more details, refer to "Starting the Engine" in section 5).
(cid:129) When there is a malfunction with
the immobilizer system. In this case, have your vehicle inspected by an authorized Kia dealer.
Turn Signal Indicator Light
High Beam Indicator Light
This indicator light blinks: (cid:129) When you turn the turn signal light
on.
If any of the following occurs, there may be a malfunction with the turn signal system. In this case, have your vehicle inspected by an authorized Kia dealer.
- The indicator light does not blink
but illuminates.
- The indicator light blinks more
rapidly.
- The indicator light does not illumi-
nate at all.
This indicator light illuminates: (cid:129) When the headlights are on and in
the high beam position
(cid:129) When the turn signal lever is pulled
into the Flash-to-Pass position.
Light ON Indicator Light
This indicator light illuminates: (cid:129) When the tail lights or headlights
are on.
Front Fog Indicator Light (if equipped)
This indicator light illuminates: (cid:129) When the front fog lights are on.
4 87
YDM USA 4a.QXP 2016-05-03 17:27 Page 88
Features of your vehicle
Cruise Indicator Light (if equipped)
CRUISE
KEY OUT Indicator Light (if equipped)
KEY OUT
LKAS (Lane Keeping Assistant System) Indicator (if equipped)
This indicator light illuminates: (cid:129) When the cruise control system is
enabled.
When the ENGINE START/STOP button is in the ACC or ON position, if any door is open, the system checks for the smart key.
For more details, refer to "Cruise Control System" in chapter 5.
Cruise SET Indicator Light (if equipped)
SET
This indicator light illuminates: (cid:129) When the cruise control speed is set.
For more details, refer to "Cruise Control System" in chapter 5.
This indicator light blinks: When the smart key is not in the vehicle and any door is open with the ignition switch or Engine Start/Stop button in the ACC or ON position. - At this time, if you close all doors, the chime will also sound for approximately 5 seconds.
- The indicator will go off while the
vehicle is moving.
The LKAS indicator will illuminate when you turn the lane keeping assistant system on by pressing the LKAS button. If there is a problem with the system, the yellow LKAS indicator will illumi- nate. For more details, refer to "LKAS" in chapter 5.
88
YDM USA 4a.QXP 2016-05-03 17:27 Page 89
REARVIEW CAMERA (IF EQUIPPED)
Always keep the camera lens clean. If lens is covered with foreign matter, the camera may not operate normally. The rearview camera is not a substi- tute for proper and safe backing-up procedures. Always drive safely and use caution when backing up. The rearview camera may not display every object behind the vehicle.
OYDM046015
The rear view camera will activate with the ignition switch on and the shift lever in the R (Reverse) position.Note- during initial start up, system may not display instantly due to the audio system booting up. 2 ~ 4 seconds may be required before displaying during initial reverse selection. This occurs when starting and immediately shifting to reverse. This system is a supplemental sys- tem that shows behind the vehicle through the UVO audio or navigation display backing-up.
Features of your vehicle
WARNING - Backing Up & Using Camera Never rely solely on the rear view camera when backing up. Prior to entering your vehicle always do a visual check of the area behind your vehicle, and before backing up be aware of your sur- roundings and supplement the rear view camera by looking over your shoulders and checking your rear view mirrors. Due to the difficulty of ensuring that the area behind you remains clear, always back up slowly and stop immediately if you even suspect that a person, and especially a child, might be behind you.
4 89
Headlight escort function (if equipped) The headlights (and/or taillights) will remain on for approximately 20 min- utes after the ignition key is removed or turned to the ACC or LOCK posi- tion. However, if the driver’s door is opened and closed, the headlights are turned off after 30 seconds. The headlights can be turned off by pressing the lock button on the trans- mitter (or smart key) twice or turning off the light switch from the headlight or Auto light position.
If the driver gets out of the vehicle through other doors (except driver's door), the battery saver function does not operate and the headlight escort function does not turn off automatically. Therefore, It causes the battery to be discharged. In this case, make sure to turn off the lamp before getting out of the vehicle. If the headlights are not working properly have your vehicle inspected by an authorized Kia dealer. Don't attempt to inspect or replace the wiring yourself to prevent mal- function.
YDM USA 4a.QXP 2016-05-03 17:27 Page 90
Features of your vehicle
LIGHTING Battery saver function (cid:129) The purpose of this feature is to prevent the battery from being dis- charged. The system automatically turns off the parking lights when the driver removes the ignition key and opens the driver-side door.
(cid:129) With this feature, the parking lights will turn off automatically if the driv- er parks on the side of the road at night. If necessary, to keep the lights on when the ignition key is removed, perform the following: 1) Open the driver-side door. 2) Turn the parking lights OFF and ON again using the light switch on the steering column.
90
YDM USA 4a.QXP 2016-05-03 17:27 Page 91
Lighting control
Parking light position (
Headlight position ( )
Features of your vehicle
OXM049110
The light switch has a Headlight and a Parking light position. To operate the lights, turn the knob at the end of the control lever to one of the following positions: (1) OFF position (2) Parking light position (3) Headlight position (4) Auto light / AFLS position(if equipped)
OAM049041
When the light switch is in the park- ing light position (1st position), the tail, position, license and instrument panel lights will turn ON.OAM049042
When the light switch is in the head- light position (2nd position) the head, tail, position, license and instrument panel lights will turn ON. The ignition switch must be in the ON position to turn on the headlights.4 91
YDM USA 4a.QXP 2016-05-03 17:27 Page 92
Features of your vehicle
Auto light position (if equipped)
OYDDCO2042
When the light switch is in the AUTO light position, the taillights and head- lights will turn ON or OFF automati- cally depending on the amount of light outside the vehicle. Never place anything over the sensor (1) located on the instrument panel. This will ensure better auto-light sys- tem control. Do not clean the sensor using a win- dow cleaner, the cleaner may leave a light film which could interfere with sensor operation.92
If your vehicle has window tint or other types of metallic coating on the front windshield, the Auto light sys- tem may not work properly.
High beam operation
OAM049044
To turn on the high beam headlights, push the lever away from you. Pull it back for low beams. The high-beam indicator will light when the headlight high beams are switched on. To prevent the battery from being discharged, do not leave the lights on for a prolonged time while the engine is not running.YDM USA 4a.QXP 2016-05-03 17:28 Page 93
WARNING - High beams
Do not use high beam when there are other vehicles. Using high beam could obstruct the other driver's vision.
OAM049043
To flash the headlights, pull the lever towards you. It will return to the normal (low-beam) position when released. The headlight switch does not need to be on to use this flashing feature.Features of your vehicle
Turn signals and lane change signals
OAM049045
The ignition switch must be on for the turn signals to function. To turn on the turn signals, move the lever up or down (A). The green arrow indicators on the instrument panel indicate which turn signal is operating. They will self-cancel after a turn is com- pleted. If the indicator continues to flash after a turn, manually return the lever to the OFF position. To signal a lane change, move the turn signal lever slightly and hold it in position (B). The lever will return to the OFF position when released.4 93
YDM USA 4a.QXP 2016-05-03 17:28 Page 94
Features of your vehicle
If an indicator stays on and does not flash or if it flashes abnormally, one of the turn signal bulbs may be burned out and will require replacement. If an indicator flash is abnormally quick or slow, a bulb may be burned out or have a poor electrical connec- tion in the circuit.
94
One-touch lane change function To activate an one-touch lane change function, move the turn sig- nal lever slightly and then release it. The lane change signals will blink 3, 5 or 7 times. You can choose one-touch lane change blinking function in "One touch turn lamp" of "User setting". Refer to "User setting" in chapter 4.
✽✽ NOTICE If an indicator flash is abnormally quick or slow, the bulb may be burned out or have a poor electrical connection in the circuit.
Front fog light (if equipped)
lights are used
OAM049046N Fog to provide improved visibility when visibility is poor due to fog, rain or snow, etc. The fog lights will turn on when the fog light switch (1) is turned to the on position after the headlights are turned on. To turn off the fog lights, turn the switch (1) to the off position. When in operation, the fog lights consume large amounts of vehicle electrical power. Only use the fog lights when visibility is poor.
YDM USA 4a.QXP 2016-05-03 17:28 Page 95
AFLS (Adaptive Front Lighting System) (if equipped)
OYDDCO2042
Adaptive front lighting system uses the steering angle and vehicle speed, to keep your field of vision wide by swiveling and leveling the headlamp. Change the switch to the AUTO posi- tion when the engine is running. The adaptive front lighting system will operate when the headlamp is ON. To turn off the AFLS, change the switch to other positions. After turn- ing the AFLS off, headlamp swiveling no longer occurs, but leveling oper- ates continuously.Features of your vehicle
Never place anything over the sen- sor(1) located on the instrument panel. This will ensure better auto- light system to turn on and off auto- matically. If the AFLS malfunction indicator comes on, the AFLS is not working properly. Drive to the nearest safe location and restart the engine. If the indicator continuously remains on, have system be checked by an authorized Kia dealer.
4 95
YDM USA 4a.QXP 2016-05-03 17:28 Page 96
Features of your vehicle
WIPERS AND WASHERS Front
Rear ( 5 Door, if equipped)
OAM049100L
A : Wiper speed control (front)
OAM049048N
· HI – High wiper speed · LO – Low wiper speed · INT – Intermittent wipe · OFF – Off · MIST – Single wipe
96
B : Intermittent control wipe time
adjustment
C : Wash with brief wipes (front)*
D : Rear wiper/washer control
/ON – Continuous wipe · · ---/INT – Intermittent wipe · O/OFF – Off
E : Wash with brief wipes (rear)
* : if equipped
Windshield wipers Operates as follows when the igni- tion switch is turned ON. MIST : For a single wiping cycle, push the lever upward and release it. The wipers will operate continuously if the lever is held in this position.
OFF : Wiper is not in operation INT : Wiper operates intermittently at the same wiping intervals. Use this mode in a light rain or mist. To vary the speed setting, turn the speed control knob.
LO : Normal wiper speed HI : Fast wiper speed
If there is a heavy accumulation of snow or ice on the windshield, defrost the windshield for about 10 minutes, or until the snow and/or ice is removed before using the windshield wipers to ensure proper operation.
YDM USA 4a.QXP 2016-05-03 17:28 Page 97
Windshield washers (front)
OYF049101
In the OFF position, pull the lever gently toward you to spray washer fluid on the windshield and to run the wipers 1-3 cycles. Use this function when the wind- shield is dirty. The spray and wiper operation will continue until you release the lever. If the washer does not work, check the washer fluid level. If the fluid level is not sufficient, you add appropriate non-abrasive wind- shield washer fluid to the washer reservoir.The reservoir filler neck is located in the front of the engine compartment on the passenger side.
CAUTION - Washer pump
To prevent possible damage to the washer pump, do not oper- ate the washer when the fluid reservoir is empty.
WARNING - Obscured visibility
Do not use the washer in freez- ing temperatures without first warming the windshield with the defrosters; the washer solu- tion could freeze on the wind- shield and obscure your vision.
Features of your vehicle
CAUTION - Wiper position When washing the vehicle, set the wiper switch in the off posi- tion to stop the auto wiper oper- ation. The wiper may operate and be damaged if the switch is set in the AUTO mode while washing the vehicle.
CAUTION - Wipers &
windshields
(cid:129) To prevent possible damage to the wipers or windshield, do not operate the wipers when the windshield is dry.
(cid:129) To prevent damage to the wiper blades, do not use gasoline, kerosene, paint thinner, or other solvents on or near them. (cid:129) To prevent damage to the wiper arms and other compo- nents,do not attempt to move the wipers manually.
4 97
YDM USA 4a.QXP 2016-05-03 17:28 Page 98
Features of your vehicle
Rear window wiper and wash- er switch (5 door) (if equipped)
OAM049103N The rear window wiper and washer switch is located at the end of the wiper and washer switch lever. Turn the switch to desired position to operate the rear wiper and washer. ON - Normal wiper operation INT - Intermittent wipe OFF - Wiper is not in operation
98
OYD044500
Push the lever away from you to spray rear washer fluid and to run the rear wipers 1~3 cycles. The spray and wiper operation will continue until you release the lever.YDM USA 4a.QXP 2016-05-03 17:28 Page 99
INTERIOR LIGHT Do not use the interior lights for extended periods when the engine is not running. It may cause battery discharge.
WARNING - Interior light
Do not use the interior lights when driving in the dark. The glare from the interior lights may obstruct your view and cause an accident.
Automatic turn off function (if equipped) The interior lights automatically turn off approximately 20 minutes after the ignition switch is turned off. If your vehicle is equipped with the theft alarm system, the interior lights automatically turn off approximately 3 seconds after the system is in armed stage.
Features of your vehicle
Map lamp (if equipped) ■ Type A
■ Type B
OYDM046385
OYDM046384
Push the lens (1) to turn the map lamp on or off. This light produces a spot beam for convenient use as a map lamp at night or as a personal lamp for the driver and front passenger.4 99
YDM USA 4a.QXP 2016-05-03 17:28 Page 100
Features of your vehicle
(cid:129) DOOR (2) :
In the DOOR position, the map lamp and the room lamp come on when any door is opened regard- less of the ignition switch position. When doors are unlocked by the transmitter (or smart key), the map lamp and the room lamp come on for approximately 30 seconds as long as any door is not open. The map lamp and the room lamp go out gradually after approximate- ly 30 seconds if the door is closed. However, if the ignition switch is ON or all doors are locked, the map lamp and the room lamp will turn off immediately. If a door is opened with the ignition switch in the ACC or LOCK position, the map lamp and the room lamp stays on for about 20 minutes. However, if a door is opened with the ignition switch in the ON position, the map lamp and the room lamp stays on continuously. If the type B room lamp switch is OFF, it doesn't work.
100
(cid:129) OFF (3) : The lights turn off even if
the
lamp
a door is opened. is When turned ON by pressing the lens (1), the lamp does not turn off even if the switch (2) is in the OFF position.
(cid:129) ON (4) : The map lamp and the room lamp stay on at all times.
Room lamp
OMD040097
To turn the room lamp ON or OFF, push the switch. If your vehicle is not equipped with a map lamp, the room lamp will also turn on or off as follows.- The room lamp comes on when a door is opened. The lamps go out after approximately 30 seconds. - The room lamp comes on for approximately 30 seconds when doors are unlocked with a trans- mitter or smart key as long as the doors are not opened.
YDM USA 4a.QXP 2016-05-03 17:28 Page 101
- The room lamp will stay on for approximately 20 minutes if a door is opened with the ignition switch in the ACC or LOCK/OFF position.
- The room lamp will stay on con- tinuously if the door is opened with the ignition switch in the ON position.
- The room lamp will go out imme- diately if the ignition switch is changed to the ON position or all doors are locked.
Luggage room lamp (cid:129) 4 Door
Features of your vehicle
The luggage lamp comes on as long as the trunk lid (tailgate) is open. To prevent unnecessary charging sys- tem drain, close the trunk lid (tail- gate) securely after using the lug- gage room.
(cid:129) 5 Door
OYDDCO2045
OYDDCO3237
The luggage room lamp comes on when the trunk (tailgate) is opened.4 101
YDM USA 4a.QXP 2016-05-03 17:28 Page 102
Features of your vehicle
Glove box lamp
Vanity mirror lamp (if equipped)
OYDECO2046CN The glove box lamp comes on when the glove box is opened. To prevent unnecessary charging system drain, close the glove box securely after use.
102
OLM049105
Push the switch to turn the light on or off. (cid:129): The lamp will turn on if this
button is pressed.
(cid:129)
: The lamp will turn off if this
button is pressed.
Always have the switch in the off position when the vanity mirror lamp is not in use. If the sunvisor is closed without turning the lamp off, it may discharge the battery or damage the sunvisor.
YDM USA 4a.QXP 2016-05-03 17:28 Page 103
WELCOME SYSTEM (IF EQUIPPED) Headlamp welcome When the headlight(light switch in the headlight or AUTO position) is on and all doors (and trunk/tailgate) are locked and closed, the headlight, position light and tail light will come on for 15 seconds if any of the below is performed. (cid:129) Without smart key system
- When the door unlock button is
pressed on the transmitter.
(cid:129) With the smart key system
- When the door unlock button is
pressed on the smart key.
At this time, if you press the door lock button (on the transmitter or smart key), the lights will turn off immediately.
Interior light welcome When the interior light switch is in the DOOR position and all doors (and trunk/tailgate) are locked and closed, the room lamp will come on for 30
seconds if any of the below is per- formed. (cid:129) Without smart key system- When the door unlock button is
pressed on the transmitter.
(cid:129) With the smart key system
- When the door unlock button is
pressed on the smart key.
- When the button of the outside
door handle is pressed.
At this time, if you press the door lock button, the lamps will turn off imme- diately.
Features of your vehicle
Puddle lamp and pocket lamp (if equipped) When all doors are locked and closed, the puddle lamp and pocket lamp will come on for 15 seconds if any of the below is performed. (cid:129) With the smart key system
- When the door unlock button is
pressed on the smart key.
- When the button of the outside
door handle is pressed.
- When the vehicle is approached with the smart key in possession.
At this time, if you press the door lock button, the lamps will turn off imme- diately.
4 103
YDM USA 4a.QXP 2016-05-03 17:28 Page 104
Features of your vehicle
DEFROSTER
CAUTION - Conductors
To prevent damage to the con- ductors bonded to the inside surface of the rear window, never use sharp instruments or window cleaners containing abrasives to clean the window.
If you want to defrost and defog the front windshield, refer to "Windshield Defrosting and Defogging" in this section.
104
The rear window defroster automati- cally turns off after approximately 20
minutes or when the ignition switch is turned off. To turn off the defroster manually, press the rear window defroster button again.Outside mirror defroster (if equipped) If your vehicle is equipped with the outside rearview mirror defrosters, they will operate at the same time you turn on the rear window defroster.
Front wiper deicer (if equipped) If your vehicle is equipped with the front wiper deicer, it will be operating at the same time you operate the front windshield defroster.
Rear window defroster ■ Type B ■ Type A
the
OYD046017L The defroster heats the window to remove frost, fog and thin ice from the interior and exterior of the rear window, while the engine is running. To activate rear window defroster, press the rear window defroster button located in the center facia switch panel. The indicator on the rear window defroster button illu- minates when the defroster is on. If there is heavy accumulation of snow on the rear window, brush it off before operating the rear defroster.
YDM USA 4a.QXP 2016-05-03 17:28 Page 105
MANUAL CLIMATE CONTROL SYSTEM
Features of your vehicle
1. Air conditioning button 2. Fan speed control knob 3. Mode selection knob
4. Rear window defroster button 5. Air intake control button 6. Temperature control knob
OYD046018L
4 105
YDM USA 4a.QXP 2016-05-03 17:29 Page 106
Features of your vehicle
Heating and air conditioning 1. Start the engine. 2. Set the mode to the desired posi-
tion. To improve the effectiveness of heating and cooling : - Heating: - Cooling:
3. Set the temperature control to the
desired position.
4. Set the air intake control to the outside (fresh) air or recirculated air position.
5. Set the fan speed control to the
desired speed.
6. If air conditioning is desired, turn the air conditioning system (if equipped) on.
106
(if equipped)
(if equipped)
OYD046239L
YDM USA 4a.QXP 2016-05-03 17:29 Page 107
Mode selection
OYD046019L The mode selection knob controls the direction of the air flow through the ventilation system. Air can be directed to the floor, dash- board outlets, or windshield. Six symbols are used to represent Face, Bi-Level, Floor, Floor-Defrost and Defrost air position.
Features of your vehicle
Face-Level (B, C, D, E, F)
Floor/Defrost-Level (A, C, D, E)
Air flow is directed toward the upper body and face. Additionally, each outlet can be controlled to direct the air discharged from the outlet.
Most of the air flow is directed to the floor and the windshield with a small amount directed to the side window defrosters.
Bi-Level (B, C, D, E, F)
Defrost-Level (A, D)
Air flow is directed towards the face and the floor.
Most of the air flow is directed to the windshield with a small amount of air directed to the side window defrosters.
Floor-Level (A, C, D, E)
Most of the air flow is directed to the floor, with a small amount of the air being directed to the windshield and side window defrosters.
4 107
YDM USA 4a.QXP 2016-05-03 17:29 Page 108
Features of your vehicle
MAX A/C-Level (B,D) (if equipped)
Temperature control
OYD046020L The MAX A/C mode is used to cool the inside of the vehicle faster. Air flow is directed toward the upper body and face. In this mode, the air conditioning and the recirculated air position will be selected automatically.
OYD046021L
Instrument panel vents The outlet vents can be opened or closed separately using the thumb- wheel. Also, you can adjust the direction of air delivered from these vents using the vent control lever as shown.
OYDDCL2007
The temperature control knob allows you to control the temperature of the air flowing from the ventilation sys- tem. To change the air temperature in the passenger compartment, turn the knob to the right for warm air or left for cooler air.108
YDM USA 4a.QXP 2016-05-03 17:29 Page 109
Air intake control
Recirculated air position
OYD046022L This is used to select outside (fresh) air position or recirculated air position. To change the air intake control posi- tion, push the control button.
The indicator light on the button illuminates when the recirculated air posi- tion is selected. With the recirculated air position selected, air from the passenger compartment will be drawn through the heat- ing system and heated or cooled according to the function selected.
Outside (fresh) air position
The indicator light on the button will not illuminate when the outside (fresh) air position is selected. With the outside (fresh) air position selected, air enters the vehicle from outside and is heated or cooled according to the function selected.
Features of your vehicle
Prolonged operation of the heater in the recirculated air position (without air conditioning selected) may cause fog- ging of the windshield and side win- dows and the air within the passenger compartment may become stale. In addition, prolonged operation of the air conditioning with the recircu- lated air position selected will result in excessively dry air in the passen- ger compartment.
WARNING - Reduced Visibility
Continuous use of the climate control system in the recirculat- ed air position may allow humidity to increase inside the vehicle which may fog the glass and obscure visibility.
4 109
YDM USA 4a.QXP 2016-05-03 17:29 Page 110
Features of your vehicle
WARNING - Recirculated
Air
Continue using the climate con- trol system in the recirculated air position can cause drowsi- ness or sleepiness, and loss of vehicle control. Set the air intake control to the outside (fresh) air position as much as possible while driving.
WARNING - Sleeping with
AC on
Do not sleep in a vehicle with the air conditioning or heating on as this may cause serious harm or death due to a drop in the oxygen level and/or body temperature.
110
Fan speed control
To turn off the blowers
OYDDCL2009
The ignition switch must be in the ON position for fan operation. The fan speed control knob allows you to control the fan speed of the air flowing from the ventilation system. To change the fan speed, turn the knob to the right for higher speed or left for lower speed.OYDDCL2032
To turn off the blowers, turn the fan speed control knob to the "0" posi- tion.YDM USA 4a.QXP 2016-05-03 17:29 Page 111
Air conditioning (if equipped)
OYD046023L Press the A/C button to turn the air conditioning system on (indicator light will illuminate). Press the button again to turn the air conditioning system off.
System operation Ventilation 1. Set the mode to the position. 2. Set the air intake control to the
outside (fresh) air position.
3. Set the temperature control to the
desired position.
4. Set the fan speed control to the
desired speed.
Heating 1. Set the mode to the position. 2. Set the air intake control to the
outside (fresh) air position.
3. Set the temperature control to the
desired position.
4. Set the fan speed control to the
desired speed.
5. If dehumidified heating is desired, turn the air conditioning system (if equipped) on.
(cid:129) If the windshield fogs up, set the
mode to the
position.
Features of your vehicle
Operation Tips (cid:129) To prevent dust or unpleasant fumes from entering the vehicle through the ventilation system, temporarily set the air intake con- trol to the recirculated air position. Be sure to return the control to the fresh air position when the irritation has passed to keep fresh air in the vehicle. This will help keep the driv- er alert and comfortable.
(cid:129) Air for the heating/cooling system is drawn in through the grilles just ahead of the windshield. Care should be taken that these are not blocked by leaves, snow, ice or other obstructions.
(cid:129) To prevent interior fog on the wind- shield, set the air intake control to the fresh air position and fan speed to the desired position, turn on the air conditioning system, and adjust the temperature control to desired temperature.
4 111
YDM USA 4a.QXP 2016-05-03 17:29 Page 112
Features of your vehicle
Air conditioning (if equipped) Kia Air Conditioning Systems are filled with R-134a refrigerant. 1. Start the engine. Push the air con-
ditioning button.
2. Set the mode to the position. 3. Set the air intake control to the recirculated air position. However, prolonged operation in the recircu- lated air position will excessively dry the air. In this case, change the air position.
4. Adjust the fan speed control and temperature control to maintain maximum comfort.
(cid:129) When maximum cooling is desired, set the temperature control to the extreme left position, set the mode control to the MAX A/C position, then set the fan speed control to the highest speed.
112
CAUTION - Excessive AC
While using the air conditioning system, monitor the tempera- ture gauge closely while driving up hills or in heavy traffic when outside temperatures are high. Air conditioning system opera- tion may cause engine over- heating and potential engine damage. Continue to use the blower fan but turn the air con- ditioning system off if the tem- perature gauge indicates engine overheating.
Air conditioning system operation tips (cid:129) If the vehicle has been parked in direct sunlight during hot weather, open the windows for a short time to let the hot air inside the vehicle escape.
(cid:129) To help reduce moisture inside of the windows on rainy or humid days, decrease the humidity inside the vehicle by operating the air conditioning system.
(cid:129) During air conditioning system operation, you may occasionally notice a slight change in engine speed as the air conditioning com- pressor cycles. This is a normal system operation characteristic.
(cid:129) Use the air conditioning system every month only for a few minutes to ensure maximum system per- formance.
(cid:129) When using the air conditioning system, you may notice clear water dripping (or even puddling) on the ground under the passenger side of the vehicle. This is a normal sys- tem operation characteristic.
YDM USA 4a.QXP 2016-05-03 17:29 Page 113
(cid:129) Operating the air conditioning sys- tem in the recirculated air position provides maximum cooling, how- ever, continual operation in this mode may cause the air inside the vehicle to become stale.
(cid:129) During cooling operation, you may occasionally notice a misty air flow because of rapid cooling and humid air intake. This is a normal system operation characteristic.
Climate control air filter
Outside air
Recirculated
air
Blower
Heater core
Climate control air filter
Evaporator core
OMG075033
The climate control air filter installed behind the glove box filters the dust or other pollutants that come into the vehicle from the outside through the heating and air conditioning system. If dust or other pollutants accumulate in the filter over a period of time, the air flow from the air vents may decrease, resulting in moisture accumulation on the inside of the windshield even when the outside (fresh) air position is selected. If this happens, have the cli- mate control air filter replaced by an authorized Kia dealer.Features of your vehicle
✽✽ NOTICE • Replace the filter according to the
Maintenance Schedule. If the vehicle is being driven in severe conditions such as dusty, rough roads, more frequent cli- mate control air filter inspections and changes are required.
• When the air flow rate suddenly decreases, the system should be checked at an authorized Kia dealer.
4 113
YDM USA 4a.QXP 2016-05-03 17:29 Page 114
Features of your vehicle
Checking the amount of air conditioner refrigerant and compressor lubricant When the amount of refrigerant is low, the performance of the air con-