- Download PDF Manual
-
(cid:129) The VSM is designed to function above approximately 9 mph (15
km/h) on curves.(cid:129) The VSM is designed to function above approximately 18 mph (30
km/h) when a vehicle is braking on a split-mu road. The split-mu road is made of surfaces which have dif- ferent friction forces.(cid:129) The Vehicle Stability Management system is not a substitute for safe driving practices but a supplemen- tary function only. It is the respon- sibility of the driver to always check the speed and the distance to the vehicle ahead. Always hold the steering wheel firmly while driving. (cid:129) Your vehicle is designed to activate according to the driver’s intention, even with installed VSM. Always follow all the normal precautions for driving at safe speeds for the conditions – including driving in inclement weather and on a slip- pery road.
YDM USA 5.QXP 5/1/2016 1:16 PM Page 43
WARNING - Tire/Wheel
size
replacing
When tires and wheels, make sure they are the same size as the original tires and wheels installed. Driving with varying tire or wheel sizes may affect the vehicle's han- dling.
Good braking practices (cid:129) Check to be sure the parking brake is not engaged and that the park- ing brake indicator light is out before driving away.
(cid:129) Driving through water may get the brakes wet. They can also get wet when the vehicle is washed. Wet brakes can be dangerous! Your vehicle will not stop as quickly if the brakes are wet. Wet brakes may cause the vehicle to pull to one side. To dry the brakes, apply the brakes lightly until the braking action returns to normal, taking care to keep the vehicle under control at all times. If the braking action does not return to normal, stop as soon as it is safe to do so and call an authorized Kia dealer for assis- tance.
(cid:129) Don't coast down hills with the vehicle out of gear. This is extreme- ly hazardous. Keep the vehicle in gear at all times, use the brakes to slow down, then shift to a lower gear so that engine braking will help you maintain a safe speed.
Driving your vehicle
(cid:129) Don't "ride"
the brake pedal. Resting your foot on the brake pedal while driving can be danger- ous because the brakes might overheat and lose their effective- ness. It also increases the wear of the brake components.
(cid:129) If a tire goes flat while you are driv- ing, apply the brakes gently and keep the vehicle pointed straight ahead while you slow down. When you are moving slowly enough for it to be safe to do so, pull off the road and stop in a safe place.
(cid:129) If your vehicle is equipped with an automatic transaxle, don't let your vehicle creep forward. To avoid creeping forward, keep your foot firmly on the brake pedal when the vehicle is stopped.
5 43
YDM USA 5.QXP 5/1/2016 1:16 PM Page 44
Driving your vehicle
(cid:129) Be cautious when parking on a hill. Firmly engage the parking brake and place the shift lever in P (auto- matic transaxle) or in first or reverse gear (manual transaxle). If your vehicle is facing downhill, turn the front wheels into the curb to help keep the vehicle from rolling. If your vehicle is facing uphill, turn the front wheels away from the curb to help keep the vehicle from rolling. If there is no curb or if it is required by other conditions to keep the vehicle from rolling, block the wheels.
(cid:129) Do not hold the vehicle on the upgrade with the accelerator pedal. This can cause the transaxle to overheat. Always use the brake pedal or parking brake.
in
freeze
(cid:129) Under some conditions your park- ing brake can the engaged position. This is most like- ly to happen when there is an accumulation of snow or ice around or near the rear brakes or if the brakes are wet. If there is a risk that the parking brake may freeze, apply it only temporarily while you put the shift lever in P (automatic transaxle) or in first or reverse gear (manual transaxle) and block the rear wheels so the vehicle cannot roll. Then release the parking brake.
44
YDM USA 5.QXP 5/1/2016 1:16 PM Page 45
Driving your vehicle
AUTONOMOUS EMERGENCY BRAKING (AEB)/ FORWARD COLLISION WARNING (FCW) (IF EQUIPPED) The AEB system is to reduce or to avoid accident risk. It recognizes the distance from the vehicle ahead or the pedestrian through the sensors (i.e. radar and camera), and, if nec- essary, warns the driver of accident risk with the warning message or the warning alarms.
System setting and activation System setting The driver can activate the AEB by placing the ignition switch to the ON position and by selecting 'User Settings', 'Driving Assist', and 'Autonomous Braking System'. The AEB deactivates, when the driver cancels the system setting.
✽✽ NOTICE Take the following precautions when using the Autonomous Emergency Braking (AEB): • This system is only a supplemental system and it is not intended to, nor does it replace the need for extreme care and attention of the driver. The sensing range and objects detectable by the sensors are limited. Pay attention to the road conditions at all times.
WARNING - Autonomous Emergency
Braking (AEB) Limitations The AEB system is a supple- mental system and is not a sub- stitute for safe driving prac- tices. It is the responsibility of the driver to always check the speed and distance to the vehi- cle ahead to ensure it is safety to use the AEB system.
• NEVER drive too fast in accor- dance with the road conditions or while cornering.
• Always drive cautiously to prevent unexpected and sudden situations from occurring. AEB does not stop the vehicle completely and does not avoid collisions.
5 45
YDM USA 5.QXP 5/1/2016 1:16 PM Page 46
Driving your vehicle
The warning light illumi- nates on the LCD display, when you cancel the AEB system. The driver can monitor the AEB ON/OFF status on the LCD display. When the warning light remains ON with the AEB acti- vated, we recommend you to have the system checked by an authorized Kia dealer.
The driver can select the initial warn- ing activation time in the User Settings in the instrument cluster LCD display. The options for the ini- tial Forward Collision Warning include the following:
46
Prerequisite for activation The AEB will activate activated when the AEB is selected on the LCD dis- play, and when the following prereq- uisites are satisfied: - The ESC
(Electronic Stability
Control) is activated.
- The driving speed is over 6 mph. (The AEB only works within a cer- tain range of vehicle speeds)
- When the AEB recognizes a vehi- cle or the pedestrian in front. (The AEB may not recognize every obstacle or provide warnings and braking in every situation, so do not rely on the AEB to stop the vehicle in instances where the driv- er sees an obstacle and has the ability to apply the brakes)
the
this condition
(cid:129) EARLY - When
is selected, initial Forward Collision Warning is activated earlier than normal. This setting maxi- mizes the amount of dis- tance between the vehicle or pedestrian ahead before the initial warning occurs. (cid:129) NORMAL - When this condition is initial selected, Forward Collision Warning is activated nor- mally. This setting allows for a nominal amount of distance between the vehicle or pedestrian ahead before the initial warning occurs.
the
(cid:129) LATE - When
this condition
is selected, the initial Forward Collision Warning is activat- ed later than normal. This setting reduces the amount of distance between the vehicle or pedestrian ahead before the initial warning occurs.
YDM USA 5.QXP 5/1/2016 1:16 PM Page 47
AEB warning message and system control The AEB produces warning mes- sages, warning alarms, and emer- gency braking based on the level of risk of a frontal collision, such as when a vehicle ahead suddenly brakes, when there is no following dis- tance from the vehicle in front, or when it detects a collision with a pedestrian is imminent.
WARNING
Set or cancel AEB with control- ling switches on steering wheel after stopping the vehicle in the safe place for your safety.
(cid:129) The AEB automatically activates
when you turn the vehicle on. The driver can deactivate the AEB by canceling the in the system set- ting on the LCD display.
(cid:129) The AEB automatically deactivates when canceling the ESC. When the ESC is canceled, the AEB cannot be activated on the LCD display.
Driving your vehicle
Forward Warning (1st warning)
OYDM056090
The warning message appears on the LCD display with the warning alarms.5 47
YDM USA 5.QXP 5/1/2016 1:16 PM Page 48
Driving your vehicle
Collision Warning (2nd warning)
Emergency braking (3rd warning)
OYDM056091
(cid:129) The warning message appears on the LCD display with the warning alarms.(cid:129) The AEB applies the brakes within certain limit to reduce the impact from a collision.
OYDM056092
(cid:129) The warning message appears on the LCD display with the warning alarms.(cid:129) The AEB controls the brakes with- in certain limit to release shock from the collision. The AEB controls the maximum brakes just before the collision.
48
Brake operation (cid:129) In an urgent situation, the braking system enters into the ready status for prompt reaction against the dri- ver’s depressing the brake pedal. (cid:129) The AEB provides additional brak- ing power for optimum braking per- formance, when driver the depresses the brake pedal.
(cid:129) The braking control is automatical- ly deactivated, when the driver sharply depresses the brake pedal, or when the driver abruptly turns the steering wheel.
(cid:129) The braking control is automatical- ly canceled, when risk factors dis- appear.
The driver should always exercise caution when operating the vehicle, even though there is no warning message or warning alarm.
YDM USA 5.QXP 5/1/2016 1:16 PM Page 49
Driving your vehicle
Warning message and warning light When the sensor is covered or the sensor lens is dirty with foreign sub- stances, such as snow or rain, the AEB operation may temporarily stop. In this case, a warning message (“Auto Emergency Braking disabled temporarily”) will appear to notify the driver.
This is not a malfunction with the AEB. To operate the AEB again, remove the foreign substances.
WARNING
The AEB cannot avoid all colli- sions. The AEB might not com- pletely stop the vehicle before collision, due to ambient weath- er and road conditions. The driver has the responsibility to drive safely and control the vehicle.
✽✽ NOTICE The AEB operates in accordance with the risk levels, such as the dis- tance from the vehicle/passer-by in front, the speed of the vehicle/pass- er-by in front, and the driver's vehi- cle operation.
Sensor to detect the distance from the vehicle in front (front radar)
OYDM046400
The sensor is to maintain a certain distance from the vehicle in front. However, the smudged sensor lens with foreign substances, such as snow and rain, adversely affects the sensing performance. It may even temporarily cancel the AEB. Always keep the sensor lens clean.5 49
System malfunction (cid:129) When the AEB is not working prop- ) will erly, the AEB warning light ( illuminate and the warning mes- sage (“Check AEB system”) will appear for a few seconds. After the message disappears, the master warning light ( ) will illuminate. In this case, we recommend you to have the vehicle inspected by an authorized Kia dealer.
(cid:129) The AEB warning message may appear along with the illumination of the ESC warning light.
WARNING
The AEB is only a supplemental system for the driver’s conven- ience. The driver still maintains responsibility to control the vehicle. Do not solely depend on the AEB system. Rather, maintain a safe braking dis- tance, if necessary, depress the brake pedal to lower the driving speed.
and,
YDM USA 5.QXP 5/1/2016 1:16 PM Page 50
Driving your vehicle
✽✽ NOTICE • Do not install any accessories, such as a license plate bracket or bumper sticker near the sensor area. Do not replace the bumper by yourself. Doing so may adverse- ly affect the sensing performance. • Always keep the sensor/bumper
area clean.
• Use only a soft cloth to wash the vehicle. Also, do not spray highly pressurized water on the sensor installed on the bumper.
• Be careful not to apply unneces- sary force on the frontal sensor area. When the sensor moves out of the correct position due to external force, the system may not operate correctly even without the warning light or message. In this case, we recommend you to have the vehicle inspected by an authorized Kia dealer.
• Use only the genuine Kia sensor cover. Do not arbitrarily apply paint on the sensor cover.
50
YDM USA 5.QXP 5/1/2016 1:16 PM Page 51
(cid:129) The AEB may unnecessarily pro- duce warning messages and warn- ing alarms. Due to the sensing lim- itation, the AEB may not produce warning messages or warning alarm at all.
(cid:129) When there is a malfunction with the AEB, the braking control does not operate upon detecting a colli- sion risk even with other braking systems normally operating.
(cid:129) The AEB operates only for the vehicle / pedestrian in front, while driving forward. It does not operate for any animals or vehicles in the opposite direction.
(cid:129) The AEB can not recognize cross- traffic or parked vehicles present- ing a side-profile.
Limitation of the system The AEB is an assistant system for a driver in a certain risky driving condi- tion and it does not take every responsibility for all risks from driving condition. The AEB monitors the driving situa- tions through the radar and the cam- era sensor. For any vehicle activity occurring outside the sensor range, the AEB may not function. The driver should exercise caution in the follow- ing situations, as the AEB operation may be limited:
Driving your vehicle
Recognizing vehicles - The radar or the camera is con- taminated with foreign substances.
- It heavily rains or snows. - There is electromagnetic interfer-
ence.
- Something in the path of travel
deflects the radar waves.
- The vehicle in front has a narrow body. (i.e. motorcycles and bicycles) - The driver’s view is degraded by driving towards sunlight, reflected light, or darkness.
- The camera cannot see the full
profile of the vehicle in front.
- The vehicle in front is a special vehicle, such as a heavily-loaded truck or a trailer.
5 51
YDM USA 5.QXP 5/1/2016 1:16 PM Page 52
Driving your vehicle
The vehicle in front does not turn ON the rear lights, does not have rear lights, has asymmetric rear lights, or has rear lights out of angle. - The outside brightness is greatly changed, such as entering/exiting the tunnel.
- The vehicle driving is unstable. - The radar/camera sensor recogni-
tion is limited.
52
OJF055025
- Driving on a curve The AEB performance decreases while driving on a curve. The AEB may not recognize the vehicle in front even in the same lane. It may unnec- essarily produce the warning mes- sage and the warning alarm, or it may not produce the warning mes- sage and the warning alarm at all. While driving on a curve, exercise caution, and, if necessary, depress the brake pedal.
OJF055026
While driving on a curve, the AEB may recognize the vehicle in front in the next lane. Exercise caution, and, if necessary, depress the brake pedal. Or, depress the accelerator pedal to maintain the driving speed. Always, take a look around the vehicle for your safety.YDM USA 5.QXP 5/1/2016 1:16 PM Page 53
Driving your vehicle
OJF055029
When the stopped vehicle in front gets out of the lane, it may not be recognized by your AEB. Always be attentive to driving conditions.5 53
OJF055027
OJF055028
- Changing lanes Even though the vehicle in the next lane enters into your lane, it may not be recognized by the AEB, until it enters the AEB sensing range. Especially when the vehicle in the next lane abruptly enters into your lane, it is more likely not be recog- nized. Always be attentive to driving conditions.
- Driving on a slope The AEB performance decreases while driving upward or downward on a slope, not recognizing the vehicle in front in the same lane. It may unnecessarily produce the warning message and the warning alarm, or it may not produce the warning mes- sage and the warning alarm at all. When the AEB suddenly recognizes the vehicle in front while passing over a slope, you may experience sharp deceleration. Always keep your eyes forward while driving upward or downward on a slope, and, if necessary, depress the brake pedal.
YDM USA 5.QXP 5/1/2016 1:16 PM Page 54
Driving your vehicle
OJF055030
- Recognizing the vehicle When the vehicle in front has heavy loading extended rearward, or when the vehicle in front has higher ground clearance, it may induce a haz- ardous situation.
54
Recognizing pedestrians - The pedestrian is not fully captured by the camera sensor, or the pedestrian does not walk in the upright position.
- The pedestrian moves very fast. - The pedestrian abruptly appears in
front.
- The pedestrian wears clothes sim-
ilar in color to the background.
- Conditions outside are too bright or
too dark.
- The vehicle drives at night or in the
darkness.
- There is an item similar in shape a
person’s body structure. - The pedestrian is small. - The pedestrian has
mobility.
impaired
WARNING - Testing the
AEB
The AEB does not operate in certain situations. Thus, never test-operate the AEB against a person or an object. It may cause a severe injury or even death.
WARNING - AEB and
Towing
Cancel the AEB in the User Settings on the LCD display, before towing another vehicle. While towing, the brake applica- tion may adversely affect your vehicle safety.
- The pedestrian blends in with their
surroundings.
- Sensor recognition is limited by
rain, snow, fog, etc.
- There is a group of pedestrians.
✽✽ NOTICE The system may temporarily cancel due to the strong electric waves.
YDM USA 5.QXP 5/1/2016 1:16 PM Page 55
(cid:129) Pay great caution to the vehicle in front, when it has heavy loading extended rearward, or when it has higher ground clearance.
(cid:129) The sensor only detects pedestri- an, not carts, bicycles, motorcy- cles, luggage bags, or strollers.
Driving your vehicle
5 55
YDM USA 5.QXP 5/1/2016 1:17 PM Page 56
Driving your vehicle
✽✽ NOTICE • During normal cruise control operation, when the SET switch is activated or reactivated after applying the brakes, the cruise control will energize after approx- imately 3 seconds. This delay is normal.
• To activate cruise control, depress the brake pedal at least once after turning the ignition switch to the ON position or starting the engine. This is to check if the brake switch which is important part to cancel cruise control is in normal condi- tion.
CRUISE CONTROL SYSTEM (IF EQUIPPED) The cruise control system allows you to program the vehicle to maintain a constant speed without depressing the accelerator pedal. This system is designed to function above approximately 25 mph (40
km/h). If the cruise control is left on, (CRUISE indicator light in the instru- ment cluster illuminated) the cruise control can be switched on acciden- tally. Keep the cruise control system off (CRUISE indicator light OFF) when the cruise control is not in use, to avoid inadvertently setting a speed. Use the cruise control system only when traveling on open highways in good weather. Do not use the cruise control when driving in heavy or varying traffic, or on slippery (rainy, icy or snow-cov- ered) or winding roads or over 6% up-hill or down-hill roads.Do not use cruise control if the traffic situation does not allow you to drive safely at a constant speed and with sufficient dis- tance to the vehicle in front.
WARNING - Misuse of Cruise Control
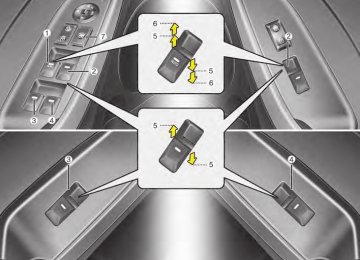
Cruise control switch
OYDDDR3027
CRUISE : Turns cruise control sys-tem on or off.
CANCEL: Cancels cruise control
operation.
RES+: Resumes or increases cruise
control speed.
SET-: Sets or decreases cruise con-
trol speed.
56
YDM USA 5.QXP 2016-05-02 14:03 Page 57
To set cruise control speed:
✽✽ NOTICE - Manual transaxle For manual transaxle vehicles, you should depress the brake pedal at least once to set the cruise control after starting the engine.
OYDEDR3022
1.Press the CRUISE button on the steering wheel to turn the system on. The CRUISE indicator light in the instrument cluster will illumi- nate.2.Accelerate to the desired speed, which must be more than 20 mph (30 km/h).
Driving your vehicle
OYDDDR3023
3.Move the lever down (to SET-), and release it at the desired speed. The SET indicator light in the instru- ment cluster will illuminate. Release the accelerator pedal at the same time. The desired speed will automatically be maintained.On a steep grade, the vehicle may slow down or speed up slightly while going uphill or downhill.
5 57
YDM USA 5.QXP 5/1/2016 1:17 PM Page 58
Driving your vehicle
To increase cruise control set speed:
To decrease the cruising speed:
To temporarily accelerate with the cruise control on: If you want to speed up temporarily when the cruise control is on, depress the accelerator pedal. Increased speed will not interfere with cruise control operation or change the set speed. To return to the set speed, take your foot off the accelerator pedal.
OYDDDR3024
OYDDDR3023
Follow either of these procedures: (cid:129) Move the lever up (to RES+) and hold it. Your vehicle will accelerate. Release the lever at the speed you want.
(cid:129) Move the lever up (to RES+) and
release it immediately. The cruising speed will increase by 1 mph (or 2km/h) each time you move the lever up (to RES+) in this manner.
Follow either of these procedures: (cid:129) Move the lever down (to SET-) and hold it. Your vehicle will gradually slow down. Release the lever at the speed you want to maintain.
(cid:129) Move the lever down (to SET-) and
release it immediately. The cruising speed will decrease by 1 mph (2 km/h) each time you move the lever down (to SET-) in this manner.
58
YDM USA 5.QXP 5/1/2016 1:17 PM Page 59
To cancel cruise control, do one of the following:
Each of these actions will cancel cruise control operation (the SET indicator light in the instrument clus- ter will go off), but it will not turn the system off. If you wish to resume cruise control operation, move up the lever (to RES+) located on your steering wheel.You will return to your previously preset speed.
OYDDDR3025
(cid:129) Depress the brake pedal. (cid:129) Depress the clutch pedal with a
manual transaxle.
(cid:129) Shift into N (Neutral) with an auto-
matic transaxle.
(cid:129) Press the CANCEL button. (cid:129) Decrease the vehicle speed lower than the memory speed by 9 mph (15 km/h).
(cid:129) Decrease the vehicle speed to less than approximately 25 mph (40
km/h).Driving your vehicle
To resume cruising speed at more than approximately 25
mph (40 km/h):OYDDDR3024
the If any method other than CRUISE button was used to cancel cruising speed and the system is still activated, the most recent set speed will automatically resume when you move the lever up (to RES+). It will not resume, however, if the vehicle speed has dropped below approximately 25 mph (40 km/h).5 59
YDM USA 5.QXP 5/1/2016 1:17 PM Page 60
Driving your vehicle
✽✽ NOTICE Always check the road conditions when you move the lever up (to RES+) to resume the speed.
To turn cruise control off, do one of the following:
OYDDDR3022
(cid:129) Press the CRUISE button (the thein CRUISE instrument cluster will go off).
indicator
light
(cid:129) Turn the ignition off. Both of these actions cancel cruise control operation. If you want to resume cruise control operation, repeat the steps provided in “To set cruise control speed”on the previous page.
60
YDM USA 5.QXP 5/1/2016 1:17 PM Page 61
DRIVE MODE INTEGRATED CONTROL SYSTEM DRIVE mode
The mode changes whenever the DRIVE MODE button is pressed.
Driving your vehicle
ECO mode (Active ECO)
NORMAL
ECO
SPORT ECO
❈ When normal mode is selected, it
is not displayed on the cluster.
OYD056039L
The drive mode may be selected according to the driver’s preference or road condition.
Active ECO helps improve fuel efficiency by control- ling certain engine and transaxle system operat- ing parameters. Fuel effi- ciency depends on the driver's driving habit and road condition. (cid:129) When the DRIVE MODE button is pressed and the ECO mode is select- ed, the ECO indicator (green) will illuminate to show that the Active ECO is operating.
(cid:129) When the Active ECO is activated, it does not turn off even though the engine restarted again. To turn off the system, the DRIVE MODE button again.
press
is
5 61
YDM USA 5.QXP 5/1/2016 1:17 PM Page 62
Driving your vehicle
When Active ECO is activated: (cid:129) The acceleration may slightly be reduced even though you depress the accelerator fully.
(cid:129) The air conditioner performance
may be limited
(cid:129) The shift pattern of the automatic
transaxle may change.
(cid:129) The engine noise may get louder.
The above situations are normal conditions when the Active Eco System is activated to improve fuel efficiency.
62
Limitation of Active ECO opera- tion: If the following conditions occur while Active ECO is operating, the system operation is limited even though there is no change in the ECO indi- cator. (cid:129) When the coolant temperature is
low: The system will be limited until engine performance becomes nor- mal.
(cid:129) When driving up a hill:
The system will be limited to gain power when driving uphill because the engine torque is restricted.
(cid:129) When using manual mode:
The system will be limited accord- ing to the shift location.
(cid:129) When the accelerator pedal is deeply depressed for a few sec- onds: The system will be limited, judging that the driver wants to speed up.
SPORT mode
SPORT
SPORT mode focuses on dynamic driving by auto- matically adjusting the steering wheel, engine and transaxle system. (cid:129) When the DRIVE MODE button is pressed and the SPORT mode is selected, the SPORT indicator (yellow) will illu- minate.
(cid:129) When the SPORT mode is activated, and the engine start/stop button is turned off and on it will change to NORMAL mode. To turn on the SPORT mode press DRIVE MODE button again.
YDM USA 5.QXP 5/1/2016 1:17 PM Page 63
(cid:129) If the system is activat-
ed: - While holding vehicle speed, it maintains the gear and RPM for some time even though the accelerator pedal is not depressed.
- Up-shifting is delayed.
✽✽ NOTICE In Sport drive mode, the fuel effi- ciency may decrease.
Driving your vehicle
5 63
YDM USA 5.QXP 5/1/2016 1:17 PM Page 64
Driving your vehicle
LANE KEEPING ASSIST SYSTEM (LKAS) (IF EQUIPPED)
When the system detects the vehicle straying from its lane, it alerts the driver with a visual and audible warn- ing, while applying a slight counter- steering torque, trying to prevent the vehicle from moving out of its lane.
WARNING - LKAS
Limitations
The LKAS is a supplemental system and should not be solely relied upon by the driver. Do not attempt sudden steering maneu- vers while the LKAS is activated. If the vehicle is driven at high speeds, the LKAS may not adjust the steering wheel. It is the driver's responsibility to always pay attention to the road and maintain control over the steering wheel while driving.
(cid:129) The steering wheel is not continu- ously controlled so if the vehicle speed is very fast when leaving a lane the vehicle may not be con- trolled by the system.
(cid:129) It is the responsibility of the driver
to drive safely.
(cid:129) Do not steer the steering wheel suddenly when the steering wheel is being assisted by the system.
(cid:129) LKAS prevents the driver from moving out of the lane unintention- ally by assisting the driver's steer- ing. However, the driver should not solely rely on the system but always pay attention on the steer- ing wheel to stay in the lane.
(cid:129) Always check the road condition and surroundings and be cautious when the system cancels, does not operate or malfunctions.
(cid:129) Do not place any accessories, stickers or tint the windshield near the rearview mirror.
OYDM056083
OYDM056082
The Lane Keeping Assist System detects lane markers on the road, and assists the driver’s steering to help keep the vehicle between lanes.64
YDM USA 5.QXP 5/1/2016 1:17 PM Page 65
(cid:129) The system detects lane markers and controls the steering wheel by a camera, therefore, if the lane markers are hard to detect, the system may not work properly. Please refer to "Driver's Attention". (cid:129) Do not remove any LKAS parts or
apply impact.
(cid:129) Do not place objects on the dash- board that reflects light such as mirrors, white paper, etc. The sys- tem may malfunction if the sunlight is reflected.
(cid:129) Loud audio sounds may interfere with the passenger from hearing warning chimes.
(cid:129) Always have your hands on the steering wheel while the LKAS sys- tem is activated. If you continue to drive with your hands off the steering wheel after the "Hand on" warning, the system will not control steering automatically. When system does not control steering automatically, if you hold steering wheel, system will control steering automatically
(cid:129) If you drive very fast, the vehicle may stray out of the lane. Always be cautious when using the system.
LKAS operation
Driving your vehicle
(cid:129) LKAS indicator - green : LKAS - white : LDWS or System Ready - yellow : FAIL
OYDM056081N (cid:129) To turn on the LKAS, push the but- ton with the ignition switch in the ON position.
(cid:129) The LKAS indicator (green) will illu-
minate.
(cid:129) To turn off the system, press the button again. The indicator turns off.
5 65
WARNING
The Lane Keeping Assist System is a supplemental sys- tem to prevent the driver from leaving the lane. However, the driver should not solely rely on the system but always check the road conditions when driving.
(cid:129) If the system detects a lane, the color changes from black to white. (cid:129) If the system detects the left lane, the left lane color will change from black to white.
(cid:129) If the system detects the right lane, the right lane color will change from black to white.
(cid:129) Both lanes must be detected for
the system to fully activate.
(cid:129) If only one of the lane is detected, the system will warn (warning beep and blinking yellow lane) the driver when the driver crosses the detect- ed lane.
YDM USA 5.QXP 5/1/2016 1:17 PM Page 66
Driving your vehicle
LKAS activation
OYDM056084
(cid:129) The LKAS screen will appear on the LCD display if the system is activated.(cid:129) When both lanes are detected and all the conditions to activate the LKAS are satisfied, the steering wheel will be controlled (green steering wheel indicator will illumi- nate).
66
YDM USA 5.QXP 5/1/2016 1:17 PM Page 67
Warning
■ Left lane
■ Right lane
■ Left lane
■ Right lane
Driving your vehicle
OYDM056088/OYDM056087
(cid:129) If you cross a lane, the lane you cross will blink (yellow) and symbol will blink green on LCD with an audible warning during max 3 sec- onds.(cid:129) If the steering wheel appears, the system will control the vehicle’s steering to prevent the vehicle from crossing the lane.
OYDM056086/OYDM056085
(cid:129) If all the conditions to activate LKAS are not satisfied, the system will convert to LDWS and warn the driver only when the driver crosses the lane markers.OQLE045243
(cid:129) If the driver takes one’s hands off the steering wheel while the LKAS is activated, the system will warn the driver after several seconds with a visual and audible warning.✽✽ NOTICE The warning message may appear late according to road conditions. Therefore, always have your hands on the steering wheel while driving.
5 67
YDM USA 5.QXP 5/1/2016 1:17 PM Page 68
Driving your vehicle
If the driver still does not have one’s hand on the steering wheel after sev- eral seconds, LKAS does not acti- vate. While LKAS deactivation, if the driv- er have one’s hand on the steering wheel, LKAS activate again.
✽✽ NOTICE • The driver is responsible for accu-
rate steering.
• Turn off the system and drive the vehicle personally in below situa- tions. - In bad weather - In bad road condition - When the steering wheel needs to be controlled by the driver fre- quently.
68
✽✽ NOTICE • Even though the steering is assist- ed by the system, the driver may control the steering.
• The steering wheel may feel heav- ier when the steering wheel is assisted by the system than when it is not.
The system will be cancelled when: (cid:129) Vehicle speed is below 35 mph (56
km/h) and over 110 mph (177 km/h).(cid:129) Only one lane is detected. (cid:129) Always turn on the turn signal to change lanes. If you change lanes without the turn signal on, the steering wheel might be controlled.
(cid:129) The hazard warning light is on. (cid:129) The width of the lane is below 2.6 m
and over 4.5 m.
(cid:129) ESC(Electronic Stability Control) and VSM(Vehicle stability manage- ment) are activated.
(cid:129) When the system is on or after changing a lane, drive in the mid- dle of the lane. If not, the system will not provide the steering assist function.
(cid:129) The steering will not be assisted when you drive fast on a sharp curve.
(cid:129) The steering will not be assisted
when you change lanes fast.
(cid:129) The steering will not be assisted
when you brake suddenly.
YDM USA 5.QXP 5/1/2016 1:17 PM Page 69
DRIVER'S ATTENTION The driver must be cautious in the below situations for the system may not assist the driver and may not work properly. • The lane is not visible due to snow, rain, stain, a puddle or many other things.
• The brightness of the outside changes suddenly such as passing through a tunnel.
• Not turning on the headlight or the light is weak even at night or in a tunnel.
• Difficult to distinguish the color of
the lane marker from the road.
• Driving on a steep grade or a curve. • Light reflects from the water on the road such as sunlight, streetlight or the light of oncoming vehicles.
• The lens or windshield is stained
with foreign matter.
• The sensor cannot detect the lane because of fog, heavy rain or heavy snow.
• The surrounding of the inside rear view mirror temperature is high due to direct light.
(Continued)
Driving your vehicle
(Continued) • The lane is very wide or narrow. • The lane marker is damaged or
indistinct.
(Continued) • MDPS (motor driven power steer-
ing) is not operational.
• Some objects are attached in steer-
• The shadow is on the lane marker
ing wheel.
by a median strip.
• The windshield
is fogged by
• There is a mark similar to a lane
humid air in the vehicle.
• The distance from the vehicle ahead is very short or the vehicle ahead drives covering the lane line. • The lane line is merged or divided. • Driving through a toll plaza or toll
gate.
marker.
• There is a boundary structure. • The distance from vehicle ahead is very short or the vehicle ahead drives hiding the lane marker.
• The vehicle shakes heavily. • The lane number increases or decreases or the lane marker are crossing complicatedly.
• Placing something on the dash-
board.
• Driving with the sun in front of
you.
• Driving in areas under construction. • The lane marker is more than two. • The lane marker in a tunnel is hard to distinguish due to dust or grease. • The lane marker is hard to distin-
guish after raining at night.
• The lane marker is hard to distin-
guish due to dust.
(Continued)
5 69
YDM USA 5.QXP 5/1/2016 1:17 PM Page 70
Driving your vehicle
LKAS malfunction
LKAS fail indicator
OYDM056089
(cid:129) If there is a problem with the sys- tem a message will appear. If the problem continues the LKAS fail indicator will illuminate.OYDM056089
The LKAS fail indicator (yellow) will illuminate with an audible warning if the LKAS is not working properly. We recommend that you contact an authorized Kia dealer.
70
When there is a problem with the sys- tem do one of the following: (cid:129) Turn the system on after turning
the engine off and on again.
(cid:129) Check if the ignition switch is in the
ON position.
(cid:129) Check if the system is affected by the weather. (ex: fog, heavy rain, etc.)
(cid:129) Check if there is foreign matter on
the camera lens
If the problem is not solved, we rec- ommend that the system be checked by an authorized Kia dealer.
YDM USA 5.QXP 5/1/2016 1:17 PM Page 71
LKAS function change The driver can change LKAS to Lane Departure Warning System (LDWS) or change the LKAS mode between Standard LKA and Active LKA by selecting 'User Settings', 'Driving Assist', and ‘Lane Keeping Assist System’ on the LCD display. The sys- tem is automatically set to Standard LKA.
Driving your vehicle
Active LKA (cid:129) LKAS operates for a vehicle to keep the region of lane center more efficiently.
(cid:129) The steering assistance is activat- ed more frequently and earlier than standard LKA.
(cid:129) LDW is generated when the vehi-
cle is about to cross the line.
Lane Departure Warning (LDWS) (cid:129) The system can be converted to LKA to LDW at the User setting mode.
(cid:129) Refer to User setting in section 4. (cid:129) LDWS alerts the driver with a visu- al and audible warning when the system detects the vehicle straying from its lane.
(cid:129) If the LDWS is operating the indi-
cator green/white will illuminate.
(cid:129) The steering wheel will not be con-
trolled.
Standard LKA (cid:129) LKAS only starts intervention when the vehicle is predicted to cross the line.
(cid:129) It's useful to a driver who dislikes
frequent intervention by LKAS
(cid:129) LDW is generated when the vehi-
cle is about to cross the line.
5 71
YDM USA 5.QXP 5/1/2016 1:18 PM Page 72
Driving your vehicle
BLIND SPOT DETECTION SYSTEM (BSD) (IF EQUIPPED)
(1) BSD (Blind Spot Detection)
The warning range depends on your vehicle speed. However, if your vehicle is about 6 mph (10
km/h) faster than the other vehi- cle, the system will not warn you.(2) LCA (Lane Change Assist)
When a vehicle approaches you at high speed, the system will warn you.
(3) RCTA (Rear Cross Traffic Alert)
When your vehicle moves rear- ward, and the sensor detects an approaching vehicle in the left or right side, the system will warn you.
WARNING - BSD
Limitations
(cid:129) The Blind Spot Detection System (BSD) is a supplemen- tal system. Do not solely rely on the system and always pay attention to drive safely.
(cid:129) The Blind Spot Detection System may not detect every object alongside the vehicle and is not a substitute for prop- er and safe lane changing pro- cedures. Always drive safely and use caution when chang- ing lanes.
OUM054176L The Blind Spot Detection System (BSD) uses a radar sensor to alert the driver. It senses toward the rear sides of the vehicle and provides and early warn- ing to the driver.
72
YDM USA 5.QXP 5/1/2016 1:18 PM Page 73
BSD (Blind Spot Detection) / LCA (Lane Change Assist) Operating conditions
When the system is not used turn the system off by turning off the switch. When the system is turned on the warning light will illuminate for 3 sec- onds on the outside rearview mirror.
OYD056040L
The indicator on the switch will illumi- nate when the Blind Spot Detection System (BSD) switch is pressed with the Engine Start/Stop Button ON. If vehicle speed exceeds 18.6 mph (30 km/h), the system will activate. If you press the switch again, the switch indicator and system will be turned off. If the vehicle is turned off, the system will remember the last settings upon restart.
Driving your vehicle
Warning type The system will activate when: 1. The system is on. 2. Vehicle speed is above 18.6 mph
(30 km/h).
3. Other vehicles are detected in the
rear side.
WARNING
The Blind Spot Detection System with Lane Change Assist and Rear Cross Traffic Alert is not a substitute for proper and safe lane changing procedures. Always drive safely and use caution when changing lanes. The Blind Spot Detection System may not detect every object alongside the vehicle.
5 73
YDM USA 5.QXP 5/1/2016 1:18 PM Page 74
Driving your vehicle
1st stage
2nd stage
OUM054028
If a vehicle is detected within the boundary of the system, a warning light will illuminate on the outside rearview mirror. If the detected vehicle is not in detecting range, the warning will turn off.OUM054029
The second stage alarm will activate when: 1.The first stage alert is on 2.The turn signal is on to change alane
When the second stage alert is acti- vated, a warning light will blink on the outside rearview mirror and an alarm will sound. If you move the turn signal switch to the original position, the second stage alert will be deactivated.
74
- The second stage alarm may be
deactivated.
(cid:129) To activate the alarm:
Go to the User Settings Mode → Sound and select "BSD" on the LCD display.
(cid:129) To deactivate the alarm:
Go to the User Settings Mode → Sound and deselect "BSD" on the LCD display.
✽✽ NOTICE The alarm function helps alert the driver. Deactivate this function only when it is necessary
YDM USA 5.QXP 5/1/2016 1:18 PM Page 75
Detecting sensor
OYDM056065
The sensors are located inside of the rear bumper. Always keep the rear bumper clean for the system to work properly.Warning message The message (“Blind Spot Detection disabled. Radar blocked”) will appear to notify the driver if there are foreign substances on the surface or inside the rear bumper or it is hot near the rear bumper. The light on the switch and the system will turn off automat- ically. Remove the foreign substance on the rear bumper. is After removed, if you drive for approxi- mately 10 minutes, the system will work normally. If the system does not work normally even though the foreign substance is removed, take your vehicle to an authorized Kia dealer and have the system checked.
foreign substance
the
Driving your vehicle
If the system does not work properly, a warning message (“Check BSD System”) will appear and the light on the switch will turn off. The system will turn off automatically.
Have your vehicle inspected by an authorized Kia dealer.
5 75
YDM USA 5.QXP 5/1/2016 1:18 PM Page 76
Driving your vehicle
RCTA (Rear Cross Traffic Alert)
OYD056047L When your vehicle moves backwards from a parking position, the sensor detects approaching vehicles to the left or right side direction and gives information to the driver.
76
Warning type
Operating conditions (cid:129) Select RCTA (Rear Cross Traffic Alert) in "User Settings" under "Driving Assist" on the instrument cluster. The system will turn on and standby to activate.
(cid:129) Select RCTA again, to turn the sys-
tem off.
(cid:129) If the vehicle is turned off, the RCTA system will remember the last set- tings upon restart. Always turn the RCTA system off when not in use. (cid:129) The system operates when the vehicle speed is below 6.2 mph (10
km/h) with the shift lever in R (Reverse).(cid:129) The RCTA (Rear Cross Traffic Alert) detecting range is 1.6 feet ~ 65 feet based on the side direction. If the approaching vehicle speed is 2.5 mph (4 km/h) ~ 22 mph (36
km/h) within sensing range, it is detected. However, the system sensing range can vary based on conditions. Always pay attention to your surroundings.OJF055196L
OJF055105L
OJF055106L
YDM USA 5.QXP 5/1/2016 1:18 PM Page 77
(cid:129) If the vehicle detected by sensors approaches your vehicle, the warn- ing chime will sound and the warn- ing light will blink on the outside rearview mirror.
(cid:129) If the detected object is not in your way, move the vehicle away from the detected object slowly; and the warning will cancel once the object has been safely cleared.
(cid:129) The system may not operate prop- erly due to other factors or circum- stances. Always pay attention to your surroundings.
❈ If your vehicle's left or right side bumper is blinded by a barrier or vehicles, the system sensing abili- ty may be deteriorated.
Driving your vehicle
Limitations condition Driver's Attention The driver must be cautious in the below situations for the system may not assist the driver and may not work properly.
- Curved roads, tollgates, etc. - The surrounding of the sensor cover
is dirty with rain, snow, mud, etc.
- The rear bumper near the sensor is covered or obstructed with foreign matter such as a sticker, bumper guard, bicycle racks, etc.
- The rear bumper is damaged or the
sensor is out of place.
- The height of the vehicle has signif- icantly changed such as when the trunk is loaded with heavy objects, abnormal tire pressure etc.
- Due to bad weather such as heavy
rain or snow.
WARNING
The Blind Spot Detection System with Lane Change Assist and Rear Cross Traffic Alert is not a substitute for proper and safe lane changing procedures. Always drive safely and use caution when changing lanes. The Blind Spot Detection System may not detect every object alongside the vehicle.
✽✽ NOTICE • The system may not work proper- ly if the bumper has been replaced or if repair work has been done near the sensor.
• The detection area differs accord- ing to the road's width. If the road is narrow the system may detect other vehicles in the next lane.
• If the road is very wide the system
may not detect other vehicles.
• The system may turn off due to strong electromagnetic interfer- ence.
5 77
Outside rearview mirror may not alert the driver when: - The outside rearview mirror hous-
ing is very dirty.
- The window is very dirty. - The windows are tinted very dark. - When driving through a narrow
road with many trees or bushes.
- When the temperature of rear
bumper is high.
- When bike racks, etc. cover the
sensor.
- When reversing from a parking space with pillars or metal struc- tures.
- When you are reversing and if the detected vehicle is simultaneously reversing.
- If there are small objects like shop-
ping carts and baby carriages.
- If there is a vehicle with decreased
ride height (lowered).
- When the vehicle is close to anoth-
er vehicle.
YDM USA 5.QXP 5/1/2016 1:18 PM Page 78
Driving your vehicle
- A fixed object is near such as a
guardrail, etc.
- A substantial amount of metallic objects such as a construction area.
- A large vehicle is nearby such as a
bus or truck.
- A motorcycle or bicycle is near. - A flat trailer is near. - If two vehicles near each other
accelerate together.
- When another vehicle passes by at
a high rate of speed.
- When changing lanes. - When going down or up a steep road where the height of the lane is different.
- When another vehicle drives very
close the back bumper/trunk.
- When a trailer or carrier is installed.
78
YDM USA 5.QXP 5/1/2016 1:18 PM Page 79
This device complies with Part 15
of the FCC rules. Operation is subject to the following two conditions: 1. This device may not cause harm-ful interference, and
2. This device must accept any inter- ference received, including inter- ference that may cause undesired operation.
Driving your vehicle
5 79
YDM USA 5.QXP 5/1/2016 1:18 PM Page 80
Driving your vehicle
ECONOMICAL OPERATION Your vehicle's fuel economy depends mainly on your style of driving, where you drive and when you drive. Each of these factors affects how many miles (kilometers) you can get from a gallon (liter) of fuel. To operate your vehicle as economically as pos- sible, use the following driving sug- gestions to help save money in both fuel and repairs: (cid:129) Drive smoothly. Accelerate at a moderate rate. Don't make "jack- rabbit" starts or full-throttle shifts and maintain a steady cruising speed. Don't race between stop- lights. Try to adjust your speed to the traffic so you don't have to change speeds unnecessarily. Avoid heavy traffic whenever pos- sible. Always maintain a safe dis- tance from other vehicles so you can avoid unnecessary braking. This also reduces brake wear.
(cid:129) Drive at a moderate speed. The faster you drive, the more fuel your vehicle uses. Driving at a moderate speed, especially on the highway, is one of the most effective ways to reduce fuel consumption.
80
(cid:129) Don't "ride" the brake pedal. This can increase fuel consumption and also increase wear on these com- ponents. In addition, driving with your foot resting on the brake pedal may cause the brakes to overheat, which reduces their effectiveness and may lead to more serious con- sequences.
(cid:129) Take care of your tires. Keep them inflated to the recommended pres- sure. Incorrect inflation, either too much or too little, results in unnec- essary tire wear. Check the tire pressures at least once a month. (cid:129) Be sure that the wheels are aligned correctly. Improper align- ment can result from hitting curbs or driving too fast over irregular surfaces. Poor alignment causes faster tire wear and may also result in other problems as well as greater fuel consumption.
(cid:129) Keep your vehicle in good condi- tion. For better fuel economy and reduced maintenance costs, main- tain your vehicle in accordance with the maintenance schedule in section 7. If you drive your vehicle in severe conditions, more frequent maintenance is required (see sec- tion 7 for details).
(cid:129) Keep your vehicle clean. For maxi- mum service, your vehicle should be kept clean and free of corrosive materials. It is especially important that mud, dirt, ice, etc. not be allowed to accumulate on the underside of the vehicle. This extra weight can result in increased fuel consumption and also contribute to corrosion.
(cid:129) Travel lightly. Don't carry unneces- sary weight in your vehicle. Weight reduces fuel economy.
(cid:129) Don't let the engine idle longer than necessary. If you are waiting (and not in traffic), turn off your engine and restart only when you're ready to go.
YDM USA 5.QXP 5/1/2016 1:18 PM Page 81
(cid:129) Remember, your vehicle does not require extended warm-up. After the engine has started, allow the engine to run for 10 to 20 seconds prior to placing the vehicle in gear. In very cold weather, however, give your engine a slightly longer warm- up period.
(cid:129) Don't "lug" or "over-rev" the engine. Lugging is driving too slowly in a very high gear resulting in engine bucking. If this happens, shift to a lower gear. Over-revving is racing the engine beyond its safe limit. This can be avoided by shifting at the recommended speed.
(cid:129) Use your air conditioning sparingly. The air conditioning system is operated by engine power so your fuel economy is reduced when you use it.
(cid:129) Open windows at high speeds can
reduce fuel economy.
(cid:129) Fuel economy is reduced by cross- winds and headwinds. To help off- set some of this loss, slow down when driving in these conditions.
Keeping a vehicle in good operating condition is important both for econ- omy and safety. Therefore, have an authorized Kia dealer perform scheduled inspections and mainte- nance.
Driving your vehicle
WARNING - Engine off
during motion
Never turn the engine off to coast down hills or anytime the vehicle is in motion. The power steering and power brakes will not function properly without the engine running. In addition, turning off the ignition while driving could engage the steer- ing wheel lock resulting in loss of vehicle steering. Keep the engine on and downshift to an appropriate gear for engine braking effect.
5 81
YDM USA 5.QXP 5/1/2016 1:18 PM Page 82
Driving your vehicle
SPECIAL DRIVING CONDITIONS Hazardous driving conditions When hazardous driving conditions are encountered such as water, snow, ice, mud, sand, or similar haz- ards, follow these suggestions: (cid:129) Drive cautiously and allow extra
distance for braking.
(cid:129) Avoid sudden braking or steering. (cid:129) When braking with non-ABS brakes pump the brake pedal with a light up-and-down motion until the vehicle is stopped.
82
Do not pump the brake pedal on a vehicle equipped with ABS. (cid:129) If stalled in snow, mud, or sand, use second gear. Accelerate slow- ly to avoid spinning the drive wheels.
(cid:129) Use sand, rock salt, tire chains, or other non-slip material under the drive wheels to provide traction when stalled in ice, snow, or mud.
WARNING - Downshifting Do not downshift with an auto- matic transaxle while driving on slippery surfaces. The sudden change in tire speed could cause the tires to skid and result in an accident.
Rocking the vehicle If it is necessary to rock the vehicle to free it from snow, sand, or mud, first turn the steering wheel right and left to clear the area around your front wheels. Then, shift back and forth between 1st (First) and R (Reverse) in vehicles equipped with a manual transaxle or R (Reverse) and any forward gear in vehicles equipped with automatic transaxle. Do not race the engine, and spin the wheels as little as pos- sible. If you are still stuck after a few tries, have the vehicle pulled out by a tow vehicle to avoid engine overheat- ing and possible damage to the transaxle. The ESC system should be turned OFF prior to rocking the vehicle.
an
CAUTION - Vehicle rocking
Prolonged rocking may cause engine overheating, transaxle damage or failure,and tire dam- age.
YDM USA 5.QXP 5/1/2016 1:18 PM Page 83