- 2011 Ford Ranger Owners Manuals
- Ford Ranger Owners Manuals
- 2004 Ford Ranger Owners Manuals
- Ford Ranger Owners Manuals
- 1997 Ford Ranger Owners Manuals
- Ford Ranger Owners Manuals
- 2007 Ford Ranger Owners Manuals
- Ford Ranger Owners Manuals
- 2008 Ford Ranger Owners Manuals
- Ford Ranger Owners Manuals
- 2005 Ford Ranger Owners Manuals
- Ford Ranger Owners Manuals
- 2006 Ford Ranger Owners Manuals
- Ford Ranger Owners Manuals
- 2009 Ford Ranger Owners Manuals
- Ford Ranger Owners Manuals
- 1998 Ford Ranger Owners Manuals
- Ford Ranger Owners Manuals
- 2001 Ford Ranger Owners Manuals
- Ford Ranger Owners Manuals
- 1999 Ford Ranger Owners Manuals
- Ford Ranger Owners Manuals
- 2003 Ford Ranger Owners Manuals
- Ford Ranger Owners Manuals
- 2010 Ford Ranger Owners Manuals
- Ford Ranger Owners Manuals
- 2002 Ford Ranger Owners Manuals
- Ford Ranger Owners Manuals
- Download PDF Manual
-
Unlocking the doors 1. Press lamps will illuminate. 2. Press doors.
and release to unlock the driver’s door. Note: The interior
and release again within three seconds to unlock all the
Locking the doors 1. Press
and release to lock all the doors.
and release again within three seconds to confirm that all the
2. Press doors are closed and locked. Note: the doors will lock again, the horn will chirp once, and the lamps will flash. If any of the doors are not properly closed the horn will make two quick chirps and the lamps will not flash.
65
Locks and Security
Power door unlock disabled The UNLOCK feature on your power door locks will not work from inside the vehicle when:
UNLOCK
LOCK
• the ignition has been turned to the OFF position, and • 20 seconds elapse after all vehicle doors are closed and locked using the remote entry transmitter, or the power door unlock control (while the accompanying door is open).
The UNLOCK feature will work again after: • a door has become ajar, • the ignition is turned to the ON position, or • using the UNLOCK • using the keyless entry keypad to unlock the vehicle. Deactivating/activating power door lock disable feature This feature can be activated and deactivated by an authorized dealer.
control on your remote entry transmitter, or
to activate the alarm. The horn will sound for a maximum of
Sounding a panic alarm Press 30 seconds and the parklamps will flash for a maximum of 3 minutes. Press again or turn the ignition to ON to deactivate, or wait for the alarm to timeout in 3 minutes. Note: The panic alarm will only operate when the ignition is in the OFF or ACC position.
Replacing the battery The remote entry transmitter uses one coin type three-volt lithium battery CR2032 or equivalent. The typical operating range for your remote entry transmitter is approximately 10 meters (33 feet). A decrease in the operating range could be caused by: • weather conditions, • nearby radio towers,
66
Locks and Security
• structures around the vehicle and • other vehicles parked next to the vehicle. To replace the battery: 1. Twist a thin coin between the two halves of the remote entry transmitter near the key ring. DO NOT TAKE THE FRONT PART OF THE REMOTE ENTRY TRANSMITTER APART. 2. Remove the old battery. 3. Insert the new battery. Refer to the diagram inside the remote entry transmitter for the correct orientation of the battery. 4. Snap the two halves back together. Note: Replacement of the battery will not cause the remote transmitter to become deprogrammed from your vehicle. The remote transmitter should operate normally after battery replacement. Replacing lost remote entry transmitters If you would like to have your remote entry transmitter reprogrammed because you lost one, or would like to buy additional remote entry transmitters, you can either reprogram them yourself, or take all remote entry transmitters to your authorized dealer for reprogramming. How to reprogram your remote entry transmitters You must have all remote entry transmitters (maximum of four) available before beginning this procedure. To reprogram the remote entry transmitters: 1. Ensure the vehicle is electronically unlocked. 2. Put the key in the ignition. 3. Turn the key from the 2 (LOCK) position to 3 (OFF). 4. Cycle, eight times, rapidly (within 10 seconds) between the 3 (OFF) position and 4 (ON). Note: The eighth turn must end in the 4 (ON) position.
67
Locks and Security
5. The doors will lock, then unlock, to confirm that the programming mode has been activated. 6. Within 20 seconds press any button on the remote entry transmitter. Note: If more than 20 seconds have passed you will need to start the procedure over again. 7. The doors will lock, then unlock, to confirm that this remote entry transmitter has been programmed. 8. Repeat Step 6 to program each additional remote entry transmitter. 9. Turn the ignition to the 3 (OFF) position after you have finished programming all of the remote entry transmitters. Note: After 20
seconds have passed, you will automatically exit the programming mode. 10. The doors will lock, then unlock, to confirm that the programming mode has been exited.Illuminated entry The interior lamps illuminate when the remote entry system is used to unlock the door(s) or sound the personal alarm. The illuminated entry system will turn off the interior lights if: • the ignition switch is turned to the ON position, or • the remote transmitter lock control is pressed, or • after 25 seconds of illumination. The dome lamp control (if equipped) must not be set to the OFF position for the illuminated entry system to operate. The inside lights will not turn off if: • they have been turned on with the dimmer control, or • any door is open. The battery saver will shut off the interior lamps 45 minutes after the last door is closed, even if the dimmer control is on.
SECURILOCK姟 PASSIVE ANTI-THEFT SYSTEM SecuriLock娂 passive anti-theft system is an engine immobilization system. This system is designed to prevent the engine from being started unless a coded key programmed to your vehicle is used. The use of the wrong type of coded key may lead to a “no-start” condition. Your vehicle comes with two coded keys; additional coded keys may be purchased from your dealer. The dealer can program your spare keys to
68
Locks and Security
your vehicle or you can program the keys yourself. Refer to Programming spare keys for instructions on how to program the coded key. Note: The SecuriLock娂 passive anti-theft system is not compatible with non-Ford aftermarket remote start systems. Use of these systems may result in vehicle starting problems and a loss of security protection. Note: Large metallic objects, electronic devices that are used to purchase gasoline or similar items, or a second coded key on the same key chain may cause vehicle starting issues. You need to prevent these objects from touching the coded key while starting the engine. These objects will not cause damage to the coded key, but may cause a momentary issue if they are too close to the key when starting the engine. If a problem occurs, turn the ignition off, remove all objects on the key chain away from the coded key and restart the engine.
Theft indicator The theft indicator is located in the instrument cluster. • When the ignition is in the OFF position, the indicator will flash once every 2 seconds to indicate the SecuriLock娂 system is functioning as a theft deterrent. • When the ignition is in the ON position, the indicator will glow for 3
seconds, then turn off, to indicate normal system functionality.
If a problem occurs with the SecuriLock娂 system, the indicator will flash rapidly or glow steadily when the ignition is in the ON position. If this occurs, the vehicle should be taken to an authorized dealer for service.
Automatic arming The vehicle is armed immediately after switching the ignition to the 3
(OFF) position. The THEFT indicator will flash every two seconds when the vehicle is armed.69
Locks and Security
Automatic disarming Switching the ignition to the 4 (ON) position with a coded key disarms the vehicle. • The THEFT indicator will illuminate for three seconds and then go • If the THEFT indicator stays on for an extended period of time or
out.
flashes rapidly, have the system serviced by your dealer.
Replacement keys If your keys are lost or stolen and you don’t have an extra coded key, you will need to have your vehicle towed to a dealership. The key codes need to be erased from your vehicle and new coded keys will need to be programmed. Replacing coded keys can be very costly. Store an extra programmed key away from the vehicle in a safe place to help prevent any inconveniences. Please visit an authorized dealer to purchase additional spare or replacement keys.
Programming spare keys You can program your own coded keys to your vehicle. Please read and understand the entire procedure before you begin. Tips: • A maximum of eight keys can be coded to your vehicle. • Only use Securilock娂 keys. • You must have two previously programmed coded keys (keys that already operate your vehicle’s engine) and the new unprogrammed key(s) readily accessible.
• If no previously programmed coded keys are available, you must take
your vehicle to your dealer to have the spare key(s) programmed.
70
Locks and Security
1. Insert a previously programmed coded key into the ignition. 2. Turn the ignition from the 3
(OFF) position to the 4 (ON) position. Keep the ignition in the 4
(ON) position for at least one second, but no more than 10
seconds. 3. Turn the ignition to the 3 (OFF) position, and remove the coded key from the ignition. 4. Within ten seconds of removing the previously programmed coded key, insert the other previously programmed coded key into the ignition. 5. Turn the ignition from the 3 (OFF) position to the 4 (ON) position. Keep the ignition in the 4 (ON) position for at least one second but not more than 10 seconds. 6. Turn the ignition to the 3 (OFF) position, and remove the second key from the ignition. 7. Within twenty seconds of removing the previously programmed coded key, insert the unprogrammed key (new/valet key) into the ignition. 8. Turn the ignition from the 3 (OFF) position to the 4 (ON) position. Keep the ignition in the 4 (ON) position for at least one second. 9. Your new unprogrammed key is now programmed. If the key has been successfully programmed it will start the vehicle’s engine and the theft indicator light will illuminate for three seconds and then go out. If the key was not successfully programmed, it will not start your vehicle’s engine and the theft indicator light will flash on and off rapidly. If failure repeats, bring your vehicle to your dealer to have the new key(s) programmed. To program additional new unprogrammed key(s), repeat this procedure from step 1 for each additional key.71
Seating and Safety Restraints
Seating and Safety Restraints
SEATING Notes:
Reclining the seatback can cause an occupant to slide under the seat’s safety belt, resulting in severe personal injuries in the
event of a collision.
Do not pile cargo higher than the seatbacks to reduce the risk of injury in a collision or sudden stop.
Adjusting the front manual seat
Never adjust the driver’s seat or seatback when the vehicle is moving.
Always drive and ride with your seatback upright and the lap belt snug and low across the hips.
Lift handle to move seat forward or backward.
Pull lever up to adjust seatback.
72
Seating and Safety Restraints
Using the manual lumbar support (if equipped) Turn the lumbar support control clockwise to increase firmness. Turn the lumbar support control counterclockwise to increase softness.
Passenger side rear access (if equipped) Pull up on the recliner handle. The seat will lean forward and unlock the track. Slide the seat forward to access the rear area of the cab.
To return seat to original position, slide the seat bottom back, then push the seatback up to lock it in place. If the seatback is pushed first, the seat will lock, and you will have to use the seat adjust handle to move the seat back to the original position.
REAR SEATS
Center facing jump seat (2 door SuperCab) (if equipped) To open, pull inboard and down on the seat handle. To stow the seat, pull seat bottom back to the fully upright position.
Do not install a child seat in a center facing jump seat.
73
Seating and Safety Restraints
Center facing jump seat (4 door SuperCab) (if equipped) To open, pull seat assembly down, then raise seatback. To stow the seat, fold seat back down and raise seat assembly to the fully upright position.
Do not install a child seat in a center facing jump seat.
Booster seats must be installed only in seating
positions equipped with a combination lap/shoulder belt.
SAFETY RESTRAINTS
Safety restraints precautions
Always drive and ride with your seatback upright and the lap belt snug and low across the hips.
To reduce the risk of injury, make sure children sit where they can be properly restrained.
Never let a passenger hold a child on his or her lap while the vehicle is moving. The passenger cannot protect the child from
injury in a collision.
All occupants of the vehicle, including the driver, should always properly wear their safety belts, even when an air bag (SRS) is
provided.
74
Seating and Safety Restraints
It is extremely dangerous to ride in a cargo area, inside or outside of a vehicle. In a collision, people riding in these areas
are more likely to be seriously injured or killed. Do not allow people to ride in any area of your vehicle that is not equipped with seats and safety belts. Be sure everyone in your vehicle is in a seat and using a safety belt properly.
In a rollover crash, an unbelted person is significantly more likely to die than a person wearing a safety belt.
Each seating position in your vehicle has a specific safety belt assembly which is made up of one buckle and one tongue that
are designed to be used as a pair. 1) Use the shoulder belt on the outside shoulder only. Never wear the shoulder belt under the arm. 2) Never swing the safety belt around your neck over the inside shoulder. 3) Never use a single belt for more than one person.
On four-door SuperCab vehicles, do not open the rear door when the rear safety belt is still buckled.
Combination lap and shoulder belts 1. Insert the belt tongue into the proper buckle (the buckle closest to the direction the tongue is coming from) until you hear a snap and feel it latch. Make sure the tongue is securely fastened in the buckle.
75
Seating and Safety Restraints
2. To unfasten, push the release button and remove the tongue from the buckle.
The front outboard safety restraints in the vehicle are combination lap and shoulder belts. The front passenger outboard safety belt has two types of locking modes described below:
Vehicle sensitive mode This is the normal retractor mode, which allows free shoulder belt length adjustment to your movements and locking in response to vehicle movement. For example, if the driver brakes suddenly or turns a corner sharply, or the vehicle receives an impact of approximately 8 km/h (5 mph) or more, the combination safety belts will lock to help reduce forward movement of the driver and passengers.
Automatic locking mode The automatic locking mode is not available on the driver safety belt. In this mode, the shoulder belt is automatically pre-locked. The belt will still retract to remove any slack in the shoulder belt. The automatic locking mode is not available on the driver safety belt. This mode should be used any time a child safety seat is installed in a passenger front seat. Refer to Safety restraints for children or Safety seats for children later in this chapter.
76
Seating and Safety Restraints
How to use the automatic locking mode • Buckle the combination lap and
shoulder belt.
• Grasp the shoulder portion and pull downward until the entire belt is pulled out.
• Allow the belt to retract. As the belt retracts, you will hear a clicking sound. This indicates the safety belt is now in the automatic locking mode.
How to disengage the automatic locking mode Disconnect the combination lap/shoulder belt and allow it to retract completely to disengage the automatic locking mode and activate the vehicle sensitive (emergency) locking mode.
After any vehicle collision, the seat belt system at all outboard seating positions (except driver, which has no “automatic locking retractor” feature) must be checked by a qualified technician to verify that the “automatic locking retractor” feature for child seats is still functioning properly. In addition, all safety belts should be checked for proper function.
77
Seating and Safety Restraints
BELT AND RETRACTOR ASSEMBLY MUST BE REPLACED if the safety belt assembly “automatic locking retractor” feature or any other safety belt function is not operating properly when checked according to the procedures in Workshop Manual.
Failure to replace the Belt and Retractor assembly could increase the risk of injury in collisions.
Energy Management Feature • This vehicle has a safety belt system with an energy management
feature at the front outboard seating positions to help further reduce the risk of injury in the event of a head-on collision. • This safety belt system has a retractor assembly that is designed to pay out webbing in a controlled manner. This feature is designed to help reduce the belt force acting on the occupant’s chest.
Safety belt pretensioner Your vehicle is equipped with safety belt pretensioners at the driver and front outboard passenger seating positions. The safety belt pretensioners are designed to activate during certain frontal or near-frontal collisions with sufficient longitudinal deceleration. A safety belt pretensioner is a device which tightens the webbing of the lap and shoulder belts in such a way that they fit more snugly against the body. The driver and front outboard passenger safety belt system (including retractors, buckle assembly, pretensioner assembly with seat and height adjusters) must be replaced if the vehicle is involved in a collision that results in the activation of the safety belt pretensioners. Refer to the Safety belt maintenance section in this chapter.
Failure to replace the safety belt assembly under the above conditions could result in severe personal injuries in the event of
a collision.
Front safety belt height adjustment Your vehicle has safety belt height adjustments for the driver and front passenger. Adjust the height of the shoulder belt so the belt rests across the middle of your shoulder.
78
Seating and Safety Restraints
• Regular Cab and 4–door Super
Cab
• 2–door SuperCab
To lower the shoulder belt height, push the button and slide the height adjuster down. To raise the height of the shoulder belt, slide the height adjuster up. Pull down on the height adjuster to make sure it is locked in place.
Position the safety belt height adjusters so that the belt rests across the middle of your shoulder. Failure to adjust the safety
belt properly could reduce the effectiveness of the seat belt and increase the risk of injury in a collision.
Lap belts
Adjusting the front center seat lap belt (if equipped) The lap belt does not adjust automatically.
The lap belt should fit snugly and as low as possible around the hips, not across the waist.
79
Seating and Safety Restraints
Insert the tongue into the correct buckle (the buckle closest to the direction the tongue is coming from). To lengthen the belt, turn the tongue at a right angle to the belt and pull across your lap until it reaches the buckle. To tighten the belt, pull the loose end of the belt through the tongue until it fits snugly across the hips. Shorten and fasten the belt when not in use.
Adjusting the rear center facing jump seat lap belt (if equipped) The lap belt will adjust automatically. To fasten, grasp the tongue, and with a continuous motion, pull out enough webbing to buckle the tongue into the correct buckle. If you did not pull out enough webbing to reach the buckle, allow the tongue to retract fully before trying to pull it out again.
The lap belt should fit snugly and as low as possible around the hips, not across the waist.
If you need to lengthen the belt, unfasten it and repeat the procedure above. To unfasten the belt, push in the release button prior to opening the rear door.
Safety belt extension assembly If the safety belt is too short when fully extended, there is a 20 cm (8
inch) safety belt extension assembly that can be added (part number 611C22). This assembly can be obtained from your dealer at no cost.80
Seating and Safety Restraints
Use only extensions manufactured by the same supplier as the safety belt. Manufacturer identification is located at the end of the webbing on the label. Also, use the safety belt extension only if the safety belt is too short for you when fully extended.
Do not use extensions to change the fit of the shoulder belt across the torso.
Safety belt warning light and indicator chime The safety belt warning light illuminates in the instrument cluster and a chime sounds to remind the occupants to fasten their safety belts. Conditions of operation If... The driver’s safety belt is not buckled before the ignition switch is turned to the ON position... The driver’s safety belt is buckled while the indicator light is illuminated and the warning chime is sounding... The driver’s safety belt is buckled before the ignition switch is turned to the ON position...
Then... The safety belt warning light illuminates 1-2 minutes and the warning chime sounds 4-8 seconds.
The safety belt warning light and warning chime turn off.
The safety belt warning light and indicator chime remain off.
BeltMinder The BeltMinder feature is a supplemental warning to the safety belt warning function. This feature provides additional reminders to the driver that the driver’s safety belt is unbuckled by intermittently sounding a chime and illuminating the safety belt warning lamp in the instrument cluster.
81
Seating and Safety Restraints
Then... The BeltMinder feature is activated - the safety belt warning light illuminates and the warning chime sounds for 6 seconds every 30
seconds, repeating for approximately 5 minutes or until safety belt is buckled. The BeltMinder feature will not activate.If... The driver’s safety belt is not buckled before the vehicle has reached at least 5 km/h (3
mph) and 1-2 minutes have elapsed since the ignition switch has been turned to ON... The driver’s safety belt is buckled while the safety belt indicator light is illuminated and the safety belt warning chime is sounding... The driver’s safety belt is buckled before the ignition switch is turned to the ON position... The following are reasons most often given for not wearing safety belts: (All statistics based on U.S. data) Reasons given... “Crashes are rare events”The BeltMinder feature will not activate.
Consider... 36700 crashes occur every day. The more we drive, the more we are exposed to “rare” events, even for good drivers. 1 in 4 of us will be seriously injured in a crash during our lifetime. 3 of 4 fatal crashes occur within 25
miles of home. We design our safety belts to enhance comfort. If you are uncomfortable - try different positions for the safety belt upper anchorage and seatback which should be as upright as possible; this can improve comfort.“I’m not going far”
“Belts are uncomfortable”
82
Reasons given... “I was in a hurry”
“Safety belts don’t work”
“Traffic is light”
“Belts wrinkle my clothes”
“The people I’m with don’t wear belts”
“I have an air bag”
“I’d rather be thrown clear”
Seating and Safety Restraints
Consider... Prime time for an accident. BeltMinder reminds us to take a few seconds to buckle up. Safety belts, when used properly, reduce risk of death to front seat occupants by 45% in cars, and by 60% in light trucks. Nearly 1 of 2 deaths occur in single-vehicle crashes, many when no other vehicles are around. Possibly, but a serious crash can do much more than wrinkle your clothes, particularly if you are unbelted. Set the example, teen deaths occur 4
times more often in vehicles with TWO or MORE people. Children and younger brothers/sisters imitate behavior they see. Air bags offer greater protection when used with safety belts. Frontal airbags are not designed to inflate in rear and side crashes or rollovers. Not a good idea. People who are ejected are 40 times more likely to DIE. Safety belts help prevent ejection, WE CAN’T “PICK OUR CRASH”.Do not sit on top of a buckled safety belt to avoid the Belt Minder chime. Sitting on the safety belt will increase the risk of
injury in an accident. To disable (one-time) or deactivate the Belt Minder feature please follow the directions stated below.
83
Seating and Safety Restraints
One time disable Any time the safety belt is buckled and then unbuckled during an ignition ON cycle, the BeltMinder will be disabled for that ignition cycle only. Deactivating/activating the BeltMinder feature Read steps 1 - 9 thoroughly before proceeding with the deactivation/activation programming procedure. The BeltMinder feature can be deactivated/activated by performing the following procedure: Before following the procedure, ensure that the following conditions are met: • The parking brake is set. • The gearshift is in P (Park) (automatic transmission) or the neutral • The ignition switch is in the OFF position. • All vehicle doors are closed. • The driver’s safety belt is unbuckled. • The parklamps/headlamps are in OFF position (If vehicle is equipped
position (manual transmission).
with Autolamps, this will not affect the procedure).
To reduce the risk of injury, do not deactivate/activate the Belt Minder feature while driving the vehicle.
BeltMinder activation and deactivation procedure 1. Turn the ignition switch to the RUN (or ON) position. (DO NOT START THE ENGINE.) 2. Wait until the safety belt warning light turns off. (Approximately 1–2
minutes.) • Steps 3–5 must be completed within 60 seconds or the procedure willhave to be repeated.
3. Buckle then unbuckle the safety belt three times, ending with the safety belt unbuckled. This can be done before or during BeltMinder warning activation. 4. Turn on the parklamps/headlamps, turn off the parklamps/headlamps. 5. Buckle then unbuckle the safety belt three times, ending with the safety belt unbuckled.
84
Seating and Safety Restraints • After step 5 the safety belt warning light will be turned on for three
seconds.
6. Within seven seconds of the safety belt warning light turning off, buckle then unbuckle the safety belt. • This will disable BeltMinder if it is currently enabled, or enable
BeltMinder if it is currently disabled.
7. Confirmation of disabling BeltMinder is provided by the safety belt warning light flashing four times per second for three seconds. 8. Confirmation of enabling BeltMinder is provided by: • The safety belt warning light flashing four times per second for three • Followed by three seconds with the safety belt warning light off. • Once again, the safety belt warning light will flash four times per
seconds.
second for three seconds.
9. After receiving confirmation, the deactivation/activation procedure is complete.
Safety belt maintenance Inspect the safety belt systems periodically to make sure they work properly and are not damaged. Inspect the safety belts to make sure there are no nicks, tears or cuts. Replace if necessary. All safety belt assemblies, including retractors, buckles, front safety belt buckle assemblies, buckle support assemblies (slide bar-if equipped), shoulder belt height adjusters (if equipped), shoulder belt guide on seatback (if equipped), child safety seat LATCH and tether anchors, and attaching hardware, should be inspected after a collision. Ford Motor Company recommends that all safety belt assemblies used in vehicles involved in a collision be replaced. However, if the collision was minor and a qualified technician finds that the belts do not show damage and continue to operate properly, they do not need to be replaced. Safety belt assemblies not in use during a collision should also be inspected and replaced if either damage or improper operation is noted. The energy absorbing functions may have been activated in a collision so the restraints should be examined; if the front air bags have deployed, the pretensioners have also deployed and must be replaced — regardless of whether there was an occupant in the passenger seat or not.
85
Seating and Safety Restraints
Failure to inspect and if necessary replace the safety belt assembly under the above conditions could result in severe
personal injuries in the event of a collision.
Refer to Interior in the Cleaning chapter.
AIR BAG SUPPLEMENTAL RESTRAINT SYSTEM (SRS)
Important supplemental restraint system (SRS) precautions The supplemental restraint system is designed to work with the safety belt to help protect the driver and right front passenger from certain upper body injuries. Air bags DO NOT inflate slowly or gently and the risk of injury from a deploying air bag is greatest close to the trim covering the air bag module.
All occupants of the vehicle, including the driver, should always properly wear their safety belts, even when an air bag (SRS) is
provided.
National Highway Traffic Safety Administration (NHTSA) recommends a minimum distance of at least 25 cm (10 inches)
between an occupant’s chest and the driver air bag module.
86
Seating and Safety Restraints
Never place your arm over the air bag module as a deploying air bag can result in serious arm fractures or other injuries.
Never place a rear facing infant seat in the front seat unless the passenger air bag is turned off.
Steps you can take to properly position yourself away from the airbag: • Move your seat to the rear as far as you can while still reaching the • Recline the seat slightly (one or two degrees) from the upright
pedals comfortably.
position.
Do not put anything on or over the air bag module. Placing objects on or over the air bag inflation area may cause those
objects to be propelled by the air bag into your face and torso causing serious injury.
Do not attempt to service, repair, or modify the Air Bag Supplemental Restraint System or its fuses. See your Ford or
Lincoln Mercury dealer.
The front passenger air bag is not designed to offer protection to an occupant in the center front seating position.
Modifying or adding equipment to the front end of the vehicle (including frame, bumper, front end body structure and tow
hooks) may affect the performance of the air bag system, increasing the risk of injury. Do not modify the front end of the vehicle.
Additional equipment may affect the performance of the air bag sensors increasing the risk of injury. Please refer to the Body
Builders Layout Book for instructions about the appropriate installation of additional equipment.
87
Seating and Safety Restraints
Children and air bags For additional important safety information, read all information on safety restraints in this guide.
Never place a rearward facing child safety restraint in front of an airbag. Airbags have been known to kill or injure children in
front facing child safety restraints. Whenever placing a child safety seat in a front seating position (including center if equipped), turn off the passenger side air bag switch after being certain the child is properly restrained. If using a forward facing child safety restraint in the front outboard seat, slide the seat all the way back, and turn off the passenger air bag. If using a rear facing child safety seat in the front outboard seating position, make sure the passenger airbag is turned off and slide the passenger seat all the way forward until the safety seat rests on the dashboard. See Passenger air bag on/off switch in this chapter.
Do not install a child seat in a center facing jump seat.
88
Seating and Safety Restraints
An air bag can kill or injure a child in a child seat. Child seats should never be placed in the front seats, unless passenger air bag switch is turned off. See Passenger air bag on/off switch in this chapter.
Rear facing child seats should NEVER be placed in the front seats unless the passenger airbag switch is turned off.
Booster seats must be installed only in seating positions equipped with a combination lap/shoulder belt.
To reduce the risk of injury, make sure children sit where they can be properly restrained.
How does the air bag supplemental restraint system work? The air bag SRS is designed to activate when the vehicle sustains sufficient longitudinal deceleration. The fact that the air bags did not inflate in a collision does not mean that something is wrong with the system. Rather, it means the forces were not of the type sufficient to cause activation. Air bags are designed to inflate in frontal and near-frontal collisions, not rollover, side-impact, or rear-impacts.
89
Seating and Safety Restraints
The air bags inflate and deflate rapidly upon activation. After air bag deployment, it is normal to notice a smoke-like, powdery residue or smell the burnt propellant. This may consist of cornstarch, talcum powder (to lubricate the bag) or sodium compounds (e.g., baking soda) that result from the combustion process that inflates the air bag. Small amounts of sodium hydroxide may be present which may irritate the skin and eyes, but none of the residue is toxic. While the system is designed to help reduce serious injuries, it may also cause minor abrasions, swelling or temporary hearing loss. Because air bags must inflate rapidly and with considerable force, there is the risk of death or serious injuries such as fractures, facial and eye injuries or internal injuries, particularly to occupants who are not properly restrained or are otherwise out of position at the time of air bag deployment. Thus, it is extremely important that occupants be properly restrained as far away from the air bag module as possible while maintaining vehicle control.
Several air bag system components get hot after inflation. Do not touch them after inflation.
If the air bag has deployed, the air bag will not function again and must be replaced immediately. If the air bag is not
replaced, the unrepaired area will increase the risk of injury in a collision.
air bags),
The SRS consists of: • driver and passenger air bag modules (which include the inflators and • one or more impact and safing sensors, passenger air bag deactivation • a readiness light and tone, • and the electrical wiring which connects the components. 90
switch and diagnostic monitor (RCM)
Seating and Safety Restraints
The RCM (restraints control module) monitors its own internal circuits and the supplemental air bag electrical system warning (including the passenger air bag deactivation switch, the impact sensors, the system wiring, the air bag system readiness light, the air bag back up power and the air bag ignitors).
Determining if the system is operational The SRS uses readiness lights in the instrument cluster and the passenger air bag deactivate switch or a tone to indicate the condition of the system. Refer to the Air bag readiness section in the Instrument cluster chapter or Passenger air bag on/off switch section in this chapter. Routine maintenance of the air bag is not required. A difficulty with the system is indicated by one or more of the following: • The readiness lights will either • The readiness lights will not illuminate immediately after ignition is turned on.
• A series of five beeps will be heard. The tone pattern will repeat
flash or stay lit.
periodically until the problem and/or light are repaired.
If any of these things happen, even intermittently, have the SRS serviced at your dealership or by a qualified technician immediately. Unless serviced, the system may not function properly in the event of a collision.
Disposal of air bags and air bag equipped vehicles (including pretensioners) See your local dealership or qualified technician. Air bags MUST BE disposed of by qualified personnel.
91
Seating and Safety Restraints
Passenger air bag ON/OFF switch
An air bag ON/OFF switch has been installed in this vehicle. Before driving, always look at the face of the switch to be sure the switch is in the proper position in accordance with these instructions and warnings. Failure to put the switch in a proper position can increase the risk of serious injury or death in a collision.
Turning the passenger air bag off 1. Insert the ignition key, turn the switch to OFF position and hold in OFF position while removing the key. 2. When the ignition is turned to the ON position the OFF light illuminates briefly, momentarily shuts off and then turns back on. This indicates that the passenger air bag is deactivated.
ON
OFF
OFF
PASSENGER AIRBAG
ON
OFF
OFF
PASSENGER AIRBAG
If the light fails to illuminate when the passenger air bag switch is in the OFF position and the ignition switch is in the On
position, have the passenger air bag switch serviced at your Ford or Lincoln-Mercury dealer immediately.
In order to avoid inadvertent activation of the switch, always remove the ignition key from the passenger air bag ON/OFF
switch.
92
Seating and Safety Restraints
Turning the passenger air bag back on The passenger air bag remains OFF until you turn it back ON. 1. Insert the ignition key and turn the switch to ON. 2. The OFF light will briefly illuminate when the ignition is turned to ON. This indicates that the passenger air bag is operational.
ON
OFF
OFF
PASSENGER AIRBAG
If the OFF light is illuminated when the passenger air bag ON/OFF switch is in the ON position and the ignition switch is ON, have the passenger air bag ON/OFF switch serviced at your Ford or Lincoln-Mercury dealer immediately.
The passenger side air bag should always be ON (the air bag OFF light should not be illuminated) unless the passenger is a person who meets the requirements stated either in Category 1, 2 or 3 of the NHTSA/Transport Canada deactivation criteria which follows.
The safety belts for the driver and right front passenger seating positions have been specifically designed to function together
with the air bags in certain types of crashes. When you turn OFF your air bag, you not only lose the protection of the air bag, you also may reduce the effectiveness of your safety belt system, which was designed to work with the air bag. If you are not a person who meets the requirements stated in the NHTSA/Transport Canada deactivation criteria turning OFF the air bag can increase the risk of serious injury or death in a collision.
Always use safety belts and child restraints properly. If a child in a rear facing infant seat must be transported in front, the
passenger air bag must be turned OFF. This is because the back of the infant seat is too close to the inflating air bag and the risk of a fatal injury to the infant when the air bag inflates is substantial.
93
Seating and Safety Restraints
The vast majority of drivers and passengers are much safer with an air bag than without. To do their job and reduce the risk of life threatening injuries, air bags must open with great force, and this force can pose a potentially deadly risk in some situations, particularly when a front seat occupant is not properly buckled up. The most effective way to reduce the risk of unnecessary air bag injuries without reducing the overall safety of the vehicle is to make sure all occupants are properly restrained in the vehicle, especially in the front seat. This provides the protection of safety belts and permits the air bags to provide the additional protection they were designed to provide. If you choose to deactivate your air bag, you are losing the very significant risk reducing benefits of the air bag and you are also reducing the effectiveness of the safety belts, because safety belts in modern vehicles are designed to work as a safety system with the air bags. Read all air bag Warning labels in the vehicle as well as the other important air bag instructions and Warnings in this Owner’s Guide. NHTSA deactivation criteria (excluding Canada) 1. Infant. An infant (less than 1 year old) must ride in the front seat because: • the vehicle has no rear seat; • the vehicle has a rear seat too small to accommodate a rear-facing • the infant has a medical condition which, according to the infant’s
infant seat; or
physician, makes it necessary for the infant to ride in the front so that the driver can constantly monitor the child’s condition.
2. Child age 1 to 12. A child age 1 to 12 must ride in the front seat because: • the vehicle has no rear seat; • although children ages 1 to 12 ride in the rear seat(s) whenever possible, children ages 1 to 12 sometimes must ride in the front because no space is available in the rear seat(s) of the vehicle; or • the child has a medical condition which, according to the child’s
physician, makes it necessary for the child to ride in the front seat so that the driver can constantly monitor the child’s condition.
3. Medical condition. A passenger has a medical condition which, according to his or her physician: • causes the passenger air bag to pose a special risk for the passenger;
and
94
Seating and Safety Restraints
• makes the potential harm from the passenger air bag in a crash greater than the potential harm from turning OFF the air bag and allowing the passenger, even if belted, to hit the dashboard or windshield in a crash.
This vehicle has special energy management safety belts for the driver and/or right front passenger. These particular belts are specifically designed to work with air bags to help reduce the risk of injury in a collision. The energy management safety belt is designed to give or release additional belt webbing in some accidents to reduce concentration of force on an occupant’s chest and reduce the risk of certain bone fractures and injuries to underlying organs. In a crash, if the air bag is turned OFF, this energy management safety belt might permit the person wearing the belt to move forward enough to incur a serious or fatal injury. The more severe the crash, and the heavier the occupant, the greater the risk. Be sure the air bag is turned ON for any person who does not qualify under the NHTSA deactivation criteria.
Transport Canada deactivation criteria (Canada Only) 1. Infant: An infant (less than 1 year old) must ride in the front seat because: • the vehicle has no rear seat; • the rear seat in the vehicle cannot accommodate a rear-facing infant • the infant has a medical condition which, according to the infant’s
seat; or
physician, makes it necessary for the infant to ride in the front seat so that the driver can monitor the infant’s condition.
2. Child age 12 or under: A child age 12 or under must ride in the front seat because: • the vehicle has no rear seat; • although children age 12 and under ride in the rear seat whenever
possible, children age 12 and under have no option but to sometimes ride in the front seat because rear seat space is insufficient; or • the child has a medical condition that, according to the child’s
physician, makes it necessary for the child to ride in the front seat so that the driver can monitor the child’s condition.
3. Medical condition: A passenger has a medical condition that, according to his or her physician: • poses a special risk for the passenger if the air bag deploys; and
95
Seating and Safety Restraints • makes the potential harm from the passenger air bag deployment greater than the potential harm from turning OFF the air bag and experiencing a crash without the protection offered by the air bag.
This vehicle has special energy management safety belts for the driver and/or right front passenger. These particular belts are specifically designed to work with air bags to help reduce the risk of injury in a collision. The energy management safety belt is designed to give or release additional belt webbing in some accidents to reduce concentration of force on an occupant’s chest and reduce the risk of certain bone fractures and injuries to underlying organs. In a crash, if the air bag is turned OFF, this energy management safety belt might permit the person wearing the belt to move forward enough to incur a serious or fatal injury. The more severe the crash, and the heavier the occupant, the greater the risk. Be sure the air bag is turned ON for any person who does not qualify under the Transport Canada deactivation criteria.
SAFETY RESTRAINTS FOR CHILDREN See the following sections for directions on how to properly use safety restraints for children. Also see Air bag supplemental restraint system (SRS) in this chapter for special instructions about using air bags.
Important child restraint precautions You are required by law to use safety restraints for children in the U.S. and Canada. If small children ride in your vehicle (generally children who are four years old or younger and who weigh 18 kg [40 lbs] or less), you must put them in safety seats made especially for children. Check your local and state or provincial laws for specific requirements regarding the safety of children in your vehicle.
Never let a passenger hold a child on his or her lap while the vehicle is moving. The passenger cannot protect the child from
injury in a collision.
Always follow the instructions and warnings that come with any infant or child restraint you might use.
Do not install a child seat in a center facing jump seat.
96
Seating and Safety Restraints
Children and safety belts If the child is the proper size, restrain the child in a safety seat. Children who are too large for child safety seats (as specified by your child safety seat manufacturer) should always wear safety belts. Follow all the important safety restraint and air bag precautions that apply to adult passengers in your vehicle. If the shoulder belt portion of a combination lap and shoulder belt can be positioned so it does not cross or rest in front of the child’s face or neck, the child should wear the lap and shoulder belt. Moving the child closer to the center of the vehicle may help provide a good shoulder belt fit.
Do not leave children, unreliable adults, or pets unattended in your vehicle.
Child booster seats Children outgrow a typical convertible or toddler seat when they weigh 40 pounds and are around 4 years of age. Although the lap/shoulder belt will provide some protection, these children are still too small for lap/shoulder belts to fit properly, which could increase the risk of serious injury. To improve the fit of both the lap and shoulder belt on children who have outgrown child safety seats, Ford Motor Company recommends use of a belt-positioning booster. Booster seats position a child so that safety belts fit better. They lift the child up so that the lap belt rests low across the hips and the knees bend comfortably. Booster seats also make the shoulder belt fit better and more comfortably for growing children. When children should use booster seats Children need to use booster seats from the time they outgrow the toddler seat until they are big enough for the vehicle seat and lap/shoulder belt to fit properly. Generally this is when they weigh about 80 lbs (about 8 to 12 years old).
97
Seating and Safety Restraints
Booster seats should be used until you can answer YES to ALL of these questions: • Can the child sit all the way back against the vehicle seat back with knees bent comfortably at the edge of the seat without slouching?
• Does the lap belt rest low across the hips? • Is the shoulder belt centered on the shoulder and chest? • Can the child stay seated like this for the whole trip? Types of booster seats There are two types of belt-positioning booster seats: • Those that are backless.
If your backless booster seat has a removable shield, remove the shield and use the lap/shoulder belt. If a seating position has a low seat back and no head restraint, a backless booster seat may place your child’s head (top of ear level) above the top of the seat. In this case, move the backless booster to another seating position with a higher seat back and lap/shoulder belts.
• Those with a high back.
If, with a backless booster seat, you cannot find a seating position that adequately supports your child’s head, a high back booster seat would be a better choice.
Both can be used in any vehicle in a seating position equipped with lap/shoulder belts if your child is over 40 lbs.
98
Seating and Safety Restraints
The shoulder belt should cross the chest, resting snugly on the center of the shoulder. The lap belt should rest low and snug across the hips, never up high across the stomach. If the booster seat slides on the vehicle seat, placing a rubberized mesh sold as shelf or carpet liner under the booster seat may improve this condition. The importance of shoulder belts Using a booster without a shoulder belt increases the risk of a child’s head hitting a hard surface in a collision. For this reason, you should never use a booster seat with a lap belt only. It is best to use a booster seat with lap/shoulder belts in the back seat- the safest place for children to ride.
Follow all instructions provided by the manufacturer of the booster seat.
Never put the shoulder belt under a child’s arm or behind the back because it eliminates the protection for the upper part of
the body and may increase the risk of injury or death in a collision.
Never use pillows, books, or towels to boost a child. They can slide around and increase the likelihood of injury or death in a
collision.
SAFETY SEATS FOR CHILDREN
99
Seating and Safety Restraints
Child and infant or child safety seats Use a safety seat that is recommended for the size and weight of the child. Carefully follow all of the manufacturer’s instructions with the safety seat you put in your vehicle. If you do not install and use the safety seat properly, the child may be injured in a sudden stop or collision. When installing a child safety seat: • Review and follow the information
presented in the Air bag supplemental restraint system (SRS) section in this chapter. • Use the correct safety belt buckle for that seating position (the buckle closest to the direction the tongue is coming from).
• Insert the belt tongue into the proper buckle until you hear a snap and feel it latch. Make sure the tongue is securely fastened in the buckle. • Keep the buckle release button pointing up and away from the safety seat, with the tongue between the child seat and the release button, to prevent accidental unbuckling. • Place seat back in upright position. • Put the safety belt in the automatic locking mode. Refer to Automatic
locking mode (passenger side front and outboard rear seating positions) (if equipped) section in this chapter.
Ford recommends the use of a child safety seat having a top tether strap. Install the child safety seat in a seating position with a tether anchor. For more information on top tether straps, refer to Attaching child safety seats with tether straps. in this chapter.
Carefully follow all of the manufacturer’s instructions included with the safety seat you put in your vehicle. If you do not install and use the safety seat properly, the child may be injured in a sudden stop or collision.
100
Seating and Safety Restraints
Installing child safety seats with combination lap and shoulder belts 1. Position the child safety seat in a seat with a combination lap and shoulder belt.
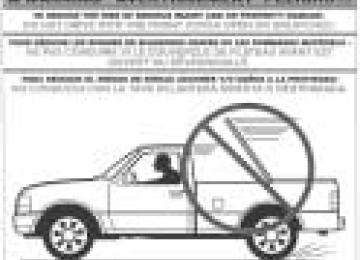
Air bags can kill or injure a child in a child seat. NEVER put a rear-facing child seat in the front unless the passenger air bag
switch is turned off. If you must use a forward-facing child seat in the front seat, move the seat all the way back and turn the passenger air bag off. See Passenger air bag on/off switch.
An air bag can kill or injure a child in a child seat. Child seats should never be placed in the front seats, unless the passenger
air bag switch is turned off, See Passenger air bag on/off switch.
Rear facing child seats should NEVER be placed in the front seats unless the passenger airbag switch is turned off.
2. Pull down on the shoulder belt and then grasp the shoulder belt and lap belt together.
101
Seating and Safety Restraints
3. While holding the shoulder and lap belt portions together, route the tongue through the child seat according to the child seat manufacturer’s instructions. Be sure the belt webbing is not twisted.
4. Insert the belt tongue into the proper buckle (the buckle closest to the direction the tongue is coming from) for that seating position until you hear and feel the latch engage. Make sure the tongue is latched securely by pulling on it.
5. To put the retractor in the automatic locking mode, grasp the shoulder portion of the belt and pull downward until all of the belt is extracted and a click is heard.
6. Allow the belt to retract. The belt will click as it retracts to indicate it is in the automatic locking mode.
102
Seating and Safety Restraints
7. Pull the lap belt portion across the child seat toward the buckle and pull up on the shoulder belt while pushing down with knee on the child seat.
8. Allow the safety belt to retract to remove any slack in the belt. 9. Before placing the child in the seat, forcibly tilt the seat forward and back to make sure the seat is securely held in place. To check this, grab the seat at the belt path and attempt to move it side to side and forward. There should be no more than one inch of movement for proper installation. 10. Try to pull the belt out of the retractor to make sure the retractor is in the automatic locking mode (you should not be able to pull more belt out). If the retractor is not locked, unbuckle the belt and repeat steps two through nine. Check to make sure the child seat is properly secured before each use.
Attaching child safety seats with tether straps Most new forward-facing child safety seats include a tether strap which goes over the back of the seat and hooks to an anchoring point. Tether straps are available as an accessory for many older safety seats. Contact the manufacturer of your child seat for information about ordering a tether strap. The tether anchors in your vehicle are located on the back of the front seat cushion.
103
Seating and Safety Restraints
The tether strap anchors in your vehicle are in the following positions (shown from top view): • Bucket seats
• 60/40 seats
Attach the tether strap only to the appropriate tether anchor as shown. The tether strap may not work properly if attached
somewhere other than the correct tether anchor.
1. Position the child safety seat on the front seat cushion. 2. Route the child safety seat tether strap over the back of the seat.
104
Seating and Safety Restraints
3. Locate the correct anchor for the selected seating position. The tether anchor is located on the rear lower portion of the passenger seat.
4. Clip the tether strap to the anchor.
105
Seating and Safety Restraints
Center seating location
When installing a child safety seat in the front center position, route the tether strap over the center arm rest and clip it to the center anchor.
106
Seating and Safety Restraints
Center seating location 60/40 vinyl seats
When installing a child safety seat in the center position on a 60/40 vinyl seat, route the tether strap through the guiding sleeve and clip it to the center anchor.
If the tether strap is clipped incorrectly, the child safety seat may not be retained properly in the event of a collision.
5. Refer to the Installing child safety seats in combination lap and shoulder belt seating positions section of this chapter for further instructions to secure the child safety seat. 6. Tighten the child safety seat tether strap according to the manufacturer’s instructions.
If the safety seat is not anchored properly, the risk of a child being injured in a collision greatly increases.
Attaching safety seats with LATCH (Lower Anchors and Tethers for Children) attachments for child seat anchors Some child safety seats have two rigid or webbing mounted attachments that connect to two anchors at certain seating positions in your vehicle.
107
Seating and Safety Restraints
This type of child seat eliminates the need to use safety belts to attach the child seat. For forward-facing child seats, the tether strap must also be attached to the proper tether anchor. See Attaching safety seats with tether straps in this chapter. Your vehicle may be equipped with LATCH anchors for child seat installation at the seating positions with tan or gray locator buttons.
• Bucket seats
• 60/40 seats
Never attach two LATCH child safety seats to the same anchor. In a crash, one anchor may not be strong enough to hold two
child safety seat attachments and may break, causing serious injury or death.
Connectors on the LATCH child seat and the child seat instructions may use the symbol shown here. Your vehicle seat will have plain gray or tan buttons, instead of this symbol, to indicate the location of the LATCH lower anchors.
108
Seating and Safety Restraints
The lower anchors for child seat installation are located at the rear section of the front passenger seat between the cushion and seat back. The LATCH anchors are below the gray or tan locator buttons on the seat back. Two plastic LATCH guides may be obtained at no charge from any Ford dealer (part number 1W4Z-54613F16–AA). They snap onto the latch lower anchor in the vehicle to help attach a child seat with rigid latch attachments. It will hold the seat foam away and expose the anchor making attachment of the child seat easier.
Follow the child seat manufacturer’s instructions to properly install a child seat with LATCH attachments.
Attach LATCH lower attachments of the child seat only to the anchors shown.
If you install a child seat with rigid LATCH attachments, do not tighten the tether strap enough to lift the child seat off the vehicle seat cushion when the child is seated in it. Keep the tether strap just snug without lifting the front of the child seat. Keeping the child seat just touching the vehicle seat gives the best protection in a severe crash. Each time you use the safety seat, check that the seat is properly attached to the lower anchors and tether anchor. Try to tilt the child seat from side to side. Also try to tug the seat forward. Check to see if the anchors hold the seat in place.
If the safety seat is not anchored properly, the risk of a child being injured in a crash greatly increases.
109
Driving
Driving
STARTING
Positions of the ignition 1. ACCESSORY, allows the electrical accessories such as the radio to operate while the engine is not running. 2. LOCK, locks the steering wheel, automatic transmission gearshift lever and allows key removal. For vehicle equipped with a manual transmission, you must depress the ignition release lever to release the key. 3. OFF, shuts off the engine and all accessories without locking the steering wheel. This position also allows the automatic transmission shift lever to be moved from the P (Park) position without the brake pedal being depressed.
When the key is in the ignition OFF position, the automatic transmission shift lever can be moved from the P (Park) position
without the brake pedal depressed. To avoid unwanted vehicle movement, always set the parking brake.
4. ON, all electrical circuits operational. Warning lights illuminated. Key position when driving. 5. START, cranks the engine. Release the key as soon as the engine starts.
Preparing to start your vehicle Engine starting is controlled by the powertrain control system. This system meets all Canadian Interference-Causing Equipment standard requirements regulating the impulse electrical field strength of radio noise. When starting a fuel-injected engine, don’t press the accelerator before or during starting. Only use the accelerator when you have difficulty starting the engine. For more information on starting the vehicle, refer to Starting the engine in this chapter.
110
Driving
Extended idling at high engine speeds can produce very high temperatures in the engine and exhaust system, creating the risk
of fire or other damage.
Do not park, idle, or drive your vehicle in dry grass or other dry ground cover. The emission system heats up the engine
compartment and exhaust system, which can start a fire.
Do not start your vehicle in a closed garage or in other enclosed areas. Exhaust fumes can be toxic. Always open the garage door before you start the engine. See Guarding against exhaust fumes in this chapter for more instructions.
If you smell exhaust fumes inside your vehicle, have your dealer inspect your vehicle immediately. Do not drive if you smell
exhaust fumes.
Important safety precautions When the engine starts, the idle RPM runs faster to warm the engine. If the engine idle speed does not slow down automatically, have the vehicle checked. Before starting the vehicle: 1. Make sure all occupants buckle their safety belts. For more information on safety belts and their proper usage, refer to the Seating and safety restraints chapter. 2. Make sure the headlamps and electrical accessories are off.
111
Driving
If starting a vehicle with an automatic transmission: • Make sure the parking brake is
set.
• Make sure the gearshift is in P
(Park).
If starting a vehicle with a manual transmission: 1. Make sure the parking brake is set. 2. Push the clutch pedal to the floor.
112
• Turn the key to 4 (ON) without turning the key to 5 (START).
Driving
light may not illuminate.
Make sure the corresponding lights illuminate or illuminate briefly. If a light fails to illuminate, have the vehicle serviced. • If the driver’s safety belt is fastened, the Starting the engine 1. Turn the key to 4 (ON) without turning the key to 5 (START). If there is difficulty in turning the key, rotate the steering wheel until the key turns freely. 2. Turn the key to 5 (START), then release the key as soon as the engine starts. Excessive cranking could damage the starter.
Note: If the engine does not start within five seconds on the first try, turn the key to 3 (OFF), wait 10 seconds and try again.
113
Driving
Cold weather starting (flexible fuel vehicles only) In cold weather, ethanol fuel distributors should supply winter grade (Ed85) ethanol. If summer grade (Ed85) ethanol is used in cold weather, you may experience increased cranking times, rough idle or hesitation until the engine has warmed up. Consult your fuel distributor for the availability of winter grade (Ed85) ethanol. High-quality blends of winter grade (Ed85) ethanol will produce satisfactory cold weather starting and driving results. Cold starting performance can also be improved by using an engine block heater. Engine block heaters are available as an option and can be obtained from your Ford dealer. Consult the engine block heater section for proper use of the engine block heater. If you experience cold weather starting problems on (Ed85) ethanol, and neither an alternative brand of (Ed85) ethanol nor an engine block heater is available, adding unleaded gasoline to your tank will improve cold starting performance. Your vehicle is designed to operate on (Ed85) ethanol, unleaded gasoline alone, or any mixture of the two.
If the engine fails to start using the preceding instructions (flexible fuel vehicles only) 1. Press and hold down the accelerator 1/3 to 1/2 way to floor, then crank the engine. 2. When the engine starts, release the key, then gradually release the accelerator pedal as the engine speeds up. If the engine still fails to start, repeat Step 1.
Using the engine block heater (if equipped) An engine block heater warms the engine coolant which aids in starting and heater/defroster performance. Use of an engine block heater is strongly recommended if you live in a region where temperatures reach -23° C (-10° F) or below. For best results, plug the heater in at least three hours before starting the vehicle. The heater can be plugged in the night before starting the vehicle.
To reduce the risk of electrical shock, do not use your heater with ungrounded electrical systems or two-pronged (cheater)
adapters.
Guarding against exhaust fumes Carbon monoxide is present in exhaust fumes. Take precautions to avoid its dangerous effects.
114
Driving
If you smell exhaust fumes inside your vehicle, have your dealer inspect your vehicle immediately. Do not drive if you smell
exhaust fumes.
Important ventilating information If the engine is idling while the vehicle is stopped for a long period of time, open the windows at least 2.5 cm (one inch) or adjust the heating or air conditioning to bring in fresh air.
BRAKES Occasional brake noise is normal. If a metal-to-metal, continuous grinding or continuous squeal sound is present, the brake linings may be worn-out and should be inspected by a qualified service technician. If the vehicle has continuous vibration or shudder in the steering wheel while braking, the vehicle should be inspected by a qualified service technician.
Four-wheel anti-lock brake system (ABS) Your vehicle is equipped with an Anti-lock Braking System (ABS). This system helps you maintain steering control during emergency stops by keeping the brakes from locking. Noise from the ABS pump motor and brake pedal pulsation may be observed during ABS braking; any pulsations or mechanical noise you may feel or hear is normal. Using ABS When hard braking is required, apply continuous force on the brake pedal; do not pump the brake pedal since this will reduce the effectiveness of the ABS and will increase your vehicle’s stopping distance. The ABS will be activated immediately, allowing you to retain full steering control during hard braking and on slippery surfaces. However, the ABS does not decrease stopping distance.
ABS warning lamp ABS The ABS lamp in the instrument cluster momentarily illuminates when the ignition is turned to ON. If the light does not illuminate during start up, remains on or flashes, the ABS may be disabled and may need to be serviced.
115
Driving
Even when the ABS is disabled, normal braking is still effective. (If your BRAKE warning lamp illuminates with the parking brake released, have your brake system serviced immediately.)
Parking brake To set the parking brake (1), press the parking brake pedal down until the pedal stops.
The BRAKE warning lamp will illuminate and will remain illuminated until the parking brake is released.
To release, pull the lever (2).
BRAKE
BRAKE
Always set the parking brake fully and make sure that the gearshift is securely latched in P (Park) (automatic
transmission) or in 1 (First) (manual transmission).
STEERING To prevent damage to the power steering system: • Never hold the steering wheel at its furthest turning points (until it • Do not operate the vehicle with a low power steering pump fluid level
stops) for more than a few seconds when the engine is running.
(below the MIN mark on the reservoir).
If the power steering system breaks down (or if the engine is turned off), you can steer the vehicle manually, but it takes more effort.
116
Driving
If the steering wanders or pulls, check for: • an improperly inflated tire • uneven tire wear • loose or worn suspension components • loose or worn steering components • improper steering alignment TRACTION-LOK AXLE (IF EQUIPPED) This axle provides added traction on slippery surfaces, particularly when one wheel is on a poor traction surface. Under normal conditions, the Traction-Lok axle functions like a standard rear axle.
PREPARING TO DRIVE YOUR VEHICLE
Utility vehicles have a significantly higher rollover rate than other types of vehicles.
In a rollover crash, an unbelted person is significantly more likely to die than a person wearing a safety belt.
Your vehicle has larger tires and increased ground clearance, giving the vehicle a higher center of gravity than a passenger car.
Vehicles with a higher center of gravity such as utility and four-wheel drive vehicles handle differently than vehicles with a
lower center of gravity. Utility and four-wheel drive vehicles are not designed for cornering at speeds as high as passenger cars any more than low-slung sports cars are designed to perform satisfactorily under off-road conditions. Avoid sharp turns, excessive speed and abrupt maneuvers in these vehicles. Failure to drive cautiously could result in an increased risk of loss of vehicle control, vehicle rollover, personal injury and death.
Loaded vehicles, with a higher center of gravity, may handle differently than unloaded vehicles. Extra precautions, such as
slower speeds and increased stopping distance, should be taken when driving a heavily loaded vehicle.
117
Driving
AUTOMATIC TRANSMISSION OPERATION (IF EQUIPPED)
Brake-shift interlock This vehicle is equipped with a brake-shift interlock feature that prevents the gearshift lever from being moved from P (Park) when the ignition is in the ON position unless the brake pedal is depressed. If you cannot move the gearshift lever out of P (Park) with ignition in the ON position and the brake pedal depressed: 1. Apply the parking brake, turn ignition key to LOCK, then remove the key. 2. Insert the key and turn it to OFF. Apply the brake pedal and shift to N (Neutral).
When the key is in the ignition OFF position, the automatic transmission shift lever can be moved from the P (Park) position
without the brake pedal depressed. To avoid unwanted vehicle movement, always set the parking brake.
3. Start the vehicle. If it is necessary to use the above procedure to move the gearshift lever, it is possible that a fuse has blown or the vehicle’s brakelamps are not operating properly. Refer to Fuses and relays in the Roadside emergencies chapter.
Do not drive your vehicle until you verify that the brakelamps are working.
Always set the parking brake fully and make sure the gearshift is latched in P (Park). Turn the ignition to the LOCK position and
remove the key whenever you leave your vehicle.
If the parking brake is fully released, but the brake warning lamp remains illuminated, the brakes may not be working properly.
See your dealer or a qualified service technician.
118
Driving with a 5–speed automatic transmission (if equipped)
Driving
Your transmission is equipped with an adaptive learning strategy found in the vehicle computer. This feature is designed to increase durability, and provide consistent shift feel over the life of the vehicle. A new vehicle or transmission may have firm and/or soft shifts. This operation is considered normal and will not affect function or durability of the transmission. Over time, the adaptive learning process will fully update transmission operation. Additionally, whenever the battery is disconnected or a new battery is installed, the strategy must relearn. P (Park) This position locks the transmission and prevents the rear wheels from turning. To put your vehicle in gear: • Start the engine • Depress the brake pedal • Move the gearshift lever into the desired gear To put your vehicle in P (Park): • Come to a complete stop • Move the gearshift lever and securely latch it in P (Park)
Always set the parking brake fully and make sure the gearshift is latched in P (Park). Turn the ignition to the LOCK position and
remove the key whenever you leave your vehicle.
R (Reverse) With the gearshift lever in R (Reverse), the vehicle will move backward. Always come to a complete stop before shifting into and out of R (Reverse). N (Neutral) With the gearshift lever in N (Neutral), the vehicle can be started and is free to roll. Hold the brake pedal down while in this position.
119
Driving
(Overdrive)
O/D
ON/OFF
The normal driving position for the best fuel economy. Transmission operates in gears one through (Overdrive) can be five. deactivated by pressing the transmission control switch on the end of the gearshift lever. This will illuminate the O/D OFF lamp and activate Drive. Drive (not shown) Drive is activated when the transmission control switch is pressed. • This position allows for all forward gears except overdrive. • O/D OFF lamp is illuminated. • Provides engine braking. • Use when driving conditions cause excessive shifting from O/D to other gears. Examples: city traffic, hilly terrain, heavy loads, trailer towing and when engine braking is required. • To return to O/D (overdrive mode), press the transmission control • O/D (Overdrive) is automatically returned each time the key is turned
switch. The O/D OFF lamp will not be illuminated.
off.
2 (Second) Use 2 (Second) to start-up on slippery roads or to provide additional engine braking on downgrades. 1 (First) • Provides maximum engine braking. • Allows upshifts by moving gearshift lever. • Will not downshift into 1 (First) at high speeds; allows for 1 (First)
when vehicle reaches slower speeds.
Forced downshifts • Allowed in (Overdrive) or Drive. • Depress the accelerator to the floor. • Allows transmission to select an appropriate gear.
120
MANUAL TRANSMISSION OPERATION (IF EQUIPPED)
Driving
Using the clutch The manual transmission has a starter interlock that prevents cranking the engine unless the clutch pedal is fully depressed. To start the vehicle: 1. Make sure the parking brake is fully set. 2. Press the clutch pedal to the floor, then put the gearshift lever in the neutral position. 3. Start the engine, then press the brake pedal and release the parking brake. 4. Move the gearshift lever to the desired gear, then slowly release the clutch pedal while slowly pressing on the accelerator. Do not drive with your foot resting on the clutch pedal or use the clutch pedal to hold your vehicle at a standstill while waiting on a hill. These actions will reduce the life of the clutch.
121
Driving
Recommended shift speeds Downshift according to the following charts for your specific engine/drivetrain combination:
Upshifts when accelerating (for best fuel economy)
Shift from:
Transfer case position (if equipped)
2H or 4H
4L
1 - 2
2 - 3
3 -4
4 - 5 (Overdrive)5 km/h (4 mph) 11 km/h (9 mph) 19 km/h (13 mph) 27 km/h (17 mph) Upshifts when cruising (recommended for best fuel economy)
14 km/h (10 mph) 32 km/h (22 mph) 50 km/h (33 mph) 71 km/h (41 mph)
Shift from:
1 -2
2 - 3
3 - 4
4 - 5 (Overdrive)Transfer case position (if equipped)
2H or 4H
16 km/h (10 mph) 26 km/h (19 mph) 43 km/h (28 mph) 68 km/h (40 mph)
4L
6 km/h (4 mph) 10 km/h (8 mph) 16 km/h (12 mph) 26 km/h (16 mph)
Maximum downshift speeds
Shift from:
5 (Overdrive) - 4
4 - 3
3 - 2
2 - 1Transfer case position (if equipped)
2H or 4H
88 km/h (55 mph) 72 km/h (45 mph) 56 km/h (35 mph) 32 km/h (20 mph)
4L
34 km/h (22 mph) 27 km/h (18 mph) 21 km/h (14 mph) 11 km/h (8 mph)
Reverse 1. Make sure that your vehicle is at a complete stop before you shift into R (Reverse). Failure to do so may damage the transmission. 2. Move the gearshift lever into the neutral position and wait at least three seconds before shifting into R (Reverse). • The gearshift lever can only be moved into R (Reverse) by moving it from left of 3 (Third) and 4 (Fourth) before shifting into R (Reverse). This is a lockout feature that protects the transmission from accidentally being shifted into R (Reverse) from 5 (Overdrive).
Parking your vehicle 1. Apply the brake and shift into the neutral position. 2. Fully apply the parking brake, then shift into 1 (First).
122
Driving
3. Turn the ignition off.
Do not park your vehicle in Neutral, it may move unexpectedly and injure someone. Use 1 (First) gear and set the parking brake
fully.
Removing the key Turn the ignition off, push the release lever (located above the ignition), then turn the key toward you and remove the key.
If your vehicle gets stuck in mud or snow If your vehicle gets stuck in mud or snow, it may be rocked out by shifting from forward and reverse gears, stopping between shifts in a steady pattern. Press lightly on the accelerator in each gear. Do not rock the vehicle if the engine is not at normal operating temperature or damage to the transmission may occur. Do not rock the vehicle for more than a minute or damage to the transmission and tires may occur, or the engine may overheat.
FOUR-WHEEL DRIVE (4WD) OPERATION (IF EQUIPPED)
For important information regarding safe operation of this type of vehicle, see Preparing to drive your vehicle in this chapter.
Four–wheel drive (4WD) supplies power to all four wheels. 4WD should not be operated on dry pavement; driveline damage may occur. If equipped with the Electronic Shift 4WD System, and 4WD Low is selected while the vehicle is moving, the 4WD system will not engage. This is normal and should be no reason for concern. Refer to Shifting to/from 4WD Low for proper operation.
4WD system indicator lights • 4WD - Illuminates when 4H
(4WD High) is engaged.
• 4WD LOW – Illuminates when 4L
(4WD Low) is engaged.
123
Driving
Using a manual 4WD system (if equipped)
2H 4H
4L
2H (2WD High) – Power to the rear wheels only; used for street and highway driving. 4H (4WD High) – Used for extra traction such as in snow or icy roads or in off-road situations. Not intended for use on dry pavement. N (Neutral) – No power to either front or rear wheels. 4L (4WD Low)– Uses extra gearing to provide maximum power to all four wheels at reduced speeds. Intended only for off-road applications such as deep sand, steep grades or pulling heavy objects. 4L (4WD Low) will not engage while the vehicle is moving; this is normal and should be no reason for concern. Refer to Shifting to/from 4L (4WD Low) for proper operation. Shifting between 2H (2WD high) and 4H (4WD high) • Move the transfer case lever between 2H (2WD High) and 4H (4WD
High) at a stop or any forward speed.
Note: Do not perform this operation if the rear wheels are slipping. Shifting to/from 4L (4WD Low) 1. Bring the vehicle to a complete stop. 2. Depress the brake. 3. On vehicles equipped with an automatic transmission, place the transmission in N (Neutral); on vehicles equipped with a manual transmission, depress the clutch. 4. Move the transfer case lever through N (Neutral) directly to the desired position. The 4WD LOW indicator will illuminate once the transfer case has engaged. • If the transfer case does not engage, repeat steps 1 through 4.
124
Driving
Using the N (Neutral) position The transfer case N (Neutral) position overrides the transmission and puts the vehicle in neutral regardless of transmission gearshift lever position. The vehicle can move forward or backward. This position should only be used when towing the vehicle.
Do not leave the vehicle unattended with the transfer case in the N (Neutral) position. Always set the parking brake fully and turn
off the ignition when leaving the vehicle.
Using the electronic shift 4WD system (if equipped)
4X4
HIGH4X4
LOW2WD
2WD (2WD High) - Power to the rear wheels only; used for street and highway driving. 4X4 HIGH (4WD High) - Used for extra traction such as in snow or icy roads or in off-road situations. Not intended for use on dry pavement. 4X4 LOW (4WD Low) - Uses extra gearing to provide maximum power to all four wheels. Intended only for off-road applications such as deep sand, steep grades or pulling heavy objects. 4L (4WD Low) will not engage while the vehicle is moving; this is normal and should be no reason for concern. Refer to Shifting to/from 4L (4WD Low) for proper operation. Shifting between 2WD (2WD High) and 4X4 HIGH (4WD High) • Move the 4WD control between 2WD and 4X4 HIGH at any forward
speed.
Note: Do not perform this operation if the rear wheels are slipping. Shifting to/from 4X4 LOW (4WD Low) 1. Bring the vehicle to a complete stop 2. Depress the brake
125
Driving
3. On vehicles equipped with an automatic transmission, place the transmission in N (Neutral); on vehicles equipped with a manual transmission, depress the clutch. 4. Move the 4WD control to the desired position. • If shifting into 4X4 LOW (4WD Low), wait for the LOW RANGE light in the instrument cluster to turn on indicating the shift is complete. • If shifting out of 4X4 LOW (4WD Low), wait for the LOW RANGE light
in the instrument cluster to turn off indicating the shift is complete.
Driving off-road with truck and utility vehicles 4WD vehicles are specially equipped for driving on sand, snow, mud and rough terrain and have operating characteristics that are somewhat different from conventional vehicles, both on and off the road. How your vehicle differs from other vehicles Truck and utility vehicles can differ from some other vehicles. Your vehicle may be higher to allow it to travel over rough terrain without getting hung up or damaging underbody components. The differences that make your vehicle so versatile also make it handle differently than an ordinary passenger car. Maintain steering wheel control at all times, especially in rough terrain. Since sudden changes in terrain can result in abrupt steering wheel motion, make sure you grip the steering wheel from the outside. Do not grip the spokes. Drive cautiously to avoid vehicle damage from concealed objects such as rocks and stumps. You should either know the terrain or examine maps of the area before driving. Map out your route before driving in the area. To maintain steering and braking control of your vehicle, you must have all four wheels on the ground and they must be rolling, not sliding or spinning. Basic operating principles • Do not use 4WD on dry, hard surfaced roads. Doing so will produce
excessive noise, increase tire wear and may damage drive components. 4WD modes are only intended for consistently slippery or loose surfaces.
• Drive slower in strong crosswinds which can affect the normal steering • Be extremely careful when driving on pavement made slippery by
characteristics of your vehicle.
loose sand, water, gravel, snow or ice.
126
Driving
If your vehicle goes off the edge of the pavement • If your vehicle goes off the edge of the pavement, slow down, but
avoid severe brake application, ease the vehicle back onto the pavement only after reducing your speed. Do not turn the steering wheel too sharply while returning to the road surface.
• It may be safer to stay on the apron or shoulder of the road and slow
down gradually before returning to the pavement. You may lose control if you do not slow down or if you turn the steering wheel too sharply or abruptly.
• It often may be less risky to strike small objects, such as highway
reflectors, with minor damage to your vehicle rather than attempt a sudden return to the pavement which could cause the vehicle to slide