- 2011 Ford Ranger Owners Manuals
- Ford Ranger Owners Manuals
- 2004 Ford Ranger Owners Manuals
- Ford Ranger Owners Manuals
- 1997 Ford Ranger Owners Manuals
- Ford Ranger Owners Manuals
- 2007 Ford Ranger Owners Manuals
- Ford Ranger Owners Manuals
- 2008 Ford Ranger Owners Manuals
- Ford Ranger Owners Manuals
- 2005 Ford Ranger Owners Manuals
- Ford Ranger Owners Manuals
- 2006 Ford Ranger Owners Manuals
- Ford Ranger Owners Manuals
- 2009 Ford Ranger Owners Manuals
- Ford Ranger Owners Manuals
- 1998 Ford Ranger Owners Manuals
- Ford Ranger Owners Manuals
- 2001 Ford Ranger Owners Manuals
- Ford Ranger Owners Manuals
- 1999 Ford Ranger Owners Manuals
- Ford Ranger Owners Manuals
- 2003 Ford Ranger Owners Manuals
- Ford Ranger Owners Manuals
- 2010 Ford Ranger Owners Manuals
- Ford Ranger Owners Manuals
- 2002 Ford Ranger Owners Manuals
- Ford Ranger Owners Manuals
- Download PDF Manual
-
File:01unpir.ex Update:Thu Mar 20 08:48:22 1997
[PI00600(R)03/96]
thirty-two pica
chart:0090101-C
File:01unpir.ex Update:Thu Mar 20 08:48:22 1997
*[PI00800(R)03/96]
thirty-six pica chart:
File:01unpir.ex Update:Thu Mar 20 08:48:22 1997
*[PI02300(R)05/95]
Table of Contents
Introduction .
Instrumentation .
Audio .
Controls and Features .
Seating and Safety Restraints .
Starting
Driving
Roadside Emergencies .
Maintainance and Care
Capacities and Specifications .
Reporting Safety Defects .
Customer Assistance
Accessories .
Quick Index
Index .
Service Station Information
. 27
. 59
101
147
155
217
249
311
315
317
327
331
343
364
File:02uniir.ex Update:Thu Mar 20 08:48:31 1997
*[II00300(R)01/96] *[II00400(R)01/96]
*[II00500(R)01/96] *[II00600(R)01/96] *[II00700(R)01/96]
*[II00750(R)01/96]
*[II00800(R)01/96] *[II00900(R)01/96]
*[II01000(R)01/96]
Introduction
Ford’s Commitment to You At Ford Motor Company, excellence is the continuous commitment to achieve the best result possible. It is dedication to learning what you want, determination to develop the right concept, and execution of that concept with care, precision, and attention to detail. In short, excellence means being the standard by which others are judged. Our Guiding Principles n Quality comes first. For your satisfaction, the quality of our
products and services must be our number one priority.
n You are the focus of everything we do. Our work must be
done with you in mind, providing better products and services than our competition.
n Continuous improvement is essential to our success. We
must strive for excellence in everything we do: in our products — in their safety and value — and in our services, our human relations, our competitiveness, and our profitability.
n Employee involvement is our way of life. We are a team.
We must treat one another with trust and respect.
n Dealers and suppliers are our partners. We must maintain mutually beneficial relationships with dealers, suppliers, and our other business associates.
n Integrity is never compromised. Our conduct worldwide
must be pursued in a manner that is socially responsible and commands respect for its integrity and for its positive contributions to society.
File:02uniir.ex Update:Thu Mar 20 08:48:31 1997
*[II01010(R)03/96] *[II01020(R)03/96]
*[II01030(R)03/96]
*[II01040(R)03/96] *[II01042(R)02/96] *[II01044(R)01/96]
*[II01046(R)01/96]
*[II01050(R)01/96] *[II01060(R)01/96]
*[II01070(R)03/96]
Things to Know About Using This Guide Congratulations on the purchase of your new vehicle. This guide has information about the equipment and the options for your new vehicle. You may not have bought all of the options available to you. If you do not know which information applies to your vehicle, talk to your dealer.
This guide describes equipment and gives specifications for equipment that was in effect when this guide was approved for printing. Ford may discontinue models or change specifications or design without any notice and without incurring obligation. NOTES and WARNINGS
NOTES give you additional information about the subject matter you are referencing.
WARNINGS remind you to be especially careful in those areas where carelessness can cause damage to your vehicle or personal injury to yourself, your passengers or other people. Please read all WARNINGS carefully.
R WARNING
Finding Information in This Guide
After you have read this guide once, you will probably return to it when you have a specific question or need additional information. To help you find specific information quickly, you can use the Quick Index, Table of Contents, or the Index.
The Quick Index at the end of the book provides a page number following each item which indicates where detailed information can be found.
File:02uniir.ex Update:Thu Mar 20 08:48:31 1997
*[II01080(R)01/96]
%*[II01090(R)01/96] *[II01100(R)01/96]
%*[II02400(R)01/96]
*[II02500(R)03/96]
%*[II02600(R)01/96] *[II02700(R)01/96]
%*[II03100(R)01/96]
*[II03250(R)03/96]
Introduction
To use the Index, turn to the back of the book and search in the alphabetical listing for the word that best describes the information you need. If the word you chose is not listed, think of other related words and look them up. We have designed the Index so that you can find information under a technical term. Canadian Owners — French Version
French Owner Guides can be obtained from your dealer or by writing to Ford Motor Company of Canada, Limited, Service Publications, P.O. Box 1580, Station B, Mississauga, Ontario L4Y 4G3. Your Maintenance Schedule and Record Booklet The Maintenance Schedule booklet lists the services that are most important for keeping your vehicle in good condition. A record log is also provided to help you keep track of all services performed. About the Warranties Your vehicle is covered by three types of warranties: Basic Vehicle Warranty, Extended Warranties on certain parts, and Emissions Warranties.
Read your Warranty Information Booklet carefully to find out about your vehicle’s warranties and your basic rights and responsibilities.
If you lose your Warranty Information Booklet, you can get a new one free of charge. Contact any Ford or Lincoln-Mercury dealer, or refer to the addresses and phone numbers on the first page of this Owner’s Guide.
File:02uniir.ex Update:Thu Mar 20 08:48:31 1997
%*[II04000(R)05/96] *[II04100(R)05/96] *[II04120(R)05/96]
*[II04140(R)05/96] *[II04160(R)05/96] *[II04180(R)05/96] *[II04200(R)05/96]
*[II04220(R)05/96]
*[II04240(R)05/96]
*[II04260(R)05/96] *[II04280(R)05/96]
Ford Extended Service Plan
More Protection for Your Vehicle
You can get more protection for your new car or light truck by purchasing a Ford Extended Service Plan (Ford ESP). Ford ESP is the only extended service program with the Ford name on it and the only service contract backed by Ford Motor Company.
Ford ESP is an optional service contract, backed and administered by Ford. It provides: n protection against repair costs after your Bumper to Bumper
Warranty expires; and
n other benefits during the warranty period (such as:
reimbursement for rentals; coverage for certain maintenance and wear items).
You may purchase Ford ESP from any participating Ford Motor Company dealer. There are several Ford ESP plans available in various time-and-mileage combinations. Each plan can be tailored to fit your own driving needs, including reimbursement benefits for towing and rental. (In Hawaii, rules vary. See your dealer for details.)
When you purchase Ford ESP, you receive peace-of-mind protection throughout the United States and Canada, provided by a network of more than 5,100 participating Ford Motor Company dealers.
NOTE: Repairs performed outside the United States and
Canada are not eligible for ESP coverage.
This information is subject to change. Ask your dealer for complete details about Ford ESP coverage.
File:02uniir.ex Update:Thu Mar 20 08:48:31 1997
%*[II04650(R)03/96] %*[II04750(R)01/96]
%*[II04800(R)05/96]
% [II04850(R)04/96]
[II04875(R)04/96]
%*[II06000(R)01/96] *[II06100(R)01/96]
%*[II06300(R)01/96] *[II06400(R)01/96] *[II06500(R)01/96] *[II06600(R)01/96] *[II06700(R)01/96]
Introduction
Special Notice NOTICE TO OWNERS OF FOUR-WHEEL DRIVE VEHICLES As with other vehicles of this type, failure to operate this vehicle correctly may result in loss of control or an accident. Be sure to read the Additional Special Driving Instructions for Four-Wheel Drive Vehicle Operators in this book and the special supplement included with four-wheel drive vehicles entitled 4-Wheeling. AMBULANCE PACKAGES
Do not use this vehicle as an ambulance.
R WARNING
Breaking Your Vehicle In Your new vehicle goes through an adjustment or break-in period during the first 1,000 miles (1,600 km) that you drive it. During the break-in period, you need to pay careful attention to how you drive your vehicle. n Avoid sudden stops. Because your vehicle has new brake
linings, you should take these steps:
— Watch traffic carefully so that you can anticipate when to
stop.
— Begin braking well in advance.
— Apply the brakes gradually.
The break-in period for new brake linings lasts for 100 miles (160 km) of city driving or 1,000 miles (1,600 km) of highway driving.
File:02uniir.ex Update:Thu Mar 20 08:48:31 1997
*[II06750(R)03/96]
%*[II06800(R)03/96]
*[II07000(R)01/96]
n Wheel lug nuts must be retightened to proper torque
specifications at 500 miles/800 km of new vehicle operation. Proper torque specifications are provided in this guide. Also retighten to proper torque specifications at 500 miles/800 km after any wheel change or any other time the wheel lug nuts have been loosened.
n Use only the type of engine oil that Ford recommends. See
Engine oil recommendations in the Index. Do not use special “break-in” oils.
Some vehicles are equipped with a Powertrain Control Module that limits engine speeds with a cut-out mode to promote durability.
File:03unisr.ex Update:Thu Mar 20 09:21:14 1997
%*[IS00400(R)01/96]
*[IS00500(R)03/96] *[IS00600(R)03/96] *[IS00700(R)03/96] *[IS00900(R)03/96]
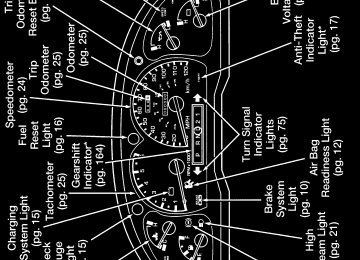
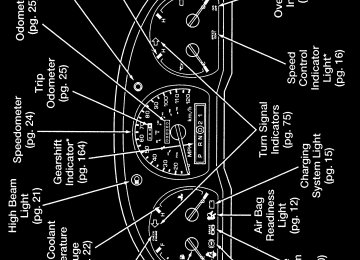
Instrumentation
The instrument panel (dashboard) on your vehicle is divided into several different sections. The illustrations on the following pages show the major parts of the instrument panel that are described in this chapter. Some items shown may not be on all vehicles.
Your vehicle has one of the following instrument clusters: n A standard instrument cluster n A optional instrument cluster with tachometer
If you are not sure which cluster your vehicle has, check the diagrams on the following pages of this section.
3
F
File:03unisr.ex Update:Thu Mar 20 09:21:14 1997
%*[IS03000(R)01/96] *[IS03100(R)01/96]
%*[IS03200(R)01/96] *[IS03300(R)03/96]
*[IS03400(R)03/96]
*[IS03500(R)03/96]
[IS03600(R)01/96]
6 pica art:0021145-A
The Mechanical Cluster The following warning lights and gauges are on the mechanical cluster. All of the warning lights and gauges alert you to possible problems with your vehicle. Some of the lights listed are optional. The following sections detail what each of these indicators means. Brake System Warning Light
The warning light for the brakes can show two things — that the parking brake is not fully released, or that the brake fluid level is low in the master cylinder reservoir. If the fluid level is low, the brake system should be checked by your dealer or a qualified service technician.
This light illuminates when you turn the ignition key to START to verify that the indicator bulb is working. If the light stays on or illuminates after you have released the parking brake fully, have the hydraulic brake system serviced.
R WARNING
The BRAKE light indicates that the brakes may not be working properly. Have the brakes checked immediately.
Brake warning light symbols
10
File:03unisr.ex Update:Thu Mar 20 09:21:14 1997
*[IS03800(R)01/96] [IS03925(R)01/96]
[IS03985(R)01/96]
[IS04050(R)01/96]
6 pica art:0021146-A
*[IS04100(R)03/96]
*[IS04110(R)03/96]
%*[IS04150(R)03/96] [IS04301(R)04/96]
[IS04325(R)05/96]
Instrumentation
Anti-lock Brake Warning Light To check the ABS brake warning light, turn the ignition key to ON. The ABS brake warning light should glow momentarily. NOTE: If the ABS brake warning light does not glow
momentarily, have your vehicle’s electrical system checked immediately. If the light begins to flash in a repeatable flash sequence, check the anti-lock system continuous power fuse and brakelamps for proper operation.
Anti-lock warning light symbol
R WARNING
If the anti-lock brake system warning light remains on or comes on while driving, have the braking system checked by a qualified service technician as soon as possible.
NOTE: If a fault occurs in the anti-lock system, and the brake
warning light is not lit, the anti-lock system is disabled but normal brake function remains operational.
Safety Belt Warning Light and Chime The safety belt warning light/chime reminds you to fasten your safety belt. One of the following will take place: n If the safety belt is not buckled before the key is turned to the ON position, the light comes on for one to two minutes and the chime sounds for 4 to 8 seconds.
11
File:03unisr.ex Update:Thu Mar 20 09:21:14 1997
*[IS04351(R)03/96]
[IS04355(R)01/96]
[IS04400(R)01/96]
6 pica art:0021148-B
%*[IS04420(R)03/96] [IS04430(R)01/96]
[IS04435(R)01/96]
*[IS04437(R)05/96]
n If the safety belt is buckled while the light is on and the
chime is sounding, both the light and chime turn off.
n If safety belt is buckled before the key is turned to the ON
position, both the light and the chime will not turn on.
Safety belt warning light symbol Air Bag Readiness Light
This light illuminates for approximately six seconds when the ignition key is turned to the ON position to verify that the indicator bulb is working and the air bag system is operating normally.
R WARNING
A problem with the air bag system is indicated by one or more of the following: the readiness light will either flash or stay lit, or it will not light, or a group of five beeps will be heard.
R WARNING
If any of these things happen, even intermittently, have the air bag system serviced at your Ford or Lincoln-Mercury dealer immediately.
12
File:03unisr.ex Update:Thu Mar 20 09:21:14 1997
[IS04440(R)01/96]
7-1/2 pica art:0021268-A
[IS04443(R)05/96]
[IS04444(R)01/96]
[IS04450(R)01/96] *[IS04460(R)01/96]
[IS04480(R)01/96]
7-1/2 pica art:0021269-A
Instrumentation
Air bag readiness light symbol Passenger Air Bag OFF Light (If equipped)
The passenger air bag OFF light is located in the lower center of the instrument panel next to the passenger air bag defeat switch. This yellow indicator light illuminates whenever the passenger air bag is turned off and the ignition is on. The passenger air bag should be turned off only when a rear-facing infant seat is installed in the front passenger seat. Door Ajar Warning Light (If equipped)
If the ignition switch is in the ON position and any door or the liftgate is not completely closed, the light will illuminate.
Door ajar warning light symbol
13
File:03unisr.ex Update:Thu Mar 20 09:21:14 1997
%*[IS04500(R)03/96] [IS04600(R)05/96]
[IS05300(R)01/96]
6 pica art:0021149-A
% [IS05835(R)05/96]
[IS05850(R)05/96]
[IS05855(R)05/96]
[IS05865(R)05/96]
6 pica art:0021226-B
Check Engine Warning Light
This light illuminates when the engine’s Emission Control System requires service. It will also illuminate when the ignition key is in the ON position and the engine is off.
Check engine warning light symbol Transmission Control Indicator Light (TCIL)
The TCIL tells you that the Transmission Control Switch (TCS) on the gearshift lever has been pushed. When the light illuminates, the transmission does not shift into j (Overdrive). Depressing the TCS on the shifter once more returns the vehicle to j (Overdrive). The transmission will be in j (Overdrive) when the vehicle is started even if the O/D OFF mode was selected when the vehicle was last shut off.
NOTE: If the TCIL does not come on when the TCS is
depressed or if the TCIL flashes when you are driving a malfunction has been detected. Have your vehicle serviced at the first opportunity. If this condition persists, damage could occur to the transmission.
Transmission control indicator light (if equipped)
14
File:03unisr.ex Update:Thu Mar 20 09:21:14 1997
%*[IS05900(R)01/96] *[IS06000(R)04/96]
[IS06100(R)01/96]
6 pica art:0021150-B
*[IS06200(R)03/96]
*[IS06300(R)03/96]
[IS06700(R)01/96]
[IS06800(R)04/96]
[IS06900(R)01/96]
[IS07000(R)01/96]
[IS07100(R)01/96]
[IS07200(R)01/96]
Instrumentation
Charging System Light
This light indicates that your battery is not being charged and that you need to have the electrical system checked.
Charging system light symbol
This light illuminates every time you turn the ignition to the ON or START position (engine off). The light should go off when the engine starts and the alternator begins to charge.
If the light stays on or illuminates when the engine is running, have the electrical system checked as soon as possible. Check Gage Light (If equipped)
This light will come on when the key is in the ON position and the: n engine coolant temperature is high n engine oil pressure is low n fuel level is near empty
This light serves as a notice that a system needs your attention and to check the engine coolant temperature gauge, the engine oil pressure gauge, and the fuel level gauge.
15
File:03unisr.ex Update:Thu Mar 20 09:21:14 1997
[IS07300(R)01/96]
[IS07400(R)01/96]
6 pica art:0021250-B
[IS07500(R)01/96]
[IS07600(R)01/96]
[IS07700(R)01/96]
6 pica art:0021372-A
[IS07710(R)05/96]
[IS07720(R)05/96]
[IS07730(R)05/96]
Please see Engine Coolant Temperature Gauge, Engine Oil Pressure Gauge, or Fuel Gauge in this chapter for more information.
Check gage light Fuel Reset Light (If Equipped)
Your vehicle may have a fuel reset light. The fuel reset light will come on when you turn the ignition key to ON and the fuel pump shut-off switch has been triggered. Refer to Fuel pump shut-off switch in the Index to find additional information.
Fuel reset light Speed Control Light (If equipped)
The SPEED CONT light will illuminate in the instrument cluster when the speed control system is engaged. The light will turn off when the brake pedal is pressed or if the speed control is shut off.
This display does not indicate any problems with the speed control, but is simply a convenient way of knowing when speed control is activated.
16
File:03unisr.ex Update:Thu Mar 20 09:21:14 1997
[IS07735(R)05/96]
6 pica art:0090108-A
[IS07740(R)05/96]
[IS07750(R)05/96]
[IS07760(R)05/96]
6 pica art:0021151-B
Instrumentation
Speed control light Anti-Theft Light (If equipped)
The THEFT light flashes on and off when the ignition switch is OFF and any door is opened. As soon as you lock the doors, the light illuminates steadily. Within 30 seconds of closing all the doors, the light flashes intermittently (every 2 seconds). This indicates that the anti-theft system is armed. Refer to Anti-Theft System in the Index for additional information.
Anti-theft indicator light
17
File:03unisr.ex Update:Thu Mar 20 09:21:14 1997
[IS07770(R)05/96]
[IS07780(R)05/96]
[IS07790(R)05/96]
6 pica art:0090222-A
% [IS07800(R)05/96]
[IS07810(R)05/96]
[IS07820(R)05/96]
6 pica art:0090223-A
Four-Wheel Drive Indicator Light (If equipped)
The 4WD light illuminates when the ignition is ON and the transfer case is placed in either the 4H (lever-operated system) or 4WD LOW (electric shift system) positions. Both the 4WD light and the 4WD LOW light will illuminate when the transfer case is in the 4L position (lever-operated system) or the 4WD LOW position (Electric shift system). Refer to Four-Wheel Drive (4WD) System in the Driving chapter for more information.
Four-wheel drive indicator light Four-Wheel Drive Low Range Indicator Light (If equipped)
The 4WD LOW light illuminates when the ignition is ON and the transfer case is placed in the 4L position (lever-operated system) or the 4WD LOW position (electric shift system). Refer to Four-Wheel Drive (4WD) System in the Driving chapter for more information.
Four-wheel drive low range indicator light
18
File:03unisr.ex Update:Thu Mar 20 09:21:14 1997
%*[IS07830(R)05/96] *[IS07900(R)04/96] *[IS08000(R)04/96]
*[IS08100(R)04/96]
[IS08200(R)01/96]
7-1/2 pica art:0020051-F
[IS08300(R)01/96]
7-1/2 pica art:0020539-H
Instrumentation
Battery Voltage Gauge (Voltmeter)
This gauge shows you the battery voltage when the ignition key is in the ON position.
If the battery is operating under cold weather conditions, the pointer may indicate in the upper range of the NORMAL band while the battery is charging. If you are running electrical accessories with the engine off or idling at a low speed, or the battery is not fully charged, the pointer may move toward the lower end of the NORMAL band.
If it stays outside the NORMAL band, have your vehicle’s electrical system checked as soon as it is safely possible.
Battery voltage gauge — mechanical cluster
Battery voltage gauge — mechanical cluster with tachometer
19
File:03unisr.ex Update:Thu Mar 20 09:21:14 1997
%*[IS08400(R)04/96] *[IS08500(R)01/96]
*[IS08600(R)05/96] *[IS08700(R)04/96] *[IS08800(R)03/96] *[IS08900(R)01/96]
*[IS09000(R)01/96]
[IS09100(R)01/96]
7-1/2 pica art:0020056-E
Engine Oil Pressure Gauge
This gauge indicates the engine’s oil pressure, not the oil level. However, if your engine’s oil level is low, it could affect the oil pressure. With the engine running, the pointer should move into the NORMAL band. If the pointer drops below the NORMAL band while the engine is running, you have lost oil pressure and continued operation will cause severe engine damage.
If you lose engine oil pressure:
1. Pull off the road as soon as safely possible.
2. Turn off the engine. If you do not stop the engine as soon as
safely possible, severe engine damage could result.
3. Check the engine’s oil level, following the instructions on checking and adding engine oil. Refer to Engine oil in the Index. If you do not follow these instructions, you or others could be injured. To assure an accurate reading, your vehicle should be on level ground.
4. If the level is low, add only as much oil as necessary before
you start the engine again. Do not overfill. Do not operate the engine if the pointer is below the NORMAL band, regardless of the oil level. Contact your nearest dealer for further service actions.
Engine oil pressure gauge — mechanical cluster
20
File:03unisr.ex Update:Thu Mar 20 09:21:14 1997
[IS09200(R)01/96]
7-1/2 pica art:0020540-E
%*[IS09300(R)05/96] *[IS09350(R)01/96]
[IS09400(R)01/96]
6 pica art:0021266-A
%*[IS09500(R)03/96] [IS09510(R)01/96]
%*[IS09550(R)03/96] *[IS09570(R)05/96]
Instrumentation
Engine oil pressure gauge — mechanical cluster with tachometer High Beam Light
This light comes on when the headlamps are turned on high beam or when you flash the lights. If your vehicle is equipped with daytime running lights and you have your headlamps on, your high beam light will not illuminate when you flash the lights.
High beam indicator light symbol “Headlamps On” Alert Chime
This chime sounds if you open the driver’s door while the headlamps or parking lamps are on, and the key is removed from the ignition. Ignition Key Buzzer or Chime
The buzzer or chime will sound if you open the driver’s door while the key is in the ignition and in the OFF, LOCK, or ACCESSORY position. Never leave your vehicle unattended with the key in the ignition.
21
File:03unisr.ex Update:Thu Mar 20 09:21:14 1997
%*[IS09600(R)05/96] *[IS09700(R)01/96] *[IS09850(R)01/96]
*[IS09860(R)01/96] *[IS09875(R)01/96]
[IS10200(R)01/96]
6 pica art:0020063-D
[IS10300(R)01/96]
6 pica art:0020752-E
%*[IS11100(R)03/96] *[IS11201(R)01/96]
Fuel Gauge
The fuel gauge displays approximately how much fuel is in the fuel tank only when the ignition switch is ON.
For a proper fuel gauge indication after adding fuel, the ignition switch should be in the OFF position while the vehicle is being refueled.
The fuel gauge indicator may vary slightly when the vehicle is in motion.
With ignition switch OFF, the fuel gauge indicator may drift from the ignition switch ON position.
Fuel gauge — mechanical cluster
Fuel gauge — mechanical cluster with tachometer Engine Coolant Temperature Gauge
This gauge tells you the temperature of the engine coolant, not the coolant level. If the coolant is not at its proper level or mixture, the gauge indicator will not be accurate.
22
File:03unisr.ex Update:Thu Mar 20 09:21:14 1997
*[IS11301(R)01/96]
*[IS11401(R)04/96]
*[IS11501(R)03/96] *[IS11601(R)03/96] *[IS11701(R)03/96] *[IS11801(R)03/96] *[IS11901(R)01/96]
*[IS12240(R)01/96]
[IS12300(R)01/96]
7-1/2 pica art:0020067-F
Instrumentation
The pointer moves from the C (cold) mark into the Normal band as the engine coolant warms up. It is acceptable for the pointer to fluctuate within the Normal band under normal driving conditions. Under certain driving conditions, such as heavy stop and go traffic or driving up hills in hot weather, the pointer may move to the top of the Normal band.
If, under any circumstances, the pointer moves above the normal band, the engine is overheating and continued operation may cause engine damage.
If your engine overheats:
1. Pull off the road as soon as it is safely possible.
2. Turn off the engine. If you do not stop the engine as soon as
safely possible, severe engine damage could result.
3. Let the engine cool. DO NOT REMOVE COOLANT SYSTEM FILL CAP UNTIL THE ENGINE IS COOL.
4. Check the coolant level following the instructions on
checking and adding coolant to your engine. Refer to Engine coolant in the Index. If you do not follow these instructions, you or others could be injured.
If the coolant continues to overheat, have the coolant system serviced as soon as possible.
Engine coolant temperature gauge — mechanical cluster
23
File:03unisr.ex Update:Thu Mar 20 09:21:14 1997
[IS12325(R)01/96]
7-1/2 pica art:0021154-C
%*[IS12601(R)03/96] *[IS12700(R)03/96] *[IS12753(R)03/96]
*[IS12756(R)03/96]
[IS12790(R)01/96]
10-1/2 pica
art:0020873-G
Engine coolant temperature gauge — mechanical cluster with tachometer Speedometer The speedometer tells you how many miles (kilometers) per hour your vehicle is moving. Some vehicles are equipped with a vehicle speed (mph/km/h) limiting device that is contained within the Powertrain Control Module (PCM). The purpose of this device is to maintain peak vehicle speed below a specified limit. (Vehicle speed limits may vary based on engine displacement.) If you are experiencing an “engine cut-out” condition at high speeds, it may be the result of this limiting device. It is a normal condition and can be avoided by reducing vehicle/engine speed.
Speedometer
24
File:03unisr.ex Update:Thu Mar 20 09:21:14 1997
%*[IS12801(R)03/96] *[IS12900(R)01/96] %*[IS13000(R)01/96] *[IS13100(R)04/96]
% [IS13200(R)04/96] *[IS13300(R)03/96] *[IS13400(R)03/96]
*[IS13525(R)03/96]
*[IS13550(R)03/96]
Instrumentation
Odometer
The odometer tells you the total number of miles (kilometers) your vehicle has been driven. Trip Odometer
If you want to track your mileage up to 999.9 miles (kilometers), use the trip odometer. Simply set the trip odometer to zero by pressing the reset control firmly when beginning the distance you wish to measure. Tachometer (If equipped)
The tachometer will show you the engine’s speed measured in revolutions per minute (RPM).
The tachometer may move slightly when the key is placed in the ACC or ON position, with the engine off. This is normal and does not affect the performance of the tachometer when the engine is running.
Some vehicles are equipped with an engine speed (RPM) limiting device contained within the powertrain control module (PCM). The purpose of this device is to maintain peak engine speed (RPM) below a specified limit. This feature is only evident on automatic transmission vehicles when shifting manually (1, 2, D) and on all manual transmission units. (Engine speed limits may vary based on engine displacement.)
If you are experiencing an “engine cut-out” condition at high speeds, it may be the result of this limiting device. It is a normal condition and can be avoided by reducing vehicle/engine speed.
25
File:03unisr.ex Update:Thu Mar 20 09:21:14 1997
[IS13650(R)05/96]
10-1/2 pica
art:0020258-G
[IS13675(R)01/96]
Tachometer NOTE: If the 4.0L engine exceeds 5200 RPM, the PCM will
restrict fuel flow to maintain engine speed at or below 5200 RPM. This function is designed to protect the engine and should be considered normal operation.
26
F
File:04unasr.ex Update:Thu Mar 20 08:49:21 1997
[AS29217(R)05/96] *[AS29220(R)03/96] *[AS29225(R)03/96] *[AS29230(R)01/95] *[AS29235(R)03/96] [AS29240(R)06/95]
*[AS29245(R)02/96]
*[AS29250(R)03/96] *[AS29255(R)02/95]
Stereo Cassette with CD DJ Compatibility Using the Controls on Your New Radio
How to turn the radio on and off
Press the “VOL/PUSH” knob to turn the radio on. Press again to turn it off.
How to adjust the volume
Turn the “VOL/PUSH” knob clockwise to increase the volume and counterclockwise to decrease the volume. Bars illuminate in the display to show relative volume level.
NOTE: If the volume level is set above a certain listening
level when the ignition switch is turned off, when the ignition switch is turned back on, the volume will come back to a “nominal” listening level. However, if the radio power is turned off, the volume will remain in the position it was set at when radio power was switched off.
Selecting the AM or FM frequency band
Push the “AM/FM” button to select the desired frequency band or to stop/store cassette tape (when in cassette mode). Pushing the button more than once will alternate between AM, FM1 and FM2. These functions are used with the station memory buttons described under How to tune radio stations.
28
File:04unasr.ex Update:Thu Mar 20 08:49:21 1997
%*[AS29260(R)03/96] [AS29265(R)10/94]
*[AS29270(R)03/96] [AS29275(R)03/95]
*[AS29280(R)03/96]
*[AS29285(R)04/96] [AS29290(R)09/94]
*[AS29295(R)04/96] *[AS29305(R)03/96]
*[AS29310(R)03/96]
Electronic Sound Systems
How to tune radio stations
There are four ways for you to tune in a particular station. You can use the “TUNE”, “SEEK”, “SCAN” or the memory buttons. n Using the “TUNE” function
You can change the frequency up or down one increment at a time by pressing and releasing either the left (b) or right (a) side of the “TUNE” button. To change frequencies quickly, press and hold down either the right or left side of the button.
Manual tuning adjusts your radio to any allowable broadcast frequency, whether or not a station is present on that frequency. (See All About Radio Frequencies in this section.)
n Using the “SEEK” function
This feature on your radio allows you to automatically select listenable stations up or down the frequency band. Press the right (a) side of the “SEEK” button to select the next listenable station up the frequency band. Press the left (b) side of the button to select the next listenable station down the frequency band. By pressing and holding the button, listenable stations can be passed over to reach the desired station.
n Using the “SCAN” function
Pressing the “SCAN” button will begin the scan mode up the frequency band, stopping on each listenable station for approximately five seconds.
To stop the scan mode on the presently sampled station, press the “SCAN” button again.
29
File:04unasr.ex Update:Thu Mar 20 08:49:21 1997
*[AS29315(R)03/96] *[AS29320(R)03/96]
*[AS29325(R)08/95] *[AS29330(R)03/96] *[AS29340(R)10/95]
*[AS29345(R)10/95] *[AS29350(R)01/95] *[AS29355(R)01/95]
*[AS29360(R)01/95]
*[AS29365(R)10/95]
*[AS29370(R)01/95] *[AS29375(R)01/95]
n Setting the station MEMORY PRESET buttons
Your radio is equipped with 6 station memory buttons. These buttons can be used to select up to 6 preset AM stations and 12 FM stations (6 in FM1 and 6 in FM2)
Follow the easy steps below to set these buttons to the desired frequencies:
1. Select a band, then select a frequency.
2. Press one of the memory preset buttons and hold the button until the sound returns. That station is now held in memory on that button.
3. Follow the two steps above for each station memory preset
button you want to set.
n Using the AUTOSET feature
With AUTOSET, you can continually set strong stations into your memory buttons without losing your originally set stations.
Press the “AUTOSET” button once. Your radio will set the first six strong stations of the band you are in (AM, FM1, or FM2) into the memory buttons. The display will show “AUTO”, then run through the frequencies setting the memory buttons.
NOTE: If there are fewer than five strong stations in the
frequency band, the remaining unfilled buttons will store the last strong station detected on the band.
When all stations are filled, the radio will begin playing the station stored in memory button 1.
To deactivate the Auto Memory Store mode and return to manually-set memory button stations, press the “AUTOSET” button. Display will show “AUTO” then “OFF”.
30
File:04unasr.ex Update:Thu Mar 20 08:49:21 1997
*[AS29380(R)03/96] *[AS29385(R)02/96] *[AS29390(R)03/96] *[AS29395(R)02/96] *[AS29405(R)03/96] *[AS29410(R)02/96] *[AS29415(R)03/96]
*[AS29420(R)04/96] *[AS29425(R)03/96]
*[AS29430(R)10/95]
Electronic Sound Systems
Adjusting the tone balance of your radio n Increasing or decreasing bass response
Press the top c of the “BASS” button to increase bass; press the bottom d of the “BASS” button to decrease bass.
n Increasing or decreasing treble response
Press the top c of the “TREBLE” button to increase treble; press the bottom d of the treble button to decrease treble.
n Adjusting speaker balance
Balance control allows you to adjust the sound distribution between the right and left speakers. Press the top c of the “BAL” button to shift the sound to the right speakers, and press the bottom d of the “BAL” button to shift the sound to the left speakers.
n Adjusting speaker fader
Fade control allows you to adjust the sound distribution between the front and rear speakers. Press the top c of the “FADE” button to shift the sound to the front speakers, and press the bottom d of the “FADE” button to shift the sound to the back speakers.
NOTE: Illuminated bars in the display show relative levels of bass and treble, and positions of speaker balance and fader functions (left to right, front to rear).
31
File:04unasr.ex