- 2009 Toyota Prius Owners Manuals
- Toyota Prius Owners Manuals
- 2008 Toyota Prius Owners Manuals
- Toyota Prius Owners Manuals
- 2013 Toyota Prius Owners Manuals
- Toyota Prius Owners Manuals
- 2004 Toyota Prius Owners Manuals
- Toyota Prius Owners Manuals
- 2001 Toyota Prius Owners Manuals
- Toyota Prius Owners Manuals
- 2005 Toyota Prius Owners Manuals
- Toyota Prius Owners Manuals
- 2015 Toyota Prius Owners Manuals
- Toyota Prius Owners Manuals
- 2012 Toyota Prius Owners Manuals
- Toyota Prius Owners Manuals
- 2002 Toyota Prius Owners Manuals
- Toyota Prius Owners Manuals
- 2010 Toyota Prius Owners Manuals
- Toyota Prius Owners Manuals
- 2014 Toyota Prius Owners Manuals
- Toyota Prius Owners Manuals
- 2006 Toyota Prius Owners Manuals
- Toyota Prius Owners Manuals
- 2003 Toyota Prius Owners Manuals
- Toyota Prius Owners Manuals
- 2007 Toyota Prius Owners Manuals
- Toyota Prius Owners Manuals
- 2011 Toyota Prius Owners Manuals
- Toyota Prius Owners Manuals
- Download PDF Manual
-
27p298
1. Touch
the “Delete All” switch of
“Group Name”.
1. Touch the “Delete” switch on the
“Log Data” screen.
221
(b) all at once
27p299
27p300
27p301
2. Touch the “Yes” switch.
2. Touch the “Yes” switch.
1. Touch the “Delete All” switch on the “Outgoing Calls” or “Incoming Calls” screen.
222
(v) Setting the security When you set the security, you can pre- vent people from using some functions of the hands−free system. It is useful when you leave your car with the hotel or you do not want others to see the data you registered. When you set or unlock the security, you have to input the security code. Be sure to change the default code when you use the security for the first time.
D Changing the security code The security code is 4 digits and the default is “0000”. Choose a new code that is hard for other people to know. When you change the security code, do not forget the code. The dealers cannot unlock the security when you forget it. If you forget the security code, initialize your personal data. (See “Initializing the security code” on page 225.)
27p303
2. Touch the “Change” switch.
27p302
1. Touch switch.
the
“Phone Book Lock”
223
D Phone Book Lock When you set the phone book lock, you can have functions locked. D Display of the phone book screen and transferring, registering, editing, delet- ing the phone book data.
following
the
D Display of speed dial screen, register- ing, deleting the speed dial and speed dialing.
D Display of the other party’s name for
calls being received or made.
D Display of dialed numbers screen and received calls screen, deleting dialed numbers and received numbers.
D Display of phone information screen. D Changing the security code. When you set this function, the speed dial screen is not displayed while you are driv- ing.
27p304
27p305
3. Input the security code. Each time you touch “A”, an inputted digit is deleted.
4. Touch the “Yes” switch.
224
27p306
27p307
1. Touch the “ON” switch.
2. Input the security code and touch
“OK”.
D Initializing the security code You can initialize the settings.
27p308
1. Touch the “Default” switch.
225
27p309
27p310
2. Input the security code and touch
“OK”.
3. Touch the “Yes” switch.
(f) Setting a Bluetooth phone D Selecting a Bluetooth phone In case you register more than one Bluetooth phone, you need to choose a favorite one.
27p311
1. Touch the “Settings” switch to dis-
play “Settings” screen.
226
27p312
27p313
27p314
2. Touch the “Select Telephone” switch to display “Select Telephone” screen. You can select the Bluetooth phone from a maximum of 6 numbers.
“Empty” is displayed when you have not registered a Bluetooth phone yet. Bluetooth mark choose the phone.
is displayed when you
Although you can register up to 6 Blue- tooth phones the system, only one Bluetooth phone can function at a time.
in
3. Touch the “OK” switch.
227
When another Bluetooth phone is trying to connect, this screen is displayed.
27p315
27p316
D Displaying Bluetooth information You can see or set the information of the Bluetooth phone on the system. Device Name
. .
the name of the Blue- tooth phone which is dis- played on the screen. You can change it into a desired name.
Bluetooth Device Address
the address peculiar system. You
. . to cannot change it.
the
the result message
When you can use the Bluetooth phone.
is displayed,
Touch the “Yes” or “No” switch.
27p317
1. Select the desired phone and touch
the “Information” switch.
228
27p318
27p319
2. Touch the “Change” switch.
3. When you complete
the setting,
touch “
”.
D Changing a Device Name You can change a device name. If you change a device name, the name regis- tered is not changed.
in your cellular phone
27p318
1. Touch the “Change” switch.
229
When you change the device name or Passkey, do the following.
27p321
1. Touch the “Bluetooth” switch.
D Changing the Bluetooth settings You can change the display and settings of Bluetooth information on the system. The items. Device Name
information displays
following
the
. .
in
name
the the Bluetooth network. You can change it. the password when you register cellular phone in the system. You can change the figure of 4−8 digits.
your
into
it
Passkey
. . . . . . .
Bluetooth Device Address . . . . . . . . . . . . . . . the address peculiar to the system. You can not change If you have it. two Bluetooth registered phones with the same Device Name or Passkey and cannot distinguish one from the other, refer to it.
you
27p320
2. Use the software keyboard to input
the device name.
230
27p322
27p323
27p324
2. Touch
the
“Change” of
Name” or “Passkey”.
“Device
3. Use the software keyboard to input
the device name.
You can input up to 20 characters.
4. Input a Passkey with 4 − 8 digits. When you touch “A”, the inputted digit is deleted.
231
D Initializing the Bluetooth settings. You can initialize the settings.
27p325
27p327
27p326
5. When you complete
the setting,
touch “
”.
1. Touch the “Default” switch.
2. Touch the “Yes” switch.
232
D Deleting a Bluetooth phone
27p328
27p329
27p330
1. Touch the “Delete” switch of “Blue-
tooth Telephone”.
2. Select the telephone you want to de-
lete and touch “OK”.
3. Touch the “Yes” switch.
233
D Displaying
the
information of
the
Bluetooth phone you delete
You can display the information of the Bluetooth phone before you delete it and you can make sure whether the telephone you delete is correct or not.
27p319
27p332
2. When you complete confirming
it,
touch “
”.
1. Select
the
telephone you want to
display the information about.
When you delete the telephone while another Bluetooth phone is connected, this message is displayed.
27p331
Touch the “Yes” switch.
234
—Speech command system The speech command system enables you to operate the hands−free system by giving a command.
27p203
27p335
1. Push the speech command switch. A beep sounds and on−screen message is displayed with an indicator at the top left.
2. Give a command while an indicator is shown in the display. If you want to check the command list, touch the “Help” switch to display the Help screen. (See “Help screen” on page 236.) When you touch the “Cancel”, the previous screen returns.
If the hands−free system does not re- spond or the confirmation screen does not disappear, push the speech command switch and try again. If no command is given, a beep sounds and the indicator disappears 6 seconds later. If the system does not recognize your speech, the system will respond with this message (“System does not recognize this command, command.”). Start the operation from the beginning.
rephrase
your
235
—Help screen This system has a function which dis- plays the voice recognition help screen. You can see the command list and op- erating guide on it. (a) Command List
(b) Operating Guide
27p362
27p361
1. Touch the “Operating Guide” tab on
the upper side of the screen.
27p334
"Microphone
It is unnecessary to speak directly into the microphone when giving a com- mand.
1. Touch the “Command List” tab on
the upper side of the screen.
2. Select
the desired category by touching the buttons on the right side of the “Command List” screen.* 3. You can scroll through the command ”
touching “
” or “
list by switch.
236
*: For the vehicles without Navigation Sys- tem, “Tel” only is shown. Touch the “OK” switch after you check it.
2. Select
the desired category by touching the buttons on the right side of “Operating Guide” screen.*
the
3. You can scroll through the list of the ” or
operating guide by touching “ “
” switch.
*: For the vehicles without Navigation Sys- tem, “Tel” only is shown. Touch the “OK” switch after you check it.
Adjustment
Type 1
Type 2 and Type 3
26p024a
27p142a
Push the “DISPLAY” button to display the “Display” screen.
Type 1 and Type 2
Contrast and brightness adjustment CONTRAST “+”: Strengthens the contrast of the screen. CONTRAST “–”: Weakens the contrast of the screen. BRIGHTNESS “+”: Brightens the screen. BRIGHTNESS “–”: Darkens the screen. The screen turns off when you touch the “SCREEN OFF”. To the display screen back on, push any bezel switch such as “INFO”, etc. The selected screen appears.
turn
26p026b
Type 3
237
Depending on the position of the head- light switch, the screen changes to the day mode or night mode. To display the screen in the day mode even with the headlight switch on, touch “DAY MODE” on the adjustment screen for brightness and contrast control. However, if the km/h or MPH button is on, mode switching cannot be done. It re- mains in the day mode. In this case, “DAY MODE” is not shown on the screen. If the screen is set in the day mode with the headlight switch this condition is memorized in the system even with the hybrid system turned off.
to on,
turned
Outside temperature display
27p155a
Type 1 and Type 2
26p046b
Type 3
27p146a
Type 1 and Type 2
26P051b
Type 3
238
(−22_F) up
from −30_C
The outside temperature is shown rang- to 50_C ing (122_F) at the upper right of the energy consumption or energy monitor screen or the upper left of the air conditioner screen.
239
240
SECTION 2– 8
OPERATION OF INSTRUMENTS AND CONTROLS Audio system Reference Using your audio systemm Radio operation Radio operation (XM satellite radio broadcast) Compact disc player operation (Type 1 and Type 2) Compact disc player operation (Type 3) MP3/WMA player operation Audio remote controls Audio system operating hints
. . . . . . . . . . . . . . . . . . . . . . . . . . . . . . . . . . . . . . . . . . . . . . . . . . . . . . . . . . . . . . . . . . . . . . . . . . . . . . . . . . . . . . . . . . . . . . . . . . . . . . . . . . . . . . . . . . . . . . . . . . . . . . . . . . . . . . . . . . . . . . . . . . . . . . . . . . . . . . . . . . . . . . . . . . . . . . . . . . . . . . . . . . . . . . . . . . . . . . . . . . . . . . . . . . . . . . . . . . . . . . . . . . . . . . . . . . . . . . . . . . . . . . . . . . . . . . . . . . . . . . . . . . . . . . . . . . . . . . . . . . . .
242
246
252
260
266
271
273
277
278241
Reference
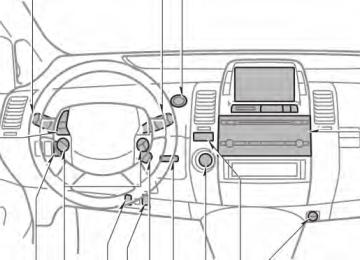
"Type 1
With Navigation System
242
26p202c
1. Multi−information display screen*
(See page 248 for details.)
2. Ejecting a compact disc
(See page 266 for details.)
3. Compact disc slot
(See page 266 for details.)
4. Frequency tuning and file search
(See page 253 and 274 for details.)
5. Scan tuning
(See page 255 for details.)
6. Compact disc or AUX adapter
mode button (See page 267 for details.)
7. Radio mode button
(See page 252 for details.)
8. Radio mode:
Compact disc mode:
Seek tuning (See page 254 for details.)
Direct access to a desired program (See page 268 for details.)
9. Turning the system on
(See page 247 for details.)
10. Adjusting the volume
(See page 247 for details.)
11. Compact disc load button
(See page 266 for details.)
12. Audio operation screen display button
*:
(See page 248 for details.) In this manual, English version screens are shown as an example.
243
"Type 2
244
26p201b
1. Multi−information display screen*
(See page 248 for details.)
2. Ejecting a compact disc
(See page 266 for details.)
3. Compact disc slot
(See page 266 for details.)
4. Frequency tuning and file search
(See page 253 and 274 for details.)
5. Scan tuning
(See page 255 for details.)
6. Compact disc or AUX adapter
mode button (See page 267 for details.)
7. Radio mode button
8. Radio mode:
(See page 252 for details.) Seek tuning (See page 254 for details.)
Compact disc mode:
Direct access to a desired program (See page 268 for details.)
9. Adjusting the volume
(See page 247 for details.)
10. Turning the system on
(See page 247 for details.)
11. Audio operation screen display button
*:
(See page 248 for details.) In this manual, English version screens are shown as an example.
"Type 3
26p014e
1. Multi−information display screen*
(See page 248 for details.)
2. Ejecting a compact disc
(See page 271 for details.)
3. Compact disc slot
(See page 271 for details.)
4. Frequency tuning
(See page 253 for details.)
5. Scan tuning
(See page 255 for details.) 6. Compact disc mode button (See page 271 for details.)
7. Radio mode button
8. Radio mode:
(See page 252 for details.) Seek tuning (See page 254 for details.)
Compact disc mode:
Direct access to a desired program (See page 272 for details.)
9. Adjusting the volume
(See page 247 for details.)
10. Turning the system on
(See page 247 for details.)
11. Audio operation screen display button
(See page 248 for details.) In this manual, English version screens are shown as an example.
*:
245
Using your audio system— —Some basics This section describes some of the basic features of the Toyota audio system. Some information may not pertain to your system. Your audio system works when the hybrid system is in “ACC” or “IG−ON”.
NOTICE
the battery
To prevent from being discharged, do not leave the audio on longer the hybrid system is not running.
than necessary when
TURNING THE SYSTEM ON AND OFF Push “PWR” button to turn the audio sys- tem on and off. The system turns on in the last mode used.
26p195a
Type 1
246
Type 2 and Type 3
VOLUME CONTROL To adjust the volume, push and turn the “VOL”.
Type 1 and Type 2
Type 1
Type 3
Type 2
247
26p260
26p136a
Type 3
Radio (Type 1)
Radio (Type 3)
the
“AM”,
“AM·SAT”,
Push “FM”, “DISC” or “DISC·AUX” button to turn on that mode. The selected mode turns on directly. Push these buttons if you want to switch from one mode to another. If the disc is not set, the compact disc player does not turn on.
248
Radio (Type 2)
26p205c
26p138a
26p206b
Compact disc (Type 1)
Compact disc (Type 3)
The switches for radio and compact disc player operation are displayed on the liquid crystal display. Touch them lightly and directly on the screen. The selected switch is highlighted in green or orange.
TONE AND BALANCE Touching the “SOUND” switch on the screen displays the sound adjustment screen.
Compact disc (Type 2)
249
treble, mid−range, and bass
How good an audio program sounds to you is largely determined by the mix of the levels. In fact, different kinds of music and vocal programs usually sound better with differ- ent mixes of treble, mid−range and bass. A good balance of the left and right stereo channels and of the front and rear sound levels is also important. Keep in mind that if you are listening to a stereo recording or broadcast, changing the right/left balance will increase the vol- ume of one group of sounds while de- creasing the volume of another.
26p261
Type 1
Type 2
TREB “+” or “–”: Adjusts high−pitched tones. MID “+” or “–” (Type 1 only): Adjusts mid−pitched tones. BASS “+” or “–”: Adjusts tones. “FRONT” or “REAR”: Adjusts sound bal- ance between the front and rear speakers. “L” or “R”: Adjusts sound balance be- tween the left and right speakers. “OK”: The previous screen returns.
low−pitched
250
AUTOMATIC SOUND LEVELIZER (ASL) (Type 1 and Type 2 only) When the audio sound becomes difficult to be heard due to road noise, wind noise, etc. during driving, the system adjusts to the optimum volume and tone quality ac- cording to the noise level. Vehicles with compact disc changer: Touch the “ASL” switch. When the system is on, the sound adjust- ment level is displayed on the screen. Vehicles without compact disc changer: Touch “ASL” screen. Touch “High”, “Mid” or “Low” and “OK”. When you touch “High”, you can obtain higher sensitivity of the sound levelizer. When you touch “Low”, the sensitivity will be lowered. Touching “Off” turns the system off.
the “DSP” switch
to display
then
the
YOUR RADIO ANTENNA To remove an antenna on the roof, care- fully turn it counterclockwise.
NOTICE
To prevent damage to the antenna, make sure to remove it before driving your Toyota through an automatic car wash.
YOUR COMPACT DISC PLAYER When you insert a disc, gently push it in with the label side up. The discs set in the player are played continuously, starting with disc number 1. The disc number of the disc currently be- ing played, the track number and the time from the beginning of the program appear on the display. Type 1 only: When play of one disc ends, first track of the following disc starts. When play of the final disc ends, play of the first disc starts again. The player will skip any empty disc num- ber.
the
251
Radio operation
(a) Listening to the radio Push these buttons to choose either an AM or FM station. “AM”, “FM1” or “FM2” appears on the dis- play. If your vehicle is equipped with satellite radio broadcast system, when you push the “AM·SAT” button, “SAT1”, “SAT2” or “SAT3” station appears on the display. For details about satellite radio broadcast, see “Radio operation (XM sat- ellite radio broadcast)” on page 260.
“AM”,
NOTICE
z Do not stack up two discs for in- sertion, or it will damage the com- pact disc player. Insert only one compact disc into a slot at a time. z Never try to disassemble or oil any part of the compact disc player. Do not insert anything other than com- pact discs into the slot.
The player is intended for use with 12 cm (4.7 in.) discs only.
252
Type 1
26p124
Type 2 and Type 3
26P197
Push and turn this knob to step up the station band or to step down. Your radio automatically changes to stereo reception when a stereo broadcast is re- ceived. “ST” appears on the display. If the signal becomes weak, the radio reduces the amount of channel separation to pre- vent the weak signal from creating noise. If the signal becomes extremely weak, the radio switches from stereo to mono recep- tion. In this case, “ST” disappears from the display.
26p260
Type 1 and Type 2
Type 1
26p125
Type 3
Type 2
253
(c) Selecting a station Tune in the desired station using one of the following methods. Preset tuning: Touch the switch (1−6) for the station you want. The switch (1−6) is highlighted in green and station frequency appears on the display. Manual tuning: Turn the “TUNE·FILE” and “TUNE” knob briefly. Each time you turn the knob, the radio will step up or down to another frequency. Seek tuning: Push “SEEK·TRACK” button on either side. The radio will begin seeking up or down for a station of the nearest frequency and will stop on recep- tion. Each time you push the button, the stations will be searched out one after another.
the
26p262
Type 1
Type 2
26p141a
Type 3
(b) Presetting a station 1. Tune in the desired station. 2. Touch one of the station selector switches (1−6) and hold it until a beep is heard. This sets the station to the switch and the frequency ap- pears on the switch.
Each switch can store FM1, FM2 and AM. To change the preset station to a different one, follow the same procedure. is cancelled The preset station memory when the power source is interrupted by battery disconnection or a blown fuse.
254
26p126
Preset scan tuning: Push the “SCAN” button or touch the “SCAN” switch (AM mode only) and hold it until you hear a beep. “P. SCAN” appears on the display. The radio will tune in the next preset sta- tion up or down the band, stay there for a few seconds, and then move to the next preset station. To select a station, push the “SCAN” button a second time.
26p263
Type 3
Type 1
Scan tuning: Push the “SCAN” button or touch the “SCAN” switch (AM mode only) briefly. “SCAN” appears on the display. The radio will find the next station up or down the band, stay there for a few se- conds, and then scan again. To select a station, push the “SCAN” button a second time.
Type 2
255
26p142a
the program
(d) RDS (Radio Data System) (1) Program type Each time you touch the “TYPE A” or “TYPE "” switch, type changes as in the following: D ROCK D EASY LIS (Easy listening) D CLS JAZZ (Classical music and Jazz) D R&B (Rhythm and Blues) D INFORM (Information) D RELIGION D MISC D ALERT (Emergency message)
26p264
Type 1
Type 2
Type 3
256
26p257
26p265
26p258
Type 3
Type 1
Type 3
When you touch the “TYPE A” or “TYPE "”, “TYPE SEEK” switch appears. Touch the switch and the system starts to seek the station in the relevant program type.
Type 2
257
the
touch
(2) Traffic program: A station that regularly broadcasts traf- fic information is automatically located. When you “TRAF” switch, “TRAF SEEK” appears on the display and the radio will start seeking any traffic pro- gram station. If any traffic program station is not found, “NOTHING” appears and the previous mode returns. If the traffic program station is found, the name traffic program station is dis- played and “TRAF” is lit for a while until traffic announcement is received.
for
26p266
26p259
Type 1
Type 3
258
Type 2
(3) Radio text If the system receives a radio text from RDS station, “MSG” appears on the dis- play. Touch the “MSG” switch, and a text message is displayed on the screen.
26p267
26p145b
Type 1
Type 3
In case a text message is not accepted in a screen, you can touch the “MSG” switch and hold it to display the rest of the message. When the system can show the station name, the display. Each time you touch the “MSG” switch, indication on the display changes from the band to the station name, a radio text in this order. After six seconds passes, indi- cation returns to the band.
“RDS” appears on
259
Type 2
Radio operation (XM satellite radio broadcast) (Type 1 only) To listen to a satellite radio broadcast in your vehicle, an additional genuine Toyota satellite receiver and antenna must be purchased and installed, and the subscrip- tion to the XM satellite radio is necessary.
(a) How to subscribe to an XM satellite
radio
An XM satellite radio is a tuner designed exclusively to receive broadcasts provided under a separate subscription. Availability is limited to the 48 contiguous states. How to subscribe: You must enter into a separate service agreement with the XM radio in order to receive satellite broadcast programming in the vehicle. Additional activation and ser- vice subscription fees apply that are not included in the purchase price of the ve- hicle and optional digital satellite tuner. For complete information on subscription rates and terms, or to subscribe to the XM the web at www.xmradio.com or call an XM’s Listener Care at (800) 852−9696. The XM radio is solely responsible for the quality, avail- ability and content of the satellite radio services provided, which are subject to the terms and conditions of the XM radio customer service agreement.
radio, visit XM on
260
their
radio
the “channel 000” on
Customers should have ID ready; the radio ID can be found by se- lecting the radio. For details, see the “Displaying the radio ID” that follows. All fees and programming are the respon- sibility of the XM satellite radio and are subject to change. Satellite tuner technology notice: Toyota satellite radio tuners are awarded Type Approval Certificates from XM Satel- lite Radio Inc. on “October 14, 2004” as proof of compatibility with the services of- fered by the XM satellite radio. (b) Displaying the radio ID Each XM tuner is identified with a unique radio ID. You will need the radio ID when activating XM service or when reporting a problem. If you select the “TUNE·FILE” knob, the ID code of 8 al- phanumeric characters appears. If you select another channel, display of the ID code is canceled. The channel (000) al- ternates the display between the radio ID and the specific radio ID code.
“CH 000” using
the
(c) Listening to the satellite radio Push the “AM·SAT” button to choose a SAT channel. “AM”, “SAT1”, “SAT2” or “SAT3” appears on the display.
26P197
26p213b
Turn this knob to select the next or pre- vious channel. If you turn continuously, you can rapidly scroll forward or down through the chan- nels.
(d) Presetting a channel 1. Tune in the desired channel. 2. Touch one of the channel selector switches (1−6) and hold it until a beep is heard. This sets the chan- nel to the switch and the frequency appears on the switch.
Each switch can store three SAT chan- nels. To change the preset channel to a different one, follow the same procedure. The preset channel memory is cancelled when the power source is interrupted by battery disconnection or a blown fuse.
(e) Selecting a channel Tune in the desired channel using one of the following methods. Preset tuning: Touch the switch (1−6) for the channel you want. The switch (1−6) is highlighted in green. Manual tuning within the channel cate- gory: Turn the “TUNE·FILE” knob. The radio will step up or down the channel. Manual tuning within the current chan- nel category: Push the “SEEK·TRACK” button on either side. The radio will step up or down the channel within the current channel category. Touch the “TYPE SEEK” switch. The radio will step up the channel within the current channel category.
261
To scan the preset channels: Push the “SCAN” button and hold it until you hear a beep. “P.SCAN” appears on the display. The radio will find the next preset chan- nel, stay there for a few seconds, and then move to the next preset channel. To select a channel, push the “SCAN” button a second time.
(f) Channel category
” Touch either switch to switch to the next or previous category.
“TYPE
“TYPE
” or
the
To scan the currently selected channel category: Touch the “TYPE SCAN” switch or push “SCAN” button briefly. “SCAN” appears on the display. The ra- dio will find the next channel in the same channel category, stay few seconds, and then scan again. To select a channel, touch the “TYPE SCAN” switch or push the “SCAN” button a second time.
for a
there
262
26p216c
(g) Displaying the title and name When you touch the “TEXT” switch, the song/program title and the artist name/fea- ture are displayed. Up to 32 alphanumeric characters can be displayed. (Some information will not be fully displayed.)
263
If the satellite radio tuner malfunctions
(h) When problems occur with the XM tuner, a message will appear on the display. Referring to the table below to identify the problem, take the suggested corrective action.
ANTENNA
UPDATING
NO SIGNAL
LOADING OFF AIR
−−−−−
−−−
The XM antenna is not connected. Check whether the XM antenna cable is attached securely. A short−circuit occurs in the antenna or the surrounding antenna cable. See a Toyota certified dealer. You have not subscribed to the XM satellite radio. The radio is being updated with the latest encryption code. Contact the XM satellite radio for subscription information. When a contact is canceled, you can choose the “CH000” and all free−to−air channels. The premium channel you selected is not authorized. Wait for about 2 seconds until the radio returns to the previous channel or “CH001”. If it does not change automatically, select another channel. If you want to listen to the premium channel, contact the XM satellite radio. The XM signal is too weak at the current location. Wait until your vehicle reaches a location with a stron- ger signal.
The unit is acquiring audio or program information. Wait until the unit has received the information. The channel you selected is not broadcasting any programming. Select another channel. There is no song/program title or artist name/feature associated with the channel at that time. No action needed.
The channel you selected is no longer available. Wait for about 2 seconds until the radio returns to the previous channel or “CH001”. If it does not change automatically, select another channel.
The XM Listener Care Center is also available on the phone, please call (800) 852−9696 during the following hours: Monday – Saturday: 7 a.m. – 1 a.m. Sunday: 12 p.m – 12 a.m.
264
NOTICE
in a residential
This equipment has been tested and found to comply with the limits for a class B digital device, pursuant to Part 15 of the FCC Rules. These limits are designed to provide reason- able protection against harmful inter- ference installation. This equipment generates, uses and can radiate radio frequency energy and, if not installed and used in ac- cordance with the instructions, may interference to radio cause harmful communications. is no guarantee that interference will not occur in a particular installation.
However, there
Increase
the separation between
If this equipment does cause harmful interference to radio or television re- ception, which can be determined by turning the equipment off and on, the user is encouraged to try to correct the interference by one or more of the following measures: — Reorient or relocate the receiving antenna. — the equipment and receiver. — Connect the equipment into an out- let on a circuit different from that to which the receiver is connected. — Consult the dealer or an experi- enced radio/TV technician for help. Information to user Alternation or modifications carried out without appropriate authorization may invalidate the user’s right to op- erate the equipment.
This XM tuner supports “Audio Ser- vices” (Music and Talk) of only XM satellite radio and “Text Information”, linked to the respective “Audio Ser- vices”. *Text includes, Station Name, (Artist) Name, (Song) Title and Category Name.
Information
265
NOTICE
Do not insert one disc stacked on top of another one or feed them in con- tinuously, to prevent discs from get- ting stuck in the player.
Inserting or ejecting compact disc
Compact disc player operation (Type 1 and Type 2) (a) Type 1: D Setting a single compact disc: 1. Push the “LOAD” button briefly. The amber indicators at both ends of the slot blinking. The amber blinking indicators change to continuous green illumination. 2. Insert only one disc. You can set a disc at the lowest empty disc number. After insertion, the set disc is automatical- ly loaded. If the label faces down, the disc cannot be played. In this case, “CD CHECK” ap- pears on the display. If you need to insert the next disc, repeat the same procedure to insert another disc.
D Setting all the discs: 1. Push the “LOAD” button until you
hear a beep.
The amber indicators at both ends of the slot blinking. The amber blinking indicators change to continuous green illumination. 2. Insert only one disc. The amber indicators blink. 3. Insert the next disc after the amber blinking indicators change to contin- uous green illumination.
4. Repeat this procedure until you in-
sert all the discs.
To cancel the operation, push the “LOAD” button. Your automatic changer can store up to 6
discs. If you do not insert the discs within 15
seconds after pushing the “LOAD” button, the operation will be canceled automatical- ly.266
26p129c
26p205c
D Ejecting a single alone: 1. Touch the switch (1−6) to highlight the disc number you want to eject.
2. Push the “
” button for the com-
pact disc briefly.
At this time, the amber indicators of the slot start blinking. D Ejecting all the discs:
Push the “ disc until you hear a beep.
” button for the compact
The numbers of the trays where the com- pact disc is not set are dimmed. Type 2: When you insert a disc, the player will automatically start. To eject the disc, push the “
” button.
(b) Playing a compact disc Type 1: Push the “DISC·AUX” button if the disc is already loaded in the player. “CD CHANGER” appears on the display. The discs set in the player are played continuously, starting with last disc you inserted. The disc number of the disc currently being played, the track number and the time from the beginning of the program are shown on the display. When play of one disc ends, first track of the following disc starts. When play of the final disc ends, play of the first disc starts again.
the
the
267
The player will skip any empty disc trays. When the AUX adapter is in use, each time you push the “DISC·AUX” button, the audio switches the compact disc mode and AUX mode alternately. For details about AUX adapter, see page 306. Type 2: Push the “DISC·AUX” button if the disc is already loaded in the player. “CD” appears on the display. The discs set in the player are played continuously. The track number and the time from the beginning of the program are shown on the display.
26p205c
(c) Selecting a desired disc (Type 1 only) Touch the desired disc number. The selected disc number is highlighted in green. The player will start playing the selected disc from the first track.
268
the selected
(d) Selecting a desired track “SEEK·TRACK” button: Push the “SEEK·TRACK” button. The play- er will start playing track from the beginning. Track list screen: Touch the desired track displayed on the track list screen. The track list screen cannot be displayed while driving. For details about the track list screen, see ”Displaying the track list” on page 270.
fast
the switch,
(e) Fast Forward/Reverse Push the “SEEK·TRACK” button and hold it to fast forward/reverse the disc. When you release the player will resume playing. When if you reach the end of the final track, the player will go back to the start track and continue op- eration. When reversing, if you reach the begin- ning of the start track, reverse is can- celled, even if you continue to hold down the button.
forwarding,
26p234b
26p235b
(f) Repeating the same track Touch the “RPT” switch briefly. When the track is finished, the player will automati- cally go back to the beginning of the track and play the track again. To cancel it, touch the “RPT” switch once again. (g) Repeating the same disc Touch the “RPT” switch and hold it until you hear a beep. When the disc is fin- ished, the player will automatically go back to the beginning of the disc and play the disc again. To cancel it, touch the “RPT” switch once again.
(h) Listening to the tracks in the disc you are listening to, in random or- der
Touch the “RAND” switch briefly, the sys- tem selects a track in the disc you are currently listening to. To cancel it, touch the “RAND” switch once again. (i) Listening to the tracks in all the
discs set, in random order
Touch the “RAND” switch and hold it until you hear a beep, the system selects a track in all the discs which are set and plays it. To cancel it, touch the “RAND” switch once again.
269
After all pass, normal play resumes.
the discs are scanned in one
26p218c
26p236b
(j) Searching for a desired track Touch the “SCAN” switch briefly, the play- er will play the next track for 10 seconds, then scan again. To select a track, touch the “SCAN” switch a second time. After all the tracks are scanned in one pass, normal play resumes. (k) Searching for a desired disc
(Type 1 only)
Touch the “SCAN” switch and hold it until you hear a beep, the track at the begin- ning of each disc will be played for 10
seconds. To continue listening to the track of your choice, touch the “SCAN” switch a second time.270
(l) Displaying the track list Touch the “TRACK LIST” switch. The track list screen will be displayed. If there are more than 6 tracks, touch “Y” or “B” to change the page. If you touch a track, that track will be played. Only track names of 13 characters or less can be displayed. Furthermore, track names may not be displayed correctly or at all, depending on the recorded content.
Inserting or ejecting compact disc
Compact disc player operation (Type 3) (a) When you insert a disc, the player will automatically start. To eject the disc, push the “
” button.
(m) If the player malfunctions If the player or another unit equipped with the player malfunctions, your audio system will display the following error messages. If “CD CHECK” appears on the display, it indicates that the disc is dirty, damaged or it was inserted up side down. Clean the disc or insert it correctly. If “CD ERROR” appears on the display, the following causes are possible. D There
the system.
trouble
inside
is
Eject the disc.
D The inside of the player unit may be too hot due to the very high ambient temperature. Eject the disc and allow the player to cool down.
If the malfunction is not rectified, take your vehicle to your Toyota dealer.
(b) Playing a compact disc Push the “DISC” button if the disc is already loaded in the player. “CD” appears on the display. The discs set in the player are played continuously. The track number and the time from the beginning of the program are shown on the display.
271
(d) Searching for a desired track Touch the “SCAN” switch. “SCAN” will be highlighted in green. The compact disc player will play the next track for 10 seconds, then scan again. To select a “SCAN” switch a second time. If the player reach- es the end of the disc, it will continue scanning at track 1. After all the tracks are scanned in one pass, normal play resumes.
track,
touch
the
(e) Other compact disc player functions “RPT” switch: Use it for automatic repeat of the track you are currently listening to. Touch the switch while the track is play- ing. When the track is finished, the player will automatically go back to the beginning of the track and play the track again. To cancel it, touch the switch once again.
(c) Selecting a desired track “SEEK·TRACK” button: Use access to a desired track. Push either side of the “SEEK·TRACK” button. The player will start playing the selected track from the beginning.
for direct
Fast forward: Touch the “ ” switch and hold it to fast forward the disc. When you release the switch, the compact disc play- er will resume playing from that position.
Reverse: Touch the “ ” switch and hold it to reverse the disc. When you release the switch, the compact disc player will resume playing.
272
“RAND” switch: Use it for automatic and random selection of the disc which you are currently listening to. When the switch is touched, the system selects a track in the disc you are cur- rently listening to. To cancel it, touch the switch once again. “TITLE” switch: Use it for displaying the disc and track title while the CD−TEXT disc is playing. The switch is not displayed on the screen while the CD−TEXT disc is not playing. Up letters can be displayed. To cancel it, touch the “TITLE OFF” switch.
to 29
If the player malfunctions
(f) If the player or another unit equipped with the player malfunctions, your audio system will display the following error messages. If “CD CHECK” appears on the display, it indicates that the disc is dirty, damaged or it was inserted up side down. Clean the disc or insert it correctly. If “CD ERROR” appears on the display, the following causes are possible. D There
the system.
trouble
inside
is
Eject the disc.
D The inside of the player unit may be too hot due to the very high ambient temperature. Eject the disc and allow the player to cool down.
If the malfunction is not rectified, take your vehicle to your Toyota dealer.
MP3/WMA player operation (Type 1 and Type 2) (a) Inserting or ejecting MP3/WMA disc Refer to the “(a) Inserting or ejecting com- pact disc” on page 266. (b) Playing a compact disc Refer to the “(b) Playing a compact disc” on page 267. (c) Selecting a desired disc (Type 1 only) Refer to the “(c) Selecting a desired disc” on page 268.
273
Turn the knob clockwise to search up the files. Turn the knob counterclockwise to search down the files.
26p239b
26p240a
(d) Selecting a desired folder “FOLDER” switch: Touch either side of the “FOLDER” switch. The player will start playing the file in the selected folder. Folder list screen: Touch the desired folder displayed on the folder list screen. The folder list screen cannot be displayed while driving. For details the folder list screen, see ”Dis- playing the folder list” on page 276.
(e) Selecting a desired file “TRACK” button: Push the “SEEK·TRACK” button. The play- er will start playing the selected file from the beginning. File list screen: Touch the desired file displayed on the file list screen. The file list screen cannot be displayed while driving. For details about the file list screen, see ”Displaying the file list” on page 276. “TUNE·FILE” knob:
274
fast
the switch,
(f) Fast Forward/Reverse Push the “SEEK·TRACK” button and hold it to fast forward/reverse the disc. When you release the player will resume playing. When if you reach the end of the final file, the player will go back to the start file and continue opera- tion. When reversing, if you reach the begin- ning of the start file, reverse is cancelled, even if you continue to hold down the button.
forwarding,
26p241b
26p242b
(g) Repeating the same file Touch the “RPT” switch briefly. When the file is finished, the player will automatical- ly go back to the beginning of the file and play the file again. To cancel it, touch the “RPT” switch once again. (h) Repeating the same folder Touch the “RPT” switch and hold it until you hear a beep. When the folder is fin- ished, the player will automatically go back to the beginning of the folder and play the folder again. To cancel it, touch the “RPT” switch once again.
(i) Listening to the files in the folder you are listening to, in random or- der
Touch the “RAND” switch briefly, the sys- tem selects a file in the folder you are currently listening to. To cancel it, touch the “RAND” switch once again. (j) Listening to the files in all the fol-
ders, in random order
Touch the “RAND” switch and hold it until you hear a beep, the system selects a file in all the folders which are set and plays it. To cancel it, touch the “RAND” switch once again.
275
(k) Searching for a desired file
(m) Displaying the folder list
(n) Displaying the file list
26p243b
26p244b
26p245b
the
in one
Touch the “SCAN” switch briefly, the play- er will play the next file for 10 seconds, then scan again. To select a file, touch the “SCAN” switch a second time. After all files are scanned pass, normal play resumes. (l) Searching for a desired folder Touch the “SCAN” switch and hold it until you hear a beep, the file at the beginning of each folder will be played for 10 se- conds. To continue listening to the file of your choice, touch the “SCAN” switch a second time. After all the folders are scanned in one pass, normal play resumes. 276
Touch the “FOLDER LIST” switch. The folder list screen will be displayed. If there are more than 6 folders, touch “Y” or “B” to change the page. If you touch a folder, that folder will be played. Up to 13 characters of folder name can be displayed. However, folder names may not be displayed correctly or at all, de- pending on the recorded content. If you touch the “FILE” switch, the file list screen will be displayed.
Touch the “FILE” switch. The file list screen will be displayed. If there are more than 6 files, touch “Y” or “B” to change the page. If you touch a file, that file will be played. Up to 13 characters of file name can be displayed. However, file names may not be displayed correctly or at all, depending on the recorded content. If you touch the “FOLDER” switch, the folder list screen will be displayed.
26p246b
Audio remote controls (steering switches)
26p112
If the player malfunctions
(p) If the player or another unit equipped with the player malfunctions, your audio system will display the following error messages. If “CD CHECK” appears on the display, it indicates that the disc is dirty, damaged or it was inserted up side down. Clean the disc or insert it correctly. If “CD ERROR” appears on the display, the following causes are possible. D There
the system.
trouble
inside
is
(o) Displaying the file information Touch the “DETAIL” switch on the fold- er list or file list screen. Up to 32 characters of album title, track, artist’s name or music genre can be dis- played. However, some information may not be displayed correctly or at all, de- pending on the recorded content.
Eject the disc.
D The inside of the player unit may be too hot due to the very high ambient temperature. Eject the disc and allow the player to cool down.
If “NO DATA DISC” appears on the dis- play, it indicates that a disc with no MP3
or WMA data has been inserted. Remove the disc from the player and insert a MP3
or WMA data disc. If the malfunction is not rectified, take your vehicle to your Toyota dealer.The switches are installed on the left side of the steering pad. “MODE” switch: Use to change the mode. If a compact disc is not inserted, the “CD” mode is skipped. When you push the switch with the audio system turned off, the audio system turns on.
this switch
” switches: Use the switches to ad- “ just the volume. Push “+” to increase the volume and “–” to decrease the volume. The volume continues to increase or de- crease while the switch is being pressed.
277
” or “
(b) When the “CD” mode is selected “ select a desired track or disc. D Push this switch briefly to select a de-
” switch: Use this switch to
sired track.
D To select a desired disc, push and hold this switch until the desired number of the disc appears and you hear a beep. (c) When the “MP3/WMA” mode is se-
lected ” or “
” switch: Use this switch to
“ select a desired file or folder. D Push this switch briefly to select a de-
sired file.
D To select a desired folder, push and hold this switch until the desired folder appears and you hear a beep.
CAUTION
Operate the switches with due care while you are driving to avoid acci- dents.
Audio system operating hints
NOTICE
To ensure correct audio system op- erations: z Be careful not to spill beverages
over the audio system.
z The use of a cellular phone inside or near the vehicle may cause a noise from the speakers of the au- dio system which you are listening to. However, this does not indicate a malfunction.
RADIO RECEPTION Usually, a problem with radio reception does not mean there is a problem with your radio—it is just the normal result of conditions outside the vehicle. For example, nearby buildings and terrain can interfere with FM reception. Power lines or telephone wires can interfere with AM signals. And of course, radio signals have a limited range. The farther you are from a station, the weaker its signal will be. conditions change constantly as your vehicle moves.
In addition,
reception
” or “
” switch: Push this switch for
(a) When the radio mode is selected “ seek tuning or to select a station. D To select a preset station, push the switch briefly. Do this again to select the next preset station.
D To seek a station, push and hold the switch until you hear a beep. Do this again to find the next station. If you push the switch on either side (“Ɲ” or “Ɯ”) during the seek mode, seeking will be canceled.
the
D To step up or down
frequency, push and hold the switch even after you hear a beep. When you release from the switch, the radio will begin seeking up or down for a station. Do this again to find the next station.
278
signals are
Here are some common reception prob- lems that probably do not indicate a prob- lem with your radio: FM Fading and drifting stations—Generally, the effective range of FM is about 40 km (25
miles). Once outside this range, you may notice fading and drifting, which increase with the distance from the radio transmit- ter. They are often accompanied by distor- tion. Multi−path—FM reflective, making it possible for two signals to reach your antenna at the same time. If this happens, the signals will cancel each oth- er out, causing a momentary flutter or loss of reception. Static and fluttering—These occur when signals are blocked by buildings, trees, or other large objects. Increasing the bass level may reduce static and fluttering. the FM signal you Station swapping—If are interrupted or weak- is ened, and there is another strong station nearby on the FM band, your radio may tune in the second station until the origi- nal signal can be picked up again.