- 2009 Toyota Prius Owners Manuals
- Toyota Prius Owners Manuals
- 2008 Toyota Prius Owners Manuals
- Toyota Prius Owners Manuals
- 2013 Toyota Prius Owners Manuals
- Toyota Prius Owners Manuals
- 2004 Toyota Prius Owners Manuals
- Toyota Prius Owners Manuals
- 2001 Toyota Prius Owners Manuals
- Toyota Prius Owners Manuals
- 2005 Toyota Prius Owners Manuals
- Toyota Prius Owners Manuals
- 2015 Toyota Prius Owners Manuals
- Toyota Prius Owners Manuals
- 2012 Toyota Prius Owners Manuals
- Toyota Prius Owners Manuals
- 2002 Toyota Prius Owners Manuals
- Toyota Prius Owners Manuals
- 2010 Toyota Prius Owners Manuals
- Toyota Prius Owners Manuals
- 2014 Toyota Prius Owners Manuals
- Toyota Prius Owners Manuals
- 2006 Toyota Prius Owners Manuals
- Toyota Prius Owners Manuals
- 2003 Toyota Prius Owners Manuals
- Toyota Prius Owners Manuals
- 2007 Toyota Prius Owners Manuals
- Toyota Prius Owners Manuals
- 2011 Toyota Prius Owners Manuals
- Toyota Prius Owners Manuals
- Download PDF Manual
-
pedal. For better holding power, first de- press the brake pedal and hold it while setting the parking brake. To release: Depress pedal while depressing the brake pedal. To remind you that the parking brake is set, the parking brake reminder light in the instrument panel remains on until you release the parking brake.
the parking brake
CAUTION
D Driving with the parking brake en-
gaged can reduce braking power.
D Before driving, be sure the parking brake is fully released and the park- ing brake reminder light is off.
Cruise control The cruise control allows you to cruise the vehicle at a desired speed over 40
km/h (25 mph) even with your foot off the accelerator pedal. Your cruising speed can be maintained up or down grades within the limits of hybrid system performance, although a slight speed change may occur when driving up or down the grades. On steeper hills, a greater speed change will occur so it is better to drive without the cruise control.CAUTION
D To help maintain maximum control of your vehicle, do not use the cruise control when driving in heavy or varying traffic, or on slip- pery (rainy, icy or snow–covered) or winding roads.
If
D Avoid vehicle speed increases when driving downhill. the vehicle speed is too fast in relation to the cruise control set speed, cancel the cruise control then shift the shift lever to “B” position to use engine braking to slow down.
25p006a
25p007a
TURNING THE SYSTEM ON To operate the cruise control, push the “ON·OFF” switch. This turns the system on. The indicator light in the instrument panel shows that you can now set the vehicle at a desired cruising speed. Anoth- er push on the switch will turn the system completely off.
CAUTION
To avoid accidental cruise control en- gagement, keep the “ON·OFF” switch off when not using the cruise control.
SETTING AT A DESIRED SPEED The transaxle must be in “D” before you set the cruise control speed. Bring your vehicle to the desired speed, push the lever down in the “– SET” direc- tion and release it. This sets the vehicle at that speed. If the speed is not satisfactory, tap the lever up for a faster speed, or tap it down for a slower speed. Each tap changes the set speed by 1.6 km/h (1.0 mph). You can now the accelerator pedal.
take your
foot off
157
RESETTING TO A FASTER SPEED Push the lever up in the “+ RES” direction and hold it. Release the lever when the desired speed is attained. While the lever is held up, the vehicle will gradually gain speed. However, a faster way to reset is to ac- celerate the vehicle and then push the control lever down in the “– SET” direc- tion. RESETTING TO A SLOWER SPEED Push the lever down in the “– SET” direc- tion and hold it. Release the lever when the desired speed is attained. While the lever is held down, the vehicle speed will gradually decrease. However, a faster way to reset is to de- press the brake pedal and then push the control lever down in the “– SET” direc- tion.
If you need acceleration—for example, when passing—depress the accelerator pedal enough for the vehicle to exceed the set speed. When you release it, the vehicle will return to the speed set prior to the acceleration. CANCELLING THE PRESET SPEED You can cancel the preset speed by: in a. Pulling
control
lever
the
the
“CANCEL” direction and releasing it.
b. Depressing the brake pedal. If the vehicle speed falls below about 40
km/h (25 mph), the preset speed will auto- matically cancel out. If the vehicle speed drops 16 km/h (10
mph) below the preset speed, the preset speed will also automatically cancel out. If the preset speed automatically cancels out other than for the above cases, have your vehicle checked by your Toyota deal- er at the earliest opportunity.158
lever or by depressing
RESUMING THE PRESET SPEED If the preset speed is cancelled by pulling the control the brake pedal, pushing the lever up in the “+ RES” direction will restore the speed set prior to cancellation. However, once the vehicle speed falls be- low about 40 km/h (25 mph), the preset speed will not be resumed. CRUISE CONTROL FAILURE WARNING If the instrument cluster flashes when using the cruise control, press the “ON·OFF” button to turn the system off and then press it again to turn it on. If any of the following conditions then oc- curs, there is some trouble in the cruise control system. D The indicator light does not come on. D The indicator light flashes again. D The
light goes out after
“CRUISE”
indicator
indicator
light
the
in
it
comes on.
If this is the case, contact your Toyota dealer and have your vehicle inspected.
SECTION 2– 7
OPERATION OF INSTRUMENTS AND CONTROLS Multi−information display Reference Before using the multi−information displayy Switch operation Functions Information Hands−free system Adjustment Outside temperature display
. . . . . . . . . . . . . . . . . . . . . . . . . . . . . . . . . . . . . . . . . . . . . . . . . . . . . . . . . . . . . . . . . . . . . . . . . . . . . . . . . . . . . . . . . . . . . . . . . . . . . . . . . . . . . . . . . . . . . . . . . . . . . . . . . . . . . . . . . . . . . . . . . . . . . . . . . . . . . . . . . . . . . . . . . . . . . . . . . . . . . . . . . . . . . . . . . . . . . . . . . . . . . . . . . . . . . . . . . . . . . . . . . . . . . . . . . . . . . . . . . . . . . . . . . . . . . . . . . . . . . . . . . . . . . . . . . . . . . . . . . . . . . . . . . . . . . . . . . . . . . . . . . . . . . . . . . . . . . . . . . . . . . . . . . . . .
160
163
163
164
166
171
237
238159
27p163b
Reference
"Type 1
160
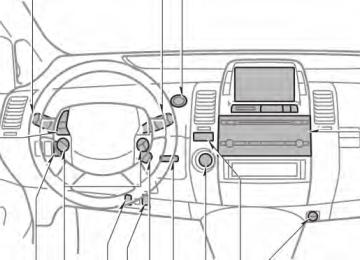
1. Multi−information display*
(See page 163 for details.)
2. “DISPLAY” button
The display adjustment shown. (See page 237 for details.)
screen
is
3. “INFO” button
The information menu screen is shown. (See page 166 for details.)
4. “CLIMATE” button
The air conditioning operation screen is shown. (See page 286 for details.)
5. “AUDIO” button
The audio operation screen is shown. (See page 242 for details.)
6. “INFO” button (on the steering pad)
The trip information screen is shown. (See page 168 for details.)
7. Speech command button (on the steer-
ing pad) (See page 235 for details.)
8. Telephone button (on the steering pad)
(See page 171 for details.)
*:
In this manual, English version screens are shown as an example.
"Type 2
27p162b
1. Multi−information display*
(See page 163 for details.)
2. “DISPLAY” button
The display adjustment shown. (See page 237 for details.)
screen
is
3. “INFO” button
The information menu screen is shown. (See page 166 for details.)
4. “CLIMATE” button
The air conditioning operation screen is shown. (See page 286 for details.)
5. “AUDIO” button
The audio operation screen is shown. (See page 242 for details.)
6. “INFO” button (on the steering pad)
The trip information screen is shown. (See page 168 for details.)
7. Speech command button (on the steer-
ing pad) (See page 184 for details.)
8. Telephone button (on the steering pad)
(See page 171 for details.)
*:
In this manual, English version screens are shown as an example.
161
"Type 3
162
1. Multi−information display*
(See page 163 for details.)
2. “DISPLAY” button
The display adjustment shown. (See page 237 for details.)
screen
is
3. “INFO” button
The information menu screen is shown. (See page 166 for details.)
4. “CLIMATE” button
The air conditioning operation screen is shown. (See page 286 for details.)
5. “AUDIO” button
The audio operation screen is shown. (See page 242 for details.)
*:
In this manual, English version screens are shown as an example.
Before using the multi−information display
27p178
Type 1 and Type 2
26p049b
Type 3
the “ACC” mode is enabled,
When the initial screen appears and the system be- gins operating. After a few seconds, the previous mode display will appear. If the electrical power source has been disconnected the multi−information display, the display will be automatically set to the initial mode.
from
CAUTION
Do not adjust the display while the vehicle is moving. Be sure to adjust the display only when the vehicle is stopped.
lightly
Switch operation the This system operates mainly by the switches on the screen. To protect screen, the touch switches on screen with your finger. When you touch a switch on the screen or on the bezel, a beep sounds. D If the system does not respond to a touch of a switch, move your finger away from the screen and then touch it again.
D You cannot operate dimmed switches. D Wipe off fingerprints on the surface of the display using a glass cleaning cloth.
D The displayed
image may become darker and moving images may be slightly distorted when the display is cold.
D When you look at the screen through polarized material such as polarized sunglasses, the screen may be dark and hard to see. If so, change the angle of the screen or take off your sunglasses.
163
Functions
26p148
26p027c
27p142a
Type 1*
Type 3
*: For other functions (Maintenance, Cal- ender and Beep setting), see the sepa- rate “Navigation System Owner’s Manu- al”.
2. Adjustment The contrast and brightness on the screen are adjusted. For details, see page 237.
1. Trip
information, Telephone, Lan-
guage and Screen setting
For details, see page 166.
27p149
Type 2
164
27p150
26p203a
24p117
3. Air conditioner Climate setting operations are available. For details, see page 286.
4. Audio The radio and compact disc operations are available. For details, see page 242.
5. Warning display The warning symbol for the faulty system appears. For details, see page 132.
165
Information
Type 1
Type 2 and Type 3
26p009b
27p148
26p027c
Push the “INFO” button to display the “Information Menu” screen.
Type 1
Type 3
Trip information: The energy monitor and fuel consumption screen are selected. Telephone: Telephone screen (See page 171 for details.) Language: Select shown. Screen setting: The screen setting screen is shown.
language screen
is shown.
is
27p149
Type 2
166
—Trip information
27p151a
Energy monitor screen Touch the “Energy” switch. Vehicle driving condition, hybrid system operating condi- tion and energy recovery condition are shown. 1.
Indicates the flow of energy by orange and yellow arrows. While the energy is recovered, the pointing direction and turn green. Indicates the remaining capacity of the hybrid battery.
the arrows
change
2.
27p152a
Type 1 and Type 2
The screen display updates every 3 sec- onds, so the actual status.
it may not coincide with
Type 1 and Type 2
26p038d
26p039c
Type 3
Type 3
167
Fuel consumption screen Touch the “Consumption” switch. Average fuel consumption, momentary fuel con- sumption recovered energy are shown. 1.
and
Indicates the past momentary fuel con- sumption every 5 minutes. Indicates the energy recovered for 5
minutes with symbols. One symbol re- fers to 50 Wh or the energy by which a 50 W bulb illuminates for an hour. Up to 4 symbols will be shown. Indicates consumption. Indicates the average fuel consumption after being reset. When the “Reset” switch is touched or more than 10 L (2.6 gal., 2.2 Imp.gal.) fuel is supplied, the average fuel consumption is reset.the current momentary
fuel
2.
3.
4.
168
—Language
26P180
27p154
Steering switch operation (Type 1 and Type 2) The trip information screen appears direct- ly by pressing the “INFO” button on the right side of the steering pad. Each press changes the “Energy Monitor” and “Con- sumption” screens alternately.
Type 1 and Type 2
26p115
Type 3
You can select the language shown on the screen. Touch your desired switch on the screen.
—Screen setting
27p145
Type 1 and Type 2
AUTOMATIC TRANSITION The function returning to the previous screen from the audio or air conditioner screen is selectable. Select “ON” or “OFF” and then touch “OK”. ON: The previous screen automatically re- turns from the audio or air condition- er screen 20 seconds after the end of audio or air conditioner screen op- eration.
OFF:The audio or air conditioner screen
remains on.
the desired switch color and
SWITCH COLOR Select touch “OK”. DELETE PERSONAL DATA The following personal data can be de- leted or returned to their default set- tings: D Phone book data D Dialed numbers and received calls D Speed dial D Bluetooth phone data D Security code This function is available only when the vehicle is not moving.
169
27p145
27p342
27p343
1. Touch “Delete personal data”. The pears.
“Delete personal data” screen ap-
2. Touch “Delete”. The “Confirmation for deleting all personal data” screen appears.
3. Touch “Yes”.
170
BACKGROUND COLOR Select and touch “OK”.
the desired background color
26p030c
Type 3
AUTOMATIC TRANSITION The function returning to the previous screen from the audio or air conditioner screen is selectable. Select “ON” or “OFF” and then touch “OK”. ON: The previous screen automatically re- turns from the audio or air condition- er screen 20 seconds after the end of audio or air conditioner screen op- eration.
OFF:The audio or air conditioner screen
remains on.
Hands−free system Hands−free system allows you to make or receive a call without taking your hands off the steering wheel by con- necting your cellular phone. This system supports Bluetooth. Bluetooth is a wireless data system by which you can call without your cellular phone being connected with a cable or placed on a cradle. If your cellular phone does not support Bluetooth, this system cannot function.
CAUTION
While you are driving, do not use a cellular phone or connect the Blue- tooth phone.
NOTICE
Do not leave your cellular phone in the vehicle. The temperature indoor may be high and damage the phone.
171
INFORMATION
In the following conditions, the sys- tem may not function. D The cellular phone is turned off. D The current position is outside the
communication area.
D The cellular phone is not connected. D The cellular phone has a low bat-
tery.
27p333
27p334
By pushing the telephone button above, you can receive a call or hang up with- out taking your hands off the steering wheel.
You can use when talking on the phone.
the microphone above
172
The other party’s voice outputs from the driver’s speaker. When the received calls or received voice outputs, the audio from the audio system will be muted.
INFORMATION
D Talk alternately with the other party on the phone. If you talk at the same time, the voice may not reach each other. (It is not a malfunc- tion.)
27p180
D Keep the volume of receiving voice down. Otherwise, echo is coming up. When you talk on the phone, speak clearly the micro- phone. the
following situations, your voice may not reach the other party. z Driving on unpaved road. (Mak-
towards
D In
ing a traffic noise.)
z Driving at the high speed. z The window is open. z Turning the air conditioning vents
towards the microphone.
z The sound of the air conditioning
fan is loud.
1. Indicates the condition of Bluetooth
connection.
“Blue” indicates an excellent connection to Bluetooth. “Yellow” indicates a bad connection to Bluetooth, resulting in possible deteriora- tion of voice quality.
: no connection to Bluetooth.
2. Indicates
the amount of battery
charge left.
Full
Empty It is not displayed while the Bluetooth is connecting or the phone book data is be- ing transferred. The amount left does not always corre- spond with the one of your cellular phone. This system does not have a charging function. 3. Indicates the receiving area. “Rm” Roaming area. “Hm” Home area. 4. Indicates the level of reception.
is displayed when
is displayed when
receiving
receiving
in
in
Excellent
Too bad The level of reception does not always correspond with the one of your cellular phone.
173
INFORMATION
This system supports the following service. D HFP (Hands Free Profile) Ver. 1.0
D OPP (Object Push Profile) Ver. 1.1
If your cellular phone does not sup- port HFP, you cannot enter the Blue- tooth phone, and take OPP service individually.An antenna for the Bluetooth connec- tion is built in the display. The indica- tion of the Bluetooth connection may turn yellow and the system may not function when you use the Bluetooth phone in the following conditions and places. D Your cellular phone is hiding behind the display (behind the seat or in the glove box and console box).
D Your cellular phone touches or is cov-
ered with metal materials.
Leave the Bluetooth phone on the place where “Blue” indication is displayed.
Bluetooth is a trademark owned by Blue- tooth SIG. Inc.
lot of personal data
When you release your vehicle: is registered when you use the hands−free system. When you release your vehicle, initial- ize your data. If you initialize it, the former state will never come back again. Pay much atten- tion when initializing the data. You can initialize the following data in the system. D phone book data D dialed numbers and received calls D speed dial D Bluetooth phone data D security code
174
FCC ID: BABBT003A IC ID: 2024B−BT003A MADE IN JAPAN
the
This device complies with Part 15 of the FCC Rules and RSS−210 of IC Rules. Operation is subject to the fol- lowing two conditions: (1) This device may not cause harmful interference, and (2) This device must accept any inter- ference received, including interference that may cause undesired operation.
CAUTION
Changes or modifications not ex- pressly approved by the party respon- sible for compliance could void the user’s authority to operate the equip- ment.
CAUTION: Radio Frequency Radiation Exposure This equipment complies with FCC radi- ation exposure limits set forth for uncon- trolled equipment and meets the FCC radio frequency (RF) Exposure Guide- lines in Supplement C to OET65. This equipment has very low levels of RF energy that it deemed to comply without maximum permissive exposure evalua- tion (MPE). But it is desirable that it should be installed and operated with at least 20cm and more between radiator and person’s body (excluding extremi- ties; hands, wrists, feet and legs). Co−location: This transmitter must not be co−located or operated in conjunction with any other antenna or transmitter.
(a) Entering a Bluetooth phone To use the hands−free system, you need to enter your phone into the sys- tem. Once you have registered it, you can make a hands−free call. 1. Push the “INFO” button to display
the “Information” screen.
27p181
2. Touch the “Telephone” switch to dis-
play “Telephone” screen.
button of the You can also push the steering wheel to display this screen when the vehicle is stopped.
175
27p182
27p183
27p184
3. Touch the “Settings” switch to dis-
play “Settings” screen.
4. Touch the “Bluetooth” switch to dis- play the “Bluetooth Settings” screen.
5. Touch the “Register” switch to con- nect your cellular phone to the sys- tem.
176
27p185
27p186
27p187
6. When this screen is displayed, input the Passkey displayed on the screen into the phone.
For the operation of the phone, see the manual that comes with your cellular phone. If you want to cancel it, touch “Cancel”.
7. When the connection is completed,
this screen is displayed.
When this screen is displayed, follow the guidance on the screen to try again.
You do not need to enter the phone in case of using the same one.
177
D Connecting a Bluetooth phone (a) automatically
27p188
27p189
(b) manually When failed or turned off, you have to connect Blue- tooth manually.
the auto connection
27p190
When the “ACC” or “IG−ON” mode is enabled, the selected Bluetooth phone will be automatically connected and the connection result is displayed. This screen appears when the Bluetooth phone is first connected after the “ACC” or “IG−ON” mode is enabled.
Touch the “Connect” switch after hav- ing enabled the Bluetooth connection on the phone.
When you register your phone, auto connection will be turned on. Always set it to this mode and leave the Blue- tooth phone in a condition where con- nection can be established. Each time you touch the “Auto Connect” switch, auto connection will be switched on or off.
178
reconnects
D Reconnecting the Bluetooth phone If the Bluetooth phone is disconnected with a poor reception from the Blue- tooth network when the “ACC” or “IG− ON” mode is enabled, the system auto- matically the Bluetooth phone. In this case, the connection
result is not displayed. If the Bluetooth is disconnected on pur- pose such as you turned your cellular phone off, this does not happen. Recon- nect it by the following methods. D Select the Bluetooth phone again. D Enter the Bluetooth phone.
(b) Calling on the Bluetooth phone After you enter the Bluetooth phone, you can call by using hands−free sys- tem. You can call using the 7 methods described below. (i) By dial You can call by inputting the telephone number. This cannot be operated while you are driving.
27p191
the connection is completed, this
When screen is displayed. Now you can use the Bluetooth phone.
27p192
Touch the desired key to input the tele- phone number.
179
Each time you digit is deleted.
touch “A”, an inputted
When you touch “ called last is inputted.
”, the number you
Touch “ steering wheel.
” or push the
button of the
(ii) By phone book You can call by phone book data which is transferred from your cellular phone. The system has one phone book. You can register up to 1000 numbers. This cannot be operated while you are driving.
27p194
27p193
2. Select the desired number from the
list.
Touch the desired key to input the tele- phone number. 1. Touch the “Phone Book” switch to
display “Phone Book” screen.
180
(iii) By dialed numbers You can call by dialed number. The system memorizes up to 5 dialed num- bers. If it is over 5, the oldest number is deleted. This cannot be operated while you are driving.
27p197
27p195
Touch “ steering wheel.
” or push the
button of the
27p196
1. Touch the “Call Log” switch to dis-
play “Outgoing Calls” screen.
D When you call by phone book,
the
name (if registered) is displayed.
D When you call the same number con- tinuously, only the newest number is registered.
2. Select the desired number from the
list.
181
(iv) By received calls You can call by received calls. When a call is received, the system memo- rizes up to 5 numbers. If it is over 5, the oldest number is deleted. This cannot be operated while you are driving.
27p199
27p198
Touch “ steering wheel.
” or push the
button of the
27p196
2. Touch the “Incoming Calls” switch to
display “Incoming Calls” screen.
1. Touch the “Call Log” switch to dis-
play.
182
27p200
27p198
button of the
” or push the
Touch “ steering wheel. D An international phone call may not be made depending on the cellular phone which you have.
D When a telephone number registered in the phone book is received, the name and the number are displayed.
D Received calls which you did not an- swer are also memorized in the system and “Abs.” left side of the number.
is displayed on
the
D Unnoticed telephone number such as a public telephone is not memorized in the system.
3. Select the desired number from the
list.
(v) By speed dial You can call by registered telephone number which you selected from a phone book, dialed numbers and re- ceived calls. (See page 191 for regis- tering the speed dial.)
27p201
1. Touch the “Speed Dial” switch to
display “Speed Dial” screen.
183
(vi) By voice recognition
Example: Call Charlize
27p202
27p203
27p194
2. Touch the desired number to call. You can change the page by touch- ing “Speed Dial 2” or “Speed Dial 3”.
When you push the telephone button while you are driving, the screen above ap- pears. Touch the desired name to call. (The telephone number is not displayed.)
You can call by giving a command. (For the operation and command of voice recognition, see “Speech Command System” on page 235 and “Help screen” on page 236.) D Dialing by name You can call by giving a voice tag reg- istered in the phone book. For setting the voice recognition, see “Setting the voice recognition” on page 209.
184
You: System:
You: System:
You: System:
Push the talk switch. “After the beep, please say the name.” “Charlize.” “Charlize chosen, when ready, please briefly push talk switch or push the off−hook switch to dial.” Push the talk switch. “After “Dial”.” “Dial.” “Dialing the name.”
the beep, please say
the
You: System: Now you can call Charlize.
27p204
“Next” is displayed when multiple entries are found for a searched name. Up to 6 entries can be displayed including the first searched one. Do the following to change the entry to the next one. D Touch the “Next” switch. D Push the talk switch to say “Next Can-
didate”.
Calling without the voice recognition. After the entry number is displayed, you can also call by pushing the telephone button or touching the “Dial” switch.
Cancelling the voice recognition The voice recognition will be cancelled when you do the following. D Keep on pushing the talk switch. D Push wheel.
the steering
button of
the
D Touch the “Cancel” switch. (Except for
recognizing the command)
D Say “Cancel”.
185
D Dialing by phone number You can call by giving a desired num- ber.
27p205
You: System:
You: System:
You: System:
ready, please briefly the talk switch or push
Push the talk switch. “After the beep, please say the number.” “812387” “When push the off−hook switch to dial.” Push the talk switch. “After the beep, please continue to add numbers or say “Dial”.” “Dial.” “Dialing the number.”
You: System: Now you can call 812387.
D Sending a tone You can send a tone by giving a de- sired number.
27p206
You: System: You: System: You: System: You: System: Now you can send the tone.
Push the talk switch. “Say numbers, pound, or star.” “1234.” “1234.” “Push the talk switch.” Push the talk switch. “Send? Say Yes or No.” “Yes.” “Sending.”
186
(vii) By POI call (with Navigation System)
(c) Receiving on the Bluetooth phone
27p207
27p208
To adjust the volume of received call:
Touch “–” or “+” or use the volume switch of the steering wheel.
On the international phone call, the other party’s name may not be displayed cor- rectly depending on the cellular phone which you have.
You can call by touching “ ” when it is displayed on the screen from Naviga- tion system. (See the separate “Navi- gation System Owner’s Manual” for de- tails.)
When a call is received, this screen is ” displayed with a sound. Touch “ or push the button of the steering wheel to talk on the phone. To hang up the phone:
” or push the Touch “ the steering wheel again. To refuse to receive the call: ” and hold it.
Touch “
button of
187
To input a Key:
Touch the “0−9” switch.
To transfer the call
Touch the “Transfer Call” switch.
You cannot change from hands−free call to cellular phone call while you are driv- ing. When you change from cellular phone call to hands−free call, the hands−free screen will be displayed and you can operate it on the screen. Transferring method and behavior are dif- ferent depending on the cellular phone which you have. For the operation of the phone, see the manual that comes with your cellular phone.
27p206
the desired number
Touch key. To hang up the phone:
to
input
the
Touch “ the steering wheel.
” or push the
button of
This cannot be operated while you are driving.
(d) Talking on the Bluetooth phone
27p209
While you are talking on the phone, this screen is displayed. You can do the operations below on the screen. To adjust the volume of the other party’s voice:
Touch “–” or “+” or use the volume switch of the steering wheel.
To hang up the phone:
Touch the “
” switch or push the
button of the steering wheel
To mute your voice:
Touch the “Mute” switch.
188
27p210
If the continuous tone signal is regis- tered in a phone book, this screen ap- pears. (If not registered, “Send” and “Exit” are not displayed.) Confirm the number displayed on the screen and touch “Send”. The number before marked sign will be sent. When you touch “Exit”, this function will be finished and normal tone screen ap- pears. To hang up the phone:
Touch “ the steering wheel.
” or push the
button of
The continuous tone signal is the marked sign (p or w) and the number following telephone number. (ex. 056133p0123w#1:)
You can do this operation when you want to operate an answering machine or use a telephone service for example. You can register the phone number and the code number in the phone book.
in bank
D Sending a tone by the speed tone You can send a tone by the speed tone. (For registering tone, see “Registering the speed tone” on page 194.)
the speed
27p211
1. Touch the “Speed Tone” switch.
189
(e) Changing the settings of the Bluetooth phone
27p212
27p214
27p311
2. Touch the desired switch to send a
tone.
You can change phone.
the settings of the
Touch the “Settings” switch to display “Settings” screen.
190
(i) (a) Registering the speed dial You can register the desired telephone number from phone book, dialed num- bers and received calls. to 17
speed dial numbers can be registered. The 6th entry is the speed dial for redial- ing.Up
27p215
1. Touch the “Speed Dial” switch to the “Speed Dial Settings”
display screen.
27p216
27p217
2. Touch
the
“Speed Dial”.
“Register” switch of
3. Select the data you want to register.
191
27p218
27p219
27p220
4. Touch the desired telephone number.
5. Touch the switch you want to regis-
ter in.
6. If you select a switch you registered
before, this screen is displayed.
The latest dialed number is registered in the 6th item (speed redial).
Touch the “Yes” switch if you want to overwrite it.
192
D Deleting the speed dial individually You can delete “01” − “17” of speed dial individually. If you delete them all at once, all of 17
numbers are deleted.the
27p222
27p223
27p221
2. Touch the switch you want to delete.
3. Touch the “Yes” switch.
1. Touch the “Delete” switch of “Speed
Dial”.
193
D Deleting all of the speed dial
(b) Registering the speed tone You can register the desired tone num- ber. Up to 6 speed tone numbers can be registered.
27p224
27p225
2. Touch the “Yes” switch.
27p226
1. Touch
the “Delete All” switch of
“Speed Dial”.
1. Touch
the
“Register” switch of
“Speed Tone”.
194
27p227
27p228
27p229
2. Use the software keyboard to input
the name.
3. Input the number and touch “OK”.
4. Touch the desired switch you want
to register in.
195
D Editing the speed tone. You can edit the speed tone.
27p230
27p232
27p231
5. If you select a switch you registered
before, this screen is displayed. Touch the “Yes” switch if you want to overwrite it.
1. Touch the “Edit” switch of “Speed
Tone”.
2. Touch the switch you want to edit.
196
27p233
27p234
3. Use the software keyboard to input
the name.
4. Input the number and touch “OK”.
D Deleting the speed tone individually. You can delete “1” to “6” of the speed tone. If you delete them all at once, all of 6
numbers are deleted.27p235
1. Touch the “Delete” switch of “Speed
Tone”.
197
D Deleting all the speed tone
27p232
27p236
27p237
2. Touch the switch you want to delete.
3. Touch the “Yes” switch.
1. Touch
the “Delete All” switch of
“Speed Tone”.
198
(ii) Setting the volume
27p238
27p239
27p240
2. Touch the “Yes” switch.
1. Touch the “Volume” switch to dis-
play the “Volume Setting” screen.
2. Touch the “−” or “+” switch to ad- just the “Voice Volume” or “Ring Volume”.
Voice Volume
. .
Ring Volume
. . .
the
adjusting party’s voice. adjusting the ring volume.
other
199
D Automatic volume settings for high
speed
the vehicle speed
You can set the volume one step up when is over 80
km/h. (When it is under 70 km/h, pre- vious volume is back.) Each time you touch the “Adaptive Volume Control” switch, you can switch on or off.D Initializing the settings You can initialize the settings.
27p241
Touch the “Default” switch.
27p242
Touch the “Yes” switch.
200
(iii) Setting the screen
D Receiving Call Display You can select the method of the re- ceiving call display.
27p243
27p244
1. Touch the “Screen” switch to display
the “Screen Settings” screen.
2. Do
the detailed settings of
screen and touch “OK”.
27p245
the
Touch the “Full” or “Icon” switch. Full mode
. . . . . .
Icon mode
. . . . .
When a call is received, the hands−free screen is displayed and you can operate it on the screen. is The displayed on the upper side of the screen. You can only operate the steering switch.
message
201
D The Bluetooth connection status at
startup
27p189
27p247
When you turn the “POWER” switch to “ACC” or “IG−ON” and the Bluetooth is automatically connected, the connection check is displayed.
Touch the “ON” or “OFF” switch of Show Bluetooth connection status at startup.
D Auto answer is received, the display When a call talking automatically changes screen and you can start to talk on the phone (without touching any switch) af- ter the preset time.
the
to
27p246
Touch the “ON” switch of “Auto An- swer” and “−” or “+” switch to adjust the waiting time of auto answer within 1 − 60 seconds.
202
D Initializing the settings You can initialize the settings.
27p248
Touch the “Default” switch.
27p249
Touch the “Yes” switch.
(iv) Setting the phone book You can register phone numbers in the phone book.
27p250
Touch the “Phone Book” to display the “Phone Book Management” screen.
203
D Transferring a telephone number You can transfer the telephone numbers in your Bluetooth phone to the system. Up to 1000 person’s data (up to 2 num- bers a person) can be registered in the phone book. Transfer it while the engine is running.
27p253
27p251
You can do the detailed settings of phone book.
27p252
2. Select the group you want to trans-
fer the data to.
1. Touch the “Transfer Data” switch to
display “Select Group” screen.
204
27p254
27p255
27p256
3. Touch the “Overwrite” or “Add To”
switch.
4. Transfer the phone book data to the
system using the Bluetooth phone.
This screen appears while transferring. To cancel it, touch the “Cancel” switch. If interrupted on the way, the phone book data transferred until then can be memorized in the system.
the transferring is
5. When this screen is displayed, the
transfer is completed.
205
D Registering the phone book data You can register the phone book data.
27p257
27p259
27p258
When this screen is displayed, try the transfer operation again.
2. Touch the desired switch to edit the
phone book.
1. Touch the “Register” switch.
206
D Editing the name When you do not input the name, the number is displayed.
27p260
27p262
27p261
3. When you complete the edit, touch
the “OK” switch.
2. Use the software keyboard to input
the name.
1. Touch the “Name” switch.
207
27p264
27p265
2. Input the number and touch ”OK”.
3. Select the desired icon.
D Editing the phone number You can register a phone number in “TEL1” and “TEL 2” separately. Up to 2 numbers a person can be registered.
27p263
1. Touch switch.
the “TEL 1” or “TEL 2”
208
“Family”,
“Friends”,
D Selecting the group You can set a group for a contact (for example: “Of- fice”...). It will then be easier for you to find this contact when needed, by using the group display. You can select “No group” or “Group 01” to “Group 19”. “No group” is displayed if you do not set the group.
27p266
1. Touch the “Group” switch.
27p267
2. Select the desired group.
D Setting the voice recognition You can set the voice recognition. Up to 20 numbers can be registered for the voice recognition.
27p268
1. Touch the “Voice Rec.” switch.
209
27p269
27p270
D Adding data to the phone book You can add data to the phone book.
27p271
2. Select the phone number and touch the “REC” switch to record a voice- tag.
3. Touch the “PLAY” switch to play the
voicetag.
If you want to delete it, touch the “Delete” switch and “OK”.
1. Touch the “Add to” switch.
210
27p272
27p273
2. Select the data you want to add log
data to.
3. Confirm
the added data on
screen and touch “OK”.
D Editing the data You can edit the registered data.
27p274
the
1. Touch the “Edit” switch.
211
27p272
27p275
27p276
2. Select the data you want to edit.
3. Touch the desired switch. When you edit the data, touch “OK”.
When you also touch the “Edit” switch on this screen, you can edit it.
212
D Deleting the data You can delete the data. When you release your vehicle, delete all your data on the system.
27p277
1. Touch the “Delete” switch of “Phone
Book”.
27p272
27p278
2. Touch the desired switch.
3. Touch the “Yes” switch.
213
27p194
27p279
2. Select the desired data.
3. Touch the “Delete” switch.
You can also delete it in the following way.
27p193
1. Touch the “Phone Book” switch.
214
D Deleting all the phone data
27p280
27p281
27p282
4. Touch the “Yes” switch.
1. Touch
the “Delete All” switch of
“Phone book”.
2. Select the deleting method. Group Data
. . . . . . .
All Contact Data
. .
deleting all the phone data in group deleting all the phone data
215
3. When you select “Group Data”, the
“Select Group” screen is displayed.
You can also delete it in the following way.
27p283
27p193
27p284
4. Select the desired group.
1. Touch the “Phone Book” switch.
5. Touch the “Yes” switch.
216
27p285
27p286
register 20 groups.
D Registering a group name You can “No Group”, “Group 01” − “Group 19” are registered by default. You can change “Group 01” − “Group 19” into desired names.
2. Touch the “Delete All” switch.
3. Touch the “Yes” switch.
27p287
1. Touch
the
“Register” switch of
“Group name”.
217
27p288
27p289
D Selecting a group icon
27p290
2. Select the group you want to regis-
ter.
3. When you complete all
touch the “OK” switch.
the edit,
1. Touch the “Icon” switch.
218
D Editing a group name
27p291
27p292
27p293
2. Select the desired icon.
1. Touch the “Name” switch.
2. Use the software keyboard to input
the name.
219
D Deleting a group name You can delete the group names indi- vidually or all at once. If you delete a group name, that group will return to the default setting. (excluding “No Group”)
27p288
27p295
27p294
2. Select the group you want to delete
the name of.
3. Touch the “Yes” switch.
1. Touch the “Delete” switch of “Group
Name”.
220
D Deleting all the group names
27p296
27p297
D Deleting the log data You can delete the log data individually or all at once. When you release your vehicle, delete all the data on the system. (a)
individually
2. Touch the “Yes” switch.