- 2009 Toyota Prius Owners Manuals
- Toyota Prius Owners Manuals
- 2008 Toyota Prius Owners Manuals
- Toyota Prius Owners Manuals
- 2013 Toyota Prius Owners Manuals
- Toyota Prius Owners Manuals
- 2004 Toyota Prius Owners Manuals
- Toyota Prius Owners Manuals
- 2001 Toyota Prius Owners Manuals
- Toyota Prius Owners Manuals
- 2005 Toyota Prius Owners Manuals
- Toyota Prius Owners Manuals
- 2015 Toyota Prius Owners Manuals
- Toyota Prius Owners Manuals
- 2012 Toyota Prius Owners Manuals
- Toyota Prius Owners Manuals
- 2002 Toyota Prius Owners Manuals
- Toyota Prius Owners Manuals
- 2010 Toyota Prius Owners Manuals
- Toyota Prius Owners Manuals
- 2014 Toyota Prius Owners Manuals
- Toyota Prius Owners Manuals
- 2006 Toyota Prius Owners Manuals
- Toyota Prius Owners Manuals
- 2003 Toyota Prius Owners Manuals
- Toyota Prius Owners Manuals
- 2007 Toyota Prius Owners Manuals
- Toyota Prius Owners Manuals
- 2011 Toyota Prius Owners Manuals
- Toyota Prius Owners Manuals
- Download PDF Manual
-
CHECKING YOUR TIRES Check the tire’s tread for tread wear indicators. If the indicators show, replace the tires. The loca- tion of tread wear indicators is shown by the “TWI” or “∆” marks, etc., molded on the sidewall of each tire.
291
The tires on your Toyota have built−in tread wear indicators to help you know when the tires need replace- ment. When the tread depth wears to 1.6 mm (0.06 in.) or less, the indica- tors will appear. If you can see the indicators in two or more adjacent grooves, the tire should be replaced. The lower the tread, the higher the risk of skidding. The effectiveness of snow tires is lost if the tread wears down below 4 mm (0.16 in.). If you have tire damage such as cuts, splits, cracks deep enough to expose the fabric, or bulges indi- cating internal damage, the tire should be replaced. If a tire often goes flat or cannot be properly repaired due to the size or location of a cut or other damage, it should be replaced. If you are not sure, consult with your Toyota dealer.
292
If air loss occurs while driving, do not continue driving. Driving even a short distance can damage a tire beyond repair. Any tires which are over 6 years old must be checked by a qualified technician even if damage is not obvious. Tires deteriorate with age even if they have never or seldom been used. This applies also to the spare tire and tires stored for future use.
REPLACING YOUR TIRES When replacing a tire, use a tire of the same size and construction, and the same or greater load ca- pacity as the originally installed tires. Using any other size or type of tire may seriously affect handling, ride, speedometer/odometer calibration, ground clearance, and clearance be- tween the body and tires or snow chains. Check that the maximum load of the replaced tire is greater than 1/2 of the Gross Axle Weight Ratings (GAWR) of either the front axle or the rear axle, whichever is greater. As for the maximum load of the tire, see the load limit at maximum cold tire inflation pressure mentioned on the sidewall of the tire, and as for the Gross Axle Weight Ratings (GAWR), see the Cer- tification Label. For details about the sidewall of the tire and the Certifica- tion Label, see pages 216 and 214.
CAUTION
Observe the following instruc- tions. Otherwise, an accident may occur resulting in death or serious injuries. D Do not mix radial, bias belted, or bias−ply tires on your ve- hicle, as this may cause dan- gerous handling characteris- tics resulting in loss of control. D Do not use tires other than the manufacturer’s recommended size, as this may cause danger- ous handling characteristics resulting in loss of control.
Toyota recommends all four tires, or at least both front or rear tires be replaced at a time as a set. See “If you have a flat tire” on page 243 for tire change procedure.
When a tire is replaced, the wheel should always be balanced. An unbalanced wheel may affect ve- hicle handling and tire life. Wheels can get out of balance with regular use and should therefore be balanced occasionally. When replacing a tubeless tire, the air valve should also be replaced with a new one.
Rotating tires
82p104a
To equalize tire wear and help ex- tend tire life, Toyota recommends that you rotate your tires accord- ing to the maintenance schedule. (For scheduled maintenance infor- mation, please refer to the “Sched- uled Maintenance Guide” or “Own- er’s Supplement”.) However, the most appropriate tim- ing for tire rotation may vary ac- cording to your driving habits and road surface conditions. The wheel assemblies must be ro- tated as illustrated above.
Manual
293
When rotating tires, check for uneven wear and damage. Abnormal wear is usually caused by incorrect tire infla- tion pressure, improper wheel align- ment, out−of−balance wheels, or se- vere braking.
CAUTION
Do not include a compact spare tire when rotating the tires. It is designed for temporary use only.
Installing snow tires and chains WHEN TO USE SNOW TIRES OR CHAINS Snow tires or chains are recommended when driving on snow or ice. On wet or dry roads, conventional tires provide better traction than snow tires. SNOW TIRE SELECTION If you need snow tires, select tires of the same size, construction and load capacity as the originally installed tires. Do not use tires other than those men- tioned above. Do not install studded tires without first checking local regulations for possible restrictions.
CAUTION
Do not use snow tires other than the manufacturer’s recommended size, as this may cause dangerous handling characteristics resulting loss of control. Otherwise, an accident may occur resulting in death or serious injuries.
in
SNOW TIRE INSTALLATION Snow tires should be installed on all wheels. Installing snow tires on the front wheels only can lead to an excessive difference in road grip capability between the front and rear tires which could cause loss of vehicle control. When storing removed tires, you should store them in a cool dry place. Mark the direction of rotation and be sure to install them in the same direction when replacing.
CAUTION
D Do not drive with the snow tires
incorrectly inflated.
D Never drive over 120 km/h (75 mph)
with any type of snow tires.
294
TIRE CHAIN SELECTION Use the tire chains of correct size. Regulations regarding the use of tire chains vary according to location or type of road, so always check local reg- ulations before installing chains. CHAIN INSTALLATION Install the chains on the front tires as tightly as possible. Do not use tire tires. Retighten chains on chains after km (1/4—1/2 mile). When installing chains on your tires, care- fully follow the instructions of the chain manufacturer. If wheel covers are used, they will be scratched by the chain band, so remove the covers before putting on the chains.
rear driving
0.5—1.0
the
CAUTION
D Do not exceed 50 km/h (30 mph) or recom- is
the chain manufacturer’s mended speed lower.
limit, whichever
D Drive carefully avoiding bumps, holes, and sharp turns, which may cause the vehicle to bounce.
D Avoid sharp turns or locked−wheel braking, as use of chains may ad- versely affect vehicle handling.
D When driving with chains installed, to drive carefully. Slow be sure down before entering curves to avoid losing control of the vehicle. Otherwise an accident may occur.
NOTICE
Do not attempt to use a tire chain on the compact spare tire, as it may re- sult in damage to the vehicle as well as the tire.
Replacing wheels WHEN TO REPLACE YOUR WHEELS If you have wheel damage such as bending, cracks or heavy corrosion, the wheel should be replaced. If you fail to replace a damaged wheel, the tire may slip off the wheel or cause loss of handling control. WHEEL SELECTION When replacing wheels, care should be taken to ensure that the wheels are re- placed by ones with the same load ca- pacity, diameter, rim width, and offset. This must be observed on compact spare tire, too. Correct replacement wheels are available at your Toyota dealer. A wheel of a different size or type may adversely affect handling, wheel and bear- ing life, brake cooling, speedometer/odom- eter calibration, stopping ability, headlight aim, bumper height, vehicle ground clear- ance, and tire or snow chain clearance to the body and chassis.
295
Aluminum wheel precautions D When aluminum wheels, check tight after driving your vehicle the first 1600
km (1000 miles).the wheel nuts are
installing that
repaired, or D If you have changed your the wheel nuts are still tight after driving 1600 km (1000 miles).
rotated, tires, check
that
D When using tire chains, be careful not
to damage the aluminum wheels.
D Use only Toyota wheel nuts and for your aluminum
wrench designed wheels.
D When balancing your wheels, use only Toyota balance weights or equivalent and a plastic or rubber hammer.
D As with any wheel, periodically check your aluminum wheels for damage. If damaged, replace immediately.
Replacement with used wheels is not rec- ommended as they may have been sub- jected to rough treatment or high mileage and could fail without warning. Also, bent wheels which have been straightened may have structural damage and therefore should not be used. Never use an inner tube in a leaking wheel which is designed for a tubeless tire.
296
SECTION 8– 3
DO−IT−YOURSELF MAINTENANCE Electrical components Checking auxiliary battery condition Auxiliary battery recharging precautionss Checking and replacing fuses Adding washer fluid Replacing light bulbs
. . . . . . . . . . . . . . . . . . . . . . . . . . . . . . . . . . . . . . . . . . . . . . . . . . . . . . . . . . . . . . . . . . . . . . . . . . . . . . . . . . . . . . . . . . . . . . . . . . . . . . . . . . . . . . . . . . . . . . . . . . . . . . . . . . . . . . . . . . . . . . . . . . . . . . . . . . . . . . . .
298
300
300
302
302297
—Checking auxiliary battery exterior
83p035
Open the back door. Remove the lug- gage storage box and auxiliary battery cover. If the back door does not open, see “If you cannot operate back door opener” on page 258.
EMERGENCY MEASURES D If electrolyte gets
in your eyes, flush your eyes with clean water and get immediate medical atten- tion. If possible, continue to apply water with a sponge or cloth while en route to the medical office.
D If electrolyte gets on your skin, thoroughly wash the contact area. If you feel pain or burn, get medical attention immediately.
D If electrolyte gets on your clothes, there is a possibility of its soaking through to your skin, so immediate- ly take off the exposed clothing and follow the procedure above, if nec- essary.
D If you accidentally swallow electro- lyte, drink a large quantity of water or milk. Follow with milk of magne- sia, beaten raw egg or vegetable oil. Then go immediately for emer- gency help.
Checking auxiliary battery condition— —Precautions
CAUTION
AUXILIARY BATTERY PRECAUTIONS When the auxiliary battery must be replaced, use the Prius designated battery. The auxiliary battery produces flam- mable and explosive hydrogen gas. D Do not cause a spark from the bat-
tery with tools.
D Do not smoke or light a match near
the battery.
The electrolyte contains poisonous and corrosive sulfuric acid. D Avoid contact with eyes, skin or
clothes.
D Never ingest electrolyte. D Wear protective safety glasses when
working near the battery.
D Keep children away from the bat-
tery.
298
Hold−down clamp
Ground cable
NOTICE
83p001c
Terminals
Check the battery for corroded or loose terminal connections, cracks, or loose hold−down clamp. a. If the battery is corroded, wash it off with a solution of warm water and bak- ing soda. Coat the outside of the termi- nals with grease to prevent further cor- rosion.
b. If the terminal connections are loose, their clamp nuts—but do not
tighten overtighten.
c. Tighten
the hold−down clamp only enough to keep the battery firmly in place. Overtightening may damage the battery case.
z Be sure the hybrid system and all accessories are off before perform- ing maintenance.
z When checking the battery, remove the ground cable from the negative terminal (“–” mark) first and rein- stall it last.
z Be careful not to cause a short cir-
cuit with tools.
z Take care no solution gets into the
battery when washing it.
If the auxiliary battery is disconnected or run down, the power window and back door may not operate automatically and the jam protection function will not func- tion correctly and does not open the back door after you reconnect, replace or re- charge the battery. In any of these cases, you should normalize each system. To normalize them, see “Power windows” on page 40 and “Back door” on page 39. Before you disconnect the auxiliary bat- tery, confirm the shift position is “P” and apply the parking brake completely.
is “N” when
After you reconnect the auxiliary battery, shift the shift lever to “N” and confirm the shift position the “IG−ON” mode is enabled. After connecting system may not start by pushing “POWER” switch. once again.
the hybrid the In that case, push it
the cables,
299
Auxiliary battery recharging precautions During recharging, the battery is pro- ducing hydrogen gas. Therefore, before recharging: 1. If recharging with the battery installed on the vehicle, be sure to disconnect the ground cable.
2. Make sure the power switch on the recharger is off when connecting the charger cables to the battery and when disconnecting them.
CAUTION
D Always charge the battery in an un- confined area. Do not charge the battery in a garage or closed room where there is not sufficient ventila- tion.
D Only do a slow charge (3.5A or less). Charging at a quicker rate is dangerous. The battery may ex- plode, causing personal injuries.
300
Checking and replacing fuses
NOTICE
Type A
Never recharge the battery with the hybrid system on. Also, be sure all accessories are turned off.
Good
Blown
Type B
83p003
Good
Blown
Type C
Good
Blown
83p004b
locations” on page 275
If the headlights or other electrical components do not work, check the fuses. If any of the fuses are blown, they must be replaced. See “Fuse locations of the fuses. Turn the hybrid system and inoperative component off. Pull the suspected fuse straight out and check it. Determine which fuse may be causing the problem. The lid of the fuse box shows the name of the circuit for each fuse. See page 314 for the functions controlled by each circuit.
for
Type A fuses can be pulled out by the pull−out tool. The location of the pull−out tool is shown in the illustration. If you are not sure whether the fuse has blown, try replacing the suspected fuse with one that you know is good. If the fuse has blown, push a new fuse into the clip. Only install a fuse with the amperage rat- ing designated on the fuse box lid. If you do not have a spare fuse, in an emergency you can pull out the “DOME” or “OBDII” fuse, which may be dispens- able for normal driving, and use it if its amperage rating is the same. If you cannot use one of the same amper- age, use one that is lower, but as close to the rating as possible. If the amperage is fuse might blow out again. but this does not indicate anything wrong. Be sure to get the correct fuse as soon as possible and return the substitute to its original clip. It is a good idea to purchase a set of spare fuses and keep them in your ve- hicle for emergencies.
that specified,
lower
than
the
the new
If fuse immediately blows out, there is a problem with the electrical sys- tem. Have your Toyota dealer correct it as soon as possible.
CAUTION
Never use a fuse with a higher am- perage rating, or any other object, in place of a fuse. This may cause ex- tensive damage and possibly a fire.
301
D Do not disassemble, repair or take apart the headlight bulbs, connec- tor, power supply circuits and ro- tate components. Or you may be injured by electric shocks. Call your dealer when the headlights fail to work or have to be replaced or dis- posed of.
NOTICE
Only use a bulb of the listed type.
following
illustrations show how
Replacing light bulbs— The to gain access to the bulbs. When replacing a bulb, make sure the hybrid system and light switch are off. Use bulbs with the wattage ratings given in the table.
CAUTION
D To prevent burning yourself, do not replace the light bulbs while they are hot.
D Halogen bulbs have pressurized gas inside and require special handling. They can burst or shatter if scratched or dropped. Hold a bulb only by its plastic or metal case. Do not touch the glass part of a bulb with bare hands.
Vehicles with discharge headlights— D Do not touch the high voltage sock- the headlight turns on. is momentarily generated injury by
et when 20000 V and may cause severe electric shock.
Adding washer fluid If any washer does not work, the wash- er tank may be empty. Add washer fluid. You may use plain water as washer fluid. However, in cold areas where tempera- tures range below the freezing point, use washer fluid containing antifreeze. This product is available at your Toyota dealer and most auto parts stores. Follow the manufacturer’s directions for how much to mix with water.
NOTICE
Do not use engine antifreeze or any other substitute because it may dam- age your vehicle’s paint.
302
the
fogging
The inside of the lens of exterior lights such as headlights may temporarily fog up when the lense becomes wet in the rain or in a car wash. This is not a problem because the temperature difference between the outside and the windshield fogs up in the rain. However, if there large drop of water on the inside of the lense, or if there is water pooled light, contact your Toyota dealer.
is caused by
inside of
lense,
inside
is a
just
like
the
the
Light bulbs
Bulb No.
Type
9006
—
—
— —
Headlights Discharge headlights Halogen headlights Front fog lights Parking lights Front turn signal lights Rear turn signal lights — Tail lights — Back−up lights License plate lights Interior lights Personal lights Door courtesy lights Vanity lights L u g g a g e c o m p a r t- ment light
— — — — —
—
7440
35
60/55
51
21
21
21A: D2R Discharge bulbs B: HB2 Halogen bulbs C: HB4 Halogen bulbs D: Wedge base bulbs E: Double end bulbs
303
—Headlights
83p030
83p031
83p010a
1. Open the hood. Remove the clips
and take out the cover.
Remove and install the clips as shown in the following illustration.
Removing clip
2. RIGHT−HAND HEADLIGHT ONLY: Re- move the clip and take out the air cleaner inlet.
Remove and install the clip as shown in the following illustration.
83p032
Installing clip
304
83p011
83p013a
83p014a
Removing clip
83p012
Installing clip
3. Unplug the connector. Turn the bulb cover counter−clockwise and remove it.
If the connector is tight, wiggle it.
4. Release
the bulb retaining spring and remove the bulb along with the socket. Install a new bulb into the socket and return the bulb retaining spring to its original position.
To install a bulb, align the tabs of the bulb with the cutout of the mounting hole.
305
—Front fog lights If either the left or right front fog lights burns out, contact your Toyota dealer.
NOTICE
Do not try to replace the front fog light bulbs by yourself. You may dam- age the vehicle.
—Parking lights
83p016a
83p015b
5. Install the bulb cover and turn clockwise. Plug in the connector.
it
306
83p017a
—Front turn signal lights
—Rear turn signal, tail and back−up lights
83p018a
83p023a
83p025c
83p019b
83p024b
a: Rear turn signal light b: Back−up light c: Tail light
307
—License plate lights
83p026b
83p028b
Remove the cover.
83p027a
308
SECTION 9
SPECIFICATIONS SPECIFICATIONS Dimensions and weight Electric motor Enginee Fuel Hybrid vehicle battery Service specifications Tires Fuses
. . . . . . . . . . . . . . . . . . . . . . . . . . . . . . . . . . . . . . . . . . . . . . . . . . . . . . . . . . . . . . . . . . . . . . . . . . . . . . . . . . . . . . . . . . . . . . . . . . . . . . . . . . . . . . . . . . . . . . . . . . . . . . . . . . . . . . . . . . . . . . . . . . . . . . . . . . . . . . . . . . . . . . . . . . . . . . . . . . . . . . . . . . . . . . . . . . . . . . . . . . . . . . . . . . . . . . . . . . . . . . . . . . . . . . . . . . . . . . . . . . . . . . . . . . . . . . . . . . . . . . . . . . . . . . . . . . . . . . . . . . . . . . . . . . . . . . . . . . . . . . . . . . . . . . . . . . . . . . . . . . . . . . . . . . . . . . . . . . . . . . . . . . . . . . . . . . . . . . . . . . . . . . . . . . . . . . .
310
310
310
311
311
311
313
314309
Dimensions and weight Overall length mm (in.) 4445
1725
Overall width mm (in.) Overall height mm (in.) 1490
2700
mm (in.) Wheelbase 1505
mm (in.) Front tread Rear tread mm (in.) 1480
Vehicle capacity weight (occupants + luggage) kg (lb.)385
*: Unladen vehicle
(175.0) (67.9) (58.7)* (106.3) (59.3) (58.3)
(845)
Electric motor Type:
Permanent magnet synchronous motor (water cooling)
Maximum output:
50/1200 − 1540 kW/rpm
Maximum torque:
400/0 − 1200 N·m/rpm
Engine Model: 1NZ−FXE Type: 4−cylinder in line, 4 cycle, gasoline Bore and stroke, mm (in.):
75.0 x 84.7 (2.95 x 3.33)
Displacement, cm3 (cu. in.):
1497 (91.4)
310
Fuel Fuel type:
Unleaded gasoline, Octane Rating 87
(Research Octane Number 91) or higherFuel tank capacity, L (gal., lmp. gal.):
45 (11.9, 9.9)
Nickel−Metal hydride battery
Hybrid vehicle battery Type: Voltage: 7.2 V Capacity: 6.5 Ah (3HR) Quantity: 28
Overall voltage: 201.6 VService specifications ENGINE Valve clearance (engine cold), mm (in.):
Intake Exhaust
0.17—0.23 (0.007—0.009) 0.27—0.33 (0.011—0.013)
Spark plug type:
DENSO SK16R11
NGK IFR5A11Spark plug gap, mm (in.):
1.1 (0.043)
311
ENGINE LUBRICATION Oil capacity (drain and refill), L (qt., lmp. qt.):
Recommended oil viscosity: SAE 5W−30
With filter Without filter
3.7 (3.9, 3.3) 3.4 (3.6, 3.0)
“Toyota Genuine Motor Oil” is used in your Toyota vehicle. Use Toyota approved “Toyota Genuine Motor Oil” or equivalent to satisfy the following grade and viscosity. Oil grade:
API grade SL “Energy−Conserving” or ILSAC multigrade engine oil.
oil008
Outside temperature
Please contact your Toyota dealer for further details.
COOLING SYSTEM Total capacity, L (qt., Imp. qt.):
For gasoline engine For electric motor and inverter and converter Coolant type:
8.6 (9.0, 7.5)
2.7 (2.9, 2.4)
“Toyota Super Long Life Coolant” is used in your Toyota vehicle at factory fill. In order to avoid technical prob- lems, only use “Toyota Super Long Life Coolant” or similar high quality ethyl- ene glycol based non−silicate, non− amine, non−nitrite, and non−borate coolant with long−life hybrid organic acid technology. (Coolant with long−life hybrid organic acid is a combination of low phosphates and or- ganic acids.) Do not use plain water alone. Please contact your Toyota dealer for further details.
technology
312
AUXILIARY BATTERY Open voltage at 20_C (68_F):
12.6 − 12.8 V 12.2 − 12.4 V 11.5 − 11.9 V
Fully charged Half charged Discharged
the
is removed with all
[Voltage that is checked 20 minutes after the key lights turned off] Charging rates: HYBRID TRANSAXLE Fluid capacity (drain and refill), L (qt., Imp. qt.): 3.6 (3.8, 3.2)
3.5 A max.
Fluid type:
“Toyota Genuine ATF WS” or equivalent
BRAKES Minimum pedal clearance when depressed with the force of 196 N (20 kgf, 44 lbf) with the traction motor running, mm (in.):
101.0 (3.98)
Pedal free play, mm (in.):
1 − 4 (0.04 − 0.16)
Parking brake adjustment when depressed with the force of 294 N (30 kgf, 66 lbf):
6 − 9 clicks
Fluid type:
SAE J1703 or FMVSS No. 116 DOT 3
STEERING Wheel free play:
Less than 30 mm (1.2 in.)
Tires Tire size and inflation pressure:
Tire size kPa (kgf/cm2 or bar, psi) Standard
Front P185/65R15 86S
240 (2.4, 35)
Rear P185/65R15 86S
230 (2.3, 33)
Spare
T125/70D16 96M
420 (4.2, 60)
15 x 6JJ 16 x 4T
torque, N·m
(kgf·m,
Wheel size: Standard Spare
Wheel nut ft·lbf):
103 (10.5, 76)
NOTE: For a complete information on tires (e.g. replacing tires or replacing wheels), see “Checking tire inflation pres- sure” “Aluminum wheel precautions”, page 289 through 296.
through
313
Fuses
90p007b
90p005b
90p008b
Instrument panel
Engine compartment
Luggage compartment
1. PWR 30 A: Power windows 2. DEF 40 A: Rear window defogger 3. M/HTR 15 A: Outside rear view mirror
heater
4. WIP 30 A: Windshield wiper 5. RR WIP 15 A: Rear wiper 6. WSH 20 A: Washer 7. ECU−IG 7.5 A: Smart entry and start system, power windows, multi−informa- tion display, electric power steering, theft deterrent system
314
8. GAUGE 10 A: Gauge and meter, back− flasher, power
lights, emergency
up windows
9. OBD 7.5 A: On−board diagnosis sys-
tem
10. STOP 7.5 A: Stop lights 11. DOOR 25 A: Power door lock system 12. ACC−B 25 A: “POWER OUTLET”,
“ACC” fuses
13. ECU−B 15 A: Multi−information display, power windows, air conditioning system
15. TAIL 10 A: Tail lights, license plates
light, parking lights
16. PANEL 7.5 A: Multi−information dis- instrument
play, clock, audio system, panel lights
17. A/C (HTR) 10 A: Air conditioning sys-
tem
18. FR DOOR 20 A: Power windows 19. PWR OUTLET 15 A: Power outlet 20. ACC 7.5 A: Audio system, multi−infor-
mation display, clock
14. AM1 7.5 A: Hybrid system
21. PWR OUTLET FR 15 A: Power outlet
22. IGN 7.5 A: Hybrid system, hybrid ve- hicle immobilizer system, SRS airbags
23. SPARE 30 A: Spare 24. SPARE 15 A: Spare 25. DRL 7.5 A: Daytime running light sys-
tem
26. H−LP LO RH 15 A (Vehicles with dis- charged headlight) or 10 A (Vehicles with halogen headlight): Right−hand headlight (low beam)
27. H−LP LO LH 15 A (Vehicles with dis- charged headlight) or 10 A (Vehicles with halogen headlight): Left−hand headlight (low beam)
35. P CON MTR 30 A: Parking control system or ABS−1 25 A: Anti−lock brake system
36. ETCS 10 A: Electronic throttle control
system
37. BATT FAN 10 A: Battery cooling fan 38. HAZ 10 A: Turn signal lights, emergen-
cy flasher
39. DOME 15 A: Audio system,
interior lights, smart entry and start system, gauge and meter, lights, luggage room light, clock
turn signal
40. ABS MAIN3 15 A: Anti−lock brake sys-
tem
28. H−LP HI RH 10 A: Right−hand head-
41. ABS MAIN2 10 A: Anti−lock brake sys-
light (high beam)
tem
29. H−LP HI LH 10 A: Left−hand headlight
42. ABS MAIN1 10 A: Anti−lock brake sys-
(high beam)
tem
30. EFI 15 A: Multiport fuel injection sys- injection
tem/sequential multiport system
fuel
31. AM2 15 A: “IGN” fuse, ignition system 32. HORN 10 A: Horn 33. HEV 20 A: Hybrid system 34. P CON MAIN 7.5 A: Parking control system, hybrid vehicle immobilizer sys- tem
43. FR FOG 15 A: Fog lights 44. CHS W/P 10 A: CHS W/P 45. AMP 30 A: Audio system 46. PTC HTR2 30 A: PTC heater 47. PTC HTR1 30 A: PTC heater 48. CDS FAN 30 A: Electric cooling fan 49. DC/DS−S 5 A: Inverter and converter 50. MAIN 120 A: Hybrid system
315
316
SECTION 10
REPORTING SAFETY DEFECTS FOR U.S. OWNERS REPORTING SAFETY DEFECTS FOR U.S. OWNERS 318
Reporting safety defects for U.S. owners. . . . . . . . . . . . . . . . . . . . . .
317
To contact NHTSA, you may either call the Auto Safety Hotline toll−free at 1−800−424−9393 (or 366−0123
in Washington, D.C. area) or write to: NHTSA, U.S. Department of Transportation, Washington, D.C. 20590. You can also obtain other information about motor vehicle safety from the Hotline.Reporting safety defects for U.S. owners If you believe that your vehicle has a defect which could cause a crash or could cause injury or death, you should immediately inform the Na- tional Highway Traffic Safety Ad- ministration (NHTSA) in addition to notifying Toyota Motor Sales, U.S.A., (Toll−free: Inc. 1−800−331−4331).
If NHTSA receives similar com- plaints, it may open an investiga- tion, and if it finds that a safety de- fect exists in a group of vehicles, it may order a recall and remedy campaign. However, NHTSA cannot become involved in individual prob- lems between you, your dealer, or Toyota Motor Sales, U.S.A., Inc.
318
Quick index D If a service reminder indicator or warning buzzer comes on D If your vehicle will not start D If your vehicle overheats D If you have a flat tire D If your vehicle needs to be towed D Tips for driving during break-in period D How to start the hybrid system D General maintenance Gas station information Fuel type:
. . . . . . . . . . . . . . . . . . . . . . . . . . . . . . . . . . . . . . . . . . . . . . . . . . . . . . . . . . . . . . . . . . . . . . . . . . . . . . . . . . . . . . . . . . . . . . . . . . . . . . . . . . . . . . . . . . . . . . . . . . . . . . . . . . . . . . . . . . . . . . . . . . . . . . . . . . . . . . . . . . . . . . . . . . . . . . . . . . . . . . . . . . . . . . . . . . . . . . . . . . . . . . . . . . . . . . . . . . . . . . . . . . . . . . . . . . . . . . . . . . . . . .
117
238
242
243
254
202
230
269UNLEADED gasoline, Octane Rating 87 (Research Octane Number 91) or higher. See page 202 for detailed information.
Fuel tank capacity:
45 L (11.9 gal., 9.9 lmp. gal.) See page 204 for detailed information.
Engine oil:
API grade SL “Energy−Conserving” or ILSAC multigrade engine oil is recommended. See page 283 for detailed information.
Tire information: See pages 289 through 296. Tire inflation pressure: See page 313.
U −5
Publication No. OM47482U Part No. 01999-47482
Printed in Japan 04−0407−01U)
Important information about this manual
Safety and vehicle damage warnings
Safety symbol
Throughout this manual, you will see safety and vehicle dam- age warnings. You must follow these warnings carefully to avoid possible injury or damage. The types of warnings, what they look like, and how they are used in this manual are explained as follows:
CAUTION
This is a warning against anything which may cause injury to people if the warning is ignored. You are informed about what you must or must not do in order to reduce the risk of injury to yourself and others.
NOTICE
This is a warning against anything which may cause damage to the vehicle or its equipment if the warning is ignored. You are informed about what you must or must not do in order to avoid or re- duce the risk of damage to your vehicle and its equipment.
When you see the safety symbol shown above, it means: “Do not...”; “Do not do this”; or “Do not let this happen”.
Important information about your Toyota
Occupant restraint systems
Toyota encourages you and your family to take the time to read Section 2−2 of this Owner’s Manual carefully. In terms of helping you understand how you can receive the maximum benefit of the occupant restraint systems this vehicle provides, Section 2−2 of this Owner’s Manu- al is the most important section for you and your family to read. Section 2−2 describes the function and operation con- cerning seats, seat belts, SRS airbags and child re- straint systems of this vehicle and some potential haz- ards you should be aware of. These systems work to- gether along with the overall structure of this vehicle in order to provide occupant restraint in the event of a crash. The effect of each system is enhanced when it is used properly and together with other systems. No single occupant restraint system can, by itself, provide you or your family with the equal level of restraint which these systems can provide when used together. That is why it is important for you and your family to under- stand these systems and how they relate to each other.
the purpose and proper use of each of
ii
The purpose of all occupant restraint systems is to help reduce the possibility of death or serious injury in the event of a collision. None of these systems, either indi- vidually or together, can ensure that there is no injury in the event of collision. However, the more you know about these systems and how to use them properly, the greater your chances become of surviving an accident without death or serious injury.
Seat belts provide the primary restraint to all occupants of the vehicle, and every occupant of the vehicle should wear seat belts properly at all times. Children should always be secured in child restraint systems that are appropriate for their age and size. SRS (Supplemental imply, Restraint System) airbags are, as designed to, seat belts and are not substitutes for them. SRS airbags can be very effective in reducing the risk of head and chest injuries by preventing contact of the head and chest with interior portions of the vehicle.
to work with, and be supplemental
their names
tremendous speed. The rapid deployment of
In order to be effective, the SRS airbags must deploy with the SRS airbags makes the SRS airbags themselves poten- tial sources of serious injury if an occupant is too close to an airbag, or if an object or some part of his or her body has been placed between the occupant and the airbag at the time of deployment. This is just one exam- ple of how the instructions in Section 2−2 of this Own- er’s Manual will help ensure proper use of the occupant restraint systems, and increase the safety they can pro- vide to you and your family in the event of an accident.
Toyota recommends you to read the provisions in Sec- tion 2−2 carefully and refer to them as needed during your time of ownership of this vehicle.
New vehicle warranty
Your new vehicle limited warranties:
is covered by
the
following Toyota
D New vehicle warranty D Emission control systems warranty D Others For the “Owner’s Warranty Information Booklet” or “Owner’s Manual Sup- plement”.
information, please
further
refer
to
Your responsibility for maintenance
It is the owner’s responsibility to make sure the speci- fied maintenance is performed. Section 7 gives details of these maintenance requirements. Also included in Sec- tion 7 is general maintenance. For scheduled mainte- nance information, please refer to the “Scheduled Main- tenance Guide” or “Owner’s Manual Supplement”.
iii
Accessories, spare parts and modification of your Toyota
for Toyota vehicles are currently available
A wide variety of non−genuine spare parts and accesso- ries in the market. You should know that Toyota does not warrant these products and is not responsible for their perfor- mance, repair, or replacement, or for any damage they may cause to, or adverse effect they may have on, your Toyota vehicle.
This vehicle should not be modified with non−genuine Toyota products. Modification with non−genuine Toyota products could affect its performance, safety or durabili- ty, and may even violate governmental regulations. In addition, damage or performance problems resulting from the modification may not be covered under warranty.
Important health and safety information about your Toyota
CAUTION
D WARNING: Engine exhaust, some of its constitu- ents, and a wide variety of automobile compo- nents contain or emit chemicals known to the State of California to cause cancer and birth de- fects and other reproductive harm. In addition, oils, fuels and fluids contained in vehicles as well as waste produced by component wear contain or emit chemicals known to the State of California to cause cancer and birth defects or other repro- ductive harm.
lead and
D Battery posts, terminals and related accessories contain lead compounds. Wash your hands after handling. Used engine oil contains chemicals that have caused cancer in laboratory animals. Always protect your skin by washing thoroughly with soap and water.
iv
Spark ignition system of your Toyota
Tires and loading on your Toyota
Underinflated or overinflated tire inflation pressure and the excess load may result in the deterioration of steering ability and braking ability, leading to an accident. Check the tire inflation pressure periodi- cally and be sure to keep the load limits given in this Owner’s Manual. For details about tire inflation pressure and load limits, see page 289 and pages 224.
The spark ignition system in your Toyota meets all re- quirements of the Canadian Interference−Causing Equip- ment Standard.
Installation of a mobile two−way radio system
As the installation of a mobile two−way radio system in your vehicle could affect electronic systems such as multiport fuel injection system / sequential multiport fuel injection system, cruise control system, anti−lock brake system, vehicle stability control system, SRS airbag sys- tem, seat belt pretensioner system and Toyota hybrid system, be sure to check with your Toyota dealer for precautionary measures or special instructions regarding installation.
Hybrid vehicle battery
The hybrid vehicle battery has a limited service life. Call your Toyota dealer information about recycling or disposal of hybrid vehicle battery and your vehicle.
for
Scrapping of your Toyota
in The SRS airbag and seat belt pretensioner devices your Toyota contain explosive chemicals. If the vehicle is scrapped with the airbags and pretensioners left as they are, this may cause an accident such as fire. Be sure to have the systems of the SRS airbag and seat belt preten- sioner removed and disposed of by the qualified service shop or by your Toyota dealer before you dispose of your vehicle.
CAUTION
When your vehicle or battery needs to be dis- posed of, be sure to consult your Toyota dealer. Hybrid vehicle batteries must be collected through Toyota dealers. If your vehicle is dis- posed of without dismantling, someone could receive an electric shock by touching the high voltage parts of the hybrid vehicle battery. If the battery is not disposed of properly, its contents can cause death or serious injury.
vi
CAUTION
Precautions for use
of hybrid vehicle
The vehicle has both high voltage DC and AC systems as well as a 12−volt system. DC and AC high voltage are both very dangerous and can cause death or serious injury, se- vere burns and electric shock. D In order to avoid personal injuries, do not touch the high voltage cables (orange colored) and their connectors.
D Follow the caution labels attached to the high volt-
age parts.
D Do not remove or replace the high voltage parts such as the inverter unit (located in the engine compartment), hybrid vehicle battery (located be- hind rear seat), etc.
D Do not touch the service plug located in the left side trim of the luggage compartment without hy- brid system technical training. (See “Precautions for use” on page 12 in Section 1−2.) This compo- nent is provided to disable the high voltage sys- tem in case of servicing at a Toyota dealer.
CAUTION
If an accident occurs
D Pull your vehicle off the road, push the “P” posi- tion switch, stop the hybrid system and if the key is inserted into key slot, remove it.
D In order to avoid personal injuries, do not touch any high voltage wirings and their connectors, and high voltage parts (inverter unit, hybrid vehicle battery, etc.).
D If some exposed electric wires are protruding in- side or outside of your vehicle, an electric shock may occur. Never touch the electric wires.
touch
it because
D If fluid leaks or gets in some parts of the vehicle, never it may be electrolyte (strong alkali) from the hybrid vehicle battery. If it gets into your skin or eyes, wash off immediately with a large amount of water, if possible, boric acid solution, and get immediate medical attention in order to help avoid serious injury.
D If a vehicle fire occurs, extinguish it using a fire extinguisher for the exclusive use on electric fires. Or, use a large amount of water to prevent flam- mable gas from being generated from the batteries.
vii
D If your vehicle needs to be towed, do it with the front wheels raised. For details on towing, see “If your vehicle needs to be towed” on page 254 in Section 5.
CAUTION
High Voltage
Your vehicle is equipped with cables connected to parts of the vehicle subject to high voltage (about 500 V at maximum). There are some other parts that reach high temperatures while you drive. Never touch battery cables (wrapped in orange−colored har- nesses) or their connectors since they are under high voltage and dangerous. Caution labels are ap- plied to these parts to identify them. Carefully ob- serve the instructions on these caution labels.
00p001
viii
ix
Information Guide
How to operate PUSH BUTTON STARTING HYBRID SYSTEM
A. Starting HYBRID SYSTEM
(1) (2)
(3)
Apply the parking brake firmly. Insert the key* and press the “POWER” switch with the brake pedal depressed firmly. You can start driving your Prius when the flashing “READY” light stays on after a few seconds and you hear a beep.
B. Stopping HYBRID SYSTEM
Press the “POWER” switch with the vehicle at a stop.
C. Selecting “ACC” or “IG-ON” mode
“OFF”
“ACC”
Green
“IG-ON”
Amber
(1) (2)
Insert the key.* Press the “POWER” switch without depressing the brake pedal. Each press changes the hybrid system from “OFF” mode to “ACC” (accessories such as the radio on), to “IG- ON” (all accessories on) and then back to “OFF”. The indicator color on the “POWER” switch tells you which mode is se- lected.
Switching by each press
You do not need to insert the key on the vehicle with smart entry and start system. (For details, see “Smart entry and start system” in the Owner’s Manual.)
Selector lever operation
A. Starting procedure
(1) When the “READY” light comes on, move the selector lever into “D” or “R” and release it with the brake pedal depressed. The “D” or “R” position is selected and the lever returns to its original position. You can confirm which position is selected with the in- dicator in the instrument cluster. Release the parking brake and your foot from the brake pedal gradually, and then start your Prius by depress- ing the accelerator pedal assuredly.
(2)
— See Owner’s Manual for details —
Information Guide
B. Stopping procedure
(1)
(2)
Stop your Prius completely by de- pressing the brake pedal and then ap- ply the parking brake. Press the “P” position switch. The in- dicator on the switch comes on and transaxle is locked to “P”.
Note: Be sure to put the hybrid transaxle into “P” when parking. During traffic jams, use the “D” position and continue driving in that position. The battery cannot be charged in “N”. When releasing the accelerator pedal in “B”, engine braking will be applied stronger than in “D”. Compared with ordinary vehicles, you may feel less powerful engine braking during high speed driving.
For environment friendly and economical driving
(1)
(2)
Avoid abrupt acceleration or deceleration. This will ensure that sufficient power supply remains in the hybrid vehicle battery and will enable you to drive efficiently. Check the tire inflation pressure frequently to keep it at the proper level.
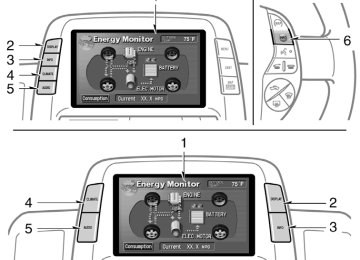
Note: Trip information (Consumption, energy monitor) can be shown in the multi- informa- tion display. Use this information for driving with good fuel economy. To see the information, press “INFO” (located outside the display) and touch “Trip Info.” (located inside the display).
On the side of the rear right seatback, there is an air vent provided to cool the hybrid vehicle battery. Do not put luggage or block the vent. If the vent is covered, the hybrid vehicle battery will overheat, and this may cause lower vehicle output and reduced performance.
— See Owner’s Manual for details — Printed in Japan 01- 0308- 00
01999- 47466 U 2
SECTION 1– 1
FEATURES ON NEW TOYOTA VEHICLE Overview of instruments and controls Instrument panel overview Instrument cluster and multi−information display overview Indicator symbols on the instrument panel and multi−information display
. . . . . . . . . . . . . . . . . . . . . . . . . . . . . . . . . . . . . . . . . . . .
. . . . . . . . . . . . . . . . . . . . . . . . . . . . . . . . . . . . . . . . . . . . . . . . . . . . . .
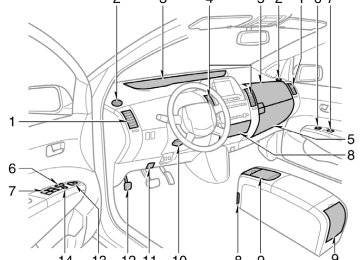
Instrument panel overview
11p003d
1. Side vents
. . . . . . . . . . . . . . . . . . . . . . .
187
2. Side defroster outlets
3. Instrument cluster
. . . . . . . . . . . . . . . . . .
4. Center vents
. . . . . . . . . . . . . . . . . . . . .
187
5. Glove boxes
. . . . . . . . . . . . . . . . . . . . .
191
6. Power door lock switches 7. Power window switches
. . . . . . . . . . . . . . . . . . . .
38
408. Auxiliary boxes
. . . . . . . . . . . . . . . . . . .
195
9. Cup holders
. . . . . . . . . . . . . . . . . . . . .
196
10. Tilt steering lock release lever
. . . . .
96
11. Hood lock release lever
. . . . . . . . . . .
43
12. Parking brake pedal
. . . . . . . . . . . . . .
141
13. Power rear view mirror
control switch
. . . . . . . . . . . . . . . . . . . . .
97
14. Window lock switch
. . . . . . . . . . . . . . .
41
1. Headlight and turn signal
switches
. . . . . . . . . . . . . . . . . . . . . . . . .
102
2. Wiper and washer switches
. . . . . . .
109
3. “POWER” switch
. . . . . . . . . . . . . . . . .
130
4. Clock
. . . . . . . . . . . . . . . . . . . . . . . . . . . .
190
5. Multi−information display
. . . . . . . . . .
146
6. Emergency flasher switch
. . . . . . . . .
106
7. Trip meter reset button
. . . . . . . . . . .
115
8. Km/h or MPH button
. . . . . . . . . . . . .
116
9. Car audio 10. Power outlet
. . . . . . . . . . . . . . . . . . . . . . . . . . . . . . . . . . . . . . . . . . . . .
156
19011. “P” position switch
. . . . . . . . . . . . . . .
135
11p001h
12. Electronic shift lever
(R, N, D, B)
. . . . . . . . . . . . . . . . . . . . . . . . . . . . . . . . . . . . . . . . . . . . . . .
135
1913. Key slot
14. Cruise control switch
. . . . . . . . . . . . .
141
15. Smart entry and start system
cancel switch
. . . . . . . . . . . . . . . . . . . . .
32
16. Climate remote control
switches
. . . . . . . . . . . . . . . . . . . . . . . . .
17. Instrument panel light control
dial
. . . . . . . . . . . . . . . . . . . . . . . . . . . . . .
186
107
18. Audio remote control switches
. . . .
174
1. Service reminder indicators
and indicator lights
. . . . . . . . . .
117, 124
2. Fuel gauge
. . . . . . . . . . . . . . . . . . . . . .
114
3. Speedometer
4. Odometer and trip meter
. . . . . . . . .
115
Instrument cluster and multi−information display overview
11p002i
Indicator symbols on the instrument cluster and Multi−information display
and
(U.S.A)
(Canada)
Brake system warning lights∗1
Driver’s seat belt reminder light∗1
or
Anti−lock brake system warning light∗1
SRS warning light∗1
Engine oil replacement reminder light∗1
(for vehicles sold in U.S.A.)Front passenger’s seat belt reminder light∗1
Vehicle stability control system warning light∗1
Low fuel level indicator light∗1
Discharge warning light∗2
or
Malfunction indicator lamp∗1
Master warning light∗1
Open door warning light∗1
High coolant temperature warning light∗2
Low engine oil pressure warning light∗2
Hybrid vehicle battery warning light∗2
Electric power steering system warning light∗2
Automatic head warning light∗2
light
leveling system
Automatic air conditioner indicator light
Hybrid system warning light∗2
Cruise control indicator light∗3
Shift position indicator light∗4
Recirculate mode indicator light
Windshield air flow indicator light
Rear window and outside rear view mirror defog- gers indicator light
Smart entry and start system warning light∗5
Low temperature indicator light
Turn signal indicator lights
Hybrid vehicle immobilizer / Theft deterrent sys- tem indicator light
Headlight high beam indicator light
Slip indicator light
Headlight indicator light
Tail light indicator light
Driving ready light
∗1: For details, see “Service reminder indicators and warning
buzzers— —Instrument cluster” on page 117.
∗2: For details, see “Service reminder indicators and warning
buzzers— —Multi−information display” on page 124. If this light flashes, see “Cruise control” on page 141.
∗3: ∗4: For details, see “Hybrid transaxle” on page 135. ∗5: For details, see “Smart entry and start system” on page 23.
SECTION 1– 2
FEATURES ON NEW TOYOTA VEHICLE Toyota hybrid system Toyota hybrid systemm Toyota hybrid system operating condition Starting your vehicle For efficient use of your vehicle Precautions for use
. . . . . . . . . . . . . . . . . . . . . . . . . . . . . . . . . . . . . . . . . . . . . . . . . . . . . . . . . . . . . . . . . . . . . . . . . . . . . . . . . . . . . . . . . . . . . . . . . . . . . . . . . . . . . . . . . . . . . . . . . . . . . . . . . . . . . . . . . . . . . . . . . . . . . . . . . . . . . . . . . . . . . . . . . . . . . . . .
11
11
12Toyota hybrid system operating condition Basic operations are described below. Be- sides, Toyota hybrid system performs vari- ous controls depending on the operating condition: The “Energy Monitor” screen tells you which power is used currently.
If you do not use the vehicle for a long time (2 weeks or more), the hy- brid vehicle battery and auxiliary battery will discharge and their condition is li- able to decline. Therefore, in order to make up for discharging, charge them once in every 2 weeks for about 30
minutes by starting the hybrid system with all electrical components turned off.Toyota hybrid system Toyota hybrid system combines a gaso- line engine and electric motor power to improve the fuel economy and minimize the emissions as well as to provide better power performance than the ordi- nary gasoline−powered vehicles. Depending on the driving condition, the vehicle runs on the best combination of; D Gasoline engine power D Electric motor power generated by
the gasoline engine
D Electric motor power of the hybrid
vehicle battery