- 2002 Toyota Avalon Owners Manuals
- Toyota Avalon Owners Manuals
- 2008 Toyota Avalon Owners Manuals
- Toyota Avalon Owners Manuals
- 2012 Toyota Avalon Owners Manuals
- Toyota Avalon Owners Manuals
- 2009 Toyota Avalon Owners Manuals
- Toyota Avalon Owners Manuals
- 2006 Toyota Avalon Owners Manuals
- Toyota Avalon Owners Manuals
- 1999 Toyota Avalon Owners Manuals
- Toyota Avalon Owners Manuals
- 2015 Toyota Avalon Owners Manuals
- Toyota Avalon Owners Manuals
- 2013 Toyota Avalon Owners Manuals
- Toyota Avalon Owners Manuals
- 2010 Toyota Avalon Owners Manuals
- Toyota Avalon Owners Manuals
- 2000 Toyota Avalon Owners Manuals
- Toyota Avalon Owners Manuals
- 1997 Toyota Avalon Owners Manuals
- Toyota Avalon Owners Manuals
- 1996 Toyota Avalon Owners Manuals
- Toyota Avalon Owners Manuals
- 2007 Toyota Avalon Owners Manuals
- Toyota Avalon Owners Manuals
- 2001 Toyota Avalon Owners Manuals
- Toyota Avalon Owners Manuals
- 2011 Toyota Avalon Owners Manuals
- Toyota Avalon Owners Manuals
- 2003 Toyota Avalon Owners Manuals
- Toyota Avalon Owners Manuals
- 2005 Toyota Avalon Owners Manuals
- Toyota Avalon Owners Manuals
- 1998 Toyota Avalon Owners Manuals
- Toyota Avalon Owners Manuals
- 2004 Toyota Avalon Owners Manuals
- Toyota Avalon Owners Manuals
- 2014 Toyota Avalon Owners Manuals
- Toyota Avalon Owners Manuals
- 2016 Toyota Avalon Owners Manuals
- Toyota Avalon Owners Manuals
- Download PDF Manual
-
Push the button a second time to turn off the skip feature. ST (Stereo reception) display Your radio automatically changes to ste- reo reception when a stereo broadcast is received. “ST” appears on the display. If the signal becomes weak, the radio re- duces the amount of channel separation to prevent the weak signal from creating noise. If the signal becomes extremely weak, the radio switches from stereo to mono reception. TAPE Push “Tape” to switch from radio opera- tion to cassette operation. If the audio system is off, you can turn on the cassette player by pushing “TAPE”. In both cases, a cassette must already be loaded in the player.
101
—CD (Compact Disc) Auto changer The compact disc player has an automat- ic changer which stores up to 12 discs. To operate the compact disc player, put the compact discs into the magazine and set the magazine in the player.
Inserting compact discs 1. Slide open the cover and push the
eject button.
TREB (Treble) This knob lets you adjust the treble level. Push “TREB/FADE” so that it pops out of its retracted position. Turn the knob to ad- just the treble. Push the knob back into its retracted position. TUNE Tuning Your Toyota has an electronic tuning radio (ETR). Push and release the “∧” (up) or “∨” (down) side of “TUNE” to step up or down the station band. (If you hear a beep, you held the button too long and the radio will go into the seek mode.) Seeking In the seek mode, the radio finds and plays the next station up or down the sta- tion band. To seek a station, push and hold the “∧” or “∨” side of “TUNE” until you hear a beep. Do this again to find another station.
102
2. Take out the magazine from the auto-
matic changer.
3. While pressing the lock release button
on the magazine, draw out a tray.
4. Place a disc on the tray with its lable face up, and insert the tray into the slot.
The magazine can store 12 discs of 12 cm (4.7 in.). The player will skip any empty disc slots.
103
—Anti-theft system (Types 1-3 and 2 only) The anti-theft system prevents the audio system from working after it has been dis- connected. To activate the system, you must set a three-digit security code. After the system is set, “SEC” will appear in the display each time the ignition is turned form “LOCK” or “ACC” or “ON”. Also, the anti-theft light flashes every few seconds while the ignition key is in the “LOCK” position. You will need to know your security code to reactivate your radio after electrical ser- vice is performed on your vehicle. Choose a security code that is easy to re- member and keep a copy of it (not in your Toyota).
NOTICE
If you pushed any wrong buttons on the anti-theft system, the following messages will appear on the display. (cid:6)“Err”—You have pushed wrong
buttons.
(cid:6)“1-9”—Indicates the number of errors you have made. You may make up to nine errors, but no more!
(cid:6)“HELP”—The number of errors you can make was exceeded. The audio sytem is completely inoper- able. Contact your Toyota dealer.
5.
Insert the magazine into the automatic changer as shown above. Then close the cover.
104
Setting a security code for the first time. 1. Turn off the audio system. Turn the ignition key to “ACC”. Simultaneously push and hold in “1”, “6”, and “PWR/VOL” until “SEC” appears on the display.
2. While you are holding in the “∧” side of
“TUNE”, push “1”.
The display will read “—“. On some modes, “(cid:3)” and “(cid:5)” will also turn on.
Input the three digit code.
3. You have 10 seconds to enter each digit. For example, “209”: To set the first digit: Push “1” until the digit you want appears on the display. To set the second digit: Push “2” until the digit you want appears on the display. To set the third digit: Push “3” until the digit you want appears on the display.
105
If you pushed any wrong buttons, “Err” and the number of errors you have made will appear on the display before “SEC” does. Go back to step 2
and try again. If the display returns to “- - -” while you are entering the code, go back to step 3. To make sure the security code has been accepted, turn the ignition to “LOCK” and then back to “ACC.” “SEC” should appear on the display. Choose a security code that is easy to re- member and keep a copy of it (not in your Toyota).Changing the security code 1. Turn off the audio system. Turn the ignition key to “ACC”. Simultaneously push and hold in “1”, “6”, and “PWR/VOL” until “SEC” appears in the display.
4. The three-digit code should be on the
display.
Push and hold in “SCAN” until the display goes dark. (At first, “SEC” will appear on the display.)
106
2. While you are holding in the “∧” side of
“TUNE” push “1”.
The display will read “—”. On some models, “ (cid:3)” and “(cid:5)” will also turn on.
Input the existing three-digit code.
3. You have 10 seconds to enter each digit. For example, “209”: To set the first digit: Push “1” until the digit you want appears on the display. To set the second digit: Push “2” until the digit you want appears on the display. To set the third digit: Push “3” until the digit you want appears on the display.
4. The three-digit code should be on the
display.
Push “SCAN”. The display will rear “---”. 5. Repeat steps 2 and 3, this time enter- ing your new code. You can use digits “0” through “9”.
107
If you pushed any wrong buttons, “Err” and the number of errors you have made will appear on the display before “SEC” does. Go back to step 2
and try again. If the display returns to “- - -” while you are entering the code, go back to step 3. To make sure the security code has been accepted, turn the ignition to “LOCK” and then back to “ACC”. “SEC” should appear on the display.NOTICE
A tenth error will activate the anti-theft system and “HELP” will appear on the display. The audio system will be completely inoperable. At this time, the anti-theft light also comes on. If this occurs, contact your Toyota dealer.
Clearing the security code 1. Turn off the audio system. Turn the ignition key to “ACC”. Simultaneously push and hold in “1”, “6”, and “PWR/VOL” until “SEC” appears on the display.
6. The new three-digit code should be on
the display.
Push and hold in “SCAN” until the display goes dark. (At first, “SEC” will appear on the display.)
108
2. While you are holding in the “∧” side of
“TUNE”, push “1”.
The display will read “- - -”. On some models, “(cid:3)” and “(cid:5)” will also turn on.
Input the existing three-digit code.
3. You have 10 seconds to enter each digit. For example, “209”: To set the first digit: Push “1” until the digit you want appears on the display. To set the second digit: Push “2” until the digit you want appears on the display. To set the third digit: Push “3” until the digit you want appears on the display.
4. The three-digit code should be on the
display.
Push “SCAN”. The display will read “—“. 5. Wait for 10 seconds until the security system is deactivated and the display goes dark.
109
If you pushed any wrong buttons, “Err” and the number of errors you have made will appear on the display before “SEC” does. Go back to step 2
and try again. If the display returns to “- - -” while you are entering the code, go back to step 3.NOTICE
A tenth error will activate the anti-theft system and “HELP” will appear on the display. The audio system will be completely inoperable. At this time, the anti-theft light also comes on. If this occurs, contact your Toyota dealer.
110
Reactivating a disabled audio system 1. Turn the ignition switch to “ACC”. 2. While you are holding in the “^∧ side of
“TUNE”, push “1”.
The dispay will read “---”. On some models, “(cid:3)” and “(cid:5)” will also turn on.
Input the existing three-digit code.
3. You have 10 seconds to enter each digit. For example, “209”: To set the first digit: Push “1” until the digit you want appears on the display. To set the second digit: Push “2” until the digit you want appears on the display. To set the third digit: Push “3” until the digit you want appears on the display.
4. The three-digit code should be on the
display.
Push and hold in “SCAN” until the display goes dark. (At first, “SEC” will appear on the display.)
If you pushed any wrong buttons, “Err” and the number of errors you have made will appear on the display before “SEC” does. Go back to step 2
and try again. If the display returns to “- - -” while you are entering the code, go back to step 3. To make sure the security code has been accepted, turn the ignition to “LOCK” and then back to “ACC”. “SEC” should appear on the display.NOTICE
A tenth error will activate the anti-theft system and “HELP” will appear on the display. The audio system will be completely inoperable. At this time, the anti-theft light also comes on. If this occurs, contact your Toyota dealer.
—Car audio system operating hints
NOTICE
To ensure the correct audio system operation: (cid:6)Be careful not to spill beverages
over the audio system.
(cid:6)Do not put anything other than a cassette tape or CD magazine into the cassette tape slot or CD changer.
ILLUMINATION CONTROL LOGIC When the instrument panel lights are on, the letters on operable buttons of the mode in current use light up. On some au- dio units, the mode selection and eject buttons also light up. On some audio-units, when a cassette tape and compact disc are not in the slot the letters on the tape and disc mode but- tons do not light up, but the slot lights up for easy access. Once a cassette tape or compact disc is inserted, the letters on the tape or disc mode buttons light up, and the slot stops illuminating.
111
RADIO RECEPTION Usually, a problem with radio reception does not mean there is a problem with your radio-it is just the normal result of conditions outside the vehicle. For example, nearby buildings and terrain can interfere with FM reception. Power lines or telephone wires can interfere with AM signals. And of course, radio signals have a limited range, and the farther you are from a station, the weaker its signal will be. In addition, reception conditions change constantly as your vehicle moves. Here are some common reception prob- lems that probably do not indicate a prob- lem with your radio: FM Fading and drifing stations—Generally, the effective range of FM is about 40 km (25 miles). Once outside this range, you may notice fading and drifting, which in- crease with the distance from the radio transmitter. They are often accompanied by distortion. Multi-path—FM signals are reflective, making it possible for two signals to reach your antenna at the same time. If this hap- pens, the signals will cancel each other out, causing a momentary flutter or loss of reception. 112
Static and fluttering—These occur when signals are blocked by buildings, trees, or other large objects. Increasing the bass level may reduce static and fluttering. Station swapping—If the FM signal you are listening to is interrupted or weak- ened, and there is another strong station nearby on the FM band, your radio may tune in the second station until the original signal can be picked up again. AM Fading—AM broadcasts are reflected by the upper atmosphere-especially at night. These reflected signals can inter- fere with those received directly from the radio station, causing the radio station to sound alternately strong and weak. Station interference—When a reflected signal and a signal received directly from a radio station are very nearly the same frequency, they can interfere with each other, making it difficult to hear the broad- cast. Static—AM is easily affected by external sources of electrical noise, such as high tension power lines, lightening, or electri- cal motors. This results in static.
CARING FOR YOUR CASSETTE PLAY- ER AND TAPES For high performance from your cassette player and tapes: Clean the tape head and other parts regu- larly. (cid:4) A dirty tape head or tape path can de- crease sound quality and tangle your cassette tapes. The easiest way to clean them is by using a cleaning tape.
Use high-quality cassettes. (cid:4) Low-quality cassette tapes can cause many problems, including poor sound, inconsistent playing speed, and constant auto-reversing. They can also get stuck or tangled in the cas- sette player.
(cid:4) Do not use a cassette if it has been damaged or tangled or if its label is peeling off.
(cid:4) Do not leave a cassette in the player if you are not listening to it, especially if it is hot outside.
(cid:4) Store cassettes in their cases and out
of direct sunlight.
(cid:4) Avoid using cassettes with a total play- ing time longer than 100 minutes (50
minutes per side). The tape used in these cassettes is thin and could get stuck or tangled in the cassette player.(cid:4)
If moisture gets into your compact disc player, you may not hear any sound even though your compact disc player appears to be working. Remove the disc from the player and wait until it dries.
(cid:4) Handle compact discs carefully, espe- cially when you are inserting them. Hold them on the edge and do not bend them. Avoid getting fingerprints on them, particularly on the shiny side. (cid:4) Dirt, scrapes, warping, pin holes, or other disc damage could cause the player to skip or to repeat a section of a track. (To see a pin hole, hold the disc up to the light.)
(cid:4) Remove discs from the compact disc player when you are not listening to them. Store them in their plastic cases away from moisture, heat, and direct sunlight.
To clean a compact disc: Wipe it with a soft, lint-free cloth that has been damp- ened with water. Wipe in a straight line from the center to the edge of the disc (not in circles). Dry it with another soft, lint- free cloth. Do not use a conventional re- cord cleaner or anti-static device.
113
CARING FOR YOUR COMPACT DISC PLAYER AND DISCS (cid:4) Use only compact discs labeled as
shown.
(cid:4) Extremely high
temperatures can keep your compact disc player from working. On hot days, use the air con- ditioning to cool the vehicle interior be- fore you listen to a disc.
(cid:4) Bumpy roads or other vibrations may make your compact disc player skip.
CAUTION
Compact disc players use invisible laser beam which could cause haz- ardous radiation exposure if directed outside the unit. Be sure to operate the player correctly as instructed.
A new disc may have rough edges on its inner and outer perimeter. Remove the rough edges by pressing the side of a ball-point pen or pencil against the inner and outer perimeter of the disc as shown. If you continue to play a disc with rough edges, flakes will fall on to the signal side of the disc and cause sound skipping or other problems.
114
Air conditioning system— —Controls (cid:1)Type 1: Manual air conditioning controls
1. Fan Speed Selector 2. Temperature Selector 3. Air Flow Selector 4. Air Intake Selector 5. “A/C” Button
115
(cid:1)Type 2: Automatic air conditioning controls
1. “AUTO” Button 2. Fan Speed Selector 3. Temperature Selector 4. Air Flow Selector 5. Air Intake Selector 6. “A/C” Button
116
“AUTO” button (type 2 only) For automatic operation of the air condi- tiooning, press the “AUTO” button. An in- dicator light will illuminate to show that the automatic operation mode has been se- lected. In the automatic operation mode, the air conditioning selects the most suitable fan speed and air flow according to the tem- perature. You may use manual controls if you want to select your own settings. To turn off the automatic operation, press the “OFF” button. Fan speed selector Turn the knob (type 1) or press the button (type 2) to adjust the fan speed. In automatic operation, you do not have to adjust the fan speed unless you desire another fan speed mode. Temperature selector Turn the knob to adjust the temperature- to the clockwise to warm, to the counter- clockwise to cool.
Air flow selector Turn the knob (type 1) or press the buttons (type 2) to select the vents used for air flow. Type 2 only—In automatic operation, you do not have to select the air flow unless you desire another air flow mode. 1. Panel—Air flows mainly from the in-
strument panel vents.
2. Bi-level —Air flows from both the floor vents and the instrument panel vents. 3. Floor—Air flows mainly from the floor
vents.
4. Floor/Windshield —Air flows mainly from the floor vents and windshield vents.
5. Windshield—Air flows mainly from
the windshield vents.
For details about air flow selector settings, see the illustration after “A/C” button. Type 1—Moving the air flow selector lever to windshield position turns on the de- froster-linked air conditioning. At this time, the “A/C” button indicator comes on regardless of whether or not the “A/C” but- ton is pressed in. This is to clean up the front view more quickly. When the “A/C” button is not pressed in, moving the air flow selector lever to anoth- er position turns off the air conditioning. Type 2—Pressing the windshield button turns on the defroster-linked air condi- tioning. At this time, the “A/C” button indi- cator comes on regardless of whether or not the “A/C” button is pressed in. This is to clean up the front view more quickly. When the “A/C” button is not pressed in, pressing another air flow control button turns off the air conditioning.
117
“A/C” button To turn on the air conditioning, press the “A/C” button. The “A/C” button indicator will come on. To turn the air conditioning off, press the button again. If the “A/C” button indicator flashes, there is a problem in the air conditioning system and the air conditioning automatically shuts off. If this happens, take your ve- hicle to a Toyota dealer for service.
Air intake selector Press the button to select the air source. 1. Recirculate—Recirculates the air in-
side the vehicle.
2. Fresh—Draws outside air into the sys-
tem.
118
—Air flow selector settings
—Operating tips (cid:2) To cool off your Toyota after it has been parked in the hot sun, drive with the windows open for a few minutes. This vents the hot air, allowing the air condi- tioning to cool the interior more quickly. (cid:2) Make sure the air intake grilles in front of the windshield are not blocked (by leaves or snow, for example).
(cid:2) On humid days, do not blow cold air on the windshield. The windshield could fog up because of the difference in air temperature on the inside and outside of the windshield.
(cid:2) Keep the area under the front seats clear to allow air to circulate through- out the vehicle.
(cid:2) On cold days, move the fan speed to “HI” for a minute to help clear the in- take ducts of snow or moisture. This can reduce the amount of fogging on the windows.
119
Heating For best results, set controls to: Type 1—
Fan speed—Any setting except “OFF” Temperature— Towards WARM Air intake—FRESH (outside air) Air flow—FLOOR Air conditioning—OFF
Air conditioning For best results, set controls to: Type 1— Fan speed—Any setting except “OFF” Temperature— Towards COLD Air intake—FRESH (outside air) Air flow—PANEL Air conditioning—ON
Type 2—
Press in the “AUTO” button. Temperature— To the desired
temperature
Air intake—FRESH (outside air) Air conditioning—OFF
(cid:2) For quick heating, select recirculated air for a few minutes. To keep the win- dows from fogging, select fresh after the vehicle interior has been warmed. (cid:2) Press the “A/C” button on for dehumid-
ified heating.
(cid:2) Choose floor/windshield air flow to heat the vehicle interior while defrost- ing or defogging the windshield.
120
Type 2— Press in the “AUTO” button. Temperature— To the desired
temperature
Air intake—FRESH (outside air) Air conditioning—ON
(cid:2) For quick cooling, move the air intake selector to recirculate for a few min- utes.
Ventilation For best results, set controls to: Type 1—
Fan speed—Any setting except “OFF” Temperature—Towards COLD Air intake—FRESH (outside air) Air flow—PANEL Air conditioning—OFF
Type 2— Press in the “AUTO” button. Temperature— To the desired
temperature
Air intake—FRESH (outside air) Air conditioning—OFF
Defogging and defrosting The inside of the windshield For best results, set controls to: Type 1— Fan speed—Any setting except “OFF” Temperature— Towards WARM to heat; COLD to cool
Air intake—FRESH (outside air) Air flow—WINDSHIELD
Moving the air flow selector lever to wind- shield position turns on the defroster- linked air conditioning. At this time, the “A/C” button indicator comes on regard- less of whether or not the “A/C” button is pressed in. This is to clean up the front view more quickly. When the “A/C” button is not pressed in, moving the air flow selector lever to anoth- er position turns off the air conditioning.
Pressing the windshield button turns on the defroster-linked air conditioning. At this time, the “A/C” button indicator comes on regardless of whether or not the “A/C” button is pressed in. This is to clean up the front view more quickly. When the “A/C” button is not pressed in, pressing another air flow control button turns off the air conditioning. (cid:2) To heat the vehicle interior while de- frosting the windshield, choose floor/ windshield air flow.
Type 2— Temperature— Towards high
temperature to heat; low temperature to cool
Air intake—FRESH (outside air) Air flow—WINDSHIELD
Pressing the windshield button turns on the defroster-linked air conditioning. At this time, the “A/C” button indicator comes on regardless of whether or not the “A/C” button is pressed in. This is to clean up the front view more quickly. When the “A/C” button is not pressed in, pressing another air flow control button turns off the air conditioning. (cid:2) On humid days, do not blow cold air on the windshield—the difference be- tween the outside and inside tempera- tures could make the fogging worse.
The outside of the windshield For best results, set controls to: Type 1—
Fan speed—Any setting except “OFF” Temperature— Towards WARM Air intake—FRESH (outside air) Air flow—WINDSHIELD
Moving the air flow selector lever to wind- shield position turns on the defroster- linked air conditioning. At this time, the “A/C” button indicator comes on regard- less of whether or not the “A/C” button is pressed in. This is to clean up the front view more quickly. When the “A/C” button is not pressed in, moving the air flow selector to another position turns off the air conditioning. Type 2—
Temperature— Towards high temperature
Air intake—FRESH (outside air) Air flow—WINDSHIELD
121
—Instrument panel vents
If air flow control is not satisfactory, check the instrument panel vents. The instru- ment panel vents may be opened or closed as shown.
Side vents
Lower vent
122
Part 1
OPERATION OF INSTRUMENTS AND CONTROLS—Chapter 1-8
Other equipment (cid:1) Clock (cid:1) Cigarette lighter and ashtray (cid:1) Glovebox (cid:1) Auxiliary box (cid:1) Cup holder (cid:1) Traction control system (cid:1) Floor matClock
Once the electrical power source has been disconnected from the clock, the time is automatically set to 1:00 (one o’clock). When the instrument panel lights are turned on, the brightness of the time indi- cation will be reduced.
The digital clock indicates the time. The key must be in the ‘‘ACC” or ‘‘ON’’ position. To reset the hour: Push the ”H” button. To reset the minutes: Push the “M” button. If quick adjustment to a full hour is de- sired, push the “:00” button. For example, if the “:00” button is de- pressed when is between 1:01—1:29, the time will change to 1:00. If the time is between 1:30—1:59, the time will change to 2:00.
time
the
123
Cigarette lighter and ashtray
Glovebox
ASHTRAY To use the ashtray, open the cover. When finished with your cigarette, thor- oughly extinguish it in the ashtray to pre- vent other cigarette butts from catching fire. After using the ashtray, close the ash- tray cover completely. To remove the ashtray, open the ashtray cover and pull it out.
CAUTION
To reduce the chance of injury in case of an accident or sudden stop while driving, always push the ash- tray back in completely after using.
To use the glovebox, do this. To open: Pull the lever. With the instrument panel lights on, the glovebox light will come on when the glo- vebox is open. To lock: Insert the master key and turn it clockwise.
CAUTION
To reduce the chance of injury in case of an accident or sudden stop, always keep the glovebox door closed while driving.
CIGARETTE LIGHTER To use the cigarette lighter, first pull the ash tray lid, then press in the ligh- ter. When it becomes heated, it auto- matically pops out ready for use. If the engine is not running, the key must be in the ”ACC” position. Do not hold the cigarette lighter pressed in. Use a Toyota genuine cigarette lighter or equivalent for replacement.
124
Auxiliary box
Cup holder (with separate front seat)
Cup holder (with bench front seat)
To open the auxiliary box, press on the knob and pull out the box lid.
CAUTION
To reduce the chance of injury in case of an accident or a sudden stop, always keep the auxiliary box closed while driving.
The cup holder is designed for holding cups or drink-cans fit snugly in its holes. To use the cup holder, push on the lid.
CAUTION
(cid:1) Do not place anything else on the cup holder, as such items may be thrown about and possible injure people in the vehicle during sud- den braking or accident.
(cid:1) Keep the cup holder shut when not
in use.
125
Traction control system
The cup holder is designed for holding cups or drink—cans fit snugly in its holes. To use the cup holder, open the armrest lid, pull out the cup holder. Then close the armrest lid.
CAUTION
Slip indicator light
(cid:1) Do not leave the armrest lid open especailly when the cup holder holds a scalding hot drink. If the lid is forcibly pulled up, the drink may spill over the seat occupants.
(cid:1) When the cup holder is in use, the lid must be securely
armrest closed with the lock engaged.
(cid:1) Do not place anything else on the cup holder, as such items may be thrown about and possible injure people in the vehicle during sud- den braking or accident.
(cid:1) Keep the cup holder shut when not
in use.
(cid:1) Do not lift the armrest upright when the cup holder is pulled out.
126
“TRAC OFF” indicator/warning light
AUTOMATIC TRACTION CONTROL SYSTEM The traction control system automati- cally controls the spinning of the front wheels which may occur when accel- erating on slippery road surfaces, thus assisting driver to control the driving power of the front wheels. When you turn the ignition switch on, the trac- tion control system always turns on automatically, and the slip indicator light and “TRAC OFF” indicator/warn- ing light will come on. The indicator lights will go off after about 3 seconds. Leave the system on during ordinary driving so that it can operate when needed. When traction control is ap- plied, the slip indicator light blinks. You may hear a slight clicking noise in the engine compartment when the engine is started. This means that the traction con- trol system is in the self-check mode, and does not indicate malfunction. When the traction control system is operating, you may feel vibration or noise of your vehicle, caused by operation of brakes. This indi- cates the system is functioning properly.
When getting the vehicle out of mud or new snow, etc. the traction control system will operate to prevent the wheels from spinning.
MANUAL OPERATION You can turn off the traction control system by pushing the “TRAC OFF” switch. The “TRAC OFF” indicator/ warning light will come on. Pushing the “TRAC OFF” switch a second time turns on the traction control system and the “TRAC OFF” indicator/warn- ing light will go off.
CAUTION
Under certain slippery road condi- tions, full traction of the vehicles and power to the front wheels can- not be maintained, even though the traction control system is in opera- tion. Do not drive the vehicle under any speed or maneuvering condi- tions which will cause the vehicle to lose traction. In situations where the road surface is covered with ice or snow, your vehicle should be fitted with snow tires or tire chains. Always drive at an appropriate and cautious pace.
127
Floor mat
Use a floor mat of the correct size. If the floor mat has a hole, then it is de- signed for use with a locking clip. Fix the floor mat and locking clip into the hole in the floor carpet.
CAUTION
Make sure the floor mat is properly placed on the floor carpet. If the floor mat slips and interferes with the movement of the pedals during driving, it may cause an accident.
128
Break-in period Drive gently and avoid high speeds. Your vehicle does not need an elaborate break-in. But following a few simple tips for the first 1600 km (1000 miles) can add to the future economy and long life of your vehicle: (cid:1) Do not drive over 88 km/h (55 mph). (cid:1) Run the engine at moderate speed be-
tween 2000 and 4000 rpm.
(cid:1) Avoid full-throttle starts. (cid:1) Try to avoid hard stops during the first
300 km (200 miles).
(cid:1) Do not drive for a long time at any
single speed, either fast or slow.
(cid:1) Do not tow a trailer during the first 800
km (500 miles).
Part 2
INFORMATION BEFORE DRIVING YOUR TOYOTA (cid:1) Break-in period (cid:1) Fuel (cid:1) Operatin in foreign countries (cid:1) Three way catalytic converter (cid:1) Engine exhaust cautions (cid:1) Facts about engine oil consuption (cid:1) Twin ground electrode spark plugs (cid:1) Brake system (cid:1) Brake pad wear limit inidicators (cid:1) Luggage stowage precautions (cid:1) Your Toyota’s identification (cid:1) Theft prevention labels (cid:1) Suspension and chassis (cid:1) Types of tiresFuel FUEL TYPE Your new vehicle must use only un- leaded gasoline. To help prevent gas station mixups, your Toyota has a new smaller fuel tank opening. The special nozzle on pumps with unleaded fuel will fit it, but the larger standard nozzle on pumps with leaded gas will not.
NOTICE
Do not use leaded gasoline. Use of leaded gasoline will cause the three-way catalytic converter to lose its effectiveness and the emis- sion control system to function im- properly. Also, this can increase maintenance costs.
OCTANE NUMBER Select Research Octane number 91 (Oc- tane Rating 87) or higher. For improved vehicle performance, the use of pre- mium unleaded gasoline with a Re- search Octane number of 96 (Ocatne Rating 91) or higher is recommended. Use of unleaded fuel with an octane num- ber or rating lower than stated above will cause persistant heavy knocking. If se- vere, this will lead to engine damage.
129
FUEL TANK CAPACITY 70 L (18.5 gal., 15.4 Imp. gal)
If your engine knocks... If you detact heavy knocking even when using the recommended fuel, or if you hear steady knocking while holding a steady speed on level roads, consult your Toyota dealer. However, now and then, you may notice light knocking for a short time while accel- erating or driving up hills. This is no cause for concern. GASOLINES CONTAINING DETER- GENT ADDITIVES Toyota recommens use of gasolines that contain detergent additives to avoid build-up of engine deposits. For further details, ask your Toyota dealer or a local gasoline retailer.. GASOLINES CONTAINING MTBE Gasolines that contain MTBE (Methyl Tertiary-Butyl Ether) are available in the market. If you use a gasoline mixed with MTBE, make certain that it does not contain more than 15% of MTBE. If the use of gasolines containing MTBE causes poor driveability and/or poor fuel economy, you should discontinue the use of fuels containing MTBE.
130
GASOLINES CONTAINING ALCOHOL If you use gasohol in your Toyota, be sure that it is unleaded, has an octane rating no lower than 87 and does not contain more than 10% ethonol. Gasohol is a mixture of gasoline and etha- nol. Toyota does not recommend the use of gasolines containing methonol. If you use gasoline containing methonol, use only gasoline meeting the requirements above and also containing less than 5% metha- nol with cosolvents and corrosion inhibi- tors for methanol.
NOTICE
(cid:2)Do not use gasohol other than stated above. It will cause fuel sys- tem damage or vehicle perfor- mance problems.
(cid:2)If driveablity problems are encoun- tered (poor hot starting, vaporiz- ing, engine knock, etc.), discontin- ue the use.
(cid:2)Take care not to spill gasohol dur- ing refueling. Gashol may cause paint damage.
Three-way catalytic converter
Operation in foreign countries If you plan to drive your Toyota in another country... First, comply with the vehicle registration laws. Second, confirm the availability of the correct fuel (unleaded and minimum oc- tane number).
The three-way catalytic converter is an emission control device installed in the exhaust system. Its purpose is to reduce pollutants in the exhaust gas.
CAUTION
(cid:1) Keep people and combustible ma- terials away from the exhaust pipe while the engine is running. The ex- haust gas is very hot.
(cid:1) Do not drive, idle or park your ve- hicle over anything that might burn easily such as grass, leaves, paper or rags.
NOTICE
A large amount of unburned gases flowing into the three-way catalytic converter may cause it to overheat and create a fire hazard. To prevent this and other damage, observe the following precautions: (cid:2)Use only unleaded gasoline. (cid:2)Do not drive with an extremely low fuel level; running out of fuel could cause the engine to misfire, creating an excessive load on the three-way catalytic converter.
131
(cid:2)To ensure that the three-way cata- lytic converter and the engine emission control system operate properly, your vehicle must re- ceive the periodic inspections re- quired by the Toyota Maintenance Schedule. For scheduled mainte- nance information, refer to the separate “Owner’s Manual Sup- plement/Maintenance Schedule”.
(cid:2)Do not allow the engine to run at idle speed for more than 20 min- utes.
(cid:2)Avoid racing the engine. (cid:2)Do not push-start or pull-start
your vehicle.
(cid:2)Do not turn off the ignition while
the vehicle is moving.
(cid:2)Keep your engine in good running order. Malfunctions in the engine electrical system, electronic igni- tion system/distributor ignition system or fuel system engine ex- haust cautions could cause an ex- tremely high three-way catalytic converter temperature.
(cid:2)If the engine becomes difficult to start or stalls frequently, take your vehicle in for a check-up as soon as possible. Remember, your To- yota dealer knows your vehicle and its three-way catalytic con- verter system best.
132
Engine exhaust cautions
CAUTION
(cid:1) Avoid inhaling the engine ex- haust. It contains carbon monox- ide, which is a colorless and odor- less gas. It can cause uncon- sciousness or even death.
(cid:1) Make sure the exhaust system has no holes or loose connec- tions. The system should be checked from time to time. If you hit something, or notice a change in the sound of the exhaust, have the system checked immediately. (cid:1) Do not run the engine in a garage or enclosed area except for the time needed to drive the vehicle in or out. The exhaust gases cannot escape, making this a paticularly dangerous situation.
(cid:1) Do not remain for a long time in a parked vehicle with the engine running. If it is unavoidable, how- ever, do so only in an unconfined area and adjust the heating or cooling system to force outside air into the vehicle.
(cid:1) Keep the trunk lid closed while driving. An open or unsealed trunk lid may cause exhaust gases to be drawn into the ve- hicle. If you must drive with the trunk lid open to accommodate a large object, close the windows, open all the instrument panel vents and have the heating or cooling system deliver fresh air into the vehicle by turning the fan to high speed with the air intake control button set at the outside air mode.
(cid:1) To allow proper operation of your vehicle’s ventilation system, keep the inlet grilles in front of the windshield clear of snow, leaves, or other obstructions.
(cid:1) If you smell exhaust fumes in the vehicle, drive with the windows open and the trunk lid closed. Have the cause immediately lo- cated and corrected.
Facts about engine oil consumption FUNCTIONS OF ENGINE OIL Engine oil has the primary functions of lu- bricating and cooling the inside of the en- gine, and plays a major role in maintaining the engine in proper working order. ENGINE OIL CONSUMPTION It is normal that an engine should con- sume some engine oil during normal engine operation. The causes of oil consumption in a normal engine are as follows. (cid:1) Oil is used to lubricate pistons, piston rings and cylinders. A thin film of oil is left on the cylinder wall when a piston moves downwards in the cylinder. High negative pressure generated when the vehicle is decelerating sucks some of this oil into the combustion chamber. This oil as well as some part of the oil film left on the cylinder wall is burned by the high temperature com- bustion gases during the combustion process.
(cid:1) Oil is also used to lubricate the stems of the intake valves. Some of this oil is sucked into the combustion cham- ber together with the intake air and is burned along with the fuel. High tem- perature exhaust gases also burn the oil used to lubricate the exhaust valve stems.
The amount of engine oil consumed de- pends on the viscosity of the oil, the quality of the oil and the conditions the vehicle is driven under. More oil is consumed by high-speed driv- ing and frequent acceleration and decel- eration. A new engine consumes more oil, since its pistons, piston rings and cylinder walls have not become conditioned. When judging the amount of oil con- sumption, note that the oil may become diluted and make it difficult to judge the true level accurately. As an example, if a vehicle is used for re- peated short trips, and consumes a nor- mal amount of oil, the dipstick may not show any drop in the oil level at all, even after 1000 km (600 miles) or more. This is because the oil is gradually becoming diluted with the fuel or moisture, making it appear that the oil level has not changed. 133
Twin ground electrode spark plugs
Your engine is fitted with twin ground elec- trode spark plugs.
NOTICE
Use only twin ground electrode spark plugs for your engine performance.
Brake system TANDEM MASTER CYLINDER BRAKE SYSTEM The tandem master cylinder brake sys- tem is a hydraulic system with two sepa- rate sub-systems. If either sub-system should fail, the other will still work. Howev- er, the pedal will be harder to press, and your stopping distance will be longer. Also, the brake system warning light may come on.
CAUTION
Do not drive your vehicle with only a single brake system. Have your brakes fixed immediately.
BRAKE BOOSTER The brake booster uses engine vacuum to power-assist the brakes. If the engine should quit while you are driving, you can bring the vehicle to a stop with normal pedal pressure. There is enough reserve vacuum for one or two stops—but no more!
The diluting ingredients evaporate out when the vehicle is then driven at high speeds, as on an expressway, making it appear that oil is excessively consumed after driving as high speeds. IMPORTANCE OF ENGINE OIL LEVEL CHECK One of the most important points in proper vehicle maintenance is to keep the engine oil at the optimum level so that oil function will not be impaired. Therefore, it is essen- tial that the oil level be checked regularly. Toyota recommends that the oil level be checked every time you refuel the vehicle.
NOTICE
Failure to check the oil level regularly could lead to serious engine trouble due to insufficient oil.
For detailed information on the oil level check, see “Checking the engine oil level” in Chapter 7-2.
134
CAUTION
(cid:1) Do not pump the brake pedal if the engine stalls. Each push on the pedal uses up your vacuum re- serve.
(cid:1) Even if the power assist is com- pletely lost, the brakes will still work. But you will have to push the pedal hard—much harder than nor- mal. And your braking distance will be longer.
lock-up of
ANTI-LOCK BRAKE SYSTEM (with “ABS” warning light) The anti-lock brake system is designed to automatically prevent the wheels during sudden braking or braking on slippery road surfaces. This assists in providing directional stability and steering performance of the vehicle under these circumstances. The anti-lock brake system becomes op- erative after the vehicle has accelerated to a speed in excess of approximately 10
km/h (6 mph). It stops operating when the vehicle decelerates to a speed below approximately 5 km/h (3 mph).You may hear a sound in the engine compartment for a few seconds when the engine is started or just after the vehicle is started. This means that the anti-lock brake system is in the self check mode, and does not indicate a malfunction. Effective way to press the “ABS” brake pedal: When the anti-lock brake system function is in action, you may feel the brake pedal pulsating and hear a noise. In this situation, to let the anti-lock brake system work for you, just hold the brake pedal down more firmly. Do not pump the brake. This will result in reduced braking performance. The brake pedal pulsation caused by the anti-lock brake system may indicate haz- ardous road surface conditions. Although the anti-lock brake system assists in pro- viding vehicle control, it is still important to drive with all due care, because the anti- lock brake system cannot overcome the laws of physics that act on your vehicle: (cid:1) Braking capability is dependent on tire
friction with the road surface.
(cid:1) Even though the anti-lock brake sys- tem is operating, a driver cannot main- tain full control on certain slippery road surfaces, when cornering at high speeds, or in violent maneuvers.
(cid:1) Avoid high speeds on wet roads. The anti-lock brake system cannot elimi- nate the risk of hydroplaning and loss of tire friction.
Always maintain a safe distance from the vehicle in front of you. Compared with ve- hicles not fitted with an anti-lock brake system, your vehicle may require a longer stopping distance in the following cases: (cid:1) Driving on rough, gravel or snow-cov-
ered roads.
(cid:1) Driving with tire chains installed. (cid:1) Driving on roads where the road sur- face is pitted or has other differences in surface height.
135
TYPE
PARKING
DRUM-IN-DISC BRAKE SYSTEM Your vehicle has a drum-in-disc type parking brake system. This type brake system needs bedding-down of the brake shoes periodically or whenever the park- ing brake shoes and/or drums are re- placed. Have your Toyota dealer perform the bed- ding-down.
“ABS” warning light This light comes on when the ignition key is turned to the “ON” position. After about 3 seconds, the light will go off. If either of the following conditions occurs, this indicates a malfunction somewhere in the parts monitored by the warning light system. Contact your Toyota dealer as soon as possible to service the vehicle. (cid:1) The light does not come on as de-
scribed above, or remains on.
(cid:1) The light comes on while driving. Even if the anti-lock brake system should fail, the brake system will still operate con- ventionally. However, when the ‘ABS’’ warning light is on (and the brake system warning light is off), the anti-lock brake system is not assisting brake perfor- mance so that the wheels can lock-up during sudden braking or braking on slip- pery road surfaces. Have your vehicle checked by your Toyota dealer as soon as possible
Type A
Type B
136
Brake pad wear limit indicators
Luggage stowage precautions When stowing luggage or cargo in the ve- hicle, observe the following: (cid:1) Put luggage or cargo in the trunk when at all possible. Be sure all items are se- cured in place.
(cid:1) Be careful
to keep
the vehicle balanced. Locating the weight as far forward as possible helps maintain balance.
(cid:1) For better fuel economy, do not carry
unneeded weight.
The brake pad wear limit indicators on your disc brakes give a warning noise when the brake pads are worn to where replacement is required. If you hear a squealing or scraping noise while driving, have the brake pads checked and replaced by your Toyota dealer as soon as possible. Expensive ro- tor damage can result if the pads are not replaced when necessary.
CAUTION
(cid:1) Do not place anything on the filler panel behind the rear seatback. Such items may be thrown about and possibly injure people in the vehicle during sudden braking or an accident.
(cid:1) Do not drive with objects left on top of the instrument panel. They may interfere with the driver’s field of veiw. Or they may move during sharp vehicle acceleration or turning, and impair the driver’s control of the vehicle. In an acci- dent they may injure the vehicle occupants.
NOTICE
Do not load the vehicle beyond the vehicle capacity weight specified in Part 8.
137
Your Toyota’s identification— —Vehicle identification number
-Engine number
The vehicle identification number (VIN) is also on the Certification Label.
The engine number is stamped on the engine block as shown.
The vehicle identification number (VIN) is the legal identifier for your ve- hicle. This number is on the left top of the instrument panel, and can be seen through the windshield from outside. This is the primary identification number for your Toyota. It is used in registering the ownership of your vehicle.
138
Suspension and chassis
CAUTION
Do not modify the suspension/ chassis with lift kits, spacers, springs, etc. It can cause danger- ous handling characteristics, re- sulting in loss of control.
Theft prevention labels (except for Canada) Your new vehicle carries theft preven- tion labels which are approximately 56
mm (2.20 in.) by 16 mm (0.63 in.). The purpose of these labels is to reduce the incidence of vehicle thefts by facilitat- ing the tracing and recovery of parts from stolen vehicles. The label is designed so that once it is applied to a surface, any at- tempt to remove it will result in destroying the integrity of the label. Transferring these labels intact from one part to anoth- er, will be impossible.NOTICE
You should not attempt to remove the theft prevention labels as it may violate certain state or federal laws.
.Summer tires
Types of tires Make sure what kind of tires your ve- hicle is originally equipped with. 1. Summer tires are high-speed capability tires best suited to highway driving under dry conditions. Since summer tires do not have the same traction performance as snow tires, sum- mer tires are inadequate for driving on snow-covered or icy roads. For driving on snow-covered or icy roads, we recom- mend using snow tires. If installing snow tires, be sure to replace all four tires. 2. All season tires All season tires are designed to provide better traction in snow and to be adequate for driving in most winter conditions, as well as for use all year round. All season tires, however, do not have ad- equate traction performance compared with snow tires in heavy or loose snow. Also, all season tires fall short in accelera- tion and handling performance compared with summer tires in highway driving.
139
CAUTION
(cid:1) Do not mix summer and all season tires on your vehicle as this can cause dangerous handling charac- teristics, resulting in loss of con- trol.
(cid:1) Do not use tires other than the manufacturer’s designated tires, and never mix tires or wheels of the sizes different from the originals.
140
Part 3
STARTING AND DRIVING (cid:1) Before starting the engine (cid:1) How to start the engine (cid:1) Tips for driving in variousconditions
(cid:1) Winter driving tips (cid:1) Trailer towing (cid:1) How to save fuel and make your
vehicle last longer, too
Before starting the engine 1. Check the area around the vehicle be-
fore entering it.
2. Adjust seat position, seatback angle, head restraint height and steering wheel angle.
3. Adjust inside and outside rear view
mirrors.
4. Lock all doors. 5. Fasten seat belts.
How to start the engine— (a) Before cranking 1. Apply the parking brake firmly. 2. Turn off unnecessary lights and acces-
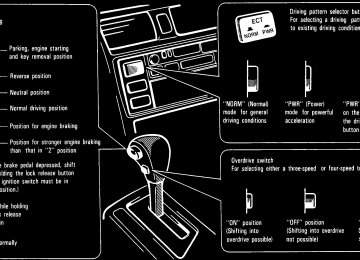
sories.
3. Put the selector lever in “P”. If you need to restart the engine while the ve- hicle is moving, put the selector lever in “N”. A starter safety device will pre- vent the starter from operating if the selector lever is in any drive position. 4. Depress the brake pedal and hold it to
the floor until driving off.
141
(b) Starting the engine Before starting the engine, be sure to fol- low the instructions in “(a) Before crank- ing”. Normal starting procedure The multiport fuel injection system/se- quential multiport fuel injection system in your engine automatically controls the proper air-fuel mixture for starting. You can start a cold or hot engine as follows: 1. With your foot off the accelerator ped- al, crank the engine by turning the key to “START”. Release it when the en- gine starts.
2. After the engine runs for about 10 sec-
onds, you are ready to drive.
If the weather is below freezing, let the en- gine warm up for a few minutes before driving. If the engine stalls... Simply restart it, using the correct proce- dure given in normal starting. If the engine will not start— See “If your vehicle will not start” in Part 4.
142
NOTICE
(cid:2)Do not crank for more than 30 sec- onds at a time. This may overheat the starter and wiring systems.
(cid:2)Do not race a cold engine. (cid:2)If the engine becomes difficult to start or stalls frequently, have the engine checked immediately.
Tips for driving in various conditions (cid:1) Always slow down in gusty cross- winds. This will allow you much better control
(cid:1) Drive slowly onto curbs and, if pos- sible, at a right angle. Avoid driving onto high, sharp-edged objects and other road hazards. Failure to do so can lead to severe tire damage result- ing in tire bursts.
(cid:1) When parking on a hill, turn the front wheels until they touch the curb so that the vehicle will not roll. Apply the park- ing brake, and place the transmission in “P”. If necessary, block the wheels. (cid:1) Washing your vehicle or driving through deep water may get the brakes wet. To see whether they are wet, check that there is no traffic near you, and then press the pedal lightly. If you do not feel a normal braking force, the brakes are probably wet. To dry them, drive the vehicle cautiously while lightly pressing the brake pedal with the parking brake depressed. If they still do not work safely, pull to the side of the road and call a Toyota deal- er for assistance.
CAUTION
(cid:1) Before driving off, make sure that the parking brake if fully released and the parking brake reminder light is off.
(cid:1) Do not leave your vehicle unat- tended while the engine is running. (cid:1) Do not rest your foot on the brake pedal while driving. It can cause dangerous overheating, needless wear, and poor fuel economy.
(cid:1) To drive down a long or steep hill, reduce your speed and downshift. Remember, if you ride the brakes excessively, they may overheat and not work properly.
(cid:1) Be careful when accelerating, up- shifting, downshifting or braking on a slippery surface. Sudden ac- celeration or engine braking, could cause the vehicle to spin or skid.
(cid:1) Do not drive in excess of the speed limit. Even if the legal speed limit permits it, do not drive over 140
km/h (85 mph) unless your vehicle has high-speed capability tires. Driving over 140 km/h (85 mph) may result in tire failure, loss of control and possible injury. Be sure to con- sult a tire dealer to determine whether the tires on your vehicle are high-speed capability tires or not before driving at such speeds. (cid:1) Do not continue normal driving when the brakes are wet. If they are wet, your vehicle will require a lon- ger stopping distance, and it may pull to one side when the brakes are applied. Also, the parking brake will not hold the vehicle securely.Winter driving tips Make sure you have ethylene-glycol antifreeze in the radiator.
NOTICE
Do not use alcohol type antifreeze.
Check the condition of the battery and cables. Cold temperatures reduce the capacity of any battery, so it must be in top shape to provide enough power for winter starting. Chapter 7-3 tells you how to visually in- spect the battery. Your Toyota dealer and most service stations will be pleased to check the level of charge. Make sure the engine oil viscosity is suitable for the cold weather. See Chapter 7-2 for recommended vis- cosity. Leaving a heavy summer oil in your vehicle during winter months may cause harder starting. If you are not sure about which oil to use, call your Toyota dealer- he will be pleased to help. Keep the door locks from freezing. Squirt lock de-icer or glycerine into the locks to keep them from freezing. To open a frozen lock, try heating the key before in- serting it.
143
Depending on where you are driving, we recommend you carry some emer- gency equipment. Some of the things you might put in the ve- hicle are tire chains, window scraper, bag of sand or salt, flares, small shovel, jump- er cables, etc.
Trailer towing Your vehicle is designed primarily as a passenger-carrying vehicle. Towing a trailer will have an adverse effect on han- dling, performance, braking, durability and driving economy (fuel consumption, etc.). Your safety and satisfaction depend on the proper use of correct equipment and cautious driving habits. For your safe- ty and the safety of others, you must not overload your vehicle or trailer. Toyota warranties do not apply to damage or mal- function caused by towing a tailer for com- merical purposes. Ask your local Toyota dealer for further details before towing. WEIGHT LIMITS Before towing, make sure the total trailer weight, gross vehicle weight, gross axle weight and trailer tongue load are all with- in the limits. The total trailer weight and tongue load can be measured with platform scales found at a highway weighing station, building supply company, trucking com- pany, junk yard, etc.
Use a washer fluid containing an anti- freeze solution. This product is available at your Toyota dealer and most auto parts stores. Follow the manufacturer’s directions for how much to mix with water.
NOTICE
Do not use engine antifreeze or any other substitute because it may damage your vehicle’s paint.
Do not use your parking brake when there is a possibility it could freeze. When parking, put the transmission into “P” and block the rear wheels. Do not use the parking brake, or snow or water accu- mulated in and around the parking brake mechanism may freeze, making it hard to release. Keep ice and snow from accumulating under the fenders. Ice and snow built up under your fenders can make steering difficult. During bad winter driving, stop and check under the fenders occasionally.
144
CAUTION
(cid:1) The total trailer weight (trailer weight plus its cargo load) must not exceed 907 kg (2000 lb.). Ex- ceeding this weight is dangerous.
(cid:1) The gross vehicle weight must not exceed the Gross Vehicle Weight Rating (GVWR) indicated on the Certification Label. The gross ve- hicle weight is the sum of weights of the unloaded vehicle, driver, passengers, luggage, hitch and trailer tongue load. It also includes the weight of any special equip- ment installed on your vehicle.
(cid:1) The load on either the front or rear axle resulting from distribution of the gross vehicle weight on both axles must not exceed the Gross Axle Weight Rating (GAWR) listed on the Certification Label.
(cid:1) The trailer cargo load should be distributed so that the tongue load is 9 to 11 % of the total trailer weight, not exceeding the maxi- mum of 90 kg (200 lb.). Never load the trailer with more weight in the back than in the front. About 60 % of the trailer load should be in the front half of the trailer and the re- maining 40 % in the rear.
145
HITCHES (cid:1) Use only a hitch which is recom- mended by the hitch manufacturer and conforms to the total trailer weight re- quirment.
(cid:1) Follow the directions supplied by the hitch manufacturer, and bolt the hitch securely to the rear bumper. Lubricate the hitch ball with a light coat of grease. (cid:1) Toyota recommends removing the trailer hitch whenever you are not tow- ing a trailer to reduce the possibility of additional damage caused by the hitch if your vehicle is struck from behind. After removing the hitch, seal any mounting holes in the vehicle body to prevent entry of pollutants such as ex- haust fumes, dirt, water, etc.
NOTICE
Do not use axle-mounting hitches they can cause damage to the axle housing, wheel bearings, wheels or tires. Also, never install a hitch which may interfere with the normal function of an Energy Absorbing Bumper.
146
recommends
BRAKES AND SAFETY CHAINS (cid:1) Toyota
trailers with brakes that conform to any applicable federal and state/provincial regula- tions.
(cid:1) A safety chain must always be used between the towing vehicle and the trailer. Leave sufficient slack in the chain for turns. The chain should cross under the trailer tongue to prevent the tongue from dropping to the ground in case it becomes damaged or seper- ated. For correct safety chain proce- dures, trailer manufacturer’s recommendations.
the hitch or
follow
CAUTION
(cid:1) If the total trailer weight exceeds 453 kg (1000 lb.), trailer brakes are required.
(cid:1) Never tap into your vehicle’s hy- draulic system as it would lower its braking effectiveness.
(cid:1) Never tow a trailer without using a safety chain securely attached to both the trailer and the vehicle. If damage occurs to the coupling unit or hitch ball, there is danger of the trailer wandering over into another lane.
TIRES (cid:1) Ensure that your vehicle’s tires are properly inflated. See Chapter 7-2 for instructions.
(cid:1) The trailer tires should be inflated to the pressure recommended by the trailer manufacturer in respect to the total trailer weight.
TRAILER LIGHTS (cid:1) Trailer lights must comply with federal, state/provincial and local regulations. See your local recreational vehicle dealer or rental agency for the correct type of wiring and relays for your trail- er. Check for correct operation of the turn signals and stop lights each time you hitch up. Direct splicing may dam- age your vehicle’s electrical system and cause a malfunction of your lights.
BREAK-IN SCHEDULE (cid:1) Toyota recommends that you do not tow a trailer with a new vehicle or a ve- hicle with any new power train compo- nent (engine, transmission, differen- tial, wheel bearing, etc.) for the first 800 km (500 miles) of driving.
MAINTENANCE
(cid:1)
If you tow a trailer, your vehicle will re- quire more frequent maintenance due to the additional load. For this informa- tion, please refer to the scheduled maintenance information in the “Own- er’s Manual Supplement/Maintenance Schedule”.
(cid:1) Retighten all fixing bolts of the towing ball and bracket after approximately 1000 km (600 miles) of trailer driving.
PRE-T OWING SAFETY CHECK (cid:1) Check that your vehicle remains level when a loaded or unloaded trailer is hitched. Do not drive if the vehicle has an abnormal nose-up or nose-down condition, and check for improper tongue load, overload, worn suspen- sion or other possible causes.
(cid:1) Make sure the trailer cargo is securely
loaded so that it cannot shift.
(cid:1) Check that your rear view mirrors con- form to any applicable federal, state/ provincial or local regulation. If not, install the rear view mirrors required for towing purpose.
TRAILER TOWING TIPS When towing a trailer, your vehicle will handle differently than when not tow- ing. The three main causes of vehicle trailer accidents are driver error, ex- cessive speed and improper trailer loading. Keep these in mind when tow- ing: (cid:1) Before starting out, check operation of the lights and all vehicle-trailer con- nections. After driving a short dis- tance, stop and recheck the lights and connections. Before actually towing a trailer, practice turning, stopping and backing with a trailer in an area away from traffic until you learn the feel.
(cid:1) Backing with a trailer is difficult and re- quires practice. Grip the bottom of the steering wheel and move your hand to the left to move the trailer to the left. Move your hand to the right to move the trailer to the right. (This procedure is generally opposite to that when backing without a trailer). Also, just turn the steering wheel a little at a time, avoiding sharp or prolonged turning. Have someone guide you when back- ing to reduce the risk of an accident. (cid:1) Because stopping distance may be in- creased, vehicle-to-vehicle distance should be increased when towing a trailer. For each 16 km/h (10 mph) of speed, allow at least one vehicle and trailer length between you and the ve- hicle ahead. Avoid sudden braking as you may skid, resulting in jackknifing and loss of control. This is especially true on wet or slippery surfaces.
(cid:1) Avoid jerky starts or sudden accelera-
tion.
147
(cid:1) Avoid jerky steering and sharp turns. The trailer could hit your vehicle in a tight turn. Slow down before making a turn to avoid the necessity of sudden braking.
(cid:1) Remember that when making a turn, the trailer wheels will be closer than the vehicle wheels to the inside of the turn. Therefore, compensate for this by making a larger than normal turning radius with your vehicle.
(cid:1) Crosswinds and rough roads will ad- versely affect handling of your vehicle and trailer, causing sway. Pay atten- tion to the rear from time to time to pre- pare yourself for being passed by large trucks or buses, which may cause your vehicle and trailer to sway. If swaying happens, firmly grip the steering wheel and reduce speed immediately but gradually. Never increase speed. Steer straight ahead. If you make no extreme correction with the steering or brakes, the vehicle and trailer will sta- bilize.
148
(cid:1) Be careful when passing other ve- hicles. Passing requires considerable distance. After passing a vehicle, do not forget the length of your trailer and be sure you have plenty of room be- fore changing lanes. In order to maintain engine braking ef- ficiency, do not use overdrive.
(cid:1)
(cid:1) Because of the added load of the trail- er, your vehicle’s engine may overheat on hot days (at temperatures over 30°C [85°F]) when going up a long or steep grade with a trailer. If the engine coolant temperature gauge indicates overheating, immediately turn off the air conditioning (if in use), pull off the road and stop in a safe spot. Refer to “If your vehicle overheats” in Part 4 of this manual.
(cid:1) Always place wheel blocks under both the vehicle and trailer wheels when parking. Apply the parking brake firm- ly. Put the transmission in “P”. Avoid parking on a slope with a trailer, but if it cannot be avoided, do so only after performing the following:
1. Apply the brakes and hold. 2. Have someone place wheel blocks un- der both the vehicle and trailer wheels. 3. When the wheel blocks are in place, release your brakes slowly until the blocks absorb the load.
4. Apply the parking brake frimly. 5. Shift into “P” and turn off the engine. When restarting out after parking on a slope: 1. With the transmission in “P” position, start the engine. Be sure to keep the brake pedal depressed.
2. Shift into the “2”, “L” or “R” position. 3. Release the parking brake and brake pedal and slowly pull or back away from the wheels blocks. Stop and ap- ply your brakes.
4. Have someone retrieve the blocks.
CAUTION
(cid:1) Do not exceed 72 km/h (45 mph) or the posted towing speed limit, whichever is lower. Because insta- bility (swaying) of a towing ve- hicle-trailer combination usually increases as the speed increases, exceeding 72 km/h (45 mph) may cause loss of control.
(cid:1) Slow down and downshift before descending steep or long down- hill grades. Do not make sudden downshifts
(cid:1) Avoid holding the pedal down too long or too frequently. This could cause the brakes to overheat and result braking efficiency.
reduced
in