- 2005 Nissan Quest Owners Manuals
- Nissan Quest Owners Manuals
- 2004 Nissan Quest Owners Manuals
- Nissan Quest Owners Manuals
- 1999 Nissan Quest Owners Manuals
- Nissan Quest Owners Manuals
- 1998 Nissan Quest Owners Manuals
- Nissan Quest Owners Manuals
- 2000 Nissan Quest Owners Manuals
- Nissan Quest Owners Manuals
- 2011 Nissan Quest Owners Manuals
- Nissan Quest Owners Manuals
- 1996 Nissan Quest Owners Manuals
- Nissan Quest Owners Manuals
- 2012 Nissan Quest Owners Manuals
- Nissan Quest Owners Manuals
- 2007 Nissan Quest Owners Manuals
- Nissan Quest Owners Manuals
- 2002 Nissan Quest Owners Manuals
- Nissan Quest Owners Manuals
- 2001 Nissan Quest Owners Manuals
- Nissan Quest Owners Manuals
- 2008 Nissan Quest Owners Manuals
- Nissan Quest Owners Manuals
- 2009 Nissan Quest Owners Manuals
- Nissan Quest Owners Manuals
- 1997 Nissan Quest Owners Manuals
- Nissan Quest Owners Manuals
- 2006 Nissan Quest Owners Manuals
- Nissan Quest Owners Manuals
- Download PDF Manual
-
Black plate (374,1)
Ground Fault Interrupt (GFI) pro- tected, grounded 110-VAC outlet. Failure to use the proper extension cord or a grounded outlet can result in a fire or electrical shock and cause serious personal injury.
5-34 Starting and driving
[ Edit: 2011/ 10/ 27 Model: E52-D ]
6 In case of emergency
Black plate (375,1)
...
Emergency engine shut off Flat tire ...
..................................................... 6-2
......................................................................................... 6-2
.................... 6-2
............................................................. 6-3
.............................................................................. 6-9Tire Pressure Monitoring System (TPMS) Changing a flat tire ...
Jump starting ...
...
Push starting ... If your vehicle overheats ... Towing your vehicle ...
........................................................................... 6-11
...................................................... 6-11
.............................................................. 6-13
........................... 6-14
............... 6-15Towing recommended by NISSAN ... Vehicle recovery (freeing a stuck vehicle)
...
[ Edit: 2011/ 10/ 27 Model: E52-D ]
EMERGENCY ENGINE SHUT OFF
FLAT TIRE
Black plate (376,1)
GUID-0E4C54B4-2114-44F8-B325-BF9D4DF5FAF5
To shut off the engine in an emergency situation while driving perform the following procedure: . Rapidly push the push-button ignition switch 3 consecutive times in less than 1.5
seconds, or. Push and hold the push-button ignition
switch for more than 2 seconds.
GUID-AC1D0281-335C-4108-853B-8A1B546B4579
TIRE PRESSURE MONITORING SYS- TEM (TPMS) GUID-DEB6C221-1388-45A8-A56A-12AE327CD076
This vehicle is equipped with the Tire Pressure Monitoring System (TPMS). It monitors tire pressure of all tires except the spare. When the low tire pressure warning light is lit and the CHECK TIRE PRESSURE warning appears on the dot matrix liquid crystal display, one or more of your tires is significantly under-inflated. If the vehicle is being driven with low tire pressure, the TPMS will activate and warn you of it by the low tire pressure warning light. This system will activate only when the vehicle is driven at speeds above 16 MPH (25 km/h). For more details, see “Warning/indicator lights and audi- ble reminders” (P.2-11) and “Tire Pressure Monitoring System (TPMS)” (P.5-3).WARNING
If the low tire pressure warning light illuminates while driving, avoid sud- den steering maneuvers or abrupt braking, reduce vehicle speed, pull off the road to a safe location and stop the vehicle as soon as possi- ble. Driving with under-inflated tires may permanently damage the tires and increase the likelihood of tire
failure. Serious vehicle damage could occur and may lead to an accident and could result in serious personal injury. Check the tire pres- sure for all four tires. Adjust the tire pressure to the recommended COLD tire pressure shown on the Tire and Loading Information label to turn the low tire pressure warning light OFF. illuminates while driving after adjusting the tire pressure, a tire may be flat. If you have a flat tire, replace it with a spare tire as soon as possible.
If the light still
. When a spare tire is mounted or a wheel is replaced, the TPMS will not function and the low tire pressure warning light will flash for approxi- mately 1 minute. The light will remain on after 1 minute. Contact your NISSAN dealer as soon as possible for tire replacement and/ or system resetting.
. Replacing tires with those not ori- ginally specified by NISSAN could affect the proper operation of the TPMS.
. Do not
inject any tire liquid or aerosol tire sealant into the tires,
6-2 In case of emergency
[ Edit: 2011/ 10/ 27 Model: E52-D ]
as this may cause a malfunction of the tire pressure sensors.
CHANGING A FLAT TIRE If you have a flat tire, below.
GUID-9C3D8FB6-951A-4EDB-A38A-8CFC44DDD5C4
follow the instructionsStopping the vehicle GUID-3C04CDD2-4FF2-4546-BEAF-E86E1FD31ECB 1. Safely move the vehicle off the road and
away from traffic.
2. Turn on the hazard warning flashers. 3. Park on a level surface and apply the parking brake. Move the selector lever to the P (Park) position.
4. Turn off the engine. 5. Raise the hood to warn other traffic, and to signal professional road assistance person- nel that you need assistance.
6. Have all passengers get out of the vehicle and stand in a safe place, away from traffic and clear of the vehicle.
WARNING
. Make sure the parking brake is securely applied and the transmis- sion is shifted into the P (Park) position.
Black plate (377,1)
. Never change tires when the vehicle is on a slope, ice or slippery areas. This is hazardous.
. Never change tires if oncoming traffic is close to your vehicle. Wait for professional road assistance.
MCE0001A
GUID-93D9DEE9-EDED-416B-B0EB-4D9AEC85C652
Blocking wheels Place suitable blocks *1 at both the front and back of the wheel diagonally opposite the flat tire to prevent the vehicle from moving when it is jacked up.
WARNING
Be sure to block the wheel as the vehicle may move and result in personal injury.
In case of emergency 6-3
[ Edit: 2011/ 10/ 27 Model: E52-D ]
Black plate (378,1)
4. Remove tools *A and jack *B located as
illustrated.
JVE0027X
JVE0031X
Getting the tools and jack 1. Open the lift gate. 2. Open the cargo floor box. (See “Cargo floor
GUID-3E8604EA-97F9-4AB5-AC55-2A26F0E2DDB8
box” (P.2-47).)
3. Remove the cargo floor board (if so
equipped).
6-4 In case of emergency
[ Edit: 2011/ 10/ 27 Model: E52-D ]
Black plate (379,1)
4. When the spare tire is completely lowered,
carefully slide it from under the vehicle.
5. Remove the suspending plate *E from the
spare tire.
6. After removing the spare tire, raise the spare tire cable completely by turning the spare tire lowering mechanism clockwise using the tool *D .
7. Before moving or jacking up the vehicle, check under the vehicle to make sure the cable is stored properly.
JVE0032X
WARNING
SCE0630
Getting the spare tire GUID-1FB755FE-1FC8-43E1-AE9C-801B417FB7E4
The spare tire is located under the center of the vehicle. 1. Lift up the floor carpeting flap behind the front center console, then remove insulation piece to access the spare tire lowering mechanism *C .2. Loosen the spare tire lowering mechanism
*C with the wheel nut wrench.
3. Using the assembled socket tool *D , turn the spare tire lowering mechanism *C counterclockwise as illustrated to lower the spare tire.
. Never jack up the vehicle before removing the spare tire from under the vehicle. This may lead to an accident could result in serious personal injury.
. Do not move the vehicle with the spare tire cable lowered. The cable could hit or become tangled with an object on the road. Serious vehicle damage could occur and may lead to an accident and could result in serious personal injury.
Removing wheel cover (if so equipped)
GUID-B6BFF967-EFDB-4567-8417-F7BC9FA8200E
WARNING
Never use your hands to remove the wheel cover. This may cause personal injury.
To remove the wheel cover, use the jack rod *1
as illustrated. Apply cloth *2 between the wheel and jack rod to prevent damaging the wheel and wheel cover.In case of emergency 6-5
[ Edit: 2011/ 10/ 27 Model: E52-D ]
Black plate (380,1)
SCE0585
Jack-up point
1. Place the jack directly under the jack-up point as illustrated so the top of the jack contacts the vehicle at the jack-up point. Align the jack head between the two notches in the front or the rear as shown. Also fit the groove of the jack head between the notches as shown. The jack should be used on level firm ground.
Jacking up the vehicle and removing the flat tire
GUID-5487C985-0D22-41CC-A2C6-8E2BCAAA97BC
Carefully read the caution label attached to the jack body and the following instruc- tions.
WARNING
. Never get under the vehicle while it is supported only by the jack. If it is necessary to work under the vehicle, support it with safety stands.
. Use only the jack provided with your vehicle to lift the vehicle. Do not use the jack provided with your vehicle on other vehicles. The jack is de- signed for lifting only your vehicle during a tire change.
. Use the correct
jack-up points. Never use any other part of the vehicle for jack support.
. Never jack up the vehicle more than
necessary.
. Never use blocks on or under the
jack.
. Do not start or run the engine while vehicle is on the jack, as it may cause the vehicle to move.
. Do not allow passengers to stay in
the vehicle while it is on the jack.
6-6 In case of emergency
[ Edit: 2011/ 10/ 27 Model: E52-D ]
Black plate (381,1)
2. Loosen each wheel nut one or two turns by turning counterclockwise with the wheel nut wrench. Do not remove the wheel nuts until the tire is off the ground.
3. To lift the vehicle, securely hold the jack lever and rod with both hands as shown above. Carefully raise the vehicle until the tire clears the ground. Remove the wheel nuts, and then remove the tire.
SCE0504
SCE0039
Installing the spare tire GUID-C0B9D734-710A-481A-86B0-9913DBADEB35
The spare tire is designed for emergency use. (See specific instructions under the heading “Wheels and tires” (P.8-29).) 1. Clean any mud or dirtfrom the surface
between the wheel and hub.
2. Carefully put the spare tire on and tighten the wheel nuts finger tight. Check that all the wheel nuts contact the wheel surface horizontally.
3. With the wheel nut wrench, tighten wheel nuts alternately and evenly in the sequence as illustrated (*1 , *2 , *3 , *4 , *5 ), more than 2 times, until they are tight.
In case of emergency 6-7
[ Edit: 2011/ 10/ 27 Model: E52-D ]
Black plate (382,1)
tened to specification at all times. It is recommended that wheel nuts be tightened to specifications at each lubrication interval.
. Adjust tire pressure to the COLD
gency use. See specific instructions under the heading “Wheels and tires” (P.8-29).
4. Lower
the vehicle slowly until
the tire touches the ground. Then, with the wheel nut wrench, tighten the wheel nuts securely in the sequence as illustrated. Lower the vehicle completely.
5. Securely store the flat tire, jack and tools in
pressure.
the vehicle.
WARNING
Incorrect wheel nuts or improperly tightened wheel nuts can cause the wheel to become loose or come off. This could cause an accident.
. Do not use oil or grease on the wheel studs or nuts. This could cause the nuts to become loose.
. Retighten the wheel nuts when the vehicle has been driven for 600
miles (1,000 km) (also in cases of a flat tire, etc.).. As soon as possible, tighten the wheel nuts to the specified torque with a torque wrench.
Wheel nut tightening torque:
80 ft-lb (108 N·m)
The wheel nuts must be kept tigh-
6-8 In case of emergency
COLD pressure:
After the vehicle has been parked for three hours or more or driven less than 1 mile (1.6 km).
COLD tire pressures are shown on the Tire and Loading Information label affixed to the driver side center pillar.
Stowing the spare tire and the tools GUID-D067B480-FEC0-4ABB-8FD0-F9C4BA40EABA Securely store the spare tire, jack and tools in their original location.
WARNING
. Always make sure that the spare tire and jacking equipment are properly secured after use. Such items can become dangerous projectiles in an accident or sudden stop.
The T-type spare tire and small size spare tire are designed for emer-
[ Edit: 2011/ 10/ 27 Model: E52-D ]
Black plate (383,1)
JUMP STARTING
GUID-F0C70992-E39E-439F-A298-885A33CD0F7D To start your engine with a booster battery, the instructions and precautions below must be followed.
WARNING
If done incorrectly, jump starting can lead to a battery explosion, resulting in severe injury or death. It could also damage your vehicle.
. Explosive hydrogen gas is always present in the vicinity of the battery. Keep all sparks and flames away from the battery.
. Do not allow battery fluid to come into contact with eyes, skin, clothing or painted surfaces. Battery fluid is a corrosive sulfuric acid solution which can cause severe burns. If the fluid should come into contact with anything, immediately flush the contacted area with water.
. Keep the battery out of the reach of
children.
The booster battery must be rated at 12 volts. Use of an improperly rated battery can damage your vehicle.
In case of emergency 6-9
. Do not use an impact wrench when tightening or loosening the spare tire lowering mechanism.
. When raising the spare tire, tighten the spare tire lowering mechanism until three clicks are heard.
. After storing the spare tire, check under the vehicle to make sure it is stored properly.
SCE0978
WARNING
. When storing the spare tire, make sure that the outer side of the spare tire *A is facing up and that the hanging plate *B is in the center of the wheel as illustrated. Failure to store the spare tire properly could result in serious vehicle damage and may lead to an accident and could result in serious personal injury.
. Do not store any tire with the cable
except the spare tire.
[ Edit: 2011/ 10/ 27 Model: E52-D ]
. Whenever working on or near a battery, always wear suitable eye protectors (for example, goggles or industrial safety spectacles) and remove rings, metal bands, or any other jewelry. Do not lean over the battery when jump starting.
. Do not attempt to jump start a It could explode
frozen battery. and cause serious injury.
. Your vehicle has an automatic en- gine cooling fan. It could come on at any time. Keep hands and other objects away from it.
Black plate (384,1)
2. Apply the parking brake. Move the selector lever to the P (Park) position. Switch off all unnecessary electrical systems (lights, hea- ter, air conditioner, etc.).
3. Remove vent caps on the battery (if so equipped). Cover the battery with a firmly wrung out moist cloth to reduce explosion hazard.
4. Connect jumper cables in the sequence as
illustrated (*1 ? *2 ? *3 ? *4 ). If the battery is discharged, the ignition switch cannot be moved from the OFF position. Connect the jumper cables to the booster vehicle *B before pushing the ignition switch.
CAUTION
. Always connect positive (+) to posi- tive (+) and negative (−) to body ground (for example, as illustrated), not to the battery.
. Make sure the jumper cables do not touch moving parts in the engine compartment and that the cable clamps do not contact any other metal.
SCE0969
WARNING
Always follow the instructions below. Failure to do so could result in damage to the charging system and cause personal injury.
1.
If the booster battery is in another vehicle *B , position the two vehicles (*A and *B ) to bring their batteries into close proximity to each other. Do not allow the two vehicles to touch.
6-10 In case of emergency
[ Edit: 2011/ 10/ 27 Model: E52-D ]
Black plate (385,1)
PUSH STARTING
IF YOUR VEHICLE OVERHEATS
5. Start the engine of the booster vehicle *B
GUID-AF8EBCAC-D95B-46B0-8FB6-7D559960C8C6
Do not attempt to start the engine by pushing.CAUTION
Continuously Variable Transmission (CVT) models cannot be push-started or tow-started. Attempting to do so may cause transmission damage.
and let it run for a few minutes.
the booster 6. Keep the engine speed of vehicle *B at about 2,000 rpm, and start the engine of the vehicle *A being jump started.
CAUTION
Do not keep the starter motor engaged for more than 10 seconds. If the engine does not start right away, place the ignition switch in the OFF position and wait 10 seconds before trying again.
7. After starting your engine, carefully discon- nect the negative cable and then the positive cable (*4 ? *3 ? *2 ? *1 ).
8. Replace the vent caps (if so equipped). Be sure to dispose of the cloth used to cover the vent holes as it may be contaminated with corrosive acid.
GUID-7BE274CB-4547-414A-A0AB-1E92E044A439
CAUTION
. Do not continue to drive if your vehicle overheats. Doing so could cause engine damage or a vehicle fire.
To avoid the danger of being scalded, never remove the radiator cap while the engine is still hot. When the radiator cap is removed, pressurized hot water will spurt out, possibly causing serious injury.
. Do not open the hood if steam is
coming out.
If your vehicle is overheating (indicated by an extremely high temperature gauge reading), or if you feel a lack of engine power, detect abnormal noise, etc., take the following steps: 1. Move the vehicle safely off the road, apply the parking brake and move the selector lever to the P (Park) position. Do not stop the engine.
2. Turn off the air conditioner. Open all the windows, move the heater or air conditioner temperature control to maximum hot and fan control to high speed.
In case of emergency 6-11
[ Edit: 2011/ 10/ 27 Model: E52-D ]
Black plate (386,1)
3. Get out of the vehicle. Look and listen for steam or coolant escaping from the radiator before opening the hood. (If steam or coolant is escaping, turn off the engine.) Do not open the hood further until no steam or coolant can be seen. 4. Open the engine hood.
cooling fan can start at any time.
6. After
the engine cools down, check the coolant level in the reservoir tank with the engine running. Add coolant to the reservoir tank if necessary. Have your vehicle repaired at a NISSAN dealer.
WARNING
If steam or water is coming from the engine, stand clear to prevent getting burned.
5. Visually check drive belts for damage or looseness. Also check if the cooling fan is running. The radiator hoses and radiator should not leak water. If coolant is leaking, the water pump belt is missing or loose, or the cooling fan does not run, stop the engine.
WARNING
Be careful not to allow your hands, hair, jewelry or clothing to come into contact with, or get caught in, engine belts or the engine cooling fan. The engine
6-12 In case of emergency
[ Edit: 2011/ 10/ 27 Model: E52-D ]
Black plate (387,1)
. Always attach safety chains before
towing.
For information about towing your vehicle behind a recreational vehicle (RV), see “Flat towing” (P.9-24) of this manual.
TOWING YOUR VEHICLE
GUID-80738224-7F1F-4B4C-8893-BF5FD3490F0F When towing your vehicle, all State (Provincial in Canada) and local regulations for towing must be followed. Incorrect towing equipment could damage your vehicle. Towing instructions are available from a NISSAN dealer. Local service operators are familiar with the applicable laws and procedures for towing. To assure proper towing and to prevent accidental damage to your vehicle, NISSAN recommends that you have a service operator tow your vehicle. It is advisable to have the service operator carefully read the following precautions.
WARNING
. Never ride in a vehicle that is being
towed.
. Never get under your vehicle after it
has been lifted by a tow truck.
CAUTION
. When towing, make sure that the transmission, axles, steering system and drivetrain are in working condi- tion. If any unit is damaged, dollies must be used.
[ Edit: 2011/ 10/ 27 Model: E52-D ]
In case of emergency 6-13
Black plate (388,1)
. When towing a CVT model with the rear wheels on the ground (if you do not use towing dollies): Always release the parking brake.
TOWING RECOMMENDED BY NISSAN GUID-DAEEA07F-BA1F-4483-BBDA-83F786579A9F NISSAN recommends that your vehicle be towed with the driving (front) wheels off the ground or place the vehicle on a flat bed truck as illustrated.
CAUTION
. Never tow Continuously Variable Transmission (CVT) models with the front wheels on the ground or four wheels on the ground (forward or backward), as this may cause
6-14 In case of emergency
SCE0976
serious and expensive damage to the drivetrain. If it is necessary to tow the vehicle with the rear wheels raised, always use towing dollies under the front wheels.
. When towing CVT models with the
front wheels on towing dollies:
— Push the ignition switch to the ACC or ON position, and secure the steering wheel in a straight- ahead position with a rope or similar device.
— Move the selector lever to the N
(Neutral) position.
[ Edit: 2011/ 10/ 27 Model: E52-D ]
Black plate (389,1)
Pulling a stuck vehicle GUID-357A4B24-B4C1-41A1-9CFA-159462B213B3
If your vehicle is stuck in sand, snow, mud, etc., use a tow strap or other device designed specifically for vehicle recovery. Always follow the manufacturer’s instructions for the recovery device.Front: GUID-D73A39BF-43C8-459F-9C24-47B7F579C407
Using a suitable tool wrapped with a cloth, remove the cover from the bumper. Securely install the vehicle recovery hook (stored in the cargo area) as illustrated. Make sure that the hook is properly secured in the original place after use.CAUTION
Tow chains or cables must be at- tached only to the main structural members of the vehicle or the recovery hook. Otherwise, the vehi- cle body will be damaged.
. Never tow a vehicle using the vehi-
cle tie downs or recovery hooks.
. Always pull the cable straight out from the front of the vehicle. Never pull on the vehicle at an angle.
In case of emergency 6-15
SCE0971
Rear (tie down and recovery hook)
VEHICLE RECOVERY (freeing a stuck vehicle)
GUID-B41CE403-0FA7-4B6B-B314-6F097C555CBF
WARNING
. Stand clear of a stuck vehicle. . Do not spin your tires at high speed. This could cause them to explode and result in serious injury. Parts of your vehicle could also overheat and be damaged.
SCE0970
Front
[ Edit: 2011/ 10/ 27 Model: E52-D ]
Black plate (390,1)
. Do not spin the tires above 35 MPH (55
km/h).
5.
If the vehicle cannot be freed after a few tries, contact a professional towing service to remove the vehicle.
[ Edit: 2011/ 10/ 27 Model: E52-D ]
. Pulling devices should be routed so they do not touch any part of the suspension, steering, brake or cool- ing systems.
. Pulling devices such as ropes or canvas straps are not recommended for use in vehicle towing or recov- ery.
Rocking a stuck vehicle GUID-80608F11-4F10-4FDC-B323-F0062D15C0B6
If your vehicle is stuck in sand, snow, mud, etc., use the following procedure: 1. Turn off the Vehicle Dynamic Control (VDC)system.
2. Make sure the area in front and behind the
vehicle is clear of obstructions.
3. Turn the steering wheel right and left to clear
an area around the front tires.
4. Slowly rock the vehicle forward and back-
ward. . Shift back and forth between R (Reverse)
and D (Drive).
. Apply the accelerator as little as possible
to maintain the rocking motion.
. Release the accelerator pedal before
shifting between R and D.
6-16 In case of emergency
7 Appearance and care
Black plate (391,1)
Cleaning exterior
....................................................................... 7-2
... ................................................................................. 7-2
................................................................................... 7-2
................................................................... 7-3
............................................................................. 7-3
...................................................................................... 7-3
................................................................................... 7-3
....................................................................... 7-3
......................................................................... 7-4Washing ... Waxing ... Removing spots ... Underbody ... Glass ... Wheels ... Chrome parts ... Tire dressing ...
Cleaning interior
Air fresheners ... Floor mats ... Seat belts ...
... ....................................................................... 7-4
..................................................................... 7-4
........................................................................... 7-5
............................................................................ 7-6
................................................................ 7-6Corrosion protection ...
Most common factors contributing to vehicle corrosion ... Environmental factors influence the rate of corrosion ... To protect your vehicle from corrosion ...
........................................................................ 7-6
....................... 7-7............................................................... 7-6
[ Edit: 2011/ 10/ 27 Model: E52-D ]
CLEANING EXTERIOR
GUID-4EA9B7EB-CDA1-47FB-A2C3-26532BE42047
In order to maintain the appearance of your vehicle, it is important to take proper care of it. To protect the paint surface, wash your vehicle as soon as you can:after a rainfall to prevent possible damage from acid rain after driving on coastal roads
. when contaminants such as soot, bird droppings, tree sap, metal particles or bugs get on the paint surface
. when dust or mud builds up on the surface Whenever possible, store or park your vehicle inside a garage or in a covered area. When it is necessary to park outside, park in a shady area or protect the vehicle with a body cover. Be careful not to scratch the paint surface when putting on or removing the body cover. WASHING GUID-815A82D3-09BB-4DBF-A23B-ADF010BCEEA1
Wash dirt off the vehicle with a wet sponge and plenty of water. Clean the vehicle thoroughly using a mild soap, a special vehicle soap or general purpose dishwashing liquid mixed with clean, lukewarm (never hot) water.7-2 Appearance and care
Black plate (392,1)
CAUTION
. Do not use car washes that use acid in the detergent. Some car washes, especially brushless ones, use some acid for cleaning. The acid may react with some plastic vehicle compo- nents, causing them to crack. This could affect their appearance, and also could cause them not to func- tion properly. Always check with your car wash to confirm that acid is not used.
. Do not wash the vehicle with strong household soap, strong chemical detergents, gasoline or solvents.
. Do not wash the vehicle in direct sunlight or while the vehicle body is hot, as the surface may become water-spotted.
. Avoid using tight-napped or rough cloths, such as washing mitts. Care must be taken when removing caked-on dirt or other foreign sub- stances so the paint surface is not scratched or damaged.
Rinse the vehicle again with plenty of clean
water. Inside flanges, seams and folds on the doors, hatches and hood are particularly vulnerable to the effects of road salt. Therefore, these areas must be regularly cleaned. Make sure that the drain holes in the lower edge of the door are open. Spray water under the body and in the wheel wells to loosen the dirt and wash away road salt. Avoid leaving water spots on the paint surface by using a damp chamois to dry the vehicle. WAXING GUID-C68617DB-C1BC-44F1-817C-50A9A77A3E14
Regular waxing protects the paint surface and helps retain new vehicle appearance. Polishing is recommended to remove built-up wax residue and to avoid a weathered appearance before reapplying wax. A NISSAN dealer can assist you in choosing the proper product. . Wax your vehicle only after a thorough washing. Follow the instructions supplied with the wax.. Do not use a wax containing any abrasives, cutting compounds or cleaners that may damage the vehicle finish.
Machine compound or aggressive polishing on a base coat/clear coat paint finish may dull the finish or leave swirl marks.
[ Edit: 2011/ 10/ 27 Model: E52-D ]
REMOVING SPOTS GUID-57B8CB18-D0F1-4EAC-B30A-339E0909CB06
Remove tar and oil spots, industrial dust, insects, and tree sap as quickly as possible from the paint surface to avoid lasting damage or staining. Special cleaning products are available at a NISSAN dealer or any automotive accessory stores. UNDERBODY GUID-66FD4980-F058-4863-8334-834568E87693
In areas where road salt is used in winter, the underbody must be cleaned regularly. This will prevent dirt and salt from building up and causing the acceleration of corrosion on the underbody and suspension. Before the winter period and again in the spring, the underseal must be checked and, if necessary, re-treated. GLASS GUID-255CF50C-C324-4858-A02A-623C8703750B Use glass cleaner to remove smoke and dust film from the glass surfaces. It is normal for glass to become coated with a film after the vehicle is parked in the hot sun. Glass cleaner and a soft cloth will easily remove this film.CAUTION
When cleaning the inside of the win- dows, do not use sharp-edged tools, abrasive cleaners or chlorine-based disinfectant cleaners. They could da-
mage the electrical conductors, radio antenna elements or rear window defroster elements.
WHEELS GUID-F809DD45-EBD7-42F6-B309-BAAB1202BB9C Wash the wheels when washing the vehicle to maintain their appearance. . Clean the inner side of the wheels when the is changed or the underside of the
wheel vehicle is washed. Inspect wheel rims regularly for dents or corrosion. Such damage may cause loss of pressure or poor seal at the tire bead.
. NISSAN recommends that the road wheels be waxed to protect against road salt in areas where it is used during winter.
CAUTION
Do not use abrasive cleaners when washing the wheels.
[ Edit: 2011/ 10/ 27 Model: E52-D ]
Black plate (393,1)
Aluminum alloy wheels GUID-0FAB7E05-1389-4006-962C-8433F84BF2D7
Wash regularly with a sponge dampened in a mild soap solution, especially during winter months in areas where road salt is used. Salt could discolor the wheels if not removed.CAUTION
Follow the directions below to avoid staining or discoloring the wheels: . Do not use a cleaner that uses strong acid or alkali contents to clean the wheels.
. Do not apply wheel cleaners to the wheels when they are hot. The wheel temperature should be the same as ambient temperature.
. Rinse the wheel to completely re- move the cleaner within 15 minutes after the cleaner is applied.
CHROME PARTS GUID-F0E6C391-DF9E-4FEE-B561-AAEE76E9011F Clean chrome parts regularly with a non- abrasive chrome polish to maintain the finish.
Appearance and care 7-3
TIRE DRESSING GUID-C26535EC-C58B-48C4-93B4-03AF1ECC26A2
NISSAN does not recommend the use of tire dressings. Tire manufacturers apply a coating to the tires to help reduce discoloration of the rubber. If a tire dressing is applied to the tires, it may react with the coating and form a com- pound. This compound may come off the tire while driving and stain the vehicle paint. If you choose to use a tire dressing, take the following precautions: . Use a water-based tire dressing. The coat- ing on the tire dissolves more easily with an oil-based tire dressing.. Apply a light coat of tire dressing to help from entering the tire tread/ to
prevent grooves (where it would be difficult remove).
it
CLEANING INTERIOR
GUID-78FD329D-FA3A-4374-B648-446134031193
Occasionally remove loose dust from the interior trim, plastic parts and seats using a vacuum cleaner or soft bristled brush. Wipe the vinyl and leather surfaces with a clean, soft cloth dam- pened in mild soap solution, then wipe clean with a dry soft cloth. Regular care and cleaning is required in order to maintain the appearance of the leather. Before using any fabric protector, read the manufacturer’s recommendations. Some fabric protectors contain chemicals that may stain or bleach the seat material. Use a cloth dampened only with water, to clean the meter and gauge lens.WARNING
. Wipe off excess tire dressing using a dry towel. Make sure the tire dressing is completely removed from the tire tread/ grooves.
. Allow the tire dressing to dry as recom-
mended by tire dressing manufacturer.
Do not use water or acidic cleaners (hot steam cleaners) on the seat. This can damage the seat or occupant classifica- tion sensor. This can also affect the operation of the air bag system and result in serious personal injury.
7-4 Appearance and care
[ Edit: 2011/ 10/ 27 Model: E52-D ]
Black plate (394,1)
CAUTION
. Never use benzine, thinner, or any
similar material.
. Small dirt particles can be abrasive and damaging to the leather sur- faces and should be removed promptly. Do not use saddle soap, car waxes, polishes, oils, cleaning fluids, solvents, detergents or am- monia-based cleaners as they may damage the leather’s natural finish. . Never use fabric protectors unless recommended by the manufacturer. . Do not use glass or plastic cleaner on meter or gauge lens covers. It may damage the lens cover.
the vehicle interior.
AIR FRESHENERS GUID-156AFC7C-18DA-4F6C-94E2-538B2692E7C7
Most air fresheners use a solvent that could affect If you use an air freshener, take the following precautions: . Hanging-type airfresheners can cause permanent discoloration when they contact vehicle interior surfaces. Place the air freshener in a location that allows it to hang free and not contact an interior surface.
.
Liquid-type air fresheners typically clip on the ventilators. These products can cause immediate damage and discoloration when spilled on interior surfaces.
Carefully read and follow the manufacturer’s instructions before using air fresheners. FLOOR MATS
GUID-6BCE0CFC-5A34-4DDB-A379-848EA4E0189D
WARNING
interference
To avoid potential pedal that may result in a collision or injury: . NEVER place a floor mat on top of another floor mat in the driver front position.
. Use only genuine NISSAN floor mats specifically designed for use in your vehicle model. See your NISSAN dealer for more informa- tion.
. Properly position the mats in the floorwell using the floor mat posi- tioning aid. See “Floor mat posi- tioning aid” (P.7-5).
The use of genuine NISSAN floor mats can extend the life of your vehicle carpet and make it easier to clean the interior. Mats should be
Black plate (395,1)
maintained with regular cleaning and replaced if they become excessively worn.
SAI0038
Front (example)
Floor mat positioning aid GUID-5CC94A77-7199-415F-920B-4ABB39D763BA This vehicle includes front floor mat brackets to act as floor mat positioning aid. NISSAN floor mats have been specially designed for your vehicle model. The front floor mats have grommet holes in them. Position the mat by placing the floor mat bracket hook through the floor mat grommet hole while centering the mat in the floorwell. Periodically check to make certain that the mats are properly positioned.
Appearance and care 7-5
[ Edit: 2011/ 10/ 27 Model: E52-D ]
Black plate (396,1)
CORROSION PROTECTION
GUID-14BA8034-9973-4F4C-A4F3-E1D69D9F18F0
MOST COMMON FACTORS CONTRI- BUTING TO VEHICLE CORROSION
GUID-FDA56B33-019D-4844-B3A0-83EA863BEA0F The accumulation of moisture-retaining dirt and debris in body panel sections, cavities, and other areas.
. Damage to paint and other protective coat- ings caused by gravel and stone chips or minor traffic accidents.
ENVIRONMENTAL FACTORS INFLU- ENCE THE RATE OF CORROSION
GUID-4F502838-DDCE-43B1-9F12-78EF5B138FEF
Moisture GUID-3CE9F892-5C05-4FB5-8BAF-3846686E0203
Accumulation of sand, dirt and water on the vehicle body underside can accelerate corro- sion. Wet floor coverings will not dry completely inside the vehicle, and should be removed for drying to avoid floor panel corrosion.Relative humidity GUID-25D1E76B-60F9-4A6C-9722-7A22749068B8
Corrosion will be accelerated in areas of high relative humidity, especially those areas where the temperatures stay above freezing where atmospheric pollution exists, or where road salt is used.belts, since these materials may se- verely weaken the seat belt webbing.
SAI0058
Bracket positions
The illustration shows the location of the floor mat brackets. SEAT BELTS GUID-54C9C999-A355-4B29-99B0-6F8D2941E223
The seat belts can be cleaned by wiping them with a sponge dampened in a mild soap solution. Allow the belts to dry completely before using them. See “Seat belts” (P.1-16).WARNING
Do not allow wet seat belts to roll up in the retractor. NEVER use bleach, dye, or chemical solvents to clean the seat
7-6 Appearance and care
[ Edit: 2011/ 10/ 27 Model: E52-D ]
Black plate (397,1)
Remove dirt with a vacuum cleaner. . Never allow water or other liquids to come in contact with electronic components inside the vehicle as this may damage them.
Chemicals used for road surface deicing are extremely corrosive. They accelerate corrosion and deterioration of underbody components such as the exhaust system, fuel and brake lines, brake cables, floor pan and fenders. In winter, the underbody must be cleaned periodically. For additional protection against rust and corrosion, which may be required in some areas, consult a NISSAN dealer.
Temperature GUID-CDF5FBA1-A705-4AAD-A67B-BA35229970EB A temperature increase will accelerate the rate of corrosion to those parts which are not well ventilated.
Air pollution GUID-6BF1E123-A934-4049-A3DA-7CE3944CCFBF Industrial pollution, the presence of salt in the air in coastal areas, or heavy road salt use will accelerate the corrosion process. Road salt will also accelerate the disintegration of paint surfaces. TO PROTECT YOUR VEHICLE FROM CORROSION GUID-3DEDDCC2-5871-4ED1-8E35-3D07DA497BC8
. Wash and wax your vehicle often to keep thevehicle clean.
. Always check for minor damage to the paint
and repair it as soon as possible.
. Keep drain holes at the bottom of the doors
open to avoid water accumulation.
. Check the underbody for accumulation of sand, dirt or salt. If present, wash with water as soon as possible.
CAUTION
. NEVER remove dirt, sand or other debris from the passenger compart- ment by washing it out with a hose.
[ Edit: 2011/ 10/ 27 Model: E52-D ]
Appearance and care 7-7
Black plate (398,1)
MEMO
7-8 Appearance and care
[ Edit: 2011/ 10/ 27 Model: E52-D ]
8 Maintenance and do-it-yourself
Black plate (399,1)
VQ35DE engine ...
General maintenance ...
Maintenance requirement
Engine cooling system ...
Explanation of maintenance items ...
Checking engine coolant level Changing engine coolant
Maintenance precautions ... Engine compartment check locations ...
Scheduled maintenance ... General maintenance ... Where to go for service ...
... ........................................................ 8-2
.................................................... 8-2
......................................................... 8-2
.................................................... 8-2
............................................................... 8-2
................................... 8-2
........................................................ 8-5
.................................. 8-6
.................................................................. 8-6
............................................................. 8-7
......................................... 8-8
.................................................. 8-8
.................................................................................... 8-8
... .................................................. 8-8
.......................................... 8-9
............ 8-11
............................................................... 8-11
................................................................................ 8-12
............................................................ 8-13
....................................................................................... 8-13
..................................................................... 8-15
.......................................... 8-15
.................................................................................. 8-15Continuously Variable Transmission (CVT) fluid ... Power steering fluid ... Brake fluid ... Window washer fluid ... Battery ...
Variable voltage control system ... Drive belt
Checking engine oil level ... Changing engine oil and filter
Jump starting ...
Engine oil
...
...
...
...
Fuses ...
Spark plugs ...
Replacing spark plugs ...
Cleaning ... Replacing ...
Self-adjusting brakes ... Brake pad wear warning ...
Air cleaner Windshield wiper blades ...
Rear window wiper blade ... Brakes ...
............................................................................. 8-16
.................................................. 8-16
............................................................................... 8-17
... ..................................................... 8-17
........................................................................... 8-17
......................................................................... 8-18
................................................... 8-19
...................................................................................... 8-19
.................................................... 8-19
.............................................. 8-19
........................................................................................ 8-20
..................................................... 8-20
Engine compartment ... .............................................. 8-21
... Passenger compartment ................................... 8-22
........................................................................................ 8-24
........................................................................ 8-25
............................................ 8-26
................................................................... 8-29
................................................................... 8-29
..................................................................... 8-32
................................................................... 8-34
....................................................................... 8-35
.......................................... 8-35Wheels and tires ... Tire pressure ... Tire labeling ... Types of tires ... Tire chains ... Changing wheels and tires ...
Intelligent Key battery replacement Lights ...
Headlights ... Exterior and interior lights ...
...
[ Edit: 2011/ 10/ 27 Model: E52-D ]
MAINTENANCE REQUIREMENT
GENERAL MAINTENANCE
Black plate (400,1)
GUID-AA55CBB0-36FE-4AE1-BB9F-D3DDA5B8D64F Your new NISSAN has been designed to have minimum maintenance requirements with long service intervals to save you both time and money. However, some day-to-day and regular maintenance is essential to maintain your NISSAN’s fine mechanical condition, as well as its emission and engine performance. It is the owner’s responsibility to make sure that the scheduled maintenance, as well as general maintenance, is performed. As the vehicle owner, you are the only one who can ensure that your vehicle receives the proper maintenance. You are a vital link in the main- tenance chain. SCHEDULED MAINTENANCE GUID-65893F94-69E3-4F34-8FDD-B08F51DC5A57
For your convenience, both required and op- tional scheduled maintenance items are de- scribed and listed in your “NISSAN Service and Maintenance Guide”. You must to that guide to ensure that necessary maintenance is performed on your NISSAN at regular intervals. GENERAL MAINTENANCE GUID-66FC02C8-9AF8-4D96-B4FC-1AEBE1F0B304
General maintenance includes those items which should be checked during normal day- to-day operation. They are essential for proper vehicle operation. responsibility to perform these procedures regularly as pre- scribed.is your
refer
It
Performing general maintenance checks re- quires minimal mechanical skill and only a few general automotive tools. These checks or inspections can be done by yourself, a qualified technician or, if you prefer, a NISSAN dealer. WHERE TO GO FOR SERVICE GUID-398932E5-71E3-483D-AF25-80EC94A6E2FA If maintenance service is required or your vehicle appears to malfunction, have the systems checked and serviced by a NISSAN dealer. NISSAN technicians are well-trained specialists and are kept up-to-date with the latest service information through technical bulletins, service tips, and in-dealership information systems. They are completely qualified to work on NISSAN vehicles before work begins. You can be confident that a NISSAN dealer’s service department performs the best job to meet the maintenance requirements on your vehicle — in a reliable and economical way.
GUID-80D9D55F-69A7-48B4-8034-9DDC954A3984
During the normal day-to-day operation of the vehicle, general maintenance should be per- formed regularly as prescribed in this section. If you detect any unusual sounds, vibrations or smell, be sure to check for the cause or have a NISSAN dealer do it promptly. In addition, you should notify a NISSAN dealer if you think that repairs are required. When performing any checks or maintenance work, see “Maintenance precautions” (P.8-5). EXPLANATION OF MAINTENANCE ITEMS GUID-63A0CB90-6864-4389-9248-0F58EBB818B2
Additional information on the following items with “*” is found later in this section.Outside the vehicle GUID-F8382F7F-DC63-478D-AE81-D9D6B9EAF10B The maintenance items listed here should be performed from time to time, unless otherwise specified. Doors and engine hood: Check that all doors and the engine hood operate properly. Also ensure that all latches lock securely. Lubricate hinges, latch pins, rollers and links if necessary. Make sure that the secondary latch keeps the hood from opening when the primary latch is released. When driving in areas using road salt or other corrosive materials, check lubrication frequently. Lights*: Clean the headlights on a regular basis.
latches,
8-2 Maintenance and do-it-yourself
[ Edit: 2011/ 10/ 27 Model: E52-D ]
Black plate (401,1)
Continuously Variable Transmission (CVT) P (Park) position mechanism: On a fairly steep hill, check that the vehicle is held securely with the selector lever in the P (Park) position without applying any brakes. Parking brake: Check the parking brake operation regularly. The vehicle should be securely held on a fairly steep hill with only the parking brake applied. If the parking brake needs adjustment, see a NISSAN dealer. Seat belts: Check that all parts of the seat belt system (for example, buckles, anchors, adjusters and retractors) operate properly and smoothly, and are installed securely. Check the belt webbing for cuts, fraying, wear or damage. Seats: Check seat position controls such as seat adjusters, seatback recliner, etc. to ensure they operate smoothly and that all latches lock securely in every position. Check that the head restraints/headrests move up and down smoothly and that the locks (if so equipped) hold securely in all latched positions. Steering wheel: Check for changes in the steering conditions, such as excessive free play, hard steering or strange noises. Warning lights and chimes: Make sure that all warning lights and chimes are operating properly. Windshield defroster: Check that
the air Maintenance and do-it-yourself 8-3
to long distance trips. the pressure in all
Make sure that the headlights, stop lights, tail lights, turn signal lights, and other lights are all operating properly and installed securely. Also check headlight aim. Road wheel nuts (lug nuts)*: When checking the tires, make sure no wheel nuts are missing, and check for any loose wheel nuts. Tighten if necessary. Tire rotation*: Tires should be rotated every 7,500 miles (12,000 km). Tires*: Check the pressure with a gauge often and always prior If necessary, adjust tires, including the spare, to the pressure specified. Check carefully for damage, cuts or excessive wear. Tire Pressure Monitoring System (TPMS) transmitter components: Replace the TPMS transmitter grommet seal, valve core and cap when the tires are replaced due to wear or age. Wheel alignment and balance: If the vehicle should pull to either side while driving on a straight and level road, or if you detect uneven or abnormal tire wear, there may be a need for wheel alignment. If the steering wheel or seat vibrates at normal highway speeds, wheel balancing may be needed.
For additional information regarding tires, refer to “Important Tire Safety Information” (US) or “Tire Safety Information” (Canada) in the War- ranty Information Booklet. Windshield: Clean the windshield on a regular basis. Check the windshield at least every six months for cracks or other damage. Have a damaged windshield repaired by a qualified repair facility. Windshield wiper blades*: Check for cracks or wear if they do not wipe properly.
Inside the vehicle GUID-3897C0E3-7461-4C2C-A02C-09726FC593F0
The maintenance items listed here should be checked on a regular basis, such as when performing scheduled maintenance, cleaning the vehicle, etc. Accelerator pedal: Check the pedal for smooth operation and make sure the pedal does not catch or require uneven effort. Keep the floor mat away from the pedal. for smooth Brake pedal: Check the pedal the brake pedal suddenly goes operation. down further feels spongy or the vehicle seems to take longer to stop, see a NISSAN dealer immediately. Keep the floor mat away from the pedal. Brakes: Check that the brakes do not pull the vehicle to one side when applied.than normal,
the pedal
If
[ Edit: 2011/ 10/ 27 Model: E52-D ]
Black plate (402,1)
flushed with plain water, being careful to clean those areas where mud and dirt may accumu- late. For additional information, see “Cleaning exterior” (P.7-2). Windshield washer fluid*: Check that there is adequate fluid in the reservoir.
comes out of the defroster outlets properly and in sufficient quantity when operating the heater or air conditioner. Windshield wiper and washer*: Check that the wipers and washer operate properly and that the wipers do not streak.
Under the hood and vehicle GUID-2B19D58B-2426-4605-AE05-3F33AAA84BAF The maintenance items listed here should be checked periodically (for example, each time you check the engine oil or refuel). Battery*: Check the fluid level in each cell. It should be between the MAX and MIN lines. Vehicles operated in high temperatures or under severe condition require frequent checks of the battery fluid level. Brake fluid level*: Make sure that the brake fluid level is between the MAX and MIN lines on the reservoir. Engine coolant level*: Check the coolant level when the engine is cold. Engine drive belts*: Make sure that the drive belts are not frayed, worn, cracked or oily. Engine oil level*: Check the level after parking the vehicle on a level surface and turning off the engine. Wait more than 10 minutes for the oil to drain back into the oil pan. Exhaust system: Make sure there are no loose
8-4 Maintenance and do-it-yourself
supports, cracks or holes. If the sound of the exhaust seems unusual or there is a smell of exhaust fumes, immediately have the exhaust system inspected by a NISSAN dealer. (See “Precautions when starting and driving” (P.5-2) for exhaust gas (carbon monoxide).) Fluid leaks: Check under the vehicle for fuel, oil, water or other fluid leaks after the vehicle has been parked for a while. Water dripping from the air conditioner after use is normal. If you should notice any leaks or if gasoline fumes are evident, check for the cause and have it corrected immediately. Power steering fluid level* and lines: Check the level when the fluid is cold, with the engine off. Check the lines for proper attachment, leaks, cracks, etc. Radiator and hoses: Check the front of the radiator and clean off any dirt, insects, leaves, etc., that may have accumulated. Make sure the hoses have no cracks, deformation, rot or loose connections. Underbody: The underbody is frequently ex- posed to corrosive substances such as those used on icy roads or to control dust. It is very important to remove these substances, other- wise rust will form on the floor pan, frame, fuel lines and around the exhaust system. At the end of winter, the underbody should be thoroughly
[ Edit: 2011/ 10/ 27 Model: E52-D ]
Black plate (403,1)
MAINTENANCE PRECAUTIONS
GUID-BBA85C43-BB85-45D3-8373-8C677304A223
When performing any inspection or mainte- nance work on your vehicle, always take care to prevent serious accidental injury to yourself or damage to the vehicle. The following are general precautions which should be closely observed.WARNING
. Park the vehicle on a level surface, apply the parking brake securely and block the wheels to prevent the vehicle from moving. Move the selector lever to P (Park).
. Be sure the ignition switch is in the OFF or LOCK position when per- forming any parts replacement or repairs.
If you must work with the engine running, keep your hands, clothing, hair and tools away from moving fans, belts and any other moving parts.
It is advisable to secure or remove any loose clothing and remove any jewelry, such as rings, watches, etc. before working on your vehicle.
. Always wear eye protection when-
ever you work on your vehicle.
If you must run the engine in an enclosed space such as a garage, be sure there is proper ventilation for exhaust gases to escape.
. Never get under the vehicle while it is supported only by a jack. If it is necessary to work under the vehicle, support it with safety stands.
. Keep smoking materials, flame and sparks away from fuel tank and the battery.
The fuel filter or fuel lines should be serviced by a NISSAN dealer be- cause the fuel lines are under high pressure even when the engine is off.
CAUTION
. Do not work under the hood while the engine is hot. Turn the engine off and wait until it cools down.
. Avoid direct contact with used en- gine oil and coolant. Improperly disposed engine oil, and engine coolant and/or other vehicle fluids can damage the environment. Al-
ways conform to local regulations for disposal of vehicle fluid.
. Never leave the engine or the CVT related component harnesses dis- connected while the ignition switch is in the ON position.
. Never connect or disconnect the battery or any transistorized com- ponent while the ignition switch is in the ON position.
. Your vehicle is equipped with an automatic engine cooling fan. It may come on at any time without warn- ing, even if the ignition key is in the OFF position and the engine is not running. To avoid injury, always disconnect the negative battery cable before working near the fan.
This “8. Maintenance and do-it-yourself” section gives instructions regarding only those items which are relatively easy for an owner to perform. A genuine NISSAN Service Manual is also available. (See “Owner’s manual/service manual order information” (P.9-28).) incomplete or You should be aware that improper servicing may result in operating difficulties or excessive emissions, and could
Maintenance and do-it-yourself 8-5
[ Edit: 2011/ 10/ 27 Model: E52-D ]
Black plate (404,1)
affect warranty coverage. If in doubt about any servicing, we recommend that it be done by a NISSAN dealer.
ENGINE COMPARTMENT CHECK LOCATIONS
GUID-8DF375C4-D2AC-40BF-8919-179130A7B1A6
GUID-2BF22F9C-AD70-479A-B6B1-C3822E0C8D88
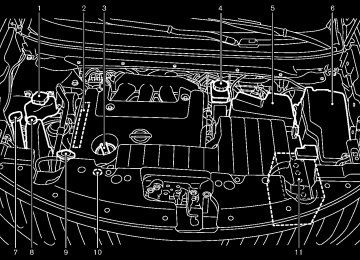
VQ35DE ENGINE 1. 2. 3. 4. 5. 6.
Power steering fluid reservoir Drive belt location Engine oil filler cap Brake fluid reservoir Air cleaner Fuse/fusible link holder
SDI2715
7. Window washer fluid reservoir Engine coolant reservoir 8. 9. Radiator filler cap 10. Engine oil dipstick 11. Battery
8-6 Maintenance and do-it-yourself
[ Edit: 2011/ 10/ 27 Model: E52-D ]
ENGINE COOLING SYSTEM
GUID-78D696A2-BE68-4A3E-B09B-A9FE35E740EE The engine cooling system is filled at the factory with a pre-diluted mixture of 50% Genuine NISSAN Long Life Antifreeze/Coolant (blue) and 50% water to provide year-round anti-freeze and coolant protection. The anti-freeze solution contains rust and corrosion inhibitors. Additional engine cooling system additives are not neces- sary.
WARNING
. Never remove the radiator or cool- ant reservoir cap when the engine is hot. Wait until the engine and radiator cool down. Serious burns could be caused by high pressure fluid escaping from the radiator. See precautions in “If your vehicle overheats” (P.6-11) of this manual.
The radiator is equipped with a pressure type radiator cap. To pre- vent engine damage, use only a genuine NISSAN radiator cap.
CAUTION
. Never use any cooling system ad- ditives such as radiator sealer. Ad- ditives may clog the cooling system and cause damage to the engine, transmission and/or cooling sys- tem.
. When adding or replacing coolant, be sure to use only Genuine NISSAN Long Life Antifreeze/Cool- ant (blue) or equivalent. Genuine NISSAN Long Life Antifreeze/Cool- ant (blue) is pre-diluted to provide antifreeze protection to −348F (−378C). If additional freeze protec- tion is needed due to weather where you operate your vehicle, add Gen- uine NISSAN Long Life Antifreeze/ Coolant (blue) concentrate follow- ing the directions on the container. If an equivalent coolant other than Genuine NISSAN Long Life Anti- freeze/Coolant (blue) is used, fol- low the coolant manufacture’s instructions to maintain minimum antifreeze protection to −348F (−378C). The use of other types of coolant solutions other than Genu-
[ Edit: 2011/ 10/ 27 Model: E52-D ]
Black plate (405,1)
ine NISSAN Long Life Antifreeze/ Coolant (blue) or equivalent may damage the engine cooling system.
(blue) ,
The life expectancy of the factory-fill coolant is 105,000 miles (168,000
km) or 7 years. Mixing any other type of coolant other than Genuine NISSAN Long Life Antifreeze/Cool- ant including Genuine NISSAN Long Life Antifreeze/Cool- ant (green), or the use of non- distilled water will reduce the life expectancy of the factory-fill cool- ant. Refer to the NISSAN Service and Maintenance Guide for more details.Maintenance and do-it-yourself 8-7
Black plate (406,1)
ENGINE OIL
GUID-98D41701-3B6E-4ED2-B4C8-7CD7CFE2CD87
SDI2174
CHECKING ENGINE OIL LEVEL GUID-716EED82-F9F6-4EAA-B95C-CCC9B334ACDB 1. Park the vehicle on a level surface and apply
the parking brake.
2. Run the engine until
it reaches operating
temperature.
3. Turn off the engine. Wait more than 10
minutes for the oil to drain back into the oil pan.CHANGING ENGINE COOLANT GUID-A29C4A21-D0A4-400F-917B-D20A6E14E9FB Major cooling system repairs should be per- formed by a NISSAN dealer. The service procedures can be found in the appropriate NISSAN Service Manual. Improper servicing can result in reduced heater performance and engine overheat- ing.
WARNING
To avoid the danger of being scalded, never change the coolant when the engine is hot.
. Never remove the radiator cap when the engine is hot. Serious burns could be caused by high pressure fluid escaping from the radiator.
. Avoid direct skin contact with used coolant. If skin contact is made, wash thoroughly with soap or hand cleaner as soon as possible.
. Keep coolant out of reach of chil-
4. Remove the dipstick and wipe it clean.
dren and pets.
Reinsert it all the way.
Engine coolant must be disposed of properly. Check your local regulations.
5. Remove the dipstick again and check the oil level. It should be within the range *1 . If the oil level is below *2 , remove the oil filler cap through the and pour
recommended oil
[ Edit: 2011/ 10/ 27 Model: E52-D ]
SDI2691
CHECKING ENGINE COOLANT LEVEL GUID-3DB67F43-9603-43B8-A7DB-2B01C5F2714B Check the coolant level in the reservoir when the engine is cold. If the coolant level is below the MIN level *2 , open the reservoir cap and add coolant up to the MAX level *1 . If the reservoir is empty, check the coolant level in the radiator when the engine is cold. If there is insufficient coolant in the radiator, fill the radiator with coolant up to the filler opening and also add it to the reservoir up to the MAX level *1 . If the cooling system frequently requires coolant, have it checked by a NISSAN dealer.
8-8 Maintenance and do-it-yourself
Black plate (407,1)
SDI2175
opening. Do not overfill *3 .
6. Recheck oil level with the dipstick. It is normal to add some oil between oil maintenance intervals or during the break- in period, depending on the severity of operating conditions.
4. Raise and support
the vehicle using a
suitable floor jack and safety jack stands. . Place the safety jack stands under the
vehicle jack-up points.
. A suitable adapter should be attached to
the jack stand saddle.
CAUTION
CAUTION
Make sure the correct lifting and sup- port points are used to avoid vehicle damage.
Oil level should be checked regularly. Operating the engine with an insuffi- cient amount of oil can damage the engine, and such damage is not cov- ered by the warranty.
CHANGING ENGINE OIL AND FILTER GUID-F30D40FD-70BC-4879-982F-EA388B7F8D12
Change the engine oil and filter according to the maintenance log shown in the NISSAN Service and Maintenance Guide.Vehicle set-up GUID-767E35E3-C0F7-4CA5-8783-CC46E37944E4
1. Park the vehicle on a level surface and applythe parking brake.
2. Start the engine and let it idle until it reaches
operating temperature.
3. Turn the engine off and wait more than 10
minutes.
[ Edit: 2011/ 10/ 27 Model: E52-D ]
Maintenance and do-it-yourself 8-9
Black plate (408,1)
7. Coat the gasket on the new filter with clean
engine oil.
8. Screw in the oil filter clockwise until a slight resistance is felt, then tighten additionally more than 2/3 turn. Oil filter tightening torque:
11 to 15 ft-lb (14.7 to 20.5 N·m)
Install the plastic cover.
9. 10. Clean and re-install the drain plug with a new washer. Securely tighten the drain plug with a wrench. Drain plug tightening torque: 22 to 29 ft-lb (29 to 39 N·m)
Do not use excessive force.
11. Refill engine with recommended oil through the oil filler opening, and install the oil filler cap securely. See “Capacities and recommended fuel/ lubricants” (P.9-2) for drain and refill capa- city. The drain and refill capacity depends on the oil temperature and drain time. Use these specifications for reference only. Al- ways use the dipstick to determine the proper amount of oil in the engine. the engine and check for
12. Start
around the drain plug and the oil Correct as required.
leakage filter.
CAUTION
Be careful not to burn yourself, as the engine oil is hot.
. Waste oil must be disposed of
properly.
. Check your local regulations. Perform steps 4 to 9 when the engine oil filter change is needed.
4. Remove the plastic cover over the oil filter location by removing the small plastic clips as illustrated.
5. Loosen the oil