- 2008 Mini Cooper Owners Manuals
- Mini Cooper Owners Manuals
- 2007 Mini Cooper Owners Manuals
- Mini Cooper Owners Manuals
- 2004 Mini Cooper Owners Manuals
- Mini Cooper Owners Manuals
- 2005 Mini Cooper Owners Manuals
- Mini Cooper Owners Manuals
- 2006 Mini Cooper Owners Manuals
- Mini Cooper Owners Manuals
- 2003 Mini Cooper Owners Manuals
- Mini Cooper Owners Manuals
- 2009 Mini Cooper Owners Manuals
- Mini Cooper Owners Manuals
- 2002 Mini Cooper Owners Manuals
- Mini Cooper Owners Manuals
- Download PDF Manual
-
OWNER’S MANUAL
MINI COOPER MINI COOPER S
CONGRATULATIONS ON YOUR NEW MINI
This Owner’s Manual should be considered a permanent part of this vehicle. It should stay with the vehicle when sold to provide the next owner with important operating, safety and maintenance information. This manual is supplemented by a Service and Warranty Information Booklet for US models or a Warranty and Service Guide Booklet for Canadian models. We recommend that you read this publication thoroughly. Your MINI is covered by the following warranties: — New Vehicle Limited Warranty — Limited Rust Perforation Warranty — Federal Emissions System Defect Warranty — Federal Emissions Performance Warranty — California Emission Control System Limited Warranty Detailed information about these warranties is listed in the Service and Warranty Information Booklet for US models or in the Warranty and Service Guide Booklet for Canadian models. We wish you an enjoyable driving experience.
CONTENTS
Using this Owner’s Manual
At a glance
Controls and features
Notes on the Owner’s Manual 6
Symbols used 6
Symbol for vehicle parts 6
Your individual vehicle 6
Editorial notice 7
For your own safety 8
Reporting safety defects 9Cockpit 12
Display elements 13
Display elements with navigationsystem 14
Indicator and warning lamps 15
Multifunction steering wheel MFL 18Opening and closing: Keys 22
Central locking system 23
Opening and closing — from outside 23
Opening and closing — from inside 26
Tailgate 27
Electric power windows 28
Sliding/tilt sunroof 29
Roller sun blind 30Adjustments: Correct sitting posture 31
Seats 31
Entry to the rear 33
Seat heating 34
Head restraints 34
Safety belts 35
Steering wheel 35
Mirrors 36
Airbags 37
Transporting children safely 38
Vehicle Memory 41© 2002 Bayerische Motoren Werke Aktiengesellschaft Munich, Germany Reprinting, including excerpts, only with the written consent of BMW AG, Munich. Order No. 01 41 0 156 724
US English II/02
Printed in Germany Printed on environmentally friendly paper (bleached without chlorine, suitable for recycling).Driving: Ignition lock 42
Starting the engine 42
Switching off the engine 43
Parking brake 44
Manual transmission 45
Continuously Variable automaticTransmission (CVT) 46
Parking lamps/Low beams 49
Indicator/Headlamp flasher 49
Instrument lighting 50
Fog lamps 50
Interior lamps 50
Light-emitting diodes 51
Washer/Wiper system 51
Cruise control 53Everything under control: Odometer 55
Tachometer 55
Fuel gauge 55
Coolant temperature gauge 56
Service Interval Display 57
Clock 57
Computer 58Technology for safety and driving convenience: Automatic Stability Control plus Traction
(ASC+T) 60
Dynamic Stability Control (DSC) 61
Flat Tire Monitor 62
Park Distance Control (PDC) 63Controlling the climate for pleasant driving: Air conditioner system 64
Automatic climate control 67Interior conveniences: Glove compartment 70
Ashtray/Beverage holder 70
Cigarette lighter 70Loading and transporting cargo: Luggage compartment cover 71
Foldable rear backrest 71
Loading cargo 72
Roof-mounted luggage rack 73Care and maintenance
Special operating instructions: Break-in procedures 76
General driving notes 76
Refueling 77
Fuel specifications 78
Antilock Brake System (ABS) 78
Brake system 79Wheels and tires: Tire inflation pressure 80
Tire condition 82
Tire replacement 83
Wheel and tire combinations 84
Winter tires 85
Snow chains 85CONTENTS
In the engine compartment: Hood 86
Engine compartment —MINI COOPER 87
Engine compartment —
MINI COOPER S 88
Washer fluid 89
Engine oil 89
Coolant 91
Brake fluid 92Maintenance and care: MINI Maintenance System 93
Caring for your vehicle 94
Vehicle immobilization 96Laws and regulations: OBD interface socket 96
Technical modifications 96
California Proposition 65 Warning 97Owner Service Procedures
Technical data
Engine data 120
Dimensions 121
Weights 122
Capacities 123
Electrical system 124Replacement procedures: Onboard tool kit 100
Windshield wiper blades 100
Lamps and bulbs 101
Repairing a flat tire 106
Changing tires — MINIwith space-saver spare tire 106
Flat tire — safety tires 110
Battery 111
Fuses 112Giving and receiving assistance: Warning triangle 113
First-aid kit 113
Jump-starting 113
Tow-starting and towing 115Index
Everything from A to Z 128
Notes on the Owner’s Manual In compiling this Owner’s Manual we have made every effort to furnish you with a convenient reference source affording quick access to all the essentials. The fastest way to find detailed information on any specific subject is to turn to the comprehensive index at the back of the manual. If you wish to gain an initial over- view of your vehicle, you will find this in the first chapter. Should you wish to sell your MINI at some time in the future, please remember to hand over this Owner’s Manual to the new owner; it is an important part of the vehicle. If you have any additional questions, your MINI center will be glad to advise you.
Symbols used
Indicates precautions that must be followed precisely in order to avoid the possibility of personal injury and serious damage to the vehicle.
Contains information that will assist you in gaining the optimum benefit from your vehicle and enable you to care more effectively for your vehicle.
Refers to measures that can be taken to help protect the environment.
Marks the end of a specific item of
information.
Indicates special equipment, country- specific equipment and optional extras.
Your individual vehicle The manufacturer of your MINI is the Bayerische Motoren Werke Aktiengesell- schaft (BMW AG). On purchasing your MINI, you have decided in favor of a model with individualized equipment and features. This Owner’s Manual describes the entire array of options and equipment available with a specific manufacturer model range.
We hope you will understand that equip- ment and features are included that you might not have chosen for your vehicle. To assist you in identifying possible variations between your own vehicle and the manual’s contents, the passages describing optional accessories and special equipment are marked with an asterisk
Identifies systems or components, which your MINI center can either
activate or adapt to suit an individual driver’s requirements ("Vehicle Memory"), see page 41.
If your MINI features equipment that is not described in this Owner’s Manual (a car radio, for instance), we have enclosed addi- tional Owner’s Manuals. We ask you to read these manuals as well.
Symbol for vehicle parts
Indicates that you should consult the relevant section of this Owner’s
Manual for information on a particular part or assembly.
Notes Symbols Your individual vehicle
Editorial notice The manufacturer pursues a policy of continuous, ongoing development that is conceived to ensure that the MINI continues to embody the highest quality and safety standards combined with advanced, state-of-the-art technology. For this reason, it is possible that the features described in this Owner’s Manual could differ from those on your vehicle. Nor can errors and omissions be entirely ruled out. You are therefore asked to appreciate that no legal claims can be entertained on the basis of the data, illustrations or descrip- tions in this Owner’s Manual.
For your own safety
Important safety information.
Use unleaded gasoline only. Fuels containing up to and including
10% ethanol or other oxygenates with up to 2.8% oxygen by weight (i.e. 15% MTBE or 3% methanol plus an equivalent amount of co-solvent) will not void the applicable warranties with respect to defects in mate- rials or workmanship. Field experience has indicated significant differences in fuel quality (volatility, composition, additives, others) among gasolines offered for sale in the United States and Canada. The use of poor-quality fuels may result in driveability, starting and stalling problems especially under certain environmental conditions, such as high ambient temperature and high altitude. Should you encounter driveability prob- lems which you suspect could be related to the fuel you are using, we recommend that you respond by switching to a recognized high-quality brand. Failure to comply with these recommenda- tions may result in unscheduled mainte- nance. Obey pertinent safety rules when you are handling gasoline.
For your own safety, use genuine parts and accessories approved by the manufacturer of the MINI. When you purchase accessories tested and approved by the manufacturer of the MINI and Original MINI Parts, you simulta- neously acquire the assurance that they have been thoroughly tested by the manu- facturer of the MINI to ensure optimum performance when installed on your vehicle. The manufacturer of the MINI warrants these parts to be free from defects in mate- rial and workmanship. The manufacturer of the MINI will not accept any liability for damages resulting from installation of parts and accessories not approved by the manufacturer of the MINI. The manufacturer of the MINI cannot test every product from other manufacturers to verify if it can be used on a MINI safely and without risk to either the vehicle, its opera- tion, or its occupants. Original MINI Parts, MINI Accessories and other products approved by the manufac- turer of the MINI, together with profes-
sional advice on using these items, are available from all MINI centers. Installation and operation of non-MINI approved accessories such as alarms, radios, amplifiers, radar detectors, wheels, suspension components, brake dust shields, telephones (including operation of any portable cellular phone from within the vehicle without using an externally mounted antenna) or transceiver equip- ment (e.g. CB, walkie-talkie, ham radio or similar) may cause extensive damage to the vehicle, compromise its safety, inter- fere with the vehicle(cid:213)s electrical system or affect the validity of the MINI Limited Warranty. See your MINI center for addi- tional information.
Maintenance, replacement, or repair of the emission control devices and
systems may be performed by any automo- tive repair establishment or individual using any certified automotive part.
The following only applies to vehicles owned and operated in the US.
REPORTING SAFETY DEFECTS If you believe that your vehicle has a defect which could cause a crash or could cause injury or death, you should immediately inform the National Highway Traffic Safety Administration (NHTSA) in addition to notifying BMW of North America, LLC., P.O. Box 1227, Westwood, New Jersey 07675-1227, Telephone (201) 307-4000. If NHTSA receives similar complaints, it may open an investigation, and if it finds that a safety defect exists in a group of vehicles, it may order a recall and remedy campaign. However, NHTSA cannot become involved in individual problems between you, your dealer or BMW of North America, LLC. To contact NHTSA, you may either call the Auto Safety Hotline toll-free at 1-800-424-9393 (or 366-0123 in Washington, D.C. area) or write to: NHTSA, U.S. Department of Transportation, Washington, D.C. 20590. You can also obtain other information about motor vehicle safety from the Hotline.
10
Overview
OVERVIEW
CONTROLS
OPERATION, CARE, MAINTENANCE
OWNER SERVICE PROCEDURES
TECHNICAL DATA
INDEX
11
COCKPIT
Parking lamps/Low beams 49
Turn signal indicators 49
Standing lamps 49
High beams 49
Headlamp flasher 49
Computer 582 Washer/Wiper system 51
3 Instrument lighting 50
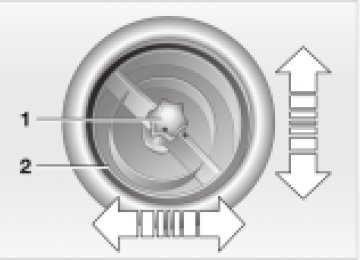
4 Outside mirror adjustment 36
5 Hazard warning flashers6 Hood release 86
7 Horn 18
8 Steering wheel adjustment 35
9 OBD interface socket 9612
DISPLAY ELEMENTS
1 Tachometer 55
with indicator and warning lamps, see from page 15
2 Display for computer 58
3 Speedometer with indicator and warninglamps, see from page 15
4 Indicator for
Odometer 55
Trip odometer 55
Service Interval 57
Program display for Continuously Variable Transmission (CVT) 4813
5 Trip odometer, reset to zero 55
6 Fuel gauge 55
7 Engine coolant temperature gauge 56DISPLAY ELEMENTS WITH NAVIGATION SYSTEM
1 Tachometer 55
with indicator and warning lamps, see from page 15
3 Speedometer with indicator and warning
lamps, see from page 15
4 Trip odometer, reset to zero 55
2 Display for computer 58
14
5 Indicator for
Odometer 55
Trip odometer 55
Service Interval 57
Program display for Continuously Variable Transmission (CVT) 48INDICATOR AND WARNING LAMPS
Technology that monitors itself The system runs a check on the warning and indicator lamps marked by " " each time you switch on the ignition. They each light up once for different periods of time. If a malfunction should occur in one of these systems, the corresponding lamp does not go out after the engine is started or it lights up while the vehicle is moving. You will see how to react correctly to this below.
Brake warning lamp If the lamp comes on when the parking brake is not engaged:
Check the brake fluid level. Before driving further, be sure to comply with the infor- mation on pages 79, 57 and 92.
Brake warning lamp for Canadian models.
With navigation system option:
Coolant temperature warning lamp in the speedometer If the lamp comes on while oper-
ating the vehicle, the engine has over- heated. Switch off the engine immediately and allow to cool down, see also page 56.
Red: stop immediately
Battery charge current The battery is no longer being charged. Indicates a defective alter-
nator drive belt or a problem with the charge circuit. Please contact the nearest MINI center. If this lamp lights up, the power-assist for steering can be deactivated.
If the drive belt is defective, do not continue driving. The engine could be
damaged due to overheating. When the power-assist is deactivated, increased steering effort is required.
Engine oil pressure
Stop immediately. Switch off engine. Check the engine oil and
top up as required. Please contact the nearest MINI center.
Do not continue driving, otherwise, the engine could be damaged
because of inadequate lubrication.
15
INDICATOR AND WARNING LAMPS
Yellow: stop immediately Flat Tire Monitor Flashes: tire failure. Reduce speed immediately and
stop the vehicle. With safety (run-flat) tires: Reduce vehicle speed carefully to under 50 mph (80 km/h). In both cases, avoid hard brake applications and steering maneuvers. Check the tire inflation pressures. Conduct in the event of a flat tire, see pages 106, 110. General information on the system, see page 62
Red and yellow: continue to drive; drive cautiously
Brake warning lamp together with yellow indicator lamps for ABS, EBV and ASC+T/DSC: The control system ABS, EBV and ASC+T/DSC has failed. Drive cautiously and defensively. Avoid full brake applications. Please have the system checked by your MINI
center as soon as possible. More information on pages 60, 61
Brake warning lamp together with the yellow indicator warning lamps ABS, EBV and ASC+T/DSC for Cana- dian models.
Red: an important reminder
Brake warning lamp with parking brake applied. More information on the parking
brake on page 44
Parking brake lamp for Canadian models.
Fasten safety belts Depending on model, with acoustic . Lights up either for several signal
seconds or until the belt is engaged, de- pending on version. More information on page 35
Depending on the level of equipment, the indicator lamp is in the vicinity of
the navigation system.
Airbags Please have the system inspected at your MINI center.
More information on pages 31, 37
Depending on the level of equipment, the indicator lamp is in the vicinity of
the navigation system.
16
Hood/tailgate Lights up when the hood and/or tailgate are open.
More information on pages 27, 86
INDICATOR AND WARNING LAMPS
Yellow: check as soon as possible
Flat Tire Monitor Stays lit: the system is defective. Please have the system inspected
at your MINI center. More information on page 62
Antilock Brake System (ABS) ABS has been deactivated in response to system malfunction.
Conventional braking efficiency is avail- able. Please have the system inspected at your MINI center. More information on page 78
ABS indicator lamp for Canadian models.
Automatic Stability Control plus Traction (ASC+T)/Dynamic Stability Control (DSC)
Indicator lamp flashes: System active: drive and braking forces are regulated. The indicator lamp stays lit: ASC+T/DSC switched off with button or defective. In the event of a defect: please have the system inspected at your MINI center. More information on pages 60, 61
Service Engine Soon If the warning lamp comes on either continuously or intermit-
tently, this indicates a malfunction in the emissions-related electronic systems. Although the vehicle remains operational, you should have the systems checked by your MINI center at the earliest possible opportunity.
"Service Engine Soon" warning lamp for Canadian models
Engine electronics
Malfunction in the engine elec- tronics. You can continue to drive
with reduced engine output or engine speed. Please have the system inspected at your MINI center.
Green: for your information Turn signal indicators Flashes when turn signal indicator is on, also for trailer towing.
Rapid flashing: the system is defective. More information on page 49
Cruise control Lights up when the cruise control is activated. Operation via the multi-
function steering wheel. More information on page 53
Blue: for your information
High beams Comes on when the high beams are on or the headlamp flasher is
actuated. More information on page 49
17
MULTIFUNCTION STEERING WHEEL MFL
Buttons facing the driver 1 Cruise control: activate/interrupt/
deactivate
2 Continue cruise control 3 Horn 4 Cruise control: store and accelerate (+) 5 Cruise control: store and decelerate (—)
The control buttons integrated within the MFL multifunction steering wheel have been designed to allow you to operate a number of accessories both quickly and safely, without taking your eyes from the road:
Some audio source functions Cruise control.
The illustration shows the possible full equipment level. For further details, please consult the description of the relevant item of equipment.
Buttons facing away from the driver Left:
Radio Press briefly: scans for stations in FM band Extended pressure: station tuning CD Press briefly: jump to next track Extended pressure: fast forward in track Cassette Press briefly: stop track scan or fast forward Extended pressure: fast forward/ rewind
18
Right: 1 Volume 2 Switch between radio, cassette and CD
19
20
21
OVERVIEW
CONTROLS
OPERATION, CARE, MAINTENANCE
OWNER SERVICE PROCEDURES
TECHNICAL DATA
INDEX
Controls
Initializing the master key with remote control When you activate a master key with remote control (replacement, additional key or after a battery change), it must be initialized. This initialization can be performed in two ways: Press button 1 or button 2, see page 24, four times in succession or if the vehicle is unlocked: 1. Switch the ignition on briefly (position 2)
and then off
2. Within 10 seconds, press button 1 and
button 2, see page 24, in succession.
In the event of a system malfunction, please contact your MINI center. You
can also obtain replacement keys and batteries there.
KEYS
Depending on the equipment fitted, your MINI has up to three key variations: 1 Master key with remote control and
Changing battery Replace if it is no longer possible to unlock the vehicle via the remote control.
battery
If the battery is discharged, please consult your MINI center. Battery
changing, see next column.
2 Door and ignition key
This key can only be used to open the doors mechanically
3 Spare key for storage in a safe place, such as in your wallet. This key is not intended for constant use
22
Only use a battery of the type speci- fied on the battery (CR 2032) and
make absolutely sure that it is fitted in the correct position.
1. Apply a screwdriver at the recess 2. Use the screwdriver to lever out the
cover.
Return used batteries to a recycling point or your MINI center.
CENTRAL LOCKING SYSTEM OPENING AND CLOSING — FROM OUTSIDE
The concept The central locking system is ready for operation whenever the driver’s door is closed. The doors, the tailgate and the fuel filler door are unlocked or locked. The central locking system can be oper- ated:
From outside via the remote control as well as via the door lock From inside by pressing a button.
If operated from outside, the anti-theft system is activated at the same time. This prevents the doors from being unlocked via safety lock buttons or door handles. In the event of an accident, the central locking system unlocks automatically. The hazard warning system and interior lamps are also switched on.
Via remote control The remote control gives you an exception- ally convenient method for unlocking and locking your vehicle. It also offers another function: To open the tailgate, refer to page 24. The tailgate will open slightly, regardless of whether it was locked or unlocked. Whenever you unlock (lock) the vehicle, you simultaneously deactivate (activate) the anti-theft system, and switch the inte- rior lamps on (off). If the vehicle has been properly locked using the remote control, the hazard warning system lights up once. When the vehicle is unlocked, the hazard warning system does not react.
Children might be able to lock the doors from the inside. Always take
the vehicle keys with you so that the vehicle can be opened again from the outside at any time.
For US owners only The transmitter and receiver units comply with part 15 of the FCC (Federal Communi- cation Commission) regulations. Operation is governed by the following: FCC ID:
LX8765S LX8765E LX8CAS
Compliance statement: This device complies with part 15 of the FCC Rules. Operation is subject to the following two conditions:
This device may not cause harmful inter- ference, and this device must accept any interference received, including interference that may cause undesired operation.
Any unauthorized modifications or changes to these devices could void the user’s authority to operate this equip- ment.
23
OPENING AND CLOSING — FROM OUTSIDE
To unlock 1. Press button 1 once to unlock the
driver’s door only
2. Press button 1 a second time to unlock
the other door as well as the tailgate and the fuel filler door.
When the vehicle is unlocked, the hazard warning system does not react.
To open the tailgate Hold button 1 pressed for approx. five seconds. The tailgate will open slightly, regardless of whether it was previously locked or unlocked.
To lock and secure Press button 2. The hazard warning system flashes once.
Do not lock the vehicle if there are passengers still inside, because they
cannot unlock the doors.<
Non-MINI systems External systems or devices may cause local interference in the functions of the remote control. In this case, use the master key to unlock the door lock.
Before and after a trip, be sure that the tailgate was not opened uninten-
tionally.
1 Unlocking and opening the tailgate 2 Locking and securing
If the remote control does not react, the battery is discharged.
In the event of a system malfunction, please contact your MINI center. You can also obtain replacement keys and batteries from your MINI center. Battery changing, see page 22.
24
OPENING AND CLOSING — FROM OUTSIDE
Manual operation (in the event of electrical malfunction) Turn the key to the extreme left or right to unlock/lock the door.
Convenience feature via door lock You can also operate the power windows and the sliding/tilt sunroof via the door lock. > To open: with the door closed, turn the key to the "Unlock" position and hold it > To close: with the door closed, turn the
key to the "Lock" position and hold it.
Watch during the closing process to be sure that no one is injured.
Releasing the key stops the operation.<
Via the door lock 1. One turn of the key in the driver’s
door lock unlocks the driver(cid:213)s door only 2. Turning the key a second time unlocks
the other door, the tailgate and the fuel filler door.
If the vehicle has been properly locked, the hazard warning system flashes once. When the vehicle is unlocked, the hazard warning system does not react.
Do not lock the vehicle if there are passengers still inside, because they
cannot unlock the doors.<
25
OPENING AND CLOSING — FROM INSIDE
To lock Touch the switch for the central locking system or press the individual safety lock buttons down.
Children might be able to lock the doors from the inside. Always take
the vehicle’s keys with you so that you can open the vehicle again from the outside at any time.<
The central locking system can be locked automatically as soon as you
begin to drive if you desire. This can be adjusted to be vehicle-specific.<
To unlock and open the doors 1. Touch the switch for the central locking
system
2. Pull the door handle above the armrest or pull the door handle for each door twice: to unlock first and then open.
Convenience opening mode From ignition key position 1: Hold the switch in the "Unlock" position. The windows and sliding/tilt sunroof open.
Convenience closing is not possible by means of the central locking
system. You should therefore close all the windows and the sliding/tilt sunroof indi- vidually.<
With this switch, you operate the central locking system when the doors are closed. The doors and tailgate are unlocked or locked only. The anti-theft system is not activated. Also, the fuel filler door remains unlocked to allow refueling.
If the remote control has been used to unlock only the driver’s door, see page 24, and you touch the switch when the driver’s door is open, the other door, the tailgate, and the fuel filler door are unlocked. If the driver’s door is closed, touching the switch locks it.<
26
TAILGATE
Opening from outside Press the button in the handle. The tailgate opens slightly. Opening with the remote control, see page 24.
Manual operation In the event of an electrical malfunction, you can also operate the tailgate manually. 3. Fold the rear seat bench upwards 4. Pull the ring.
The tailgate is unlocked.
27
Closing The handle recesses in the interior trim panel of the tailgate make it easier to pull the lid down.
To avoid injuries, be sure that the travel path of the tailgate is clear
when it is closed, as with all closing proce- dures. Operate the vehicle only when the tailgate is closed. Otherwise, exhaust fumes could penetrate the interior of the vehicle. Should it be absolutely necessary to operate the vehicle with the tailgate open: 1. Close all windows. Shut the sliding/tilt
sunroof
2. Sharply increase the air supply for the air
conditioning or automatic climate control, see pages 64 and/or 67.<
To close: Press the switch upwards. The window closes until you release the switch or when the engine is running: Briefly press the switch upwards. The window closes automatically. Pressing the switch again stops the opera- tion.
The window on the front passenger side cannot be closed automati-
cally.<
After the ignition has been switched off: You can use the electric power windows as long as no one opens any of the doors. If a door is opened during operation, the opening/closing process stops immedi- ately.
When leaving the vehicle, always remove the ignition key from the lock and remember to close the doors to prevent children from operating the power windows and injuring themselves, etc.<
For the convenience mode via the door lock, refer to page 25.
Watch during the closing process to be sure that no one is injured.<
ELECTRIC POWER WINDOWS
Open and close windows From ignition key position 1: To open: Press the switch downwards. The window opens until you release the switch or briefly press the switch downwards. The window opens automatically. Pressing the switch again stops the opera- tion.
28
SLIDING/TILT SUNROOF*
To prevent injuries, exercise care when closing the sliding/tilt sunroof and keep it in your field of vision until it is shut. When leaving the vehicle, always remove the ignition key from the lock and remember to close the doors to prevent children from operating the sunroof and injuring themselves, etc. Be sure that adequate clearance is main- tained for the opening path of the sliding/ tilt sunroof, otherwise damage can occur.<
For the convenience mode via the door lock, refer to page 25.
Do not use force to close the sliding/ tilt sunroof in its raised position, as damage to the mechanism could result.<
After the ignition has been switched off: You can still operate the sliding/tilt sunroof for up to one minute, as long as no one opens any of the doors. If a door is opened during operation, the opening/closing stops immediately.
Automatic opening and closing To open: Push the switch past the resistance point: The sunroof opens completely
To close: 1. Push the switch past the resistance
point: The sunroof closes to the raised position
2. Push the switch again:
The sunroof closes completely.
Touching the switch briefly during opening or closing stops the movement immedi- ately.
29
Raising — Opening — Closing From ignition key position 1: