- 2008 Mini Cooper Owners Manuals
- Mini Cooper Owners Manuals
- 2007 Mini Cooper Owners Manuals
- Mini Cooper Owners Manuals
- 2004 Mini Cooper Owners Manuals
- Mini Cooper Owners Manuals
- 2005 Mini Cooper Owners Manuals
- Mini Cooper Owners Manuals
- 2006 Mini Cooper Owners Manuals
- Mini Cooper Owners Manuals
- 2003 Mini Cooper Owners Manuals
- Mini Cooper Owners Manuals
- 2009 Mini Cooper Owners Manuals
- Mini Cooper Owners Manuals
- 2002 Mini Cooper Owners Manuals
- Mini Cooper Owners Manuals
- Download PDF Manual
-
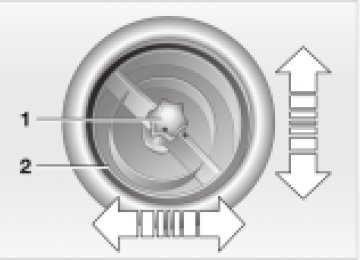
To raise: Press the switch or push the switch backwards to the resis- tance point.
Opening and closing 1. Push the switch in the desired direction until you feel resistance and hold in this position
2. Release the switch when the desired
position has been reached.
ROLLER SUN BLIND*
Manual opening and closing In the event of an electrical malfunction, you can also operate the sliding/tilt sunroof manually: 1. Push the clock towards the interior and
remove
2 Use an Allen wrench to turn the sliding/
tilt sunroof in the desired direction.
1 Opening 1. Press the button in the handle, see
arrow 1. The cap is unlocked
2. Guide the roller sun blind towards the
back.
2 Closing 1. Use the handle to pull the roller sun
blind forwards
2. Engage the handle in the device, see
arrow 2.
SLIDING/TILT SUNROOF*
Safety feature As of approximately the middle of the roof opening, if the sliding/tilt sunroof encoun- ters resistance during closing, the closing operation is interrupted and the sunroof opens again slightly.
Despite this safety feature, be extremely careful that the closing
path of the sunroof is not obstructed when- ever it is closed. Otherwise, triggering the closing-force limitation may not be ensured in some situations (with very thin objects, for instance). You can override this safety feature by pressing the switch beyond the resistance point and holding it.<
30
CORRECT SITTING POSTURE
SEAT ADJUSTMENT
The ideal seating position can make a vital contribution to relaxed, fatigue-free driving. The correct seating position also works together with the safety belts and airbags to provide occupants with maximum levels of passive safety in an accident. To ensure that the safety systems operate with optimal efficiency, we strongly urge you to observe the instruc- tions contained in the following section. For supplementary information on trans- porting children, refer to page 38.
Sitting correctly with airbags
Always maintain an adequate distance between yourself and all of the airbags. Always hold the steering wheel by the rim with the hands at the 9 and 3 o’clock positions to keep any chance of injury to hands or arms to an absolute minimum, should the airbag be deployed. No one and nothing is to come between the airbags and the seat occupant. Never use the front passenger airbag cover as a storage surface for objects of any kind, or as a support for legs or feet, as this will increase the risk of injury in a collision severe enough in which the airbag will deploy.<
For airbag locations and additional infor- mation on airbags, refer to page 37.
Safe with safety belts
Important adjustment information
Never allow more than one person to wear a single safety belt. Never allow
Never try to adjust your seat while operating the vehicle. The seat could
respond with an unexpected movement, and the ensuing loss of vehicle control could lead to an accident. Never ride with the backrest reclined to an extreme horizontal angle (especially impor- tant for front passengers to remember). Keep the backrest relatively upright to minimize the risk of sliding under the safety belt and sustaining injury in an acci- dent.<
Adjusting the seats, see next page.
infants or small children to ride in a passenger’s lap. Avoid twisting the belt while routing it firmly across the hips and shoulder, wear it as snugly against your body as possible. Do not allow the belt to rest against hard or fragile objects. Do not route the belt across your neck, or run it across sharp edges. Be sure that the belt does not become caught or jammed. Avoid wearing bulky clothing that prevents the belt from fitting properly, and pull on the belt periodically to retension it over your shoulders. In the event of a frontal impact, a loose lap belt could slide over the hips, leading to abdominal injury. In addi- tion, the safety belt’s restraint effective- ness is reduced if the belt is worn loosely. Expectant mothers should always wear their safety belts, taking care to position the lap belt against the lower hips, where it will not exert pressure against the abdom- inal area.<
For information on using the safety belts, refer to page 35.
31
SEAT ADJUSTMENT
Longitudinal seat adjustment 1. Lift the handle 2. Push the seat into the desired position 3. After releasing the handle, apply pres-
sure to the seat to ensure that the latch engages securely.
Make corrections in the longitudinal adjustment of the seat to ensure that the safety belt still fits firmly against your body. If you do not do this, the protection provided by the safety belt may be reduced.<
Seat height 1. To raise:
Pull the handle up repeatedly, continuing until the seat reaches the desired height
2. To lower:
Push the handle repeatedly, continuing until the seat reaches the desired height.
Lumbar support* You can adjust the contour of the backrest for additional support in the curvature of your spine’s lumbar region. The upper hips and spinal column receive supplementary support to help you main- tain a relaxed, upright posture. Turn the wheel to increase or decrease the curvature.
32
SEAT ADJUSTMENT
ENTRY TO THE REAR
When returning the seat to the rear position, ensure that no one is
injured and that no objects are damaged. Engage and lock both seats and backrests into position prior to driving, otherwise unexpected movement could increase the risk of accident.<
Backrest tilt 1. Pull the lever at the inside of the seat 2. Apply weight to or remove weight from
the backrest as required
3. Release the lever so that the backrest
locks into place.
Easy Entry 1. Press the lever on the outside of the seat
downwards, see arrow 1. The backrest folds forward automati- cally
2. Push the seat forwards, see arrow 2.
Original position 1. Push the seat back into its home posi-
tion
2. Fold the backrest back to the home posi-
tion to lock the seat.
33
Installation 1. Press the button and at the same time
insert the head restraint in the reception points
2. Adjust the head restraint.
To avoid possible violation of traffic laws, never retract the head
restraints unless the rear seats are empty. Always ensure that the head restraints are raised before transporting passengers in the rear seat.<
HEATED SEATS*
HEAD RESTRAINTS
The seat cushion and backrest can be heated with the ignition key in position 2.
Select the temperature setting: Press each button briefly.
Adjusting the head restraints To raise: pull the head restraint upward. To lower: press the button and push the head restraint downward.
Direct deactivation from second tempera- ture setting. Press the button for a longer period.
You can reduce the risk of spinal injury and whiplash by adjusting the
head restraint to a height at which it is centered roughly at ear level.<
Removal 1. Pull up the head restraint, continuing
until it is at maximum extension
2. Press the button and remove the head
restraint at the same time.
34
SAFETY BELTS
STEERING WHEEL
Drive with your safety belt on Even though there is an airbag, wear a safety belt every time you get in the vehicle, because airbags enhance safety by providing added protection.
To fasten Make sure you hear the lock engage in the belt buckle.
To release 1. Press the red button in the belt buckle 2. Hold the belt 3. Guide the belt back into its reel.
Safety belt height adjustment Use the height adjustment mechanism to adapt the safety belt to the ideal position for your own body: Press the button and at the same time push the entire unit upwards or downwards. Also observe the instructions on adjusting the seats on page 31.
If the safety belts are damaged or stretched in an accident: have the safety belt system replaced by your MINI center and the belt anchors checked, other- wise the safety function can no longer be guaranteed. If a child-restraint system was in the vehicle during an accident, consult the manufacturer’s instructions regarding replacement.<
To adjust the steering wheel height 1. Push the locking lever downward 2. Adjust the desired steering wheel
position
3. Pull the lever back in.
Do not adjust the steering wheel while the vehicle is moving, other-
wise unexpected movement could increase the risk of accident.<
35
MIRRORS
Manual adjustment The mirrors can also be adjusted manually: Press the edge of the lens.
Electric heating* Both mirrors are heated automatically when the ignition key is in position 2.
Adjusting exterior mirrors 1 Switch for choosing between the left and
right mirror
2 Switch for 4-way adjustment.
Interior rearview mirror To reduce glare from vehicles behind you when you are driving at night: Tilt the lever forward.
Illuminated vanity mirror From ignition key position 1: 1. Fold down the sun visor 2. Fold the cover panel upwards.
Sun visors Can be swung sideways.
36
MIRRORS
AIRBAGS
Interior rearview mirror, automatic dimming feature* The mirror dims automatically as required. The mirror becomes clear again when you engage reverse gear or select selector lever position R. Keep the photocells free and clean to ensure that the mirror functions perfectly. There is one photocell in the mirror frame; the other is on the back of the mirror.
Do not cover the area between the inside rearview mirror and the wind- shield, and do not place stickers or toll tags on the windshield in front of the mirror.<
1 Side airbags in seats on the driver and
passenger sides (front)
2 Head airbags on the driver and
passenger sides for both rows of seats (front/rear)
3 Front airbags on the driver and
passenger sides
Protective effect The front airbags supplement the safety belts by helping to provide additional protection for the driver and front passenger in the event of a frontal collision in which the protection afforded by the belts alone may no longer be sufficient. When needed, the head and side airbags help to furnish protection in the event of side impact. Each of the side airbags is
designed to help support the seat occu- pant’s upper body. For information on sitting posture, refer to page 31.
The airbags do not deploy in response to minor collisions, rear impacts and
certain kinds of vehicle rollover.<
Even when all safety guidelines are observed, there is a small residual risk that passengers will sustain facial, hand or arm injuries in isolated instances. The ignition and inflation noise may induce a mild temporary hearing loss in sensitive individ- uals.
Do not apply adhesive materials to the cover panels of the airbags, cover them or modify them in any other way. Do not fit covers, cushions or other items to the front seats that have not been specially approved for seats with side airbags. Do not hang clothing, e.g. jackets, over the backrests. Do not attempt to remove the airbag restraint system from the vehicle. In the event of malfunctions, immobilization or use (triggering) of the airbag restraint system in accordance with its intended function, only commission a MINI center with the inspection, repair or disassembly.
37
AIRBAGS
TRANSPORTING CHILDREN
Indicator lamp
The indicator lamp on the instru- ment panel shows the airbag system status starting from igni-
tion key position 1. System operational: > The indicator lamp comes on briefly.
System malfunction: > The indicator lamp does not come on > The indicator lamp fails to go out after
the engine has been started, or it comes on during normal driving.
A system defect could prevent the airbags from deploying in response to a severe impact occurring within the system’s normal triggering range. Have the system checked as soon as possible by your MINI center.
Do not make any changes yourself to the individual components and wiring. This includes the padded cover of the steering wheel, in the instrument panel and the roof supports, as well as the sides of the roof- liner and the original backrest covers on the front seats. Do not attempt to remove or dismantle the steering wheel. In view of the applicable safety regulations, arrange for your MINI center to dispose of the airbag generators. Unprofessional attempts to service the system could lead to failure in an emergency or undesired airbag activation, either of which could result in personal injury. Do not touch the individual components directly after the system has been triggered, as otherwise there is a danger of burns.<
At all times, occupants should sit upright and be properly restrained (infants and small children in appropriate child-restraint systems; larger children and adults using the safety belts). Never let an occupant’s head rest near or on a head airbag because the inflating airbag could cause serious or fatal injury. A child which is not properly restrained could place his or her head on or near the airbag.<
38
Children younger than 13 years and/or smaller than 5 ft (150 cm) should only travel in the rear in suitable restraint systems. Commercially-available child-restraint systems are designed to be secured with a lap belt or with the lap belt portion of a combination lap/shoulder belt. Improperly or inadequately installed restraint systems can increase the risk of injury to children. Always read and follow the instructions that come with the system. If you use a child-restraint system with a tether strap:
TRANSPORTING CHILDREN SAFELY
Both seating positions are fitted with a head restraint. Lift the head restraint and pass the tether strap between the head restraint and the seat back. It is recom- mended to readjust the head restraint into the lowest possible position.
Your vehicle has one of two different types of child-restraint anchor fittings on the back of the rear seats, see arrows 1 or 2. Depending on the location selected for seating in the rear passenger area, attach the tether strap to the corresponding anchorage point to secure the child- restraint system. Adjust the tether strap according to the child restraint manufacturer(cid:213)s instructions.
Anchor fitting 1 is shown above. Anchor fitting 2 is shown in the next
column.<
Adjust the tether strap according to the child restraint manufacturer’s instructions. Before installing any child- restraint device or child seat, please read the following: Never install a rearward-facing child- restraint system in the front passenger seat of this vehicle. Your vehicle is equipped with an airbag supplemental restraint system for the front passenger. Because the backrest on any rearward-facing child-restraint system — of the kind designed for infants under 1 year and 20 Ibs./9 kg — would be within the airbag’s deployment range, you should never mount such a device in the front passenger seat, since the impact of the airbag against the child restraint’s backrest could lead to serious or fatal injuries. If it is necessary for a child — not an infant — to ride in the front seat, certain precautions should be taken. First, move the passenger seat as far away from the instrument panel as possible. This important precaution is intended to maximize the distance between the airbag and the child. Older children should be tightly secured with a safety belt, after they have outgrown a booster seat that is appropriate for their age, height and weight. Younger children should be secured in an appropriate
39
TRANSPORTING CHILDREN SAFELY
forward-facing child-restraint system that has first been properly secured with a safety belt. Never install a rearward-facing child-restraint system in the front passenger seat. We strongly urge you to carefully read and comply with the instructions for installa- tion and use provided by the child restraint’s manufacturer whenever you use such a device. Be sure that all occupants — of all ages — remain properly and securely restrained at all times. According to accident statistics, children are safer when properly restrained in the rear seats than in the front seating posi- tions.<
All rear seats in your vehicle conform to the guidelines defined in SAE J1819, an industry recommended practice for securing child-restraint systems in motor vehicles.
Child seat security All of the rear belt retractors and the front passenger’s safety belt can be locked for mounting and securing child-restraint systems. Information regarding this is located near the buckle latch of each safety belt.
To lock the belt Pull the entire length of the belt from the belt retractor. Allow the reel to retract the belt somewhat and engage the buckle, then tighten the belt against the child- restraint system. The retraction mecha- nism is now locked.
To unlock the belt Release the buckle, remove the child- restraint system and allow the belt retractor to reel the belt completely in.
40
TRANSPORTING CHILDREN
VEHICLE MEMORY
How the system functions Doubtless you have often reflected on how great it would be if you could configure your vehicle’s various adjustment settings to meet your own personal requirements. In developing this vehicle, the manufac- turer has incorporated a number of options that your MINI center can program to reflect your individual preferences.
What the system can do Your MINI center can provide you with details on the capabilities of the Vehicle Memory system. Examples for Vehicle Memory: > Signals an acknowledgement when
locking or unlocking your vehicle
> Automatic locking after starting off > Automatic unlocking when the parking
brake is applied
> Selective central locking
First open the driver’s door, then the whole car
> Automatic opening/closing of sliding/tilt
sunroof
> Opening/closing windows and/or
sliding/tilt sunroof via remote control
> Speed-dependent windshield wiper
LATCH child-restraint system Open the cover. The illustration is an example showing the mounts for the LATCH (Lower Anchors and Tethers for Children) child-restraint mounting system at the right rear. The system is also available at the left rear position.
Always follow all manufacturer’s instructions and observe all safety precautions when installing the LATCH child-restraint system.<
> Automatic activation of windshield
wipers on cleaning
> "Follow me home" lamps
Low beams light up for a short time after the engine has been switched off
> Locking when engine is running (with
second key)
> Stop function of power windows on
opening/closing
> Activating/deactivating daytime driving
lamps*
> Switching on interior lamps via remote
control.
This symbol draws your attention to other Vehicle Memory functions
described in the Owner’s Manual.<
41
STARTING THE ENGINE
Do not allow the engine to warm up with the vehicle at a standstill. Move off imme- diately at a moderate engine speed.
Do not allow the engine to run in enclosed spaces. The exhaust gases contain carbon monoxide, an odorless and colorless, but highly toxic gas. Breathing the exhaust gases poses an extreme health risk, and can lead to uncon- sciousness and death. Do not leave the vehicle unattended with the engine running. An unattended vehicle with a running engine represents a poten- tial safety hazard. When driving, standing at idle or when parking, take precautions to avoid contact between the hot exhaust system and easily flammable materials (grass, hay or leaves, for example). Such contact could lead to a fire, resulting in serious personal injury and property damage.<
Vehicles with Continuously Variable automatic Transmission (CVT):
Do not move the selector lever from posi- tion "P" until the engine is running. Your vehicle is equipped with an interlock. Therefore, the ignition key cannot be turned to position 0 and removed until the selector lever is in position "P" (Interlock).<
1 Steering unlocked Individual electrical accessories are ready for operation. You will find that it is often easier to turn the ignition key from position 0 to posi- tion 1 when you move the steering wheel slightly to help disengage the lock.
2 Ignition switched on All electrical accessories are ready for oper- ation.
3 Starting the engine
Vehicles with manual transmission: Step on the clutch when starting the vehicle. A lockout prevents the engine from starting if the clutch is not depressed.<
IGNITION LOCK
0 Steering locked 1 Steering unlocked 2 Ignition switched on 3 Starting the engine
0 Steering locked The key can be inserted or removed in this position only.
To lock the steering: 1. Remove the key 2. Turn the steering wheel slightly to the
left or right until the lock engages.
42
STARTING THE ENGINE
SWITCHING OFF THE ENGINE
Manual transmission 1. Engage the parking brake 2. Put the manual gearshift lever in neutral 3. Press the clutch pedal 4. Start the engine.
Continuously Variable automatic Transmission (CVT)* 1. Press the footbrake 2. Put the selector lever in position P or N 3. Starting the engine.
Move the selector lever to position N and engage the parking brake before
leaving your vehicle with the engine running. Do not leave the vehicle with the engine running. An unattended vehicle with a running engine represents a potential safety hazard.<
You should never remove the ignition key when the vehicle is in motion, as
the steering lock could engage. When you leave the vehicle, always remove the ignition key and engage the steering lock. When you park on downward slopes, engage the parking brake.<
Manual transmission Turn the ignition key to position 1 or 0.
Continuously Variable automatic Transmission (CVT)* Engage selector lever position P, turn the ignition key to position 1 or 0.
Starting When starting the engine, do not press the accelerator pedal.
Do not actuate the starter for too short a time. Do not turn it for more than approx. 20 seconds. Release the igni- tion key immediately when the engine starts. Extended starting attempts, characterized by excessively frequent or long periods with the starter engaged, can lead to damage in the catalytic converter.<
If the engine does not start on the first attempt (the engine is very hot or cold, for instance): > Press the accelerator pedal halfway
down while engaging the starter.
Cold starts at extremely low temperatures (as of approx. +5 7(—15 6)): > Press the accelerator pedal halfway
down while engaging the starter
> For the initial start attempt, allow the starter to remain engaged somewhat longer (approx. 10 seconds).
43
If, in exceptional circumstances, it should be necessary to engage the
parking brake while the vehicle is in motion, do not pull the lever with excessive pressure. Keep your thumb pressed against the release button while carefully pulling the lever up to apply moderate pressure. Excessive pressure can lead to overbraking and loss of traction (fishtailing) at the rear axle. The brake lamps do not come on when the parking brake is engaged. Vehicles with manual transmission: Always engage the parking brake when parking on hills and inclined surfaces, as first gear or reverse may not provide adequate resistance to rolling. Vehicles with CVT: Place the selector lever in P.<
PARKING BRAKE
The parking brake is designed primarily to prevent the vehicle from rolling when it is parked. It operates against the rear wheels.
To engage Lever automatically locks in position. The warning lamp in the instrument cluster comes on when the ignition key is in posi- tion 2, see page 16.
To release 1. Pull up slightly 2. Press the button 3. Push the lever downwards.
44
MANUAL TRANSMISSION
The manual gearshift lever neutral plane lies in the gear plane of the 3rd/4th gear. When shifting from each gear into "Neutral", the manual gearshift lever springs back automatically into the gear- shift lever neutral plane.
6-speed transmission*
When changing gear in the 5th/6th gear plane, press the gearshift lever to the right to prevent shifting to a gear of the 3rd/4th gear plane.<
Reverse Before selecting reverse gear, ensure the vehicle is stationary; then, fully press the clutch pedal and pause briefly before moving the gearshift lever into position. As you do this, the backup lamps will turn on automatically when the ignition key is in position 2. 5-speed transmission: Press the gearshift lever to the right and to the back. 6-speed transmission: Press the gearshift lever to the left to over- come the slight resistance and press forwards. As you do this, the backup lamps will turn on automatically when the ignition key is in position 2.
Do not hold the vehicle in place on slopes by slipping or "riding" the clutch. Use the parking brake instead. Riding the clutch causes the clutch assembly to wear out sooner.<
45
CONTINUOUSLY VARIABLE AUTOMATIC TRANSMISSION (CVT)*
You can drive with a steplessly shifting CVT. In addition, you can also shift manually. When you move the selector lever from the D position to the right into the M/S + — range, the performance-oriented shift programs of the CVT are engaged. Step- tronic enters the manual selection mode and executes the desired shift whenever you tap the selector lever in the direction indicated by "+" or "—" . Whenever you want to use automatic again, just move the selector lever toward the left to position D.
In positition D, you achieve the lowest fuel consumption for average
driving.<
Selector lever positions
P R N D M/S + —
Range selection Inadvertent engaging of certain selector lever positions is prevented by a lock. Press the button on the front side of the selector lever knob. The lock is released.
While the vehicle is stationary and before shifting out of P or N, press the brake pedal in order to disengage the selector lever lock mechanism (Shiftlock). If the engine speed is too high when the vehicle is at a standstill, the selector lever is also blocked to protect the transmission. Hold the brake pedal down until starting off. Otherwise the vehicle will "creep" when a drive position is engaged.<
To prevent the vehicle from starting off on its own, always move the
selector lever to position P or N and engage the parking brake before leaving your vehicle with the engine running. Do not leave the vehicle unattended with the engine running. An unattended vehicle with a running engine represents a poten- tial safety hazard.<
If the selector lever is not placed in position P when the vehicle is parked,
the position display of the selector lever stays on. This can lead to battery discharge.<
46
CONTINUOUSLY VARIABLE AUTOMATIC TRANSMISSION (CVT)*
The transmission will only execute upshifts and downshifts that will result in a plau- sible combination of vehicle speed and engine rpm, forinstance, downshifts that would result in excessive engine speed are not executed. Switching from M/S + — into the selector lever positions P, R and N and switching from manual mode back into the Sport program is only possible via D.
P Park Select "P" only when the vehicle is completely stopped. Transmission locks to prevent rear wheels from turning.
R Reverse Select "R" only when the vehicle is completely stopped.
N Neutral Select "N" only if your journey is inter- rupted for a long period.
D Drive (CVT driving position) This position is designed for driving under all normal operating conditions.
"Kickdown" In "kickdown", you achieve maximum acceleration and maximum speed in posi- tion D. Press the accelerator pedal past the increased resistance point at the full- throttle position.
M/S + — Manual mode and Sport program Switch from D into M/S + —: Activates the Sport program and indicates SD in the gear indicator in the speedo- meter. > Press briefly:
CVT shifts from the Sport program to the manual mode
> Press selector lever briefly towards "+":
Transmission shifts upwards
> Press selector lever briefly towards "—":
Transmission shifts back.
1 to 6 appear in the gear indicator.
47
CONTINUOUSLY VARIABLE AUTOMATIC TRANSMISSION (CVT)*
Do not work in the engine compart- ment when a drive gear (forward or
reverse) is engaged. If you do this, the vehicle could move.<
Jump-starting and towing, refer to pages 113, 115.<
Available displays
P R N D SD 1 2 3 4 5 6 EP
Electronic transmission control module If there is a malfunction in the transmission system, EP appears in the display. All selector lever positions can still be selected. In positions for driving forward: The vehicle can now only be driven with a limited gear selection.
Avoid high engine loads. Proceed to the nearest MINI center.<
48
PARKING LAMPS/LOW BEAMS
SIGNAL/HEADLAMP FLASHER
You can also have this function acti- vated.<
Switching on the standing lamps For parking, you can activate lights on one side of the vehicle (observe local laws). In ignition key position 0: Move the lever into the relevant turn signal indicator position.
"Lights on" warning If the lights have not been switched off and the ignition key is in position 0, an acoustic signal sounds for a few seconds when you open the driver’s door to remind you that the lights have not been switched off.
Daytime driving lamps* If you desire, the light switch can be left in the second position: When the ignition is switched off, the external lighting is also switched off.
You can have this function set by your MINI center.<
1 Turn signal indicator (green indicator
accompanied by periodic clicking sound from the relay)
2 High beams/Headlamp flasher (blue
indicator lamp)
To signal briefly Press the lever up to but not beyond the detent.
If the indicator lamp of the indicators and the clicking from the relay are both faster than normal: one of the turn signal indicators has failed.<
49
Switching on the parking lamps Turn to the first position. The front, rear and side vehicle lighting is switched on. One-sided standing lamps, see next column.
Switching on the low beams Turn to the second position. With the low beams on and with the igni- tion switched off, only the parking lamps will remain on.
"Follow me home" lamps If you switch off the engine with the low beams on, and then switch off the low beams, they remain lit for approx. one minute.
INSTRUMENT LIGHTING
FOG LAMPS
INTERIOR LAMPS
To control the instrument lighting, press the button.
To increase the illumination intensity Keep the button pressed until the desired brightness is reached.
To decrease the illumination intensity Press the button briefly. With each brief press of the button, the illumination intensity is reduced in steps.
When the parking lamps/low beams are switched on: Briefly press the switch upwards or down- wards. Briefly press once again to switch off.
Fog lamps*
Fog lamps switched on: Green light-emitting diode in the switch lights up.
The fog lamps are deactivated whenever the high beams are switched on.
Switching the interior lamps on and off manually Press button 1.
Switching the reading lamps on and off Press button 2.
50
LIGHT-EMITTING DIODES
WASHER/WIPER SYSTEM
Light-emitting diodes (LEDs) installed behind translucent lenses serve as the light source for many of the controls and displays in your vehicle. These light-emit- ting diodes are related to conventional lasers, and legislation defines them as "light-emitting diodes, Class 1".
Do not remove the protective lens and avoid staring directly at the unfil- tered beam for several hours, as inflamma- tion of the iris could result.<
0 Wipers parked 1 Intermittent operation or rain sensor 2 Normal wiper speed 3 Fast wiper speed 4 Brief wipe 5 Clean windshield and headlamps
Intermittent operation (not on vehicles with rain sensor) The interval varies depending on the speed being driven.
You can have this function set by your MINI center.<
Rain sensor* The rain sensor is located on the wind- shield, directly in front of the interior rear- view mirror. When the rain sensor is activated, the windshield wipers are auto- matically controlled depending on the amount of water (or snow) landing on the windshield. To activate the rain sensor: From ignition key position 1: Lever in position 1. The wipers move across the windshield once. To deactivate the rain sensor: Put lever in position 0.
Switch the rain sensor off when passing through an automatic car
wash. Failure to do so could result in damage caused by undesired wiper activa- tion.<
Fast wiper speed When the vehicle is stationary, the wipers switch automatically to normal wiper speed.
You can have this function activated/ deactivated by your MINI center.<
51
WASHER/WIPER SYSTEM
Cleaning windshield and headlamps* The system sprays washer fluid against the windshield. The wipers are automatically activated for a brief period. When the vehicle lighting is on, the head- lamps are also cleaned at appropriate inter- vals.
Do not use the washers if there is any danger that the fluid will freeze on the windshield. If you do so, your vision could be obscured. For this reason, use an antifreeze agent, see page 89. Do not use the washers when the reservoir is empty, since this could cause damage to the washing pump.<
Windshield washer jets* The windshield washer jets are heated automatically when the ignition key is in position 2.
52
Rear window wiper 6 Intermittent operation:
Turn the cap to position 6
The rear window wiper moves across the window a number of times before switching to intermittent operationCleaning the rear window 7 Intermittent operation:
Turn the cap to position 7 and hold in place
8 In lever position 0:
Turn the cap to position 8 and hold in place
CRUISE CONTROL*
Starting at about 25 mph (40 km/h), the vehicle maintains and stores any vehicle speed that you specify.
To activate the system From ignition key position 1: Press button 2. The indicator lamp in the instrument cluster lights up. Cruise control is active.
To maintain and store speed or to accelerate Press button 3. The system maintains and stores the current vehicle speed. Every time you tap the button, the speed increases by approx. 1 mph (2 km/h).
To decelerate Press button 4. If you are already driving with active cruise control, the speed is decreased by approx. 1 mph (2 km/h) every time you briefly tap the button.
Press and hold button 4. With the cruise control active, the system automatically reduces the throttle opening to slow the vehicle. When you release the button, the system maintains and stores the current speed.
Do not use cruise control on twisting roads, when high traffic density
prevents driving at a constant speed, when the road surface is slick (snow, rain, ice), or when the road surface is loose (rocks, sand).<
Press and hold button 3. The vehicle accelerates without pressure on the accelerator pedal. When you release the button, the system maintains and stores the current speed.
If, on a downhill gradient, the engine braking effect is not sufficient, the
controlled speed may be exceeded. Speed can drop on uphill grades if the engine output is insufficient.<
53
CRUISE CONTROL*
To cancel the cruise control When the system is activated, press button 2. The indicator lamp stays lit. You can use the cruise control again as required. In addition, cruise control is canceled auto- matically > if the brakes are applied > when you apply pressure to the clutch
pedal, or when you move the CVT selector lever from D to P, N or R
> or if the cruise speed is either exceeded
or not met for an extended length of time (if you press the accelerator pedal and exceed the stored speed, for example).
To continue cruise control Press button 1. The vehicle accelerates to and maintains the last speed stored. If you turn the igni- tion key to position 0, the stored speed is deleted and the system is deactivated.
To deactivate the system With cancelled cruise control, press button 2 once again. The indicator lamp goes out and the stored speed is deleted.
54
ODOMETER
TACHOMETER
FUEL GAUGE
Do not operate the engine with the needle in the red overspeed zone of the gauge. To protect the engine, the power is reduced when you approach a certain engine speed in this sector.
1 Trip odometer To set to zero: With ignition key in position 1, press the button until the trip odometer is at zero.
2 Odometer You can activate the displays shown in the illustration with the ignition key in posi- tion 0 by pressing the button in the instru- ment cluster.
In the speedometer Once indicator lamp 1 stays on continu- ously, there are still approx. 2.1 gallons (8 liters) of fuel in the fuel tank. Tank capacity: approx. 13.2 gallons (50 liters). When you switch on the ignition, the indi- cator lamp lights up briefly to confirm that the system is operational. If the tilt of the vehicle varies (when you are driving in mountainous areas, for example), the needle may fluctuate slightly.
Please refuel early, since driving to the last drop of fuel can result in damage to the engine and/or catalytic converter.<
55
1 Red indicator lamp When you switch on the ignition, warning lamp 1 comes on briefly to confirm that the system is operational. If the lamp comes on while operating the vehicle, the engine has overheated. Switch off the engine immediately and allow it to cool down.
Navigation system option
Coolant temperature warning lamp in the tachometer. If the lamp comes on while oper-
ating the vehicle, the engine has over- heated. Switch off the engine immediately and allow it to cool down.
FUEL GAUGE
TEMPERATURE GAUGE
In the navigation system
Please also comply with the instruc- tions in the previous column.<
Once indicator lamp 1 switches from orange to red, there are still approx. 2.1 gallons (8 liters) of fuel in the fuel tank.
Low temperature The needle is located at the bottom or on the right. The engine is still cold. Drive at moderate engine and vehicle speeds.
Center position Normal operating temperature of the engine.
High temperature As soon as there is a deviation from the center position upwards or to the left: Drive moderately and at low engine speed, if necessary, switch off the engine and allow to cool down. Checking coolant level, see page 91.
56
SERVICE INTERVAL DISPLAY
A flashing message and a "—" in front of the number mean that the service interval has already been exceeded by the distance shown on the display. Please contact your MINI center for an appointment. For more information on the Service Interval Display, see page 93.
Remaining distance for service The displays shown in the illustration appear for a few seconds when the ignition key is in position 1 or after the engine is started. The next service due appears in miles (kilo- meters) with the message INSPECTION or/ and OILSERVICE, together with the distance remaining before the next scheduled service. The computer bases its calculations of the remaining distance on your driving style in the period immediately preceding your data request.
57
Brake fluid change You can obtain a display of the number of days remaining until the next due brake fluid change, see page 92. While the next due service is displayed, press the button in the display element. As of the due date of the brake fluid change, the clock symbol also lights up in the remaining distance display for Service, see left column. Please contact your MINI center for an appointment.
Periods of immobilization in which the battery is disconnected are not
taken into account by the display. For this reason, ensure that the brake fluid, independent of the display, is replaced every two years at the latest, see page 92.<
CLOCK
COMPUTER*
The displays appear in the following order: Outside temperature, cruising range, average fuel consumption, average vehicle speed. Starting with ignition key position 1, the last active setting is displayed.
If the vehicle is equipped with a navi- gation system, see chapter covering
the computer in the navigation system Owner’s Manual.<
Mode selection With the ignition key in position 1 and higher, you can use the button in the turn signal indicator lever to retrieve informa- tion from the computer for display in the tachometer. By pressing the button briefly, you can call up a new function for display.
Settings From ignition key position 1: Left button: hours Right button: minutes
Move forward in increments: Press the button or Fast forward: Press and hold the button
Changeover from 24-hour to 12-hour mode: Press both buttons at the same time for approx. 5 seconds.
58
Average speed — Average fuel consumption Press the button in the turn signal indicator lever for a longer period. The average speed value/consumption value on display is recalculated. Any time spent when the vehicle is stationary and the engine is switched off is ignored for the calculation.
COMPUTER*
Outside temperature If the vehicle is equipped with a tacho- meter, but not with a computer, the temperature is always displayed.
You can display the exterior tempera- ture and distance driven in other
units of measurement.<
Cruising range The computer bases its calculations for the cruising range on the driving style and on the remaining fuel in the tank.
59
AUTOMATIC STABILITY CONTROL PLUS TRACTION (ASC+T)*
Indicator lamp
The indicator lamp on the instru- ment cluster will go out shortly after the ignition has been
switched on, see pages 16, 17. If the indicator lamp flashes: ASC+T controls the drive and braking forces.
If the indicator lamp fails to go out after the engine is started, or if it
comes on during normal driving and stays on: If the system is either defective or was switched off with the button, then the stabilizing applications described are no longer available. You can, however, drive the vehicle normally without ASC+T. In the event of a malfunction, please see your MINI center, see pages 16, 17.<
Switch off the ASC+T Briefly press the switch. The indicator lamp stays lit. When driving with snow chains or to "rock free" in snow, it can be helpful to switch off the ASC+T for a brief period.
To maintain vehicle stability, always drive with the ASC+T switched on
whenever possible.<
Switch the ASC+T back on Briefly press the switch once again. Indicator lamp goes out.
The concept This system optimizes vehicle stability and traction, especially when just starting off, when accelerating or when cornering. ASC+T recognizes the danger present in traction loss and will increase driving stability and traction by reducing the engine’s output, and if necessary, by applying the brakes to the front wheels. ASC+T is operational each time you start the engine.
The laws of physics cannot be repealed, even with ASC+T. An appro-
priate driving style always remains the responsibility of the driver. Avoid using the additional safety margin provided by the system as an excuse for taking unnecessary risks. Do not make any modifications to the ASC+T system. Allow only authorized tech- nicians to perform service procedures on the ASC+T.<
60
DYNAMIC STABILITY CONTROL (DSC)*
The concept This system maintains driving stability even in critical driving situations. The system optimizes vehicle stability during acceleration and when starting from a full stop, as well as optimizing trac- tion. In addition, it recognizes unstable vehicle conditions, such as under- or over- steering, and, as far as is possible within the laws of physics, helps keeping the vehicle on a steady course by reducing the rpms and brake applications to the indi- vidual wheels. The DSC is operational every time you start the engine. DSC contains the functions Antilock Brake System ABS/Electronic Brake Force Distribution EBV/ASC+T.
The laws of physics cannot be repealed, even with DSC. An appro-
priate driving style always remains the responsibility of the driver. We therefore urge you to avoid using the additional safety margin of the system as an excuse for taking risks. Do not make any modifications to the DSC system. Allow only authorized technicians to perform service procedures on the DSC.<
To switch off the DSC Briefly press the switch. The indicator lamp stays lit. When driving with snow chains, it may be effective to switch off the DSC for a brief period.
To maintain stability, always drive with the DSC switched on whenever
possible.<