- 2011 Jeep Wrangler Owners Manuals
- Jeep Wrangler Owners Manuals
- 2005 Jeep Wrangler Owners Manuals
- Jeep Wrangler Owners Manuals
- 2006 Jeep Wrangler Owners Manuals
- Jeep Wrangler Owners Manuals
- 2004 Jeep Wrangler Owners Manuals
- Jeep Wrangler Owners Manuals
- 2013 Jeep Wrangler Owners Manuals
- Jeep Wrangler Owners Manuals
- 2009 Jeep Wrangler Owners Manuals
- Jeep Wrangler Owners Manuals
- 2008 Jeep Wrangler Owners Manuals
- Jeep Wrangler Owners Manuals
- 2012 Jeep Wrangler Owners Manuals
- Jeep Wrangler Owners Manuals
- 2010 Jeep Wrangler Owners Manuals
- Jeep Wrangler Owners Manuals
- 2007 Jeep Wrangler Owners Manuals
- Jeep Wrangler Owners Manuals
- Download PDF Manual
-
CONTENTS
䡵 Suggestions For Obtaining Service For Your
Vehicle . . . . . . . . . . . . . . . . . . . . . . . . . . . . . . 440
▫ Prepare For The Appointment . . . . . . . . . . . . 440
▫ Prepare A List . . . . . . . . . . . . . . . . . . . . . . . . 440
▫ Be Reasonable With Requests . . . . . . . . . . . . . 440
䡵 If You Need Assistance . . . . . . . . . . . . . . . . . . . 440
䡵 Warranty Information (U.S. Vehicles Only) . . . . . 443
䡵 Mopar威 Parts . . . . . . . . . . . . . . . . . . . . . . . . . 443䡵 Reporting Safety Defects . . . . . . . . . . . . . . . . . . 443
▫ In Canada . . . . . . . . . . . . . . . . . . . . . . . . . . 444
䡵 Publication Order Forms . . . . . . . . . . . . . . . . . . 444
䡵 Department Of Transportation Uniform TireQuality Grades . . . . . . . . . . . . . . . . . . . . . . . . 446
▫ Treadwear . . . . . . . . . . . . . . . . . . . . . . . . . . 446
▫ Traction Grades . . . . . . . . . . . . . . . . . . . . . . 446
▫ Temperature Grades . . . . . . . . . . . . . . . . . . . 447 9440 IF YOU NEED CONSUMER ASSISTANCE
SUGGESTIONS FOR OBTAINING SERVICE FOR YOUR VEHICLE
Prepare For The Appointment If you’re having warranty work done, be sure to have the right papers with you. Take your warranty folder. All work to be performed may not be covered by the warranty, discuss additional charges with the service manager. Keep a maintenance log of your vehicle’s service history. This can often provide a clue to the current problem. Prepare A List Make a written list of your vehicle’s problems or the specific work you want done. If you’ve had an accident, or work done that is not on your maintenance log, let the service advisor know.
Be Reasonable With Requests If you list a number of items, and you must have your vehicle by the end of the day, discuss the situation with the service advisor and list the items in order of priority. At many dealers, you may obtain a rental vehicle at a minimal daily charge. If you need a rental, it is advisable to make these arrangements when you call for an ap- pointment.
IF YOU NEED ASSISTANCE The manufacturer and its dealers are vitally interested in your satisfaction. We want you to be happy with our products and services. Warranty service must be done by an authorized Chrysler, Dodge, or Jeep dealer. We strongly recommend that you take your vehicle to your selling dealer. They know you and your vehicle best, and are most concerned that you get prompt and high quality service. The manufacturer’s dealers have the facilities, factory-trained
technicians, special tools, and the latest information to assure your vehicle is fixed correctly and in a timely manner. This is why you should always talk to your dealer’s service manager first. Most matters can be resolved with this process. • If for some reason you are still not satisfied, talk to the general manager or owner of the dealership. They want to know if you need assistance. • If your dealership is unable to resolve the concern, you
may contact the Manufacturer’s Customer Center.
Any communication to the Manufacturer’s Customer Center should include the following information: • Owner’s name and address • Owner’s telephone number (home and office) • Dealership name
IF YOU NEED CONSUMER ASSISTANCE 441
• Vehicle identification number • Vehicle delivery date and mileage DaimlerChrysler Motors Corporation Customer Center P.O. Box 21–8004
Auburn Hills, MI 48321–8004
Phone: (800) 992-1997
DaimlerChrysler Canada Inc. Customer Center P.O. Box 1621
Windsor, Ontario N9A 4H6
Phone —(800) 465–2001
In Mexico contact: Av. Prolongacion Paseo de la Reforma, 1240
Sante Fe C.P. 05109
Mexico, D. F. In Mexico (915) 729–1248 or 729–1240
Outside Mexico (525) 729–1248 or 729–1240442 IF YOU NEED CONSUMER ASSISTANCE
Customer Assistance For The Hearing Or Speech Impaired (TDD/TTY) To assist customers who have hearing difficulties, the manufacturer has installed special TDD (Telecommuni- cation Devices for the Deaf) equipment at its Customer Center. Any hearing or speech impaired customer who has access to a TDD or a conventional teletypewriter (TTY) in the United States can communicate with the manufacturer by dialing 1–800–380–CHRY. Service Contract You may have purchased a service contract for your vehicle to help protect you from the high cost of unex- pected repairs after your manufacturer’s new vehicle limited warranty expires. The manufacturer stands be- hind only the manufacturer’s Service Contracts. If you purchased a manufacturer’s Service Contract, you will receive Plan Provisions and an Owner Identification Card in the mail within three weeks of your vehicle delivery date. If you have any questions about your service
contract, call the manufacturer’s Service Contract Na- tional Customer Hotline at 1-800-521-9922. The manufacturer will not stand behind any service contract that is not the manufacturer’s Service Contract. It is not responsible for any service contract other than the manufacturer’s Service Contract. If you purchased a service contract that is not a manufacturer’s Service Contract, and you require service after your manufactur- er’s new vehicle limited warranty expires, please refer to your contract documents, and contact the person listed in those documents. We appreciate that you have made a major investment when you purchased your new vehicle. Your dealer has also made a major investment in facilities, tools, and training to assure that you are absolutely delighted with your ownership experience. You’ll be pleased with their sincere efforts to resolve any warranty issues or related concerns.
WARNING!
contain or emit
Engine exhaust, some of its constituents, and certain vehicle components chemicals known to the State of California to cause cancer and birth defects or other reproductive harm. In addition, certain fluids contained in vehicles and certain prod- ucts of component wear contain or emit chemicals known to the State of California to cause cancer and birth defects or other reproductive harm.
WARRANTY INFORMATION (U.S. Vehicles Only) See the Warranty Information Booklet for the terms and provisions of DaimlerChrysler’s warranties applicable to this vehicle.
IF YOU NEED CONSUMER ASSISTANCE 443
MOPAR姞 PARTS Mopar威 fluids, lubricants, parts, and accessories are available from your dealer. They will help you keep your vehicle operating at its best.
REPORTING SAFETY DEFECTS In the 50 United States and Washington D.C.: If you believe that your vehicle has a defect, which could cause a crash or cause injury or death, you should immediately inform the National Highway Traffic Safety Administra- tion (NHTSA) in addition to notifying the manufacturer. If NHTSA receives similar complaints, it may open an investigation, and if it finds that a safety defect exists in a group of vehicles, it may order a recall and remedy campaign. However, NHTSA cannot become involved in individual problems between you, your dealer, and the manufacturer.
444 IF YOU NEED CONSUMER ASSISTANCE
from
safety
motor
vehicle
To contact NHTSA, you may either call the Auto Safety Hotline toll free at 1–888–327–4236 (TTY: 1–800–424– 9153), or go to http://www.safercar.gov; or write to: Administrator, NHTSA, 400 Seventh Street, SW., Wash- ington, DC 20590. You can also obtain other information about http:// www.safercar.gov. http://www.NHTSA.gov. In Canada: If you believe that your vehicle has a safety defect, you should contact the Customer Service Department imme- diately. Canadian customers who wish to report a safety defect to the Canadian government should write to Transport Canada, Motor Vehicle Defect Investigations and Recalls, 2780 Sheffield Road, Ottawa, Ontario K1B 3V9.
PUBLICATION ORDER FORMS To order the following manuals, you may use either the website or the phone numbers listed below. Visa, Mas- tercard, American Express, and Discover orders are ac- cepted. If you prefer mailing your payment, please call for an order form. NOTE: A street address is required when ordering manuals. (No P.O. Boxes). • Service Manuals.
These comprehensive service manuals provide the information that students and professional technicians need in diagnosing/troubleshooting, problem solving, maintaining, servicing, and repairing DaimlerChrysler Corporation vehicles. A complete working knowledge of the vehicle, system, and/or components is written in straightforward language with illustrations, dia- grams, and charts.
• Diagnostic Procedure Manuals.
Filled with diagrams, charts and detailed illustrations, these practical manuals make it easy for students and technicians to find and fix problems on computer- controlled vehicle systems and features. They show exactly how to find and correct problems the first time, using step-by-step troubleshooting and driveability procedures, proven diagnostic tests and a complete list of all tools and equipment.
• Owner’s Manuals.
These manuals have been prepared with the assistance of service and engineering specialists to acquaint you with specific Chrysler group vehicles. Included are starting, operating, emergency and maintenance pro- cedures as well as specifications, capabilities and safety tips.
IF YOU NEED CONSUMER ASSISTANCE 445
Call Toll Free at: • 1–800–890–4038 (U.S.) • 1–800–387–1143 (Canada) Or Visit us on the World Wide Web at: • www.techauthority.daimlerchrysler.com • www.daimlerchrysler.ca/manuals
446 IF YOU NEED CONSUMER ASSISTANCE
DEPARTMENT OF TRANSPORTATION UNIFORM TIRE QUALITY GRADES The following describes the tire grading categories estab- lished by the National highway Traffic Safety Adminis- tration. The specific grade rating assigned by the tire’s manufacturer in each category is shown on the sidewall of the tires on your car. All Passenger Car Tires Must Conform to Federal Safety Requirements in Addition to These Grades. Treadwear The treadwear grade is a comparative rating based on the wear rate of the tire when tested under controlled con- ditions on a specified government test course. For ex- ample, a tire graded 150 would wear one and a half (1
1/2) times as well on the government course as a tire graded 100. The relative performance of tires depends upon the actual conditions of their use, however, andmay depart significantly from the norm due to variations in driving habits, service practices and differences in road characteristics and climate. Traction Grades The traction grades, from highest to lowest, are AA, A, B, and C. Those grades represent the tire’s ability to stop on wet pavement as measured under controlled conditions on specified government test surfaces of asphalt and concrete. A tire marked C may have poor traction perfor- mance.
WARNING!
The traction grade assigned to this tire is based on straight-ahead braking traction tests, and does not include acceleration, cornering, hydroplaning, or peak traction characteristics.
Temperature Grades The temperature grades are A (the highest), B, and C, representing the tire’s resistance to the generation of heat and its ability to dissipate heat when tested under controlled conditions on a specified indoor laboratory test wheel. Sustained high temperature can cause the material of the tire to degenerate and reduce tire life, and excessive temperature can lead to sudden tire failure. The grade C corresponds to a level of performance which all passenger car tires must meet under the Federal Motor Vehicle Safety Standard No. 109. Grades B and A repre- sent higher levels of performance on the laboratory test wheel than the minimum required by law.
IF YOU NEED CONSUMER ASSISTANCE 447
WARNING!
The temperature grade for this tire is established for a tire that is properly inflated and not overloaded. Excessive speed, under inflation, or excessive load- ing, either separately or in combination, can cause heat buildup and possible tire failure.
INDEX
10
450 INDEX
ABS (Anti-Lock Brake System) . . . . . . . . . . . . 204,296
Adding Fuel . . . . . . . . . . . . . . . . . . . . . . . . . . . 325
Adding Washer Fluid . . . . . . . . . . . . . . . . . . . . . 194
Air Cleaner, Engine (Engine Air Cleaner Filter) . . . 375
Air Conditioner Maintenance . . . . . . . . . . . . . . . 376
Air Conditioning . . . . . . . . . . . . . . . . . . . . . 254,258
. . . . . . . . . . . . . . . . . 258
Air Conditioning Controls Air Conditioning, Operating Tips . . . . . . . . . . . . 258
Air Conditioning Refrigerant . . . . . . . . . . . . . . . 377
Air Conditioning System . . . . . . . . . . . . . . . . . . 258
Air Filter . . . . . . . . . . . . . . . . . . . . . . . . . . . . . . 375
Air Pressure, Tires . . . . . . . . . . . . . . . . . . . . . . . 309
Airbag . . . . . . . . . . . . . . . . . . . . . . . . . . . . . . . . 47
Airbag Deployment . . . . . . . . . . . . . . . . . . . . . . . 60
Airbag Light . . . . . . . . . . . . . . . . . . . . . . . . . 62,204
Airbag Maintenance . . . . . . . . . . . . . . . . . . . . . . . 61
Airbag, Side . . . . . . . . . . . . . . . . . . . . . . . . . . . . 58
. . . . . . . . . . . . . . . . . . . . 19
Alarm (Security Alarm) Alignment and Balance . . . . . . . . . . . . . . . . . . . 315Alterations/Modifications, Vehicle . . . . . . . . . . . . . 9
Antenna, Satellite Radio . . . . . . . . . . . . . . . . . . . 248
Antifreeze (Engine Coolant) . . . . . . . . . . . . . . . . 412
Anti-Lock Brake System (ABS) . . . . . . . . . . . . 107,296
Anti-Lock Warning Light . . . . . . . . . . . . . . . . . . 204
Appearance Care . . . . . . . . . . . . . . . . . . . . . . . . 393
Arming Theft System (Security Alarm) . . . . . . . . . 19
. . . . . . . . . . . . . . . . 33
Auto Down Power Windows Automatic Transmission . . . . . . . . . . . . . . . . . . . 388
Fluid and Filter Changes . . . . . . . . . . . . . . . . . 388
Fluid Level Check . . . . . . . . . . . . . . . . . . . . . . 388
Fluid Type . . . . . . . . . . . . . . . . . . . . . . . . . . . 388
Gear Ranges . . . . . . . . . . . . . . . . . . . . . . . . . . 276
Shifting . . . . . . . . . . . . . . . . . . . . . . . . . . . . . 275
. . . . . . . . . . . . . . . . . . . . . . 390
Special Additives Torque Converter . . . . . . . . . . . . . . . . . . . . . . 280
Auxiliary Electrical Outlet (Power Outlet) . . . . . . . 116
Auxiliary Power Outlet . . . . . . . . . . . . . . . . . . . . 116
Axle Lock . . . . . . . . . . . . . . . . . . . . . . . . . . 285,286Battery . . . . . . . . . . . . . . . . . . . . . . . . . . . . . . . 376
Emergency Starting . . . . . . . . . . . . . . . . . . . . . 356
Keyless Transmitter Replacement (RKE) . . . . . . . 25
Belts, Drive . . . . . . . . . . . . . . . . . . . . . . . . . . . . 372
Belts, Seat . . . . . . . . . . . . . . . . . . . . . . . . . . . . . . 37
Body Mechanism Lubrication . . . . . . . . . . . . . . . 378
Brake Assist System . . . . . . . . . . . . . . . . . . . . . . 108
Brake Assist Warning Light . . . . . . . . . . . . . . . . . 209
Brake Control System, Electronic . . . . . . . . . . . . . 107
Brake System . . . . . . . . . . . . . . . . . . . . . . . . . . . 386
. . . . . . . . . . . . . . . . . . . . 107,296
Anti-Lock (ABS) . . . . . . . . . . . . . . . . . . . . . . . . . . . . . . 386
Hoses Master Cylinder . . . . . . . . . . . . . . . . . . . . . . . 387
Parking . . . . . . . . . . . . . . . . . . . . . . . . . . . . . 295
Warning Light . . . . . . . . . . . . . . . . . . . . . . . . 204
Brake/Transmission Interlock . . . . . . . . . . . . . . . 275
Break-In Recommendations, New Vehicle . . . . . . . . 77
Bulb Replacement . . . . . . . . . . . . . . . . . . . . . 408,409INDEX 451
Capacities, Fluid . . . . . . . . . . . . . . . . . . . . . . . . 412
Caps, FillerFuel . . . . . . . . . . . . . . . . . . . . . . . . . . . . . . . . 325
Power Steering . . . . . . . . . . . . . . . . . . . . . . . . 377
Car Washes . . . . . . . . . . . . . . . . . . . . . . . . . . . . 394
Carbon Monoxide Warning . . . . . . . . . . . . . . . . . 324
. . . . . . . . . . . . . . . . . . . . . . . . . . . . 97
Cargo Light Catalytic Converter . . . . . . . . . . . . . . . . . . . . . . 373
Caution, Exhaust Gas . . . . . . . . . . . . . . . . . . . . . . 78
CD (Compact Disc) Player Maintenance . . . . . . . . 251
Cellular Phone . . . . . . . . . . . . . . . . . . . . . . . . . . 252
Center High Mounted Stop Light . . . . . . . . . . . . 411
Certification Label . . . . . . . . . . . . . . . . . . . . . . . 328
Chains, Tire . . . . . . . . . . . . . . . . . . . . . . . . . . . . 315
Changing A Flat Tire . . . . . . . . . . . . . . . . . . . . . 352
Charging System Light . . . . . . . . . . . . . . . . . . . . 202
Chart, Tire Sizing . . . . . . . . . . . . . . . . . . . . . . . . 30110
452 INDEX
Check Engine Light (Malfunction Indicator Light) . . . . . . . . . . . . . 208,366
Child Restraint . . . . . . . . . . . . . . . . . . . . 64,65,71,75
Child Restraint Tether Anchors . . . . . . . . . . . . . 70,71
Child Seat . . . . . . . . . . . . . . . . . . . . . . . . . . . . . . 69
Climate Control . . . . . . . . . . . . . . . . . . . . . . . . . 252
Clock . . . . . . . . . . . . . . . . . . . . . . . . . . . 219,235,246
Compact Disc (CD) Maintenance . . . . . . . . . . . . . 251
Compass . . . . . . . . . . . . . . . . . . . . . . . . . . . . . . 211
Compass Calibration . . . . . . . . . . . . . . . . . . . . . 213
Console . . . . . . . . . . . . . . . . . . . . . . . . . . . . . . . 118
Console, Floor . . . . . . . . . . . . . . . . . . . . . . . . . . 118
Contract, Service . . . . . . . . . . . . . . . . . . . . . . . . 442
Converter, Catalytic . . . . . . . . . . . . . . . . . . . . . . 373
Cooling System . . . . . . . . . . . . . . . . . . . . . . . . . 380
Adding Coolant (Antifreeze) . . . . . . . . . . . . . . 382
Coolant Capacity . . . . . . . . . . . . . . . . . . . . . . 412
. . . . . . . . . . . . . . . . . . . . . . . . . 384
Coolant Level Disposal of Used Coolant . . . . . . . . . . . . . . . . 383Drain, Flush, and Refill . . . . . . . . . . . . . . . . . . 381
Inspection . . . . . . . . . . . . . . . . . . . . . . . . . . . 380
Points to Remember . . . . . . . . . . . . . . . . . . . . 384
Pressure Cap . . . . . . . . . . . . . . . . . . . . . . . . . 383
Selection of Coolant (Antifreeze) . . . . . . . . . 381,412
Temperature Gauge . . . . . . . . . . . . . . . . . . . . . 205
Corrosion Protection . . . . . . . . . . . . . . . . . . . . . 393
Crankcase Emission Control System . . . . . . . . . . 375
Cruise Light . . . . . . . . . . . . . . . . . . . . . . . . . . . 205
Cup Holder . . . . . . . . . . . . . . . . . . . . . . . . . . . . 117
Customer Assistance . . . . . . . . . . . . . . . . . . . . . 440Data Recorder, Event . . . . . . . . . . . . . . . . . . . . . . 62
Daytime Running Lights . . . . . . . . . . . . . . . . . . . 101
Dealer Service . . . . . . . . . . . . . . . . . . . . . . . . . . 368
Defroster, Rear Window . . . . . . . . . . . . . . . . . . . 195
Defroster, Windshield . . . . . . . . . . . . . . . 253,255,256
Delay (Intermittent) Wipers . . . . . . . . . . . . . . . . . 101
Diagnostic System, Onboard . . . . . . . . . . . . . . . . 365Dimmer Switch, Headlight Dipsticks
. . . . . . . . . . . . . . . . . 100
Oil (Engine)
. . . . . . . . . . . . . . . . . . . . . . . . . . 369
Disabled Vehicle Towing . . . . . . . . . . . . . . . . . . . 359
Disarming, Theft System . . . . . . . . . . . . . . . . . . . 19
DisposalEngine Oil Used Coolant (Antifreeze)
. . . . . . . . . . . . . . . . . . . . . . . . . . . 371
. . . . . . . . . . . . . . . . 383
Door Locks . . . . . . . . . . . . . . . . . . . . . . . . . . . 29,30
Doors . . . . . . . . . . . . . . . . . . . . . . . . . . . . . . . . . 26
. . . . . . . . . . . . . . . . . . . . . . . . . . . . 372
Drive Belts Driver’s Seat Back Tilt . . . . . . . . . . . . . . . . . . . . . 88
Driving . . . . . . . . . . . . . . . . . . . . . . . . . . . . . . . 289
Off-Pavement . . . . . . . . . . . . . . . . . . . . . . . . . 290
Off-Road . . . . . . . . . . . . . . . . . . . . . . . . . . . . 290
Dual Top . . . . . . . . . . . . . . . . . . . . . . . . . . . . . . 120Electrical Outlet, Auxiliary (Power Outlet) Electrical Power Outlets
. . . . . . 116
. . . . . . . . . . . . . . . . . . . 116INDEX 453
Electronic Brake Control System . . . . . . . . . . . . . 107
Anti-Lock Brake System . . . . . . . . . . . . . . . . . 107
Brake Assist System . . . . . . . . . . . . . . . . . . . . 108
Electronic Roll Mitigation . . . . . . . . . . . . . . . . 109
Electronic Stability Program . . . . . . . . . . . . . . . 110
Traction Control System . . . . . . . . . . . . . . . . . 108
. . . . . . . . . . . . . 109
Electronic Roll Mitigation (ERM) . . . . . . 104
Electronic Speed Control (Cruise Control) . . . . . . . . . . . . 110
Electronic Stability Program (ESP) . . . . . . 210
Electronic Throttle Control Warning Light Electronic Vehicle Information Center (EVIC) . . . . 210
Emergency Brake . . . . . . . . . . . . . . . . . . . . . . . . 295
Emergency, In Case ofBrake Warning Light . . . . . . . . . . . . . . . . . . . . 204
. . . . . . . . . . . . . . 205
Coolant Temperature Gauge Hazard Warning Flasher . . . . . . . . . . . . . . . . . 350
Jacking . . . . . . . . . . . . . . . . . . . . . . . . . . . . . 352
Jump Starting . . . . . . . . . . . . . . . . . . . . . . . . . 356
Tow Hooks . . . . . . . . . . . . . . . . . . . . . . . . . . 35810
454 INDEX
Emission Control System Maintenance . . . . . . 366,416
Engine. . . . . . . . . . . . . . . . . . . . . . . . . . 375
Air Cleaner . . . . . . . . . . . . . . . . . . . . . . . . . 269
Block Heater Break-In Recommendations . . . . . . . . . . . . . . . . 77
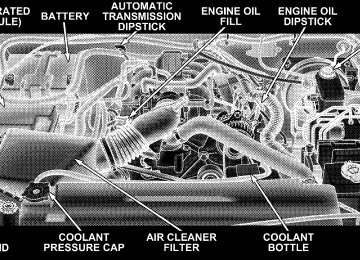
Compartment . . . . . . . . . . . . . . . . . . . . . . . . . 364
Compartment Identification . . . . . . . . . . . . . . . 364
Exhaust Gas Caution . . . . . . . . . . . . . . . . . . 78,324
Fails to Start . . . . . . . . . . . . . . . . . . . . . . . . . . 266
Flooded, Starting . . . . . . . . . . . . . . . . . . . . . . 266
Fuel Requirements . . . . . . . . . . . . . . . . . . 321,412
Jump Starting . . . . . . . . . . . . . . . . . . . . . . . . . 356
Oil . . . . . . . . . . . . . . . . . . . . . . . . . . . . . . 369,412
. . . . . . . . . . . . . . . . . . . . . . . . . . 371
Oil Disposal Oil Filter . . . . . . . . . . . . . . . . . . . . . . . . . . . . 372
Oil Selection . . . . . . . . . . . . . . . . . . . . . . . . . . 412
Overheating . . . . . . . . . . . . . . . . . . . . . . . . . . 351
Starting . . . . . . . . . . . . . . . . . . . . . . . . . . . . . 265
Temperature Gauge . . . . . . . . . . . . . . . . . . . . . 205Engine Oil Viscosity . . . . . . . . . . . . . . . . . . . . . . 371
. . . . . . . . . . . . . . . . . 371
Engine Oil Viscosity Chart Enhanced Accident Response Feature . . . . . . . . . . 61
Entry System, Illuminated . . . . . . . . . . . . . . . . . . 20
Event Data Recorder . . . . . . . . . . . . . . . . . . . . . . 62
Exhaust Gas Caution . . . . . . . . . . . . . . . . . . . 78,324
Exhaust System . . . . . . . . . . . . . . . . . . . . . . . . . 380
Extender, Seat Belt . . . . . . . . . . . . . . . . . . . . . . . . 46
Exterior Finish Care . . . . . . . . . . . . . . . . . . . . . . 394Fabric Care . . . . . . . . . . . . . . . . . . . . . . . . . 396,398
Fabric Top . . . . . . . . . . . . . . . . . . . . . . . . . . . . . 398
FiltersAir Cleaner Engine Fuel Engine Oil
. . . . . . . . . . . . . . . . . . . . . . . . . . 375
. . . . . . . . . . . . . . . . . . . . . . . . . . 375
. . . . . . . . . . . . . . . . . . . . . . . . . . . 372
Finish Care . . . . . . . . . . . . . . . . . . . . . . . . . . . . 394
FlashersHazard Warning . . . . . . . . . . . . . . . . . . . . . . . 350
Turn Signal
. . . . . . . . . . . . . . . . . . . . . 203,410,411
Flooded Engine Starting . . . . . . . . . . . . . . . . . . . 266
Fluid Capacities . . . . . . . . . . . . . . . . . . . . . . . . . 412
Fluid Level Checks . . . . . . . . . . . . . . . . . . . . . . 392
Automatic Transmission . . . . . . . . . . . . . . . . . 388
Engine Oil . . . . . . . . . . . . . . . . . . . . . . . . . . . 369
Manual Transmission . . . . . . . . . . . . . . . . . . . 391
Power Steering . . . . . . . . . . . . . . . . . . . . . . . . 377
Fluids, Lubricants and Genuine Parts . . . . . . . . . . 413
Fog Light Service . . . . . . . . . . . . . . . . . . . . . . . . 410
Fog Lights . . . . . . . . . . . . . . . . . . . . . . . . . . 100,410
Fold and Tumble Rear Seat . . . . . . . . . . . . . . . . . . 90
Folding Rear Seat . . . . . . . . . . . . . . . . . . . . . . . . 93
Folding Windshield . . . . . . . . . . . . . . . . . . . . . . 187
Four Wheel Drive . . . . . . . . . . . . . . . . . . . . . . . 280
Shifting . . . . . . . . . . . . . . . . . . . . . . . . . . . . . 282
Four Wheel Drive Operation . . . . . . . . . . . . . . . . 280
Four-Way Hazard Flasher . . . . . . . . . . . . . . . . . . 350
Front Axle (Differential) . . . . . . . . . . . . . . . . . . . 392INDEX 455
Fuel
. . . . . . . . . . . . . . . . . . . . . . . . . . . . . . . . . 321
Filler Cap (Gas Cap) . . . . . . . . . . . . . . . . . . . . 325
Filter . . . . . . . . . . . . . . . . . . . . . . . . . . . . . . . 375
Gasoline . . . . . . . . . . . . . . . . . . . . . . . . . . . . 321
Gauge . . . . . . . . . . . . . . . . . . . . . . . . . . . . . . 202
Materials Added . . . . . . . . . . . . . . . . . . . . . . . 323
Octane Rating . . . . . . . . . . . . . . . . . . . . . . . . 321
Requirements . . . . . . . . . . . . . . . . . . . . . . . . . 412
Tank Capacity . . . . . . . . . . . . . . . . . . . . . . . . 412
Fuel System Caution . . . . . . . . . . . . . . . . 324,326,327
Fuses . . . . . . . . . . . . . . . . . . . . . . . . . . . . . . . . 400. . . . . . . . . . . . . . . 325,366
Gas Cap (Fuel Filler Cap) Gasoline (Fuel) . . . . . . . . . . . . . . . . . . . . . . . . . 321
Gasoline, Reformulated . . . . . . . . . . . . . . . . . . . 322
Gasoline/Oxygenate Blends . . . . . . . . . . . . . . . . 322
GaugesCoolant Temperature . . . . . . . . . . . . . . . . . . . . 205
Fuel . . . . . . . . . . . . . . . . . . . . . . . . . . . . . . . . 20210
456 INDEX
. . . . . . . . . . . . . . . . . . . . . . . . . . . 208
Odometer . . . . . . . . . . . . . . . . . . . . . . . . . 202
Speedometer . . . . . . . . . . . . . . . . . . . . . . . . . . 205
Tachometer . . . . . . . . . . . . . . . . . . . . . . . . 271,276
Gear Ranges General Information . . . . . . . . . . . . . . . . . . . . . . 321
Glass Cleaning . . . . . . . . . . . . . . . . . . . . . . . . . . 397
Gross Axle Weight Rating . . . . . . . . . . . . . . . . . . 331
Gross Vehicle Weight Rating . . . . . . . . . . . . . . . . 330
GVWR . . . . . . . . . . . . . . . . . . . . . . . . . . . . . . . 328Hard Top . . . . . . . . . . . . . . . . . . . . . . . . . . . . . 125
Hard Top, Modular . . . . . . . . . . . . . . . . . . . . . . 125
Hard Top Removal . . . . . . . . . . . . . . . . . . . . . . . 129
Hazard Warning Flasher . . . . . . . . . . . . . . . . . . . 350
Head Restraints . . . . . . . . . . . . . . . . . . . . . . . . . . 90
Head Rests . . . . . . . . . . . . . . . . . . . . . . . . . . . . . 90
HeadlightsBulb Replacement . . . . . . . . . . . . . . . . . . . . . . 409
Dimmer Switch . . . . . . . . . . . . . . . . . . . . . . . 100Replacing . . . . . . . . . . . . . . . . . . . . . . . . . . . . 409
Switch . . . . . . . . . . . . . . . . . . . . . . . . . . . . . . . 99
Heater . . . . . . . . . . . . . . . . . . . . . . . . . . . . . . . 252
Heater, Engine Block . . . . . . . . . . . . . . . . . . . . . 269
High Beam Indicator . . . . . . . . . . . . . . . . . . . . . 203
HitchesTrailer Towing . . . . . . . . . . . . . . . . . . . . . . . . 334
Holder, Cup . . . . . . . . . . . . . . . . . . . . . . . . . . . 117
Hood Release . . . . . . . . . . . . . . . . . . . . . . . . . . . 96
Hoses . . . . . . . . . . . . . . . . . . . . . . . . . . . . . 385,386
Hydraulic Clutch Fluid . . . . . . . . . . . . . . . . . . . . 390Ignition . . . . . . . . . . . . . . . . . . . . . . . . . . . . . . . 14
Key . . . . . . . . . . . . . . . . . . . . . . . . . . . . . . . . . 14
Ignition Key Removal . . . . . . . . . . . . . . . . . . . . . 14
Illuminated Entry . . . . . . . . . . . . . . . . . . . . . . . . 20
Infant Restraint . . . . . . . . . . . . . . . . . . . . . . . . . . 65
Inflation Pressure Tires . . . . . . . . . . . . . . . . . . . . 309
Inside Rearview Mirror . . . . . . . . . . . . . . . . . . . . 85INDEX 457
Instrument Cluster . . . . . . . . . . . . . . . . . . . . . . . 201
Instrument Panel and Controls . . . . . . . . . . . . . . 200
Instrument Panel Lens Cleaning . . . . . . . . . . . . . 397
Integrated Power Module (Fuses) . . . . . . . . . . . . 400
Interior Appearance Care . . . . . . . . . . . . . . . . . . 396
Interior Lights . . . . . . . . . . . . . . . . . . . . . . . . . . . 97
Intermittent Wipers (Delay Wipers) . . . . . . . . . . . 101
Introduction . . . . . . . . . . . . . . . . . . . . . . . . . . . . . 4Jack Location . . . . . . . . . . . . . . . . . . . . . . . . . . . 352
Jack Operation . . . . . . . . . . . . . . . . . . . . . . . 352,354
Jacking Instructions . . . . . . . . . . . . . . . . . . . . . . 354
Jump Starting . . . . . . . . . . . . . . . . . . . . . . . . . . 356Key, Programming . . . . . . . . . . . . . . . . . . . . . . . . 18
Key, Replacement . . . . . . . . . . . . . . . . . . . . . . . . 17
Key, Sentry (Immobilizer) . . . . . . . . . . . . . . . . . . . 16
Key-In Reminder . . . . . . . . . . . . . . . . . . . . . . . . . 15
Keyless Entry System . . . . . . . . . . . . . . . . . . . . . . 20Keys
. . . . . . . . . . . . . . . . . . . . . . . . . . . . . . . . . 14
. . . . . . . . . . . . . . 203
Lane Change and Turn Signals . . . . . . . . . . . . . . . . . . . . . . . . . . . . . . 37
Lap Belts Lap/Shoulder Belts . . . . . . . . . . . . . . . . . . . . . . . 37
LATCH . . . . . 70,71
(Lower Anchors and Tether for CHildren) . . . . . . . . . . . . . . . . . . . . . . 321
Lead Free Gasoline Lights . . . . . . . . . . . . . . . . . . . . . . . . . . . . . . . . . 97
Airbag . . . . . . . . . . . . . . . . . . . . . . . . . . . . 62,204
Anti-Lock . . . . . . . . . . . . . . . . . . . . . . . . . . . 204
Anti-Lock Warning . . . . . . . . . . . . . . . . . . . . . 204
Back-Up . . . . . . . . . . . . . . . . . . . . . . . . . . . . . 411
Brake Assist Warning . . . . . . . . . . . . . . . . . 115,209
Brake Warning . . . . . . . . . . . . . . . . . . . . . . . . 204
Bulb Replacement . . . . . . . . . . . . . . . . . . . . . . 409
Cargo . . . . . . . . . . . . . . . . . . . . . . . . . . . . . . . 97
Center Mounted Stop . . . . . . . . . . . . . . . . . . . 411
Check Engine (Malfunction Indicator) . . . . . . . . 20810
458 INDEX
Cruise . . . . . . . . . . . . . . . . . . . . . . . . . . . . . . 205
Daytime Running . . . . . . . . . . . . . . . . . . . . . . 101
Dimmer Switch, Headlight . . . . . . . . . . . . . . . 100
Electronic Stability Program (ESP) Indicator . . . . . . . . . . . . . . . . . . . . . . . 115,208,209
Electronic Throttle Control Warning . . . . . . . . . 210
Engine Temperature Warning . . . . . . . . . . . . . . 205
Fog . . . . . . . . . . . . . . . . . . . . . . . . . . . . . 100,410
Hazard Warning Flasher . . . . . . . . . . . . . . . . . 350
Headlight Switch . . . . . . . . . . . . . . . . . . . . . . . 99
Headlights . . . . . . . . . . . . . . . . . . . . . . . . . . . 409
High Beam . . . . . . . . . . . . . . . . . . . . . . . . . . . 203
High Beam Indicator . . . . . . . . . . . . . . . . . . . . 203
Instrument Cluster . . . . . . . . . . . . . . . . . . . . . . 99
. . . . . . . . . . . . . . . . . . . . . . . . . . . . . . 97
Interior Lights On Reminder . . . . . . . . . . . . . . . . . . . . 100
Low Fuel . . . . . . . . . . . . . . . . . . . . . . . . . . . . 202
Low Tire . . . . . . . . . . . . . . . . . . . . . . . . . . . . 206
Oil Pressure . . . . . . . . . . . . . . . . . . . . . . . . . . 203Passing . . . . . . . . . . . . . . . . . . . . . . . . . . . . . 100
Rear Servicing . . . . . . . . . . . . . . . . . . . . . . . . 411
. . . . . . . . . . . . . . . . . . . . . . . . . . . . 411
Rear Tail Seat Belt Reminder . . . . . . . . . . . . . . . . . . . . . 203
Sentry Key . . . . . . . . . . . . . . . . . . . . . . . . . . . 205
Service . . . . . . . . . . . . . . . . . . . . . . . . . . . . . . 409
Side Marker . . . . . . . . . . . . . . . . . . . . . . . . . . 411
Tire Pressure Monitoring (TPMS) . . . . . . . . . . . 206
Traction Control . . . . . . . . . . . . . . . . . . . . . . . 208
. . . . . . . . . . . . . . . . . . 100,203,410,411
Turn Signal Warning (Instrument Cluster Description) . . . . . 202
Loading Vehicle . . . . . . . . . . . . . . . . . . . . . . . . . 328
. . . . . . . . . . . . . . . . . . . . . . . . . . . . . . . 304
Locking Axle . . . . . . . . . . . . . . . . . . . . . . . . 285,286
LocksTires
Door . . . . . . . . . . . . . . . . . . . . . . . . . . . . . . 29,30
Power Door . . . . . . . . . . . . . . . . . . . . . . . . . . . 31
Steering Wheel . . . . . . . . . . . . . . . . . . . . . . . . . 15Lower Anchors and Tether for CHildren (LATCH) . . . . . . . . . . . . . . . . . . . . . . . . . . . . 70,71
Lubrication, Body . . . . . . . . . . . . . . . . . . . . . . . 378Maintenance Free Battery . . . . . . . . . . . . . . . . . . 376
Maintenance Procedures . . . . . . . . . . . . . . . . . . . 369
Maintenance Schedule . . . . . . . . . . . . . . . . . . . . 416
Schedule “A” . . . . . . . . . . . . . . . . . . . . . . . . . 432
Schedule “B” . . . . . . . . . . . . . . . . . . . . . . . . . 419
Maintenance Schedules . . . . . . . . . . . . . . . . . . . . 416
Malfunction Indicator Light (Check Engine) . . 208,366
Manual, Service . . . . . . . . . . . . . . . . . . . . . . . . . 444
Manual Transmission . . . . . . . . . . . . . . . . . . 269,390
Fluid Level Check . . . . . . . . . . . . . . . . . . . . . . 391
Lubricant Selection . . . . . . . . . . . . . . . . . . . . . 390
Shift Speeds . . . . . . . . . . . . . . . . . . . . . . . . . . 271
Master Cylinder (Brakes) . . . . . . . . . . . . . . . . . . 387
Mini-Trip Computer . . . . . . . . . . . . . . . . . . . . . . 211
Mirrors . . . . . . . . . . . . . . . . . . . . . . . . . . . . . . . . 85INDEX 459
Outside . . . . . . . . . . . . . . . . . . . . . . . . . . . . . . 86
Rearview . . . . . . . . . . . . . . . . . . . . . . . . . . . . . 85
Modifications/Alterations, Vehicle . . . . . . . . . . . . . 9
Modular Hard Top . . . . . . . . . . . . . . . . . . . . . . . 125
Monitor, Tire Pressure System . . . . . . . . . . . . . . . 317
Mopar Parts . . . . . . . . . . . . . . . . . . . . . . . . . 368,443
Multi-Function Control Lever . . . . . . . . . . . . . . . . 98Navigation Radio . . . . . . . . . . . . . . . . . . . . . . . . 245
Navigation System . . . . . . . . . . . . . . . . . . . . . . . 245
New Vehicle Break-In Period . . . . . . . . . . . . . . . . 77Occupant Restraints . . . . . . . . . . . . . . . . . . . . . . . 36
Octane Rating, Gasoline (Fuel) . . . . . . . . . . . . . . 321
. . . . . . . . . . . . . . . . . . . . . . . . . . 208,210
Odometer Trip . . . . . . . . . . . . . . . . . . . . . . . . . . 206,208,210
. . . . . . . . . . . . 290
. . . . . . . . . . . . 290Off-Pavement Driving (Off-Road) Off-Road Driving (Off-Pavement)
10
460 INDEX
Oil, Engine . . . . . . . . . . . . . . . . . . . . . . . . . . . . 369
Capacity . . . . . . . . . . . . . . . . . . . . . . . . . . . . 412
Dipstick . . . . . . . . . . . . . . . . . . . . . . . . . . . . . 369
Filter . . . . . . . . . . . . . . . . . . . . . . . . . . . . . . . 372
Identification Logo . . . . . . . . . . . . . . . . . . . . . 371
Materials Added to . . . . . . . . . . . . . . . . . . . . . 371
Pressure Warning Light . . . . . . . . . . . . . . . . . . 203
Recommendation . . . . . . . . . . . . . . . . . . . 371,412
Viscosity . . . . . . . . . . . . . . . . . . . . . . . . . . 371,412
Oil Pressure Light . . . . . . . . . . . . . . . . . . . . . . . 203
Onboard Diagnostic System . . . . . . . . . . . . . . 365,366
Outside Rearview Mirrors . . . . . . . . . . . . . . . . . . 86
Overheating, Engine . . . . . . . . . . . . . . . . . . . . . . 351
Owner’s Manual (Operator Manual) . . . . . . . . . . 444Paint Care . . . . . . . . . . . . . . . . . . . . . . . . . . . . . 393
Paint Damage . . . . . . . . . . . . . . . . . . . . . . . . . . 393
Panic Alarm . . . . . . . . . . . . . . . . . . . . . . . . . . . . 22
Parking Brake . . . . . . . . . . . . . . . . . . . . . . . . . . 295Passing Light . . . . . . . . . . . . . . . . . . . . . . . . . . . 100
PCV Valve . . . . . . . . . . . . . . . . . . . . . . . . . . . . 375
Pets . . . . . . . . . . . . . . . . . . . . . . . . . . . . . . . . . . 77
Placard, Tire and Loading Information . . . . . . . . . 305
Polishing and Waxing . . . . . . . . . . . . . . . . . . . . . 394
Power. . . . . . . . . . . . . . . 400
Distribution Center (Fuses) . . . . . . . . . . . . . . . . . . . . . . . . . . . 31
Door Locks Steering . . . . . . . . . . . . . . . . . . . . . . . . . . 298,377
Windows . . . . . . . . . . . . . . . . . . . . . . . . . . . . . 32
Pregnant Women and Seat Belts . . . . . . . . . . . . . . 46
Preparation for Jacking . . . . . . . . . . . . . . . . . . . . 353
PretensionersSeat Belts . . . . . . . . . . . . . . . . . . . . . . . . . . . . . 44
Programming Transmitters (Remote Keyless Entry)
. . . . . . . . . . . . . . . . . . . . 23
Radial Ply Tires . . . . . . . . . . . . . . . . . . . . . . . . . 312
Radio Broadcast Signals . . . . . . . . . . . . . . . . . . . 216Radio, Navigation . . . . . . . . . . . . . . . . . . . . . . . 245
Radio Operation . . . . . . . . . . . . . . . . . . . . . . . . 252
Radio, Satellite . . . . . . . . . . . . . . . . . . . . . . . 246,247
Rear Axle (Differential) . . . . . . . . . . . . . . . . . . . . 392
Rear Swing Gate . . . . . . . . . . . . . . . . . . . . . . . . . 34
Rear Window Defroster . . . . . . . . . . . . . . . . . . . 195
Rear Window Features . . . . . . . . . . . . . . . . . . . . 193
Rear Wiper/Washer . . . . . . . . . . . . . . . . . . . . . . 193
Rearview Mirrors . . . . . . . . . . . . . . . . . . . . . . . . 85
Recorder, Event Data . . . . . . . . . . . . . . . . . . . . . . 62
Recreational Towing . . . . . . . . . . . . . . . . . . . . . . 346
. . . . . . . 346
. . . . . 347
Reformulated Gasoline . . . . . . . . . . . . . . . . . . . . 322
Refrigerant . . . . . . . . . . . . . . . . . . . . . . . . . . . . 377
Release, Hood . . . . . . . . . . . . . . . . . . . . . . . . . . . 96
Reminder, Lights On . . . . . . . . . . . . . . . . . . . . . 100
. . . . . . . . . . . . . . . . . . . . . . . 45
Reminder, Seat BeltShifting into Transfer Case Neutral (N) Shifting out of Transfer Case Neutral (N)
INDEX 461
Remote Control
Door Locks
. . . . . . . . . . . . . . . . . . . . . . . . . . . 20
Remote Keyless Entry (RKE) . . . . . . . . . . . . . . . . . 20
Replacement Bulbs . . . . . . . . . . . . . . . . . . . . . . . 408
Replacement Parts . . . . . . . . . . . . . . . . . . . . . . . 368
Replacement Tires . . . . . . . . . . . . . . . . . . . . . . . 314
Reporting Safety Defects . . . . . . . . . . . . . . . . . . . 443
Restraint, Head . . . . . . . . . . . . . . . . . . . . . . . . . . 90
Restraints, Child . . . . . . . . . . . . . . . . . . . . . . . 64,69
Restraints, Occupant . . . . . . . . . . . . . . . . . . . . . . 36
Rotation, Tires . . . . . . . . . . . . . . . . . . . . . . . . . . 316Safety Checks Inside Vehicle . . . . . . . . . . . . . . . . . 79
Safety Checks Outside Vehicle . . . . . . . . . . . . . . . 80
Safety Defects, Reporting . . . . . . . . . . . . . . . . . . 443
Safety Information, Tire . . . . . . . . . . . . . . . . . . . 300
Safety Tips . . . . . . . . . . . . . . . . . . . . . . . . . . . . . 78
Satellite Radio . . . . . . . . . . . . . . . . . . . . . . . 246,24710
462 INDEX
Satellite Radio Antenna . . . . . . . . . . . . . . . . . . . 248
Schedule, Maintenance . . . . . . . . . . . . . . . . . . . . 416
Seat Belt Reminder . . . . . . . . . . . . . . . . . . . . . . . 45
. . . . . . . . . . . . . . . . . . . . . . . . . . . . . . 37
Seat Belts Adjustable Upper Shoulder Anchorage . . . . . . . . 43
And Pregnant Women . . . . . . . . . . . . . . . . . . . 46
Child Restraint . . . . . . . . . . . . . . . . . . . . . . . 64,75
Extender . . . . . . . . . . . . . . . . . . . . . . . . . . . . . 46
Front Seat . . . . . . . . . . . . . . . . . . . . . . . . . . . . 37
Maintenance . . . . . . . . . . . . . . . . . . . . . . . . . . 397
Pretensioners . . . . . . . . . . . . . . . . . . . . . . . . . . 44
Reminder . . . . . . . . . . . . . . . . . . . . . . . . . . . . 203
. . . . . . . . . . . . . . . . . . . . . . . . . . . . . . . . . 87
Adjustment . . . . . . . . . . . . . . . . . . . . . . . . . . . 87
Cleaning . . . . . . . . . . . . . . . . . . . . . . . . . . . . 396
Easy Entry . . . . . . . . . . . . . . . . . . . . . . . . . . . . 89
Fold and Tumble Rear . . . . . . . . . . . . . . . . . . . 90
Head Restraints . . . . . . . . . . . . . . . . . . . . . . . . 90
Height Adjustment . . . . . . . . . . . . . . . . . . . . . . 88Seats
Rear Folding . . . . . . . . . . . . . . . . . . . . . . . . . . 93
. . . . . . . . . . . . . . . . . . . . . . . . . . . 92,93
Removal Seatback Release . . . . . . . . . . . . . . . . . . . . . . . 88
Tilting . . . . . . . . . . . . . . . . . . . . . . . . . . . . . . . 88
. . . . . . . . . . . . . . . . . . . . . 19
Security Against Theft . . . . . . . . . . . . . . . . 19
Security Alarm (Theft Alarm) . . . . . . . . . . . . . . . . . . . . . . . . . 371
Selection of Oil . . . . . . . . . . . . . . . . . . . 16
Sentry Key (Immobilizer) Sentry Key Programming . . . . . . . . . . . . . . . . . . . 18
. . . . . . . . . . . . . . . . . . . 17
Sentry Key Replacement Service Assistance . . . . . . . . . . . . . . . . . . . . . . . 440
Service Contract . . . . . . . . . . . . . . . . . . . . . . . . . 442
Service Manuals . . . . . . . . . . . . . . . . . . . . . . . . 444
Setting the Clock . . . . . . . . . . . . . . . . . . 219,235,246
Shift Lock Manual Override . . . . . . . . . . . . . . . . 274
Shift Speeds, Manual Transmission . . . . . . . . . . . 271
Shifting . . . . . . . . . . . . . . . . . . . . . . . . . . . . . . . 273
Automatic Transmission . . . . . . . . . . . . . . . . . 275
Manual Transmission . . . . . . . . . . . . . . . . . . . 269Shoulder Belt Upper Anchorage . . . . . . . . . . . . . . 43
Shoulder Belts . . . . . . . . . . . . . . . . . . . . . . . . . . . 37
Side Airbag . . . . . . . . . . . . . . . . . . . . . . . . . . . . . 58
Signals, Turn . . . . . . . . . . . . . . . . . . . 100,203,410,411
Snow Chains (Tire Chains) . . . . . . . . . . . . . . . . . 315
Soft Top . . . . . . . . . . . . . . . . . . . . . . . . . . . 141,164
Spare Tire . . . . . . . . . . . . . . . . . . . . . . . . . . . . . 353
Spark Plugs . . . . . . . . . . . . . . . . . . . . . . . . . . . . 373
SpecificationsFuel (Gasoline) Oil
. . . . . . . . . . . . . . . . . . . . . . . . 321
. . . . . . . . . . . . . . . . . . . . . . . . . . . . . . . . 371
. . . . . . . . . . . . . . 104
Speed Control (Cruise Control) Speedometer . . . . . . . . . . . . . . . . . . . . . . . . . . . 202
Starting . . . . . . . . . . . . . . . . . . . . . . . . . . . . . . . 265
Automatic Transmission . . . . . . . . . . . . . . . . . 265
Cold Weather . . . . . . . . . . . . . . . . . . . . . . . . . 266
Engine Block Heater . . . . . . . . . . . . . . . . . . . . 269
Engine Fails to Start . . . . . . . . . . . . . . . . . . . . 266
Manual Transmission . . . . . . . . . . . . . . . . . . . 265INDEX 463
Steering Power . . . . . . . . . . . . . . . . . . . . . . . . . . . 298,377
Tilt Column . . . . . . . . . . . . . . . . . . . . . . . . . . 103
Wheel Lock . . . . . . . . . . . . . . . . . . . . . . . . . . . 15
. . . . . . . . . . . . . . . . . . . . . . . . . . . 103
Wheel, Tilt Storage . . . . . . . . . . . . . . . . . . . . . . . . . . . . 118,407
Storage, Behind the Seat . . . . . . . . . . . . . . . . . . . 119
Storage, Vehicle . . . . . . . . . . . . . . . . . . . . . . 259,407
Storing Your Vehicle . . . . . . . . . . . . . . . . . . . . . . 407
Sunrider . . . . . . . . . . . . . . . . . . . . . . . . . . . . . . 160
Supplemental Restraint System - Airbag . . . . . . . . 47
Sway Bar Disconnect, Electronic . . . . . . . . . . . . . 287
Swing Gate, Rear . . . . . . . . . . . . . . . . . . . . . . . . . 34
System, Navigation . . . . . . . . . . . . . . . . . . . . . . 245. . . . . . . . . . . . . . . . . . . . . . . . . . . . 205
Tachometer . . . . . . . . . . 205
Temperature Gauge, Engine Coolant Tether Anchor, Child Restraint . . . . . . . . . . . . . . . 70
Theft System Arming . . . . . . . . . . . . . . . . . . . . . . 1910
464 INDEX
Theft System Disarming . . . . . . . . . . . . . . . . . . . . 19
Tilt Steering Column . . . . . . . . . . . . . . . . . . . . . 103
Tip Start . . . . . . . . . . . . . . . . . . . . . . . . . . . . . . 266
Tire and Loading Information Placard . . . . . . 304,305
Tire Identification Number (TIN) . . . . . . . . . . . . . 303
Tire Markings . . . . . . . . . . . . . . . . . . . . . . . . . . 300
Tire Safety Information . . . . . . . . . . . . . . . . . . . . 300
Tires . . . . . . . . . . . . . . . . . . . . . . . . . . . . . . 308,446
Air Pressure . . . . . . . . . . . . . . . . . . . . . . . . . . 309
Alignment and Balance . . . . . . . . . . . . . . . . . . 315
Chains . . . . . . . . . . . . . . . . . . . . . . . . . . . . . . 315
Changing . . . . . . . . . . . . . . . . . . . . . . . . . . . . 352
General Information . . . . . . . . . . . . . . . . . . . . 308
High Speed . . . . . . . . . . . . . . . . . . . . . . . . . . 311
Inflation Pressures . . . . . . . . . . . . . . . . . . . . . 309
Jacking . . . . . . . . . . . . . . . . . . . . . . . . . . . 352,354
Load Capacity . . . . . . . . . . . . . . . . . . . . . 304,305
Pressure Monitor System (TPMS) . . . . . . . . . . . 317
. . . . . . . . . . . . . . . . . . 206
Pressure Warning LightQuality Grading . . . . . . . . . . . . . . . . . . . . . . . 446
. . . . . . . . . . . . . . . . . . . . . . . . . . . . . . 312
Radial Replacement . . . . . . . . . . . . . . . . . . . . . . . . . 314
Rotation . . . . . . . . . . . . . . . . . . . . . . . . . . . . . 316
Safety . . . . . . . . . . . . . . . . . . . . . . . . . . . . . . 300
Sizes . . . . . . . . . . . . . . . . . . . . . . . . . . . . . . . 301
Spare Tire . . . . . . . . . . . . . . . . . . . . . . . . . . . 353
Spinning . . . . . . . . . . . . . . . . . . . . . . . . . . . . 312
Tread Wear Indicators . . . . . . . . . . . . . . . . . . . 312
To Open Hood . . . . . . . . . . . . . . . . . . . . . . . . . . 96
Tongue Weight/Trailer Weight . . . . . . . . . . . . . . 338
Torque Converter Clutch . . . . . . . . . . . . . . . . . . 280
Tow Hooks, Emergency . . . . . . . . . . . . . . . . . . . 358
Towing . . . . . . . . . . . . . . . . . . . . . . . . . . . . 330,359
Disabled Vehicle . . . . . . . . . . . . . . . . . . . . . . . 359
Guide . . . . . . . . . . . . . . . . . . . . . . . . . . . . . . 335
Recreational . . . . . . . . . . . . . . . . . . . . . . . . . . 346
Weight . . . . . . . . . . . . . . . . . . . . . . . . . . . . . . 335
. . . . . . . . . . . . . . . . . . . . . . 284Trac-Lok Rear Axle
Traction Control . . . . . . . . . . . . . . . . . . . . . . . . . 108
Traction Control Light . . . . . . . . . . . . . . . . . . . . 208
Trailer Towing . . . . . . . . . . . . . . . . . . . . . . . . . . 330
Cooling System Tips . . . . . . . . . . . . . . . . . . . . 345
. . . . . . . . . . . . . . . . . . . . . . . . . . 321,334
Hitches Minimum Requirements . . . . . . . . . . . . . . . . . 339
Trailer and Tongue Weight . . . . . . . . . . . . . . . . 338
Wiring . . . . . . . . . . . . . . . . . . . . . . . . . . . . . . 343
Trailer Towing Guide . . . . . . . . . . . . . . . . . . . . . 335
Trailer Weight . . . . . . . . . . . . . . . . . . . . . . . . . . 335
Transfer Case . . . . . . . . . . . . . . . . . . . . . . . . . . . 391
Four-Wheel-Drive Operation . . . . . . . . . . . . . . 280
Maintenance . . . . . . . . . . . . . . . . . . . . . . . . . . 391Transmission Automatic . . . . . . . . . . . . . . . . . . . . . . . . . . . 275
Maintenance . . . . . . . . . . . . . . . . . . . . . . . 388,390
Manual . . . . . . . . . . . . . . . . . . . . . . . . . . . . . 269
Range Indicator . . . . . . . . . . . . . . . . . . . . . . . 206
Shifting . . . . . . . . . . . . . . . . . . . . . . . . . . . . . 273INDEX 465
. . . . . . . . . . . . . . . . . . . . 25
Transmitter Battery Service (Remote Keyless Entry) Transmitter Programming . . . . . . . . . . . . . . . . . . . . 23
(Remote Keyless Entry) . . . . . . . . . . . . . . . . . . . . . . . . 77
Transporting Pets Tread Wear Indicators . . . . . . . . . . . . . . . . . . . . 312
Trip Computer . . . . . . . . . . . . . . . . . . . . . . . . . . 211
Trip Odometer . . . . . . . . . . . . . . . . . . . . . . . . . . 208
Trip Odometer Reset Button . . . . . . . . . . . . . . . . 206
Turn Signals . . . . . . . . . . . . . . . . . . . 100,203,410,411Uniform Tire Quality Grades . . . . . . . . . . . . . . . . 446
. . . . . . . . . . . . . . . . . . . . . . . . 396
Upholstery CareVacuum/Vapor Harnesses . . . . . . . . . . . . . . . . . 385
Vehicle Identification Number (VIN) . . . . . . . . . . . . 9
Vehicle Loading . . . . . . . . . . . . . . . . . . . . . . 305,328
Vehicle Modifications/Alterations . . . . . . . . . . . . . . 9
Vehicle Storage . . . . . . . . . . . . . . . . . . . . . . . 259,40710
466 INDEX
Viscosity, Engine Oil . . . . . . . . . . . . . . . . . . . . . . 371
Warning Flasher, Hazard . . . . . . . . . . . . . . . . . . 350
Warning Lights (Instrument Cluster Description) . . . . . . . . . . . . . 202
Warnings and Cautions . . . . . . . . . . . . . . . . . . . . . 9
Warranty Information . . . . . . . . . . . . . . . . . . . . . 443
Washer, Adding Fluid . . . . . . . . . . . . . . . . . . . . . 194
Washers, Windshield . . . . . . . . . . . . . . . . . . . . . 379
Waxing and Polishing . . . . . . . . . . . . . . . . . . . . . 394
Wheel Alignment and Balance . . . . . . . . . . . . . . . 315
Wheel and Wheel Trim . . . . . . . . . . . . . . . . . . . . 396
Wheel and Wheel Trim Care . . . . . . . . . . . . . . . . 396Wheel Mounting . . . . . . . . . . . . . . . . . . . . . . . . 355
Wind Buffeting . . . . . . . . . . . . . . . . . . . . . . . . . . 34
Window Fogging . . . . . . . . . . . . . . . . . . . . . . . . 258
Windows . . . . . . . . . . . . . . . . . . . . . . . . . . . . . . 32
Power . . . . . . . . . . . . . . . . . . . . . . . . . . . . . . . 32
Windshield, Folding . . . . . . . . . . . . . . . . . . . . . . 187
Windshield Washers . . . . . . . . . . . . . . . . . . . 101,379
Fluid . . . . . . . . . . . . . . . . . . . . . . . . . . . . . . . 379
Windshield Wiper Blades . . . . . . . . . . . . . . . . . . 379
Windshield Wipers . . . . . . . . . . . . . . . . . . . . . . . 101
Wiper, Rear . . . . . . . . . . . . . . . . . . . . . . . . . . . . 193YES Essentials威 Fabric Cleaning Procedure . . . . . . 396
INTRODUCTION INTRODUCTION Roll Over WarningHOW TO USE THIS MANUAL WARNINGS AND CAUTIONS VEHICLE IDENTIFICATION NUMBER VEHICLE MODIFICATIONS/ALTERATIONS THINGS TO KNOW BEFORE STARTING YOUR VEHICLE A WORD ABOUT YOUR KEYS Ignition Key RemovalKey-In-Ignition ReminderSTEERING WHEEL LOCK - IF EQUIPPED To Manually Lock the Steering WheelTo Release the Steering Wheel LockSENTRY KEY IMMOBILIZER SYSTEM Important Note About ServiceReplacement KeysCustomer Key ProgrammingGeneral InformationSECURITY ALARM SYSTEM - IF EQUIPPED To Set the AlarmTo Disarm the SystemILLUMINATED ENTRY REMOTE KEYLESS ENTRY - IF EQUIPPED To Unlock the Doors and Swing GateTo Lock the Doors and Swing GateUsing The Panic AlarmTo Turn Off Flash Lights With LockProgramming Additional TransmittersGeneral InformationBattery ReplacementDOORS Front Door RemovalRear Door Removal (4 Door Models)DOOR LOCKS Manual Door LocksPower Door Locks - If EquippedWINDOWS Power Windows - If EquippedWind BuffetingREAR SWING GATE OCCUPANT RESTRAINTS Lap/Shoulder BeltsRear Center Lap/Shoulder Belt Retractor Lock-OutAdjustable Upper Shoulder Belt AnchorageSeat Belt PretensionersEnhanced Seat Belt Use Reminder System (BeltAlert)Seat Belts And Pregnant WomenSeat Belt ExtenderDriver And Front Passenger Supplemental Restraint Systems (SRS) Child RestraintENGINE BREAK-IN RECOMMENDATIONS SAFETY TIPS Exhaust GasSafety Checks You Should Make Inside The VehicleSafety Checks You Should Make Outside The VehicleUNDERSTANDING THE FEATURES OF YOUR VEHICLE MIRRORS Inside Day/Night MirrorOutside MirrorsSEATS Front Seat AdjustmentManual Seat Height Adjustment - If EquippedFront Seat Back ReclineFront Passenger Easy Entry Seat (2 Door Models)Head RestraintsFold And Tumble Rear Seat (2 Door Models)Removing the Rear Seat (2 Door Models)Replacing the Rear Seat (2 Door Models)60/40 Split Folding Rear Seat (4 Door Models)To Raise the Rear SeatTO OPEN AND CLOSE THE HOOD LIGHTS Interior LightsMulti-Function Control LeverParking Lights, Instrument Panel Lights, and HeadlightsLights-On ReminderHeadlight Dimmer SwitchPassing LightFront Fog Lights - If EquippedTurn SignalsDaytime Running Lights - If EquippedWINDSHIELD WIPERS AND WASHERS Intermittent Wiper SystemWindshield Wiper OperationWindshield WashersMist FeatureTILT STEERING COLUMN ELECTRONIC SPEED CONTROL - IF EQUIPPED To ActivateTo Set At A Desired SpeedTo Deactivate To Resume SpeedTo Vary The Speed SettingManual TransmissionTo Accelerate For PassingELECTRONIC BRAKE CONTROL SYSTEM ABS (Anti-Lock Brake System)TCS (Traction Control System)BAS (Brake Assist System)ERM (Electronic Roll Mitigation)ESP (Electronic Stability Program)ESP/BAS Warning LampELECTRICAL POWER OUTLET Electrical Outlet Use With Engine OffCUP HOLDERS STORAGE Console Storage CompartmentRear Storage CompartmentDUAL TOP - IF EQUIPPED Removing The Soft TopInstalling the Soft TopFREEDOM TOP 3- PIECE MODULAR HARD TOP Front Panel(s) RemovalFront Panel(s) InstallationFront Panel(s) Installation Only (With Rear Hard Top Removed)Rear Panel RemovalRear Panel InstallationDOOR FRAME Door Frame Removal (2 Door Models)Door Frame Installation (2 Door Models)Door Frame Removal (4 Door Models)Door Frame Installation (4 Door Models)SOFT TOP (2 DOOR MODELS) Folding Down The Soft Top Putting Up The Soft Top SUNRIDER - 4 DOOR MODELS SOFT TOP (4 DOOR MODELS) Folding Down The Soft Top Putting Up The Soft Top FOLDING WINDSHIELD Lowering the Windshield and Removing Side BarsRaising The Windshield And Replacing Side BarsREAR WINDOW FEATURES - HARD TOP ONLY Rear Window Wiper/Washer - If EquippedRear Window Defroster - If EquippedUNDERSTANDING YOUR INSTRUMENT PANEL INSTRUMENT PANEL AND CONTROLS INSTRUMENT CLUSTER INSTRUMENT CLUSTER DESCRIPTION COMPASS AND TRIP COMPUTER - IF EQUIPPED Control ButtonsTrip Conditions Compass Temperature DisplayRADIO GENERAL INFORMATION Radio Broadcast SignalsTwo Types of SignalsElectrical DisturbancesAM ReceptionFM ReceptionSALES CODE REQ - AM/FM STEREO RADIO AND 6-DISC CD/DVD CHANGER (MP3/WMA AUX JACK) Operating Instructions - Radio ModeOperation Instructions - (DISC MODE for CD and MP3/WMA Audio Play, DVD-VIDEO)Notes On Playing MP3/WMA FilesLIST Button (DISC Mode for MP3/WMA Play)INFO Button (DISC Mode for MP3/WMA Play)SALES CODE RES - AM/FM STEREO RADIO WITH CD PLAYER (MP3 AUX JACK) Operating Instructions - Radio ModeOperation Instructions - CD MODE for CD and MP3 Audio PlayNotes On Playing MP3 FilesLIST Button (CD Mode for MP3 Play)INFO Button (CD Mode for MP3 Play) SALES CODE RER - AM/FM/CD/DVD RADIO WITH NAVIGATION SYSTEM - IF EQUIPPED Operating Instructions - Satellite RadioClock Setting ProcedureSATELLITE RADIO - IF EQUIPPED System ActivationElectronic Serial Number/Sirius Identification Number (ENS/SID)Selecting Satellite Mode (RSC Radios)Satellite AntennaReception QualityOperating Instructions - Satellite ModeOperating Instructions - Hands Free Phone (If Equipped)Operating Instructions - Video Entertainment System (VES) (If Equipped)CD/DVD DISC MAINTENANCE RADIO OPERATION AND CELLULAR PHONES CLIMATE CONTROLS Manual Heater OnlyManual Air Conditioning and Heating System - If EquippedOperating TipsSTARTING AND OPERATING STARTING PROCEDURES Manual TransmissionAutomatic TransmissionNormal StartingExtreme Cold Weather (below -20 degrees F or -29 degrees C)If Engine Fails to StartAfter StartingENGINE BLOCK HEATER - IF EQUIPPED MANUAL TRANSMISSION 6-Speed Manual TransmissionAUTOMATIC TRANSMISSION Shift Lock Manual OverrideBrake/Transmission Interlock SystemAutomatic Transmission with OverdriveFOUR-WHEEL DRIVE OPERATION (COMMAND-TRAC OR ROCK-TRAC) - IF EQUIPPED Operating Instructions/PrecautionsShift PositionsShifting ProcedureTRAC-LOK REAR AXLE - IF EQUIPPED AXLE LOCK (TRU-LOK) - RUBICON MODELS REAR AXLE LOCK - 4WD NON-RUBICON MODELS (IF EQUIPPED) ELECTRONIC SWAY BAR DISCONNECT - IF EQUIPPED ON-ROAD DRIVING TIPS OFF-ROAD DRIVING TIPS When To Use 4L (Low) RangeDriving Through WaterDriving In Snow, Mud and SandHill ClimbingTraction DownhillAfter Driving Off-RoadPARKING BRAKE ANTI-LOCK BRAKE SYSTEM POWER STEERING TIRE SAFETY INFORMATION Tire Markings Tire Identification Number (TIN) Tire Loading and Tire PressureTIRES - GENERAL INFORMATION Tire PressureTire Inflation Pressures Tire Pressures for High Speed OperationRadial-Ply TiresTire SpinningTread Wear IndicatorsLife of TireReplacement TiresAlignment and BalanceTIRE CHAINS TIRE ROTATION RECOMMENDATIONS TIRE PRESSURE MONITOR SYSTEM (TPMS) - IF EQUIPPED Base System - If EquippedGeneral InformationFUEL REQUIREMENTS Reformulated GasolineGasoline/Oxygenate BlendsMMT In GasolineMaterials Added To FuelFuel System CautionsCarbon Monoxide WarningsADDING FUEL Fuel Filler Cap (Gas Cap)VEHICLE LOADING Certification LabelTRAILER TOWING Common Towing DefinitionsTrailer Hitch ClassificationTrailer Towing Weights (Maximum Trailer Weight Ratings)Trailer and Tongue WeightTowing RequirementsTowing TipsRECREATIONAL TOWING (BEHIND MOTORHOME, ETC.) Towing - 2WD ModelsTowing - 4WD ModelsShifting Out Of Neutral (N)WHAT TO DO IN EMERGENCIES HAZARD WARNING FLASHERS IF YOUR ENGINE OVERHEATS JACKING AND TIRE CHANGING Jack LocationSpare Tire StowagePreparations For JackingJacking InstructionsJUMP STARTING EMERGENCY TOW HOOKS - IF EQUIPPED TOWING A DISABLED VEHICLE MAINTAINING YOUR VEHICLE ENGINE COMPARTMENT - 3.8L ONBOARD DIAGNOSTIC SYSTEM - OBD II Loose Fuel Filler Cap MessageEMISSIONS INSPECTION AND MAINTENANCE PROGRAMS REPLACEMENT PARTS DEALER SERVICE MAINTENANCE PROCEDURES Engine OilDrive Belts - Check Condition and TensionSpark PlugsCatalytic ConverterCrankcase Emission Control SystemFuel FilterEngine Air Cleaner FilterMaintenance-Free BatteryAir Conditioner MaintenancePower Steering Fluid CheckDriveline And Steering Component LubricationBody Lubrication Windshield Wiper BladesWindshield WashersExhaust SystemCooling SystemHoses and Vacuum/Vapor HarnessesBrake SystemAutomatic TransmissionHydraulic Clutch Fluid - Manual TransmissionManual TransmissionTransfer CaseFront/Rear Axle FluidAppearance Care And Protection From CorrosionFUSES (TOTALLY INTEGRATED POWER MODULE) VEHICLE STORAGE REPLACEMENT BULBS - IF EQUIPPED BULB REPLACEMENT Head LightFront Park/Turn SignalFront Side MarkerFront Fog LightRear Tail, Stop, Turn Signal, and Back-Up LightsCenter High Mounted Stop Light (CHMSL)FLUID CAPACITIES FLUIDS, LUBRICANTS AND GENUINE PARTS EngineChassisMAINTENANCE SCHEDULES EMISSION CONTROL SYSTEM MAINTENANCE MAINTENANCE SCHEDULES Schedule BSchedule AIF YOU NEED CONSUMER ASSISTANCE SUGGESTIONS FOR OBTAINING SERVICE FOR YOUR VEHICLE Prepare For The AppointmentPrepare A ListBe Reasonable With RequestsIF YOU NEED ASSISTANCE WARRANTY INFORMATION (U.S. Vehicles Only) MOPAR PARTS REPORTING SAFETY DEFECTS In CanadaPUBLICATION ORDER FORMS DEPARTMENT OF TRANSPORTATION UNIFORM TIRE QUALITY GRADES TreadwearTraction GradesTemperature GradesINDEX
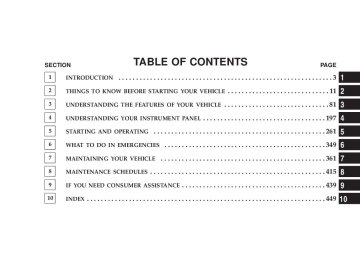
SECTION
TABLE OF CONTENTS
PAGE
INTRODUCTION . . . . . . . . . . . . . . . . . . . . . . . . . . . . . . . . . . . . . . . . . . . . . . . . . . . . . . . . . . . . . 3
THINGS TO KNOW BEFORE STARTING YOUR VEHICLE . . . . . . . . . . . . . . . . . . . . . . . . . . . . . 11
UNDERSTANDING THE FEATURES OF YOUR VEHICLE . . . . . . . . . . . . . . . . . . . . . . . . . . . . . . 81
UNDERSTANDING YOUR INSTRUMENT PANEL . . . . . . . . . . . . . . . . . . . . . . . . . . . . . . . . . . . 197
STARTING AND OPERATING . . . . . . . . . . . . . . . . . . . . . . . . . . . . . . . . . . . . . . . . . . . . . . . . . 261
WHAT TO DO IN EMERGENCIES . . . . . . . . . . . . . . . . . . . . . . . . . . . . . . . . . . . . . . . . . . . . . . 349
MAINTAINING YOUR VEHICLE . . . . . . . . . . . . . . . . . . . . . . . . . . . . . . . . . . . . . . . . . . . . . . . 361
MAINTENANCE SCHEDULES . . . . . . . . . . . . . . . . . . . . . . . . . . . . . . . . . . . . . . . . . . . . . . . . . . 415
IF YOU NEED CONSUMER ASSISTANCE . . . . . . . . . . . . . . . . . . . . . . . . . . . . . . . . . . . . . . . . . 439
10
INDEX . . . . . . . . . . . . . . . . . . . . . . . . . . . . . . . . . . . . . . . . . . . . . . . . . . . . . . . . . . . . . . . . . . . . 449
10
INTRODUCTION
CONTENTS
䡵 Introduction . . . . . . . . . . . . . . . . . . . . . . . . . . . 4
▫ Roll Over Warning . . . . . . . . . . . . . . . . . . . . . 5
䡵 How To Use This Manual . . . . . . . . . . . . . . . . . . 7䡵 Warnings And Cautions . . . . . . . . . . . . . . . . . . . 9
䡵 Vehicle Identification Number . . . . . . . . . . . . . . . 9
䡵 Vehicle Modifications/Alterations . . . . . . . . . . . . 94 INTRODUCTION
INTRODUCTION This is a specialized utility vehicle designed for both on-road and off-road use. It can go places and perform tasks for which conventional two-wheel drive enclosed vehicles were not intended. It handles and maneuvers differently from many passenger cars both on-road and off-road, so take time to become familiar with your vehicle. Before you start to drive this vehicle, read the Owner’s Manual. Be sure you are familiar with all vehicle controls, particularly those used for braking, steering, transmis- sion, and transfer case shifting. Learn how your vehicle handles on different road surfaces. Your driving skills will improve with experience. When driving off-road or working the vehicle, don’t overload the vehicle or expect the vehicle to overcome the natural laws of physics. Always observe federal, state, provincial and local laws wherever you drive.
As with other vehicles of this type, failure to operate this vehicle correctly may result in loss of control or an accident. Be sure to read “On-Road/Off-Road Driving Tips” in this manual.
WARNING!
Never leave children alone in a vehicle. Leaving children in a vehicle unattended is dangerous for a number of reasons. A child or others could be seri- ously or fatally injured. Do not leave the keys in the ignition. A child could operate power windows, other controls, or move the vehicle.
INTRODUCTION 5
Roll Over Warning Utility vehicles have a significantly higher roll over rate than other types of vehicles. This vehicle has a higher ground clearance, higher center of gravity, and narrower track than many passenger cars. It is capable of perform- ing better in a wide variety of off-road applications. Driven in an unsafe manner, all vehicles can be caused to go out of control. Because of the higher center of gravity and the narrower track, if this vehicle is out of control it may roll over when some other vehicles may not. Do not attempt sharp turns or abrupt maneuvers or other unsafe driving actions that can cause loss of vehicle control. Failure to operate this vehicle safely may result in an accident, roll over of the vehicle and serious injury or death. Because of its open-body construction, your vehicle offers less protection than closed vehicles in the event of an accident.
6 INTRODUCTION
Failure to use driver and passenger seat belts provided is a major cause of severe or fatal injury. In fact, the U.S. government notes that the universal use of existing seat belts could cut the highway death toll by 10,000 or more each year, and could reduce disabling injuries by 2
million annually. In a roll over crash, an unbelted person is significantly more likely to die than a person wearing a seal belt. Always buckle up. Although your vehicle may be equipped with a soft top or optional hard top to give the occupants protection from the weather, these tops do not offer structural protection in the event of an accident and do not change the open-body characteristic of the vehicle. Even though your vehicle has a sport bar and side bars for some extra protection, it is a truly open vehicle-there is no structural integrated top and it has low sides and a folding wind- shield. Many of these vehicles do not have fully enclosed hard doors.Operating this vehicle at excessive speeds or while intoxicated may result in loss of control, collision with other vehicles or objects, going off the road, or overturn- ing, any of which may lead to serious injury or death. Also, failure to use standard seat belts subjects the driver and passengers to a greater risk of being thrown out of an open-body vehicle than out of a closed vehicle in an accident which can result in injury or death. This manual has been prepared with the assistance of service and engineering specialists to acquaint you with the operation and maintenance of your new vehicle. It is supplemented by a Warranty Information Booklet and various customer oriented documents. You are urged to read these publications carefully. Following the instruc- tions and recommendations in this manual will help assure safe and enjoyable operation of your vehicle.
NOTE: After you read the manual, it should be stored in the vehicle for convenient reference and remain with the vehicle when sold so that the new owner will be aware of all safety warnings. When it comes to service, remember that your authorized dealer knows your vehicle best, has the factory-trained technicians and genuine Mopar威 parts, and is interested in your satisfaction.
HOW TO USE THIS MANUAL Consult the table of contents to determine which section contains the information you desire. The detailed index, at the rear of this manual, contains a complete listing of all subjects. Consult the following table for a description of the symbols that may be used on your vehicle or throughout this owner manual:
INTRODUCTION 7
8 INTRODUCTION
VEHICLE MODIFICATIONS/ALTERATIONS
INTRODUCTION 9
WARNING!
Any modifications or alterations to this vehicle could seriously affect its roadworthiness and safety and may lead to an accident resulting in serious injury or death.
WARNINGS AND CAUTIONS This manual contains WARNINGS against operating procedures, which could result in an accident or bodily injury. It also contains CAUTIONS against procedures, which could result in damage to your vehicle. If you do not read this entire manual, you may miss important information. Observe all Warnings and Cautions.
VEHICLE IDENTIFICATION NUMBER The vehicle identification number (VIN) is found on a stamped plate located on the left front corner of the instrument panel pad, visible from outside of vehicle through windshield. This number also appears on the Automobile Information Disclosure Label affixed to a window on your vehicle. Save this label for a convenient record of your vehicle identification number and optional equipment. NOTE:
It is illegal to remove the VIN plate.
THINGS TO KNOW BEFORE STARTING YOUR VEHICLE
CONTENTS
▫ Ignition Key Removal ▫ Key-In-Ignition Reminder
䡵 A Word About Your Keys . . . . . . . . . . . . . . . . . .14
. . . . . . . . . . . . . . . . . . .14
. . . . . . . . . . . . . . . .15
䡵 Steering Wheel Lock — If Equipped . . . . . . . . . .15
▫ To Manually Lock The Steering Wheel . . . . . . .15
▫ To Release The Steering Wheel Lock . . . . . . . . .16
䡵 Sentry Key Immobilizer System . . . . . . . . . . . . . .16
▫ Important Note About Service . . . . . . . . . . . . .17
▫ Replacement Keys . . . . . . . . . . . . . . . . . . . . . .17▫ Customer Key Programming . . . . . . . . . . . . . .18
▫ General Information . . . . . . . . . . . . . . . . . . . .18
䡵 Security Alarm System — If Equipped . . . . . . . . .19
▫ To Set The Alarm . . . . . . . . . . . . . . . . . . . . . .19
▫ To Disarm The System . . . . . . . . . . . . . . . . . . .19
䡵 Illuminated Entry . . . . . . . . . . . . . . . . . . . . . . . .20
䡵 Remote Keyless Entry — If Equipped . . . . . . . . .20
▫ To Unlock The Doors And Swing Gate . . . . . . .21
▫ To Lock The Doors And Swing Gate . . . . . . . . .2112 THINGS TO KNOW BEFORE STARTING YOUR VEHICLE
▫ Using The Panic Alarm . . . . . . . . . . . . . . . . . .22
▫ To Turn Off “Flash Lights With Lock” . . . . . . . .22
▫ Programming Additional Transmitters . . . . . . . .23
▫ General Information . . . . . . . . . . . . . . . . . . . .24
▫ Battery Replacement . . . . . . . . . . . . . . . . . . . .25
䡵 Doors . . . . . . . . . . . . . . . . . . . . . . . . . . . . . . . .26
. . . . . . . . . . . . . . . . . . . .26
. . . . . . . .27
䡵 Door Locks . . . . . . . . . . . . . . . . . . . . . . . . . . . .29
▫ Manual Door Locks . . . . . . . . . . . . . . . . . . . . .30
▫ Power Door Locks — If Equipped . . . . . . . . . .31
. . . . . . . . . . . . . . . . . . . . . . . . . . . . .32
▫ Power Windows — If Equipped . . . . . . . . . . . .32▫ Front Door Removal ▫ Rear Door Removal (4 Door Models)
䡵 Windows
▫ Wind Buffeting . . . . . . . . . . . . . . . . . . . . . . . .34
䡵 Rear Swing Gate . . . . . . . . . . . . . . . . . . . . . . . .34
䡵 Occupant Restraints . . . . . . . . . . . . . . . . . . . . . .36
▫ Lap/Shoulder Belts . . . . . . . . . . . . . . . . . . . . .37
▫ Rear Center Lap/Shoulder Belt RetractorLock-Out
. . . . . . . . . . . . . . . . . . . . . . . . . . . .42
▫ Adjustable Upper Shoulder Belt Anchorage . . . .43
▫ Seat Belt Pretensioners . . . . . . . . . . . . . . . . . . .44
▫ Enhanced Seat Belt Use Reminder System(BeltAlert)
. . . . . . . . . . . . . . . . . . . . . . . . . . .45
▫ Seat Belts And Pregnant Women . . . . . . . . . . . .46
▫ Seat Belt Extender . . . . . . . . . . . . . . . . . . . . . .46
▫ Driver And Front Passenger SupplementalRestraint Systems (SRS) . . . . . . . . . . . . . . . . . .47
▫ Child Restraint . . . . . . . . . . . . . . . . . . . . . . . .64
䡵 Engine Break-In Recommendations . . . . . . . . . . .77
䡵 Safety Tips . . . . . . . . . . . . . . . . . . . . . . . . . . . .78
▫ Exhaust Gas . . . . . . . . . . . . . . . . . . . . . . . . . .78THINGS TO KNOW BEFORE STARTING YOUR VEHICLE 13
▫ Safety Checks You Should Make Inside The
Vehicle . . . . . . . . . . . . . . . . . . . . . . . . . . . . . .79
▫ Safety Checks You Should Make Outside The
Vehicle . . . . . . . . . . . . . . . . . . . . . . . . . . . . . .80
14 THINGS TO KNOW BEFORE STARTING YOUR VEHICLE
A WORD ABOUT YOUR KEYS The keys for your new vehicle are enclosed in a plastic bag with the key code number on it. If you received your keys without the bag, ask your dealer to give you the number. The key code can also be obtained by the dealer from your vehicle invoice. Ignition Key Removal
Manual Transmission Turn the ignition switch to the ACC position, push the key and cylinder inward, rotate the key to the LOCK position, and remove the key. Automatic Transmission — If Equipped Place the shift lever in P (Park). Turn the ignition switch to the ACC position, push the key and cylinder inward, rotate the key to the LOCK position, and remove the key.
Ignition Key Positions
WARNING!
Leaving children in a vehicle unattended is danger- ous for a number of reasons. A child or others could be injured. Children should be warned not to touch the parking brake, brake pedal, or the gear selector lever. Do not leave the keys in the ignition. A child could operate power windows, other controls, or move the vehicle.
CAUTION!
An unlocked vehicle is an invitation to thieves. Always remove the key from the ignition, and lock all doors when leaving the vehicle unattended.
THINGS TO KNOW BEFORE STARTING YOUR VEHICLE 15
Key-In-Ignition Reminder Opening the driver’s door when the key is in the ignition, sounds a signal to remind you to remove the key.
STEERING WHEEL LOCK — IF EQUIPPED Your vehicle may be equipped with a passive steering wheel lock (manual transmission only). This lock pre- vents steering the vehicle without the ignition key. If the steering wheel is moved a half turn in either direction and the key is not in the ignition, the steering wheel will lock. To Manually Lock the Steering Wheel With the engine running, rotate the steering wheel 1/2
revolution from straight ahead position, turn off the engine and remove the key. Rotate the steering wheel slightly in both directions until the lock engages.16 THINGS TO KNOW BEFORE STARTING YOUR VEHICLE
To Release the Steering Wheel Lock Insert the key in the ignition and turn the wheel slightly to the right or left to disengage the lock. If you turned the wheel to the right to engage NOTE: the lock, you must turn the wheel slightly to the right to disengage it. If you turned the wheel to the left to engage the lock, turn the wheel slightly to the left to disengage it.
SENTRY KEY IMMOBILIZER SYSTEM The Sentry Key Immobilizer System (SKIM) prevents unauthorized operation of the vehicle by disabling the engine. The system will shut the engine down after 2
seconds of running if an invalid key is used to start the vehicle. This system utilizes ignition keys which have an electronic chip (transponder) embedded into them. Only keys that have been programmed to the vehicle can be used to start and operate the vehicle for longer than the 2 second validation time period.The Sentry Key Immobilizer System does not need to be armed or activated. Operation of the system is automatic regardless of whether or not the vehicle is locked or unlocked. During normal operation, the “Security Alarm System Indicator Light” will come on for 3 seconds immediately after the ignition switch is turned on for a bulb check. Afterwards, if the bulb remains on, this indicates a malfunction in the electronics. If the bulb begins to flash immediately after the ignition switch is turned on, this indicates that an invalid key is being used to start the vehicle. Both of these conditions will result in the engine being shut down after 2 seconds of running. Keep in mind that a key which has not been programmed is also considered an invalid key even if it is cut to fit the ignition for that vehicle. If the “Security Alarm System Indicator Light” comes on during normal vehicle operation (it has been running for
longer than 10 seconds) a fault has been detected in the electronics and the vehicle should be serviced as soon as possible. NOTE: • The Sentry Key Immobilizer System is not compatible with remote starting systems. Use of these systems may result in vehicle starting problems and loss of security protection. • Mobil Speedpass™, additional Sentry Keys, or any other transponder equipped components on the same keychain will not cause a key-related (Transponder) fault unless the additional part is physically held against the ignition key being used when starting the vehicle. Also, cell phones, pagers, or other RF electron- ics will not cause interference with this system.
All of the keys provided with your new vehicle have been programmed to the vehicle electronics.
THINGS TO KNOW BEFORE STARTING YOUR VEHICLE 17
Important Note About Service A four digit PIN number is needed to service the Sentry Key Immobilizer System. This number can be obtained from your authorized dealer. However, this number can also be found on your customer invoice that you were given upon receipt of your vehicle. Replacement Keys
NOTE: Only keys that have been programmed to the vehicle electronics can be used to start the vehicle. Once a Sentry Key has been programmed to a vehicle, it cannot be programmed to any other vehicle. At the time of purchase, the original owner is provided with a four digit PIN number. This number is required for dealer replacement of keys. Duplication of keys may be performed at an authorized dealer or by using the Customer Key Programming procedure. This procedure
18 THINGS TO KNOW BEFORE STARTING YOUR VEHICLE
consists of programming a blank key to the vehicle electronics. A blank key is one which has never been programmed. NOTE: When having the Sentry Key System serviced, bring all vehicle keys to the dealer. Customer Key Programming
You can program new keys to the system if you have two valid keys by doing the following: 1. Cut the additional Sentry Key Transponder blank(s) to match the ignition switch lock cylinder key code. 2. Insert the first valid key into the ignition switch and turn the ignition switch ON for at least 3 seconds but no longer than 15 seconds. Turn the ignition switch OFF and remove the first key. 3. Insert the second valid key and turn the ignition switch ON within 15 seconds. After ten seconds, a chime
will sound and the “Security Alarm System Indicator Light” will begin to flash. Turn the ignition switch OFF and remove the second key. 4. Insert a blank Sentry Key into the ignition switch and turn the ignition switch ON within 60 seconds. After 10
seconds, a single chime will sound. The “Security Alarm System Indicator Light” will stop flashing, turn on for 3
seconds; then turn off. The new Sentry Key has been programmed. Repeat this process to program up to a total of 8 keys. General Information The Sentry Key Immobilizer System complies with FCC rules part 15 and with RSS-210 of Industry Canada. Operation is subject to the following two conditions: 1. This device may not cause harmful interference.2. This device must accept any interference that may be received, including interference that may cause undes- ired operation.
SECURITY ALARM SYSTEM — IF EQUIPPED This system monitors the vehicle doors, swing gate, and ignition for unauthorized operation. When the alarm is activated, the system provides both audible and visual signals. The horn, headlights, and tail lights will sound/ flash repeatedly for three minutes. If disturbance is still present (driver’s door, passenger door, other doors, igni- tion) after three minutes, the headlights and tail lights will flash for an additional 15 minutes. NOTE: The “Panic” and “Security” alarms are quite different. Please take a moment to activate the “Panic” and the “Security” modes to hear the differences in the horn. In case one should go off in the future, you will need to know which mode has been activated in order to deactivate it.
THINGS TO KNOW BEFORE STARTING YOUR VEHICLE 19
To Set the Alarm The alarm will set when you use the remote keyless entry transmitter to lock the doors and swing gate or when you use the power door lock switch while the door is open. After all the doors are locked and closed, the “Sentry Key/Security Alarm Indicator Light” (located in the instrument cluster) will flash rapidly for about 16 sec- onds to signal that the system is arming. During this 16
second arming period, opening any door or the swing gate will cancel the arming. If the system successfully arms, the “Sentry Key/Security Alarm Indicator Light” will flash at a slower rate to indicate the alarm is set. To Disarm the System To disarm the system, you will need to press the “Un- lock” button on the remote keyless entry transmitter or turn the ignition key to the RUN position. If something has triggered the system in your absence, the horn will sound three times when you unlock the doors. Check the vehicle for tampering.20 THINGS TO KNOW BEFORE STARTING YOUR VEHICLE
The Security Alarm System is designed to protect your vehicle; however, you can create conditions where the system will arm unexpectedly. If you remain in the vehicle and lock the doors with the transmitter, once the system is armed (after 16 seconds), when you pull the door handle to exit the alarm will sound. If this occurs, press the “Unlock” button on the remote keyless entry transmitter to disarm the system. You may also acciden- tally disarm the system by unlocking the driver’s door with the key and then locking it. The door will be locked but the Security Alarm will not arm.
ILLUMINATED ENTRY The interior lights will come on when you open any door. The lights will remain on after all of the doors are closed, and then fade to off or they will immediately fade to off once the ignition switch is turned on.
REMOTE KEYLESS ENTRY — IF EQUIPPED
Three Button Transmitter
This system allows you to lock or unlock the doors and swing gate or activate the panic alarm from distances a maximum of 66 feet (20 meters) using a hand held radio transmitter. The transmitter need not be pointed at the vehicle to activate the system.
NOTE: The line of transmission must not be blocked with metal objects. To Unlock the Doors and Swing Gate Press and release the “Unlock” button on the key fob once to unlock only the driver’s door or twice to unlock all the doors and swing gate. When the “Unlock” button is pressed, the illuminated entry will initiate, and the parking lights will flash on twice. The system can be programmed to unlock all the doors upon the first “Unlock” button press by using the follow- ing procedure: 1. Press and hold the “Lock” button on a programmed key fob. 2. Continue to hold the “Lock” button at least 4 seconds, but not longer than 10 seconds, then press and hold the “Unlock” button. 3. Release both buttons at the same time.
THINGS TO KNOW BEFORE STARTING YOUR VEHICLE 21
the feature while outside of the vehicle, by
4. Test pressing the “Lock/Unlock” button on the keyfob. NOTE: Pressing the “Lock” button on the keyfob while you are inside the vehicle will activate the Security Alarm. Opening a door with the Security Alarm activated will cause the alarm to sound. Press the “Unlock” button to deactivate the Security Alarm. 5. If the desired programming was not achieved or to reactivate this feature, repeat the above steps. To Lock the Doors and Swing Gate Press and release the “Lock” button on the transmitter to lock all doors. The turn signal lights will flash and the horn will chirp once to acknowledge the lock signal. If desired, the “Sound Horn On Lock” feature can be turned on or off by performing the following steps: 1. Press the “Lock” button for 4 to 10 seconds.
22 THINGS TO KNOW BEFORE STARTING YOUR VEHICLE
2. While the “Lock” button is pressed (after 4 seconds), press the PANIC button. Release both buttons. The “Sound Horn On Lock” feature can be reactivated by repeating this procedure. Using The Panic Alarm To turn the panic alarm feature ON or OFF, press and hold the PANIC button on the transmitter for at least one second and release. When the panic alarm is on, the headlights and park lights will flash, the horn will pulse on and off and the interior lights will turn on. The panic alarm will stay on for 3 minutes unless you turn it off by pressing the PANIC button a second time or if the vehicle speed is 5 mph (8 km/h) or greater. NOTE: When you turn off the panic alarm by pressing the PANIC button a second time, you may have to be closer to the vehicle due to the radio frequency noises of the system.
To Turn Off “Flash Lights With Lock”
NOTE: The Flash Lights With Lock feature can be turned on or off by performing the following steps: 1. Press the “Unlock” button for 4 to 10 seconds. 2. While the “Unlock” button is pressed, (after 4 seconds) press the “Lock” button. Release both buttons. 3. Test the flash lamps with LOCK feature while outside of the vehicle, by pressing the “Lock” button on the key fob with the ignition in the LOCK position, and the key removed. NOTE: Pressing the “Lock” button on the key fob, while you are in the vehicle, will activate the Security Alarm. Opening a door with the Security Alarm activated will cause the alarm to sound. Press the “Unlock” button to deactivate the Security Alarm.
The “Flash Lights On Lock/Unlock” feature can be reactivated by repeating this procedure. Programming Additional Transmitters Vehicles will be shipped from the assembly plants with two key fob transmitters programmed only for that vehicle. A total of eight fobs can be programmed for your vehicle. Additional fobs can be programmed to your vehicle through the use of a currently programmed fob. NOTE: When entering program mode using that fob, all other programmed fobs will be erased and you will have to reprogram them for your vehicle. Use the Following procedure to program additional key fobs if the vehicle is not equipped with Sentry Key: 1. Enter your vehicle and close all doors. 2. Fasten your seat belt (Fastening the seatbelt will cancel any chiming that may confuse you during this program- ming procedure).
THINGS TO KNOW BEFORE STARTING YOUR VEHICLE 23
3. Place the key into the ignition. 4. Turn the ignition to the ON position ( Do not start the engine ). 5. Press and hold the “Unlock” button on the key fob. 6. After holding the “Unlock” button for four seconds, also press the PANIC button within 6 seconds. 7. When a single chime is heard release both buttons. The chime is an indication that you have successfully entered program mode. All fobs that are to be programmed must be done so within 60 seconds of when the chime was heard. 8. Using the fob to be programmed, press and release both the “Lock” and “Unlock” buttons, simultaneously. 9. A single chime will be heard. 10. Within four seconds of hearing the chime, press and release the “Unlock” button on the fob.
24 THINGS TO KNOW BEFORE STARTING YOUR VEHICLE
11. A single chime will be heard. 12. Repeat steps 8 through 10 to program up to six additional fobs. 13. Turn the ignition to the OFF position. 14. Your vehicle will remain in program mode up to 60
seconds from when the original chime was heard. After 60 seconds, all programmed fobs function normally. NOTE: contact your dealer for details. General Information This device complies with part 15 of FCC rules and with RS-210 of Industry Canada. Operation is subject to the following conditions: 1. This device may not cause harmful interference.If you do not have a programmed transmitter,
2. This device must accept any interference that may be received including interference that may cause undesired operation. NOTE: Changes or modifications not expressly ap- proved by the party responsible for compliance could void the user’s authority to operate the equipment. If your Remote Lock Control fails to operate from a normal distance, check for these two conditions. 1. Weak batteries in transmitter. The expected life of batteries is five years. 2. Closeness to a radio transmitter such as a radio station tower, airport transmitter, military base, and some mobile or CB radios.
THINGS TO KNOW BEFORE STARTING YOUR VEHICLE 25
Battery Replacement The recommended replacement battery is CR2032. NOTE: Perchlorate Material – special handling may apply, See www.dtsc.ca.gov/hazardouswaste/perchlorate 1. If the key fob is equipped with a screw, remove the screw. With the transmitter buttons facing down, use a flat blade (screw driver) to pry the two halves of the transmitter apart. Use extreme care not to damage the seal or internal components.
Separating Transmitter Halves
2. Remove and replace the batteries. Avoid touching the new batteries with your fingers. Skin oils may cause battery deterioration. If you touch a battery, clean it with rubbing alcohol.
26 THINGS TO KNOW BEFORE STARTING YOUR VEHICLE
3. To assemble the transmitter case, snap the two halves together. NOTE: and tighten the screw until snug.
If the key fob is equipped with a screw, reinstall
If the trip/reset button is pressed while the VF warnings are being displayed, the VF display will revert back to only displaying the odometer/trip odometer mileage. Front Door Removal
1. Remove the hinge pin screws from the upper and lower outside hinges (using a #T50 Torx威 head driver).
DOORS The vacuum fluorescent (VF) display located in the odometer area displays the word “door” as an indication of a door ajar or door not completely closed. When the vehicle is not moving and the door is ajar or not completely closed, the VF display will show the word “door.” If any other active warnings including “GATE”, “GAS- CAP”, “NOFUSE”, or “ESPOFF” are present, they will be shown in the VF display and will also continue to cycle. If the vehicle is moving, three single chimes will occur (One chime for each complete display cycle (three cycles total). After this, the display will continue to cycle only (no chimes).
2. Unplug wiring harness connector under instrument panel.
THINGS TO KNOW BEFORE STARTING YOUR VEHICLE 27
To reinstall the door(s), perform the above steps in the opposite order. Rear Door Removal (4 Door Models)
1. Remove the hinge pin screws from the upper and lower outside hinges (using a #T50 Torx威 head driver).
3. Unhook door strap from the body hook. Be careful not to allow door to swing fully open as mirror may damage paint. 4. With the door open, lift the door to clear hinge pins from their hinges, and remove door.
2. Slide front seat(s) fully forward.
28 THINGS TO KNOW BEFORE STARTING YOUR VEHICLE
3. Remove interior B-pillar trim access door at bottom of B-pillar.
4. Unplug wiring harness connector.
5. Unhook door strap from the body hook. 6. With the door open, lift the door to clear hinge pins from their hinges, and remove door. To reinstall the door(s), perform the above steps in the opposite order.
DOOR LOCKS The vacuum fluorescent (VF) display located in the odometer area displays the word “door” as an indication of a door ajar or door not completely closed. When the vehicle is not moving and the door is ajar or not completely closed, the VF display will show the word “door.” If any other active warnings including “GATE”, “GAS- CAP”, “NOFUSE”, or “ESPOFF” are present, they will be shown in the VF display and will also continue to cycle. If the vehicle is moving, three single chimes will occur
THINGS TO KNOW BEFORE STARTING YOUR VEHICLE 29
(One chime for each complete display cycle (three cycles total). After this, the display will continue to cycle only (no chimes). If the trip/reset button is pressed while the VF warnings are being displayed, the VF display will revert back to only displaying the odometer/trip odometer mileage. NOTE: The ignition key that is used to start the vehicle is used to lock or unlock the doors, glove box, swing gate, and console storage.
30 THINGS TO KNOW BEFORE STARTING YOUR VEHICLE
Manual Door Locks The front (2 Door Models) and rear doors (4 Door Models) are equipped with a rocker-type interior door lock. To lock a door when leaving your vehicle, press to the “Lock” position (flush) and close the door.
WARNING!
• For personal security reasons and safety in an accident, lock the vehicle doors when you drive as well as when you park and leave the vehicle. • Never leave children alone in a vehicle. Leaving children in a vehicle unattended is dangerous for a number of reasons. A child or others could be seriously or fatally injured. Do not leave the keys in the ignition. A child could operate power win- dows, other controls, or move the vehicle.
Manual Door Lock
Power Door Locks — If Equipped The door lock switch is located on each front door panel. Press the switch downward to lock the doors, and upward to unlock the doors.
THINGS TO KNOW BEFORE STARTING YOUR VEHICLE 31
WARNING!
• For personal security reasons and safety in an accident, lock the vehicle doors when you drive as well as when you park and leave the vehicle. • Never leave children alone in a vehicle. Leaving children in a vehicle unattended is dangerous for a number of reasons. A child or others could be seriously or fatally injured. Do not leave the keys in the ignition. A child could operate power win- dows, other controls, or move the vehicle.
Power Door Lock Switch
32 THINGS TO KNOW BEFORE STARTING YOUR VEHICLE
WINDOWS
Power Windows — If Equipped The power window switches are located on the instru- ment panel center stack (below the radio). The top left switch controls the left front window and the top right switch controls the right front window. The lower left switch controls the left rear passenger window (4 door models), and the lower right switch controls the right rear passenger window (4 door models). The switches will continue to function for up to 10 minutes after the ignition key has been removed, or until a door is opened.
Power Window Switches
Auto Down Both the driver and front passenger window switch has an “Auto Down” feature. Press the window switch past the first detent, release, and the window will go down automatically. To cancel the “Auto Down” movement, operate the switch in either the up or down direction and release the switch. To stop the window from going all the way down during the auto-down operation, pull up on the switch briefly. To open the window part way, press to the first detent and release it when you want the window to stop. The power window switches remain active for 10 min- utes after the ignition has been turned off. Opening either front door will cancel this feature. The rear passenger window switches (if equipped) are located on the back of the center floor console.
THINGS TO KNOW BEFORE STARTING YOUR VEHICLE 33
Rear Power Window Switches (4 Door)
34 THINGS TO KNOW BEFORE STARTING YOUR VEHICLE
Window Lockout Switch (4 Door Models Only) The window lockout switch (located between the win- dow switches) allows you to disable the rear window switches that are located on the back of the center floor console. To disable the window controls, press the win- dow lockout button downward. To enable the window controls, press the window lockout button upward. Wind Buffeting
Wind buffeting can be described as the perception of pressure on the ears or a helicopter type sound in the ears. Your vehicle may exhibit wind buffeting with the windows down in certain open or partially open posi- tions. This is a normal occurrence and can be minimized by adjusting window opening.
REAR SWING GATE The vacuum fluorescent (VF) display located in the odometer area displays the word “gATE” as an indica- tion of when the swing gate is not completely closed. When the vehicle is not moving, and the swing gate is not completely closed, the VF display will show the word “gATE.” If any other active warnings are present, they will be shown in the VF display and will also continue to cycle. If the vehicle is moving, three single chimes will occur if the rear swing gate is open (one chime for each complete display cycle). After this, the VF display will continue to sequence only (no chimes). If the trip/reset button is pressed while the VF warnings are being displayed, the VF display will revert back to only displaying the odometer/trip odometer mileage.
The swing gate can be unlocked using the remote keyless entry, or by activating the power door lock switches located on the front doors. To open the swing gate, press the button on the gate handle.
Gate Handle
THINGS TO KNOW BEFORE STARTING YOUR VEHICLE 35
NOTE: Close flip-up window before swing gate (hard top models only).
CAUTION!
Do not press on rear wiper blade when closing swing gate, as damage to the blade will result.
WARNING!
Driving with the flip-up window open can allow poisonous exhaust gases into your vehicle. You and your passengers could be injured by these fumes. Keep the flip-up window closed when you are oper- ating the vehicle.
36 THINGS TO KNOW BEFORE STARTING YOUR VEHICLE
OCCUPANT RESTRAINTS Some of the most important safety features in your vehicle are the restraint systems. These include the front and rear seat belts for the driver and all passengers, front airbags for both the driver and front passenger, and side airbags (if equipped) for both the driver and front passenger. If you will be carrying children too small for adult-size belts, your seat belts can also be used to hold infant and child restraint systems. NOTE: The front airbags have a multi stage inflator design. This allows the airbag to have different rates of inflation that are based on collision severity. Please pay close attention to the information in this section. It tells you how to use your restraint system properly to keep you and your passengers as safe as possible.
WARNING!
In a collision, you and your passengers can suffer injuries, including fatalities, if you are not properly buckled up. You can strike the interior of your vehicle or other passengers, or you can be thrown out of the vehicle. Always be sure you and others in your vehicle are buckled up properly.
Buckle up even though you are an excellent driver, even on short trips. Someone on the road may be a poor driver and cause a collision that includes you. This can happen far away from home or on your own street.
Research has shown that seat belts save lives, and that they can reduce the seriousness of injuries in a collision. Some of the worst injuries happen when people are thrown from the vehicle. Seat belts reduce the possibility of ejection and the risk of injury caused by striking the inside of the vehicle. Everyone in a motor vehicle should be belted at all times to reduce or prevent injuries. Lap/Shoulder Belts All seating positions in your vehicle have combination lap/shoulder belts. The belt webbing retractor is de- signed to lock during very sudden stops or collisions. This feature allows the shoulder part of the belt to move freely with you under normal conditions. But in a colli- sion, the belt will lock and reduce the risk of your striking the inside of the vehicle or being thrown out.
THINGS TO KNOW BEFORE STARTING YOUR VEHICLE 37
WARNING!
• It is extremely dangerous to ride in a cargo area, inside or outside of a vehicle. In a collision, people riding in these areas are more likely to be seri- ously injured or killed. • Do not allow people to ride in any area of your vehicle that is not equipped with seats and seat belts. • Be sure everyone in your vehicle is in a seat using
a seat belt properly.
Lap/Shoulder Belt Operating Instructions 1. Enter the vehicle and close the door. Sit back and adjust the seat. 2. The seat belt latch plate is above the back of the front seat, next to your arm in the rear seat. Grasp the latch plate and pull out the belt. Slide the latch plate up the webbing as far as necessary to allow the belt to go around your lap.
38 THINGS TO KNOW BEFORE STARTING YOUR VEHICLE
WARNING!
• Wearing a seat belt incorrectly is dangerous. Seat belts are designed to go around the large bones of your body. These are the strongest parts of your body and take the forces of a collision the best. Wearing your belt in the wrong place could make your injuries in a collision much worse. You might suffer internal injuries, or you could even slide out of part of the belt. Follow these instructions to wear your seat belt safely and to keep your pas- sengers safe, too. • Two people should never be belted into a single seat belt. People belted together can crash into one another in an accident, hurting one another badly. Never use a lap/shoulder belt or a lap belt for more than one person, no matter what their size.
THINGS TO KNOW BEFORE STARTING YOUR VEHICLE 39
Latch Plate
Latch Plate To Buckle
3. When the belt is long enough to fit, insert the latch plate into the buckle until you hear a “click.”
4. Position the lap belt across your thighs, below your abdomen. To remove slack in the lap belt portion, pull up on the shoulder belt. To loosen the lap belt if it is too tight, tilt the latch plate and pull on the lap belt. A snug belt reduces the risk of sliding under the belt in a collision.
40 THINGS TO KNOW BEFORE STARTING YOUR VEHICLE
WARNING!
A belt that is buckled into the wrong buckle will not protect you properly. The lap portion could ride too high on your body, possibly causing internal injuries. Always buckle your belt into the buckle nearest you. A belt that is loose will not protect you as well. In a sudden stop you could move too far forward, increasing the possibility of injury. Wear your seat belt snugly. A belt that is worn under your arm is very dangerous. Your body could strike the inside surfaces of the vehicle in a collision, increasing head and neck injury. A belt worn under the arm can cause internal injuries. Ribs aren’t as strong as shoulder bones. Wear the belt over your shoulder so that the strongest bones will take the force in a collision. A shoulder belt placed behind will not protect you from injury during a collision. You are more likely to hit your head in a collision if you do not wear your shoulder belt. The lap and shoulder belt are meant to be used together.
NOTE: The “Seat Belt Indicator Light” will remain on until the driver’s seat belt is buckled.
WARNING!
THINGS TO KNOW BEFORE STARTING YOUR VEHICLE 41
A lap belt worn too high can increase the risk of internal injury in a collision. The belt forces won’t be at the strong hip and pelvic bones, but across your abdomen. Always wear the lap belt as low as pos- sible and keep it snug. A twisted belt cannot do its job as well. In a collision it could even cut into you. Be sure the belt is straight. If you cannot straighten a belt in your vehicle, take it to your dealer and have it fixed.
Removing Slack From Belt
5. Position the shoulder belt on your chest so that it is comfortable and not resting on your neck. The retractor will withdraw any slack in the belt.
42 THINGS TO KNOW BEFORE STARTING YOUR VEHICLE
6. To release the belt, push the red button on the buckle. The belt will automatically retract to its stowed position. If necessary, slide the latch plate down the webbing to allow the belt to retract fully.
WARNING!
A frayed or torn belt could rip apart in a collision and leave you with no protection. Inspect the belt system periodically, checking for cuts, frays, or loose parts. Damaged parts must be replaced immediately. Do not disassemble or modify the system. Seat belt assemblies must be replaced after a collision if they have been damaged (bent retractor, torn webbing, etc.).
Rear Center Lap/Shoulder Belt Retractor Lock-Out This feature is designed to lock the retractor whenever the 60% rear seat back is not fully latched. This prevents someone from wearing the rear center lap/shoulder belt when the rear seat back is not fully latched. NOTE: • If the rear center lap/shoulder belt cannot be pulled • If the rear seat back is properly latched and the rear center lap/shoulder belt still cannot be pulled out, the Automatic-Locking Retractor (ALR) system may be activated. To reset this feature you must let all of the belt webbing return into the retractor. You will not be able to pull out more webbing until all of the webbing has been returned back into the retractor.
out, check that the rear seat back is fully latched.
WARNING!
The rear center lap/shoulder belt is equipped with a