- 2011 Jeep Wrangler Owners Manuals
- Jeep Wrangler Owners Manuals
- 2005 Jeep Wrangler Owners Manuals
- Jeep Wrangler Owners Manuals
- 2006 Jeep Wrangler Owners Manuals
- Jeep Wrangler Owners Manuals
- 2004 Jeep Wrangler Owners Manuals
- Jeep Wrangler Owners Manuals
- 2013 Jeep Wrangler Owners Manuals
- Jeep Wrangler Owners Manuals
- 2009 Jeep Wrangler Owners Manuals
- Jeep Wrangler Owners Manuals
- 2008 Jeep Wrangler Owners Manuals
- Jeep Wrangler Owners Manuals
- 2012 Jeep Wrangler Owners Manuals
- Jeep Wrangler Owners Manuals
- 2010 Jeep Wrangler Owners Manuals
- Jeep Wrangler Owners Manuals
- 2007 Jeep Wrangler Owners Manuals
- Jeep Wrangler Owners Manuals
- Download PDF Manual
-
Chrysler Group LLC 12JK72-126-AA
First Edition
Printed in U.S.A.
2 0 1 2
O W N E R ’ S M A N U A LWrangler
Includes Wrangler Unlimited
907711 Wrangler OM cover.indd 1
3/28/11 1:48 PM
VEHICLES SOLD IN CANADA With respect to any Vehicles Sold in Canada, the name Chrysler Group LLC shall be deemed to be deleted and the name Chrysler Canada Inc. used in substitution therefore.
DRIVING AND ALCOHOL Drunken driving is one of the most frequent causes of accidents. Your driving ability can be seriously impaired with blood alcohol levels far below the legal minimum. If you are drink- ing, don’t drive. Ride with a designated non-drinking driver, call a cab, a friend, or use public transportation.
WARNING!
Driving after drinking can lead to an accident. Your perceptions are less sharp, your reflexes are slower, and your judgment is impaired when you have been drinking. Never drink and then drive.
This manual illustrates and describes the operation of fea- tures and equipment that are either standard or optional on this vehicle. This manual may also include a description of features and equipment that are no longer available or were not ordered on this vehicle. Please disregard any features and equipment described in this manual that are not on this vehicle. Chrysler Group LLC reserves the right to make changes in design and specifications, and/or make additions to or improvements to its products without imposing any obliga- tion upon itself to install them on products previously manu- factured.
Copyright © 2011 Chrysler Group LLC
SECTION
TABLE OF CONTENTS
PAGE
INTRODUCTION . . . . . . . . . . . . . . . . . . . . . . . . . . . . . . . . . . . . . . . . . . . . . . . . . . . . . . . . . . . . 3
THINGS TO KNOW BEFORE STARTING YOUR VEHICLE . . . . . . . . . . . . . . . . . . . . . . . . . . . . .11
UNDERSTANDING THE FEATURES OF YOUR VEHICLE . . . . . . . . . . . . . . . . . . . . . . . . . . . . . 91
UNDERSTANDING YOUR INSTRUMENT PANEL . . . . . . . . . . . . . . . . . . . . . . . . . . . . . . . . . . 263
STARTING AND OPERATING . . . . . . . . . . . . . . . . . . . . . . . . . . . . . . . . . . . . . . . . . . . . . . . . 367
WHAT TO DO IN EMERGENCIES . . . . . . . . . . . . . . . . . . . . . . . . . . . . . . . . . . . . . . . . . . . . . 491
MAINTAINING YOUR VEHICLE . . . . . . . . . . . . . . . . . . . . . . . . . . . . . . . . . . . . . . . . . . . . . . 511
MAINTENANCE SCHEDULES . . . . . . . . . . . . . . . . . . . . . . . . . . . . . . . . . . . . . . . . . . . . . . . . . 563
IF YOU NEED CONSUMER ASSISTANCE . . . . . . . . . . . . . . . . . . . . . . . . . . . . . . . . . . . . . . . . 581
10
INDEX . . . . . . . . . . . . . . . . . . . . . . . . . . . . . . . . . . . . . . . . . . . . . . . . . . . . . . . . . . . . . . . . . . . 591
10
INTRODUCTION
CONTENTS
䡵 Introduction . . . . . . . . . . . . . . . . . . . . . . . . . . . 4
䡵 Rollover Warning . . . . . . . . . . . . . . . . . . . . . . . 5
䡵 How To Use This Manual . . . . . . . . . . . . . . . . . . 6䡵 Warnings And Cautions . . . . . . . . . . . . . . . . . . . 8
䡵 Vehicle Identification Number . . . . . . . . . . . . . . 8
䡵 Vehicle Modifications/Alterations . . . . . . . . . . . . 94 INTRODUCTION INTRODUCTION Congratulations on selecting your new Chrysler Group LLC vehicle. Be assured that it represents precision workmanship, distinctive styling, and high quality - all essentials that are traditional to our vehicles. This is a specialized utility vehicle. It can go places and perform tasks that conventional passenger cars are not intended. It handles and maneuvers differently from many passenger cars both on-road and off-road, so take time to become familiar with your vehicle. The two-wheel drive version of this vehicle was designed for on-road use only. It is not intended for off-road driving or use in other severe conditions suited for a four-wheel drive vehicle. Before you start to drive this vehicle, read the Owner’s Manual. Be sure you are familiar with all vehicle controls, particularly those used for braking, steering, transmis- sion, and transfer case shifting. Learn how your vehicle
handles on different road surfaces. Your driving skills will improve with experience. When driving off-road or working the vehicle, don’t overload the vehicle or expect the vehicle to overcome the natural laws of physics. Always observe federal, state, provincial and local laws wherever you drive. As with other vehicles of this type, failure to operate this vehicle correctly may result in loss of control or a collision. Refer to “On-Road/Off-Road Driving Tips” in “Starting And Operating” for further information. This Owner’s Manual has been prepared with the assis- tance of service and engineering specialists to acquaint you with the operation and maintenance of your vehicle. It is supplemented by Warranty Information, and various customer-oriented documents. Please take the time to read these publications carefully. Following the instruc- tions and recommendations in this manual will help assure safe and enjoyable operation of your vehicle.
NOTE: After reviewing the owner information, it should be stored in the vehicle for convenient referenc- ing and remain with the vehicle when sold. When it comes to service, remember that your authorized dealer knows your vehicle best, has factory-trained tech- nicians and genuine MOPAR威 parts, and cares about your satisfaction.
ROLLOVER WARNING Utility vehicles have a significantly higher rollover rate than other types of vehicles. This vehicle has a higher ground clearance and a higher center of gravity than many passenger cars. It is capable of performing better in a wide variety of off-road applications. Driven in an unsafe manner, all vehicles can go out of control. Because of the higher center of gravity and the narrower track, if this vehicle is out of control it may roll over when some other vehicles may not.
INTRODUCTION 5
Do not attempt sharp turns, abrupt maneuvers, or other unsafe driving actions that can cause loss of vehicle control. Failure to operate this vehicle safely may result in a collision, rollover of the vehicle, and severe or fatal injury. Drive carefully.Rollover Warning Label
6 INTRODUCTION Failure to use the driver and passenger seat belts pro- vided is a major cause of severe or fatal injury. In a rollover crash, an unbelted person is significantly more likely to die than a person wearing a seat belt. Always buckle up.
HOW TO USE THIS MANUAL Consult the Table of Contents to determine which section contains the information you desire. Since the specification of your vehicle depends on the items of equipment ordered, certain descriptions and illustrations may differ from your vehicle’s equipment.
The detailed index at the back of this Owner’s Manual contains a complete listing of all subjects. Consult the following table for a description of the symbols that may be used on your vehicle or throughout this Owner’s Manual:
INTRODUCTION 7
8 INTRODUCTION WARNINGS AND CAUTIONS This Owner’s Manual contains WARNINGS against op- erating procedures that could result in a collision or bodily injury. It also contains CAUTIONS against proce- dures that could result in damage to your vehicle. If you do not read this entire manual, you may miss important information. Observe all Warnings and Cautions.
VEHICLE IDENTIFICATION NUMBER The Vehicle Identification Number (VIN) is found on the left front corner of the instrument panel pad, visible from outside of the vehicle through the windshield. This number also appears underbody, on the right side of the frame rail near the center of the vehicle, as well as on the Automobile Information Disclosure Label affixed to a window on your vehicle. Save this label for a convenient record of your vehicle identification number and optional equipment.
NOTE:
It is illegal to remove or alter the VIN plate.
VEHICLE MODIFICATIONS/ALTERATIONS
WARNING!
Any modifications or alterations to this vehicle could seriously affect its roadworthiness and safety and may lead to a collision resulting in serious injury or death.
INTRODUCTION 9
THINGS TO KNOW BEFORE STARTING YOUR VEHICLE
CONTENTS
▫ Ignition Key Removal ▫ Key-In-Ignition Reminder
䡵 A Word About Your Keys . . . . . . . . . . . . . . . . . 14
. . . . . . . . . . . . . . . . . . 14
. . . . . . . . . . . . . . . 15
䡵 Sentry Key威 . . . . . . . . . . . . . . . . . . . . . . . . . . 16
▫ Replacement Keys . . . . . . . . . . . . . . . . . . . . . 17
▫ Customer Key Programming . . . . . . . . . . . . . 17
▫ General Information . . . . . . . . . . . . . . . . . . . 18
䡵 Vehicle Security Alarm — If Equipped . . . . . . . . 19
▫ Rearming The System . . . . . . . . . . . . . . . . . . 19▫ To Arm The System . . . . . . . . . . . . . . . . . . . 19
▫ To Disarm The System . . . . . . . . . . . . . . . . . 20
䡵 Illuminated Entry — If Equipped . . . . . . . . . . . 20
䡵 Remote Keyless Entry (RKE) — If Equipped . . . 21
▫ To Unlock The Doors And Swing Gate . . . . . . 21
▫ Remote Key Unlock On First Press . . . . . . . . . 22
▫ To Lock The Doors And Swing Gate . . . . . . . . 23
▫ Sound Horn On Lock . . . . . . . . . . . . . . . . . . 23
▫ Using The Panic Alarm . . . . . . . . . . . . . . . . . 2312 THINGS TO KNOW BEFORE STARTING YOUR VEHICLE
▫ To Turn Off Flash Lights With Lock . . . . . . . . 24
▫ Programming Additional Transmitters . . . . . . 25
▫ General Information . . . . . . . . . . . . . . . . . . . 25
▫ Transmitter Battery Replacement . . . . . . . . . . 25
䡵 Remote Starting System — If Equipped . . . . . . . 26
. . . . . . . . . . . . . . . 27
䡵 Doors . . . . . . . . . . . . . . . . . . . . . . . . . . . . . . . 29▫ How To Use Remote Start
▫ Upper Half Door Window Removal — If
Equipped . . . . . . . . . . . . . . . . . . . . . . . . . . . 30
▫ Upper Half Door Window Installation — If
Equipped . . . . . . . . . . . . . . . . . . . . . . . . . . . 30
▫ Front Door Removal . . . . . . . . . . . . . . . . . . . 30
▫ Rear Door Removal (Four-Door Models) . . . . . 32䡵 Door Locks . . . . . . . . . . . . . . . . . . . . . . . . . . . 34
▫ Manual Door Locks . . . . . . . . . . . . . . . . . . . 34
▫ Power Door Locks — If Equipped . . . . . . . . . 36
▫ Child-Protection Door Lock System — RearDoors 䡵 Windows
. . . . . . . . . . . . . . . . . . . . . . . . . . . . . 38
. . . . . . . . . . . . . . . . . . . . . . . . . . . . 39
▫ Power Windows — If Equipped . . . . . . . . . . . 39
▫ Wind Buffeting . . . . . . . . . . . . . . . . . . . . . . . 41
䡵 Rear Swing Gate . . . . . . . . . . . . . . . . . . . . . . . 42
䡵 Occupant Restraints . . . . . . . . . . . . . . . . . . . . . 43
▫ Lap/Shoulder Belts . . . . . . . . . . . . . . . . . . . . 46
▫ Rear Center Lap/Shoulder Belt RetractorLockout — Four-Door Models Only . . . . . . . . 51
▫ Lap/Shoulder Belt Untwisting Procedure . . . . 52▫ Adjustable Upper Shoulder Belt Anchorage . . . 53
▫ Seat Belts In Passenger Seating Positions . . . . . 54
▫ Automatic Locking Retractor Mode (ALR) —If Equipped . . . . . . . . . . . . . . . . . . . . . . . . . 54
▫ Energy Management Feature . . . . . . . . . . . . . 55
▫ Seat Belt Pretensioners . . . . . . . . . . . . . . . . . 56
▫ Enhanced Seat Belt Use Reminder System(BeltAlert威)
. . . . . . . . . . . . . . . . . . . . . . . . . 56
▫ Seat Belts And Pregnant Women . . . . . . . . . . 57
▫ Seat Belt Extender . . . . . . . . . . . . . . . . . . . . . 58
▫ Supplemental Restraint System (SRS) — AirBags
. . . . . . . . . . . . . . . . . . . . . . . . . . . . . . 58
THINGS TO KNOW BEFORE STARTING YOUR VEHICLE 13
▫ Air Bag Deployment Sensors And Controls . . . 63
▫ Event Data Recorder (EDR) . . . . . . . . . . . . . . 70
▫ Child Restraints . . . . . . . . . . . . . . . . . . . . . . 71
䡵 Engine Break-In Recommendations . . . . . . . . . . 84
䡵 Safety Tips . . . . . . . . . . . . . . . . . . . . . . . . . . . 85
▫ Transporting Passengers . . . . . . . . . . . . . . . . 85
▫ Exhaust Gas . . . . . . . . . . . . . . . . . . . . . . . . . 86
▫ Safety Checks You Should Make Inside TheVehicle . . . . . . . . . . . . . . . . . . . . . . . . . . . . . 87
▫ Periodic Safety Checks You Should Make
Outside The Vehicle . . . . . . . . . . . . . . . . . . . 89
14 THINGS TO KNOW BEFORE STARTING YOUR VEHICLE A WORD ABOUT YOUR KEYS The keys for your new vehicle are enclosed in a plastic bag with the key code number on it. If you received your keys without the bag, ask your authorized dealer to give you the number. The key code can also be obtained by your authorized dealer from your vehicle invoice. Ignition Key Removal
1. Place the shift lever in PARK (if equipped with an automatic transmission). 2. Turn the ignition switch to the ACC (ACCESSORY) position.
Ignition Switch Positions 3 — ON/RUN 4 — START
1 — LOCK 2 — ACC (ACCESSORY) 3. Push the ignition key inward. 4. Turn the ignition key to the LOCK position, and remove the key.
WARNING!
access to an unlocked vehicle.
• Before exiting a vehicle, always apply the parking brake, shift the transmission into PARK, and re- move the key fob from the ignition. When leaving the vehicle, always lock your vehicle. • Never leave children alone in a vehicle, or with • Allowing children to be in a vehicle unattended is dangerous for a number of reasons. A child or others could be seriously or fatally injured. Chil- dren should be warned not to touch the parking brake, brake pedal or the shift lever. • Do not leave the key fob in or near the vehicle, and do not leave the ignition in the ACC or ON/RUN position. A child could operate power windows, other controls, or move the vehicle.
(Continued)
THINGS TO KNOW BEFORE STARTING YOUR VEHICLE 15
WARNING! (Continued)
• Do not leave children or animals inside parked vehicles in hot weather. Interior heat build-up may cause serious injury or death.
CAUTION!
An unlocked vehicle is an invitation to thieves. Always remove the key from the ignition, and lock all doors when leaving the vehicle unattended.
Key-In-Ignition Reminder Opening the driver’s door when the key is in the ignition sounds a signal to remind you to remove the key. The Key-In-Ignition reminder only sounds NOTE: when the ignition key is placed in the LOCK or ACC position.
16 THINGS TO KNOW BEFORE STARTING YOUR VEHICLE SENTRY KEY姞 The Sentry Key威 Immobilizer System prevents unauthor- ized vehicle operation by disabling the engine. The system does not need to be armed or activated. Operation is automatic, regardless of whether the vehicle is locked or unlocked. The system uses ignition keys that have an embedded electronic chip (transponder) to prevent unauthorized vehicle operation. Therefore, only keys that are pro- grammed to the vehicle can be used to start and operate the vehicle. The system will shut the engine off in two seconds if someone uses an invalid key to try to start the engine. NOTE: A key that has not been programmed is also considered an invalid key, even if it is cut to fit the ignition switch lock cylinder for that vehicle. During normal operation, after turning on the ignition switch, the Vehicle Security Light will turn on for three
seconds for a bulb check. If the light remains on after the bulb check, it indicates that there is a problem with the electronics. In addition, if the Vehicle Security Light begins to flash after the bulb check, it indicates that someone used an invalid key to try to start the engine. Either of these conditions will result in the engine being shut off after two seconds. If the Vehicle Security Light turns on during normal vehicle operation (vehicle running for longer than 10 sec- onds), it indicates that there is a fault in the electronics. Should this occur, have the vehicle serviced as soon as possible by an authorized dealer.
CAUTION!
The Sentry Key威 Immobilizer system is not compat- ible with some after-market remote starting systems. Use of these systems may result in vehicle starting problems and loss of security protection.
All of the keys provided with your new vehicle have been programmed to the vehicle electronics. Replacement Keys
NOTE: Only keys that are programmed to the vehicle electronics can be used to start and operate the vehicle. Once a Sentry Key威 is programmed to a vehicle, it cannot be programmed to any other vehicle.
CAUTION!
Always remove the Sentry Keys威 from the vehicle and lock all doors when leaving the vehicle unat- tended.
At the time of purchase, the original owner is provided with a four-digit Personal Identification Number (PIN). Keep the PIN in a secure location. This number is required for authorized dealer replacement of keys. Du- plication of keys may be performed at an authorized
THINGS TO KNOW BEFORE STARTING YOUR VEHICLE 17
dealer or by following the customer key programming procedure. This procedure consists of programming a blank key to the vehicle electronics. A blank key is one that has never been programmed. NOTE: When having the Sentry Key威 Immobilizer System serviced, bring all vehicle keys with you to an authorized dealer. Customer Key Programming If you have two valid Sentry Keys威, you can program new Sentry Keys威 to the system by performing the following procedure: 1. Cut the additional Sentry Key威 Transponder blank(s) to match the ignition switch lock cylinder key code. 2. Insert the first valid key into the ignition switch. Turn the ignition switch to the ON/RUN position for at least three seconds, but no longer than 15 seconds. Then, turn the ignition switch to the LOCK position and remove the first key.18 THINGS TO KNOW BEFORE STARTING YOUR VEHICLE 3. Insert the second valid key into the ignition switch. Turn the ignition switch to the ON/RUN position within 15 seconds. After 10 seconds, a chime will sound. In addition, the Vehicle Security Light will begin to flash. Turn the ignition switch to the LOCK position and remove the second key. 4. Insert a blank Sentry Key威 into the ignition switch. Turn the ignition switch to the ON/RUN position within 60 seconds. After 10 seconds, a single chime will sound. In addition, the Vehicle Security Light will stop flashing. To indicate that programming is complete, the Vehicle Security Light will turn on again for three seconds and then turn off. The new Sentry Key威 is programmed. The Remote Keyless Entry (RKE) transmitter will also be pro- grammed during this procedure.
Repeat this procedure to program up to eight keys. If you do not have a programmed Sentry Key威, contact your authorized dealer for details. If a programmed key is lost, see your authorized NOTE: dealer to have all remaining keys erased from the sys- tem’s memory. This will prevent the lost key from starting your vehicle. The remaining keys must then be reprogrammed. All vehicle keys must be taken to an authorized dealer at service to be reprogrammed. General Information The Sentry Key威 system complies with FCC rules Part 15
and with RSS-210 of Industry Canada. Operation is subject to the following conditions: • This device may not cause harmful interference. • This device must accept any interference that may be received, including interference that may cause unde- sired operation.the time of
VEHICLE SECURITY ALARM — IF EQUIPPED The Vehicle Security Alarm monitors the vehicle doors, swing gate, and ignition for unauthorized operation. While the Vehicle Security Alarm is armed, interior switches for door locks are disabled. The Vehicle Security Alarm provides both audible and visible signals when alarming. The horn will sound, the headlights will turn on, the park lamps and/or turn signals will flash repeat- edly for three minutes. If the disturbance is still present (driver’s door, passenger door, other doors, ignition) after three minutes, the headlights, park lamps and/or turn signals will flash for an additional 15 minutes. NOTE: The Panic Alarm and the Vehicle Security Alarm are quite different. Please take a moment to activate the Panic Alarm and the Vehicle Security Alarm to hear the differences in the horn. In case one should go off in the future, you will need to know which mode has been activated in order to deactivate it.
THINGS TO KNOW BEFORE STARTING YOUR VEHICLE 19
Rearming The System If something triggers the alarm, and no action is taken to disarm it, the Vehicle Security Alarm will turn off the horn after three minutes, turn off all of the visual signals after 15 minutes, and then the Vehicle Security Alarm will rearm itself. To Arm The System The Vehicle Security Alarm will set when you use the Remote Keyless Entry (RKE) transmitter to lock the doors and swing gate, or when you use the power door lock switch while the door is open. After all the doors are locked and closed, the Vehicle Security Light (located on the instrument cluster) will flash rapidly for about 16 sec- onds to signal that the Vehicle Security Alarm is arming. During this 16-second arming period, opening any door or the swing gate will cancel the arming. If the Vehicle Security Alarm is successfully set, the Vehicle Security Light will flash at a slower rate to indicate the Vehicle Security Alarm is armed.
20 THINGS TO KNOW BEFORE STARTING YOUR VEHICLE To Disarm The System To disarm the Vehicle Security Alarm, you will need to press the UNLOCK button on the RKE transmitter, or turn the ignition switch to the ON/RUN position. If something has triggered the Vehicle Security Alarm in your absence, the horn will sound three times and the exterior lights blink three times when you unlock the doors. Check the vehicle for tampering. The Vehicle Security Alarm is designed to protect your vehicle; however, you can create conditions where the Vehicle Security Alarm will arm unexpectedly. If you remain in the vehicle and lock the doors with the RKE transmitter, once the Vehicle Security Alarm is armed (after 16 seconds), when you pull the door handle to exit, the alarm will sound. If this occurs, press the UNLOCK button on the RKE transmitter to disarm the Vehicle Security Alarm. You may also accidentally disarm the Vehicle Security Alarm by unlocking the driver’s door
with the key and then locking it. The door will be locked but the Vehicle Security Alarm will not arm. NOTE: • Unlocking the doors with the manual door lock plung- ers or the driver’s door lock cylinder will not disarm the Vehicle Security Alarm. • When the Vehicle Security Alarm is armed, the interior power door lock switches will not unlock the doors.
ILLUMINATED ENTRY — IF EQUIPPED The courtesy lights will turn on when you use the Remote Keyless Entry (RKE) transmitter to unlock the doors or open any door. The lights will fade to off after approximately 30 seconds or they will immediately fade to off once the ignition switch is turned to ON/RUN from the OFF position.
NOTE: • The front courtesy overhead console and door cour- tesy lights will turn on if the dimmer control is in the ⬙Dome ON⬙ position (extreme top position). • The Illuminated Entry system will not operate if the is in the “Dome defeat” position
dimmer control (extreme bottom position).
REMOTE KEYLESS ENTRY (RKE) — IF EQUIPPED This system allows you to lock or unlock the doors, swing gate, and activate the Panic Alarm from a maxi- mum distance of 66 ft (20 m) using a Remote Keyless Entry (RKE) transmitter. The RKE transmitter does not need to be pointed at the vehicle to activate the system.
THINGS TO KNOW BEFORE STARTING YOUR VEHICLE 21
Three Button RKE Transmitter
NOTE: The line of transmission must not be blocked with metal objects. To Unlock The Doors And Swing Gate Press and release the RKE transmitter UNLOCK button once to unlock the driver’s door only, or twice to unlock all the doors and swing gate. When the RKE transmitter
22 THINGS TO KNOW BEFORE STARTING YOUR VEHICLE UNLOCK button is pressed, the Illuminated Entry will initiate and the parking lights will flash twice. Remote Key Unlock On First Press This feature lets you program the system to unlock either the driver’s side, or all doors and swing gate on the first press of the UNLOCK button on the RKE transmitter. • For vehicles equipped with an Electronic Vehicle In- formation Center (EVIC), refer to “Electronic Vehicle Information Settings (Customer-Programmable Features)” in “Understand- ing Your Instrument Panel” for further information. • For vehicles not equipped with the EVIC, the Remote Unlock feature can be enabled or disabled by perform- ing the following steps:
(EVIC)/Personal
Center
1. Press and hold the LOCK button on a programmed RKE transmitter.
2. Continue to hold the RKE transmitter LOCK button for at least four seconds, but not longer than 10 seconds, then press and hold the RKE transmitter UNLOCK button. 3. Release both buttons at the same time. 4. Test this feature while outside of the vehicle by pressing the LOCK/UNLOCK button on the RKE trans- mitter. NOTE: Pressing the RKE transmitter LOCK button while you are inside of the vehicle will activate the Vehicle Security Alarm. Opening a door with the Vehicle Security Alarm activated will cause the alarm to sound. Press the RKE transmitter UNLOCK button to deactivate the Vehicle Security Alarm. 5. If the desired programming was not achieved or to reactivate this feature, repeat the above steps.
NOTE: Pressing the LOCK button on the RKE transmit- ter while you are inside the vehicle will activate the Vehicle Security Alarm. Opening a door with the Vehicle Security Alarm activated will cause the alarm to sound. Press the UNLOCK button to deactivate the Vehicle Security Alarm. To Lock The Doors And Swing Gate Press and release the LOCK button on the RKE transmit- ter to lock all doors. The turn signals will flash and the horn will chirp once to acknowledge the lock signal. Sound Horn On Lock This feature will cause the horn to chirp when the doors are locked with the RKE transmitter. This feature can be turned on or turned off. To change the current setting, proceed as follows: • For vehicles equipped with the EVIC, refer to “Elec- tronic Vehicle Information Center (EVIC)/Personal
THINGS TO KNOW BEFORE STARTING YOUR VEHICLE 23
Settings (Customer-Programmable Features)” in “Un- derstanding Your Instrument Panel” for further infor- mation. • For vehicles not equipped with the EVIC, perform thefollowing steps:
1. Press the RKE transmitter LOCK button for 4 to 10 seconds. 2. While the LOCK button is pressed (after four seconds), press the RKE transmitter PANIC button. Release both buttons. The “Sound Horn On Lock” feature can be reactivated by repeating this procedure. Using The Panic Alarm To turn the Panic Alarm feature on or off, press and hold the PANIC button on the RKE transmitter for at least one second and release. When the Panic Alarm is activated,
24 THINGS TO KNOW BEFORE STARTING YOUR VEHICLE the headlights will turn on, the park lights will flash, the horn will pulse on and off and the interior lights will turn on. The Panic Alarm will stay on for three minutes unless you turn it off by pressing the PANIC button a second time, or if the vehicle speed is 5 mph (8 km/h) or greater. NOTE: When you turn off the Panic Alarm by pressing the PANIC button a second time, you may have to move closer to the vehicle due to the radio frequency noises of the system. To Turn Off Flash Lights With Lock
This feature will cause the turn signal lights to flash when the doors are locked or unlocked with the RKE transmit- ter. This feature can be turned on or turned off. To change the current setting, proceed as follows: • For vehicles equipped with the EVIC, refer to “Elec- tronic Vehicle Information Center (EVIC)/Personal
Settings (Customer-Programmable Features)” in “Un- derstanding Your Instrument Panel” for further infor- mation. • For vehicles not equipped with the EVIC, perform the
following steps:
1. Press the RKE transmitter UNLOCK button for 4 to 10 seconds. 2. While the UNLOCK button is pressed, (after four seconds) press the RKE transmitter LOCK button. Re- lease both buttons. 3. Test the “Flash Lights With Lock” feature outside of the vehicle by pressing the RKE transmitter LOCK button with the ignition in the LOCK position and the key removed. NOTE: Pressing the RKE transmitter LOCK button while you are in the vehicle will activate the Vehicle Security Alarm. Opening a door with the Vehicle Security
Alarm activated will cause the alarm to sound. Press the RKE transmitter UNLOCK button to deactivate the Ve- hicle Security Alarm. The “Flash Lights With Lock” feature can be reactivated by repeating this procedure. Programming Additional Transmitters Refer to Sentry Key威 “Customer Key Programming.” If you do not have a programmed RKE transmitter, contact your authorized dealer for details. General Information This device complies with part 15 of FCC rules and with RS-210 of Industry Canada. Operation is subject to the following conditions: 1. This device may not cause harmful interference. 2. This device must accept any interference that may be received including interference that may cause undesired operation.
THINGS TO KNOW BEFORE STARTING YOUR VEHICLE 25
NOTE: Changes or modifications not expressly ap- proved by the party responsible for compliance could void the user’s authority to operate the equipment. If your RKE transmitter fails to operate from a normal distance, check for these two conditions: 1. Weak battery in the RKE transmitter. The expected life of a battery is five years. 2. Closeness to a radio transmitter such as a radio station tower, airport transmitter, military base, and some mobile or CB radios. Transmitter Battery Replacement The recommended replacement battery is CR2032. NOTE: Perchlorate Material – special handling may apply. See www.dtsc.ca.gov/hazardouswaste/perchlorate26 THINGS TO KNOW BEFORE STARTING YOUR VEHICLE 1. With the RKE transmitter buttons facing down, use a flat blade screwdriver to pry the two halves of the RKE transmitter apart. Use extreme care not to damage the seal or internal components.
2. Remove and replace the battery. Avoid touching the new battery with your fingers. Skin oils may cause battery deterioration. If you touch a battery, clean it with rubbing alcohol. 3. To reassemble the RKE transmitter case, snap the two halves together.
REMOTE STARTING SYSTEM — IF EQUIPPED
Separating RKE Transmitter Halves
This system uses the Remote Keyless Entry (RKE) transmitter to start the engine conve- niently from outside the vehicle while still maintaining security. The system has a range of
approximately 300 ft (91 m). NOTE: • The vehicle must be equipped with an automatic • Obstructions between the vehicle and RKE transmitter
transmission to be equipped with Remote Start.
may reduce this range.
How To Use Remote Start All of the following conditions must be met before the engine will remote start: • Shift lever in PARK • Doors closed • Hood closed • Hazard switch off • Brake switch inactive (brake pedal not pressed) • Ignition key removed from ignition switch • Battery at an acceptable charge level • RKE PANIC button not pressed • System not disabled from previous remote start event • Vehicle theft alarm not active
THINGS TO KNOW BEFORE STARTING YOUR VEHICLE 27
WARNING!
• Do not start or run an engine in a closed garage or confined area. Exhaust gas contains Carbon Mon- oxide (CO) which is odorless and colorless. Car- bon Monoxide is poisonous and can cause serious injury or death when inhaled. • Keep Remote Keyless Entry (RKE) transmitters away from children. Operation of the Remote Start System, windows, door locks or other controls could cause serious injury or death.
Remote Start Abort Message On Electronic Vehicle Information Center (EVIC) — If Equipped The following messages will display in the EVIC if the vehicle fails to remote start or exits remote start prema- turely: • Remote Start Aborted — Door Ajar
28 THINGS TO KNOW BEFORE STARTING YOUR VEHICLE
• Remote Start Aborted — Hood Ajar • Remote Start Aborted — Fuel Low • Remote Start Aborted — L/Gate Ajar • Remote Start Aborted — System Fault The EVIC message stays active until the ignition is turned to the ON/RUN position. To Enter Remote Start
Press and release the REMOTE START button on the RKE transmitter twice within five sec- onds. The parking lights will flash and the horn will chirp twice (if programmed). Then, the engine will start and the vehicle will remain in the Remote Start mode for a 15-minute cycle. NOTE: • The park lamps will turn on and remain on during
Remote Start mode.
when the vehicle is in the Remote Start mode.
• For security, power window operation is disabled • The engine can be started two consecutive times (two 15-minute cycles) with the RKE transmitter. However, the ignition switch must be cycled to the ON/RUN position before you can repeat the start sequence for a third cycle.
Remote start will also cancel if any of the following occur: • The engine stalls or RPM exceeds 2500
• Any engine warning lamps come on • The hood is opened • The hazard switch is pressed • The transmission is moved out of PARK • The brake pedal is pressedTo Exit Remote Start Mode Without Driving The Vehicle Press and release the REMOTE START button one time, or allow the engine to run for the entire 15-minute cycle. NOTE: To avoid unintentional shut downs, the system will disable the one time press of the REMOTE START button for two seconds after receiving a valid Remote Start request. To Exit Remote Start Mode And Drive The Vehicle Before the end of the 15-minute cycle, press and release the UNLOCK button on the RKE transmitter to unlock the doors and disarm the Vehicle Security Alarm (if
THINGS TO KNOW BEFORE STARTING YOUR VEHICLE 29
equipped). Then, insert the key into the ignition switch and turn the switch to the ON/RUN position. NOTE: The ignition switch must be in the ON/RUN position in order to drive the vehicle.DOORS
CAUTION!
Careless handling and storage of the removable door panels may damage the seals, causing water to leak into the vehicle’s interior.
30 THINGS TO KNOW BEFORE STARTING YOUR VEHICLE Upper Half Door Window Removal — If Equipped Grasp the half door window and pull upward.
Upper Half Door Window
Upper Half Door Window Installation — If Equipped
1. Grasp the half door window and line up the pins with the pockets in the lower door.
2. Push down to ensure the half door window is fully seated. Front Door Removal
WARNING!
Do not drive your vehicle on public roads with the doors removed as you will lose the protection that they can provide. This procedure is furnished for use during off-road operation only.
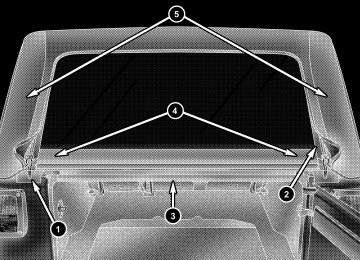
1. Roll down the glass window to prevent any damage. 2. Remove the hinge pin screws from the upper and lower outside hinges (using a #T50 Torx威 head driver). NOTE: The hinge pin screws and nuts can be stowed in the rear cargo tray located under the rear loadfloor.
THINGS TO KNOW BEFORE STARTING YOUR VEHICLE 31
end (top) of the connector. This will unlock the connector tab, allowing the tab to be pressed down and enabling the harness to be disconnected.Hinge Pin Screw
3. Unplug the wiring harness connector under the instru- ment panel by pressing the tab at the top of the connector and pulling to disconnect. If the red latch on the connector is locked, push NOTE: the red latch down until you can only see the latch on one
Door Strap/Harness Location
1 — Harness Connector 2 — Body Hook 3 — Door/Harness Strap
32 THINGS TO KNOW BEFORE STARTING YOUR VEHICLE 4. Unhook the door strap from the body hook. Be careful not to allow the door to swing fully open as the mirror may damage the paint. 5. With the door open, lift the door to clear the hinge pins from their hinges and remove the door. NOTE: Doors are heavy; use caution when removing them. To reinstall the door(s), perform the previous steps in the opposite order. Rear Door Removal (Four-Door Models)
WARNING!
Do not drive your vehicle on public roads with the doors removed as you will lose the protection that they can provide. This procedure is furnished for use during off-road operation only.
1. Roll down the glass window to prevent any damage. 2. Remove the hinge pin screws from the upper and lower outside hinges (using a #T50 Torx威 head driver). NOTE: The hinge pin screws and nuts can be stowed in the rear cargo tray located under the rear loadfloor.
Hinge Pin Screw
3. Slide the front seat(s) fully forward. 4. Remove the trim access door from the bottom of the B-pillar.
THINGS TO KNOW BEFORE STARTING YOUR VEHICLE 33
If the red latch on the connector is locked, push NOTE: the red latch to the right until you can only see the latch on one end (right) of the connector. This will unlock the connector tab, allowing the tab to be pressed down and enabling the harness to be disconnected.5. Unplug the wiring harness connector.
Trim Access Door
Red Connector Latch
6. Unhook the door strap from the body hook.
34 THINGS TO KNOW BEFORE STARTING YOUR VEHICLE 7. With the door open, lift the door to clear the hinge pins from their hinges and remove the door. NOTE: Doors are heavy; use caution when removing them. To reinstall the door(s), perform the previous steps in the opposite order.
DOOR LOCKS
Manual Door Locks All doors are equipped with an interior rocker-type door lock lever. To lock a door when leaving your vehicle, press the rocker lever forward to the LOCK position and close the door. To UNLOCK the door press the rocker lever rearward.
Manual Door Lock (Full Frame Doors)
2
THINGS TO KNOW BEFORE STARTING YOUR VEHICLE 35
WARNING!
access to an unlocked vehicle.
fob from the ignition and lock your vehicle.
• For personal security reasons and safety in an accident, lock the vehicle doors when you drive, as well as when you p ark and leave the vehicle. • When leaving the vehicle, always remove the key • Never leave children alone in a vehicle, or with • Allowing children to be in a vehicle unattended is dangerous for a number of reasons. A child or others could be seriously or fatally injured. Chil- dren should be warned not to touch the parking brake, brake pedal or the shift lever. • Do not leave the key in or near the vehicle. A child could operate power windows, other controls, or move the vehicle.
Manual Door Lock (Half Doors)
NOTE: The ignition key that is used to start the vehicle is used to lock or unlock the doors, swing gate, glove compartment, and console storage.
36 THINGS TO KNOW BEFORE STARTING YOUR VEHICLE Power Door Locks — If Equipped The power door lock switch is located on each front door panel. Press the switch forward to lock the doors, and rearward to unlock the doors.
Power Door Lock Switch
WARNING!
access to an unlocked vehicle.
fob from the ignition and lock your vehicle.
• For personal security reasons and safety in an accident, lock the vehicle doors when you drive, as well as when you park and leave the vehicle. • When leaving the vehicle, always remove the key • Never leave children alone in a vehicle, or with • Allowing children to be in a vehicle unattended is dangerous for a number of reasons. A child or others could be seriously or fatally injured. Chil- dren should be warned not to touch the parking brake, brake pedal or the shift lever. • Do not leave the key in or near the vehicle. A child could operate power windows, other controls, or move the vehicle.
Automatic Door Locks — If Equipped When enabled, the door locks will lock automatically when the vehicle’s speed exceeds 15 mph (24 km/h). The auto door lock feature can be enabled or disabled by your authorized dealer per written request of the customer. Please see your authorized dealer for service. Automatic Unlock Doors On Exit The doors will unlock automatically on vehicles with power door locks if: 1. The “Automatic Unlock Doors On Exit” feature is enabled. 2. The vehicle speed returned to 0 mph (0 km/h) and the transmission shift lever is in NEUTRAL or PARK. 3. The driver door is opened. 4. The doors were not previously unlocked.
THINGS TO KNOW BEFORE STARTING YOUR VEHICLE 37
Automatic Unlock Doors On Exit Programming The “Automatic Unlock Doors On Exit” feature can be enabled or disabled as follows: 1. Close all doors and place the key in the ignition. 2. Cycle the ignition switch between LOCK and ON/ RUN and then back to LOCK four times ending up in the LOCK position. 3. Press the power door unlock switch to unlock the doors. 4. A single chime will indicate the completion of the programming. 5. Repeat these steps if you want to return this feature to its previous setting. NOTE: Use the “Automatic Unlock Doors On Exit” feature in accordance with local laws.
38 THINGS TO KNOW BEFORE STARTING YOUR VEHICLE Child-Protection Door Lock System — Rear Doors To provide a safer environment for small children riding in the rear seats, the rear doors are equipped with Child-Protection Door Lock system. To Engage Or Disengage The Child-Protection Door Lock System 1. Open the rear door. 2. Insert the tip of the ignition key into the lock and rotate to the LOCK or UNLOCK position. 3. Repeat steps 1 and 2 for the opposite rear door.
Child-Protection Door Lock Function
WARNING!
Avoid trapping anyone in a vehicle in a collision. Remember that the rear doors can only be opened from the outside when the Child-Protection locks are engaged.
NOTE: For emergency exit with the system engaged, move the rocker lever rearward (unlocked position), roll down the window and open the door with the outside door handle.
WINDOWS
Power Windows — If Equipped The power window switches are located on the instru- ment panel below the radio. Press the switch downward to open the window and upward to close the window.
THINGS TO KNOW BEFORE STARTING YOUR VEHICLE 39
Power Window Switches
The top left switch controls the left front window and the top right switch controls the right front window. NOTE: The switches will continue to function for up to 10 minutes after the ignition key has been turned to the LOCK position, or until a front door is opened.
Window Lockout Switch — Four-Door Models The window lockout switch (located between the front window switches) allows you to disable the rear window switches that are located on the back of the center floor console. To disable the window controls, press the win- dow lockout button downward. To enable the window controls, press the window lockout button upward.
40 THINGS TO KNOW BEFORE STARTING YOUR VEHICLE Four-Door Models The lower left switch controls the left rear passenger window, and the lower right switch controls the right rear passenger window. Auto-Down Both the driver and front passenger window switches have an “Auto-Down” feature. Press the window switch past the first detent, release, and the window will go down automatically. To cancel the Auto-Down move- ment, operate the switch in either the up or down direction and release the switch. To stop the window from going all the way down during the Auto-Down operation, pull up on the switch briefly. To partially open the window, press halfway to the first detent and release it when you want the window to stop.
THINGS TO KNOW BEFORE STARTING YOUR VEHICLE 41
Window Lockout Switch
Rear Power Windows — Four-Door Models The rear passenger window switches are located on the back of the center floor console. Press the switch down- ward to open the window and upward to close the window.
Rear Power Window Switches (Four-Door Models)
Wind Buffeting Wind buffeting can be described as the perception of pressure on the ears or a helicopter-type sound in the ears. Your vehicle may exhibit wind buffeting with the windows down in certain open or partially open posi- tions. This is a normal occurrence and can be minimized by adjusting the window opening.
42 THINGS TO KNOW BEFORE STARTING YOUR VEHICLE REAR SWING GATE The rear swing gate can be unlocked by using the key, Remote Keyless Entry (RKE) transmitter, or by activating the power door lock switches located on the front doors. To open the swing gate, press the button on the gate handle.
NOTE: Close the rear flip-up window before attempting to close the swing gate (hard top models only).
CAUTION!
Do not press on rear wiper blade when closing the rear flip-up window, as damage to the blade will result.
WARNING!
Driving with the flip-up window open can allow poisonous exhaust gases into your vehicle. You and your passengers could be injured by these fumes. Keep the flip-up window closed when you are oper- ating the vehicle.
Gate Handle
ger
all passengers
OCCUPANT RESTRAINTS Some of the most important safety features in your vehicle are the restraint systems: • Three-point lap and shoulder belts for the driver and • Advanced Front Air Bags for driver and front passen- • Supplemental Seat-Mounted Side Air Bags (SAB) — if • An energy-absorbing steering column and steering • Knee bolsters/blockers for front seat occupants • Front seat belts incorporate pretensioners that may enhance occupant protection by managing occupant energy during an impact event
equipped
wheel
THINGS TO KNOW BEFORE STARTING YOUR VEHICLE 43
• All seat belt systems (except the driver’s) include Automatic Locking Retractors (ALRs), which lock the seat belt webbing into position by extending the belt all the way out and then adjusting the belt to the desired length to restrain a child seat or secure a large item in a seat — if equipped
Please pay close attention to the information in this section. It tells you how to use your restraint system properly, to keep you and your passengers as safe as possible. If you will be carrying children too small for adult-sized seat belts, the seat belts or the Lower Anchors and Tether for CHildren (LATCH) feature also can be used to hold infant and child restraint systems. For more information on LATCH, refer to Lower Anchors and Tether for CHildren (LATCH).
44 THINGS TO KNOW BEFORE STARTING YOUR VEHICLE NOTE: The Advanced Front Air Bags have a multistage inflator design. This allows the air bag to have different rates of inflation based on several factors, including the severity and type of collision. Here are some simple steps you can take to minimize the risk of harm from a deploying air bag: 1. Children 12 years old and under should always ride buckled up in a rear seat.
WARNING!
Infants in rear facing child restraints should never ride in the front seat of a vehicle with a passenger Advanced Front Air Bag. An air bag deployment can cause severe injury or death to infants in that posi- tion.
Children that are not big enough to wear the vehicle seat belt properly (see section on Child Restraints) should be
secured in the rear seat in child restraints or belt- positioning booster seats. Older children who do not use child restraints or belt-positioning booster seats should ride properly buckled up in the rear seat. Never allow children to slide the shoulder belt behind them or under their arm. If a child from 1 to 12 years old (not in a rear facing child seat) must ride in the front passenger seat, move the seat as far back as possible and use the proper child restraint. (Refer to “Child Restraints”) You should read the instructions provided with your child restraint to make sure that you are using it properly. 2. All occupants should always wear their lap and shoulder belts properly. 3. The driver and front passenger seats should be moved back as far as practical to allow the Advanced Front Air Bags room to inflate.
4. Do not lean against the door or window. If your vehicle has side air bags, and deployment occurs, the side air bags will inflate forcefully into the space between you and the door. 5. If the air bag system in this vehicle needs to be modified to accommodate a disabled person, contact the Customer Center. Phone numbers are provided under ⴖIf You Need Assistanceⴖ.
WARNING!
• Relying on the air bags alone could lead to more severe injuries in a collision. The air bags work with your seat belt to restrain you properly. In some collisions, the air bags won’t deploy at all. Always wear your seat belts even though you have air bags.
(Continued)
THINGS TO KNOW BEFORE STARTING YOUR VEHICLE 45
WARNING! (Continued)
• Being too close to the steering wheel or instrument panel during Advanced Front Air Bag deployment could cause serious injury, including death. Air Bags need room to inflate. Sit back, comfortably extending your arms to reach the steering wheel or instrument panel. • Seat-Mounted Side Air Bags (SAB) also need room to inflate. Do not lean against the door or window. Sit upright in the center of the seat. • In a collision, you and your passengers can suffer much greater injuries if you are not properly buckled up. You can strike the interior of your vehicle or other passengers, or you can be thrown out of the vehicle. Always be sure you and others in your vehicle are buckled up properly.
46 THINGS TO KNOW BEFORE STARTING YOUR VEHICLE Buckle up even though you are an excellent driver, even on short trips. Someone on the road may be a poor driver and cause a collision that includes you. This can happen far away from home or on your own street. Research has shown that seat belts save lives, and they can reduce the seriousness of injuries in a collision. Some of the worst injuries happen when people are thrown from the vehicle. Seat belts reduce the possibility of ejection and the risk of injury caused by striking the inside of the vehicle. Everyone in a motor vehicle should be belted at all times.
Lap/Shoulder Belts All seating positions in your vehicle are equipped with lap/shoulder belts. The belt webbing retractor is de- signed to lock during very sudden stops or collisions. This feature allows the shoulder part of the belt to move freely with you under normal conditions. However, in a collision the belt will lock and reduce the risk of you striking the inside of the vehicle or being thrown out.
WARNING!
• It is dangerous to ride in a cargo area, inside or outside of a vehicle. In a collision, people riding in these areas are more likely to be seriously injured or killed. • Do not allow people to ride in any area of your vehicle that is not equipped with seats and seat belts.
(Continued)
WARNING! (Continued)
using a seat belt properly.
• Be sure everyone in your vehicle is in a seat and • Wearing a seat belt incorrectly is dangerous. Seat belts are designed to go around the large bones of your body. These are the strongest parts of your body and can take the forces of a collision the best. Wearing your belt in the wrong place could make your injuries in a collision much worse. You might suffer internal injuries, or you could even slide out of part of the belt. Follow these instructions to wear your seat belt safely and to keep your pas- sengers safe, too.
(Continued)
THINGS TO KNOW BEFORE STARTING YOUR VEHICLE 47
WARNING! (Continued)
• Two people should never be belted into a single seat belt. People belted together can crash into one another in a collision, hurting one another badly. Never use a lap/shoulder belt or a lap belt for more than one person, no matter what their size.
Lap/Shoulder Belt Operating Instructions 1. Enter the vehicle and close the door. Sit back and adjust the seat.
48 THINGS TO KNOW BEFORE STARTING YOUR VEHICLE 2. The seat belt latch plate is above the back of the front seat and next to your arm in the rear seat. Grasp the latch plate and pull out the belt. Slide the latch plate up the webbing as far as necessary to allow the belt to go around your lap.
3. When the belt is long enough to fit, insert the latch plate into the buckle until you hear a “click.”
Pulling Out The Lap/Shoulder Belt Latch Plate
Inserting Latch Plate Into Buckle
WARNING!
• A belt that is buckled into the wrong buckle will not protect you properly. The lap portion could ride too high on your body, possibly causing internal injuries. Always buckle your belt into the buckle nearest you. • A belt that is loose will not protect you properly. In a sudden stop you could move too far forward, increasing the possibility of injury. Wear your seat belt snugly.
(Continued)
THINGS TO KNOW BEFORE STARTING YOUR VEHICLE 49
WARNING! (Continued)
• A belt that is worn under your arm is dangerous. Your body could strike the inside surfaces of the vehicle in a collision, increasing head and neck injury. A belt worn under the arm can cause internal injuries. Ribs aren’t as strong as shoulder bones. Wear the belt over your shoulder so that the strongest bones will take the force in a collision. • A shoulder belt placed behind you will not protect you from injury during a collision. You are more likely to hit your head in a collision if you do not wear your shoulder belt. The lap and shoulder belt are meant to be used together.
4. Position the lap belt across your thighs, below your abdomen. To remove slack in the lap belt portion, pull up on the shoulder belt. To loosen the lap belt if it is too tight, tilt the latch plate and pull on the lap belt. A snug belt reduces the risk of sliding under the belt in a collision.
50 THINGS TO KNOW BEFORE STARTING YOUR VEHICLE NOTE: The Seat Belt Reminder Light will remain on until the driver and front passenger (if equipped with front passenger BeltAlert威) seat belt is buckled. For further information, refer to “Enhanced Seat Belt Use Reminder System (BeltAlert威)”.
Removing Slack From Belt
WARNING!
• A lap belt worn too high can increase the risk of internal injury in a collision. The belt forces won’t be at the strong hip and pelvic bones, but across your abdomen. Always wear the lap belt as low as possible and keep it snug. • A twisted belt cannot do its job as well. In a collision, it could even cut into you. Be sure the belt is straight. If you cannot straighten a belt in your vehicle, take it to your authorized dealer immediately and have it fixed.
5. Position the shoulder belt on your chest so that it is comfortable and not resting on your neck. The retractor will withdraw any slack in the belt.
6. To release the belt, push the red button on the buckle. The belt will automatically retract to its stowed position. If necessary, slide the latch plate down the webbing to allow the belt to retract fully.
WARNING!
A frayed or torn belt could rip apart in a collision and leave you with no protection. Inspect the belt system periodically, checking for cuts, frays, or loose parts. Damaged parts must be replaced immediately. Do not disassemble or modify the system. Seat belt assemblies must be replaced after a collision if they have been damaged (i.e., bent retractor, torn web- bing, etc.).
THINGS TO KNOW BEFORE STARTING YOUR VEHICLE 51
Rear Center Lap/Shoulder Belt Retractor Lockout — Four-Door Models Only This feature is designed to lock the retractor whenever the 60% rear seatback is not fully latched. This prevents someone from wearing the rear center lap/shoulder belt when the rear seatback is not fully latched. NOTE: • If the rear center lap/shoulder belt cannot be pulled • If the rear seatback is properly latched and the rear center lap/shoulder belt still cannot be pulled out, the Automatic-Locking Retractor (ALR) system may be activated. To reset this feature you must let all of the belt webbing return into the retractor. You will not be able to pull out more webbing until all of the webbing has been returned back into the retractor.out, check that the rear seatback is fully latched.
52 THINGS TO KNOW BEFORE STARTING YOUR VEHICLE
WARNING!
The rear center lap/shoulder belt is equipped with a lock-out feature to ensure that the rear seatback is in the fully upright and locked position when occupied. If the rear seatback is not fully upright and locked and the rear center lap/shoulder belt can be pulled out of the retractor, the vehicle should immediately be taken to your authorized dealer for service. Failure to follow this warning could result in serious or fatal injury.
Lap/Shoulder Belt Untwisting Procedure Use the following procedure to untwist a twisted lap/ shoulder belt. 1. Position the latch plate as close as possible to the anchor point. 2. At about 6 to 12 in (15 to 30 cm) above the latch plate, grasp and twist the belt webbing 180 degrees to create a fold that begins immediately above the latch plate. 3. Slide the latch plate upward over the folded webbing. The folded webbing must enter the slot at the top of the latch plate. 4. Continue to slide the latch plate up until it clears the folded webbing.
Adjustable Upper Shoulder Belt Anchorage In the front seat positions, the shoulder belt anchorage can be adjusted upward or downward to position the belt away from your neck. Push in on the anchorage near your outside shoulder and slide it up or down to reach the position that serves you best.
THINGS TO KNOW BEFORE STARTING YOUR VEHICLE 53
WARNING!
Position the shoulder belt height adjusters so that the belt rests across the middle of your shoulder. Failure to adjust the safety belt properly could reduce the effectiveness of the seat belt and increase the risk of injury in a collision.
As a guide, if you are shorter than average, you will prefer a lower position, and if you are taller than average, you will prefer a higher position. When you release the anchorage, try to move it up or down to make sure that it is locked in position.
Adjusting Upper Shoulder Belt
54 THINGS TO KNOW BEFORE STARTING YOUR VEHICLE Seat Belts In Passenger Seating Positions The seat belts in the passenger seating positions are equipped with Automatic Locking Retractors (ALR) which are used to secure a child restraint system. For additional information, refer to “Installing Child Re- straints Using The Vehicle Seat Belt” under the “Child Restraints” section. The chart below defines the type of feature for each seating position.
ALR ALR
Passenger
Center N/A ALR
Driver First Row N/A Second Row ALR • N/A — Not Applicable • ALR — Automatic Locking Retractor If the passenger seating position is equipped with an ALR and is being used for normal usage: Only pull the belt webbing out far enough to comfortably wrap around the occupant’s mid-section so as to not
activate the ALR. If the ALR is activated, you will hear a ratcheting sound as the belt retracts. Allow the webbing to retract completely in this case and then carefully pull out only the amount of webbing necessary to comfort- ably wrap around the occupant’s mid-section. Slide the latch plate into the buckle until you hear a ⬙click.⬙ Automatic Locking Retractor Mode (ALR) — If Equipped In this mode, the shoulder belt is automatically pre- locked. The belt will still retract to remove any slack in the shoulder belt. The Automatic Locking Mode is avail- able on all passenger-seating positions with a combina- tion lap/shoulder belt. Use the Automatic Locking Mode anytime a child safety seat is installed in a seating position that has a belt with this feature. Children 12 years old and under should always be properly restrained in the rear seat.
How To Engage The Automatic Locking Mode 1. Buckle the combination lap and shoulder belt. 2. Grasp the shoulder portion and pull downward until the entire belt is extracted. 3. Allow the belt to retract. As the belt retracts, you will hear a clicking sound. This indicates the safety belt is now in the Automatic Locking Mode. How To Disengage The Automatic Locking Mode Unbuckle the combination lap/shoulder belt and allow it to retract completely to disengage the Automatic Locking Mode and activate the vehicle sensitive (emergency) locking mode.
THINGS TO KNOW BEFORE STARTING YOUR VEHICLE 55
WARNING!
• The belt and retractor assembly must be replaced if the seat belt assembly Automatic Locking Re- tractor (ALR) feature or any other seat belt func- tion is not working properly when checked ac- cording to the procedures in the Service Manual. • Failure to replace the belt and retractor assembly
could increase the risk of injury in collisions.
Energy Management Feature This vehicle has a safety belt system with an Energy Management feature in the front seating positions to help further reduce the risk of injury in the event of a head-on collision. This safety belt system has a retractor assembly that is designed to release webbing in a controlled manner. This feature is designed to help reduce the belt force acting on the occupant’s chest.
56 THINGS TO KNOW BEFORE STARTING YOUR VEHICLE
WARNING!
• The belt and retractor assembly must be replaced if the seat belt assembly Automatic Locking Re- tractor (ALR) feature or any other seat belt func- tion is not working properly when checked ac- cording to the procedures in the Service Manual. • Failure to replace the belt and retractor assembly
could increase the risk of injury in collisions.
Seat Belt Pretensioners The seat belts for both front seating positions are equipped with pretensioning devices that are designed to remove slack from the seat belt in the event of a collision. These devices may improve the performance of the seat belt by assuring that the belt is tight about the occupant early in a collision. Pretensioners work for all size occu- pants, including those in child restraints.
NOTE: These devices are not a substitute for proper seat belt placement by the occupant. The seat belt still must be worn snugly and positioned properly. The pretensioners are triggered by the Occupant Re- straint Controller (ORC). Like the air bags, the preten- sioners are single use items. A deployed pretensioner or a deployed air bag must be replaced immediately. Enhanced Seat Belt Use Reminder System (BeltAlert姞) BeltAlert威 is a feature intended to remind the driver and front passenger (if equipped with front passenger BeltAlert威) to fasten their seat belts. The feature is active whenever the ignition is on. If the driver or front seat passenger is unbelted, the Seat Belt Reminder Light will turn on and remain on until both front seat belts are fastened.
The BeltAlert威 warning sequence begins after the vehicle speed is over 5 mph (8 km/h), by blinking the Seat Belt Reminder Light and sounding an intermittent chime. Once the sequence starts, it will continue for the entire duration or until the respective seatbelts are fastened. After the sequence completes, the Seat Belt Reminder Light remains illuminated until the respective seat belts are fastened. The driver should instruct all other occu- pants to fasten their seat belts. If a front seat belt is unbuckled while traveling at speeds greater than 5 mph (8 km/h), BeltAlert威 will provide both audio and visual notification. The front passenger seat BeltAlert威 is not active when the front passenger seat is unoccupied. BeltAlert威 may be triggered when an animal or heavy object is on the front passenger seat or when the seat (if equipped). It is recommended that pets be restrained in the rear seat in pet harnesses or pet carriers that are secured by seat belts, and cargo is properly stowed.
is folded flat
THINGS TO KNOW BEFORE STARTING YOUR VEHICLE 57
BeltAlert威 can be enabled or disabled by your authorized dealer. Chrysler Group LLC does not recommend deac- tivating BeltAlert威. NOTE: Although BeltAlert威 has been deactivated, the Seat Belt Reminder Light will continue to illuminate while the driver’s or front passenger (if equipped with BeltAlert威) seat belt remains unfastened. Seat Belts And Pregnant Women We recommend that pregnant women use seat belts throughout their pregnancy. Keeping the mother safe is the best way to keep the baby safe. Pregnant women should wear the lap part of the belt across the thighs and as snug across the hips as possible. Keep the belt low so that it does not come across the abdomen. That way the strong bones of the hips will take the force if there is a collision.Supplemental Restraint System (SRS) — Air Bags This vehicle has Advanced Front Air Bags for both the driver and right front passenger as a supplement to the seat belt restraint systems. The driver’s Advanced Front Air Bag is mounted in the steering wheel. The Advanced Front Passenger Air Bag is mounted in the instrument panel, above the glove compartment. The letters SRS are embossed on the air bag covers.
58 THINGS TO KNOW BEFORE STARTING YOUR VEHICLE Seat Belt Extender If a seat belt is too short, even when fully extended and when the adjustable upper shoulder belt anchorage (if equipped) is in its lowest position, your authorized dealer can provide you with a seat belt extender. This extender should be used only if the existing belt is not long enough. When it is not required, remove the ex- tender and store it.
WARNING!
Using a seat belt extender when not needed can increase the risk of injury in a collision. Only use when the seat belt is not long enough when it is worn low and snug, and in the recommended seating positions. Remove and stow the seat belt extender when not needed.
2
THINGS TO KNOW BEFORE STARTING YOUR VEHICLE 59
The Advanced Front Air Bags have a multistage inflator design. This allows the air bag to have different rates of inflation that are based on several factors, including the severity and type of collision. This vehicle may be equipped with driver and/or front passenger seat track position sensors that may adjust the inflation rate of the Advanced Front Air Bags based upon seat position. This vehicle may be equipped with a driver and/or front passenger seat belt buckle switch that detects whether the driver or front passenger seat belt is fastened. The seat belt buckle switch may adjust the inflation rate of the Advanced Front Air Bags. This vehicle may be equipped with Supplemental Seat- Mounted Side Air Bags (SAB). The SABs are marked with an air bag label sewn into the outboard side of the front seats.Advanced Front Air Bag And Knee Bolster Locations
1 — Driver And Passenger Advanced Front Air Bags 2 — Knee Bolster NOTE: The Driver and Front Passenger Advanced Front Air Bags are certified to the new Federal regulations for Advanced Air Bags.
60 THINGS TO KNOW BEFORE STARTING YOUR VEHICLE NOTE: • Air Bag covers may not be obvious in the interior trim, • After any accident, the vehicle should be taken to an
but they will open during air bag deployment.
authorized dealer immediately.
Air Bag System Components Your vehicle may be equipped with the following air bag system components: • Occupant Restraint Controller (ORC) • Air Bag Warning Light • Steering Wheel and Column • Instrument Panel • Knee Impact Bolster • Driver Advanced Front Air Bag • Passenger Advanced Front Air Bag
• Supplemental Seat-Mounted Side Air Bags (SAB) • Front and Side Impact Sensors • Front Seat Belt Pretensioners, Seat Belt Buckle Switch,
and Seat Track Position Sensors
Advanced Front Air Bag Features The Advanced Front Air Bag system has multistage driver and front passenger air bags. This system provides output appropriate to the severity and type of collision as determined by the Occupant Restraint Controller (ORC), which may receive information from the front impact sensors. The first stage inflator is triggered immediately during an impact that requires air bag deployment. This low output is used in less severe collisions. A higher energy output is used for more severe collisions.
THINGS TO KNOW BEFORE STARTING YOUR VEHICLE 61
WARNING! (Continued)
• If your vehicle is equipped with SAB, do not attach cupholders or any other objects on or around the door. The inflating SAB could drive the objects into occupants, causing serious injury. • Do not cover or place items on the air bag covers. These items may cause serious injury during in- flation. • Do not drill, cut or tamper with the knee bolster in • Do not mount any accessories to the knee bolster such as alarm lights, stereos, citizen band radios, etc.
any way.
WARNING!
• No objects should be placed over or near the air bag on the instrument panel, because any such objects could cause harm if the vehicle is in a collision severe enough to cause the air bag to inflate. • Do not put anything on or around the air bag covers or attempt to open them manually. You may damage the air bags and you could be injured because the air bags may no longer be functional. The protec- tive covers for the air bag cushions are designed to open only when the air bags are inflating. • If your vehicle is equipped with Supplemental Seat-Mounted Side Air Bags (SAB), do not use accessory seat covers or place objects between you and the SAB; the performance could be adversely affected and/or objects could be pushed into you, causing serious injury.
(Continued)
62 THINGS TO KNOW BEFORE STARTING YOUR VEHICLE Supplemental Seat-Mounted Side Air Bags (SAB) — If Equipped Supplemental Seat-Mounted Side Air Bags (SAB) may provide enhanced protection to help protect an occupant during a side impact. The SAB is marked with an air bag label sewn into the outboard side of the front seats.
When the air bag deploys, it opens the seam between the front and side of the seat’s trim cover. Each air bag deploys independently; a left side impact deploys the left air bag only and a right-side impact deploys the right air bag only. NOTE: • Air Bag covers may not be obvious in the interior trim, • Being too close to the SAB during deployment could
but they will open during air bag deployment.
cause you to be severely injured or killed.
Knee Impact Bolsters The Knee Impact Bolsters help protect the knees of the driver and the front passenger, and position front occu- pants for the best interaction with the Advanced Front Air Bags.
Supplemental Seat-Mounted Side Air Bag Location
Along with seat belts and pretensioners, Advanced Front Air Bags work with the knee bolsters to provide im- proved protection for the driver and front passenger. Side air bags also work with seat belts to improve occupant protection. Air Bag Deployment Sensors And Controls
Occupant Restraint Controller (ORC) The ORC is part of a Federally regulated safety system required for this vehicle. The ORC determines if deployment of the front and/or side air bags is required in a frontal or side collision. Based on the impact sensor’s signals, a central electronic ORC deploys the Advanced Front Air Bags, Supplemen- tal Seat-Mounted Side Air Bags (SAB) — if equipped, and front seat belt pretensioners, as required, depending on several factors, including the severity and type of impact.
THINGS TO KNOW BEFORE STARTING YOUR VEHICLE 63
Advanced Front Air Bags are designed to provide addi- tional protection by supplementing the seat belts in certain frontal collisions depending on several factors, including the severity and type of collision. Advanced Front Air Bags are not expected to reduce the risk of injury in rear, side, or rollover collisions. The Advanced Front Air Bags will not deploy in all frontal collisions, including some that may produce sub- stantial vehicle damage — for example, some pole colli- sions, truck underrides, and angle offset collisions. On the other hand, depending on the type and location of impact, Advanced Front Air Bags may deploy in crashes with little vehicle front-end damage but that produce a severe initial deceleration. The side air bags will not deploy in all side collisions. Side air bag deployment will depend on the severity and type of collision.64 THINGS TO KNOW BEFORE STARTING YOUR VEHICLE Because air bag sensors measure vehicle deceleration over time, vehicle speed and damage by themselves are not good indicators of whether or not an air bag should have deployed. Seat belts are necessary for your protection in all crashes, and also are needed to help keep you in position, away from an inflating air bag. The ORC also monitors the readiness of the electronic parts of the air bag system whenever the ignition switch is in the START or ON/RUN positions. If the key is in the LOCK position, in the ACC position, or not in the ignition, the air bag system is not on and the air bags will not inflate. The ORC contains a backup power supply system that may deploy the air bags even if the battery loses power or it becomes disconnected prior to deployment.
Also, the ORC turns on the Air Bag Warning Light for four to eight seconds for a self-check when the ignition is first turned on. After the self-check, the Air Bag Warning Light will turn off. If the ORC detects a malfunction in any part of the system, it turns on the Air Bag Warning Light either momentarily or continuously. A single chime will sound if the light comes on again after initial startup. It also includes diagnostics that will illuminate the instru- ment cluster Air Bag Warning Light if a malfunction is noted that could affect the air bag system. The diagnos- tics also record the nature of the malfunction.
WARNING!
Ignoring the Air Bag Warning Light in your instru- ment panel could mean you won’t have the air bags to protect you in a collision. If the light does not come on as a bulb check when the ignition is first turned on, stays on after you start the vehicle, or if it comes on as you drive, have an authorized dealer service the air bag system immediately.
Driver And Passenger Advanced Front Air Bag Inflator Units The Driver and Passenger Advanced Front Air Bag Inflator Units are located in the center of the steering wheel and on the right side of the instrument panel. When the ORC detects a collision requiring the Ad- vanced Front Air Bags, it signals the inflator units. A large quantity of non-toxic gas is generated to inflate the Advanced Front Air Bags. Different air bag inflation rates
THINGS TO KNOW BEFORE STARTING YOUR VEHICLE 65
are possible, based on the collision type and severity. The steering wheel hub trim cover and the upper right side of the instrument panel separate and fold out of the way as the air bags inflate to their full size. The air bags fully inflate in about 50 to 70 milliseconds. This is about half of the time it takes to blink your eyes. The air bags then quickly deflate while helping to restrain the driver and front passenger. The Advanced Front Air Bag gas is vented through the vent holes in the sides of the air bag. In this way, the air bags do not interfere with your control of the vehicle. Supplemental Seat-Mounted Side Air Bags (SAB) Inflator Units — If Equipped The Supplemental Seat-Mounted Side Air Bags Inflator Units (if equipped) are designed to activate only in certain side collisions.66 THINGS TO KNOW BEFORE STARTING YOUR VEHICLE The ORC determines if a side collision requires the side air bags to inflate, based on several factors, including the severity and type of collision. Based on several factors, including the severity and type of collision, the side air bag inflator on the crash side of the vehicle is triggered, releasing a quantity of non-toxic gas. The inflating SAB exits through the seat seam into the space between the occupant and the door. The SAB fully inflate in about 10 milliseconds. The side air bag moves at a very high speed and with such a high force that it could injure you if you are not seated properly, or if items are positioned in the area where the side air bag inflates. This especially applies to children. Knee Impact Bolsters The Knee Impact Bolsters help protect the knees of the driver and the front passenger, and position front occu- pants for the best interaction with the Advanced Front Air Bag.
Front And Side Impact Sensors In front and side impacts, front and side impact sensors can aid the ORC in determining the appropriate response to certain impact events. Enhanced Accident Response System In the event of an impact causing air bag deployment, if the communication network remains intact, and the power remains intact, depending on the nature of the event the ORC will determine whether to have the Enhanced Accident Response System perform the follow- ing functions: • Cut off fuel to the engine. • Flash hazard lights as long as the battery has power or • Turn on the interior lights, which remain on as long as the battery has power or until the ignition key is removed.
until the ignition key is turned off.
• Unlock the doors automatically. In order to reset the Enhanced Accident Response System functions after an event, the ignition switch must be changed from IGN ON to IGN OFF. If A Deployment Occurs The Advanced Front Air Bags are designed to deflate immediately after deployment. NOTE: Front and/or side air bags will not deploy in all collisions. This does not mean something is wrong with the air bag system. If you do have a collision which deploys the air bags, any or all of the following may occur: • The nylon air bag material may sometimes cause abrasions and/or skin reddening to the driver and front passenger as the air bags deploy and unfold. The abrasions are similar to friction rope burns or those you might get sliding along a carpet or gymnasium
THINGS TO KNOW BEFORE STARTING YOUR VEHICLE 67
floor. They are not caused by contact with chemicals. They are not permanent and normally heal quickly. However, if you haven’t healed significantly within a few days, or if you have any blistering, see your doctor immediately. • As the air bags deflate you may see some smoke-like particles. The particles are a normal by-product of the process that generates the non-toxic gas used for air bag inflation. These airborne particles may irritate the skin, eyes, nose, or throat. If you have skin or eye irritation, rinse the area with cool water. For nose or throat irritation, move to fresh air. If the irritation continues, see your doctor. If these particles settle on your clothing, follow the garment manufacturer’s in- structions for cleaning. • Do not drive your vehicle after the air bags have deployed. If you are involved in another collision, the air bags will not be in place to protect you.68 THINGS TO KNOW BEFORE STARTING YOUR VEHICLE
WARNING!
• Deployed air bags and seat belt pretensioners cannot protect you in another collision. Have the air bags, seat belt pretensioner, and seat belt retractor assembly replaced by an authorized dealer immediately. Also, have the Occupant Re- straint Controller (ORC) system serviced as well.
(Continued)
WARNING! (Continued)
• Do not attempt to modify any part of your air bag system. The air bag may inflate accidentally or may not function properly if modifications are made. Take your vehicle to an authorized dealer for any air bag system service. If your seat, includ- ing your trim cover and cushion, needs to be serviced in any way (including removal or loosening/tightening of seat attachment bolts), take the vehicle to your authorized dealer. Only manufacturer approved seat accessories may be used. If it is necessary to modify the air bag system for persons with disabilities, contact your autho- rized dealer.
Maintaining Your Air Bag System
WARNING!
• Modifications to any part of the air bag system could cause it to fail when you need it. You could be injured if the air bag system is not there to protect you. Do not modify the components or wiring, including adding any kind of badges or stickers to the steering wheel hub trim cover or the upper right side of the instrument panel. Do not modify the front bumper or vehicle body structure, or add aftermarket side steps or running boards. • You need proper knee impact protection in a collision. Do not mount or locate any aftermarket equipment on or behind the knee bolsters. • It is dangerous to try to repair any part of the air bag system yourself. Be sure to tell anyone who works on your vehicle that it has an air bag system.
THINGS TO KNOW BEFORE STARTING YOUR VEHICLE 69
Air Bag Warning Light
You will want to have the air bags ready to inflate for your protection in a collision. The Air Bag Warning Light monitors the internal circuits and interconnecting wiring associated with air bag system electrical components. While the air bag system is designed to be maintenance free, if any of the following occurs, have an authorized dealer service the air bag system immediately. • The Air Bag Warning Light does not come on during the four to eight seconds when the ignition switch is first turned to the ON/RUN position. • The Air Bag Warning Light remains on after the four to • The Air Bag Warning Light comes on intermittently or
eight-second interval.
remains on while driving.
70 THINGS TO KNOW BEFORE STARTING YOUR VEHICLE If the speedometer, tachometer, or any engine NOTE: related gauges are not working, the Occupant Restraint Controller (ORC) may also be disabled. The air bags may not be ready to inflate for your protection. Promptly check the fuse block for blown fuses. Refer to the label located on the inside of the fuse block cover for the proper air bag fuses. See your authorized dealer if the fuse is good. Event Data Recorder (EDR) This vehicle is equipped with an event data recorder (EDR). The main purpose of an EDR is to record, in certain crash or near crash-like situations, such as an air bag deployment or hitting a road obstacle, data that will assist in understanding how a vehicle’s systems per- formed. The EDR is designed to record data related to vehicle dynamics and safety systems for a short period of time, typically 30 seconds or less. The EDR in this vehicle is designed to record such data as: • How various systems in your vehicle were operating;
were buckled/fastened;
• Whether or not the driver and passenger safety belts • How far (if at all) the driver was depressing the accelerator and/or brake pedal; and, • How fast the vehicle was traveling. These data can help provide a better understanding of the circumstances in which crashes and injuries occur. NOTE: EDR data are recorded by your vehicle only if a non-trivial crash situation occurs; no data are recorded by the EDR under normal driving conditions and no per- sonal data (e.g., name, gender, age, and crash location) are recorded. However, other parties, such as law en- forcement, could combine the EDR data with the type of personally identifying data routinely acquired during a crash investigation.
To read data recorded by an EDR, special equipment is required, and access to the vehicle or the EDR is needed. In addition to the vehicle manufacturer, other parties, such as law enforcement, that have the special equip- ment, can read the information if they have access to the vehicle or the EDR. Child Restraints Everyone in your vehicle needs to be buckled up at all times, including babies and children. Every state in the United States and all Canadian provinces require that small children ride in proper restraint systems. This is the law, and you can be prosecuted for ignoring it. Children 12 years or under should ride properly buckled up in a rear seat, if available. According to crash statistics, children are safer when properly restrained in the rear seats, rather than in the front. There are different sizes and types of restraints for children from newborn size to the child almost large
THINGS TO KNOW BEFORE STARTING YOUR VEHICLE 71
enough for an adult safety belt. Always check the child seat owner’s manual to ensure you have the correct seat for your child. Use the restraint that is correct for your child.WARNING!
In a collision, an unrestrained child, even a tiny baby, can become a projectile inside the vehicle. The force required to hold even an infant on your lap could become so great that you could not hold the child, no matter how strong you are. The child and others could be badly injured. Any child riding in your vehicle should be in a proper restraint for the child’s size.
Infants And Child Restraints Safety experts recommend that children ride rearward- facing in the vehicle until they are two years old or until they reach either the height or weight limit of their rear
72 THINGS TO KNOW BEFORE STARTING YOUR VEHICLE facing child safety seat. Two types of child restraints can be used rearward-facing: infant carriers and convertible child seats. The infant carrier is only used rearward-facing in the vehicle. It is recommended for children from birth until they reach the weight or height limit of the infant carrier. Convertible child seats can be used either rearward- facing or forward-facing in the vehicle. Convertible child seats often have a higher weight limit in the rearward- facing direction than infant carriers do, so they can be used rearward-facing by children who have outgrown their infant carrier but are still less than at least two years old. Children should remain rearward-facing until they reach the highest weight or height allowed by their convertible child seat. Both types of child restraints are held in the vehicle by the lap/shoulder belt or the LATCH child restraint anchor system. Refer to “Lower Anchors and Tether for CHildren (LATCH)”.
WARNING!
• Rearward-facing child seats must never be used in the front seat of a vehicle with the front passenger air bag. An air bag deployment could cause severe injury or death to infants in this position. • Improper installation can lead to failure of an infant or child restraint. It could come loose in a collision. The child could be badly injured or killed. Follow the manufacturer’s directions ex- actly when installing an infant or child restraint.
Here are some tips for getting the most out of your child restraint: • Before buying any restraint system, make sure that it has a label certifying that it meets all applicable Safety Standards. The manufacturer also recommends that you try a child restraint in the vehicle seats where you will use it before you buy it.
• The restraint must be appropriate for your child’s weight and height. Check the label on the restraint for weight and height limits. • Carefully follow the instructions that come with the restraint. If you install the restraint improperly, it may not work when you need it. • The seat belts in the passenger seating positions are equipped with either an Automatic Locking Retractor (ALR) or a cinching latch plate or both. Both types of seat belts are designed to keep the lap portion of the seat belt tight around the child restraint so that it is not necessary to use a locking clip. The ALR will make a ratcheting noise if you extract the entire belt from the retractor and then allow the belt to retract into the retractor. For additional information on ALR, refer to “Automatic Locking Mode”.
THINGS TO KNOW BEFORE STARTING YOUR VEHICLE 73
• In the rear seat, you may have trouble tightening the lap/shoulder belt on the child restraint because the buckle or latch plate is too close to the belt path opening on the restraint. Disconnect the latch plate from the buckle and twist the short buckle-end belt several times to shorten it. Insert the latch plate into the buckle with the release button facing out. • If the belt still cannot be tightened, or if pulling and pushing on the restraint loosens the belt, disconnect the latch plate from the buckle, turn the buckle around, and insert the latch plate into the buckle again. If you still cannot make the child restraint secure, try a different seating position. • Buckle the child into the restraint exactly as the
manufacturer’s instructions tell you.
74 THINGS TO KNOW BEFORE STARTING YOUR VEHICLE
WARNING!
When your child restraint is not in use, secure it in the vehicle with the seat belt or remove it from the vehicle. Do not leave it loose in the vehicle. In a sudden stop or accident, it could strike the occupants or seatbacks and cause serious personal injury.
Older Children And Child Restraints Children who are two years old or who have outgrown their rear-facing convertible child seat can ride forward- facing in the vehicle. Forward-facing child seats and convertible child seats used in the forward-facing direc- tion are for children who are over two years old or who have outgrown the rear-facing weight or height limit of their rear-facing convertible child seat. Children should remain in a forward-facing child seat with a harness for as long as possible, up to the highest weight or height allowed by the child seat. These child seats are also held
in the vehicle by the lap/shoulder belt or the LATCH child restraint anchorage system. Refer to “Lower An- chors and Tether for CHildren (LATCH)”. is above the All children whose weight or height forward-facing limit for the child seat should use a belt-positioning booster seat until the vehicle’s seat belts fit properly. If the child cannot sit with knees bent over the vehicle’s seat cushion while the child’s back is against the seatback, they should use a belt-positioning booster seat. The child and belt-positioning booster seat are held in the vehicle by the lap/shoulder belt. Children Too Large For Booster Seats Children who are large enough to wear the shoulder belt comfortably, and whose legs are long enough to bend over the front of the seat when their back is against the seatback, should use the lap/shoulder belt in a rear seat. • Make sure that the child is upright in the seat.
as possible.
• The lap portion should be low on the hips and as snug • Check belt fit periodically. A child’s squirming or • If the shoulder belt contacts the face or neck, move the child closer to the center of the vehicle. Never allow a child to put the shoulder belt under an arm or behind the back.
slouching can move the belt out of position.
For additional information, refer to
NOTE: www.seatcheck.org or call 1–866–SEATCHECK. Cana- dian residents should refer to Transport Canada’s web-