- 2003 Toyota Sienna Owners Manuals
- Toyota Sienna Owners Manuals
- 1999 Toyota Sienna Owners Manuals
- Toyota Sienna Owners Manuals
- 2005 Toyota Sienna Owners Manuals
- Toyota Sienna Owners Manuals
- 2010 Toyota Sienna Owners Manuals
- Toyota Sienna Owners Manuals
- 2014 Toyota Sienna Owners Manuals
- Toyota Sienna Owners Manuals
- 1998 Toyota Sienna Owners Manuals
- Toyota Sienna Owners Manuals
- 2004 Toyota Sienna Owners Manuals
- Toyota Sienna Owners Manuals
- 2001 Toyota Sienna Owners Manuals
- Toyota Sienna Owners Manuals
- 2006 Toyota Sienna Owners Manuals
- Toyota Sienna Owners Manuals
- 2009 Toyota Sienna Owners Manuals
- Toyota Sienna Owners Manuals
- 2000 Toyota Sienna Owners Manuals
- Toyota Sienna Owners Manuals
- 2012 Toyota Sienna Owners Manuals
- Toyota Sienna Owners Manuals
- 2008 Toyota Sienna Owners Manuals
- Toyota Sienna Owners Manuals
- 2007 Toyota Sienna Owners Manuals
- Toyota Sienna Owners Manuals
- 2002 Toyota Sienna Owners Manuals
- Toyota Sienna Owners Manuals
- 2011 Toyota Sienna Owners Manuals
- Toyota Sienna Owners Manuals
- 2015 Toyota Sienna Owners Manuals
- Toyota Sienna Owners Manuals
- Download PDF Manual
-
Random playback
■ Playing files from a folder in random order
that corresponds to “RDM”.
Press To cancel, press the button twice.
■ Playing all the files from a USB memory in random order
that corresponds to “RDM” twice.
Press To cancel, press the button again.
Repeat play
■ Repeating a file
that corresponds to “RPT”.
Press To cancel, press the button twice.
■ Repeating all the files in a folder
that corresponds to “RPT” twice.
Press To cancel, press the button again.
414
3-2. Using the audio system
Switching the display
Press
Each time the button is pressed, the display changes in the following order: Track title → Track title/Artist name → Track title/Album name → Track title/Elapsed time
■USB memory functions
Depending on the USB memory that is connected to the system, certain functions may not be available. Disconnecting the device and reconnecting it once again may resolve some malfunctions.
■Error messages
“USB ERROR”: This indicates a problem in the USB memory or its connec-
tion.
“NO SUPPORT”: This indicates that no MP3/WMA files are included in the
USB memory player.
415
3-2. Using the audio system
■USB memory
●Compatible devices
USB memory that can be used for MP3 and WMA playback Depending on the type of USB device, playback may not be possible.
●Compatible device formats
The following device formats can be used: • USB communication formats: USB2.0 FS (12mbps) • File formats: FAT16/32 (Windows) • Correspondence class: Mass storage class MP3 and WMA files written in any format other than those listed above may not play correctly, and their file names and folder names may not be displayed correctly. Items related to standards and limitations are as follows: • Maximum directory hierarchy: 8 levels • Maximum number of folders in a device: 999 (including the root) • Maximum number of files in a device: 65025
• Maximum number of files per folder: 255●MP3 and WMA files
MP3 (MPEG Audio LAYER 3) is a standard audio compression format. Files can be compressed to approximately 1/10 of their original size using MP3 compression. WMA (Windows Media® Audio) is a Microsoft audio compression format. This format compresses audio data to a size smaller than that of the MP3
format. There is a limit to the MP3 and WMA file standards that can be used and to the media/formats on which the files are recorded.416
3-2. Using the audio system
●MP3 file compatibility
• Compatible standards
MP3 (MPEG1 AUDIO LAYERII, III, MPEG2 AUDIO LAYERII, III, MPEG2.5)
• Compatible sampling frequencies
MPEG1 AUDIO LAYERII, III: 32, 44.1, 48 (kHz) MPEG2 AUDIO LAYERII, III: 16, 22.05, 24 (kHz) MPEG2.5: 8, 11.025, 12 (kHz)
• Compatible bit rates (compatible with VBR) MPEG1 AUDIO LAYERII, III: 32-320 (kbps) MPEG2 AUDIO LAYERII, III: 32-160 (kbps) MPEG2.5: 32-160 (kbps)
• Compatible channel modes: stereo, joint stereo, dual channel and
monaural
●WMA file compatibility
• Compatible standards
WMA Ver. 9
• Compatible sampling frequencies HIGH PROFILE 32, 44.1, 48 (kHz)
• Compatible bit rates
HIGH PROFILE 32-320 (kbps, VBR)
●File names
The only files that can be recognized as MP3/WMA and played are those with the extension .mp3 or .wma.
●ID3 and WMA tags
ID3 tags can be added to MP3 files, making it possible to record the track title, artist name, etc. The system is compatible with ID3 Ver. 1.0, 1.1, and Ver. 2.2, 2.3, 2.4 ID3
tags. (The number of characters is based on ID3 Ver. 1.0 and 1.1.) WMA tags can be added to WMA files, making it possible to record the track title and artist name in the same way as with ID3 tags.417
3-2. Using the audio system
●MP3 and WMA playback
When a device containing MP3 or WMA files is connected, all files in the USB memory device are checked. Once the file check is finished, the first MP3 or WMA file is played. To make the file check finish more quickly, we recommend that you do not include any files other than MP3 or WMA files or create any unnecessary folders.
●Extensions
If the file extensions .mp3 and .wma are used for files other than MP3 and WMA files, they will be mistakenly recognized and played as MP3 and WMA files. This may result in large amounts of interference and damage to the speakers.
●Playback
• To play MP3 files with steady sound quality, we recommend a fixed bit rate of at least 128 kbps and a sampling frequency of 44.1 kHz. • There is a wide variety of freeware and other encoding software for MP3 and WMA files on the market, and depending on the status of the encod- ing and the file format, poor sound quality or noise at the start of playback may result. In some cases, playback may not be possible at all. • Microsoft, Windows, and Windows Media are registered trademarks of Microsoft Corporation in the U.S.A. and other countries.
418
3-2. Using the audio system
CAUTION
■While driving
Do not connect USB memory or operate the controls on the USB memory.
NOTICE
■To prevent damage to USB memory
●Do not leave USB memory in the vehicle. The temperature inside the vehi-
cle may become high, resulting in damage to the player.
●Do not push down on or apply unnecessary pressure to the USB memory while it is connected as this may damage the USB memory or its terminal. ●Do not insert foreign objects into the port as this may damage the USB
memory or its terminal.
419
3-2. Using the audio system Optimal use of the audio system
Type A
Adjusting the sound quality and ASL
Type B and C
Selector buttons
Selector knob
Menu button
420
3-2. Using the audio system
Using the audio control function
■ Changing sound quality modes
Type A
Pressing
selects the mode in the following order.
“BAS” → “TRE” → “FAD” → “BAL” → “ASL” Type B and C
STEP 1
Press
STEP 2
Press “BASS”, “MID” (type C only), “TREB”, “FADE”, or “BAL”
that corresponds to the desired mode.
421
3-2. Using the audio system
■ Adjusting sound quality
Turning
or
adjusts the level.
Sound quality
mode
Mode displayed
Level
Turn to the
left
Turn to the
right
Low-pitched
tones*1
Mid-pitched tones*1High-pitched
tones*1
Front/rearvolume balance Left/right volume
balance
BAS
-5 to 5
MID*2
-5 to 5
Low
High
TRE
-5 to 5
FAD
F7 to R7 Shifts to rear
Shifts to
front
BAL
L7 to R7
Shifts to left Shifts to right
*1:The sound quality level is adjusted individually in each audio mode. *2:Type C only
422
3-2. Using the audio system
■ Adjusting the Automatic Sound Levelizer (ASL)
Type A
When “ASL” is selected, turning “ASL” level in the order of “LOW”, “MID” and “HIGH”.
to the right changes the
Turning
to the left turns “ASL” off.
ASL automatically adjusts the volume and tone quality according to vehi- cle speed. Type B and C
STEP 1
Press
STEP 2
Press
that corresponds to “MORE”.
STEP 3
Press
that corresponds to “ASL”.
STEP 4
that corresponds to the desired mode.
Press Type B: “LOW”, “MID”, “HIGH”, or “OFF” Type C: “ON” or “OFF” ASL automatically adjusts the volume and tone quality according to vehicle speed.
423
3-2. Using the audio system
■ Setting the number of preset pages (type B and C)
The number of preset pages desired can be set from 1 to 6. The initial setting is 6 pages.
STEP 1
Press
STEP 2
Press
that corresponds to “MORE”.
STEP 3
Press
that corresponds to “PRESET”.
STEP 4
Press set pages.
that corresponds to the desired number of pre-
■ Language settings (type B and C)
→P. 373
■Trademark owned by SRS Labs, Inc. (type A and B)
The audio systems utilize SRS FOCUS™ and SRS TruBass® audio enhancement technologies, under license from SRS Labs, Inc., in all mode except AM radio mode.
FOCUS, TruBass, SRS and Inc. FOCUS and TruBass technologies are incorporated under license from SRS Labs, Inc.
symbols are trademarks of SRS Labs,
424
3-2. Using the audio system Using the AUX adapter
This adapter can be used to connect a portable audio device and lis- ten to it using the vehicle’s speakers.
STEP 1
Open the cover and connect the portable audio device.
STEP 2
Press
or
■Operating portable audio devices connected to the audio system
The volume can be adjusted using the vehicle’s audio controls. All other adjustments must be made on the portable audio device itself.
■When using a portable audio device connected to the power outlet
Noise may occur during playback. Use the power source of the portable audio device.
425
3-2. Using the audio system Using the steering switches
Some audio features can be controlled using the switches on the steering wheel.
Volume Power on, select audio source Radio mode: Selects a radio
station CD mode: Selects
track, file (MP3
and WMA) and discBluetooth® audio mode:
Selects a track and album
iPod® mode: Selects a song USB memory mode:
Selects a file and folder
RSE mode: Selects
track/ file and chap- ter
426
3-2. Using the audio system
Turning on the power
Press
when the audio system is turned off.
The audio system can be turned off by holding the switch down until you hear a beep.
Changing the audio source
when the audio system is turned on. The audio source Press changes as follows each time the button is pressed. If a mode cannot be used, it will be skipped. Type A: FM (1, 2) → CD player → AUX → AM → SAT (1, 2, 3) Type B and C: FM → SAT → CD player (type B) or CD changer (type C) → RSE* → Bluetooth® audio → AUX → iPod® or USB memory → AM *: If equipped
Adjusting the volume
Press “+” on volume.
to increase the volume and “-” to decrease the
Hold down the button to continue increasing or decreasing the volume.
427
3-2. Using the audio system
Selecting a radio station
STEP 1
Press
to select the radio mode.
STEP 2
Press “∧” or “∨” on
to select a radio station.
To scan for receivable stations, press and hold the switch until you hear a beep.
Selecting a track/file or song
STEP 1
Press USB memory mode.
to select CD, RSE, Bluetooth® audio, iPod® or
STEP 2
Press “∧” or “∨” on song.
Selecting an album
to select the desired track/file or
STEP 1
Press
to select Bluetooth® audio mode.
STEP 2
Press and hold “∧” or “∨” on
until you hear a beep.
Selecting a folder
STEP 1
Press
to select USB memory mode.
STEP 2
Press and hold “∧” or “∨” on
until you hear a beep.
428
3-2. Using the audio system
Selecting a disc in the CD changer (type C only)
STEP 1
Press
to select the CD mode.
STEP 2
Press and hold “∧” or “∨” on
until you hear a beep.
Selecting a track/file or chapter (vehicles with rear seat entertainment system)
STEP 1
Press
to select the RSE mode.
STEP 2
Press “∧” or “∨” on chapter.
to select the desired track/file or
■Canceling automatic selection of a radio station
Press
again.
CAUTION
■To reduce the risk of an accident
Exercise care when operating the audio switches on the steering wheel.
429
3-3. Using the Bluetooth® audio system Bluetooth® audio system∗
The Bluetooth® audio system enables you to enjoy music played on a portable digital audio player (portable player) from the vehicle speakers via wireless communication. This audio system supports Bluetooth®, a wireless data system capable of playing portable audio music without cables. If your por- table player does not support Bluetooth®, the Bluetooth® audio sys- tem will not function. Vehicles with a navigation system
Owners of models equipped with a navigation system should refer to the “NAVIGATION SYSTEM OWNER’S MANUAL”.
Vehicles without a navigation system
Title
Using the Bluetooth® audio system Operating a Bluetooth® enabled portable player Setting up a Bluetooth® enabled portable player Bluetooth® audio system setup
Page P. 433
P. 439
P. 441
P. 446■Conditions under which the system will not operate
●If using a portable player that does not support Bluetooth® ●If the portable player is switched off ●If the portable player is not connected ●If the portable player’s battery is low ●If the portable player is behind the seat or in the glove box or console box ●If metal is covering or touching the portable player
430
∗: If equipped
3-3. Using the Bluetooth® audio system
■When transferring ownership of the vehicle
Be sure to initialize the system to prevent personal data from being improp- erly accessed. (→P. 516)
■About Bluetooth®
Bluetooth is a registered trademark of Bluetooth SIG. Inc.
■Compatible models
●Bluetooth® specifications:
Ver. 1.2, or higher (Recommended: Ver. 2.0+EDR or higher)
●Following Profiles:
• A2DP (Advanced Audio Distribution Profile) Ver. 1.0 or higher • AVRCP (Audio/Video Remote Control Profile) Ver. 1.0 or higher (Ver. 1.3 or higher recommended)
Portable players must correspond to the above specifications in order to be connected to the Bluetooth® audio system. However, please note that some functions may be limited depending on the type of portable player.
■Certification for the Bluetooth® audio system
FCC ID: AJDK025 IC ID: 775E-K025
MADE IN THAILAND This device complies with Part 15 of the FCC Rules and RSS-Gen of IC Rules. Operation is subject to the following two conditions: (1) This device may not cause harmful interference, and (2) This device must accept any interference received, including interference that may cause undesired oper- ation.431
3-3. Using the Bluetooth® audio system
CAUTION
■FCC WARNING
Changes or modifications not expressly approved by the party responsible for compliance could void the user’s authority to operate the equipment. Radio Frequency Radiation Exposure. This equipment complies with FCC/ IC radiation exposure limits set forth for uncontrolled equipment and meets the FCC radio frequency (RF) Exposure Guidelines in Supplement C to OET65 and RSS-102 of the IC radio frequency (RF) Exposure rules. This equipment has very low levels of RF energy that it deemed to comply with- out maximum permissive exposure evaluation (MPE). But it is desirable that it should be installed and operated with at least 7.9 in. (20 cm) and more between the radiator and person’s body (excluding extremities: hands, wrists, feet and ankles). This transmitter must not be co-located or operated in conjunction with any other antenna or transmitter.
■While driving
Do not connect portable players or operate the controls.
NOTICE
■To prevent damage to portable players
Do not leave portable players in the vehicle. The temperature inside the vehicle may become high, resulting in damage to the player.
432
3-3. Using the Bluetooth® audio system Using the Bluetooth® audio system
■ Audio unit
■ Microphone
Display A message, name, number, etc. is displayed. Lower-case characters and special characters cannot be displayed.
Selects items such as menu and number Turn: Selects an item Press: Inputs the selected item Bluetooth® connection con- dition
If “BT” is not displayed, the Bluetooth® audio sys- tem cannot be used.
433
3-3. Using the Bluetooth® audio system
Operating the system using voice commands
By following voice guidance instructions output from the speaker, voice commands enable to the operation of the Bluetooth® audio sys-
tem without the need to check the display or operate
■ Operation procedure when using voice commands
Press the talk switch and follow voice guidance instructions.
■ Auxiliary commands when using voice commands
The following auxiliary commands can be used when operating the system using a voice command: Cancel: Exits the Bluetooth® audio system Repeat: Repeats the previous voice guidance instruction Go back: Returns to the previous procedure Help: Reads aloud the function summary if a help comment is registered for the selected function
434
3-3. Using the Bluetooth® audio system
Using the Bluetooth® audio system for the first time
Before using the Bluetooth® audio system, it is necessary to register a Bluetooth® enabled portable player in the system. Follow the proce- dure below to register (pair) a portable player:
STEP 1
Press
until “BT AUDIO” is displayed.
STEP 2
Press
that corresponds to “SETUP”.
The introductory guidance and portable player name registration instructions are heard.
STEP 3
Select “Pair Audio Player (Pair Audio)” using a voice com-
mand or
STEP 4
Register a portable player name by either of the following methods:
a. Select “Record Name” using
, and say the name to
be registered.
b. Press the talk switch and say the name to be registered.
A voice guidance instruction to confirm the input is heard.
435
3-3. Using the Bluetooth® audio system
STEP 5
Select “Confirm” using a voice command or
A passkey is displayed and heard, and a voice guidance instruction for inputting the passkey into the portable player is heard. STEP 6
Input the passkey into the portable player. Refer to the manual that comes with the portable player for the oper- ation of the portable player.
Guidance for registration completion is heard. If the portable player has a Bluetooth® phone, the phone can be reg- istered at the same time. (→P. 496)
436
3-3. Using the Bluetooth® audio system
Menu list of the Bluetooth® audio system
■ Normal operation
First menu
Second menu
“BT•A Setup”
“Setup”
“System Setup”*
Third menu
Operation detail
“Pair Audio Player” “Select Audio Player”
“Change Name”
“List Audio Play- ers” “Set Passkey”
“Delete Audio”
“Guidance Vol- ume”
“Device Name”
“Initialize”
Registering a portable player
Selecting a portable player to be used Changing the registered name of a portable player Listing the registered porta- ble players Changing the passkey Deleting a registered porta- ble player Setting voice guidance vol- ume Displaying the Bluetooth® device address and name Initializing the system
“BT•A Setup” can be canceled by pressing the on-hook switch or saying the voice command, “Cancel”. *: Selection of system set-up is possible only by the operation of
the steering wheel switch.
437
3-3. Using the Bluetooth® audio system
■When using a voice command
For numbers, say a combination of single digits from zero to nine. Say the command correctly and clearly.
■Situations in which the system may not recognize your voice
●When driving on rough roads ●When driving at high speeds ●When air is blowing out of the vents onto the microphone ●When the air conditioning fan emits a loud noise
■Operations that cannot be performed while driving
●Operating the system with
●Registering a portable player to the system
■Changing the passkey
→P. 444
438
3-3. Using the Bluetooth® audio system Operating a Bluetooth® enabled portable player
Power
Volume
Selecting a track/ fast-forwarding and reversing
Selecting an album
Selector buttons
Playback
Playback/pause
Displaying text messages
Selecting an album
Press “∧” or “∨” on
Selecting tracks
Press “∧” or “∨” on
to select the desired track.
439
3-3. Using the Bluetooth® audio system
Playing and pausing tracks
Press
Fast-forwarding and rewinding tracks
Press and hold “∧” or “∨” on
Switching the display
Press
Each time the button is pressed, the display changes in the following order: Track title → Track title/Artist name → Track title/Album name → Track title/Elapsed time
Using the steering wheel audio switches
→P. 426
■Bluetooth® audio system functions
Depending on the portable player that is connected to the system, certain functions may not be available.
440
3-3. Using the Bluetooth® audio system Setting up a Bluetooth® enabled portable player
Registering a portable player in the Bluetooth® audio system allows the system to function. The following functions can be used for reg- istered portable players: ■ Functions and operation procedures
STEP 1
Press
until “BT AUDIO” is displayed.
STEP 2
STEP 3
that corresponds to “SETUP”
Press Select one of the following functions using a voice com-
mand or
● Registering a portable player
“Pair Audio Player”
● Selecting a portable player to be used
“Select Audio Player”
● Changing the registered name
“Change Name”
● Listing the registered portable players
“List Audio Players”
● Changing the passkey
“Set Passkey”
● Deleting a registered portable player
“Delete Audio Player”
441
3-3. Using the Bluetooth® audio system
Registering a portable player
Select “Pair Audio Player” using a voice command or perform the procedure for registering a portable player. (→P. 435)
, and
Selecting a portable player to be used
STEP 1
Select “Select Audio Player” using a voice command or
STEP 2
Select the portable player to be used by either of the following methods, and select “Confirm” by using a voice command or
a. Press the talk switch and say the name of the desired por-
table player.
b. Press the talk switch and say “List Audio Players”. When the name of the desired portable player is read aloud, press the talk switch.
STEP 3
Press the talk switch and say “From Car” or “From Audio”, and
select “Confirm” by using a voice command or
442
3-3. Using the Bluetooth® audio system
Vehicles without a smart key system When the portable player is on standby for the connection, it will be automatically connected whenever the engine switch is in either “ACC” or “ON” position. If a portable player that has already been paired is selected, it is nec- essary to select “From Car” or “From audio” setting. Vehicles with a smart key system When the portable player is on standby for the connection, it will be automatically connected whenever the “ENGINE START STOP” switch is in either ACCESSORY or IGNITION ON position. If a portable player that has already been paired is selected, it is nec- essary to select “From Car” or “From audio” setting.
Changing the registered name of a portable player
STEP 1
Select “Change Name” using a voice command or
STEP 2
Select the name of the portable player to be changed by either of the following methods, and select “Confirm” using a
voice command or
a. Press the talk switch and say the name of the desired por-
table player.
b. Press the talk switch and say “List Audio Players”. When the name of the desired portable player is read aloud, press the talk switch.
STEP 3
Press the talk switch or select “Record Name” using and say the new name.
STEP 4
Select “Confirm” using a voice command or
443
3-3. Using the Bluetooth® audio system
Listing the registered portable players
. The list
Select “List Audio Players” using a voice command or of registered portable players will be read aloud. When listing is complete, the system returns to “BT•A Setup”. Pressing the talk switch while the name of a portable player is being read aloud selects the portable player, and the following functions will become available: ● Selecting a portable player: “Select Audio Player” ● Changing a registered name: “Change Name” ● Deleting a portable player: “Delete Audio Player”
Changing the passkey
STEP 1
Select “Set Passkey” using a voice command or
STEP 2
Press the talk switch, say a 4 to 8-digit number, and select
“Confirm” using a voice command or
STEP 3
When the entire number to be registered as a passkey has
been input, press
again.
If the number to be registered has 8 digits, pressing of the knob is not necessary.
444
3-3. Using the Bluetooth® audio system
Deleting a registered portable player
STEP 1
Select “Delete Audio Player” using a voice command or
STEP 2
Select the portable player to be deleted by either of the follow- ing methods and select “Confirm” using a voice command or
a. Press the talk switch and say the name of the desired por-
table player.
b. Press the talk switch and say “List Audio Players”. When the name of the desired portable player is read aloud, press the talk switch.
If the portable player to be deleted is paired as a Bluetooth® phone, the registration of the mobile phone can be deleted at the same time. A voice guidance instruction to delete a mobile phone is heard.
STEP 3
Select “Confirm” by using a voice command or
■The number of portable players that can be registered Up to 2 portable players can be registered in the system.
445
3-3. Using the Bluetooth® audio system Bluetooth® audio system setup
■ System setup items and operation procedures
→P. 512
446
3-4. Using the rear audio system Rear seat entertainment system features∗
The rear seat entertainment system is designed to allow the rear pas- sengers to enjoy audio and DVD video separately from the front audio system.
Front audio system DVD player Display Headphone volume control dials and headphone jacks Power outlets Rear seat entertainment system controller A/V input adapter
∗: If equipped 447
3-4. Using the rear audio system
Opening and closing the display
■ Opening and closing the display
Press the lock release button to open the display.
Pull the display down to an easily viewable angle (at 100° or 120°).
To close the display, push the display up until a click is heard.
The illumination of the screen is automatically turned off when the display is closed. However, the rear seat entertainment system is not turned off. (The sound is not turned off.)
This screen appears for a few seconds when the rear display is opened.
Vehicles without navigation sys-
tem only: Press
while
this screen is displayed to change the language. (The screen will be displayed for approximately 4
seconds.)■ Caution display
448
3-4. Using the rear audio system
Loading a disc
STEP 1
Open the cover.
STEP 2
Insert the disc into the slot with the label side up.
STEP 3
Close the cover.
Ejecting a disc
STEP 1
Open the cover.
STEP 2
STEP 3
Close the cover.
The “DISC” indicator light turns on while the disc is loaded. The player will play the track or chapter, and will repeat it after it reaches the end.
Press
and remove the disc.
449
3-4. Using the rear audio system
Turning the rear seat entertainment system power on/off
■ Operating from the front audio system
Selecting either the front audio system or DVD player audio for the speakers
Press that corresponds to “OFF”, to turn off the rear seat entertainment system.
Press that corre- sponds to “ON”, to turn on the rear seat entertainment system.
■ Operating from the remote controller
Press seat entertainment screen.
to control the rear
450
3-4. Using the rear audio system
Setting the rear seat entertainment system lock
Vehicles with a navigation system
Owners of models equipped with a navigation system should refer to the “NAVIGATION SYSTEM OWNER’S MANUAL”.
Vehicles without a navigation system Front audio system
Selecting either the front audio system or DVD player audio for the speakers Selecting or “UNLOCK” for the rear seat entertainment system
“LOCK”
The rear seat entertainment lock remains on, system even when the engine switch is turned off.
DVD player display
451
3-4. Using the rear audio system
Adjusting and turning off the screen
■ Adjusting the screen
on the remote con-
Press troller. Select the brightness, contrast, tone or color, and make adjust-
ments. Press
to input it.
“-” or “Red”
“+” or “Green”
Darkens Weakens the contrast
Brightens Strengthens the contrast
Weakens the tone
Strengthens the tone
Strengthens the red color
Strengthens the green color
“Brightness” “Contrast” “Tone” (if displayed) “Color” (if displayed)
452
■ Turning off the screen
3-4. Using the rear audio system
on the remote con-
Press troller. Press the “Screen off” displayed on the screen.
Press
or
to turn on the screen.
Headphone jacks
To use the headphones, con- nect them to the jack. To adjust the volume Turn the knob clockwise to increase the volume. Turn the knob counterclock- wise to decrease the volume.
453
3-4. Using the rear audio system
■The rear seat entertainment system can be used when
Vehicles without a smart key system The engine switch is in the “ACC” or “ON” position. Vehicles with a smart key system The “ENGINE START STOP” switch is in the ACCESSORY or IGNITION ON mode.
■Discs that can be used
Discs with the marks shown below can be used. Playback may not be possible depending on recording format or disc fea- tures, or due to scratches, dirt or deterioration.
■When
appears on the screen
It indicates that the selected switch is inoperable.
454
3-4. Using the rear audio system
■Headphone audio during split screen display
Audio from the left-hand screen will be played through the left headphone, and audio from the right-hand screen will be played through the right head- phone.
■Error messages
Message
Cause
Correction Procedures
No disc found
Check disc
DVD error
No music files found
Region code error
There is no disc in the DVD player • The disc is dirty or dam- aged • The disc is inserted upside down • There is a malfunction within the system • Operation is stopped due to a high tempera- ture inside the player This indicates that no playable data is included in the disc The DVD has an incompatible DVD region code
Insert a disc
• Clean the disc • Insert the disc correctly
• Eject the disc and allow the player to cool down • If the malfunction still exists, take the vehicle to your Toyota dealer
Eject the disc
Insert a DVD with a compatible region code
455
3-4. Using the rear audio system
■Before using the remote controller (for new vehicle owners)
STEP 1
Remove the cover.
STEP 2
Remove the insulating sheet.
■When the remote controller batteries are fully depleted
Remove the depleted batteries and install new 2 AA batteries.
■If the remote controller batteries are discharged
The following symptoms may occur. ●The rear seat entertainment system control will not function properly. ●The operational range is reduced.
■When using AA batteries
Batteries can be purchased at your Toyota dealer, electric appliance shops, or camera stores. Replace only with the same or equivalent type recommended by a Toyota dealer. Dispose of used batteries according to the local laws.
456
3-4. Using the rear audio system
■Headphones
With some headphones generally available on the market, it may be difficult to receive signals properly. Toyota recommends the use of Toyota genuine wireless headphones. Please contact your Toyota dealer for further details.
■Volume
●Adjust the volume when you connect the headphones to the jack. Loud
volume from headphones may cause hearing loss or damage.
●Conversational speech on some DVDs is recorded at a low volume to emphasize the impact of sound effects. If you adjust the volume assum- ing that the conversations represent the maximum volume level that the DVD will play, you may be startled by louder sound effects or when you change to a different audio source. Be sure to adjust the volume with this in mind.
CAUTION
■While driving
Do not use headphones. Doing so may cause an accident, resulting in death or serious injury.
■When the rear seat entertainment system is not used
Keep the display closed. In the event of an accident or sudden braking, the opened display may hit an occupant’s body, resulting in injury.
■To prevent accidents and electric shock
Do not disassemble or modify the remote controller.
■When the remote controller is not used
Stow the remote controller. Injuries may result in the event of an accident or sudden braking.
■Removed battery and other parts
Keep away from children. These parts are small and if swallowed by a child they can cause choking.
457
3-4. Using the rear audio system
NOTICE
■For normal operation after replacing the battery
Observe the following precautions to prevent accidents. ●Always work with dry hands.
Moisture may cause the battery to rust.
●Do not touch or move any other components inside the remote controller. ●Do not bend either of the battery terminals.
458
3-4. Using the rear audio system Using the DVD player (DVD video)
■ Remote controller
Turning on or off the rear entertainment screen Turning on the DVD mode Selecting a chapter Turning on the title selection screen Reversing a disc Playing/pausing a disc Turning on or off the opera- tion switches (icon) on the display Inputting switch (icon) Selecting a switch (icon) Turning on the menu screen Fast forwarding a disc
selected
the
459
3-4. Using the rear audio system
■ Display (Page 1)
Turning off the operation switches (icon) on the dis- play Displaying page 2
Turning on the title selection screen for the disc Turning on the menu screen for the disc Reversing a disc Stopping a disc Pausing the disc/canceling the pause Fast forwarding a disc460
3-4. Using the rear audio system
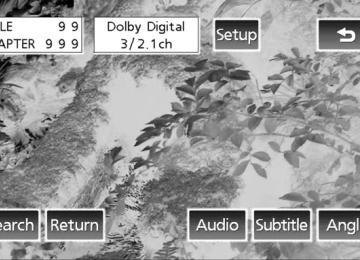
Displaying the initial setting screen Displaying page 1
Search for a title Returning to the previous screen Changing guage Changing the subtitle lan- guage Changing the anglethe audio
lan-
■ Display (Page 2)
■ Front audio system
Press: Selecting a chapter Press and hold: Fast-for- warding/reversing a disc Playing/pausing a disc Selecting the DVD mode Stopping/playing a disc Starting a disc Displaying the elapsed time
NOTICE
■Cleaning the display
Wipe the display with a dry soft cloth. If the screen is wiped with a rough cloth, the surface of the screen may be scratched.
461
3-4. Using the rear audio system
NOTICE
■To prevent damage to the remote controller
●Keep the remote control away from direct sunlight, temperature heat and
high humidity.
●Do not drop or knock the remote controller against hard objects. ●Do not sit on or place heavy objects on the remote controller.
■DVD player
Never try to disassemble or oil any part of the DVD player. Do not insert any- thing other than a disc into the slot.
Turning on or off the operation switches
Press
to turn on the operation switches.
Press switches.
once again or select
to turn off the operation
Turning on the title selection screen
or select
to turn on the title selection screen. Press For the operation of the title selection screen, see the separate man- ual for the DVD disc.
Turning on the menu screen
or select
to turn on the menu screen. For the Press operation of the menu screen, see the separate manual for the DVD disc.
462
3-4. Using the rear audio system
Slow playback
Press
or select
to pause video and then press
or select
. Video is played slowly when you press
or
select
by pressing and holding
Returning to the previous screen
Select the menu screen, see the separate manual for the DVD disc.
to return to the previous screen. For the operation of
Searching for a title
STEP 1
Select
on the control icon screen.
STEP 2
Input the desired title number
and then select
: deletes the last input number
: returns to the previous screen