- 2003 Toyota Sienna Owners Manuals
- Toyota Sienna Owners Manuals
- 1999 Toyota Sienna Owners Manuals
- Toyota Sienna Owners Manuals
- 2005 Toyota Sienna Owners Manuals
- Toyota Sienna Owners Manuals
- 2010 Toyota Sienna Owners Manuals
- Toyota Sienna Owners Manuals
- 2014 Toyota Sienna Owners Manuals
- Toyota Sienna Owners Manuals
- 1998 Toyota Sienna Owners Manuals
- Toyota Sienna Owners Manuals
- 2004 Toyota Sienna Owners Manuals
- Toyota Sienna Owners Manuals
- 2001 Toyota Sienna Owners Manuals
- Toyota Sienna Owners Manuals
- 2006 Toyota Sienna Owners Manuals
- Toyota Sienna Owners Manuals
- 2009 Toyota Sienna Owners Manuals
- Toyota Sienna Owners Manuals
- 2000 Toyota Sienna Owners Manuals
- Toyota Sienna Owners Manuals
- 2012 Toyota Sienna Owners Manuals
- Toyota Sienna Owners Manuals
- 2008 Toyota Sienna Owners Manuals
- Toyota Sienna Owners Manuals
- 2007 Toyota Sienna Owners Manuals
- Toyota Sienna Owners Manuals
- 2002 Toyota Sienna Owners Manuals
- Toyota Sienna Owners Manuals
- 2011 Toyota Sienna Owners Manuals
- Toyota Sienna Owners Manuals
- 2015 Toyota Sienna Owners Manuals
- Toyota Sienna Owners Manuals
- Download PDF Manual
-
00 SIENNA(U)
Foreword
Welcome to the growing group of value−conscious people who drive Toyotas. We are proud of the advanced engineering and quality construction of each vehicle we build. This Owner’s Manual explains the features of your new Toyota. Please read it and follow the instructions carefully so that you can enjoy many years of safe motoring. When it comes to service, remember that your Toyota dealer knows your vehicle best and is interested in your complete satisfaction. He will provide quality mainte- nance and any other assistance you may require. Please leave this Owner’s Manual in this vehicle at the time of resale. The next owner will need this information also. All information and specifications in this manual are current at the time of printing. However, because of Toyota’s policy of continual product improve- ment, we reserve the right to make changes at any time without notice. Please note that this manual applies to all models and explains all equipment, including options. Therefore, you may find some explanations for equipment not installed on your vehicle.
© 1999 TOYOTA MOTOR CORPORATION All rights reserved. This material may not be reproduced or copied, in whole or in part, without the written permission of Toyota Motor Corporation.
New vehicle warranty
Your new vehicle limited warranties:
is covered by
the
following Toyota
D New vehicle warranty D Emission control systems warranty D Others further
information, please
refer
For “Owner’s Warranty Manual Supplement”.
Information Booklet” or
to
the separate “Owner’s
Your responsibility for maintenance
these maintenance
It is owner’s responsibility to make sure that the speci- fied maintenance is performed. Section 6 gives details of in Section 6 is general maintenance. For scheduled mainte- nance information, please refer to the separate “Sched- uled Maintenance Guide” or “Owner’s Manual Supple- ment”.
requirements. Also
included
00 SIENNA(U)
Accessories, spare parts and modification of your Toyota
A wide variety of non−genuine spare parts and accesso- ries for Toyota vehicles are currently available in the market. You should know that Toyota does not warrant these products and is not responsible either for their performance, repair or replacement, or for any damage they may cause to, or adverse effect they may have on, your Toyota vehicle.
This vehicle should not be modified with non−genuine Toyota products. Modification with non−genuine Toyota products could affect its performance, safety or durabili- ty, and may even violate governmental regulations. In addition, damage or performance problems resulting from the modification may not be covered under warranty.
ii
00 SIENNA(U)
Spark ignition system of
your Toyota
The spark ignition system in your Toyota meets all re- quirements of the Canadian Interference−Causing Equip- ment Standard.
Installation of a mobile two−way radio system
Scrapping of your Toyota
The SRS airbag and seat belt pretensioner devices in your Toyota contain explosive chemicals. If the vehicle is scrapped with the airbags and pretensioners left as they are, it may cause an accident such as a fire. Be sure to have the systems of the SRS airbag and seat belt pretensioner removed and disposed of by a qualified service shop or by your Toyota dealer before you dis- pose of your vehicle.
fuel
injection system/sequential multiport
As the installation of a mobile two−way radio system in your vehicle could affect electronic systems such as multiport fuel injection system, cruise control system, anti−lock brake system, SRS airbag system and seat belt pretensioner system, be sure to check with your Toyota dealer for precautionary measures or special instructions regarding installation.
iii
00 SIENNA(U)
iv
00 SIENNA(U)
Important information about this manual
Safety and vehicle damage warnings
Safety symbol
In this manual, you will see CAUTION and NOTICE warn- ings. These are used in the following ways:
CAUTION
This is a warning against something which may cause injury to people if the warning is ignored. You are informed what you must or must not do in order to avoid or reduce the risk to yourself and other people.
NOTICE
This is a warning against something which may cause damage to the vehicle or its equipment if the warning is ignored. You are informed what you must or must not do in order to avoid or reduce the risk of damage to your vehicle and its equipment.
In this manual, you will also see a circle with a slash through it. This means “Do not”, “Do not do this”, or “Do not let this happen”.
00 SIENNA(U)
Quick index D If a service reminder indicator or warning buzzer comes on D If your vehicle will not start D If your engine stalls while driving D If your vehicle overheats D If you have a flat tire D If your vehicle needs to be towed D Tips for driving during break−in period D How to start the engine D General maintenance Gas station information Fuel type:
. . . . . . . . . . . . . . . . . . . . . . . . . . . . . . . . . . . . . . . . . . . . . . . . . . . . . . . . . . . . . . . . . . . . . . . . . . . . . . . . . . . . . . . . . . . . . . . . . . . . . . . . . . . . . . . . . . . . . . . . . . . . . . . . . . . . . . . . . . . . . . . . . . . . . . . . . . . . . . . . . . . . . . . . . . . . . . . . . . . . . . . . . . . . . . . . . . . . . . . . . . . . . . . . . . . . . . . . . . . . . . . . . . . . . . . . . . . . . . . . . . . . . . . . . . . . . . . . . . . . . . . . . . . . . . . . . . . . . . . . . . . . . . . . . . . . . . . . . . . . . . . . . . . . . . . . . . . . . . . . . . . . . . . .
120
210
213
213
214
223
184
198
235UNLEADED gasoline, Octane Rating 87 (Research Octane Number 91) or higher. For improved vehicle performance, the use of premium unleaded gasoline with an Octane Rating of 91 (Research Octane Number 96) or higher is recommended. See page 184 for detailed information.
Fuel tank capacity: 79 L (21 gal., 17.5 lmp. gal.) Engine oil:
API grade SJ, “Energy−Conserving” or ILSAC multigrade engine oil is recommended. See page 246 for detailed information.
Automatic transmission fluid:
Automatic transmission fluid D−II or DEXRONrIII (DEXRONrII)
Tire information: See pages 250 through 254. Tire pressure: See page 269.
gU−5
Publication No. OM45405U Part No. 01999-45405
Printed in Japan 01−9906−00U )
00 SIENNA(U)
SECTION 1− 1
OPERATION OF INSTRUMENTS AND CONTROLS Overview of instruments and controls Instrument panel overview Instrument cluster overview Indicator symbols on the instrument panel
. . . . . . . . . . . . . . . . . . . . . . . . . . . . . . . . . . . . . . . . . . . . . . . . . . . . . . . . . . . . . . . . . . . . . . . . . . . . . . . . . . . . . . . . . . . . . . . .
00 SIENNA(U)
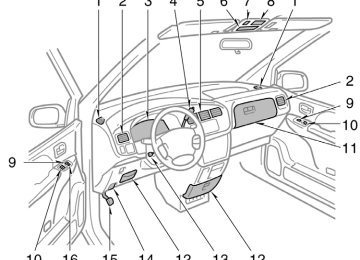
Instrument panel overview
1. Side defroster outlets 2. Side vents 3. Instrument cluster 4. Automatic transmission selector lever 5. Center vents 6. Garage door opener box or auxiliary
box
7. Electric moon roof switch or
personal light switch
8. Front personal
lights or
front interior
light
9. Power door lock switches 10. Power window switches 11. Glove box 12. Auxiliary boxes 13. Tilt steering lock release lever 14. Hood lock release lever 15. Parking brake pedal 16. Window lock switch
00 SIENNA(U)
1. Headlight and turn signal switch 2. Wiper and washer switches 3. Clock 4. Air conditioning controls 5. Emergency flasher switch 6. Rear window and outside rear view
mirror defoggers switch
7. Power rear quarter window switch 8. Rear fan speed selector 9. Car audio 10. Ashtray 11. Cigarette lighter 12. Power outlet 13. Power sliding door switch 14. Ignition switch 15. Cruise control switch 16. Audio remote control buttons 17. Power sliding door off switch 18. Theft deterrent system/Engine
immobiliser system indicator light 19. Tire pressure warning system
switch
reset
20. Power rear view mirror control switch 21. Instrument panel light control dial
00 SIENNA(U)
Instrument cluster overview "With tachometer
1. Engine coolant temperature gauge 2. Tachometer 3. Service reminder indicators and
indicator lights
4. Speedometer 5. Fuel gauge 6. Trip meter reset knob
7. Odometer and two trip meters
00 SIENNA(U)
"Without tachometer
1. Engine coolant temperature gauge 2. Service reminder indicators and
indicator lights
3. Speedometer
4. Odometer and two trip meters 5. Fuel gauge 6. Trip meter reset knob
00 SIENNA(U)
Indicator symbols on the instrument panel
(type A)
(type B)
Brake system warning light∗1
Seat belt reminder light∗1
Discharge warning light∗1
(type A)
(type B)
Low oil pressure warning light∗1
Anti−lock brake system warning light∗1
Open door warning light∗1
Open power sliding door warning light∗1
(type A)
Malfunction indicator lamp∗1
SRS warning light∗1
Low fuel level warning light∗1
Low tire pressure warning light∗1
Low windshield washer fluid level warning light∗1
(type B)
00 SIENNA(U)
Turn signal indicator lights
Headlight high beam indicator light
Overdrive−off indicator light
Cruise control indicator light∗2
Automatic transmission indicator lights
∗1: For details, see “Service reminder indicators and warning
buzzers” in Section 1−5.
∗2: If this light flashes, see “Cruise control” in Section 1−6.
00 SIENNA(U)
00 SIENNA(U)
SECTION 1− 2
OPERATION OF INSTRUMENTS AND CONTROLS Keys and Doors Keys Engine immobiliser system Front doors Sliding door Power sliding door Wireless remote control Power windows Power rear quarter windows Center side windows and manual rear quarter windows Back door Hood Theft deterrent system Fuel tank cap Electric moon roof
. . . . . . . . . . . . . . . . . . . . . . . . . . . . . . . . . . . . . . . . . . . . . . . . . . . . . . . . . . . . . . . . . . . . . . . . . . . . . . . . . . . . . . . . . . . . . . . . . . . . . . . . . . . . . . . . . . . . . . . . . . . . . . . . . . . . . . . . . . . . . . . . . . . . . . . . . . . . . . . . . . . . . . . . . . . . . . . . . . . . . . . . . . . . . . . . . . . . . . . . . . . . . . . . . . . . . . . . . . . . . . . . . . . . . . . . . . . . . . . . . . . . . . . . . . . . . . . . . . . . . . . . . . . . . . . . . . . . . . . . . . . . . . . . . . . . . . . . . . . . . . . . . . . . . . . . . . . . . . . . . . . . . . . . . . . . . . . . . . . . . . . . . . . . . . . . . . . . . . . . . . . . . . . . . . . . . . . . . . . . . . . . . . . . . . . . . . . . . . . . . . . . . . . . . . . . . . . . . . . . . . . . . . . . . . . . . . . . . . . . . . . . . . . . . . . . . . . . . . . . . . . . . . . . . . . . . . . . . . . . . . . . . . . . . . . . . . . . . . . . . . . . . . . . . . . . . . . . . . . . . . . . . . . . . . . . . . . . . . . . . . . . . . . . . . . . . . . . . . . . . . . . . . . . . . . . . . . . . . . . . . . . . . . . . . . . . .
10
13
14
16
19
23
28
29
30
30
31
32
34
3600 SIENNA(U)
Keys (without engine immobiliser system)
Keys (with engine immobiliser system)
Your vehicle is supplied with two kinds of key. 1. Master key—This key works in every
lock.
2. Sub key—This key will not work in the
glove box.
To protect things locked in the glove box when you have your vehicle parked, leave the sub key with the attendant. Since the doors can be locked without a key, you should always carry a spare master key in case you accidentally lock your keys inside the vehicle.
KEY NUMBER PLATE Your key number is shown on the plate. Keep the plate in a safe place such as your wallet, not in the vehicle. If you should lose your keys or if you need additional keys, duplicates can be made by a Toyota dealer using the key number. We recommend you to write down the key number and keep it in safe place.
Your vehicle is supplied with the two kinds of key. 1. Master key (black)—This key works in lock. Your Toyota dealer will every need it to make you a new key with built−in transponder chip.
2. Sub key (gray)—This key will not work
in the glove box.
A transponder chip for engine immobiliser system has been filled in the head of the master and sub keys. These chips are needed to enable the system to function correctly, so be careful not to lose these keys. If you make your own duplicate key, you will not be able to cancel the system or start the engine.
10
00 SIENNA(U)
To protect things locked in the glove box when you have your vehicle parked, leave the sub key with the attendant. Since the side door can be locked without a key, you should always carry a spare master key in case you accidentally lock your keys inside the vehicle.
NOTICE
the
When using a key containing a trans- ponder chip, observe following precautions: z When starting the engine, do not use the key with a key ring resting on the key grip and do not press the key ring against the key grip. Otherwise the engine may not start, or may stop soon after it starts.
z When starting the engine, do not use the key with other transponder keys around (including keys of oth- er vehicles) and do not press other key plates against the key grip. Otherwise the engine may not start, or may stop soon after it starts. If this happens, remove the key once and then insert it again after taking off other transponder keys (includ- ing keys of other vehicles) from the ring or while gripping or covering them with your hand to start the engine.
11
00 SIENNA(U)
z Do not cover the key grip with any material that cuts off electromagnet- ic waves.
z Do not knock the key hard against
other objects.
z Do not leave the key exposed to high temperatures for a long period, such as on the dashboard and hood under the direct sunlight.
z Do not put the key
in water or
wash it in an ultrasonic washer.
z Do not bend the key grip.
z Do not use the key with electromag-
netic materials.
KEY NUMBER PLATE Your key number is shown on the plate. Keep the plate in a safe place such as your wallet, not in the vehicle. If you should lose your keys or if you need additional keys, duplicates can be made by a Toyota dealer using the key number. We recommend you to write down the key number and keep it in safe place.
12
00 SIENNA(U)
Engine immobiliser system
immobiliser system
The engine is a theft prevention system. When you in- sert the key in the ignition switch, the transponder chip the key’s head transmits an electronic code to the ve- hicle. The engine will start, only when the electronic code in the chip corre- sponds to the registered ID code for the vehicle.
in
Inserting the registered key in the ignition switch automatically cancels the system, which enables the engine to start. The indicator light will go off. For your Toyota dealer to make you a new key with built−in transponder chip, your dealer will need your key number and master key. However, there is a limit to the number of additional keys your Toyota dealer can make for you. If you make your own duplicate key, you will not be able to cancel the sys- tem or start the engine.
13
The system is automatically set when the key is removed from the ignition switch. The indicator light will start flashing every 1 second to show the system is set. If either of the following indicator condi- tions occurs, contact your Toyota dealer. D The light stays on except when the theft deterrent system is set- ting or activating. (See “Theft deterrent system”.)
indicator
D The indicator light does not start flash- ing when the key is removed from the ignition switch.
D The indicator light flashes unsteady.
00 SIENNA(U)
For vehicles sold in U.S.A.
For vehicles sold in Canada
Front doors
This device complies with RSS−210 of Industry Canada. Operation is subject to the following two conditions: (1) This device may not cause interfer- ence, and (2) this device must accept any interference that may cause undesired operation of the device.
interference,
including
FCC ID: MOZ RI−4BTY MADE IN JAPAN This device complies with Section 15 of the FCC Rules. Operation is subject to the following two conditions: (1) This device may not cause harmful interference, and (2) this device must accept any interference received, includ- ing interference that may cause unde- sired operation.
CAUTION
Changes or modifications not ex- pressly approved by the party respon- sible for compliance could void the user’s authority to operate the equip- ment.
14
LOCKING AND UNLOCKING WITH KEY Insert the key into the keyhole and turn it. To lock: Turn the key forward. To unlock: Turn the key backward. Vehicles with power door lock system—All the doors lock and unlock simultaneously with either front door. In the driver’s door lock, turning the key once will unlock the driver’s door and twice in succession will unlock all the doors simultaneously.
00 SIENNA(U)
LOCKING AND UNLOCKING WITH POW- ER DOOR LOCK SWITCH Push the switch. To lock: Push the switch on the front side. To unlock: Push the switch on the rear side. All the doors lock or unlock simultaneous- ly.
CAUTION
Before driving, be sure that the doors are closed and locked, especially when small children are in the ve- hicle. Along with the proper use of locking the doors helps seat belts, prevent the driver and passengers from being thrown out from the ve- hicle during an accident. It also helps prevent the doors from being opened unintentionally.
15
Driver’s side
IN-
LOCKING AND UNLOCKING WITH SIDE LOCK KNOB Move the lock knob. To lock: Push the knob forward. To unlock: Pull the knob backward. Closing the front door with the lock knob in the lock position will also lock the front door. Be careful not to lock your keys in the vehicle. Vehicles with power door lock system— The door cannot be locked if you leave the key in the ignition switch.
Passenger’s side
00 SIENNA(U)
Sliding door
CLOSING FROM OUTSIDE To close the fully−opened sliding door, pull the outside handle toward you and then close the door.
Lock release button
LOCKING AND UNLOCKING WITH KEY (on some models) Insert the key into the keyhole and turn it. To lock: Turn the key forward. To unlock: Turn the key backward.
LOCKING AND UNLOCKING WITH INSIDE LOCK KNOB Move the lock knob. To lock: Push the knob downward. To unlock: Push the knob upward. To open the sliding door, push the lock release button and then open the door.
16
00 SIENNA(U)
Vehicles with power door lock system— The sliding doors will be locked simulta- neously when either front door or the back door is locked with the power door lock switch or key. If you lock either front door or the back door with the power door lock switch or key while the sliding door is open, the sliding door will be locked after it is closed. (For instructions, see “Front doors” or “Back door” in this section.) Closing the sliding door with the lock knob in the lock position will also lock the slid- ing door. Be careful not to lock your keys in the vehicle. CLOSING FROM INSIDE To close push the close the door.
fully−opened sliding door, then
the lock release button and
door
sliding
Half−opened (5−door models) When opening the left side sliding door, it stops at the half−opened position if the fuel filler door is opened.
stopper
NOTICE
forcibly opening
Avoid the sliding door fully when refueling. Otherwise, the fuel filler door may be damaged.
LOCKING WITH SLIDING DOOR CHILD− PROTECTORS Open the sliding door fully and move the lock lever to the “LOCK” position as shown on the label. Then close the sliding door. If the child−protector is locked, you cannot open the sliding door from the inside. We recommend using feature whenever small children are in the vehicle. Power sliding door—If the power sliding door system is on, the child−protector fea- ture is cancelled when someone pushes one of “PWR DOOR” switches or “POWER DOOR” switch of the wireless remote control transmitter.
this
the
17
00 SIENNA(U)
CAUTION
Make sure to turn off the power slid- ing door system after the child−protectors.
locking
NOTICE
Do not close the sliding door by ap- plying the brakes. Doing so could cause the door to be damaged.
CAUTION
D When the vehicle is stopped on a gradient, the door will slide faster when opening or closing, so be es- pecially careful that the passengers do not get hit or pinched in the doorway.
the door
D When stopping on a downward slope, open fully while passengers are getting on or off. Do not pull the outside handle or push the lock release button while the door is open as the door could suddenly close by itself causing in- jury.
18
00 SIENNA(U)
Power sliding door Some vehicles are equipped with a power sliding door on the right side. This system has the following functions: D The power sliding door can be oper- ated with the “PWR DOOR” switches inside the vehicle or wireless remote control transmitter. (For details about the wireless remote control transmitter, see “Wireless remote control” in this section.)
D If you move the sliding door
to the opening or closing direction by hand, the sliding door will automatically and completely open or close after you let go of the sliding door.
CAUTION
Do not leave small children or pets unattended in your vehicle. They could operate the power sliding door, and they themselves or others could be injured. Turn off the power sliding door system when the power sliding door is not in use.
the power sliding door,
“PWR DOOR OFF” SWITCH This switch is used to turn on and off the power sliding door system. For op- erating the “PWR DOOR OFF” switch on the instru- ment panel must be pushed out. (The orange line on the top of the switch indicates that the system is on.) To dis- able the power sliding door feature, push in the switch.
When the power sliding door system is on, you can open and close the sliding door with the “PWR DOOR” switches in- side the vehicle or wireless remote control transmitter even if the sliding door child− protector is locked. If small children or pets are in the vehicle, turn off the sys- tem to prevent the accidental operation of the door.
CAUTION
When jacking up the vehicle, turn off the power sliding door system and close the sliding door completely.
NOTICE
When your vehicle goes through an automatic car wash, make sure the power sliding door system is off.
19
00 SIENNA(U)
“PWR DOOR” SWITCHES These switches are used to open and close the power sliding door. Push and release one of the two “PWR DOOR” switches. One switch is located on the instrument panel on the driver’s side. The other is located on the right center pillar. Opening and closing can be performed by the “PWR DOOR” switches under the fol- lowing conditions: D The sliding door is unlocked. D The power sliding door system is on. is
“PWR DOOR OFF” switch
(The pushed out.)
D To open the power sliding door when the ignition key is in the “ON” position, the transmission selector lever must be in “P”. (To close the sliding door from the fully−opened or half−opened posi- tion, the transmission selector lever is not required to be in “P”.)
CAUTION
If you shift the automatic transmis- sion selector lever out of “P” and accelerate before the power sliding door is closed completely, the sliding door may reverse to the open posi- tion. A child or others could fall out of the vehicle and be injured. Always make sure the power sliding door is closed and latched before you start driving.
OPENING BY HAND When the power sliding door system is on, if you pull the outside door handle or push the inside lock release button to re- lease the sliding door, it will then automat- ically and completely open. When the power sliding door system is off, open the sliding door as usual. CLOSING BY HAND When the power sliding door system is on, if you slide the door about 10 cm (4
in.) to the closing direction and let the door go, it will automatically and com- pletely close. When the power sliding door system is off, close the sliding door as usual.Instrument panel
Center pillar
20
00 SIENNA(U)
If you shift out of “P” when the power sliding door is opened or in the process of closing with the power sliding door sys- tem on, a buzzer will sound and the open power sliding door warning light will flash. This is a warning that the sliding door is not completely closed.
OPEN POWER SLIDING DOOR WARN- ING LIGHT AND BUZZER This light on the instrument panel comes on if the power sliding door is not com- pletely closed with the ignition key in the “ON” position. (See “Service reminder indi- cators and warning buzzers” in Section 1−5.) If you forcibly close the power sliding door by hand when the ignition key is in the “ON” position, the open power sliding door warning light may stay on. In this case, try opening and closing the power sliding door again by hand slowly, or use one of the “PWR DOOR” switches or wireless remote control transmitter.
the
JAM PROTECTION FUNCTION If anything with sufficient resistance ob- structs the power sliding door while it is closing or opening, the sliding door will automatically reverse to the opposite di- rection. However, if the power sliding door is between fully−closed and half− opened positions while it is opening, the door will stop at that position. Before operating the power sliding door, make sure there is nobody near the slid- ing door. Make sure the sliding door stops at the fully−opened position, and then al- low the passengers to get on and off the vehicle.
21
00 SIENNA(U)
The resistance must be as strong as the force of the moving door, or stronger. As the sliding door approaches fully− closed or fully−opened position, its moving force increases significantly. If the sliding door receives a strong im- pact, this function may work even if noth- ing is caught.
the
CAUTION
Power sliding door could injure people if they are caught in the door path. When using the power sliding door, observe the following: D Never try jamming any part of your jam protection
body to make the function work intentionally.
D You must always make sure
the head, hands and other parts of the body of all occupants are away from the sliding door. If someone’s neck, head or hand gets caught in a closing sliding door, it could re- sult in a serious injury. When any- one closes the power sliding door, make sure he/she operates the slid- ing door safely.
NOTICE
Objects caught in the path of the slid- ing door may be damaged. Make sure there is nothing in the doorway be- fore closing the sliding door.
D The
jam protection
function may not work if something gets caught just before the sliding door is fully closed.
22
CAUTION
When the vehicle is stopped on a downward slope of a steep grade (17% or more), the sliding door may not stay in the fully−opened position and could suddenly close by itself, possibly resulting a personal injury. Making sure the sliding door does not close abruptly, the power sliding door system. Then the sliding door will operate under the control of the electric power.
turn on
THE POWER SLIDING
RESETTING DOOR SYSTEM If the power sliding door system operates incorrectly or does not operate under the following conditions, the system must be initialized and reset by the steps in the next column. D The battery is disconnected and then reconnected, or a discharged battery is recharged. In system by doing from 6 to 10.
initialize and reset the following steps
this case,
the
D The open power sliding door warning light stays on though the sliding door is closed. In system by doing from 1 to 10.
initialize and reset the following steps
this case,
the
CAUTION
To initialize and reset power sliding door system, stop the vehicle on a level ground.
00 SIENNA(U)
1. Be sure to turn off the power sliding door system by pushing in the “PWR DOOR OFF” switch.
2. Disconnect
the battery
for 1 minute
and then reconnect it.
3. Close the sliding door by hand.
(Step 3 can be performed before step 2.)
4. Turn on the power sliding door system by pushing out the “PWR DOOR OFF” switch.
5. Wait 5 seconds. 6. Open the sliding door by using one of
the “PWR DOOR” switches.
7. Wait 3 seconds after the sliding door
stops at the fully−opened position.
8. Close the sliding door by using one of the “PWR DOOR” switches or wireless remote control transmitter.
9. Wait 3 seconds after the sliding door
stops at the fully−closed position.
10. Repeat the steps from 6 to 9. If the power sliding door system does not operate properly after the above proce- dure, there may be a problem in the sys- tem. Contact your Toyota dealer.
Wireless remote control
Locking operation
Unlocking operation
23
00 SIENNA(U)
You have 30 seconds to open a door after using the wireless remote unlock feature. If a door is not opened by then, all the doors will automatically lock again. If the “LOCK” or “UNLOCK” switch is kept pressed in, the locking or unlocking opera- tion is not repeated. Release the button and then push again.
(on some
“POWER DOOR” SWITCH models) This switch of the transmitter is used to open and close the power sliding door. Push the switch slowly and se- curely. To open: Push door opens completely. To close: Push the switch again. The slid- ing door closes completely.
the switch. The sliding
to
THE
AND
UNLOCKING
The wireless remote control system al- lows you lock or unlock all the doors from a distance within approxi- mately 1 m (3 ft.) of the vehicle. On some models, the system also allows you to activate the theft deterrent sys- tem from the same distance. LOCKING DOORS To lock and unlock all the doors, push the switches of the transmitter slowly and securely. To lock: Push the “LOCK” switch. All the doors are locked simultaneously. At this time, parking lights, side marker lights and tail lights flash. Check to see that the doors are securely locked. If any of the doors is not securely closed, in the ignition switch, or locking cannot be performed by the “LOCK” switch. “UNLOCK” switch To unlock: Push once to unlock the driver’s door alone. Pushing the switch twice within 3 seconds unlocks all the doors simultaneously. At this time, parking lights, side marker lights and tail lights flash twice.
the key
the
is
if
24
00 SIENNA(U)
Opening and closing can be performed by the “POWER DOOR” switch under the fol- lowing conditions only: D The sliding door is unlocked. D The power sliding door system is on. is
“PWR DOOR OFF” switch
(The pushed out.)
D The
ignition key
is not
in
the “ON”
position.
intermittently and
“PANIC” SWITCH Pushing the “PANIC” switch blows the horn the headlights, tail lights and other exterior lights. The “PANIC” switch is used to deter ve- hicle theft when you witness anyone at- tempting into or damage your vehicle.
to break
flashes
The alarm will last for one minute. To stop alarm midway, do the following: D Push the “PANIC” switch once again. D Unlock either front door or back door with the key or wireless remote control transmitter.
D Turn the key from the “LOCK” to “ON”
position.
The “PANIC” mode does not work when the key is in the “ON” position. WIRELESS REMOTE CONTROL TRANS- MITTER The wireless remote control transmitter is an electronic component. Observe the fol- lowing instructions in order not to cause damage to the transmitter. D Do not leave the transmitter on places the temperature becomes high
where such as on the dashboard.
D Do not disassemble it. D Avoid knocking
it hard against other
objects or dropping it.
D Avoid putting it in water. You can use up to 4 wireless remote con- trol the same vehicle. Contact your Toyota dealer for detailed information.
transmitters
for
25
If the wireless remote control transmitter does not actuate the doors or alarm, or operate from a normal distance: D Check for closeness to a radio trans- mitter such as a radio station or an airport which can interfere with normal operation of the transmitter.
D The battery may have been consumed. Check the battery in the transmitter. To replace “Replacing transmitter battery”.
the battery, see
00 SIENNA(U)
Replacing transmitter battery For replacement, use a CR2032 lithium battery or equivalent.
CAUTION
Special care should be that small children do not swallow the re- moved transmitter battery or compo- nents.
taken
NOTICE
When replacing the transmitter bat- tery, be careful not to lose the com- ponents.
Replace the transmitter battery by the fol- lowing procedures:
26
1. Using a coin or equivalent, open the
transmitter case.
00 SIENNA(U)
that
replacing battery, check
After the transmitter operates properly. If the trans- mitter still does not operate properly, con- tact your Toyota dealer. If you lose your transmitter, contact your Toyota dealer as soon as possible to avoid the possibility of theft, or an acci- dent. (See “If you lose your wireless re- mote control transmitter” in Section 4.)
2. Remove the discharged transmitter bat-
3. Put a new transmitter battery with posi-
tery.
NOTICE
Do not bend the terminals.
tive (+) side up.
Close the transmitter case securely.
NOTICE
z Make sure
the positive side and negative side of the transmitter bat- tery should be faced correctly.
z Be careful not to bend the electrode of the transmitter battery insertion and that dust or oils do not adhere to the transmitter case.
z Close the transmitter case securely.
MODEL/FCC ID: GQ43VT14T CAN: 1470102849
MADE IN U.S.A. This complies with Section 15 of the FCC rules. Operation is subject to the following two conditions: (1) This device may not cause harmful interference, and (2) this device must accept any interference received, includ- ing interference that may cause unde- sired operation.27
00 SIENNA(U)
Power windows
Window lock switch
Automatic operation (to open only): Push the switch completely down and then release it. The window will fully open. To stop the window partway, lightly pull the switch up and then release it.
The windows can be operated with the switch on each front door. The power windows work when the ignition switch is in the “ON” position. Key off operation: If both front doors are closed, they work for 45 seconds even after the ignition switch is turned off. They stop working when either is opened. OPERATING THE DRIVER’S WINDOW Use the switch on the driver’s door. Normal operation: The window moves as long as you hold the switch. To open: Lightly push down the switch. To close: Pull up the switch.
front door
28
that controls
the switch on
OPERATING THE PASSENGER’S WIN- DOW Use the passenger’s door. The driver’s door also has the switch the passenger’s window. The window moves as long as you hold the switch. To open: Push down the switch. To close: Pull up the switch. If you push in the window lock switch on the driver’s door, the passenger’s window cannot be operated.
00 SIENNA(U)
CAUTION
To avoid serious personal injury, you must do the following. D Always make sure the head, hands and other parts of the body of all occupants are kept completely in- side the vehicle before you close the power windows. If someone’s neck, head or hands gets caught in a closing window, it could result in a serious injury. When anyone closes the power windows, be sure that they operate the windows safe- ly.
D When small children are in the ve- hicle, never let them use the power window switches without supervi- sion. Use the window lock switch to prevent from making unex- pected use of the switches.
them
D Never leave small children alone in the vehicle, especially with the igni- tion key still inserted. They could use the power window switches and in a window. Unat- get tended children can become in- volved in serious accidents.
trapped
Power rear quarter windows
The rear quarter windows can be oper- ated with the “REAR VENT” switch on the instrument panel. rear quarter windows work The power when the ignition switch is in the “ON” position. However, if both front doors are closed, they work for 45 seconds even after the ignition switch is turned off. They stop working when either is opened. Both the left and the right rear quarter windows move as long as you hold the switch. To open: Push the right side of the switch. To close: Push the left side of the switch.
front door
29
00 SIENNA(U)
Center side windows and manual rear quarter windows
Back door
To open the window, pull the latch han- dle toward you and swing it fully out. When closing the window, make sure it is completely closed.
Insert the key into the keyhole and turn it. To lock: Turn the key clockwise. To unlock: Turn the key counterclockwise. Vehicles with power door lock system—All the doors lock and unlock simultaneously with back door.
CAUTION
To avoid serious personal injury, you must do the following. D Always make sure the hands and other parts of the body of all occu- pants are kept completely inside the vehicle before you close the power rear quarter windows. If someone’s hands get caught in a closing win- in a serious dow, injury. When anyone closes the power rear quarter windows, make sure that he/she operates the win- dows safely.
it could result
D Never leave small children alone in the vehicle, especially with the igni- tion key still inserted. They could use the power rear quarter window switch and get trapped in a window. Unattended children can be involved in serious accidents.
30
00 SIENNA(U)
Hood
When closing the back door, use the inside strap or handle for easier reach to the back door. To close the back door, lower it and press down on it. After closing the back door, try pulling it up to make sure it is secure- ly closed. in See Section 2 for precautions to observe for loading luggage.
“Luggage stowage precautions”
CAUTION
Keep the back door closed while driv- ing. This not only keeps the luggage from being thrown out but also pre- vents exhaust gases from entering the vehicle.
To open the hood: 1. Pull the hood lock release lever. The
hood will spring up slightly.
CAUTION
NOTICE
To prevent damage to the back door dampers, do not apply any force, paint or let any other foreign matter on them.
Before driving, be sure that the hood is closed and securely locked. Other- wise, the hood may open unexpected- ly while driving and an accident may occur.
31
Strap
Handle
00 SIENNA(U)
Theft deterrent system
2. In front of the vehicle, pull up the the
lever and
lift
auxiliary catch hood.
3. Hold the hood open by inserting the
support rod into the slot.
Before closing the hood, check to see that you have not forgotten any tools, rags, etc. and return its clip—this prevents rattles. Then lower the hood make sure If necessary, press down gently on the front edge to lock it.
the support rod
into place.
locks
to
it
To deter the vehicle theft, the system is designed to give an alarm if any of the front, sliding or back doors or hood is forcibly unlocked or the battery ter- minal is disconnected and then recon- nected when the vehicle is locked. The alarm blows the horn intermittently and flashes the headlights, tail lights and other exterior lights.
CAUTION
After inserting the support rod into the slot, make sure the rod supports the hood securely from falling down on to your head or body.
32
00 SIENNA(U)
As the doors are locked, the system will give you a preparation time of 30 seconds before the setting, during which the front, sliding or back doors and hood may be opened. Be careful not to unlock any door with the key or wireless remote control transmitter during setting. This will cancel the system. light 4. After making sure starts flashing, you may leave the ve- hicle.
indicator
the
The system will automatically be set after the preparation time passes. The indicator light will flash to show the system is set. If any of the front, sliding or back doors or hood is open at that time, the setting is interrupted until it is closed and locked. Never leave anyone in the vehicle when you set the system, because unlocking from the inside will activate the system.
SETTING THE SYSTEM 1. Turn
the ignition key position and remove it.
to the “LOCK”
The indicator light will start flashing every 1 second when the key is removed from the (See “Engine immobiliser system” for details.) 2. Have all passengers get out of
ignition
switch.
the
vehicle.
3. Close the front, sliding and back doors and hood. Then lock all the doors with the key or wireless remote control transmitter.
The indicator light will come on when the front, sliding and back doors and hood are closed and locked.
WHEN THE SYSTEM IS SET Activating the system The system will give the alarm under the following conditions: D If any of
front, sliding or back doors the hood is forcibly opened without the key or wire- less remote control transmitter
is unlocked or
the
if
D If the battery terminal is disconnected
and then reconnected
The indicator light will come on when the system is activating. If any of the doors is unlocked without the key or wireless remote control transmitter and the key is not in the ignition switch, all the doors will be automatically locked again. After one minute, the alarm will automati- cally stop and the indicator light will starts flashing again. Reactivating the alarm Once set, the system cannot be cancelled without the key or wireless remote control transmitter. If the front, sliding and back doors and hood are closed after the alarm stops, the system automatically resets the alarm.
33
00 SIENNA(U)
the system does not work properly,
If have it checked by your Toyota dealer.
Fuel tank cap
described
The alarm will activate again under the same circumstances in “Activating the system”. Stopping the alarm To stop alarm midway, do the following: D Unlock either front door or back door with the key or wireless remote control transmitter.
D Turn the key from the “LOCK” to “ON”
position.
the system at
the
These ways cancel same time. TESTING THE SYSTEM 1. Open all the windows. 2. Set
the system as described above. The doors should be locked with the key or wireless remote control transmit- ter. Be sure to wait until the indicator light goes off or starts flashing.
3. Unlock any door from the inside. The
system should activate the alarm.
this operation
4. Cancel the system as described above. 5. Repeat the other doors and hood. When testing on the hood, also check that the system is activated when the battery terminal is disconnected and then reconnected.
for
34
1. To open the fuel filler door, pull the
lever up. When refueling, turn off the engine.
CAUTION
D Do not smoke, cause sparks or al- flames when refueling.
low open The fumes are flammable.
D When opening the cap, do not re- move the cap quickly. In hot weath- er, fuel under pressure could cause injury by spraying out of the filler neck is suddenly re- moved.
the cap
if
NOTICE
5−door models—Avoid opening the fuel filler door when the left side slid- ing door is fully opened. Otherwise, the fuel filler door may be damaged.
00 SIENNA(U)
2. To remove the fuel tank cap, turn the cap slowly counterclockwise, then pause slightly before removing it. After removing the cap, hang it on the cap hanger.
the cap clockwise
It is not unusual to hear a slight swoosh when the cap is opened. When installing, turn till you hear a click. If the cap is not tightened securely, the malfunction lamp comes on. Make sure the cap is tightened securely.
indicator
The indicator lamp goes off after driving several times. If the indicator lamp does not go off, contact your Toyota dealer as soon as possible. The left side sliding door does not open fully if the fuel filler door is opened.
CAUTION
D Make sure the cap is tightened se- in
curely to prevent fuel spillage case of an accident.
D Use only a genuine Toyota fuel tank cap for replacement. It has a built− in check valve to reduce fuel tank vacuum.
35
00 SIENNA(U)
the
To operate the moon roof, use switches beside the personal light. The moon roof works when the ignition switch is in the “ON” position. However, if both front doors are closed, it works for 45 seconds even after the ignition switch is turned off. It stops working when any of the doors is opened. Sun shade operation— The sun shade can be opened or closed by hand. Sliding operation— To open: Push the switch on the “SLIDE OPEN” side. The roof will fully open. To stop the roof partway, push the “SLIDE OPEN” or “TILT UP” side briefly. The sun shade will be opened together with the roof. To close: Push the switch on the “TILT UP” side. As a precaution when closing, the roof stops at the half closed position before fully closing. Therefore, release the switch and then push it again to close it com- pletely.
the switch on either
Tilting operation— To tilt up: Push the switch on the “TILT UP” side. To lower: Push the switch on the “SLIDE OPEN” side. You may stop the moon roof at any de- sired position. The roof will move while the switch is being pushed and stop when released except to slide open.
CAUTION
To avoid serious personal injury, you must do the following. D While the vehicle is moving, always keep the head, hands and other parts of the body of all occupants away from the roof opening. Other- wise, you could be seriously injured if the vehicle stops suddenly or if the vehicle is involved in an acci- dent.
Electric moon roof
Sliding operation
Tilting operation
36
00 SIENNA(U)
D Always make sure nobody places his/her head, hands and other parts of the body in the roof opening be- fore you close the roof. If some- one’s neck, head or hands gets caught in the closing roof, it could result injury. When anyone closes the roof, first make sure it is safe to do so.
in a serious
D Never leave small children alone in the vehicle, especially with the igni- tion key still inserted. They could use the moon roof switches and get trapped in the roof opening. Unat- tended children can become in- volved in serious accidents.
D Never sit on
top of
the vehicle
around the roof opening.
37
00 SIENNA(U)
38
00 SIENNA(U)
SECTION 1− 3
OPERATION OF INSTRUMENTS AND CONTROLS Seats, Seat belts, Steering wheel and Mirrors Seats Front seats Rear seats Head restraints Armrests Seat belts SRS driver and front passenger airbags Child restraint Tilt steering wheel Outside rear view mirrors Anti−glare inside rear view mirror Sun visors
. . . . . . . . . . . . . . . . . . . . . . . . . . . . . . . . . . . . . . . . . . . . . . . . . . . . . . . . . . . . . . . . . . . . . . . . . . . . . . . . . . . . . . . . . . . . . . . . . . . . . . . . . . . . . . . . . . . . . . . . . . . . . . . . . . . . . . . . . . . . . . . . . . . . . . . . . . . . . . . . . . . . . . . . . . . . . . . . . . . . . . . . . . . . . . . . . . . . . . . . . . . . . . . . . . . . . . . . . . . . . . . . . . . . . . . . . . . . . . . . . . . . . . . . . . . . . . . . . . . . . . . . . . . . . . . . . . . . . . . . . . . . . . . . . . . . . . . . . . . . . . . . . . . . . . . . . . . . . . . . . . . . . . . . . . . . . . . . . . . . . . . . . . . . . . . . . . . . . . . . . . . . . . . . . . . . . . . . . . . . . . . . . . . . . . . . . . . . . . . . . . . . . . . . . . . . . . . . . . . . . . . . . . . . . . . . . . . . . . . . . . . . . . . . . . . . . . . . . . . . . . . . . . . . . . . . . . . . . . . . . . . . . . . . . . . . . . . . . . . . . . . . . . . . . . . . . . . . . . . . . . . . . . . . .
40
40
43
57
58
58
69
76
100
100
102
10339
00 SIENNA(U)
Seats While the vehicle is being driven, all ve- hicle occupants should have the seatback upright, sit well back in the seat and prop- erly wear the seat belts provided.
Front seats— —Seat adjustment precautions Adjust the driver’s seat so that the foot pedals, steering wheel and instrument panel controls are within easy reach of the driver.
CAUTION
CAUTION
D Do not drive the vehicle unless the occupants are properly seated. Do top of a not allow sitting on folded−down seatback, or the luggage compartment. Persons not properly seated and not properly re- strained by seat belts can be se- verely injured in the event of emer- gency braking or a collision.
in
D During driving, do not allow pas- to stand up or move sengers around between seats. Severe inju- ries can occur in the event of emer- gency braking or a collision.
D Adjustments should not be made while the vehicle is moving, as the seat may unexpectedly move and cause the driver to lose control of the vehicle.
D When adjusting the seat, be careful not to hit the seat against a pas- senger or luggage.
D After adjusting the seat position, try sliding it forward and backward to make sure it is locked in posi- tion.
D After adjusting the seatback, exert body pressure to make sure it is locked in position.
40
D Do not put objects under the seats except putting in the auxiliary box. The objects may interfere with the seat−lock mechanism or unexpect- edly push up the seat position ad- justing lever; the seat may suddenly move, causing the driver to lose control of the vehicle.
D While adjusting the seat, do not put your hands under the seat or near the moving parts. You may catch and injure your hands or fingers.
00 SIENNA(U)
—Adjusting front seats (manual seat)
1. SEAT POSITION ADJUSTING LEVER Pull the lever up. Then slide the seat to the desired position with slight body pressure and release the lever. 2. SEATBACK
ADJUSTING
ANGLE
LEVER
lever up. lean back to the desired angle
Lean forward and pull the Then and release the lever.
CAUTION
To reduce the risk of sliding under the lap belt during a collision, avoid reclining the seatback any more than needed. The seat belts provide maxi- mum protection in a frontal or rear collision when the driver and the pas- senger are sitting up straight and well back If you are reclined, the lap belt may slide past your hips and apply restraint forces directly to the abdomen. Therefore, in the event of a frontal collision, the risk of personal injury may increase with increasing recline of the seat- back.
in the seats.
3. SEAT CUSHION HEIGHT ADJUSTING
KNOB
Turn the knob either way.
41
00 SIENNA(U)
—Adjusting front seats (power seat)
1. SEAT POSITION AND SEAT CUSHION
HEIGHT ADJUSTING SWITCH
CAUTION
To reduce the risk of sliding under the lap belt during a collision, avoid reclining the seatback any more than needed. The seat belts provide maxi- mum protection in a frontal or rear collision when the driver and the pas- senger are sitting up straight and well back If you are reclined, the lap belt may slide past your hips and apply restraint forces directly to the abdomen. Therefore, in the event of a formal collision, the risk of personal injury may increase with increasing recline of the seat- back.
in the seats.
Move the control switch in the desired direction. Releasing the switch will stop the seat at that position. Do not place anything under front seats. It might interfere with the seat−lock mechanism. 2. SEATBACK
ADJUSTING
ANGLE
the
SWITCH
Move the control switch in the desired direction. Releasing the switch will stop the seat- back at that position.
42
00 SIENNA(U)
—Adjusting second seat (bench seat)
Folding the seats up will enlarge the lug- gage compartment. See “Luggage stowage precautions” in Section 2 for precautions to observe for loading luggage.
Rear seats— —Rear seat precautions
CAUTION
D Any operations should not be made
while the vehicle is moving.
D When adjusting the seat, be careful not to hit the seat against a pas- senger or luggage.
D After adjusting the seat position, try sliding it forward and backward to make sure it is lock in position. D After adjusting the seatback, exert body pressure to make sure it is locked in position.
D When returning seats to their origi-
nal position: Make sure the seat belts are not twisted or caught under the seat and are arranged in their proper position and are ready to use. Make sure is securely locked by pushing forward and rear- ward on the top of the seatback or by trying to pull up the edge of the bottom cushion. Failure to do so will prevent seat belt from operat- ing properly.
the seat