- 2003 Toyota Sienna Owners Manuals
- Toyota Sienna Owners Manuals
- 1999 Toyota Sienna Owners Manuals
- Toyota Sienna Owners Manuals
- 2005 Toyota Sienna Owners Manuals
- Toyota Sienna Owners Manuals
- 2010 Toyota Sienna Owners Manuals
- Toyota Sienna Owners Manuals
- 2014 Toyota Sienna Owners Manuals
- Toyota Sienna Owners Manuals
- 1998 Toyota Sienna Owners Manuals
- Toyota Sienna Owners Manuals
- 2004 Toyota Sienna Owners Manuals
- Toyota Sienna Owners Manuals
- 2001 Toyota Sienna Owners Manuals
- Toyota Sienna Owners Manuals
- 2006 Toyota Sienna Owners Manuals
- Toyota Sienna Owners Manuals
- 2009 Toyota Sienna Owners Manuals
- Toyota Sienna Owners Manuals
- 2000 Toyota Sienna Owners Manuals
- Toyota Sienna Owners Manuals
- 2012 Toyota Sienna Owners Manuals
- Toyota Sienna Owners Manuals
- 2008 Toyota Sienna Owners Manuals
- Toyota Sienna Owners Manuals
- 2007 Toyota Sienna Owners Manuals
- Toyota Sienna Owners Manuals
- 2002 Toyota Sienna Owners Manuals
- Toyota Sienna Owners Manuals
- 2011 Toyota Sienna Owners Manuals
- Toyota Sienna Owners Manuals
- 2015 Toyota Sienna Owners Manuals
- Toyota Sienna Owners Manuals
- Download PDF Manual
-
“AM”,
05 SIENNA_U (L/O 0409)
(Eject button)
(Program)
Cassette player This button is used to eject a cassette. Compact disc player This button is used to eject one or all compact discs. To eject the current compact disc, push and release the compact disc eject button. To eject a specific disc, push “Ɲ” (preset button 3) or “Ɯ” (preset button 4) until the number of the disc you want to eject is displayed. Push and release the eject but- ton. To eject all discs at a time, press and hold the eject button until you hear a beep. The last compact disc played before pushing the button will be ejected first. If the ejected disc is not removed for a long time, the eject function will be cancelled.
” indicates the top side, “
Push “ ” (preset button 4) to select the other side of a cassette tape. The display indicates which side is currently selected (“ ” indicates the bottom side). Auto−reverse the cassette player reaches the end of a tape side, it automatically reverses and begins to play the other side. This is true whether the cassette was playing or fast forwarding.
feature: After
(Reverse/Fast−forward button)
Cassette player
Push “ ” (preset button 6) to fast−for- ward a cassette tape. “FF” will appear on the display. Push “ ” (preset button 5) to rewind a tape. “REW” will appear on the display. To stop the tape while it is fast−forward- ” or “TAPE” button. To stop ing, push “ the tape while it is rewinding, push “ ” or “TAPE” button. If a tape rewinds completely, the cassette player will stop and then play that same side. If a tape fast−forwards completely, the cassette will play the other side of the tape using the auto−reverse feature.
231
2005 SIENNA from Sep. ’04 Prod. (OM45431U)
05 SIENNA_U (L/O 0409)
“SURROUND ON” or
BAL: Adjusts the sound balance between the right and left speakers. The display ranges from L7 to R7. SURROUND: Turn on or off the surround function. “SUR- ROUND OFF” will appear on the display. DISC (Compact disc) Push the “DISC” button to play a compact disc. When the audio system is set into com- pact disc operation, the display shows the track, or track and disc number currently being played. Vehicles with rear seat entertainment sys- tem— The “DISC” button may also be used to operate a DVD player when a disc is loaded in the DVD player. Pressing the “DISC” button changes between the CD player and DVD player. When the DVD player is in operation, “AUX” appears on the display.
inserted
incorrectly
Error messages If the player malfunctions, your audio sys- tem will display one of the six following error messages. “WAIT”: The compact disc player unit may be too hot. Allow the player to cool down. “ERROR 1”: The disc may be dirty, dam- aged or (up−side down). Clean the disc and re−insert it. “NO DISC”: The compact disc changer of separate unit is empty. Insert a disc. “ERROR 3”: There is a problem inside the system. Eject the disc or magazine. Set the disc or magazine again. “ERROR 4”: Over−current. Ask your Toyota dealer to inspect. “CD OPEN”: The compact disc changer lid of separate unit is open. Close the compact disc changer lid. If the malfunction still exists, take your vehicle to your Toyota dealer. Ɲ DISC Ɯ Use these buttons to select a disc you want to listen to. Push “Ɲ” (preset button 3) or “Ɯ” (preset button 4) until the number of the disc you want to listen to appears on the display.
Compact disc player
” (preset button 6) or Push and hold “ “ ” (preset button 5) to fast forward or reverse within a compact disc. When you release the button, the compact disc play- er will resume playing. AM Push the “AM” button to turn on the radio and select the AM band. “AM” will appear on the display. AUDIO CONTROL (Tone and sound bal- ance adjustment function) Each “AUDIO push CONTROL” knob, the mode changes. To adjust the knob. BAS: Adjusts low−pitched tones. The dis- play ranges from −5 to 5. MID: Adjusts mid−pitched tones. The dis- play ranges from −5 to 5. TRE: Adjusts high−pitched tones. The dis- play ranges from −5 to 5. FAD: Adjusts the sound balance between the front and rear speakers. The display ranges from F7 to R7.
tone and balance,
time
turn
you
the
the
232
2005 SIENNA from Sep. ’04 Prod. (OM45431U)
05 SIENNA_U (L/O 0409)
B NR∗
” (preset button 3). “
Dolbyr If you are listening to a tape that was recorded with Dolbyr B Noise Reduction, ” will push “ appear on the display. Push the button again to turn off Dolbyr B NR. The Dolby NR mode reduces tape noise by about 10 dB. For best sound reproduc- tion, play your tapes with this button on or off according to the mode used to re- cord the tape. ∗ : Dolby noise reduction manufactured under license from Dolby Laboratories Licensing Corporation. “DOLBY” and the double D symbol are trademarks of Dolby Laboratories Licensing Corporation. FM Push the “FM” button to turn on the radio and select the FM band. “FM1”, “FM2” or “FM TYPE” will appear on the display. This system allows you to set twelve FM and six RDS stations, three for each of the preset button. If the RDS is off or RDS stations are not preset to the preset buttons, “FM TYPE” will not appear on the display.
in
LOAD This button is used to load the compact discs the compact disc player. This player can store up to six discs. To load one compact disc only, quickly push and release the button, then insert a compact disc. After the disc is loaded, the shutter of the slot will close. If no compact disc is inserted, the shutter will close after 15 seconds. To load multiple compact discs, push and hold the button (until you hear a beep when the audio system is on). When the indicators on both sides of the slot turn green, insert the first compact disc. After the disc is loaded, the shutter of the slot will close. After a few seconds, the shut- ter will automatically open again and the indicators will turn green so the next disc can be inserted. The same process can be applied the discs. If the player is full of discs, “DISC FULL” will appear on the display. If no compact disc is inserted, the shutter will close after 15 seconds. PWR·VOL (Power and Volume) Push “PWR·VOL” to turn the audio system on and off. Turn “PWR·VOL” to adjust the volume.
the rest of
loading
for
in random order, or
RAND (Random) There are two random features—you can either listen to the tracks on one compact to disc the listen tracks on all the compact discs in the magazine in random order. To play the tracks on one disc in random order: Quickly push and release “RAND” (preset ” will appear on the button 1). “ display and the player will perform the tracks on the disc you are listening to in random order. To turn off the random fea- ture, push this button again. To play all the tracks in the magazine in random order: Push and hold “RAND” (preset button 1) ” will ap- until you hear a beep. “ pear on the display and the player will perform all the tracks on all the discs in the magazine in random order. To turn off the this button again.
feature, push
random
233
2005 SIENNA from Sep. ’04 Prod. (OM45431U)
05 SIENNA_U (L/O 0409)
the repeat
RPT (Repeat) Cassette player Push “RPT” (preset button 2) while the ” will appear on track is playing. “ the display. When the track ends, it will automatically rewind and replay. To turn off feature, push this button again. There must be at least 3 seconds of blank space between tracks in order for the re- peat feature to work correctly. Compact disc player There are two repeat features—you can either replay a disc track or a whole com- pact disc. Repeating a track: Quickly push and release “RPT” (preset button 2) while is playing. ” will appear on the display. When “ the track ends, it will automatically replay. To turn off the repeat feature, push this button again.
track
the
RDS (Radio Data System) Your audio system is equipped with Radio Data System (RDS). RDS station providing good reception is automatically selected if current reception worsens. The “RDS” button turns the RDS on and off. This button is operational except in AM mode. To turn on the RDS, push and hold this button until you hear a beep and “RDS” will appear on the display. At this time, the radio starts to search the RDS sta- tions and “RDS SEARCH” will flash on the display. Quickly push and release this button when the RDS to “RDS the RDS stations and search SEARCH” will flash on the display. When found, stations are “FOUND” and the number of the RDS sta- tions will appear on the display, and you will hear two beeps. The stations will be preset to the preset buttons. If the RDS stations can not be found, “NO RDS ST” will appear on the display and you will hear a beep, and the display returns to the previous mode. To turn the RDS off, push the button until you hear a beep again.
the radio starts
the RDS
turns on,
234
Repeating a disc: Push and hold “RPT” (preset button 2) ” will ap- until you hear a beep. “ pear on the display. The player will repeat all the tracks on the disc you are listening to. When the disc ends, the player will automatically go back to the first track on the disc and replay. To turn off the repeat feature, push this button again. SCAN Radio You can either scan all the frequencies on a band or scan only the preset stations for that band. To scan the preset stations: Push and hold “Ɯ” or “Ɲ” side of the “SCAN” button until you hear a beep. The radio will tune in the next preset station up or down the band, stay there for 5
seconds, and then move to the next pre- set station. To stop scanning, push this button again. To scan all the frequencies: Quickly push and release “Ɯ” or “Ɲ” side of the “SCAN” button. The radio will find the next station up or down the station band, stay there for 5 seconds, and then scan again to the next station. To stop scanning, push this button again.2005 SIENNA from Sep. ’04 Prod. (OM45431U)
05 SIENNA_U (L/O 0409)
Compact disc player There are two scan features—you can ei- ther scan the tracks on a specific disc or scan the first tracks of all the discs in the magazine. Scanning the tracks on a disc: Quickly push and release “Ɯ” or “Ɲ” side of the “SCAN” button. “SCAN” will appear on the display and the player will scan up or down all the tracks on the disc you are listening to. To stop scanning, push this button again. If the player scanned all the tracks on the disc, it will stop scanning. The discs in the compact disc changer of separate unit can be scanned up only. Scanning the first tracks of all the discs in the magazine: Push “Ɯ” or “Ɲ” side of the “SCAN” but- ·SCAN” will ton until you hear a beep. “ appear on the display and the player will scan up or down the first track of the next disc. To stop scanning, push this button again. the auto changer has scanned all the discs, it will stop scan- ning. The discs in the compact disc changer of separate unit can be scanned up only.
If
of
or
“Ɲ”
“Ɯ”
side
the seek mode,
the radio finds and the next station up or down the
SEEK·TRACK (Seeking/Track up/down) Radio In plays station band. To seek the next station, quickly push and release the “SEEK·TRACK” button. Do this again to find the station after that. Cassette Player Use this button to skip up or down to locate a song or recording. You can select up to nine recordings (in- cluding current one). A blank space of at least 3 seconds is considered to be a start of a recording. When beginning of a tape is reached, the player automatically resumes play. When the end of the tape is reached, the player automatically reverses sides and resumes normal play. In addition, the feature may not work well with some spoken word, live, or classical recordings.
of
or
“Ɲ”
“Ɯ”
side
the current
the down side of
Compact disc player Use this button to skip up or down to a different track. Push the “SEEK·TRACK” button until the number of the track you want to listen to appears on the display. If you want to return to the beginning of track, quickly push the button one time. Vehicles with rear seat entertainment sys- tem— While the DVD player is in operation, the chapter or track can be changed by push- ing the “SEEK·TRACK” button. ST (Stereo reception) display Your radio automatically changes to stereo reception when a stereo broadcast is re- ceived. “ST” appears on the display. If the signal becomes weak, the radio reduces the amount of channel separation to prev- ent the weak signal from creating noise. If the signal becomes extremely weak, the radio switches from stereo to mono recep- tion. TAPE Push the “TAPE” button to play a cassette tape.
side of
“Ɯ” or
“Ɲ”
the
235
2005 SIENNA from Sep. ’04 Prod. (OM45431U)
05 SIENNA_U (L/O 0409)
in RDS
is operational only
TEXT Radio This button mode. When an RDS radio station transmits a text message, “TEXT” will be displayed. At this time, push the “TEXT” button to view the text message. The message display will be canceled if any button that affects the display is pushed. To view the mes- sage again, push this button again. After the entire message has been displayed, the message will disappear. The RDS audio system has memory to store three 64−character messages. To store a message in memory, push and hold the “TEXT” button until you hear a beep. If three messages are already stored in memory, the oldest message will be over- written by the new message. To recall a radio text message, push the “TEXT” button momentarily. This will dis- play the most recent message. Each push of the button will display messages in the order of most to least recent.
If no messages have been stored, or if there are no more messages to be re- called, “NO MESSAGE” will appear on the display, and the message display will be canceled. The message display will be canceled if you activate any function that affects the display. Compact disc player This button is used to change the display for the compact disc that contains text data. To change the display, quickly push and release the “TEXT” button while the com- pact disc is playing. The display changes in the order from the elapsed time to disc title the elapsed time. If this button is pushed while a compact disc that does not contain text data is playing, “NO TITLE” will appear on the display. If the entire disc or track title does not appear on the display, push and hold the button until you hear a beep. The rest of the title will appear.
then back
track
title,
to
to
the
“TRAF” button,
TRAF (Traffic) This button turns the traffic announcement (TA) feature on and off. This button is operational only in FM mode. By pushing “TRAF SEEK” will flash on the display and the radio will start seeking any traffic program station. When a traffic program station is found, “TRAF” will be displayed and you will hear a beep. After the traffic announcement program is over, the display returns to the previous mode. If no traffic program station is found, “NO TRAF INFO” appears on the display for a few seconds and the display returns to the previous mode. To cancel the traffic announcement, push this button again. TUNE (Tuning) Turn the “TUNE” knob clockwise to step up the frequency. Turn the knob counter- clockwise to step down the frequency.
236
2005 SIENNA from Sep. ’04 Prod. (OM45431U)
05 SIENNA_U (L/O 0409)
TYPE (Program Types) When you push the “TYPE” button while receiving an RDS station, the current pro- gram type appears on the display. Each time you push this button, the pro- gram type changes as in the following: D ROCK D EASY LIS (Easy listening) D CLS/JAZZ (Classical music and Jazz) D R&B (Rhythm and Blues) D INFORM (Information) D RELIGION D MISC (Miscellaneous) D ALERT (Emergency message)
237
2005 SIENNA from Sep. ’04 Prod. (OM45431U)
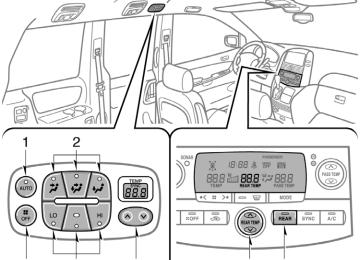
Audio remote controls (steering switches)
05 SIENNA_U (L/O 0409)
Some parts of the audio system can be adjusted using the switches on the steer- ing wheel. Details of the specific switches, controls, and features are described below. 1. Volume control switch 2. “ƜƝ” switch 3. “MODE” switch
238
2005 SIENNA from Sep. ’04 Prod. (OM45431U)
05 SIENNA_U (L/O 0409)
to
increase while
1. Volume control switch Push “+” to increase the volume. The vol- ume continues the switch is being pushed. Push “−” the volume. The to decrease volume continues to decrease while the switch is being pushed. 2. “ƜƝ” switch Radio This switch has the following features— To select a preset station: Quickly push and release the “Ɯ” or “Ɲ” side of the switch. Do this again to select the next preset station. To seek a station: Push and hold the “Ɯ” or “Ɲ” side of the switch until you hear a beep. Do this again to find the next station. If you push the switch on either side during the seek mode, seeking will be cancelled. To step up or down the frequency, push and hold the switch even after you hear a beep. When you the switch, the radio will begin seeking up or down for a station. Do this again to find the next station.
release
from
Cassette player This switch has the following features— To skip to a different track in either direc- tion: Quickly push and release the “Ɯ” or “Ɲ” side of the switch. “FF 1” or “REW 1” will appear on the display. Next, push either side of the track switch until the track you want to listen to is set. If you push the switch ten times, the skip function will turn off. (You can skip up to nine tracks at a time.) When counting the number of the tracks you want to rewind, remember to count the current track as well. For example, if you want to rewind to a song that is two tracks before the song you are listening to, push the “Ɲ” side of the switch three times. If you push the track switch further than you wanted to, push the other side of the switch. The in- creased or reduced. The track number you select is not valid if the tracks remaining on the current side of the cassette.
track number will be
the number of
is higher
than
it
D When the tape reaches to the begin- ning, the player will automatically start playing that side.
D After the tape reaches to the end, the reverse and
player will automatically start playing the other side.
There must be at least 3 seconds of blank space between tracks for the track switch to work correctly. In addition, the feature may not work well with some spoken, live, or classical recordings. To fast forward or reverse: Push and hold the “Ɯ” side of the switch to fast forward a cassette tape. “FF” will appear on the display. Push and hold the “Ɲ” side of the switch to rewind a tape. “REW” will appear on the display. To stop the tape while it is fast forward- ing, push the “Ɯ” side of the switch. To stop the tape while it is rewinding, push the “Ɲ” side of the switch. If a tape rewinds completely, the cassette player will stop and then play that same side. If a tape fast forwards completely, the cassette will play the other side of the tape using the auto−reverse feature.
239
2005 SIENNA from Sep. ’04 Prod. (OM45431U)
05 SIENNA_U (L/O 0409)
To turn the audio system off, push and hold the “MODE” switch until the system turns off.
Compact disc player Use this switch to skip up or down to a different track in either direction. Quickly push and release the “Ɯ” or “Ɲ” side of the switch until the track you want to listen to is set. If you want to return to the beginning of the current track, push the “Ɲ” side of the switch once, quickly. Vehicles with rear seat entertainment sys- tem— While the DVD player is in operation, the chapter or track can be changed by push- ing the “Ɯ” or “Ɲ” side of the switch. With compact disc changer only— Push and hold the “Ɯ” or “Ɲ” side of the switch until the disc you want to listen to is set. 3. “MODE” switch Push the “MODE” switch to select an au- dio mode. Each push changes the mode sequentially if the desired mode is ready to use. The DVD player will be selectable if a rear seat entertainment system is installed in your vehicle. To turn the audio system on, push the “MODE” switch.
240
if
the
front audio system
Rear seat audio system— The rear seat audio system is designed for the rear seat passengers to enjoy the audio sound separately between the front seats and the rear seats. The rear seat audio system can be turned on with the rear audio system controller even is off. When the front audio is turned off, the rear audio system will be turned off simul- taneously. The rear passengers can enjoy all the modes (AM and FM radio, cassette tape player and compact disc player with changer) with the rear seat audio system when a cassette tape and a compact disc are loaded in the front audio system. When the same mode is selected on the front and rear audio systems at the same time, the system can be operated on the front audio system. If the radio mode is selected on the front and rear audio systems at the same time, AM and FM modes cannot be changed on the rear seat audio system. You can enjoy the rear seat audio system with commercial headphone. See “—Head- phone input jacks” on page 248 in this Section for details.
2005 SIENNA from Sep. ’04 Prod. (OM45431U)
You can also enjoy the rear seat audio system with a wireless headphone. The wireless headphone can be used within rear seat. If the signal becomes weak, the headphone will mute. For details, refer to the manufacturer’s instructions. With some wireless headphone generally available in the market, it may be difficult to catch sound properly. Toyota recom- mends the use of Toyota genuine wireless headphone. You can purchase a wireless headphone at a Toyota dealer.
05 SIENNA_U (L/O 0409)
CAUTION
D Do not drive with using the head- phone. Otherwise, you may be hard to hear the sound from the outside while using the headphone and may cause an accident.
D With DVD player:
that
Conversational speech on some DVDs is recorded at a low volume to emphasize the impact of sound effects. If you adjust the volume assuming the conversations represent the maximum volume lev- el that the DVD will play, you may be startled by louder sound effects or when you change to a different audio source. Be sure to adjust the volume with this in mind. Make sure the volume creased, before you headphone.
is not turn on
in- the
241
2005 SIENNA from Sep. ’04 Prod. (OM45431U)
05 SIENNA_U (L/O 0409)
The rear seat audio system consists of following components. 1. Volume control knobs 2. Rear seat audio system display 3. Headphone input jacks 4. Front audio system 5. Rear seat audio system controller
—Rear seat audio system controller The rear seat audio system can be oper- ated with the rear seat audio system con- troller.
CAUTION
Do not disassemble or modify the controller. It may cause an accident, fire or electric shock.
NOTICE
Keep the controller away from direct sunlight, high heat and high humidity. These conditions could cause the case to deform or the battery to ex- plode or leak.
242
BEFORE USING THE CONTROLLER (for new vehicle owners) A battery is already set in the control- ler with an insulating sheet, which pre- from being dis- vents charged. Before using the controller, remove the insulating sheet.
the battery
2005 SIENNA from Sep. ’04 Prod. (OM45431U)
05 SIENNA_U (L/O 0409)
USING THE CONTROLLER To use the rear seat audio system con- troller, direct the signal output portion of the controller to the signal reception portion of the rear seat audio system display. The rear seat audio system controller can be operated when the ignition switch is in the “ACC” or “ON” position. The controller does not operate properly when the signal reception portion of the display to direct sunlight. Block the display from direct sunlight. Details of specific buttons, controls, and features see “CONTROLLER FEATURES” on page 244
in this Section.is exposed
controller,
the
of
CAUTION
To reduce the chance of in case of an accident or a sudden stop while driving, stow the controller in the console box or front seat side table when it is not in use.
injury
NOTICE
Observe the followings, otherwise the controller may be damaged. z Do not drop or strongly knock the
controller against hard objects.
z Do not sit on or place heavy ob-
jects on the controller.
z Do not leave the controller exposed to high temperatures (such as on the long time.
instrument panel) for a
243
2005 SIENNA from Sep. ’04 Prod. (OM45431U)
05 SIENNA_U (L/O 0409)
” and “ ” and “
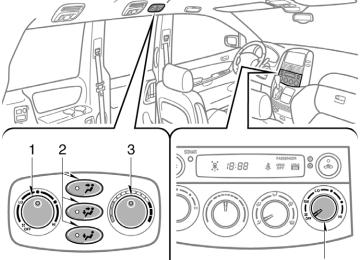
CONTROLLER FEATURES 1. “ 2. “ 3. “ON/SOURCE” button 4. “OFF” button
” (DISC/CH/PROG) buttons ” (TUNE/TRACK) buttons
1. “
” and “
” (DISC/CH/PROG) but-
tons
the “
” or “
Radio You can scan only the preset stations for the band of the front audio system. (For instructions, see “—Controls and features” on page 223 in this Section.) To scan the preset stations: ” (DISC/CH/PROG) Push button. The radio will tune in the next preset station up or down the band. The station frequency will appear on the dis- play. Cassette tape player Push ” (DISC/CH/PROG) ” or “ button to select the other side of a cas- sette indicates which ” indicates side is currently selected. (“ indicates the bottom the side.) the cassette Auto−reverse player reaches the end of a tape side, it automatically reverses and begins to play the other side. This is true whether the cassette was playing or fast forwarding.
tape. The display
feature: After
top side, “
the “
”
244
2005 SIENNA from Sep. ’04 Prod. (OM45431U)
05 SIENNA_U (L/O 0409)
” or “
” or “
” and “
” (TUNE/TRACK) but-
Compact disc player Compact disc changer only— Use this button to select a disc you want to listen to. ” (DISC/CH/PROG) Push the “ button until the number of the disc you want to listen to appears on the display. 2. “ ” (TUNE/TRACK) buttons Radio Push the “ ton to tune or seek. Tuning: ” or “ ” Quickly push and release the “ (TUNE/TRACK) button. Each time you push the button, the radio will step up or down to another frequency. If you push and hold the button, and the radio will go into the seek mode. Seeking: ” (TUNE/ Push and hold the “ TRACK) button. The radio will seek up or down for a station of the nearest frequen- cy and will stop on reception. Each time you push the button, the stations will be searched one after another.
” or “
”
the “
” (TUNE/TRACK) button.
Cassette tape player This button has the following features— To fast forward or reverse: ” (TUNE/TRACK) Push and hold button until “FF” will appears on the dis- play to forward a tape. Push and hold the (TUNE/TRACK) button until “REW” “ appears on the display to rewind a tape. To stop the tape while it is fast forward- ” (TUNE/TRACK) button. To ing, push “ stop the tape while it is rewinding, push “ If a tape rewinds completely, the cassette player will stop and then play that same side. If a tape fast forwards completely, the cassette will play the other side of the tape using the auto−reverse feature. To skip up or down to locate a song or recording. You can select up to nine recordings (in- cluding current one). ” (TUNE/TRACK) but- Push the “ ton. “FF 1” or “REW 1” will appear on the display. Next, push either side of the track button until the number on the display reaches the number of tracks you want to skip. If you push the button 10 times, the skip feature will be turned off.
” or “
For the skip feature to work correctly a blank space of at least 3 seconds is con- sidered to be a start of a recording. When a beginning of a tape is reached, the player automatically resumes play. When the end of the tape is reached, the player automatically reverses sides and resumes normal play. In addition, the feature may not work well with some spoken, live, or classical re- cordings. Compact disc player This button has the following features— To skip up or down to a different track: ” (TUNE/TRACK) but- Push the “ ton until the number of the track you want to listen to appears on the display. If you the want current track, quickly push ” (TUNE/TRACK) button one time. To fast forward or reverse: ” (TUNE/ Push and hold the “ TRACK) button to fast forward or reverse within a compact disc. When you release the button, the compact disc player will resume playing.
the beginning of
to return to
” or “
” or “
the
“
245
2005 SIENNA from Sep. ’04 Prod. (OM45431U)
05 SIENNA_U (L/O 0409)
3. “ON/SOURCE” button Push “ON/SOURCE” button to turn on the rear seat audio system. Use “ON/SOURCE” button to select an audio mode when the rear seat audio sys- tem is on. Each time you push this but- ton, the system changes between the ra- dio, cassette player and compact disc player. When you change the mode, the display indicates which mode is selected. When a cassette tape and compact discs are not loaded in the front audio system, only a radio mode can be selected in the rear seat audio system. If you push “ON/SOURCE” button to se- lect the casette tape player mode or com- pact disc player mode in that case, a beep sounds from front audio system and “INVALID” for 6
seconds, and then the rear audio system returns to the radio mode. If you push “ON/SOURCE” button while receiving an emergency broadcast, a beep sounds and the screen to indicate that no button can be operated.“INVALID” appears on
the screen
flashes on
Radio AM mode When you select the AM mode, “AM” will appear on the screen. FM mode When you select the FM mode, “FM1” or “FM2” will appear on the display. If the front audio system receives a traffic the rear seat announcement (TA) while audio system the radio mode, “TRAF” will flash on the screen and the rear seat audio system will turn off. When the traffic an- nouncement (TA), the rear seat audio sys- tem cannot select the AM/FM mode. Tape mode “TAPE” appears on the screen while this mode is selected.
front audio
receives a
in
is
the screen while this
Compact disc mode “CD” appears on mode is selected. The screen shows the track, or track and disc number currently being played. Error messages If the player malfunctions, your audio sys- tem will screen one of the four following error messages. “WAIT”: The compact disc player unit may be too hot. Allow the player to cool down. “ERR 1”: The disc may be dirty, damaged or (up−side down). Clean the disc and re−insert it. “ERR 3”: There is a problem inside the system. Eject the disc. Set the disc again. “ERR 4”: Over−current. Ask your Toyota dealer to inspect. If the malfunction still exists, take your vehicle to your Toyota dealer. 4. “OFF” button Push “OFF” button to turn off seat audio system.
incorrectly
the rear
inserted
246
2005 SIENNA from Sep. ’04 Prod. (OM45431U)
05 SIENNA_U (L/O 0409)
REPLACING CONTROLLER BATTERY For replacement, use a CR2025 lithium battery or equivalent.
CAUTION
Special care should be that small children do not swallow the re- moved battery or components.
taken
NOTICE
z When replacing the battery, be care-
ful not to lose the components.
z Replace only with
the same or equivalent type of battery recom- mended by a Toyota dealer.
z Dispose of used batteries according
to the local regulations.
Replace the battery by using the following procedures: 1. Pull
the case out while pushing
the
lock release button to the side.
2. Remove the discharged battery. 3. Put in a new battery with the positive
(+) side up. Put in the case securely.
NOTICE
z Make sure that the positive side of the controller battery is facing cor- rectly.
z Do not replace the battery with wet
hands. Water may cause rust.
z Do not touch or move any compo- nents inside of the controller, or it may interfere with proper operation.
247
2005 SIENNA from Sep. ’04 Prod. (OM45431U)
05 SIENNA_U (L/O 0409)
—Headphone input jacks
z Be careful not to bend the electrode of the controller battery insertion and that dust or oil does not ad- here to the transmitter case.
z Close the battery case securely.
After replacing the battery, check that the controller operates properly. If the control- ler still does not operate properly, contact your Toyota dealer.
You can enjoy the rear seat audio sys- tem with commercial headphone. To use the headphones, connect them to the jack. The key must be in the “ACC” or “ON” position.
To adjust the volume of the headphones, turn the knob. Turn right to increase the volume. Turn left to decrease the volume. The maximum volume depends on the type of headphones. The recommended headphone impedance is from 16 Ω to 32 Ω. Please contact your Toyota dealer for fur- ther details.
CAUTION
248
2005 SIENNA from Sep. ’04 Prod. (OM45431U)
Adjust the volume when you connect the headphones jack. Loud sounds may have a significant impact on the human body.
the
to
05 SIENNA_U (L/O 0409)
Rear seat entertainment system—
The rear seat entertainment system con- sists of the following components. 1. Rear seat entertainment system display 2. DVD player 3. Headphone input jacks 4. Headphone volume control dials 5. Front audio system 6. Power outlet main switch 7. Power outlets 8. Input terminal adapter 9. Rear seat entertainment system
controller
249
2005 SIENNA from Sep. ’04 Prod. (OM45431U)
05 SIENNA_U (L/O 0409)
The rear seat entertainment system is de- signed for the rear passengers to enjoy audio and DVD video separately from the front audio system. The rear seat entertainment system can be operated when the ignition key is in the “ACC” or “ON” position. The rear passengers can enjoy all modes (AM and FM radio, cassette tape player, compact disc player with changer and DVD player) on the rear seat entertain- ment system only if a cassette tape and a compact disc are loaded in the front audio system. The rear seat entertainment system can play DVD video, audio CD, video CD, CD text, dts−CD or DVD audio only when a disc is loaded in the DVD player. You can enjoy videos and sound when your personal audio system is connected to the input terminal adapter. For details, refer to the manufacturer’s instructions.
You can enjoy the rear seat entertainment system with commercial headphone. See “—Headphone input jacks” on page 299 in this Section for details. You can also enjoy the rear seat enter- tainment system with a wireless head- phone. The wireless headphone can be used within rear seat. If the signal be- the headphone will mute. comes weak, For details, refer the manufacturer’s instructions. With some wireless headphone generally available in the market, it may be difficult to catch sound properly. Toyota recom- mends the use of Toyota genuine wireless headphone. You can purchase a wireless headphone at a Toyota dealer.
to
CAUTION
D Do not drive with using the head- phone. Otherwise, you may be hard to hear the sound from the outside while using the headphone and may cause an accident.
D With DVD player:
that
Conversational speech on some DVDs is recorded at a low volume to emphasize the impact of sound effects. If you adjust the volume assuming the conversations represent the maximum volume lev- el that the DVD will play, you may be startled by louder sound effects or when you change to a different audio source. Be sure to adjust the volume with this in mind. Make sure the volume creased, before you headphone.
is not turn on
in- the
250
2005 SIENNA from Sep. ’04 Prod. (OM45431U)
05 SIENNA_U (L/O 0409)
—Display
To open the display, push the lock release button.
Push down the display until it is locked.
NOTICE
The screen should be cleaned with a dry soft cloth. If the screen is pushed by hand or wiped with a hard cloth, the surface of the screen may be scratched.
To close, push up the display until you hear a click. The illumination of the screen is automati- cally is closed. However, the rear seat entertain- ment system is not turned off.
turned off when
the display
CAUTION
To reduce the chance of in case of an accident or sudden stop while driving, close the display when it is not in use.
injury
251
2005 SIENNA from Sep. ’04 Prod. (OM45431U)
05 SIENNA_U (L/O 0409)
NOTICE
z Benzene or alkaline solutions may damage the coated surface of the screen.
z To prevent the battery from being discharged, do not turn on the rear seat entertainment system longer than necessary when the engine is not running.
—Rear seat entertainment system controller The rear seat entertainment system can be operated with the rear seat entertain- ment system controller and buttons on the DVD player unit. The system cannot be operated by touching the switches on the screen directly.
CAUTION
Do not disassemble or modify the controller. It may cause an accident, fire or electric shock.
NOTICE
Keep the controller away from direct sunlight, high heat and high humidity. These conditions could cause the case to deform or the battery to ex- plode or leak.
BEFORE USING THE CONTROLLER (for new vehicle owners) A battery is already set in the control- ler with an insulating sheet, which pre- from being dis- vents charged. Before using the controller, remove the insulating sheet according to the following procedure.
the battery
252
2005 SIENNA from Sep. ’04 Prod. (OM45431U)
05 SIENNA_U (L/O 0409)
1. Remove the cover of the controller
as shown.
2. Remove the insulating sheet.
253
2005 SIENNA from Sep. ’04 Prod. (OM45431U)
05 SIENNA_U (L/O 0409)
USING THE CONTROLLER To use the rear seat entertainment sys- tem controller, direct the signal output portion of the controller to the signal reception portion of the rear seat enter- tainment system display. The controller does not operate properly when the signal reception portion of the display to direct sunlight. Block the display from direct sunlight.
is exposed
CAUTION
To reduce the chance of in case of an accident or a sudden stop while driving, stow the controller in the console box or front seat side table when it is not in use.
injury
NOTICE
Observe the followings, otherwise the controller may be damaged. z Do not drop or strongly knock the
controller against hard objects.
z Do not sit on or place heavy ob-
jects on the controller.
z Do not leave the controller exposed to high temperatures (such as on the long time.
instrument panel) for a
254
2005 SIENNA from Sep. ’04 Prod. (OM45431U)
05 SIENNA_U (L/O 0409)
FCC Information
in construction of
Caution: Any changes or modifica- tions this device which are not expressly approved by the party responsible for compliance could void the user’s authority to op- erate the equipment.
FCC Label Information
the
following
This device complies with part 15 of the FCC Rules. Operation is subject to two conditions: (1) This device may not cause harmful interference, and (2) this device must accept any interference received, In- cluding interference that may cause undesired operation.
LOCATING THE CONTROLLER If you lose sight of the controller, push and hold the “CURSOR (REMOTE)” button on the DVD player unit until you hear a beep. A buzzer sounds from the controller to let you know where it is. To stop the buzzer, push any button of the controller. If the controller is located close to some- thing that blocks the signal, such as some kind of metal, the controller may not re- ceive the signal and the buzzer may not sound.
255
2005 SIENNA from Sep. ’04 Prod. (OM45431U)
—Control buttons "Controller
256
05 SIENNA_U (L/O 0409)
1. “DVD” button
This button turns on the DVD mode.
2. “SOURCE” button
This button turns on the rear seat en- tertainment system and selects the mode.
3. “OFF” button
This button turns off the rear seat en- tertainment system.
4. Joystick
This joystick selects a control switch, mode switch on the menu for the disc.
the screen or
5. “ENT” button
This button inputs the selected switch or the selected menu for the disc.
6. “DISC/CH/PROG” button
This button skips directly to a desired preset station, disc, track or chapter.
7. “""” button This button when the DVD player is operated.
fast
forwards a screen
8. “RETURN” button
This button skips to the predetermined scene for the disc.
2005 SIENNA from Sep. ’04 Prod. (OM45431U)
05 SIENNA_U (L/O 0409)
9. “MENU” button
16. “TOP MENU” button
This button indicates the menu screen for DVD video when the DVD player is operated.
This button indicates the title selection screen for DVD video when the DVD player is operated.
10. “AUDIO” button
17. “
” button
This button indicates the changing au- dio screen when is operated.
the DVD player
11. “SUB TITLE” button
This button indicates the changing sub- title screen when the DVD player is operated.
12. “DISPLAY” button
This button adjusts tone, contrast and brightness of the screen.
the color,
13. “SET UP” button
This button indicates the initial set up screen when the DVD player is oper- ated.
14. “ANGLE” button
This button selects the angle of the screen when the DVD player is oper- ated.
15. “SEARCH” button
This button indicates the title search screen when the DVD player is oper- ated.
This button pauses a screen when the DVD player is operated.
18. “AA” button
This button reverse a screen when the DVD player is operated.
19. “"” button
This button plays a screen when the DVD player is operated.
20. “TUNE/TRACK” button
This button seeks a radio station or selects track/chapter.
21. “CURSOR” button
button
This control switches on the screen when the DVD player is operated.
indicates
the
22. “VIDEO” button
This button causes the display to use the video signal from an external video device.
257
2005 SIENNA from Sep. ’04 Prod. (OM45431U)
05 SIENNA_U (L/O 0409)
"Buttons on the DVD player unit
1. “
” button
This button ejects a disc.
2. “SOURCE” button
This button turns on the rear seat en- tertainment system and selects the mode.
3. “TUNE/TRACK” button
This button seeks a radio station or selects track/chapter.
4. “DISC/CH/PROG” button
This button skips directly to a desired preset station, disc, track or chapter.
5. “CURSOR (REMOTE)” button
the
button
indicates
This control switches on the screen when the DVD player is operated. This button also can be used when you lose sight of the controller.
258
6. Joy stick
This joy stick selects a control switch, mode switch on the menu for the disc.
the screen or
2005 SIENNA from Sep. ’04 Prod. (OM45431U)
05 SIENNA_U (L/O 0409)
—Turning the rear seat entertainment system on and off
7. “ENT” button
This button inputs the selected switch or the selected menu for the disc.
8. “DISC” indicator light indicates
light
This loaded.
that
the disc
is
Controller
DVD player unit
the
turn on
the system, push
To “SOURCE” button. The screen indicates which mode can be selected. Push the “DVD” or “VIDEO” but- ton when the connected DVD player or your personal audio machine is on. The rear seat entertainment system will be turned on. The rear seat entertainment system can select all the modes. When a cassette tape, a compact disc, a DVD video disc, an audio CD, a video CD, a CD text, a dts−CD or a DVD audio disc is not loaded on the front audio sys- tem or the radio mode can be selected on the rear seat entertainment system.
the DVD player, only
259
2005 SIENNA from Sep. ’04 Prod. (OM45431U)
05 SIENNA_U (L/O 0409)
—Front audio system operation All the modes of the front audio system can be operated on the rear seat enter- tainment system. When the same mode is selected on the front and rear audio systems simulta- neously, the system can be operated on the front audio system. If the radio mode is selected on the front and rear audio systems at the same time, AM and FM modes cannot be changed on the rear seat audio system.
To turn off the system, push the “OFF” button. When the front audio system is turned off, the rear audio system and the DVD player will be turned off simultaneously.
260
Controller
DVD player unit
2005 SIENNA from Sep. ’04 Prod. (OM45431U)
05 SIENNA_U (L/O 0409)
SELECTING THE MODE Use the joystick to select the mode. Push the “ENT” button to enter the mode.
Radio
The mode display which is selected by the joy stick is colored blue. When the “ENT” button is pushed, the mode display changes to green. If the mode display is gray, it cannot be selected. The “Speaker sound” on the mode display is selected on the front audio system.
Cassette tape player and compact disc player
261
2005 SIENNA from Sep. ’04 Prod. (OM45431U)
When you select a mode, the screen indi- cates which is selected. Radio AM mode: When you select the AM mode, “AM” will appear on the screen. FM mode: When you select the FM mode, “FM1” or “FM2” will appear on the screen. Tape mode “TAPE” appears on the screen while this mode is selected. Compact disc mode “CD” appears on mode is selected. The screen shows the track, or track and disc number currently being played.
the screen while this
Controller
262
DVD player unit
05 SIENNA_U (L/O 0409)
OPERATING FRONT AUDIO SYSTEM To operate the front audio system, use the following switches. 1. “DISC/CH/PROG” button Radio You can scan only the preset stations for the band of the front audio system. (For instructions, see “—Controls and features” on page 223 in this Section.) To scan the preset stations: ” side of the “DISC/ Push the “ CH/PROG” button. The radio will tune in the next preset station up or down the band. The station frequency will appear on the screen.
” or “
2005 SIENNA from Sep. ’04 Prod. (OM45431U)
” or “
feature: After
Cassette tape player Push the “ ” side of the “DISC/ CH/PROG” button to select the other side of a cassette tape. The screen indicates ” indi- which side is currently selected. (“ ” indicates the bot- cates the top side, “ tom side.) Auto−reverse the cassette player reaches the end of a tape side, it automatically reverses and begins to play the other side. This is true whether the cassette was playing or fast forwarding. Compact disc player with changer Use these buttons to select a disc you want to listen to. ” side of the “DISC/ Push the “ CH/PROG” button until the number of the disc you want to listen appears on the display.
” or “
05 SIENNA_U (L/O 0409)
” or “
” or “
” side of the “TUNE/
2. “TUNE/TRACK” button Radio Push the “ TRACK” button to tune or seek. Tuning: Quickly push and release the “ ” side of the “TUNE/TRACK” button. Each time you push the button, the radio will step up or down to another frequency. If you push and hold the button, and the radio will go into the seek mode. Seeking: ” side of the Push and hold the “ “TUNE/TRACK” button. The radio will seek up or down for a station of the nearest frequency and will stop on reception. Each time you push the button, the stations will be searched one after another. Cassette tape player To fast forward a cassette tape, push and hold the “ ” side of the “TUNE/TRACK” button until “FF” appears on the screen. ” side of the “TUNE/ Push and hold the “ TRACK” button until “REW” appears on the screen to rewind a tape. Use this button to skip up or down to locate a song or recording.
” or “
” or “
You can select up to nine recordings (in- cluding current one). ” side of the “TUNE/ Push the “ TRACK” button. “FF 1” or “REW 1” will appear on the screen. Next, push either side of the track button until the number on the screen reaches the number of tracks you want to skip. If you push the button 10 times, the skip feature will be turned off. For the skip feature to work correctly a blank space of at least 3 seconds is con- sidered to be a start of a recording. When a beginning of a tape is reached, the player automatically resumes play. When the end of the tape is reached, the player automatically reverses sides and resumes normal play. In addition, the feature may not work well with some spoken, live, or classical re- cordings.
263
2005 SIENNA from Sep. ’04 Prod. (OM45431U)
” or “
Compact disc player Use this button to skip up or down to a different track. Push the “ ” side of the “TUNE/ TRACK” button until the number of the track you want to listen to appears on the screen. If you want to return to the begin- ning of the current track, quickly push the ” side of the “TUNE/TRACK” button one “ time. ” side of the Push and hold the “ “TUNE/TRACK” button to fast forward or reverse within a compact disc. When you release the button, the compact disc play- er will resume playing.
” or “
05 SIENNA_U (L/O 0409)
REPLACING CONTROLLER BATTERY For replacement, use 3 AA batteries.
CAUTION
Special care should be taken to pre- vent small children from swallowing the removed transmitter battery or components.
NOTICE
z When replacing the battery, be care-
ful not to lose the components.
z Replace only with
the same or equivalent type of battery recom- mended by a Toyota dealer.
z Dispose of used batteries according
to local regulations.
Replace the battery according to the fol- lowing procedure: 1. Remove the cover of the controller as
shown.
264
2005 SIENNA from Sep. ’04 Prod. (OM45431U)
2. Remove the discharged batteries and the new batteries as shown.
in
put Install the cover.
05 SIENNA_U (L/O 0409)
NOTICE
z Be sure that the positive side and negative side of the controller bat- tery should be faced correctly.
z Do not replace the battery with wet
hands. Water may cause rust.
z Do not touch or move any compo- nents inside of the controller, or it may interfere with proper operation. z Be careful not to bend the electrode
of the controller battery insertion.
z Close the battery case securely.
After replacing the battery, check that the controller operates properly. If the control- ler still does not operate properly, contact your Toyota dealer.
—DVD player The DVD player can play audio CDs, DVD video discs, CD texts, dts−CDs and video CDs. For appropriate discs for this player, see “Audio/video system operating hints” on page 300 in this Section. The DVD player works when the ignition key is in the “ACC” or “ON” position. To turn on the DVD player, a disc must be loaded in the player. To turn off the player, eject the disc. Error messages If the player malfunctions, your audio sys- tem will display one of the three following error messages. the If screen: It indicates that the disc is dirty, damaged or it was inserted upside down. Clean the disc or insert it correctly. If “REGION CODE ERROR” appears on the screen: It indicates that the DVD re- gion code is not set properly. the If screen: There the player. Eject the disc. Set the disc again. If the malfunction still exists, take your vehicle to your Toyota dealer.
“DVD ERROR” appears on inside
“DISC CHECK” appears on
is a problem
265
2005 SIENNA from Sep. ’04 Prod. (OM45431U)
05 SIENNA_U (L/O 0409)
If a disc which is not playable is inserted, “DISC CHECK” will also appear on the screen. For appropriate discs for this play- er, see “Audio/video system operating hints” on page 300 in this Section. The player will play the track or chapter, and it will play from the beginning of the track or chapter again after it reaches the end.
NOTICE
Never try to disassemble or oil any part of the DVD player. Do not insert anything other than a disc into the slot.
8 cm (3 in.) compact disc singles Your compact disc player does not need an adaptor to play compact disc singles. Compact disc singles are about 8 cm (3
in.) than standard discs.in diameter−smaller
NOTICE
Do not use an adaptor for compact disc singles—it could cause tracking errors or interfere with the ejection of compact discs.
2005 SIENNA from Sep. ’04 Prod. (OM45431U)
INSERTING THE DISC Insert the compact disc into the slot with the label side up. “DISC” indicator light turns on while the disc is loaded. If the label faces down, the disc cannot be played. In this case, “DISC CHECK” and disc number appear on the screen.
266
05 SIENNA_U (L/O 0409)
—Selecting the DVD mode
the DVD mode, push
To select “DVD” button on the controller. You can also select the DVD mode on the mode selection screen mentioned above.
the
EJECTING THE DISC
Push the “
” button.
267