- 2009 Toyota Prius Owners Manuals
- Toyota Prius Owners Manuals
- 2008 Toyota Prius Owners Manuals
- Toyota Prius Owners Manuals
- 2013 Toyota Prius Owners Manuals
- Toyota Prius Owners Manuals
- 2004 Toyota Prius Owners Manuals
- Toyota Prius Owners Manuals
- 2001 Toyota Prius Owners Manuals
- Toyota Prius Owners Manuals
- 2005 Toyota Prius Owners Manuals
- Toyota Prius Owners Manuals
- 2015 Toyota Prius Owners Manuals
- Toyota Prius Owners Manuals
- 2012 Toyota Prius Owners Manuals
- Toyota Prius Owners Manuals
- 2002 Toyota Prius Owners Manuals
- Toyota Prius Owners Manuals
- 2010 Toyota Prius Owners Manuals
- Toyota Prius Owners Manuals
- 2014 Toyota Prius Owners Manuals
- Toyota Prius Owners Manuals
- 2006 Toyota Prius Owners Manuals
- Toyota Prius Owners Manuals
- 2003 Toyota Prius Owners Manuals
- Toyota Prius Owners Manuals
- 2007 Toyota Prius Owners Manuals
- Toyota Prius Owners Manuals
- 2011 Toyota Prius Owners Manuals
- Toyota Prius Owners Manuals
- Download PDF Manual
-
erator pedals to avoid depressing the wrong pedal. • Accidentally depressing the accelerator pedal instead of the brake pedal will result in sudden acceleration that may lead to an accident that could result in death or serious injury.
• When backing up, you may twist your body around, leading to a diffi- culty in operating the pedals. Make sure to operate the pedals properly. • Make sure to keep a correct driving posture even when moving the vehicle only slightly. This allows you to depress the brake and acceler- ator pedals properly.
• Depress the brake pedal using your right foot. Depressing the brake pedal using your left foot may delay response in an emergency, result- ing in an accident.
●Because there is no engine noise when the vehicle is being driven using the electric motor, pedestrians in the vicinity may not notice the vehicle. Even though the vehicle is equipped with the vehicle proximity notification system, drive with care as pedestrians in the vicinity may still not notice the vehicle if the surrounding area is noisy.
●Do not drive the vehicle over or stop the vehicle near flammable materials. The exhaust system and exhaust gases can be extremely hot. These hot parts may cause a fire if there is any flammable material nearby.
●Do not let the vehicle roll backward while a forward driving position is
selected, or roll forward while the shift position is in R. Doing so may result in an accident or damage to the vehicle.
183
2-1. Driving procedures
CAUTION
●If the smell of exhaust is noticed inside the vehicle, open the windows and check that the back door is closed. Large amounts of exhaust in the vehi- cle can cause driver drowsiness and an accident, resulting in death or a serious health hazard. Have the vehicle inspected by your Toyota dealer immediately.
●Do not shift the shift position to P while the vehicle is moving.
Doing so can damage the transmission and may result in a loss of vehicle control.
●Do not shift the shift position to R while the vehicle is moving forward.
Doing so can damage the transmission and may result in a loss of vehicle control.
●Do not shift the shift position to D while the vehicle is moving backward.
Doing so can damage the transmission and may result in a loss of vehicle control.
●Moving the shift position to N while the vehicle is moving will disengage the hybrid system. Engine braking is not available with the hybrid system disengaged.
●During normal driving, do not turn off the hybrid system. Turning the hybrid system off while driving will not cause loss of steering or braking control, but the power assist to these systems will be lost. This will make it more difficult to steer and brake, so you should pull over and stop the vehicle as soon as it is safe to do so. However, in the event of an emergency, such as if it becomes impossible to stop the vehicle in the normal way: →P. 556
●Use engine braking (shift position B instead of shift position D) to maintain
a safe speed when driving down a steep hill. Using the brakes continuously may cause the brakes to overheat and lose effectiveness. (→P. 202)
184
2
2-1. Driving procedures
CAUTION
●Do not adjust the positions of the steering wheel, the seat, or the inside or
outside rear view mirrors while driving. Doing so may result in a loss of vehicle control that can cause accidents, resulting in death or serious injury.
●Always check that all passengers’ arms, heads or other parts of their body
are not outside the vehicle, as this may result in death or serious injury.
●Do not drive in excess of the speed limit. Even if the legal speed limit per- mits it, do not drive over 85 mph (140 km/h) unless your vehicle has high- speed capability tires. Driving over 85 mph (140 km/h) may result in tire failure, loss of control and possible injury. Be sure to consult a tire dealer to determine whether the tires on your vehicle are high-speed capability tires or not before driving at such speeds. ■When driving on slippery road surfaces
●Sudden braking, acceleration and steering may cause tire slippage and
reduce your ability to control the vehicle, resulting in an accident.
●Sudden acceleration, engine braking due to shift changing, or changes in
engine speed could cause the vehicle to skid, resulting in an accident.
●After driving through a puddle, depress the brake pedal to make sure that the brakes are functioning properly. Wet brake pads may prevent the brakes from functioning properly. If the brakes on only one side are wet and not functioning properly, steering control may be affected, resulting in an accident.
185
2-1. Driving procedures
CAUTION
■When changing the shift position
Be careful not to change the shift position with the accelerator pedal depressed. Changing the shift position to any positions other than P or N may cause the vehicle to accelerate abruptly, causing an accident and resulting in death or serious injury. After changing the shift position, make sure to confirm the current shift posi- tion displayed on the shift position indicator inside the meter.
■If you hear a squealing or scraping noise (brake pad wear limit indica-
tors) Have your Toyota dealer check and replace the brake pads as soon as pos- sible. Rotor damage may result if the pads are not replaced when needed. It is dangerous to drive the vehicle when the wear limits of the brake pads and/or those of the brake discs are exceeded.
■When the vehicle is stopped
●Do not depress the accelerator pedal unnecessarily.
If the vehicle is in any shift position other than P or N, the vehicle may accelerate suddenly and unexpectedly, causing an accident.
●Do not leave the vehicle with the hybrid system on for a long time.
If such a situation cannot be avoided, park the vehicle in an open space and check that exhaust fumes do not enter the vehicle interior.
●In order to prevent accidents due to the vehicle rolling away, always keep depressing the brake pedal while the “READY” indicator is on. Apply the parking brake as necessary.
186
2-1. Driving procedures
CAUTION
●If the vehicle is stopped on an incline, in order to prevent accidents caused by the vehicle rolling forward or backward, always depress the brake pedal and securely apply the parking brake as needed.
●Avoid revving or racing the engine.
Running the engine at high speed while the vehicle is stopped may cause the exhaust system to overheat, which could result in a fire if combustible material is nearby.
■When the vehicle is parked
●Make sure to firmly apply the parking brake and shift the shift position to P. Failure to do so may cause the vehicle to move, or the vehicle to acceler- ate suddenly if the accelerator pedal is accidentally depressed. Also, when leaving the vehicle, make sure to turn off the hybrid system and lock the vehicle. Sound or shuddering may not be noticed even when the hybrid vehicle is ready to drive (when the “READY” indicator is illuminated).
●Do not leave glasses, cigarette lighters, spray cans, or soft drink cans in
the vehicle when it is in the sun. Doing so may result in the following: • Gas may leak from a cigarette lighter or spray can, and may lead to a
fire.
• The temperature inside the vehicle may cause the plastic lenses and
plastic material of glasses to deform or crack.
• Soft drink cans may fracture, causing the contents to spray over the interior of the vehicle, and may also cause a short circuit in the vehi- cle’s electrical components.
187
2-1. Driving procedures
CAUTION
●Do not leave cigarette lighters in the vehicle. If a cigarette lighter is in a place such as the glove box or on the floor, it may be lit accidentally when luggage is loaded or the seat is adjusted, causing a fire.
●Do not attach adhesive discs to the windshield or windows. Do not place containers such as air fresheners on the instrument panel or dashboard. Adhesive discs or containers may act as lenses, causing a fire in the vehi- cle.
●Do not leave a door or window open if the curved glass is coated with a metallized film such as a silver-colored one. Reflected sunlight may cause the glass to act as a lens, causing a fire.
●Do not touch the exhaust pipe while the hybrid system is operating or
immediately after turning the hybrid system off. Doing so may cause burns.
●Do not leave the hybrid system operating in an area with snow build-up, or where it is snowing. If snowbanks build up around the vehicle while the hybrid system is operating, exhaust gases may collect and enter the vehi- cle. This may lead to death or a serious health hazard.
■Exhaust gases
Exhaust gases include harmful carbon monoxide (CO), which is colorless and odorless. Inhaling exhaust gases may lead to death or a serious health hazard. ●If the vehicle is in a poorly ventilated area, stop the hybrid system. In a closed area, such as a garage, exhaust gases may collect and enter the vehicle. This may lead to death or a serious health hazard.
●The exhaust system should be checked occasionally. If there is a hole or crack caused by corrosion, damage to a joint or abnormal exhaust noise, be sure to have the vehicle inspected and repaired by your Toyota dealer. Failure to do so may allow exhaust gases to enter the vehicle, resulting in death or a serious health hazard.
188
2-1. Driving procedures
CAUTION
■When taking a nap in the vehicle
Always turn the hybrid system off. Otherwise, if you accidentally move the shift lever or depress the accelerator pedal, this could cause an accident or fire due to hybrid system overheating. Additionally, if the vehicle is parked in a poorly ventilated area, exhaust gases may collect and enter the vehicle, leading to death or a serious health hazard.
■When braking
●When the brakes are wet, drive more cautiously.
Braking distance increases when the brakes are wet, and this may cause one side of the vehicle to brake differently than the other side. Also, the parking brake may not securely hold the vehicle.
●If the electronically controlled assist function does not operate, do not fol- low other vehicles closely and avoid downhill or sharp turns that require braking. In this case, braking is still possible, but the brake pedal should be depressed more firmly than usual. Also, the braking distance will increase. ●The brake system consists of 2 individual hydraulic systems; if one of the systems fails, the others will still operate. In this case, the brake pedal should be depressed more firmly than usual and the braking distance will increase. If this happens, do not continue to drive the vehicle. If the brake system warning light (red indicator) comes on while driving, immediately stop the vehicle in a safe place and contact your Toyota dealer.
189
2-1. Driving procedures
NOTICE
■When driving the vehicle
●Do not depress the accelerator and brake pedals at the same time during
driving, as this may restrain driving torque.
●Do not use the accelerator pedal or depress the accelerator and brake
pedals at the same time to hold the vehicle on a hill.
■Avoiding damage to vehicle parts
●Do not turn the steering wheel fully in either direction and hold it there for
an extended period of time. Doing so may damage the power steering motor.
●When driving over bumps in the road, drive as slowly as possible to avoid
damaging the wheels, underside of the vehicle, etc.
■If you get a flat tire while driving
A flat or damaged tire may cause the following situations. Hold the steering wheel firmly and gradually depress the brake pedal to slow down the vehicle. ●It may be difficult to control your vehicle. ●The vehicle will make abnormal sounds or vibrations. ●The vehicle will lean abnormally. Information on what to do in case of a flat tire. (→P. 523)
190
2
2-1. Driving procedures
NOTICE
■When encountering flooded roads
Do not drive on a road that has flooded after heavy rain etc. Doing so may cause the following serious damage to the vehicle: ●Engine stalling ●Short in electrical components ●Engine damage caused by water immersion In the event that you drive on a flooded road and the vehicle is flooded, be sure to have your Toyota dealer check the following: ●Brake function ●Changes in quantity and quality of engine oil, transmission fluid for the
hybrid system, etc.
●Lubricant condition for the bearings and suspension joints (where possi-
ble), and the function of all joints, bearings, etc.
If the P position control system is damaged by flooding, it may not be possi- ble to shift the shift position to P, or from P to other positions. When the shift position cannot be changed from P to any other position, the front wheels will lock, and you will be unable to tow the vehicle with the front wheels on the ground, as the front wheels may be locked. In this case, transport the vehicle with both front wheels or all four wheels lifted.
191
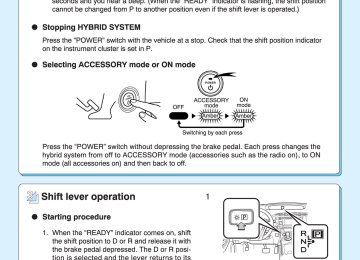
2-1. Driving procedures Power (ignition) switch
Performing the following operations when carrying the electronic key on your person starts the hybrid system or changes “POWER” switch modes. ■ Starting the hybrid system
STEP 1
STEP 2
Check that the parking brake is set. Firmly depress the brake pedal. Check that the “POWER” switch indicator turns green. If the indi- cator does not turn green, the hybrid system cannot be started. When the shift position is N, the hybrid system cannot start. Shift the shift position to P when starting the hybrid system. (→P. 205)
Press the “POWER” switch.
The hybrid system can be started from any “POWER” switch mode. Continue depressing the brake pedal until the hybrid system is completely started.
STEP 3
192
2-1. Driving procedures
STEP 4
Check that the “READY” indicator is on. If the “READY” indicator changes from a flashing light to a solid light and the buzzer sounds, the hybrid system is starting nor- mally. The vehicle will not move when the “READY” indicator is off. The vehicle can move when the “READY” indicator is on even if the engine is stopped. (The gasoline engine starts or stops auto- matically in accordance with the state of the vehicle.)
■ Stopping the hybrid system
STEP 1
STEP 2
Stop the vehicle completely. Set the parking brake. (→P. 212)
STEP 3
Shift the shift position to P. (→P. 205)
Check that the shift position indicator shows P. (→P. 202)
STEP 4
STEP 5
Press the “POWER” switch. The hybrid system will stop. Slowly release the brake pedal and check that the indicator on the “POWER” switch is off.
193
2-1. Driving procedures
■ Changing “POWER” switch modes Modes can be changed by pressing the “POWER” switch with the brake pedal released. (The mode changes each time the switch is pressed.)
Off The emergency flashers can be used. ACCESSORY mode Some electrical components such as the audio system can be used. The “POWER” switch indicator turns amber. ON mode All electrical components can be used. The “POWER” switch indicator turns amber.
194
2
2-1. Driving procedures
■Auto power off function
If the vehicle is left in ACCESSORY or ON mode (the hybrid system is not operating) for more than an hour with the shift position in P, the “POWER” switch will automatically turn off. However, this function cannot entirely pre- vent the 12-volt battery from discharging. Do not leave the vehicle with the “POWER” switch in ACCESSORY or ON mode for long periods of time when the hybrid system is not operating.
■Sounds and vibrations specific to a hybrid vehicle
→P. 34
■Electronic key battery depletion
→P. 76
■When the ambient temperature is low, such as during winter driving
conditions The “READY” indicator may flash for a long time when the hybrid system is starting. Driving will become possible once the “READY” indicator has illumi- nated. Wait until the “READY” indicator has illuminated.
■Conditions affecting operation
→P. 72
■Notes for the entry function
→P. 73
■If the hybrid system does not start
The immobilizer system may not have been deactivated. (→P. 135) Contact your Toyota dealer.
195
2-1. Driving procedures
■When the “POWER” switch indicator flashes in amber
The system may be malfunctioning. Have the vehicle inspected by your Toyota dealer immediately.
■If the “READY” indicator does not come on
If the “READY” indicator does not come on when you press the “POWER” switch with the shift position in P and the brake pedal depressed, contact your Toyota dealer immediately.
■If the hybrid system is malfunctioning
→P. 495
■If the electronic key battery is depleted
→P. 454
■Operation of the “POWER” switch
●When operating the “POWER” switch, one short, firm press is enough. If the switch is pressed improperly, the hybrid system may not start or the “POWER” switch mode may not change. It is not necessary to press and hold the switch.
●If attempting to restart the hybrid system immediately after turning the “POWER” switch off, the hybrid system may not start in some cases. After turning the “POWER” switch off, please wait a few seconds before restarting the hybrid system.
■Automatically P position selection function
→P. 207
196
2-1. Driving procedures
■When the P position control system malfunctions
The “POWER” switch will not be able to be turned off. In such a case, the switch can be turned off after applying the parking brake. Have the vehicle inspected by your Toyota dealer immediately.
■Ending display
When the “POWER” switch is turned off, each of the following will be dis- played on the multi-information display, and will extinguish after approxi- mately 30 seconds. ●The driving distance, driving time, consumption and eco savings since
the hybrid system was started.
●The odometer/trip meter ●The clock
CAUTION
■When starting the hybrid system
Always start the hybrid system while sitting in the driver’s seat. Do not depress the accelerator pedal while starting the hybrid system under any cir- cumstances. Doing so may cause an accident resulting in death or serious injury.
■Stopping the hybrid system in an emergency
If you want to stop the hybrid system in an emergency while driving the vehi- cle, press and hold the “POWER” switch for more than 3 seconds, or press it briefly 3 times or more in succession. (→P. 556) However, do not touch the “POWER” switch while driving except in an emer- gency. Turning the hybrid system off while driving will not cause loss of steering or braking control, but the power assist to these systems will be lost. This will make it more difficult to steer and brake, so you should pull over and stop the vehicle as soon as it is safe to do so.
197
2-1. Driving procedures
NOTICE
■To prevent 12-volt battery discharge
●Do not leave the “POWER” switch in ACCESSORY or ON mode for long
periods of time without the hybrid system on.
●If the hybrid system is off, but the indicator on the “POWER” switch is illu- minated, this indicates that the “POWER” switch is still turned on. When exiting the vehicle, always check that the “POWER” switch is off. ■Symptoms indicating a malfunction with the “POWER” switch
If the “POWER” switch seems to be operating somewhat differently than usual, such as the switch sticking slightly, there may be a malfunction. Con- tact your Toyota dealer immediately.
198
2
2-1. Driving procedures EV drive mode
In EV drive mode, the electric motor (traction motor), powered by the hybrid battery (traction battery), is used to drive the vehicle. This mode allows you to drive in residential areas late at night, or in indoor parking lots etc. without concern for noises and exhaust gas emissions.
Turns EV drive mode on/off
When EV drive mode is turned on, the EV drive mode indica- tor will come on. Pressing the switch when in EV drive mode will return the vehicle to normal driving (using the gasoline engine and elec- tric motor [traction motor]).
199
2-1. Driving procedures
■Situations in which EV drive mode cannot be turned on It may not be possible to turn EV drive mode on in the following situations.* If it cannot be turned on, a buzzer will sound and a message will be shown on the multi-information display. ●The temperature of the hybrid system is high.
The vehicle has been left in the sun, driven on a hill, driven at high speeds, etc.
●The temperature of the hybrid system is low.
The vehicle has been left in temperatures lower than about 32 °F (0 °C) for a long period of time etc.
●The gasoline engine is warming up. ●The hybrid battery (traction battery) is low.
When the amount of remaining hybrid battery (traction battery) charge displayed on the meter is low. (→P. 42)
●Vehicle speed is high. ●The accelerator pedal is depressed firmly or the vehicle is on a hill etc. ●The windshield defogger is in use. *: Depending on the circumstances, EV drive mode may also not be
switched to in situations other than those above.
■Switching to EV drive mode when the gasoline engine is cold
If the hybrid system is started while the gasoline engine is cold, the gasoline engine will start automatically after a short period of time in order to warm up. In this case, you will become unable to switch to EV drive mode. After the hybrid system has started and the “READY” indicator has illumi- nated, press the EV drive mode switch before the gasoline engine starts to switch to EV drive mode.
200
2
2-1. Driving procedures
■Automatic cancelation of EV drive mode
When driving in EV drive mode, the gasoline engine may automatically restart in the following situations. When EV drive mode is canceled, a buzzer will sound and the EV drive mode indicator will flash and go off. ●The hybrid battery (traction battery) becomes low. ●Vehicle speed becomes high. ●The accelerator pedal is depressed firmly or the vehicle is on a hill etc.
■Possible driving distance when driving in EV drive mode
In EV drive mode, it is possible to drive up to about 1.3 mile (2 km) if driving at a speed of about 25 mph (40 km/h) or less. (The distance that is possible depends on the hybrid battery [traction battery] level and driving conditions.)
■Changing a driving mode when in EV drive mode
EV drive mode can be used in conjunction with Eco drive mode and power mode. However, EV drive mode may be automatically canceled when used in con- junction with power mode.
■Fuel economy
PRIUS is designed to achieve the best possible fuel economy during normal driving (using the gasoline engine and electric motor [traction motor]). Driv- ing in EV drive mode more than necessary may lower fuel economy.
CAUTION
■While driving
When driving in EV drive mode, pay special attention to the area around the vehicle. Because there is no engine noise, pedestrians, people riding bicy- cles or other people and vehicles in the area may not be aware of the vehicle starting off or approaching them, so take extra care while driving.
201
2-1. Driving procedures Hybrid transmission
Select a shift position appropriate for the driving conditions. ■ Shifting the shift lever
Shift lever Operate the shift lever gently and ensure correct shifting operation.
When shifting to the D or R positions, move the shift lever along the shift gate. To shift to the N position, slide the shift lever to the left and hold it. The shift position will change to N. Shifting to B is only possible when shift position D is selected.
The shift lever will always return to this original position after a shifting operation.
When shifting from P to N, D or R, from D to R, or from R to D, ensure that the brake pedal is being depressed and the vehicle is stationary.
202
2-1. Driving procedures
Shift position indicator The position of the frame on the shift position indicator changes in accordance with the current shift position. When any shift position other than D or B is selected, the arrow toward B and B position indicator disappear from the shift position indicator.
When selecting the shift position, make sure that the shift position has been changed to the desired position by checking the shift position indica- tor provided on the instrument cluster. ■ Shift position purpose
Shift position
Function
Parking the vehicle/starting the hybrid system
Reversing Neutral
Normal driving*
Applying moderate engine braking when driving
down hills or on steep slopes
*: For good fuel economy and noise reduction, the D position should usu-
ally be used.
203
2-1. Driving procedures
■ Selecting a driving mode
The following modes can be selected to suit driving conditions:
Eco drive mode Suitable for improving the fuel economy, because the torque corre- sponding to the accelerator pedal depression amount can be gener- ated more smoothly than it is in normal conditions and the operation of the air conditioning system (heating/cooling) will be minimized. When the “ECO MODE” switch is pressed, the “ECO MODE” indicator comes on. Power mode Use when high levels of response and feeling are desirable, such as when driving in mountainous regions or when overtaking. When the power mode switch is pressed, the power mode indicator comes on.
204
2
2-1. Driving procedures
P position switch
■ When shifting the shift position to P
Fully stop the vehicle and set the parking brake, and then press the P position switch.
the shift position
When is changed to P, the indicator comes on. Check that the P position is illumi- nated on the shift position indica- tor.
■ Shifting the shift position from P to other positions
● While depressing the brake pedal firmly, operate the shift lever. If the shift lever is operated without depressing the brake pedal, the buzzer will sound and the shifting operation will be disabled. ● When selecting the shift position, make sure that the shift posi- tion has been changed to the desired position by checking the shift position indicator provided on the instrument cluster. ● The shift position cannot be changed from P to B directly.
205
2-1. Driving procedures
■Operation of the air conditioning system in Eco drive mode
Eco drive mode controls the heating/cooling operations and fan speed of the air conditioning system to enhance fuel efficiency. (→P. 204) To improve air conditioning performance, adjust the fan speed or turn off Eco drive mode.
■For the shift positions
●When the “POWER” switch is off, the shift position cannot be changed. ●When the “POWER” switch is in ON mode (the hybrid system is not oper- ating), the shift position can only be changed to N. The shift position will be changed to N even if the shift lever is shifted to D or R and held in that position.
●When the “READY” indicator is on, the shift position can be changed
from P to D, N or R.
●When the “READY” indicator is flashing, the shift position cannot be changed from P to another position even if the shift lever is operated. Wait until the “READY” indicator changes from a flashing to a solid light, and then operate the shift lever again.
●The shift position can only be changed to B directly from D. In addition, if an attempt is made to change the shift position by moving the shift lever in any of the following situations, the buzzer will sound and the shifting operation will be disabled or the shift position will automatically change to N. When this happens, select an appropriate shift position. ●Situations where the shifting operation will be disabled:
• When an attempt is made to change the shift position from P to another
position by moving the shift lever without depressing the brake pedal.
• When an attempt is made to change the shift position from P or N to B
by moving the shift lever.
206
2-1. Driving procedures
●Situations where the shift position will automatically change to N: • When the P position switch is pressed while the vehicle is running.*1
• When an attempt is made to select the R position by moving the shift lever when the vehicle is moving forward.*2
• When an attempt is made to select the D position by moving the shift lever when the vehicle is moving in reverse.*3
• When an attempt is made to change the shift position from R to B by*1: Shift position may be changed to P when driving at extremely low
moving the shift lever.
speeds.
*2: Shift position may be changed to R when driving at low speeds. *3: Shift position may be changed to D when driving at low speeds.
■Reverse warning buzzer
When shifting into R, a buzzer will sound to inform the driver that the shift position is in R.
■Automatically P position selection function
When the shift position is in a position other than P, pressing the “POWER” switch with the vehicle stopped completely will cause the shift position to change to P automatically, and then the “POWER” switch will turn off.
■If the shift position cannot be shifted from P
There is a possibility that the 12-volt battery is discharged. Check the 12-volt battery in this situation. (→P. 543)
207
2-1. Driving procedures
■About engine braking
When shift position B is selected, releasing the accelerator pedal will apply engine braking. ●When the vehicle is driven at high speeds, compared to ordinary gaso- line-fueled vehicles, the engine braking deceleration is felt less than that of other vehicles.
●The vehicle can be accelerated even when shift position B is selected. If the vehicle is driven continuously in the B position, fuel efficiency will become low. Usually, shift the shift position to D.
■When driving with cruise control or radar cruise control activated
Even if switching the driving mode to power mode with the intent of enabling engine braking, engine braking will not activate because cruise control or radar cruise control will not be canceled.
■When canceling Eco drive mode/power mode
●Press the switch again. Also, power mode will be canceled automatically when the “POWER” switch is turned off. However, Eco drive mode will not be canceled automatically until the switch is pressed, even if the “POWER” switch is turned off.
●When in Eco drive mode, if the power mode switch is pressed or the operation is reversed, the mode will switch to that of the last switch to be pressed.
■Switching the drive mode when in EV drive mode
→P. 201
■After recharging/reconnecting the 12-volt battery
→P. 433
208
2-1. Driving procedures
■Customization
Settings (e.g. Reverse warning buzzer) can be changed. (Customizable features →P. 590)
CAUTION
■When driving on slippery road surfaces
Do not accelerate or shift the shift position suddenly. Sudden changes in engine braking may cause the vehicle to spin or skid, resulting in an accident.
■For the shift lever
Do not remove the shift lever knob or use anything but a genuine Toyota shift lever knob. Also, do not hang anything on the shift lever. Doing so could prevent the shift lever from returning to position, causing unexpected accidents to occur when the vehicle is in motion.
■P position switch
Do not press the P position switch while the vehicle is moving. If the P position switch is pressed when driving at very low speeds (for example, directly before stopping the vehicle), the vehicle may stop sud- denly when the shift position switches to P, which could lead to an accident.
209
2-1. Driving procedures
NOTICE
■Hybrid battery (traction battery) charge
If the shift position is in N, the hybrid battery (traction battery) will not be charged. To help prevent the battery from discharging, avoid leaving the N position selected for an extended period of time.
■Situations where P position control system malfunctions are possible If any of the following situations occurs, P position control system malfunc- tions are possible. Immediately stop the vehicle in a safe place on level ground, apply the park- ing brake, and then contact your Toyota dealer. ●When the “P LOCK MALFUNCTION” warning message appears on the
multi-information display. (→P. 509)
●When the shift position indicator remains off.
■Notes regarding shift lever and P position switch operation
Avoid repeatedly operating the shift lever and P position switch in quick suc- cession. The system protection function may activate and it will not be temporarily possible to shift the shift position other than P. If this happens, please wait for a while before attempting to change the shift position again.
210
2
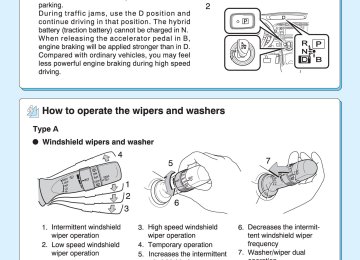
2-1. Driving procedures Turn signal lever
The turn signal lever can be used to show the following intention of the driver:
Right turn Left turn Lane change to the right (push and hold the lever partway) The right hand signals will flash until you release the lever. left Lane change (push and hold the lever partway) The left hand signals will flash until you release the lever.
the
to
■Turn signals can be operated when The “POWER” switch is in ON mode.
■If the indicator flashes faster than usual
Check that a light bulb in the front or rear turn signal lights has not burned out.
211
2-1. Driving procedures Parking brake
U.S.A.
Canada
To set the parking brake, fully depress the parking brake pedal with your left foot while depressing the brake pedal with your right foot. (Depressing the pedal again releases the parking brake.)
■Parking brake engaged warning buzzer
→P. 493
■Usage in winter time
→P. 317
NOTICE
■Before driving
Fully release the parking brake. Driving the vehicle with the parking brake set will lead to brake components overheating, which may affect braking performance and increase brake wear.
212
2-1. Driving procedures Horn
To sound the horn, press on or close to the
mark.
■After adjusting the steering wheel
Make sure that the steering wheel is securely locked. The horn may not sound if the steering wheel is not securely locked. (→P. 117)
213
2-2.Instrument cluster Gauges and meters
The units used on the display may differ depending on the target region. The following gauges and meters and display illuminate when the “POWER” switch is in ON mode:
Fuel gauge Displays the quantity of fuel remaining in the tank. Speedometer Displays the vehicle speed. Instantaneous fuel consumption Displays the current rate of fuel consumption. Shift position indicators Displays the shift position. Multi-information display Presents the driver with a variety of driving-related data. (→P. 223)
214
2
Touch tracer display (if equipped)
2-2. Instrument cluster
When the audio control switches, climate control switches, “DISP” button or “TRIP” button of the steering wheel are touched, the touch tracer display will appear in front of the gauges, with the touched button highlighted to allow the driver to identify the button that is being operated.
The button can then be operated by further presses. If an audio/navigation system is used that is not compatible with the steering switches in this vehi- cle, the audio switch display may not operate correctly.
215
2-2. Instrument cluster
MPH or km/h button
The speed units can be selected MPH or km/h.
Press the button to switch the display between MPH and km/h.
216
2-2. Instrument cluster
Instrument panel light control
The brightness of the instrument panel lights can be adjusted by turn- ing the dial.
Brighter Darker
■Brightness of the instrument panel light
If the headlight switch is turned on while the surrounding area is dark, the instrument panel lights will dim.
217
2-2. Instrument cluster
CAUTION
■To prevent an accident
Instrument cluster
Do not place anything or attach a sticker in front of the instrument cluster. The item may obscure or obstruct the display, or could reflect off the display, possibly causing an accident.
NOTICE
■To prevent damage to the engine and its components
The engine may be overheating if the high coolant temperature warning light comes on or flashes. In this case, immediately stop the vehicle in a safe place, and check the engine after it has cooled completely. (→P. 549)
218
2-2. Instrument cluster Indicators and warning lights
The indicator and warning lights on the instrument cluster and instrument panel inform the driver of the status of the vehicle’s vari- ous systems. For the purpose of explanation, the following illustration displays all indicators and warning lights illuminated. Instrument cluster
Some indicators and the units used on the display may differ depending on the target region. Instrument panel
219
2-2. Instrument cluster
■ Indicators
The indicators inform the driver of the operating state of the vehicle’s various systems.
(U.S.A.)
(Canada)
Turn signal indicator (→P. 211)
Headlight indicator (→P. 250)
Tail light indicator (→P. 250)
Headlight high beam indicator (→P. 253)
Front fog light indicator (→P. 256)
Security indicator (→P. 135)
“READY” indicator (→P. 192)
Eco Driving Indicator Light (→P. 225)
“ECO MODE” indicator (→P. 204)
Power mode indicator (→P. 204)
Cruise control indicator (→P. 266, 270)
Radar cruise control indicator (→P. 270)
“SET” indicator (→P. 266, 270)
“LKA” indicator (→P. 286)
Slip indicator (→P. 297, 301)
EV indicator (→P. 225)
(if equipped)
(if equipped)
(if equipped)
(if equipped) *1, 2
220
2-2. Instrument cluster
EV drive mode indica- tor (→P. 199)
*1, 3
(if equipped)
“PCS” warning (→P. 304)
Shift position indicators (→P. 202)
“AIR BAG ON/OFF” indicator (→P. 154)
*1: These lights turn on when the “POWER” switch is turned to the ON mode to indicate that a system check is being performed. They will turn off after the hybrid system is on, or after a few seconds. There may be a malfunction in a system if a light does not come on, or if the lights do not turn off. Have the vehicle inspected by your Toyota dealer.
*2: The light flashes to indicate that the system is operating. *3: The light comes on when the system is turned off. The light flashes
faster than usual to indicate that the system is operating.
221
2-2. Instrument cluster
■ Warning lights
Warning lights inform the driver of malfunctions in any of the vehicle’s systems. (→P. 493)
*1
*2
*1
*1
*1
*1
*1
*1
*1
*1
*1
(U.S.A.) *1
(Canada) *1
(U.S.A.) *1
(Canada) (red) *1, 2
(yellow) *1
(if equipped) *2
(U.S.A.)
(Canada)
(if equipped)
(if equipped)
*1
(if equipped) *1: These lights turn on when the “POWER” switch is turned to ON mode to indicate that a system check is being performed. They will turn off after the hybrid system is on, or after a few seconds. There may be a malfunction in a system if a light does not come on, or if the lights do not turn off. Have the vehicle inspected by your Toyota dealer.
*2: The light flashes to indicate a malfunction.
CAUTION
■If a safety system warning light does not come on
Should a safety system light such as the ABS and SRS airbag warning light not come on when you start the hybrid system, this could mean that these systems are not available to help protect you in an accident, which could result in death or serious injury. Have the vehicle inspected by your Toyota dealer immediately if this occurs.
222
2-2. Instrument cluster Multi-information display
The multi-information display presents the driver with a variety of driving-related data, including the clock.
● Energy monitor (→P. 42) ● Hybrid System Indicator (→P. 225) ● 5-minute/1-minute fuel consumption (→P. 50) ● Monthly fuel consumption record/eco savings record (→P. 53) ● Odometer/trip meter/distance to empty (→P. 228) ● Clock (→P. 230) ● Calendar (→P. 230) ● Dynamic radar cruise control display (if equipped) (→P. 270) ● Lane-keeping assist display (if equipped) (→P. 286) ● Warning messages (→P. 507)
223
2-2. Instrument cluster
Switching the display
To switch “DISP” button.
the display, press
On vehicles with touch tracer dis- play, the steering switches opera- tion status is displayed on the instrument cluster for confirma- tion purposes. (→P. 215)
the odometer,
To switch trip meter and distance to empty, press “TRIP” button.
224
2
2-2. Instrument cluster
Hybrid System Indicator
Hybrid System Indicator displays the hybrid system operating condi- tion and provides Eco-friendly driving assistance in accordance with the driving conditions and the acceleration. ■ Names and meaning of each icons
Hybrid battery (traction bat- tery) status (→P. 48) EV indicator The EV indicator comes on when driving the vehicle using only the electric motor (traction motor). Eco Driving Indicator Light Turns on when the vehicle is driven in Eco-friendly. Hybrid System Indicator Refer to “Reading Hybrid System Indicator” below. Average speed* Average fuel consumption/eco savings* Use the displayed average fuel consumption as a reference.
*:The current amount since the trip meter was reset will be displayed. These functions can be reset by pressing and holding the “TRIP” button. The display can be switched between average fuel consump- tion/average speed and eco sav- ings. (→P. 232)
225
2-2. Instrument cluster
■ Reading Hybrid System Indicator
Charge area Eco area Power area Hybrid Eco area
As shown below, the driving conditions of the vehicle can be con- firmed by checking the status of the indicator bar.
226
2-2. Instrument cluster
Hybrid System Indicator*1
Charge area: Shows regenerative charging. (→P. 32)
Hybrid Eco area: Shows that gasoline engine power is not being used very often.*2
Eco area: Shows that the vehicle is driven in Eco-friendly.
Power area: Shows that the driving power is more than the upper limit of Eco driving (during full power driving etc.).
*1: The images are examples only, and may vary slightly from actual condi-
tions.
*2: The gasoline engine will automatically stop and restart under various
conditions.
227
2-2. Instrument cluster
Odometer/trip meter/distance to empty
■ Switching the display
The display changes as follows each time the “TRIP” button is pressed. Also, if the button is kept pressed down while the trip meter is being displayed, the trip meter will be reset to 0.
228
2
2-2. Instrument cluster
■ Display items ● Odometer
● Trip meter
Displays the total distance the vehicle has been driven.
Displays the distance the vehicle has been driven since the meter was last reset. Trip meters A and B can be used to record and display different dis- tances independently.
● Distance to empty
Displays the estimated maximum distance that can be driven with the quantity of fuel remaining. • This distance is computed based on your average fuel consumption. As a result, the actual distance that can be driven may differ from that displayed.
• When only a small amount of fuel is added to the
tank, the display may not be updated. When refueling, turn the “POWER” switch off. If the vehicle is refueled without turning the “POWER” switch off, the display may not be updated.
229
2-2. Instrument cluster
Clock
The clock can be adjusted by pressing the buttons.
Adjust hours. Adjust minutes. Round the nearest hour.* *: e.g. 1:00 to 1:29 → 1:00
1:30 to 1:59 → 2:00Setting up the displays
STEP 1
Press the “DISP” button until the “SETTINGS” screen appears.
Calendar will be displayed.
STEP 2
While the vehicle is stopped, press and hold the “DISP” button until the screen changes. The selected item will change each time the “DISP” button is pressed.
230
2-2. Instrument cluster
■ Setting the gasoline price
STEP 1
Select “GASOLINE PRICE”.
Press and hold the “DISP” button to enter the setting mode.
STEP 2
Select gasoline price by pressing the “DISP” or “TRIP” button.
Press and hold the button to change the amount continuously. If neither button is operated for approximately 5 seconds, the set- ting will be changed and the screen will return to the previous display.
231
2-2. Instrument cluster
■ Switching the fuel consumption display
Select “FUEL CONSU. DISP.”.
Press and hold the “DISP” button to enter the setting mode.
Select “CONSUMP.” or “ECO SAVINGS”.
Press and hold the “DISP” button to finish setting.
STEP 1
STEP 2
232
2-2. Instrument cluster
■ Setting the comparison consumption Select TION”.
STEP 1
“COMP. CONSUMP-
Press and hold the “DISP” button to enter the setting mode.
STEP 2
Select the comparison consump- tion by pressing the “DISP” or “TRIP” button.
Press and hold the button to change the amount continuously. If neither button is operated for approximately 5 seconds, the set- ting will be changed and the screen will return to the previous display.
233
2-2. Instrument cluster
■ Setting the calendar
STEP 1
STEP 2
Select “CALENDAR”.
Press and hold the “DISP” button to enter the setting mode.
Select the date by pressing the “DISP” or “TRIP” button.
Press and hold the button to change the date continuously. If neither button is operated for approximately 5 seconds, the set- ting will be changed and the screen will return to the previous display.
234
2-2. Instrument cluster
■ Switching the EV indicator and Eco Driving Indicator Light
activated or deactivated
STEP 1
Select “EV/ECO”.
Press and hold the “DISP” button to enter the setting mode.
STEP 2
Select “ON” or “OFF”.
Press and hold the “DISP” button to finish setting.
235
2-2. Instrument cluster
■ Switching the steering switch operation display on/off (if
equipped)
Select “STEERING SWITCH”.
Press and hold the “DISP” button to enter the setting mode.
Select “ON” or “OFF”.
Press and hold the “DISP” button to finish setting.
STEP 1
STEP 2
236
2-2. Instrument cluster
■ Selecting 12h/24h clock display
STEP 1
Select “CLOCK”.
Press and hold the “DISP” button to enter the setting mode.
STEP 2
Select “12h” or “24h”.
Press and hold the “DISP” button to finish setting.
237
2-2. Instrument cluster
■ Selecting the language
STEP 1
Select “LANGUAGE”.
Press and hold the “DISP” button to enter the setting mode.
STEP 2
Select the language you want to read.
Press and hold the “DISP” button to set the language.
238
2-2. Instrument cluster
■ Turning off the multi-information display
STEP 1
Select “SCREEN OFF”.
Press and hold the “DISP” button to enter the setting mode.
STEP 2
Select “OFF”.
Press and hold the “DISP” button to turn off the multi-information display. To re-display the multi-information display, press the “DISP” button to display “SETTINGS” screen and follow the same pro- cedure, selecting “ON” instead of “OFF”.
the
■ Returning to the previous screen
Select “EXIT” and press and hold the “DISP” button.
The screen will revert to the “SETTINGS” screen.
239
2-2. Instrument cluster
■System check display
After switching the “POWER” switch to ON mode, “welcome to PRIUS” is dis- played while is checked. When the system check is com- plete, the normal screen will return.
system operation
■Ending display
→P. 197
■Eco Driving Indicator Light
Eco Driving Indicator Light will turn on when driving power is lower than the upper limit of Eco driving. It will turn off when the acceleration exceeds the Eco driving accelerator upper limit or when the vehicle is stopped. Eco Driving Indicator Light will not operate in the following conditions: ●The shift position is anything other than D. ●The driving mode is set to power mode or EV drive mode. (→P. 199, 204) ●The vehicle speed is approximately 80 mph (130 km/h) or higher. Eco Driving Indicator Light is also displayed when 5-minute consumption, 1- minute consumption, monthly fuel consumption record or eco savings record is displayed. Eco Driving Indicator Light can be set to activated or deactivated. (→P. 235)
240
2-2. Instrument cluster
■Driving in Eco drive mode
The multi-information display will automatically switch the display to Hybrid System Indicator, regardless of which display is currently being shown. (→P. 225)
■Touch tracer display
●The touch tracer display can be set to not display even if the steering
switches are touched.
●Only the circular, rubber-covered switches have a built-in touch sensor. Touching any of the other switches will not display the touch tracer dis- play.
■Display settings can be changed when
The vehicle speed is less than approximately 5 mph (8 km/h).
■Engine speed
On hybrid vehicles, engine speed is precisely controlled in order to help improve fuel efficiency and reduce exhaust emissions etc. There are times when the engine speed that is displayed may differ even when vehicle oper- ation and driving conditions are the same.
■When the 12-volt battery is disconnected
The following data will be reset. ●Average fuel consumption ●Distance to empty ●Average vehicle speed ●Clock ●Display settings ●Trip meter
241
2-2. Instrument cluster
■Vacuum fluorescent display
Small spots or light spots may appear on the display. This phenomenon is characteristic of vacuum fluorescent displays, and there is no problem to continue using the display.
NOTICE
■Steering switches
To prevent damage to the steering switches, observe the following precau- tions. ●Do not touch the steering switches with wet hands ●Do not push hard or sharp objects into the steering switches ●Do not subject the steering switches to strong impacts ●Do not allow organic solvents containing thinner, benzene or gasoline, or
acidic/alkaline soap to adhere to the surfaces of the steering switches
242
2
2-2. Instrument cluster Head-up display∗
The head-up display can be used to project vehicle speed and other information onto the windshield.
(Head-up display)
Head-up display Display brightness will change automatically according to the brightness of the surrounding area. HUD main switch Turn-by-turn switch (if equipped) Display position adjustment switch Display brightness adjust- ment switch Used the display brightness to the desired level.
navigation
to adjust
∗: If equipped 243
2-2. Instrument cluster
■ Head-up display contents
● Speedometer
Displays the vehicle speed. ● Hybrid System Indicator
Provides assistance for Eco-friendly driving.
● Turn-by-turn navigation*
Displays a notification of upcoming intersections during navigation system route guidance. (→P. 247) ● Dynamic radar cruise control*
Indicates that there is a possibility of collision. (→P. 270)
● PCS (Pre-Collision System)*
Displays the approach warning. (→P. 303)
● LKA (Lane-Keeping Assist)*
Displays a warning message that alerts the driver of a deviation from the lane through use of the lane departure warning function. (→P. 498) *: If equipped
244
2
2-2. Instrument cluster
Switching the head-up display
Display items can be switched by pressing the “HUD” main switch.
Speedometer Displays the vehicle speed. Speedometer and Hybrid Sys- tem Indicator Displays Hybrid System Indicator under the speedometer. (→P. 225) Off