- 2009 Toyota Prius Owners Manuals
- Toyota Prius Owners Manuals
- 2008 Toyota Prius Owners Manuals
- Toyota Prius Owners Manuals
- 2013 Toyota Prius Owners Manuals
- Toyota Prius Owners Manuals
- 2004 Toyota Prius Owners Manuals
- Toyota Prius Owners Manuals
- 2001 Toyota Prius Owners Manuals
- Toyota Prius Owners Manuals
- 2005 Toyota Prius Owners Manuals
- Toyota Prius Owners Manuals
- 2015 Toyota Prius Owners Manuals
- Toyota Prius Owners Manuals
- 2012 Toyota Prius Owners Manuals
- Toyota Prius Owners Manuals
- 2002 Toyota Prius Owners Manuals
- Toyota Prius Owners Manuals
- 2010 Toyota Prius Owners Manuals
- Toyota Prius Owners Manuals
- 2014 Toyota Prius Owners Manuals
- Toyota Prius Owners Manuals
- 2006 Toyota Prius Owners Manuals
- Toyota Prius Owners Manuals
- 2003 Toyota Prius Owners Manuals
- Toyota Prius Owners Manuals
- 2007 Toyota Prius Owners Manuals
- Toyota Prius Owners Manuals
- 2011 Toyota Prius Owners Manuals
- Toyota Prius Owners Manuals
- Download PDF Manual
-
“OFF” mode with the odometer reading shown. (For details, see “Odometer and two trip meters” on page 115.) the “POWER” switch
to select the “IG−ON” mode while holding down the trip meter reset button.
“POWER” switch
2. Press
twice
the
the
to
If
indicates
Hold down the button for at least 5 sec- onds. The odometer “000000” and the light goes off. If the system fails to reset, the light will remain flashing. (k) “VSC” warning light This light warns that there is a problem somewhere in the vehicle stability control system. The light will come on when the “IG−ON” mode is enabled and will go off after the “READY” light comes on. If the light comes on while driving, the system does not work. However, as con- ventional braking operates when applied, there is no problem to continue your driv- ing. In the following cases, contact your Toyota dealer: D The warning light does not come on
after the “IG−ON” mode is enabled.
D The warning light remains on after the
“READY” light comes on.
D The warning light comes on while you
are driving.
CAUTION
If the “VSC” warning light remains on together with the red brake system warning light, immediately stop your vehicle at a safe place and contact your Toyota dealer. In this case, not only the vehicle sta- bility control system will fail but also the vehicle will become extremely un- stable during braking.
(l) Key Reminder Buzzer This buzzer acts as a reminder to remove the key if you open the driver’s door when the hybrid system is off and the key is inserted into the key slot. (m) Shift Position Reminder Buzzer This buzzer will sound if the driver’s door is opened while the hybrid transaxle is in “N”, “D” or “B”.
CHECKING SERVICE REMINDER INDICA- TORS (except the low fuel level indica- tor light) 1. Apply the parking brake. 2. Open one of the doors.
The open door warning come on.
light should
3. Close the door.
The open door warning light should go off.
4. Press the “POWER” switch twice with- out pressing the brake pedal to select the “IG−ON” mode. At this time, all the bulbs are checked in self−diagnosis mode. All the service reminder indicators ex- cept the open door warning light come on. The yellow brake system, “ABS” and “VSC” warning lights go off after a few seconds.
There may be the case that the yellow brake system, “ABS” and “VSC” warning lights stay on for about 60 seconds after the “IG−ON” mode is enabled. It is normal if they go out after a while. If any service reminder indicator or warn- ing buzzer does not function as described above, have it checked by your Toyota dealer as soon as possible.
123
—Multi−information display
24p006e
If an error occurs in the system, the warning message and icon appear. For details on the warning display and how to remedy the system, see the de- scription on the following pages.
124
If the indicator comes on...
Do this.
(a)
(b)
(c)
(d)
(e)
(f)
(g)
Stop and check.
Stop and check.
Stop and check.
Take vehicle to Toyota dealer.
Take vehicle to Toyota dealer immediately.
Take vehicle to Toyota dealer.
Take vehicle to Toyota dealer.
125
(a) Discharge Warning Light This light warns that the auxiliary battery is being discharged. If it comes on while you are driving, there is a problem somewhere in the charging system. The hybrid system will continue to oper- ate, however, until the auxiliary battery is discharged. Turn off the air conditioning, blower, radio, etc., and drive directly to the nearest Toyota dealer or repair shop.
(b) Low Engine Oil Pressure Warning
Light
This light warns that the engine oil pres- sure is too low. If it stays on while you are driving, pull off the road to a safe place and stop the engine immediately. Call a Toyota dealer or qualified repair shop for assistance. The light may come on when the oil level is extremely is not designed to indicate low oil level, and the oil level must be checked using the level dipstick.
low. It
NOTICE
Do not drive the warning light on—even for one block. It may ruin the engine.
the vehicle with
(c) High Coolant Temperature
Warning Light
The light operates to warn that the hybrid system is almost overheating. If it comes on while you are driving, stop the vehicle and check your hybrid system. For detailed instructions, see “If your ve- hicle overheats” on page 246. Your vehicle may overheat during severe operating conditions, such as: D Driving up a long hill on a hot day. D Reducing speed or stopping after high
speed driving.
NOTICE
z Do not remove the thermostat
in the cooling system as this may cause the hybrid system to over- heat. The thermostat is designed to control the flow of coolant to keep the temperature of the hybrid sys- tem within the specified operating range.
z Continued driving with the light on could result in the overheating of hybrid system.
126
(d) Electric Power Steering System
Warning Light
light comes on when This steering control system fails.
the power
CAUTION
If this light comes on, take your ve- hicle to the Toyota dealer as soon as possible. In this case, you may feel the heavy steering wheel maneuver- ing. Drive your vehicle while gripping the steering wheel firmly.
(e) Hybrid System Warning Light ( This light comes on if there is a problem in the electric motor, inverter unit, hybrid vehicle battery, etc. If this light is on, stop your vehicle in a safe place immediately and contact your Toyota dealer. Even if the hybrid system warning light comes on, you can temporarily increase the vehicle speed by depressing the ac- celerator pedal. Immediately pull up your vehicle to a safe place and contact your Toyota dealer.
(f) Hybrid Vehicle Battery Warning
Light
in
the
following
light comes on
This cases. a. The hybrid vehicle battery voltage drops when the hybrid transaxle is left in “N” position. The system works properly if you put the hybrid transaxle in “P” position and the light goes off. b. The hybrid vehicle battery charged. If this light comes on with the “READY” light on in case of b., stop your vehicle in a safe place and contact your Toyota dealer. (g) Automatic Headlight Leveling Sys-
is dis-
tem Warning Light
This light warns that there is a problem somewhere in the automatic headlight leveling system. If it comes on, have your vehicle checked by your Toyota dealer,
127
128
SECTION 2– 6
OPERATION OF INSTRUMENTS AND CONTROLS “POWER” switch, Transmission and Parking brake 130
Push button start system 136
Hybrid transaxlee 140
Vehicle stability control system Parking brake 142
142
Cruise control. . . . . . . . . . . . . . . . . . . . . . . . . . . . . . . . . . . . . . . . . . . . . . . . . . . . . . . . . . . . . . . . . . . . . . . . . . . . . . . . . . . . . . . . . . . . . . . . . . . . . . . . . . . . . . . . . . . . . . . . . . . . . . . . . . . . . . . . . . . . . . . . . . . . . . . . . . . . . . . . . . . . . . . . . . . . . . . . . . . . . . . . . . . . . . . . . . . . . . . . .
129
Push button start system—
—Key slot
25p118
21p006a
Your vehicle keys and the key slot are different shapes from conventional ones. Keep the following in mind when operating the key: D When
the key, be sure
inserting
to
push it in all the way.
D When pulling out the key, be careful because it will be pushed out by the spring and it might fly out.
D If the key cannot be pulled out, push it in all the way again, then pull it out.
“IG−ON” or
“OFF” mode.
The push button start system is used to start or stop the hybrid system and select “ACC”, (See “—Selecting the push button start system mode” on page 132 and “How to start the hybrid system” on page 234.) The system contains the following components. 1. “POWER” switch 2. Key slot 3. Brake pedal 4. Electronic shift lever
130
CAUTION
Do not put your finger into the key slot. Your finger might be injured.
NOTICE
Observe the following instructions, or the key mechanism might be damaged and will not work properly. z The key should be operated with a
clean hand and fingers.
z Do not insert the key forcibly. z Do not insert any key other than genuine formal keys into the key slot.
z Do not pull out the key forcibly
when it cannot be removed.
z Do not put water, oil, foreign ob-
jects, etc. into the key slot.
z Do not insert a wet, oily or dam-
aged key into the key slot.
z Do not affix a sticker on the key. z Do not insert the key in the wrong
way.
z Do not pull out the key ring when removing the key out of the key slot.
Should you find anything unusual, contact your Toyota dealer as soon as possible.
—“POWER” switch
25p113
NOTICE
Observe the following instructions or the push switch start system may not work properly. z The switch should be operated with a clean finger. Do not use an oily or dirty finger.
z Be careful not to spill water or oth-
er liquid on the switch.
Press the “POWER” switch slowly and surely. Quick operation may not activate the desired mode.
CAUTION
D Do not press the switch while driv-
ing, except in an emergency.
D In hot weather, the switch surface may get hot. Take care not to get burned.
In the following conditions, contact your Toyota dealer as soon as pos- sible. z If
the switch flashes in amber, the system may be malfunctioning. Once you turn the power off, it may not turn on again.
indicator on
the
z If you find anything unusual in the switch function, refrain from using the vehicle.
In the following condition, have your vehicle inspected by your Toyota deal- er. z The indicator light on the “POWER” switch does not come on when the clearance lights are turned on.
131
3) “OFF” (Indicator is turned off) The hybrid system is off. You may hear a motor sound in the en- gine compartment for a few seconds after the system is turned off and about 90
seconds have passed. The hybrid vehicle immobilizer system is automatically set. See “Hybrid vehicle im- mobilizer system” on page 21.—Selecting the push button start system mode (with smart function—on some models)
25p105
Without depressing the brake pedal
time you press
Carrying a smart key allows you to op- erate the “POWER” switch without the key being inserted into the key slot. Each the “POWER” switch briefly without the brake pedal depressed, the hybrid system mode changes in the order of “OFF”, “ACC”, “IG−ON” and then back to “OFF”. The smart function can be set to become inoperative using the smart cancel switch. For details, see “Deactivating the smart function” on page 33.
132
in
the brake pedal
1) “ACC” (Green indicator is turned on) Accessories such as the radio operate. Pressing the “POWER” switch briefly with- out depressing the “OFF” mode turns on this mode. In the “ACC” mode, pressing the “POW- ER” switch briefly while depressing the brake pedal will start the hybrid system. If you leave your vehicle in the “ACC” mode for about an hour, the hybrid system is automatically turned off. 2) “IG−ON” (Amber indicator is turned on) All accessories are operable. Pressing the “POWER” switch briefly with- the brake pedal out depressing the “ACC” mode turns on this mode. In the “IG−ON” mode, pressing the “POW- ER” switch briefly while depressing the brake pedal will start the hybrid system. However, if “N” position is selected, the hybrid system will be turned in the “OFF” mode.
in
the vehicle the “POWER” switch
For starting tips, see “How to start the hybrid system—” on page 234. turn the If in an emergency, you must is hybrid system off while moving, press for more than 3 seconds. At this time, the “ACC” mode and shift position “N” are automatically enabled. 2) “OFF” (Indicator is turned off) The hybrid system is off. You may hear a motor sound in the en- gine compartment for a few seconds after the system is turned off and about 90
seconds have passed. The hybrid vehicle immobilizer system is automatically set. See “Hybrid vehicle im- mobilizer system” on page 21.25p106
With the brake pedal depressed
The hybrid system will start and stop by pressing the “POWER” switch briefly with the brake pedal depressed. You may hear a motor sound in the en- gine compartment when the brake pedal is depressed with the hybrid system off. 1) “START” (Amber indicator comes on for a few seconds.) The hybrid system is ready to operate and all accessories are operable. (“IG− ON”) Press the “POWER” switch with the brake pedal depressed.
NOTICE
z The hybrid
system
cannot be started when the shift position is in “N”. Be sure to put it in “P” and then start the system.
z Do not leave the hybrid system in “ACC” or “IG−ON” for a long time. The auxiliary battery will discharge. z The hybrid mode in which the bat- tery is discharged or disconnected is retained that mode is turned on when power is applied.
in memory, and
When you leave your vehicle, be sure to turn the “POWER” switch off and carry the smart key. If you get out of your vehicle while carry- ing a key without turning off the “POWER” switch and then close the door, a warning tone sounds inside and beeps sound out- side.
133
—Selecting the push button start system mode (without smart function)
INFORMATION
You can insert a genuine key while in the “IG−ON” mode or with the hybrid system starting. Do not insert any key other than genuine keys.
25p103
Without depressing the brake pedal
time you press
Each the “POWER” switch briefly without the brake pedal depressed, the hybrid system mode changes in the order of “OFF”, “ACC”, “IG−ON” and then back to “OFF”. 1) “ACC” (Green indicator is turned on) Accessories such as the radio operate. Pressing the “POWER” switch briefly with- out depressing the “OFF” mode turns on this mode. The key can be removed at this position. The hybrid system is automatically turned off.
the brake pedal
in
134
in
the
“IG−ON” mode, pressing
In the “ACC” mode, pressing the “POW- ER” switch briefly while depressing the brake pedal will start the hybrid system. If you leave your vehicle in the “ACC” mode for about an hour, the hybrid system is automatically turned off. 2) “IG−ON” (Amber indicator is turned on) All accessories are operable. Pressing the “POWER” switch briefly with- out depressing the brake pedal the “ACC” mode turns on this mode. In the “POWER” switch briefly while depressing the brake pedal will start the hybrid sys- tem. However, if “N” position is selected, the hybrid system will be turned in the “OFF” mode. 3) “OFF” (Indicator is turned off) The hybrid system is off. The key can be removed at this position. You may hear a motor sound in the en- gine compartment for a few seconds after the system is turned off and about 90
seconds have passed. Once you remove the key, the hybrid ve- hicle immobilizer system is automatically set. See “Hybrid vehicle immobilizer sys- tem” on page 21.the vehicle
For starting tips, see “How to start the hybrid system—” on page 234. If, in an emergency, you must turn the hybrid system off while is moving, press the “POWER” switch more than 3 seconds. At this time, the “ACC” mode and shift position “N” are automati- cally enabled. 2) “OFF” (Indicator is turned off) The hybrid system is off. The key can be removed at this position. You may hear a motor sound in the en- gine compartment for a few seconds after the system is turned off and about 90
seconds have passed. Once you remove the key, the hybrid ve- hicle immobilizer system is automatically set. See “Hybrid vehicle immobilizer sys- tem” on page 21.25p104
With the brake pedal depressed
The hybrid system will start and stop by pressing the “POWER” switch briefly with the brake pedal depressed. You may hear a motor sound in the en- gine compartment when the brake pedal is depressed with the hybrid system off. 1) “START” (Amber indicator comes on for a few seconds.) The hybrid system is ready to operate and all accessories are operable. (“IG− ON”) Insert the key and press the “POWER” switch briefly with the brake pedal de- pressed.
NOTICE
z The hybrid
system
cannot be started when the shift position is in “N”. Be sure to put it in “P” and then start the system.
z Do not leave the hybrid system in “ACC” or “IG−ON” for a long time. The auxiliary battery will discharge. z The hybrid mode in which the bat- tery is discharged or disconnected is retained that mode is turned on when power is applied.
in memory, and
135
Hybrid transaxle
“P” position switch
25p002i
You can operate the shift lever only in “D”.
The shift lever always re- turns to this original position after shifting operation.
Keep the shift lever in “N” for a while after you shift it to that position.
Shift lever
136
transaxle has an electronic Your hybrid shift lever system to minimize incorrect operation. This means you can only shift to other position from “P” when the brake pedal is depressed. With the following improper shifting, the rejection function operates and a beep sounds so the hybrid transaxle cannot be shifted. (i) When you attempt to shift the transaxle from the “P” position without depress- ing the brake pedal.
(ii) When you push the “P” switch while
driving.
(iii) When you operate the shift lever from “D” to “R” or vice versa while the ve- hicle is moving.
(iv) When you operate the shift lever to “B”
from any position other than “D”.
In case of (i), the transaxle remains in “P”. In case of (ii) through (iv), the trans- axle is automatically shifted to “N”.
NOTICE
the
following
instructions. Observe Otherwise, the lever may cause a mal- function, resulting in trouble: z Do not remove the knob on the le-
ver.
z Do not use a knob other than the
originally fitted knob.
z Do not hang anything on the lever. Should you find anything unusual, contact your Toyota dealer as soon as possible.
25p003a
(a) Shift lever The shift position is displayed on the in- strument cluster. R: Reverse position (buzzer sounds) N: Neutral position D: Normal driving position B: Engine braking position
(shown only while in “D”)
(b) “P” position switch The “P” (parking) position is displayed on the instrument cluster, and the indicator on the “P” position switch comes on. (c) Normal driving 1. Start the hybrid system as instructed in “How to start the hybrid system” on page 234.
2. With your foot holding down the brake
pedal, shift the shift lever to “D”.
CAUTION
Never put your foot on the accelera- tor pedal while shifting. Doing so can cause abrupt acceleration.
3. Release the parking brake and brake the accelerator pedal
pedal. Depress slowly for smooth starting. the transaxle to “D” When you shift while backing up, an alarm sounds and the transaxle is shifted to “N”.
137
CAUTION
Be careful when downshifting on a slippery shifting could cause the vehicle to skid or spin.
surface. Abrupt
(e) Backing up 1. Bring the vehicle to a complete stop. 2. With the brake pedal held down with your foot, shift the shift lever to the “R” position. You will hear beeps while the transaxle is in “R”.
When you shift the transaxle to “R” while driving, an alarm sounds and the transaxle is shifted to “N”. (f) Parking 1. Bring the vehicle to a complete stop. 2. With the brake pedal pressed down, fully depress the parking brake pedal to apply the parking brake securely.
3. With
the brake pedal pressed down,
push the “P” position switch.
If you press the “POWER” switch while stopping, is automatically shifted to the “P” and the hybrid system is turned off.
transaxle
the
25p004c
(d) Using engine braking To use engine braking, shift the shift lever to “B” position. During high speed driving, you may feel that deceleration by engine braking is less than that of a typical vehicle. Do not continue normal driving with the transaxle in “B” for a long time. This may cause decreased fuel economy. To prevent this, use “D” for normal driving. When you shift the transaxle to “B” from a position other than “D”, an alarm sounds and the transaxle is automatically shifted to “N”.
138
is
in
“N”,
“D” or
If the driver’s door is opened when the transaxle “B”, beep sounds and a warning message appears on the multi−information display to warn you to shift the transaxle to “P”. If you push the “P” position switch while driving, an alarm sounds and the transaxle is automatically shifted to “N”.
NOTICE
Be sure to put the hybrid transaxle in “P” when parking. In “N”, the hybrid vehicle battery will not be charged even if the gasoline engine is run- ning. You cannot start your vehicle if the transaxle is left in “N” for a long time because the hybrid vehicle bat- tery will discharge.
When shifting the transaxle from “P” on the slope, a large parking lock releasing noise will be generated. However, this does not indicate a malfunction.
(g) Vehicle driving characteristics Creeping In order to hold the vehicle properly on an incline and for better accelerator pedal operation at starting, your vehicle is de- signed like a typical automatic transmis- sion vehicle which tends to move without depressing the accelerator pedal with the transaxle in a position other than “P” or “N”. With the transaxle in a position other than “P” or “N”, depress the brake pedal firmly even when stopped and apply the parking brake as required. When moving in a compact area or during it is an effective way to a traffic jam, control the brake pedal operation without depressing the ac- celerator pedal. Regenerative brake When the accelerator pedal is released or the brake pedal is depressed, the electric motor acts as a generator and converts kinetic energy to electric energy to provide deceleration and recover electric energy to charge the hybrid vehicle battery. At noise may increase.
the electric motor running
the speed using only
this time,
The operation is the same as a typical gasoline powered vehicle. You may experience the following condi- tion while braking. As they do not indicate a malfunction, perform braking as usual: D In
the “POWER” switch once or twice will se- lect “ACC” or “IG−ON” only if the brake pedal is not depressed. In this condi- tion, the brake pedal may move a little.
“OFF” mode, pressing
the
Hybrid driving This vehicle runs in combination with the gasoline engine and electric motor. If the “READY” light is on, you can start your vehicle even with the gasoline engine stopped.
If the system malfunctions
(h) In the following conditions, there is some problem in the system. D The indicator on the “P” position switch flashes. However, this does not indi- cate a malfunction unless a warning message appears in the multi−informa- tion display.
D All frames of shift position indicators in
the instrument cluster flash.
D The parking system error message ap- pears on the multi−information display. D The instrument cluster and multi−infor- mation display does not come on when the “IG−ON” mode is enabled.
In these cases, stop your vehicle in a safe and level place, apply the parking brake securely and contact your Toyota dealer immediately. (i) When the auxiliary battery is dis-
connected
Before you disconnect the auxiliary bat- tery, confirm the shift position is “P” and apply the parking brake completely. After you reconnect the auxiliary battery, shift the shift lever to “N” and confirm the shift position is in “N” when the “IG−ON” mode is enabled.
139
Vehicle stability control system The vehicle stability control system helps provide integrated control of the systems such as anti−lock brake sys- tem, brake assist system, hybrid system control, etc. This system automatically controls the brakes and hybrid system to help prevent the vehicle from skid- ding when cornering on a slippery road surface or operating steering wheel abruptly. This system activates when the vehicle speed than about 15 km/h (9
mph).is more
140
CAUTION
If
the slip
indicator
D Do not rely exclusively on the ve- hicle stability control system. Even if the vehicle stability control sys- tem is operating, you must always drive carefully and attentively to avoid serious injury. Reckless driv- ing will result in an unexpected ac- cident. light flashes, sounding an alarm, special care should be taken while driving. D Only use tires of specified size. The size, manufacturer, brand and tread pattern for all 4 tires should be the same. If you use tires other than specified, or mixed types or size, the vehicle stability control system may not function correctly. When replacing the tires or wheels, con- tact (See “Checking and replacing tires” on page 293.)
your Toyota dealer.
25p115
Slip indicator light If the vehicle is going to skid during driv- ing, the slip indicator light blinks and an alarm sounds intermittently. Special care should be taken while driving. The slip indicator light blinks in the follow- ing conditions also. D The vehicle
tires are racing. Utmost
care is required when driving.
D When
the anti−lock brake system
is operating. See “Brake system” on page 211 for details.
The slip indicator light comes on when the “IG−ON” mode is enabled and will go off after the “READY” light comes on. If the indicator light does not come on when the ignition is turned on, contact your Toyota dealer.
25p117
In the following cases, contact your Toyota dealer: D The warning light does not come on
after the “IG−ON” mode is enabled.
D The warning light remains on after the
“READY” light comes on.
D The warning light comes on while driv-
ing.
“VSC” warning light This light warns that there is a problem somewhere in the vehicle stability control system. The light will come on when the “IG−ON” mode is enabled and will go off after the “READY” light comes on. If the light comes on while driving, the system does not work. However, because the conventional braking still operates, you can drive your vehicle without damaging it. Contact your Toyota dealer.
141
Parking brake
25p008a
Vehicles sold in U.S.A.
25p009a
Vehicles sold in Canada
142
When parking, firmly apply the parking brake to avoid inadvertent creeping. To set: Fully depress the parking brake pedal. For better holding power, first de- press the brake pedal and hold it while setting the parking brake. To release: Depress pedal while depressing the brake pedal. To remind you that the parking brake is set, the parking brake reminder light in the instrument panel remains on until you release the parking brake.
the parking brake
CAUTION
D Driving with the parking brake en-
gaged can reduce braking power.
D Before driving, be sure the parking brake is fully released and the park- ing brake reminder light is off.
Cruise control The cruise control allows you to cruise the vehicle at a desired speed over 40
km/h (25 mph) even with your foot off the accelerator pedal. Your cruising speed can be maintained up or down grades within the limits of hybrid system performance, although a slight speed change may occur when driving up or down the grades. On steeper hills, a greater speed change will occur so it is better to drive without the cruise control.CAUTION
D To help maintain maximum control of your vehicle, do not use the cruise control when driving in heavy or varying traffic, or on slip- pery (rainy, icy or snow–covered) or winding roads.
If
D Avoid vehicle speed increases when driving downhill. the vehicle speed is too fast in relation to the cruise control set speed, cancel the cruise control then shift the shift lever to “B” position to use engine braking to slow down.
25p006a
25p007a
TURNING THE SYSTEM ON To operate the cruise control, push the “ON·OFF” switch. This turns the system on. The indicator light in the instrument panel shows that you can now set the vehicle at a desired cruising speed. Anoth- er push on the switch will turn the system completely off.
CAUTION
To avoid accidental cruise control en- gagement, keep the “ON·OFF” switch off when not using the cruise control.
SETTING AT A DESIRED SPEED The transaxle must be in “D” before you set the cruise control speed. Bring your vehicle to the desired speed, push the lever down in the “– SET” direc- tion and release it. This sets the vehicle at that speed. If the speed is not satisfactory, tap the lever up for a faster speed, or tap it down for a slower speed. Each tap changes the set speed by 1.6 km/h (1.0 mph). You can now the accelerator pedal.
take your
foot off
If you need acceleration—for example, when passing—depress the accelerator pedal enough for the vehicle to exceed the set speed. When you release it, the vehicle will return to the speed set prior to the acceleration. CANCELLING THE PRESET SPEED You can cancel the preset speed by: in a. Pulling
control
lever
the
the
“CANCEL” direction and releasing it.
b. Depressing the brake pedal. If the vehicle speed falls below about 40
km/h (25 mph), the preset speed will auto- matically cancel out. If the vehicle speed drops 16 km/h (10
mph) below the preset speed, the preset speed will also automatically cancel out. If the preset speed automatically cancels out other than for the above cases, have your vehicle checked by your Toyota deal- er at the earliest opportunity.143
RESETTING TO A FASTER SPEED Push the lever up in the “+ RES” direction and hold it. Release the lever when the desired speed is attained. While the lever is held up, the vehicle will gradually gain speed. However, a faster way to reset is to ac- celerate the vehicle and then push the control lever down in the “– SET” direc- tion. RESETTING TO A SLOWER SPEED Push the lever down in the “– SET” direc- tion and hold it. Release the lever when the desired speed is attained. While the lever is held down, the vehicle speed will gradually decrease. However, a faster way to reset is to de- press the brake pedal and then push the control lever down in the “– SET” direc- tion.
144
lever or by depressing
RESUMING THE PRESET SPEED If the preset speed is cancelled by pulling the control the brake pedal, pushing the lever up in the “+ RES” direction will restore the speed set prior to cancellation. However, once the vehicle speed falls be- low about 40 km/h (25 mph), the preset speed will not be resumed. CRUISE CONTROL FAILURE WARNING If the instrument cluster flashes when using the cruise control, press the “ON·OFF” button to turn the system off and then press it again to turn it on. If any of the following conditions then oc- curs, there is some trouble in the cruise control system. D The indicator light does not come on. D The indicator light flashes again. D The
light goes out after
“CRUISE”
indicator
indicator
light
the
in
it
comes on.
If this is the case, contact your Toyota dealer and have your vehicle inspected.
SECTION 2– 7
OPERATION OF INSTRUMENTS AND CONTROLS Multi−information display Reference Before using the multi−information displayy Switch operation Functions Information Adjustment Outside temperature display
. . . . . . . . . . . . . . . . . . . . . . . . . . . . . . . . . . . . . . . . . . . . . . . . . . . . . . . . . . . . . . . . . . . . . . . . . . . . . . . . . . . . . . . . . . . . . . . . . . . . . . . . . . . . . . . . . . . . . . . . . . . . . . . . . . . . . . . . . . . . . . . . . . . . . . . . . . . . . . . . . . . . . . . . . . . . . . . . . . . . . . . . . . . . . . . . . . . . . . . . . . . . . . . . . . . . . . . . . . . . . . . . . . . . . . . . . . . . . . . . . . . . . . . . . . . . . . . . . . . . . . . . . . . . . . . . . . . . . . . . . . . . . . . . . . .
146
147
147
148
150
152
153145
Reference
Type A (with Navigation system)
26p045c
Type B (without Navigation system)
146
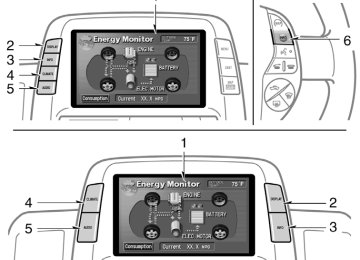
1. Multi−information display*
(See page 147 for details.)
2. “DISPLAY” button
The display adjustment shown. (See page 152 for details.)
screen
is
3. “INFO” button
The information menu screen is shown. (See page 150 for details.)
4. “CLIMATE” button
The air conditioning operation screen is shown. (See page 180 for details.)
5. “AUDIO” button
The audio operation screen is shown. (See page 156 for details.)
6. “INFO” button (on the steering pad)
The trip information screen is shown. (See page 151 for details.)
*:
In this manual, English version screens are shown as an example.
Before using the multi−information display
CAUTION
Do not adjust the display while the vehicle is moving. Be sure to adjust the display only when the vehicle is stopped.
26p049b
the “ACC” mode is enabled,
When the initial screen appears and the system be- gins operating. After a few seconds, the previous mode display will appear. If the electrical power source has been disconnected the multi−information display, the display will be automatically set to the initial mode.
from
lightly
Switch operation the This system operates mainly by the switches on the screen. To protect screen, the touch switches on screen with your finger. When you touch a switch on the screen or on the bezel, a beep sounds. D If the system does not respond to a touch of a switch, move your finger away from the screen and then touch it again.
D You cannot operate dimmed switches. D Wipe off fingerprints on the surface of the display using a glass cleaning cloth.
147
Functions
*: For other functions (Maintenance, Tele- phone and Calender), see the separate “Navigation System Owner’s Manual”.
1. Trip
information,
Language
and
Screen setting
26p170
For details, see page 150.
26p026b
2. Adjustment The contrast and brightness on the screen are adjusted. For details, see page 152.
With Navigation system*
26p027c
Without Navigation system
148
26p114a
26p136a
24p006e
3. Air conditioner Climate setting operations are available. For details, see page 180.
4. Audio The radio and cassette tape operations are available. For details, see page 156.
5. Warning display The warning symbol for the faulty system is appeared. For details, see page 124.
149
Information
Type A
Type B
—Trip information
26p009b
26p027c
26p038d
Push the “INFO” button to display the “Information Menu” screen.
Trip information: The energy monitor and fuel consumption screen are selected. Language: Select language screen shown. Screen setting: The screen setting screen is shown.
is
Energy monitor screen Touch the “Energy” switch. Vehicle driving condition, hybrid system operating condi- tion and energy recovery condition are shown. 1.
Indicates the flow of energy by orange and yellow arrows. While the energy is recovered, the pointing direction and turn green. Indicates the remaining capacity of the hybrid vehicle battery.
the arrows
change
2.
150
The screen display updates every 3 sec- onds, so the actual status.
it may not coincide with
4.
Indicates the average fuel consumption after being reset. When the “Reset” switch is touched or more than 10 L (2.6 gal., 2.2 Imp.gal.) fuel is supplied, the average fuel consumption is reset.
26p039c
26P180
and
Fuel consumption screen Touch the “Consumption” switch. Average fuel consumption, momentary fuel con- recovered energy are sumption shown. 1.
Indicates the past momentary fuel con- sumption every 5 minutes. Indicates the energy recovered for 5
minutes with symbols. One symbol re- fers to 50 Wh or the energy by which a 50 W bulb illuminates for an hour. Up to 4 symbols will be shown. Indicates consumption.the current momentary
2.
3.
fuel
Steering switch operation (with Navigation system) The trip information screen appears direct- ly by pressing the “INFO” button on the right side of the steering pad. Each press changes the “Energy Monitor” and “Con- sumption” screens alternately.
151
—Language
—Screen setting
Adjustment
Type A
Type B
26p115
26p030c
26p024a
Push the “DISPLAY” button to display the “Display” screen.
You can select the language shown on the screen. Touch your desired switch on the screen.
AUTOMATIC TRANSITION The function returning to the previous screen from the audio or air conditioner screen is selectable. Select “ON” or “OFF” and then touch “OK”. ON: The previous screen automatically re- turns from the audio or air condition- er screen 20 seconds after the end of audio or air conditioner screen op- eration.
OFF:The audio or air conditioner screen
remains on.
BACKGROUND COLOR Select and touch “OK”.
the desired background color
152
Outside temperature display
26p026b
26P051b
26p046b
Contrast and brightness adjustment CONTRAST “+”: Strengthens the contrast of the screen. CONTRAST “–”: Weakens the contrast of the screen. BRIGHTNESS “+”: Brightens the screen. BRIGHTNESS “–”: Darkens the screen. The screen turns off when you touch the “SCREEN OFF”. To the display screen back on, push any bezel switch such as “INFO”, etc. The selected screen appears.
turn
Depending on the position of the head- light switch, the screen changes to the day mode or night mode. To display the screen in the day mode even with the headlight switch on, touch “DAY MODE” on the adjustment screen for brightness and contrast control. However, if the km/h or MPH button is on, mode switching cannot be done. It re- mains in the day mode. In this case, “DAY MODE” is not shown on the screen. If the screen is set in the day mode with the headlight switch this condition is memorized in the system even with the hybrid system turned off.
to on,
turned
(−22_F) up
from −30_C
The outside temperature is shown rang- ing to 50_C (122_F) at the upper right of the energy consumption or energy monitor screen or the upper left of the air conditioner screen.
153
154
SECTION 2– 8
OPERATION OF INSTRUMENTS AND CONTROLS Audio system Reference Using your audio systemm Radio operation Cassette tape player operation Compact disc player operation Audio remote controls Audio system operating hints
. . . . . . . . . . . . . . . . . . . . . . . . . . . . . . . . . . . . . . . . . . . . . . . . . . . . . . . . . . . . . . . . . . . . . . . . . . . . . . . . . . . . . . . . . . . . . . . . . . . . . . . . . . . . . . . . . . . . . . . . . . . . . . . . . . . . . . . . . . . . . . . . . . . . . . . . . . . . . . . . . . . . . . . . . . . . . . . . . . . . . . . . . . . . . . . . . . . . . . . . . . . . . . . . . . . . . . . . . . . . . . . . . . . . . . . . . . . . . . . . . . . . . . . . . . . . . . . . . . . .
156
158
163
166
169
173
174155
Reference "Type 1
With Navigation System
26p014c
1. Multi−information display screen*
(See page 160 for details.)
2. Ejecting a compact disc
(See page 170 for details.)
3. Compact disc slot
(See page 169 for details.)
4. Frequency tuning
(See page 163 for details.)
5. Scan tuning
(See page 164 for details.) 6. Compact disc mode button (See page 169 for details.)
7. Radio mode button
8. Radio mode:
(See page 163 for details.) Seek tuning (See page 164 for details.)
Compact disc mode:
Direct access to a desired program (See page 172 for details.)
156
*:
11. Audio operation screen display button
(See page 160 for details.) In this manual, English version screens are shown as an example.
9. Adjusting the volume
(See page 159 for details.)
10. Turning the system on
(See page 159 for details.)
"Type 2
With Navigation System
26p110a
1. Multi−information display screen*
(See page 160 for details.)
2. Compact disc slot
(See page 169 for details.)
3. Ejecting a compact disc
(See page 170 for details.)
4. Radio mode button
(See page 163 for details.)
5. Frequency tuning
(See page 163 for details.)
6. Stopping and ejecting a casette tape
(See page 166 for details.)
7. Scan tuning
(See page 164 for details.)
8. Tape or Compact disc mode button (See page 166 or 169 for details.)
9. Casette tape slot
(See page 166 for details.)
10. Radio mode:
Tape or Compact disc mode:
Seek tuning (See page 164 for details.)
Direct access to a desired program (See page 168 or 172
for details.)11. Turning the system on
(See page 159 for details.)
157
Using your audio system— —Some basics This section describes some of the basic features of the Toyota audio system. Some information may not pertain to your system. Your audio system works when the hybrid system is in “ACC” or “IG−ON”.
NOTICE
the battery
To prevent from being discharged, do not leave the audio on longer the hybrid system is not running.
than necessary when
TURNING THE SYSTEM ON AND OFF Push “PWR” button to turn the audio sys- tem on and off. The system turns on in the last mode used.
12. Adjusting the volume
(See page 159 for details.)
13. Compact disc load button
(See page 169 for details.)
14. Audio operation screen display button
*:
(See page 160 for details.) In this manual, English version screens are shown as an example.
158
Push the “AM”, “FM”, “TAPE” “DISC” or “TAPE·DISC” button to turn on that mode. The selected mode turns on di- rectly. Push these buttons if you want to switch from one mode to another. If the tape or disc is not set, the cassette player or compact disc player does not turn on. You can turn off the cassette player by ejecting the audio system was previously off, then the entire audio system will be turned off when you eject the cassette tape. If another function was previously playing, it will come on again.
the cassette tape. If
VOLUME CONTROL To adjust the volume, push and turn the “VOL”.
Type 1
Type 2
159
The switches for radio, cassette tape and compact disc player operation are displayed on the liquid crystal display. Touch them lightly and directly on the screen. The selected switch green.
is highlighted
in
26p136a
26p138a
Radio
Compact disc (Type 1)
26p137a
26p149b
Casette tape
160
Compact disc (Type 2)
26p140a
TONE AND BALANCE Touching the “SOUND” switch on the screen displays the sound adjustment screen.
low−pitched
BASS “+” or “–”: Adjusts tones. MID “+” or “–” (Type 2 only): Adjusts mid−pitched tones. TREB “+” or “–”: Adjusts high−pitched tones. “FRONT” or “REAR”: Adjusts sound bal- ance between the front and rear speakers. “L” or “R”: Adjusts sound balance be- tween the left and right speakers. “OK”: The previous screen returns.
treble, mid−range, and bass
How good an audio program sounds to you is largely determined by the mix of the levels. In fact, different kinds of music and vocal programs usually sound better with differ- ent mixes of treble, mid−range and bass. A good balance of the left and right stereo channels and of the front and rear sound levels is also important. Keep in mind that if you are listening to a stereo recording or broadcast, changing the right/left balance will increase the vol- ume of one group of sounds while de- creasing the volume of another.
161
YOUR RADIO ANTENNA To remove an antenna on the roof, care- fully turn it counterclockwise.
NOTICE
To prevent damage to the antenna, make sure to remove it before driving your Toyota through an automatic car wash.
YOUR CASSETTE PLAYER When you insert a cassette, the exposed tape should be to the right.
NOTICE
Do not oil any part of the player and do not insert anything other than cas- sette tapes into the slot, or the tape player may be damaged.
YOUR COMPACT DISC PLAYER When you insert a disc, gently push it in with the label side up. The discs set in the player are played continuously, starting with disc number 1. The disc number of the disc currently be- ing played, the track number and the time from the beginning of the program appear on the display. Type 2 only: When play of one disc ends, first track of the following disc starts. When play of the final disc ends, play of the first disc starts again. The player will skip any empty disc num- ber.
the
162
NOTICE
z Do not stack up two discs for in- sertion, or it will cause damage the compact disc player. Insert only one compact disc into slot at a time.
z Never try to disassemble or oil any part of the compact disc player. Do not insert anything other than com- pact discs into the slot.
The player is intended for use with 12 cm (4.7 in.) discs only.
Radio operation
(a) Listening to the radio Push these buttons to choose either an AM or FM station. “AM”, “FM1” or “FM2” appears on the dis- play.
26p141a
Push and turn this knob to step up the station band or to step down. Your radio automatically changes to stereo reception when a stereo broadcast is re- ceived. “ST” appears on the display. If the signal becomes weak, the radio reduces the amount of channel separation to pre- vent the weak signal from creating noise. If the signal becomes extremely weak, the radio switches from stereo to mono recep- tion. In this case, “ST” disappears from the display.
(b) Presetting a station 1. Tune in the desired station. 2. Touch one of the station selector switches (1−6) and hold it until a beep is heard. This sets the station to the switch and the frequency ap- pears on the switch.
Each switch can store FM1, FM2 and AM. To change the preset station to a different one, follow the same procedure. The preset station memory is cancelled when the power source is interrupted by battery disconnection or a blown fuse.
163
(c) Selecting a station Tune in the desired station using one of the following methods. Preset tuning: Touch the switch (1−6) for the station you want. The switch (1−6) is highlighted in green and station frequency appears on the display. Manual tuning: Turn the “TUNE” knob briefly. Each time you turn the knob, the radio will step up or down to another fre- quency. Seek tuning: Push the “SEEK TRACK” button on either side. The radio will begin seeking up or down for a station of the nearest frequency and will stop on recep- tion. Each time you push the button, the stations will be searched out one after another.
164
26p126
26p142a
Scan tuning: Push the “SCAN” button or touch the “SCAN” switch (AM mode only) briefly. “SCAN” appears on the display. The radio will find the next station up or down the band, stay there for a few se- conds, and then scan again. To select a station, push the “SCAN” button a second time. Preset scan tuning: Push the “SCAN” button or touch the “SCAN” switch (AM mode only) and hold it until you hear a beep. “P. SCAN” appears on the display. The radio will tune in the next preset sta- tion up or down the band, stay there for a few seconds, and then move to the next preset station. To select a station, push the “SCAN” button a second time.
the program
(d) RDS (Radio Data System) (1) Program type Each time you touch the “TYPE A” or “TYPE "” switch, type changes as in the following: D ROCK D EASY LIS (Easy listening) D CLS JAZZ (Classical music and Jazz) D R&B (Rhythm and Blues) D INFORM (Information) D RELIGION D MISC D ALERT (Emergency message)
the
touch
(2) Traffic program: A station that regularly broadcasts traf- fic information is automatically located. When you “TRAF” switch, “TRAF SEEK” appears on the display and the radio will start seeking any traffic pro- gram station. If any traffic program station is not found, “NOTHING” appears and the previous mode returns. If the traffic program station is found, the name traffic program station is dis- played and “TRAF” is lit for a while until traffic announcement is received.
for
26p143a
When you touch the “TYPE A” or “TYPE "”, “TYPE SEEK” switch appears. Touch the switch and the system starts to seek the station in the relevant program type.
26p144a
(3) Radio text If the system receives a radio text from RDS station, “MSG” appears on the dis- play. Touch the “MSG” switch, and a text message is displayed on the screen.
165
Cassette tape player operation (Type 2 only)
26p145b
26p127
26p146a
In case a text message is not accepted in a screen, you can touch the “MSG” switch and hold it to display the rest of the message. When the system can show the station name, the display. Each time you touch the “MSG” switch, indication on the display changes from the band to the station name, a radio text in this order. After six seconds passes, indi- cation returns to the band.
“RDS” appears on
166
(a) Playing a cassette tape When you insert a cassette tape, the exposed tape should face to the right. The player will automatically start when you insert a cassette tape. At this time, “Tape” appears on the display. If a metal or chrome equivalent cassette tape the player will automatically recognize it and “MTL” appears on the display. To stop or eject the cassette tape, push the “
the cassette player,
” button.
is put
in
” switch. The “
If a cassette is already in the slot, push the “TAPE” button. Dolbyr Noise Reduction* feature: If you are listening to a tape that was recorded with Dolbyr B Noise Reduction, touch the ” switch will be “ highlighted the switch again to turn off Dolbyr B NR. The Dolby NR mode reduces tape noise by about 10 dB. For best sound reproduc- tion, play your tapes with this switch on or off according to the mode used for recording the tape.
in green. Touch
license
* Dolby noise reduction manufactured un- from Dolby Laboratories Li- der censing Corporation. the “DOLBY” and are trademarks of double−D symbol Dolby Laboratories Licensing Corporation.
26p147a
If a tape rewinds completely, the cassette player will stop and then play the same side. If a tape fast forwards completely, the cassette player will play the other side of the tape using the auto−reverse feature. Auto−reverse feature: After the cassette player reaches the end of a tape, it auto- matically reverses and begins to play the other side, regardless of whether the cas- sette was playing or fast forwarding.
(b) Manual program selection Reverse switch: You can reverse the tape by touching the “ A " ” switch. The dis- play will show the opposite direction after reversing the tape. Also if the tape reach- es the end of one side, it is automatically reversed to the other side. Fast forward and Rewind switches: You can fast forward or fast rewind by touch- ing the “AA” or “""” switch. To stop the tape while it is fast forward- ing, touch “""”, to stop the tape while it is rewinding, touch “AA”.
167
Touch the “SKIP” switch. The player will automatically skip any blank portions of 15
seconds or more and play the next pro- gram. To cancel it, touch the switch once again.26p148a
the switch again
(c) Automatic program selection “RPT” switch: The repeat feature auto- matically replays the current program. Touch the “RPT” switch while the program is playing. When the program ends, it will automatically be rewound and replayed. Touch the repeat feature. There must be at least 3 seconds of blank space between programs the repeat feature to work correctly.