- 2009 Toyota Highlander Owners Manuals
- Toyota Highlander Owners Manuals
- 2004 Toyota Highlander Owners Manuals
- Toyota Highlander Owners Manuals
- 2014 Toyota Highlander Owners Manuals
- Toyota Highlander Owners Manuals
- 2010 Toyota Highlander Owners Manuals
- Toyota Highlander Owners Manuals
- 2005 Toyota Highlander Owners Manuals
- Toyota Highlander Owners Manuals
- 2015 Toyota Highlander Owners Manuals
- Toyota Highlander Owners Manuals
- 2003 Toyota Highlander Owners Manuals
- Toyota Highlander Owners Manuals
- 2001 Toyota Highlander Owners Manuals
- Toyota Highlander Owners Manuals
- 2006 Toyota Highlander Owners Manuals
- Toyota Highlander Owners Manuals
- 2011 Toyota Highlander Owners Manuals
- Toyota Highlander Owners Manuals
- 2002 Toyota Highlander Owners Manuals
- Toyota Highlander Owners Manuals
- 2007 Toyota Highlander Owners Manuals
- Toyota Highlander Owners Manuals
- Download PDF Manual
-
The glass hatch is equipped with damper stays that hold the glass hatch in place. Observe the following precautions.Failure to do so may cause dam- age to the glass hatch damper stay, resulting in malfunction.
●Do not attach any foreign objects, such as strikers, plastic sheets, or adhesives to the damper stay rod.
●Do not touch the damper stay rod with
gloves or other fabric items.
●Do not attach any accessories other than genuine Toyota parts to the glass hatch.
●Do not place your hand or foot on the damper stay or apply lateral forces to it.
70
1-3. Adjustable components (seats, mirrors, steering wheel) Front seats
Manual seat
Seat position adjustment lever Seatback angle adjustment lever Vertical height adjustment lever (driver’s side only) Seat cushion (front) angle adjustment knob (driver’s side only) Pull up the lever until the lock is completely released.
71
1-3. Adjustable components (seats, mirrors, steering wheel)
Power seat
Seat position adjustment switch Seatback angle adjustment switch Seat cushion (front) angle adjustment switch (driver’s side only) Vertical height adjustment switch (driver’s side only) Driver’s seat leg support adjustment switch (if equipped) Seat lumbar support adjustment switch (driver’s side only)
Active head restraints
When the occupant’s lower back presses against the seatback during a rear-end collision, the head restraint moves slightly for- ward and upward to help reduce the risk of whiplash to the seat occupant.
72
1-3. Adjustable components (seats, mirrors, steering wheel)
■Active head restraints
Even small forces applied to the seatback may cause the head restraint to move. Pushing up a locked head restraint forcibly may cause the inner struc- ture of the head restraint to appear. This does not indicate a problem.
Inner structure
During rear-end collision
CAUTION
■Seat adjustment
●Be careful that the seat does not hit passengers or luggage. ●Do not recline the seat more than necessary when the vehicle is in motion
to reduce the risk of sliding under the lap belt. If the seat is too reclined, the lap belt may slide past the hips and apply restraint forces directly to the abdomen or your neck may contact the shoulder belt, increasing the risk of death or serious injury in the event of an accident.
●Manual seat only: After adjusting the seat, make sure that the seat is
locked in position.
73
1-3. Adjustable components (seats, mirrors, steering wheel) Rear seats
■ Second seats
Seat position adjustment lever Seatback angle adjustment lever Pull up the lever until the lock is completely released.
■ Third seats
The third seats do not have a seat adjustment function.
Moving a second seat for third seat access
■ Getting in the vehicle (right side only)
Pull up the lever and fold down the seatback. The seat will slide forward. Move the seat to the front-most position.
74
1-3. Adjustable components (seats, mirrors, steering wheel)
■ Getting out of the vehicle (right side only)
Lift the lever on the side of the seatback and fold down the seat- back. The seat will slide forward. Move the seat to the front-most position.
■ After passengers have entered/exited the vehicle
Lift up the seatback and slide the seat backward until it locks.
Folding down the second seats
■ Before folding down the second seats STEP 1
Stow the rear center seat belt buckle.
STEP 2
Pass the outer seat belts through the seat belt hangers and secure the seat belt plates.
This prevents the shoulder belt from being damaged. Make sure that the seat belts are removed from the hangers before using them.
75
1-3. Adjustable components (seats, mirrors, steering wheel)
■ Folding down the second seats
From inside
From outside (if equipped)
Pull the lever to unlock the seat- back and then fold the seatback down.
Pull the lever. L: Left side and center second
seats
R:Right side second seat
■ After folding down the second seats
Slide the folded second seats to the rear-most position.
76
1-3. Adjustable components (seats, mirrors, steering wheel)
Folding down the third seats
■ Before folding down the third seats STEP 1
Stow the third seat belt buckles.
STEP 2
■ Folding down the third seats
Pass the seat belts through the seat belt hangers.
This helps to prevent the shoulder belts from being damaged. Make sure that the seat belts are removed from the hangers before using them.
While pulling the straps, fold down the seatbacks.
The head restraints will fold down automatically when the straps are pulled.
77
1-3. Adjustable components (seats, mirrors, steering wheel)
■ Returning the third seats STEP 1
Pull the straps and raise the seatbacks until they lock.
STEP 2
Raise the head restraints.
Removing the second center seat
■ Before removing the second center seat STEP 1
Take out the side table from the console box.
STEP 2
Lower the second center seat head restraint to the lowest position. (→P. 82)
78
1-3. Adjustable components (seats, mirrors, steering wheel)
■ Removing the second center seat STEP 1
Fold down the second center seatback while pulling the seat- back lock release strap.
STEP 2
STEP 3
Pull the lock release lever to remove the second center seat.
Stow the second center seat in the console box.
STEP 4
Make sure that the seat is securely locked in position and close the console box door.
79
1-3. Adjustable components (seats, mirrors, steering wheel)
Installing the second center seat
■ Before installing the second center seat STEP 1
Take out the second center seat from the console box.
STEP 2
Remove the side table, if used, from the second seat. (→P. 387)
■ Installing the second center seat STEP 1
Fully engage the front pins with the hooks, and swing the second center seat downward. Push down on the second center seat to engage the rear pin locks.
Unfold the seatback and lock it.
Stow the side table in the console box.
STEP 2
80
1
1-3. Adjustable components (seats, mirrors, steering wheel)
CAUTION
■When adjusting a rear seat or removing the second center seat
●Be careful that the seat does not hit passengers or luggage. ●Do not recline the seat more than necessary when the vehicle is in motion to reduce the risk of sliding under the lap belt. If the seat is too reclined, the lap belt may slide past the hips and apply restraint forces directly to the abdomen or your neck may contact the shoulder belt, increasing the risk of death or serious injury in the event of an accident.
●Be careful not to get your hands or feet caught in the seat.
■Before folding down the rear seats
Do not fold down a rear seat when there are passengers sitting in the rear seats or when there is luggage placed on the rear seats.
■After adjusting the seats
Observe the following precautions. Failure to do so may result in death or serious injury. ●Make sure that the seat and seatback are securely locked in position by
lightly rocking them back and forth.
●Second center seat: Make sure the seat is locked in place by trying to
shake the seatback and lift up the rear part of the seat cushion.
●Check that the seat belts are not twisted or caught under the seat.
■Caution while driving
Keep the console box closed. Injuries may result in the event of an accident or sudden braking.
NOTICE
■When folding down the second seats
Do not fold the seatback forward with the luggage cover hooks attached.
■Removed second center seat
Avoid putting heavy loads on the seat. The metallic seat pins may be dam- aged, and you may be unable to correctly reinstall the seat.
81
1-3. Adjustable components (seats, mirrors, steering wheel) Head restraints
Head restraints are provided for all seats.
Front seats
Vertical adjustment
Up Pull the head restraints up. Down Push the head restraint down while pushing the lock release button.
Angle adjustment (if equipped)
Up Pull the head restraints up. Down Push the head restraint down while pushing the lock release button. When using the center seat, raise the head restraint from the stowed position.
Lock release button
Second seats
Lock release buttons
82
1-3. Adjustable components (seats, mirrors, steering wheel)
■ When using the third seat head restraints
To use To fold
■Adjusting the height of the head restraints (except second center seat
and third seats)
Make sure that the head restraints are adjusted so that the center of the head restraint is closest to the top of your ears.
■Adjusting the rear center seat head restraint
Always raise the head restraint one level from the stowed position when using.
■Removing the front and second seat outer head restraints
Pull the head restraint up while pushing the lock release button.
83
1-3. Adjustable components (seats, mirrors, steering wheel)
■Installing the front and second seat outer head restraints
Align the head restraint with the installa- tion holes and push it down to the lock position. Press and hold the lock release button when lowering the head restraint.
CAUTION
■Head restraint precautions
Observe the following precautions regarding the head restraints. Failure to do so may result in death or serious injury. ●Use the head restraints designed for each respective seat. ●Adjust the head restraints to the correct position at all times. ●After adjusting the head restraints, push down on them and make sure
they are locked in position.
●Do not drive with the head restraints removed.
84
1-3. Adjustable components (seats, mirrors, steering wheel) Seat belts
Make sure that all occupants are wearing their seat belts before driv- ing the vehicle. ■ Correct use of the seat belts
● Extend the shoulder belt so that it comes fully over the shoulder, but does not come into contact with the neck or slide off the shoul- der.
● Position the lap belt as low
as possible over the hips.
● Adjust the position of the seatback. Sit up straight and well back in the seat. ● Do not twist the seat belt.
■ Fastening and releasing the seat belt
Fastening the belt Push the tab into the buckle until a clicking sound is heard. Releasing the belt Press the release button.
Release button
85
1-3. Adjustable components (seats, mirrors, steering wheel)
■ Adjusting the height of the belt (front seats)
Down Up Move the height adjuster up and down as needed until you hear a click.
Seat belt pretensioners (front seats)
The pretensioner helps the seat belt to quickly restrain the occu- pant by retracting the seat belt when the vehicle is subjected to certain types of severe frontal collision or a vehicle rollover.
The pretensioner may not acti- vate in the event of a minor frontal impact, a side impact or a rear impact.
■Emergency locking retractor (ELR)
The retractor will lock the belt during a sudden stop or on impact. It may also lock if you lean forward too quickly. A slow, easy motion will allow the belt to extend so that you can move around fully.
■Automatic locking retractor (ALR)
When a passenger's shoulder belt is completely extended and then retracted even slightly, the belt is locked in that position and cannot be extended. This feature is used to hold the child restraint system (CRS) firmly. To free the belt again, fully retract the belt and then pull the belt out once more. (→P. 144)
86
1
1-3. Adjustable components (seats, mirrors, steering wheel)
■Pregnant women
Obtain medical advice and wear the seat belt in the proper way. (→P. 85) Women who are pregnant should position the lap belt as low as possible over the hips in the same manner as other occu- pants. Extend the shoulder belt com- pletely over the shoulder and position the belt across the chest. Avoid belt contact over the rounding of the abdominal area. If the seat belt is not worn properly, not only a pregnant woman, but also the fetus could suffer death or serious injury as a result of sudden braking or a collision.
■People suffering illness
Obtain medical advice and wear the seat belt in the proper way.
■When not using the rear seat belts
Second seat belts
Pass the outer seat belts through the seat belt hangers and secure the seat belt plates to prevent the shoulder belts from being damaged.
Third seat belts
Pass the outer seat belts through the seat belt hangers to help prevent the shoulder belts from being damaged.
87
1-3. Adjustable components (seats, mirrors, steering wheel)
■Child seat belt usage
The seat belts of your vehicle were principally designed for persons of adult size. ●Use a child restraint system appropriate for the child, until the child becomes large enough to properly wear the vehicle's seat belt. (→P. 139) ●When the child becomes large enough to properly wear the vehicle's seat
belt, follow the instructions on P. 85 regarding seat belt usage. ■Replacing the belt after the pretensioner has been activated
If the vehicle is involved in multiple collisions, the pretensioner will activate for the first collision, but will not activate for the second or subsequent colli- sions.
■Seat belt extender
If your seat belts cannot be fastened securely because long enough, a personalized seat belt extender is available from your Toyota dealer free of charge.
they are not
CAUTION
Observe the following precautions to reduce the risk of injury in the event of sudden braking, sudden swerving or an accident. Failure to do so may cause death or serious injury. ■Wearing a seat belt
●Ensure that all passengers wear a seat belt. ●Always wear a seat belt properly. ●Each seat belt should be used by one person only. Do not use a seat belt
for more than one person at once, including children.
●Toyota recommends that children be seated in the rear seat and always
use a seat belt and/or an appropriate child restraint system.
88
1-3. Adjustable components (seats, mirrors, steering wheel)
CAUTION
●Do not recline the seat any more than necessary to achieve a proper seat- ing position. The seat belt is most effective when the occupants are sitting up straight and well back in the seats.
●Do not wear the shoulder belt under your arm. ●Always wear your seat belt low and snug across your hips.
■Adjustable shoulder anchor
Always make sure the shoulder belt is positioned across the center of your shoulder. The belt should be kept away from your neck, but not falling off your shoulder. Failure to do so could reduce the amount of protection in an accident and cause death or serious injuries in the event of a sudden stop, sudden swerve or accident. (→P. 86)
■Seat belt pretensioners
●Do not place anything, such as a cushion, on the front passenger's seat. Doing so will disperse the passenger's weight, which prevents the sensor from detecting the passenger's weight properly. As a result, the seat belt pretensioner for the front passenger's seat may not activate in the event of a collision.
●If the pretensioner has activated, the SRS warning light will come on. In that case, the seat belt cannot be used again and must be replaced at your Toyota dealer.
■Child restraint lock function belt precaution
Do not allow children to play with the child restraint lock function belt. If the belt becomes twisted around a child’s neck, it will not be possible to pull the belt out leading to choking or other serious injuries that could result in death. If this occurs and the buckle cannot be unfastened, scissors should be used to cut the belt.
89
1-3. Adjustable components (seats, mirrors, steering wheel)
CAUTION
■Seat belt damage and wear
●Do not damage the seat belts by allowing the belt, plate, or buckle to be
jammed in the door.
●Inspect the seat belt system periodically. Check for cuts, fraying, and loose parts. Do not use a damaged seat belt until it is replaced. Damaged seat belts cannot protect an occupant from death or serious injury.
●Ensure that the belt and tab are locked and the belt is not twisted.
If the seat belt does not function correctly, immediately contact your Toyota dealer.
●Replace the seat assembly, including the belts, if your vehicle has been
involved in a serious accident, even if there is no obvious damage.
●Do not attempt to install, remove, modify, disassemble or dispose of the seat belts. Have any necessary repairs carried out by your Toyota dealer. Inappropriate handling of the pretensioner may prevent it from operating properly resulting in death or serious injury.
■Using a seat belt extender
●Do not wear the seat belt extender if you can fasten the seat belt without
the extender.
●Do not use the seat belt extender when installing a child restraint system because the belt will not securely hold the child restraint system, increas- ing the risk of death or serious injury in the event of an accident.
●The personalized extender may not be safe on another vehicle, when used by another person, or at a different seating position other than the one originally intended.
NOTICE
■When using a seat belt extender
When releasing the seat belt, press on the buckle release button on the extender, not on the seat belt. This helps prevent damage to the vehicle interior and the extender itself.
90
1-3. Adjustable components (seats, mirrors, steering wheel) Steering wheel
The steering wheel can be adjusted to a comfortable position.
STEP 1
STEP 2
Hold the steering wheel and press the lever down.
Adjust to the ideal position by moving the steering wheel horizontally and vertically.
After adjustment, pull the lever up the steering wheel.
to secure
CAUTION
■Caution while driving
Do not adjust the steering wheel while driving. Doing so may cause the driver to mishandle the vehicle and an accident, resulting in death or serious injury.
■After adjusting the steering wheel
Make sure that the steering wheel is securely locked. Otherwise, the steering wheel may move suddenly, possibly causing an accident and resulting in death or serious injury.
91
1-3. Adjustable components (seats, mirrors, steering wheel) Anti-glare inside rear view mirror
Glare from the headlights of vehicles behind can be reduced by using the following functions. ■ Manual anti-glare inside rear view mirror
Normal position Anti-glare position
■ Auto anti-glare inside rear view mirror
In automatic mode, sensors are used to detect the headlights of vehicles behind and the reflected light is automatically reduced. Type A
Turns automatic mode on/off
time
The indicator comes on when automatic mode is turned on. Vehicles without smart key system: The mirror will revert to auto- matic mode each the engine switch is turned to the “ON” position. Vehicles with smart key sys- tem: The mirror will revert to auto- the matic mode each “ENGINE START STOP” switch is turned to IGNITION ON mode.
time
92
1
1-3. Adjustable components (seats, mirrors, steering wheel)
Type B
Turns automatic mode on/off
time
The indicator comes on when automatic mode is turned on. Vehicles without smart key system: The mirror will revert to auto- matic mode each the engine switch is turned to the “ON” position. Vehicles with smart key sys- tem: The mirror will revert to auto- the matic mode each “ENGINE START STOP” switch is turned to IGNITION ON mode.
time
Adjusting the height of the rear view mirror
Adjust the height of the rear view mirror by moving it up and down.
93
1-3. Adjustable components (seats, mirrors, steering wheel)
■To prevent sensor error (vehicles with auto anti-glare inside rear view
mirror)
Type A
Type B
To ensure that the sensors operate prop- erly, do not touch or cover them.
To ensure that the sensors operate prop- erly, do not touch or cover them.
CAUTION
■Caution while driving
Do not adjust the position of the mirror while driving. Doing so may lead to mishandling of the vehicle and an accident, resulting in death or serious injury.
94
1-3. Adjustable components (seats, mirrors, steering wheel) Outside rear view mirrors
Mirror angle can be adjusted using the switches.
STEP 1
Select a mirror to adjust.
Left Right
STEP 2
Adjust the mirror.
Up Right Down Left
95
1-3. Adjustable components (seats, mirrors, steering wheel)
Folding back the mirrors
Push backward to fold the mir- rors.
■The outside rear view mirrors can be operated when
Vehicles without smart key system
The engine switch is in the “ACC” or “ON” position.
Vehicles with smart key system
The “ENGINE START STOP” switch is in ACCESSORY or IGNITION ON mode.
■When the mirrors are fogged up (vehicles with outside rear view mirror
defoggers) Turn on the mirror defoggers to defog the mirrors. (→P. 269)
96
1
1-3. Adjustable components (seats, mirrors, steering wheel)
CAUTION
■When driving the vehicle
Observe the following precautions while driving. Failing to do so may result in loss of control of the vehicle and cause an acci- dent, resulting in death or serious injury. ●Do not adjust the mirrors while driving. ●Do not drive with the mirrors folded back. ●Both the driver and passenger side mirrors must be extended and properly
adjusted before driving.
■When the mirror defoggers are operating (vehicles with outside rear
view mirror defoggers) Do not touch the rear view mirror surfaces, as they can become very hot and burn you.
97
1-4. Opening and closing the windows and moon roof Power windows
The power windows can be opened and closed using the following switches.
Closing One-touch closing (driver’s window only)* Opening One-touch opening (driver’s window only)*
*: Pressing
the switch
the opposite direction will stop win- dow travel partway.
in
Press the switch down to lock the passenger window switches. Use this switch to prevent chil- dren from accidentally opening or closing a passenger window.
Lock switch
98
1
1-4. Opening and closing the windows and moon roof
■The power windows can be operated when
Vehicles without smart key system
The engine switch is in the “ON” position.
Vehicles with smart key system
The “ENGINE START STOP” switch is in IGNITION ON mode. ■Operating the power windows after turning the engine off
Vehicles without smart key system
The power windows can be operated for approximately 45 seconds after the engine switch is turned to the “ACC” or “LOCK” position. They cannot, how- ever, be operated once either front door is opened.
Vehicles with smart key system
The power windows can be operated for approximately 45 seconds after the “ENGINE START STOP” switch is turned to ACCESSORY mode or turned OFF. They cannot, however, be operated once either front door is opened.
■Jam protection function (driver’s window only)
If an object becomes caught between the window and the window frame, window travel is stopped and the window is opened slightly.
CAUTION
■Closing the windows
Observe the following precautions. Failing to do so may result in death or serious injury. ●Check to make sure that all passengers do not have any part of their body
in a position where it could be caught when a window is being operated.
●Do not allow children to operate the power windows.
Closing a power window on someone can cause serious injury, and in some instances, even death.
99
1-4. Opening and closing the windows and moon roof
CAUTION
■Jam protection function (driver’s window only)
●Never try jamming any part of your body to activate the jam protection
function intentionally.
●The jam protection function may not work if something gets caught just
before the window fully closes.
●The jam protection function may not work depending on the shape of the
object that is caught. Be careful not to catch fingers or anything else.
100
1
1-4. Opening and closing the windows and moon roof Moon roof∗
Use the overhead switches to open, close, and tilt the moon roof up and down. ■ Opening and closing
■ Tilting up and down
Open The moon roof stops slightly before the fully opened posi- tion. Move again to fully open. Close Move the switch forward to stop the moon roof partway.
the switch backward
Tilt up Tilt down Push the switch in either direc- tion to stop the moon roof part- way.
∗: If equipped 101
1-4. Opening and closing the windows and moon roof
■The moon roof can be operated when
Vehicles without smart key system
The engine switch is in the “ON” position.
Vehicles with smart key system
The “ENGINE START STOP” switch is in IGNITION ON mode.
■Operating the moon roof after turning the engine off
Vehicles without smart key system
The moon roof can be operated for approximately 45 seconds after the engine switch is turned to the “ACC” or “LOCK” position. It cannot, however, be operated once either front door is opened.
Vehicles with smart key system
The moon roof can be operated for approximately 45 seconds after the “ENGINE START STOP” switch is turned to ACCESSORY mode or turned OFF. They cannot, however, be operated once either front door is opened.
■Jam protection function
If an object is detected between the moon roof and the frame while closing or tilting down, travel is stopped and the moon roof opens slightly.
■To reduce wind noise
Drive with the moon roof opened to slightly before the fully open position as driving with the moon roof opened fully will cause wind noise.
102
STEP 2
STEP 3
STEP 2
STEP 3
STEP 4
1-4. Opening and closing the windows and moon roof
■When the moon roof does not close normally
Perform the following procedure: ●If the moon roof closes but then re-opens slightly STEP 1
Stop the vehicle. Press and hold the “SLIDE (open/close)” switch in the close posi- tion.*1
The moon roof will close, reopen and pause for approximately 10
seconds.*2 Then it will close again, tilt up and pause for approxi- mately 1 second. Finally, it will tilt down, open and close. Check to make sure that the moon roof is completely closed and then release the switch.●If the moon roof tilts down but then tilts back up STEP 1
Stop the vehicle. Press and hold the “UP” switch*1 until the moon roof moves into the tilt up position and stops. Release the “UP” switch once and then press and hold the “UP” switch again.*1
The moon roof will pause for approximately 10 seconds in the tilt up position.*2 Then it will adjust slightly and pause for approximately 1
second. Finally, it will tilt down, open and close. Check to make sure that the moon roof is completely closed and then release the switch. *1: If the switch is released at the incorrect time, the procedure willhave to be performed again from the beginning.
*2: If the switch is released after the above mentioned 10 second pause, automatic operation will be disabled. In that case, press and hold the “SLIDE (open/close)” switch in the close position or the “UP” switch, and the moon roof will tilt up and pause for approximately 1 second. Then it will tilt down, open and close. Check to make sure that the moon roof is completely closed and then release the switch.
If the moon roof does not fully close even after performing the above proce- dure correctly, have the vehicle inspected by your Toyota dealer.
103
1-4. Opening and closing the windows and moon roof
■Sunshade
The sunshade can be opened and closed manually. However, the sunshade will open automatically when the moon roof is opened.
■Moon roof open reminder function (vehicles with multi-information dis-
play)
Vehicles without smart key system
An alarm will sound when the driver’s door is opened with the moon roof not fully closed and the engine switch OFF.
Vehicles with smart key system
An alarm will sound when the driver’s door is opened with the moon roof not fully closed and the “ENGINE START STOP” switch OFF.
CAUTION
■Opening the moon roof
Observe the following precautions. Failure to do so may cause death or serious injury. ●Do not allow any passengers to put their hands or heads outside the vehi-
cle while it is moving.
●Do not sit on top of the moon roof.
■Closing the moon roof
Observe the following precautions. Failing to do so may result in death or serious injury. ●Check to make sure that all passengers do not have any part of their bod- ies in a position where it could be caught when the moon roof is being operated.
●Do not allow children to operate the moon roof.
Closing the moon roof on someone can cause death or serious injury.
104
1-4. Opening and closing the windows and moon roof
CAUTION
■Jam protection function
●Never try jamming any part of your body to activate the jam protection
function intentionally.
●The jam protection function may not work if something gets caught just
before the moon roof fully closes.
●The jam protection function may not work depending on the shape of the
object that is caught. Be careful not to catch fingers or anything else.
105
1-5. Refueling Opening the fuel tank cap
Perform the following steps to open the fuel tank cap. ■ Before refueling the vehicle
Vehicles without smart key system
Turn the engine switch OFF and ensure that all the doors and windows are closed.
Vehicles with smart key system
Turn the “ENGINE START STOP” switch OFF and ensure that all the doors and windows are closed.
■ Opening the fuel tank cap STEP 1
Open the fuel filler door.
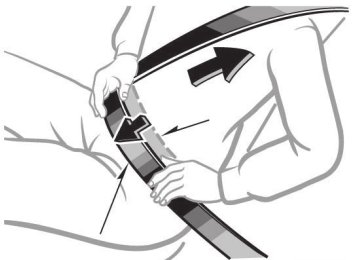
STEP 2
Turn the fuel tank cap slowly to open.
106
1-5. Refueling
STEP 3
Hang the fuel tank cap on the back of the fuel filler door.
Closing the fuel tank cap
When replacing the fuel tank cap, turn it until a clicking sound is heard.
Once the cap is released, it will turn slightly in the opposite direc- tion.
■Fuel types
Use unleaded gasoline. (Octane rating 87 [Research Octane Number 91] or higher)
■Fuel tank capacity
Approximately 19.2 gal. (72.5 L, 15.9 Imp. gal.)
107
1-5. Refueling
CAUTION
■Refueling the vehicle
Observe the following precautions while refueling the vehicle. Failure to do so may result in death or serious injury. ●Touch the vehicle or some other metal surface to discharge any static
electricity. Sparks resulting from discharging static electricity may cause the fuel vapors to ignite.
●Always hold the grips on the fuel tank cap and turn it slowly to remove it. A whooshing sound may be heard when the fuel tank cap is loosened. Wait until the sound cannot be heard before fully removing the cap. In hot weather, pressurized fuel may spray out of the filler neck and cause injury.
●Do not allow anyone that has not discharged static electricity from their
bodies to come close to an open fuel tank.
●Do not inhale vaporized fuel.
Fuel contains substances that are harmful if inhaled.
●Do not smoke while refueling the vehicle.
Doing so may cause the fuel to ignite and cause a fire.
●Do not return to the vehicle or touch any person or object that is statically
charged. This may cause static electricity to build up, resulting in a possible ignition hazard.
■When replacing the fuel cap
Do not use anything but a genuine Toyota fuel tank cap designed for your vehicle. Doing so may cause a fire or other incident which may result in death or serious injury.
108
1-5. Refueling
NOTICE
■Refueling
Do not spill fuel during refueling. Doing so may damage the vehicle, such as causing the exhaust systems to operate abnormally or damaging fuel system components or the vehicle's painted surface.
109
1-6. Theft deterrent system Engine immobilizer system∗
The vehicle's keys have built-in transponder chips that prevent the engine from starting if the key has not been previously registered in the vehicle's on-board computer. Never leave the keys inside the vehicle when you leave the vehicle.
Vehicles without navigation system
from
indicator
Vehicles without smart key system: The light flashes after the key has been removed the engine switch to indicate that the sys- tem is operating. The indicator light stops flash- ing after the registered key has been inserted into the engine switch to indicate that the system has been can- celed. Vehicles with smart key sys- tem: The indicator light flashes after the “ENGINE START STOP” switch has been turned OFF to indicate that the sys- tem is operating. The indicator light stops flash- ing after the “ENGINE START STOP” switch has been turned to ACCESSORY or IGNITION ON mode to indicate that the system has been canceled.
110
∗: If equipped
1
1-6. Theft deterrent system
Vehicles with navigation system
from
indicator
Vehicles without smart key system: The light flashes after the key has been removed the engine switch to indicate that the sys- tem is operating. The indicator light stops flash- ing after the registered key has been inserted into the engine switch to indicate that the system has been can- celed. Vehicles with smart key sys- tem: The indicator light flashes after the “ENGINE START STOP” switch has been turned OFF to indicate that the sys- tem is operating. The indicator light stops flash- ing after the “ENGINE START STOP” switch has been turned to ACCESSORY or IGNITION ON mode to indicate that the system has been canceled.
111
1-6. Theft deterrent system
■System maintenance
The vehicle has a maintenance-free type engine immobilizer system.
■Conditions that may cause the system to malfunction
●If the key is in contact with a metallic object ●If the key is in close proximity to or touching a key with the security sys-
tem (key with a built-in transponder chip) of another vehicle
■Certifications for the engine immobilizer system
●For vehicles sold in the U.S.A.
Vehicles without smart key system
FCC ID: MOZRI-21BTY
Vehicles with smart key system
FCC ID: NI4TMIMB-1
This device complies with Part 15 of the FCC Rules. Operation is subject to the following two conditions: (1) this device may not cause harmful interfer- ence, and (2) this device must accept any interference received, including interference that may cause undesired operation. FCC WARNING: Changes or modifications not expressly approved by the party responsible for compliance could void the user's authority to operate the equipment. ●For vehicles sold in Canada Operation is subject to the following two conditions: (1) this device may not cause interference, and (2) this device must accept any interference, includ- ing interference that may cause undesired operation of the device.NOTICE
■To ensure the system operates correctly
Do not modify or remove the system. If modified or removed, the proper operation of the system cannot be guar- anteed.
112
1
1-6. Theft deterrent system Alarm∗
The system sounds the alarm and flashes the lights when forcible entry is detected. ■ Triggering of the alarm
The alarm is triggered in the following situations when the alarm is set. ● A locked door is unlocked or opened in any way other than using the entry function (vehicles with smart key system) or wireless remote control or mechanical key. (The doors will lock again automatically.)
● The hood is opened. ● The locked glass hatch is opened in any way other than using the wireless remote control door lock function or entry function (vehicles with smart key system).
● The battery is reconnected.
■ Setting the alarm system
Vehicles without navigation system
Close the doors, glass hatch and hood, and lock all the doors. The system will be set automatically after 30 sec- onds. The light changes from being on to flashing when the system is set.
indicator
∗: If equipped 113
1-6. Theft deterrent system
Vehicles with navigation system
Close the doors, glass hatch and hood, and lock all the doors. The system will be set automatically after 30 sec- onds. The light changes from being on to flashing when the system is set.
indicator
■ Deactivating or stopping the alarm
● Unlock the doors. ● Vehicles without smart key system: Turn the engine switch to the “ON” position, or start the engine. (The alarm will be deac- tivated or stopped after a few seconds.)
● Vehicles with smart key system: Turn the “ENGINE START STOP” switch to IGNITION ON mode, or start the engine. (The alarm will be deactivated or stopped after a few sec- onds.)
● Open the glass hatch using the entry function (vehicles with smart key system) or wireless remote control (vehicles with- out smart key system).
■System maintenance
The vehicle has a maintenance-free type alarm system.
■Items to check before locking the vehicle
To prevent unexpected triggering of the alarm and vehicle theft, make sure of the following. ●Nobody is in the vehicle. ●The windows and moon roof are closed before the alarm is set. ●No valuables or other personal items are left in the vehicle.
114
1-6. Theft deterrent system
■Triggering of the alarm
The alarm may be triggered in the following situations. (Stopping the alarm deactivates the alarm system.)
●A person inside the vehicle opens a door or the hood when the vehicle is locked.
●The battery is recharged or replaced
when the vehicle is locked.
■Panic mode
→P. 48
■When the battery is disconnected Be sure to cancel the alarm system. If the battery is disconnected before canceling the alarm, the system may be triggered when the battery is reconnected.
■Alarm-operated door lock
●When the alarm is operating, the doors are locked automatically to pre-
vent intruders.
●Do not leave the key inside the vehicle when the alarm is operating, and make sure the key is not inside the vehicle when recharging or replacing the battery.
■When using the key to unlock the doors
Deactivate the alarm.
115
1-6. Theft deterrent system
NOTICE
■To ensure the system operates correctly
Do not modify or remove the system. If modified or removed, the proper operation of the system cannot be guar- anteed.
116
1-6. Theft deterrent system Theft prevention labels (U.S.A.)
These labels are attached to the vehicle to reduce vehicle theft by facilitating the tracing and recovery of parts from sto- len vehicles. Do not remove under penalty of law.
117
1-7. Safety information Correct driving posture
Drive in a good posture as follows:
and to
Sit upright and well back in the seat. (→P. 71) Adjust the position of the seat forward or backward to ensure the pedals can be reached easily the extent depressed required. (→P. 71) Adjust the seatback so that the controls are easily oper- able. Adjust the tilt and telescopic positions of the steering wheel downward so the air- bag is facing your chest. (→P. 91) Lock the head restraint in place with the center of the head restraint closest to the top of your ears. (→P. 82) Wear the seat belt correctly. (→P. 85)
118
1-7. Safety information
CAUTION
■While driving
●Do not adjust the position of the driver's seat while driving.
Doing so could cause the driver to lose control of the vehicle.
●Do not place a cushion between the driver or passenger and the seatback. A cushion may prevent correct posture from being achieved, and reduce the effectiveness of the seat belt and head restraint, increasing the risk of death or serious injury to the driver or passenger.
●Do not place anything under the front seats.
Objects placed under the front seats may become jammed in the seat tracks and stop the seat from locking in place. This may lead to an acci- dent. The adjustment mechanism may also be damaged.
■Adjusting the seat position
●Take care when adjusting the seat position to ensure that other passen-
gers are not injured by the moving seat.
●Do not put your hands under the seat or near the moving parts to avoid
injury. Fingers or hands may become jammed in the seat mechanism.
119
1-7. Safety information SRS airbags
The SRS airbags inflate when the vehicle is subjected to certain types of severe impacts that may cause significant injury to the occupants. They work together with the seat belts to help reduce the risk of death or serious injury.
Front airbags Driver airbag/front passenger airbag Can help protect the head and chest of the driver and front pas- senger from impact with interior components. Driver knee airbag Can help provide driver protection.
Side and curtain shield airbags Side airbags Can help protect the torso of the front seat occupants. Curtain shield airbags Can help protect primarily the head of occupants in the outer seats.
120
Airbag system components
1-7. Safety information
Curtain shield airbags Side airbags Front passenger airbag Side and curtain shield air- bag sensors Door sensors Front airbag sensors Front passenger’s seat belt buckle switch Curtain shield airbag sen- sors “AIR BAG ON” and “AIR BAG OFF” indicator lights
SRS warning light Driver airbag Driver’s seat position sen- sor Driver’s seat belt buckle switch Driver knee airbag Airbag sensor assembly Occupant detection system (ECU and sensors)
Your vehicle is equipped with ADVANCED AIRBAGS designed based on US motor vehicle safety standards (FMVSS208). The airbag sys- tem controls airbag deployment power for the driver and front pas- senger. The driver airbag system consists of the driver seat's position sensor etc. The front passenger's airbag system consists of the front passenger occupant classification sensor etc.
121
1-7. Safety information
The main SRS airbag system components are shown above. The SRS airbag system is controlled by the airbag sensor assembly. The airbag sensor assembly consists of a safing sensor and an airbag sensor. In certain types of severe frontal or side impacts, the SRS airbag sys- tem triggers the airbag inflators. A chemical reaction in the inflators quickly fills the airbags with non-toxic gas to help restrain the motion of the occupants.
■SRS warning light
This warning light system monitors the airbag sensor assembly, front airbag sensors, side and curtain shield airbag sensor assemblies, curtain shield air- bag sensor assemblies, door sensors, driver's seat position sensor, driver's seat belt buckle switch, front passenger occupant classification system, “AIR BAG ON” and “AIR BAG OFF” indicator lights, front passenger’s seat belt buckle switch, front seat belt pretensioner assemblies, inflators, intercon- necting wiring and power sources. (→P. 509)
■If the SRS airbags deploy (inflate)
●Bruising and slight abrasions may result from contact with a deploying
(inflating) SRS airbag.
●A loud noise and white powder will be emitted. ●Parts of the airbag module (steering wheel hub, airbag cover and inflator) as well as the front seats, and parts of the front and rear pillars and roof side rail, may be hot for several minutes. The airbag itself may also be hot.
●The windshield may crack.
122
1
1-7. Safety information
■SRS airbag deployment conditions (front airbags)
●The SRS front airbags will deploy in the event of an impact that exceeds the set threshold level (the level of force corresponding to an approxi- mately 12 - 18 mph [20 - 30 km/h] frontal collision with a fixed wall that does not move or deform). However, this threshold velocity will be considerably higher if the vehicle strikes an object, such as a parked vehicle or sign pole, which can move or deform on impact, or if the vehicle is involved in an underride collision (e.g. a collision in which the front of the vehicle “underrides”, or goes under, the bed of a truck, etc.).
●It is possible that in some collisions where the forward deceleration of the vehicle is very close to the designed threshold level, the SRS front air- bags and the seat belt pretensioners may not activate together.
●The SRS front passenger airbag will not activate if there is no passenger sitting in the front passenger seat. However, the front passenger airbag may deploy if luggage is put in the seat, or the seat belt is fastened, even if the seat is unoccupied. (→P. 132)
■SRS airbag deployment conditions (SRS side airbags)
●The SRS side airbags will deploy in the event of an impact that exceeds the set threshold level (the level of force corresponding to the impact force produced by an approximately 3300 lb. [1500 kg] vehicle colliding with the vehicle cabin from a direction perpendicular to the vehicle orien- tation at an approximately speed of 12 - 18 mph [20 - 30 km/h]).
●The SRS side airbag on the passenger seat will not activate if there is no passenger sitting in the front passenger seat. However, the side airbag on the passenger seat may deploy if luggage is put in the seat, or the seat belt is fastened, even if the seat is unoccupied. (→P. 132)
■SRS airbag deployment conditions (SRS curtain shield airbags)
The SRS curtain shield airbags will deploy in the event of vehicle rollover or an impact that exceeds the set threshold level (the level of force correspond- ing to the impact force produced by an approximately 3300 lb. [1500 kg] vehicle colliding with the vehicle cabin from a direction perpendicular to the vehicle orientation at an approximately speed of 12 - 18 mph [20 - 30 km/h]).
123
1-7. Safety information
■Conditions under which the SRS airbags may deploy (inflate), other
than a collision The SRS front airbags may also deploy if a serious impact occurs to the underside of your vehicle. Some examples are shown in the illustration.
●Hitting a curb, edge of pavement or
hard surface
●Falling into or jumping over a deep hole ●Landing hard or vehicle falling
The SRS curtain shield airbags may also deploy under the situation shown in the illustration.
●The angle of vehicle tip-up is marginal. ●The vehicle skids and hits a curb stone.
■Types of collisions that may not deploy the SRS airbag (front airbags) The SRS front airbags are generally not designed to inflate if the vehicle is involved in a side or rear collision, if it rolls over, or if it is involved in a low- speed frontal collision. But, whenever a collision of any type causes suffi- cient forward deceleration of the vehicle, deployment of the SRS front air- bags may occur.
●Collision from the side ●Collision from the rear ●Vehicle rollover
124
1-7. Safety information
■Types of collisions that may not deploy the SRS airbag
(side airbags and curtain shield airbags) The SRS side airbag and curtain shield airbag system may not activate if the vehicle is subjected to a collision from the side at certain angles, or a colli- sion to the side of the vehicle body other than the passenger compartment.
●Collision from the side to the vehicle body other than the passenger com- partment
●Collision from the side at an angle
The SRS side airbags are not generally designed to inflate if the vehicle is involved in a frontal or rear collision, if it rolls over, or if it is involved in a low- speed side collision.
●Collision from the front ●Collision from the rear ●Vehicle rollover
The SRS curtain shield airbags are not generally designed to inflate if the vehicle is involved in a frontal or rear collision, if it pitches end over end, or if it is involved in a low-speed side collision.
●Collision from the front ●Collision from the rear ●Pitching end over end
125
1-7. Safety information
■When to contact your Toyota dealer
In the following cases, contact your Toyota dealer as soon as possible. ●Any of the SRS airbags have been inflated.
●The front of the vehicle is damaged or deformed, or was involved in an acci- dent that was not severe enough to cause the SRS airbags to inflate.
●A portion of a door is damaged or deformed, or the vehicle was involved in an accident that was not severe enough to cause the SRS side airbags and curtain shield airbags to inflate.
●The pad section of the steering wheel or dashboard or lower portion of the instrument panel is scratched, cracked, or otherwise damaged.
●The surface of the seats with the side airbag is scratched, cracked or other- wise damaged.
●The portion of the front pillars, rear pil- lars or roof side rail garnishes (padding) containing the curtain shield airbags inside is scratched, cracked or other-