- 2009 Toyota 4runner Owners Manuals
- Toyota 4runner Owners Manuals
- 2005 Toyota 4runner Owners Manuals
- Toyota 4runner Owners Manuals
- 2002 Toyota 4runner Owners Manuals
- Toyota 4runner Owners Manuals
- 2010 Toyota 4runner Owners Manuals
- Toyota 4runner Owners Manuals
- 2012 Toyota 4runner Owners Manuals
- Toyota 4runner Owners Manuals
- 2001 Toyota 4runner Owners Manuals
- Toyota 4runner Owners Manuals
- 2015 Toyota 4runner Owners Manuals
- Toyota 4runner Owners Manuals
- 2006 Toyota 4runner Owners Manuals
- Toyota 4runner Owners Manuals
- 2004 Toyota 4runner Owners Manuals
- Toyota 4runner Owners Manuals
- 2003 Toyota 4runner Owners Manuals
- Toyota 4runner Owners Manuals
- 2008 Toyota 4runner Owners Manuals
- Toyota 4runner Owners Manuals
- 2014 Toyota 4runner Owners Manuals
- Toyota 4runner Owners Manuals
- 2000 Toyota 4runner Owners Manuals
- Toyota 4runner Owners Manuals
- 2011 Toyota 4runner Owners Manuals
- Toyota 4runner Owners Manuals
- 2007 Toyota 4runner Owners Manuals
- Toyota 4runner Owners Manuals
- Download PDF Manual
-
from LOW, MID, and HIGH volume and tone settings. The ASL system automati- cally adjusts volume and tone in accor- dance with the driving speed. This helps ensure an optimal listening experience even if noise levels rise while driving. DISC·AUX (Compact disc) Push compact disc. When the audio system is set to compact disc operation, the track, or track and disc number currently being played. Vehicles with AUX adapter— To switch between CD, DVD, and AUX (external the “DISC·AUX†button. The AUX mode is only available when AUX adapter is connected to the system. When the AUX adapter is in use, “AUX†will appear on the display.
the “DISC·AUX†button
the display shows
device) modes,
to play a
press
inserted
incorrectly
Error messages If the player malfunctions, your audio sys- tem will display following error messages. “WAITâ€: The compact disc player unit may be too hot. Allow the player to cool down. “ERROR 1â€: The disc may be dirty, dam- aged or (up−side down). Clean the disc and re−insert it. “NO DISCâ€: The compact disc changer of the separate unit is empty. Insert a disc. “ERROR 3â€: There is a problem inside the system. Eject the disc or magazine. Set the disc or magazine again. “ERROR 4â€: Over−current. Ask your Toyota dealer to inspect. “CD OPENâ€: The compact disc changer lid of the separate unit is open. Close the compact disc changer lid. If “NO MUSIC†appears on the display, it indicates that a disc with no MP3/WMA data has been inserted. Remove the disc from the player and insert an MP3/WMA data disc. If the malfunction still exists, take your vehicle to your Toyota dealer.
Æ DISC Æœ Use these buttons to select a disc you want to listen to. Push “Ɔ(preset button 3) or “Ɯ†(preset button 4) until the number of the disc you want to listen appears on the display. FM1 FM2
Push the “FM1†or “FM2†button to turn on the radio and select the FM band. “FM1†or “FM2†will appear on the display. This system allows you to set twelve FM sta- tions, two for each of the preset button. FOLDER (Folder up/down) To skip up or down to a different folder: Push either side of the “FOLDER†several times until the number of the folder you want to listen to appears on the display. To jump to the first file in the current folder: Push and hold the “Ɔside of the button until you hear a beep. When playing a disc featuring both audio data (CD−DA) and MP3/WMA files, audio data (CD−DA) is played.223
07 12.25
in
LOAD This button is used to load the compact discs the compact disc player. This player can store up to six discs. To load one compact disc only, quickly push and release the button, then insert a compact disc. After the disc is loaded, the shutter of the slot will close. If no compact disc is inserted, the shutter will close after 15 seconds. To load multiple compact discs, push and hold the button (until you hear a beep when the audio system is on), then insert the first compact disc. After the disc is loaded, the shutter of the slot will close. After a few seconds, the shutter will auto- matically open again so the next disc can be inserted. The same process can be applied for loading the rest of the discs. If the player is full of discs, “DISC FULL†will appear on the display. If no compact disc is inserted, the shutter will close after 15 seconds.
224
in random order, or
PWR·VOL (Power and Volume) Push “PWR·VOL†to turn the audio system on and off. Turn “PWR·VOL†to adjust the volume. RAND (Random) Compact disc player There are two random features—you can either listen to the tracks on one compact to disc listen the tracks on all the compact discs in the magazine in random order. To play the tracks on one disc in random order: Quickly push and release “RAND†(preset †will appear on the button 1). “ display and the player will perform the tracks on the disc you are listening to in random order. To turn off the random fea- ture, push this button again. To play all the tracks in the magazine in random order: Push and hold “RAND†(preset button 1) †will until you hear a beep. “ appear on the display and the player will perform all the tracks on all the discs in the magazine in random order. To turn off the this button again.
feature, push
random
in a
the files
MP3/WMA player There are two random playback features— you can either listen to all of the files on the compact discs in random order. You can also listen to the files in a single folder in random order. To randomly play folder: Quickly push and release “RAND†(preset †will appear on the button 1). “ display. To randomly play all of the files on the compact disc: Push and hold “RAND†(preset button 1) †will until you hear a beep. “ appear on the display and the player will play all of the files on the disc in random order. To turn off the random playback feature, push this button again.
07 12.25
the
track
RPT (Repeat) Compact disc player There are two repeat features—you can either replay a disc track or a whole com- pact disc. Repeating a track: Quickly push and release “RPT†(preset button 2) while is playing. †will appear on the display. When “ the track ends, it will automatically replay. To turn off the repeat feature, push this button again. Repeating a disc: Push and hold “RPT†(preset button 2) until you hear a beep. “ †will ap- pear on the display. The player will repeat all the tracks on the disc you are listening to. When the disc ends, the player will automatically go back to the first track on the disc and replay. To turn off the repeat feature, push this button again.
file
the
MP3/WMA player There are two repeat features—You can repeat a single file or an entire folder. Repeating a file: Quickly push and release “RPT†(preset button 2) while is playing. †will appear on the display. When “ the file ends, it will repeat automatically. This process will be continued until you push the button again to turn off the re- peat feature. Repeating a folder: Push and hold “RPT†(preset button 2) †will ap- until you hear a beep. “ pear on the display. The player will repeat all of the files in the folder. When the last file in the folder ends, the folder will re- peat from the beginning. To turn off the repeat feature, push this button again.
SCAN Radio You can either scan all the frequencies on a band or scan only the preset stations for that band. To scan the preset stations: Push and hold the “SCAN†button until you hear a beep. The radio will tune in the next preset station up the band, stay there for 5 seconds, and then move to the next preset station. To stop scanning, push this button again. To scan all the frequencies: Quickly push and release the “SCAN†but- ton. The radio will find the next station up the station band, stay there for 5 seconds, and then scan again to the next station. To stop scanning, push this button again. XMr Satellite Radio∗— You can either scan the currently selected channel category or scan only the preset channels for that band.
225
07 12.25
the currently selected channel
To scan the preset channels: Push and hold the “SCAN†button until you hear a beep. “SCAN†appears on the display. The radio will tune in the next preset channel up the band, stay there for 5 seconds, and then move to the next preset channel. To stop scanning, push this button again. To scan category: Quickly push and release the “SCAN†but- ton. “SCAN†appears on the display. The radio will the same channel category up the band, stay there for 5 seconds, and then scan again. To stop scanning, push this button again. ∗: Use of satellite requires XMr tuner and service. Contact your Toyota dealer for details.
the next channel
radio
find
in
listening
Compact disc player There are two scan features—you can ei- ther scan the tracks on a specific disc or scan the first tracks of all the discs in the magazine. Scanning the tracks on a disc: Quickly push and release the “SCAN†but- ton. “SCAN†will appear on the display and the player will scan all the tracks on the disc you are to. To stop scanning, push this button again. If the player scanned all the tracks on the disc, it will stop scanning. Scanning the first tracks of all the discs in the magazine: Push the “SCAN†button until you hear a †will appear on the dis- beep. “ play and the first track on the next disc. To stop scanning, push this button again. If the player has scanned all the discs, it will stop scan- ning.
the player will scan
to. To select a
MP3/WMA player There are two scan features—you can ei- ther scan the files in a folder on a specif- ic disc or scan the first file of all the folder. Scanning the files on a folder: Quickly push and release “SCANâ€. “SCAN†will appear on the display and the player will scan all the files in the folder you are listening file, push the “SCAN†again. After all the tracks on the disc have been scanned in one pass, nor- mal play resumes. Scanning the first file of all the folders: “SCAN†until you hear a beep. Push †will appear on the display and “ the player will scan the first file of the next folder. To select a folder, push the “SCAN†again. After all the folders have been scanned in one pass, normal play resumes.
226
07 12.25
up/
the seek mode,
(Seeking/Tracking
the radio finds and the next station up or down the
SEEK/TRACK down) Radio In plays station band. To seek the next station, quickly push and release “Ɯ†or “Ɔside of the “SEEK/ TRACK†button. Do this again to find the station after that. XMr Satellite Radio∗— To select the next channel within the cur- rent channel category, push the “Ɯ†or “Ɔside of the “SEEK/TRACK†button. Repeat until a desired channel is found. ∗: Use of satellite
requires XMr tuner and service. Contact your Toyota dealer for details.
radio
Compact disc player Use this button to skip up or down to a different track. the “SEEK/ Push “Ɯ†or “Ɔside of TRACK†button until the number of the track you want to listen to appears on the display. If you want to return to the begin- ning of the current track, quickly push the down side of the button one time. MP3/WMA player To file up or down to a different file: Push either side of the “TRACK†several times until the file you want to listen to appears on the display. If you want to return to the beginning of the current file, push the “Ɔside of the button one time, quickly.
ST (Stereo reception) display Your radio automatically changes to stereo reception when a stereo broadcast is re- ceived. “ST†appears on the display. If the signal becomes weak, the radio reduces the amount of channel separation to prev- ent the weak signal from creating noise. If the signal becomes extremely weak, the radio switches from stereo to mono recep- tion. TEXT XMr Satellite Radio∗1— When you push the “TEXT†button, the display changes as follows: CH NAME → TITLE (SONG/PROGRAM TITLE) → NAME (ARTIST NAME/FEA- TURE) → CH NUMBER → CH NAME Up to 10 alphanumeric characters can be displayed. (Some information will not be fully displayed.) The message display will be canceled if any button is pushed. If there is no song/program title or artist name/feature associated with the channel at that time, “− − − − −†will appear on the display.
that affects
the display
227
07 12.25
This XMr tuner supports “Audio Services†(Music and Talk) of only XMr Satellite Radio and “Text Informationâ€âˆ—2 linked to the respective audio services. ∗1: Use of satellite
requires XMr tuner and service. Contact your Toyota dealer for details. Information
includes, Channel Name, (Artist) Name, (Song) Title and Category Name.
∗2: Text
radio
to
Compact disc player This button is used to change the display for the compact disc that contains text data. To change the display, quickly push and release the “TEXT†button while the com- pact disc is playing. The display changes in the order from the elapsed time to disc title the elapsed time. If this button is pushed while a compact disc that does not contain text data is playing, “NO TITLE†will appear on the display. If the entire disc or track title does not appear on the display, push and hold the button until you hear a beep. The rest of the title will appear.
then back
track
title,
to
228
file
the
in the order
“TEXT†button while
MP3/WMA player This button is used to change the display for the MP3/WMA file that contains text data. To change the display, quickly push and release the MP3/WMA is playing. The display changes the elapsed time to folder name to file name to album title to track title to artist name, then back to the elapsed time. If is pushed while an MP3/WMA file that does not contain text data is playing, “NO TITLE†will appear on the display. If the entire text data is not displayed, push and hold it until you hear a beep. The rest of the text data will appear.
this button
from
TUNE·FILE (Tuning and File up/down) Radio Turn the knob clockwise to step up the frequency. Turn the knob counterclockwise to step down the frequency. XMr Satellite Radio∗— Turn the “TUNE·FILE†knob clockwise to step up the channel. Turn the knob coun- terclockwise to step down the channel. ∗: Use of satellite
requires XMr tuner and service. Contact your Toyota dealer for details.
radio
MP3/WMA player Turn the knob clockwise to file up. Turn the knob counterclockwise to file down. TYPE XMr Satellite Radio∗— When you push the “Ɔor “Ɯ†side of the “TYPE†button while receiving a XMr channel, the current channel category ap- pears on the display. When the channel category appears, push either “Ɔor “Ɯ†side of the “TYPE†but- ton to switch to the next or previous cate- gory. ∗: Use of satellite
requires XMr tuner and service. Contact your Toyota dealer for details.
radio
07 12.25
"Type 3
CY17066y
229
07 12.25
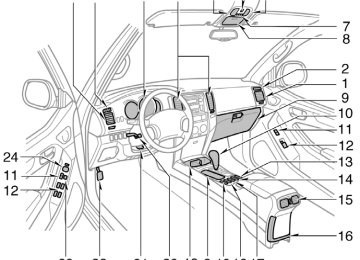
Details of specific buttons, controls and features are described in the alphabetical list that follows.
230
to preset and
1 2 3 4 5 6 (Preset buttons) These buttons are used tune in radio stations. To preset a station to a button: Tune in the desired station. (See “TUNE·FILE†or “SEEK/TRACKâ€.) Push and hold down the button until you hear a beep—this will set the station to the button. The preset but- ton number will appear on the display. To recall a preset station: Push the button for the station you want. The preset but- ton number and station frequency will ap- pear on the display. These systems can store one AM and two FM stations for each button. (The display will show “AMâ€, “FM1†or “FM2†when you push “AM·SAT†or “FM†button.) XMr Satellite Radio∗— These buttons are used tune in radio channels. To preset a channel to a button: Tune in the desired channel. (See “TUNE·FILE†or “SEEK/TRACKâ€.) Push and hold down the button until you hear a beep—this will set the channel to the button. The preset but- ton number will appear on the display.
to preset and
To recall a preset channel: Push the but- ton for the channel you want. The preset button number and channel number will appear on the display. This radio can store three XMr channels for each button. (The display will show “SAT1â€, “SAT2†or “SAT3†when you push “AM·SAT†button.) ∗: Use of satellite
requires XMr tuner and service. Contact your Toyota dealer for details.
radio
(Eject button)
This button is used to eject one or all compact discs. To eject the current compact disc, push and release the compact disc eject button. To eject a specific disc, push “Ɔ(preset button 3) or “Ɯ†(preset button 4) until the number of the disc you want to eject is displayed. Push and release the eject but- ton. To eject all discs at a time, press and hold the eject button until you hear a beep. The last compact disc played before pushing the button will be ejected first. If the ejected disc is not removed for a long time, the eject function will be cancelled.
07 12.25
(Reverse/Fast−forward button)
Push and hold “ †(preset button 6) or “ †(preset button 5) to fast−forward or reverse within a compact disc. When you release the button, the compact disc play- er will resume playing. AM·SAT (AM band and XMr Satellite Ra- dio∗) Push the “AM·SAT†button to turn on the radio and select the AM or XMr band. “AMâ€, “SAT1â€, “SAT2†or “SAT3†will ap- pear on the display. Error messages If tuner malfunctions, your audio system will display following error messages. “ANTENNAâ€: D The XMr antenna
is not connected. Check whether the XMr antenna cable is attached securely.
the satellite radio
D A short−circuit occurs in the antenna or the surrounding antenna cable. See a Toyota certified dealer.
“UPDATINGâ€: D You have not subscribed to the XMr Satellite Radio. The radio is being up- dated with the latest encryption code. Contact for subscription information. When a con- tact is canceled, you can choose the “CH000†and all free−to−air channels.
the XMr Satellite Radio
D The premium channel you selected is not authorized. Wait for about 2 sec- onds until the radio returns to the pre- vious channel or “CH001â€. If it does not change automatically, select anoth- er channel. If you want to listen to the premium channel, contact the XMr Sat- ellite Radio.
is
“NO SIGNALâ€: The XMr signal too weak at the current location. Wait until your vehicle reaches a location with a stronger signal. “LOADINGâ€: The unit is acquiring audio or program information. Wait until the unit has received the information. “OFF AIRâ€: The channel you selected is not broadcasting any programming. Select another channel.
to
the radio returns
“− − −â€: The channel you selected is no longer available. Wait for about 2 seconds until the previous channel or “CH001â€. If it does not change automatically, select another channel. The XMr Listener Care Center available on 1−800−967−2346 1−877−438−9677 (Canada). ∗: Use of satellite radio
is also the phone, please call or
requires XMr tuner and service. Contact your Toyota dealer for details.
(U.S.A.)
the
you
time
push
AUDIO CONTROL (Tone and sound bal- ance controls) Each “AUDIO CONTROL†knob, the mode changes. To adjust the tone and balance or turn the rear seat entertainment system on/off, turn the knob. BAS: Adjusts low−pitched tones. The dis- play ranges from −5 to 5. MID: Adjusts mid−pitched tones. The dis- play ranges from −5 to 5. TRE: Adjusts high−pitched tones. The dis- play ranges from −5 to 5. FAD: Adjusts the sound balance between the front and rear speakers. The display ranges from F7 to R7.
231
07 12.25
BAL: Adjusts the sound balance between the right and left speakers. The display ranges from L7 to R7. Switching over the Automatic Sound Le- velizer (ASL) ON/OFF ASL: The Automatic Sound Levelizer can be turned on by turning the knob. The ASL system automatically adjusts volume and tone in accordance with ambient noise levels. This helps ensure an optimal lis- tening experience even when road, wind or other ambient noise levels rise. RSE: rear seat entertainment system—See “Rear seat entertainment system†on page 240 in this Section. DISC·AUX (Compact disc) Push compact disc. When the audio system is set to compact disc operation, the track, or track and disc number currently being played.
the “DISC·AUX†button
the display shows
Vehicles with
to play a
232
press
the DVD
device) modes,
player. Pressing
Vehicles with rear seat entertainment sys- tem— The “DISC·AUX†button may also be used to operate the DVD player when a disc is in the “DISC·AUX†button allows you to switch between the CD player and the DVD play- er. When the DVD player is in operation, “RSE DVD†appears on the display. Vehicles with AUX adapter— To switch between CD, DVD, and AUX (external the “DISC·AUX†button. The AUX mode is only available when AUX adapter is connected to the system. When the AUX adapter is in use, “AUX†will appear on the display. Error messages If the player malfunctions, your audio sys- tem will display following error messages. “WAITâ€: The compact disc player unit may be too hot. Allow the player to cool down. “ERROR 1â€: The disc may be dirty, dam- aged or (up−side down). Clean the disc and re−insert it. “NO DISCâ€: The compact disc changer of the separate unit is empty. Insert a disc.
incorrectly
inserted
“ERROR 3â€: There is a problem inside the system. Eject the disc or magazine. Set the disc or magazine again. “ERROR 4â€: Over−current. Ask your Toyota dealer to inspect. “CD OPENâ€: The compact disc changer lid of the separate unit is open. Close the compact disc changer lid. If “NO MUSIC†appears on the display, it indicates that a disc with no MP3/WMA data has been inserted. Remove the disc from the player and insert an MP3/WMA data disc. If the malfunction still exists, take your vehicle to your Toyota dealer. Æ DISC Æœ Use these buttons to select a disc you want to listen to. Push “Ɔ(preset button 3) or “Ɯ†(preset button 4) until the number of the disc you want to listen appears on the display. FM Push the “FM†button to turn on the radio and select the FM band. “FM1†or “FM2†will appear on the display. This system allows you to set twelve FM stations, two for each of the preset buttons.
07 12.25
To load multiple compact discs, push and hold the button (until you hear a beep when the audio system is on), then insert the first compact disc. After the disc is loaded, the shutter of the slot will close. After a few seconds, the shutter will auto- matically open again so the next disc can be inserted. The same process can be applied for loading the rest of the discs. If the player is full of discs, “DISC FULL†will appear on the display. If no compact disc is inserted, the shutter will close after 15 seconds. PWR·VOL (Power and Volume) Push “PWR·VOL†to turn the audio system on and off. Turn “PWR·VOL†to adjust the volume.
FOLDER (Folder up/down) To skip up or down to a different folder: Push either side of the “FOLDER†several times until the number of the folder you want to listen to appears on the display. To jump to the first file in the current folder: Push and hold the “Ɔside of the button until you hear a beep. When playing a disc featuring both audio data (CD−DA) and MP3/WMA files, audio data (CD−DA) is played. LOAD This button is used to load the compact discs the compact disc player. This player can store up to six discs. To load one compact disc only, quickly push and release the button, then insert a compact disc. After the disc is loaded, the shutter of the slot will close. If no compact disc is inserted, the shutter will close after 15 seconds.
in
in random order, or
RAND (Random) Compact disc player There are two random features—you can either listen to the tracks on one compact to disc listen the tracks on all the compact discs in the magazine in random order. To play the tracks on one disc in random order: Quickly push and release “RAND†(preset †will appear on the button 1). “ display and the player will perform the tracks on the disc you are listening to in random order. To turn off the random fea- ture, push this button again. To play all the tracks in the magazine in random order: Push and hold “RAND†(preset button 1) †will until you hear a beep. “ appear on the display and the player will perform all the tracks on all the discs in the magazine in random order. To turn off the this button again.
feature, push
random
233
07 12.25
in a
the files
MP3/WMA player There are two random playback features— you can either listen to all of the files on the compact discs in random order. You can also listen to the files in a single folder in random order. To randomly play folder: Quickly push and release “RAND†(preset †will appear on the button 1). “ display. To randomly play all of the files on the compact disc: Push and hold “RAND†(preset button 1) †will until you hear a beep. “ appear on the display and the player will play all of the files on the disc in random order. To turn off the random playback feature, push this button again.
234
the
track
RPT (Repeat) Compact disc player There are two repeat features—you can either replay a disc track or a whole com- pact disc. Repeating a track: Quickly push and release “RPT†(preset button 2) while is playing. †will appear on the display. When “ the track ends, it will automatically replay. To turn off the repeat feature, push this button again. Repeating a disc: Push and hold “RPT†(preset button 2) until you hear a beep. “ †will ap- pear on the display. The player will repeat all the tracks on the disc you are listening to. When the disc ends, the player will automatically go back to the first track on the disc and replay. To turn off the repeat feature, push this button again.
file
the
MP3/WMA player There are two repeat features—You can repeat a single file or an entire folder. Repeating a file: Quickly push and release “RPT†(preset button 2) while is playing. †will appear on the display. When “ the file ends, it will repeat automatically. This process will be continued until you push the button again to turn off the re- peat feature. Repeating a folder: Push and hold “RPT†(preset button 2) †will ap- until you hear a beep. “ pear on the display. The player will repeat all of the files in the folder. When the last file in the folder ends, the folder will re- peat from the beginning. To turn off the repeat feature, push this button again.
07 12.25
SCAN Radio You can either scan all the frequencies on a band or scan only the preset stations for that band. To scan the preset stations: Push and hold the “SCAN†button until you hear a beep. The radio will tune in the next preset station up the band, stay there for 5 seconds, and then move to the next preset station. To stop scanning, push this button again. To scan all the frequencies: Quickly push and release the “SCAN†but- ton. The radio will find the next station up the station band, stay there for 5 seconds, and then scan again to the next station. To stop scanning, push this button again.
XMr Satellite Radio∗— You can either scan the currently selected channel category or scan only the preset channels for that band. To scan the preset channels: Push and hold the “SCAN†button until you hear a beep. “SCAN†appears on the display. The radio will tune in the next preset channel up the band, stay there for 5 seconds, and then move to the next preset channel. To stop scanning, push this button again. To scan category: Quickly push and release the “SCAN†but- ton. “SCAN†appears on the display. The radio will the same channel category up the band, stay there for 5 seconds, and then scan again. To stop scanning, push this button again. ∗: Use of satellite requires XMr tuner and service. Contact your Toyota dealer for details.
the currently selected channel
the next channel
radio
find
in
listening
Compact disc player There are two scan features—you can ei- ther scan the tracks on a specific disc or scan the first tracks of all the discs in the magazine. Scanning the tracks on a disc: Quickly push and release the “SCAN†but- ton. “SCAN†will appear on the display and the player will scan all the tracks on the disc you are to. To stop scanning, push this button again. If the player scanned all the tracks on the disc, it will stop scanning. Scanning the first tracks of all the discs in the magazine: Push the “SCAN†button until you hear a †will appear on the dis- beep. “ play and the first track on the next disc. To stop scanning, push this button again. If the player has scanned all the discs, it will stop scan- ning.
the player will scan
235
07 12.25
to. To select a
MP3/WMA player There are two scan features—you can ei- ther scan the files in a folder on a specif- ic disc or scan the first file of all the folder. Scanning the files on a folder: Quickly push and release “SCANâ€. “SCAN†will appear on the display and the player will scan all the files in the folder you are listening file, push the “SCAN†again. After all the tracks on the disc have been scanned in one pass, nor- mal play resumes. Scanning the first file of all the folders: “SCAN†until you hear a beep. Push †will appear on the display and “ the player will scan the first file of the next folder. To select a folder, push the “SCAN†again. After all the folders have been scanned in one pass, normal play resumes.
236
up/
the seek mode,
(Seeking/Tracking
the radio finds and the next station up or down the
SEEK/TRACK down) Radio In plays station band. To seek the next station, quickly push and release “Ɯ†or “Ɔside of the “SEEK/ TRACK†button. Do this again to find the station after that. XMr Satellite Radio∗— To select the next channel within the cur- rent channel category, push the “Ɯ†or “Ɔside of the “SEEK/TRACK†button. Repeat until a desired channel is found. ∗: Use of satellite
requires XMr tuner and service. Contact your Toyota dealer for details. Compact disc player Use this button to skip up or down to a different track. the “SEEK/ Push “Ɯ†or “Ɔside of TRACK†button until the number of the track you want to listen to appears on the display. If you want to return to the begin- ning of the current track, quickly push the down side of the button one time.
radio
MP3/WMA player To file up or down to a different file: Push either side of the “TRACK†several times until the file you want to listen to appears on the display. If you want to return to the beginning of the current file, push the “Ɔside of the button one time, quickly. Vehicles with rear seat entertainment sys- tem— While the DVD player is in operation, the chapter or track can be changed by push- ing the “SEEK·TRACK†button. ST (Stereo reception) display Your radio automatically changes to stereo reception when a stereo broadcast is re- ceived. “ST†appears on the display. If the signal becomes weak, the radio reduces the amount of channel separation to prev- ent the weak signal from creating noise. If the signal becomes extremely weak, the radio switches from stereo to mono recep- tion.
side of
“Ɯ†or
“Æâ€
the
07 12.25
that affects
TEXT Radio XMr Satellite Radio∗1— When you push the “TEXT†button, the display changes as follows: CH NAME → TITLE (SONG/PROGRAM TITLE) → NAME (ARTIST NAME/FEA- TURE) → CH NUMBER → CH NAME Up to 10 alphanumeric characters can be displayed. (Some information will not be fully displayed.) The message display will be canceled if any button is pushed. If there is no song/program title or artist name/feature associated with the channel at that time, “− − − − −†will appear on the display. This XMr tuner supports “Audio Services†(Music and Talk) of only XMr Satellite Radio and “Text Informationâ€âˆ—2 linked to the respective audio services. ∗1: Use of satellite
requires XMr tuner and service. Contact your Toyota dealer for details. Information
includes, Channel Name, (Artist) Name, (Song) Title and Category Name.
the display
∗2: Text
radio
to
Compact disc player This button is used to change the display for the compact disc that contains text data. To change the display, quickly push and release the “TEXT†button while the com- pact disc is playing. The display changes in the order from the elapsed time to disc title the elapsed time. If this button is pushed while a compact disc that does not contain text data is playing, “NO TITLE†will appear on the display. If the entire disc or track title does not appear on the display, push and hold the button until you hear a beep. The rest of the title will appear.
then back
track
title,
to
file
the
in the order
“TEXT†button while
MP3/WMA player This button is used to change the display for the MP3/WMA file that contains text data. To change the display, quickly push and release the MP3/WMA is playing. The display changes the elapsed time to folder name to file name to album title to track title to artist name, then back to the elapsed time. If is pushed while an MP3/WMA file that does not contain text data is playing, “NO TITLE†will appear on the display. If the entire text data is not displayed, push and hold it until you hear a beep. The rest of the text data will appear.
this button
from
237
07 12.25
TUNE·FILE (Tuning and File up/down) Radio Turn the knob clockwise to step up the frequency. Turn the knob counterclockwise to step down the frequency. XMr Satellite Radio∗— Turn the “TUNE·FILE†knob clockwise to step up the channel. Turn the knob coun- terclockwise to step down the channel. ∗: Use of satellite
requires XMr tuner and service. Contact your Toyota dealer for details.
radio
MP3/WMA player Turn the knob clockwise to file up. Turn the knob counterclockwise to file down. TYPE XMr Satellite Radio∗— When you push the “Ɔor “Ɯ†side of the “TYPE†button while receiving a XMr channel, the current channel category ap- pears on the display. When the channel category appears, push either “Ɔor “Ɯ†side of the “TYPE†but- ton to switch to the next or previous cate- gory. ∗: Use of satellite
requires XMr tuner and service. Contact your Toyota dealer for details.
radio
238
Audio remote controls (steering switches)
CY17029
Some parts of the audio system can be adjusted using the switches on the steer- ing wheel. Details of the specific switches, controls, and features are described below. 1. Volume control switches 2. “ƜƆswitch 3. “MODE†switch
1. Volume control switches Push the “+†side to increase the volume. The volume continues to increase while the switch is being pushed. Push the “−†side to decrease the volume. The volume continues to decrease while the switch is being pushed. 2. “Ɯ Ɔswitch Radio This switch has the following features— To select a preset station: Quickly push and release the “Ɯ†or “Ɔside of the switch. Do this again to select the next preset station. To seek a station: Push and hold the “Ɯ†or “Ɔside of the switch until you hear a beep. Do this again to find the next station. If you push the switch on either side during the seek mode, seeking will be cancelled. To step up or down the frequency, push and hold the switch even after you hear a beep. When you release the switch, the radio will begin seeking up or down for a station. Do the next station.
this again
to find
07 12.25
XMr Satellite Radio∗— To select a preset channel, push the “Ɯ†or “Ɔside of the switch. Repeat until a desired channel is found. ∗: Use of satellite
requires XMr tuner and service. Contact your Toyota dealer for details.
radio
Compact disc player Use this switch to skip up or down to a different track in either direction. Quickly push and release the “Ɯ†or “Ɔside of the switch until the track you want to listen to is set. If you want to return to the beginning of the current track, push the “Ɔside of the switch once, quickly. Vehicles with rear seat entertainment sys- tem— While the DVD player is in operation, the chapter or track can be changed by push- ing the “Ɯ†or “Ɔside of the switch. With compact disc changer only— Push and hold the “Ɯ†or “Ɔside of the switch until the disc you want to listen to is set.
MP3/WMA player Use this switch to select a desired file or disc. To select a desired file: Quickly push and release the “Ɯ†or “Ɔside of the switch until the file you want to listen to is set. If you want to return to the beginning of the current file, push the “Ɔside of the switch once, quickly. To select a desired disc: Push and hold the “Ɯ†or “Ɔside of the switch until the disc you want to listen to is set. Vehicles with rear seat entertainment sys- tem— While the DVD player is in operation, the chapter or track can be changed by push- ing the “Ɯ†or “Ɔside of the switch. 3. “MODE†switch Push the “MODE†switch to select an au- dio mode. Each push changes the mode sequentially if the desired mode is ready to use. To turn the audio system on, push the “MODE†switch. To turn the audio system off, push and hold the “MODE†switch until the system turns off.
AUX adapter
CY17076
inserting a mini plug into
An AUX adapter is installed in the rear console box. By the AUX adapter, you can listen to music from a portable audio device through the vehicle’s speaker system. To use the AUX adapter, switch to the AUX mode (external device mode) by pressing the “DISC·AUX†button. When the AUX adapter is in use, “AUX†will appear on the display. To adjust the volume, turn the “PWR·VOL†knob. When using a portable audio device con- the power outlet, noise may nected occur during playback. this happens, use the power source of the portable au- dio device.
to
If
239
07 12.25
Rear seat entertainment system— If you install an audio system other than a genuine audio system, you will not be able to use the AUX adapter.
CY17070y
240
07 12.25
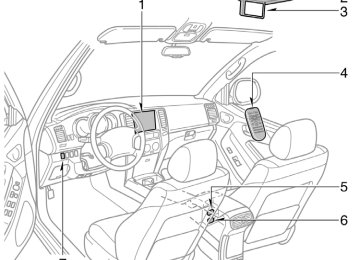
The rear seat entertainment system con- sists of the following components. 1. Front audio system 2. DVD player 3. Rear seat entertainment system display 4. Rear seat entertainment system
controller
5. A/V input adapter 6. Power outlet (115 VAC) 7. Power outlet main switch
The rear seat entertainment system is de- signed for the rear passengers to enjoy audio and DVD video separately from the front audio system. The rear seat entertainment system can be operated when the engine switch is in the “ACC†or “ON†position. The rear passengers can enjoy DVD vid- eo, audio CD, video CD, CD text, dts−CD and MP3. The rear seat entertainment system can play DVD video, audio CD, video CD, CD text, dts−CD or MP3 only when a disc is loaded in the DVD player. You can enjoy videos and sound when your personal audio system is connected to the A/V input adapter. For details, refer to the manufacturer’s instructions. You can enjoy the rear seat entertainment system with a wireless headphone. The wireless headphone can be used within rear seat. If the signal becomes weak, the headphone will mute. For details, refer to the manufacturer’s instructions. With some wireless headphone generally available in the market, it may be difficult to catch sound properly. Toyota recom- mends the use of Toyota genuine wireless headphone.
You can purchase a wireless headphone at a Toyota dealer.
CAUTION
D Do not operate a motor vehicle while using headphones. Doing so may cause an accident, resulting in death or serious injury.
D With DVD player:
that
Conversational speech on some DVDs is recorded at a low volume to emphasize the impact of sound If you adjust the volume effects. assuming the conversations represent the maximum volume lev- el that the DVD will play, you may be startled by louder sound effects or when you change to a different audio source. Be sure to adjust the volume with this in mind. Make sure the volume creased, before you headphone.
is not turn on
in- the
241
07 12.25
—Display
CY17058
CY17059
CY17060
To open the display, push the lock release button.
Pull the display down to an easily view- able angle (between 90_ and 125_)
NOTICE
The screen should be cleaned with a dry soft cloth. If the screen is pushed by hand or wiped with a hard cloth, the surface of the screen may be scratched.
242
To close, push the display up until you hear a click. The illumination of the screen is automati- cally is closed. However, the rear seat entertain- ment system is not turned off.
turned off when
the display
CAUTION
To reduce the chance of in case of an accident or sudden stop while driving, close the display when it is not in use.
injury
07 12.25
NOTICE
z Benzene or alkaline solutions may damage the coated surface of the screen.
z To prevent the battery from being discharged, do not turn on the rear seat entertainment system longer than necessary when the engine is not running.
INFORMATION
z Wipe off fingerprints on the surface of the display using a glass clean- ing cloth.
z The displayed
image may become darker and moving images may be slightly distorted when the display is cold.
—Rear seat entertainment system controller The rear seat entertainment system can be operated with the rear seat entertain- ment system controller and buttons on the DVD player unit. The system cannot be operated by touching the switches on the screen directly.
CAUTION
Do not disassemble or modify the controller. It may cause an accident, fire or electric shock.
NOTICE
Keep the controller away from direct sunlight, high heat and high humidity. These conditions could cause the case to deform or the battery to ex- plode or leak.
BEFORE USING THE CONTROLLER (for new vehicle owners) A battery is already set in the control- ler with an insulating sheet, which pre- from being dis- vents charged. Before using the controller, remove the insulating sheet according to the following procedure.
the battery
z When you
look at
the screen through polarised material such as polarised sunglasses, the screen may be dark and hard to see. If so, change the screen, look at the screen from different angles, adjust the screen settings on the “Display†screen, or take off your sunglasses.
the angle of
243
07 12.25
Z17448
Z17449
1. Remove the cover of the controller
as shown.
2. Remove the insulating sheet.
CY17061
244
07 12.25
USING THE CONTROLLER To use the rear seat entertainment sys- tem controller, direct the signal output portion of the controller to the signal reception portion of the rear seat enter- tainment system display. The controller does not operate properly when the signal reception portion of the display to direct sunlight. Block the display from direct sunlight.
is exposed
CAUTION
To reduce the chance of in case of an accident or a sudden stop while driving, stow the controller in the console box or front seat side table when it is not in use.
injury
NOTICE
Observe the followings, otherwise the controller may be damaged. z Do not drop or strongly knock the
controller against hard objects.
z Do not sit on or place heavy ob-
jects on the controller.
z Do not leave the controller exposed to high temperatures (such as on the long time.
instrument panel) for a
245
07 12.25
246
—Control buttons "Controller
Z18004y
07 12.25
1. “DVD†button
9. “
†button
16. “ANGLE†button
This button turns on the DVD mode.
2. “VIDEO†button
This button causes the display to use the video signal from an external video device.
3. “OFF†button
This button turns off the rear seat en- tertainment system.
4. Joystick
This joystick selects a control switch, mode switch on the menu for the disc.
the screen or
5. “ENT†button
This button inputs the selected switch or the selected menu for the disc.
6. “FOLDER
†button
This button selects a desired folder.
7. “FOLDER
†button
This button selects a desired folder.
8. “
†button This button when the DVD player is operated.
fast
forwards a screen
This button stops a screen when the DVD player is operated.
10. “SET UP†button
This button indicates the initial set up screen when the DVD player is oper- ated.
11. “MENU†button
This button indicates the menu screen for DVD video when the DVD player is operated.
12. “AUDIO†button
This button indicates the changing au- dio screen when is operated.
the DVD player
This button selects the angle of the screen when the DVD player is oper- ated.
17. “SEARCH†button
This button indicates the title search screen when the DVD player is oper- ated.
18. “TOP MENU†button
This button indicates the title selection screen for DVD video when the DVD player is operated.
19. “
†button
This button reverse a screen when the DVD player is operated.
13. “SUB TITLE†button
20. “" †button
This button indicates the changing sub- title screen when the DVD player is operated.
14. “DISPLAY†button
This button adjusts tone, contrast and brightness of the screen.
the color,
15. “SIZE†button
This button changes the display mode when the DVD player is operated.
This button plays or pauses a screen when the DVD player is operated.
21. “TRACK/CHAPTER
†button
This button selects track/chapter.
22. “TRACK/CHAPTER
†button
This button selects track/chapter.
23. “OPTION†button
button
This control switches on the screen when the DVD player is operated.
indicates
the
247
07 12.25
REPLACING CONTROLLER BATTERY For replacement, use 3 AA batteries.
CAUTION
Special care should be taken to pre- vent small children from swallowing the removed battery or components.
Z17448
Z17458
NOTICE
z When replacing the battery, be care-
ful not to lose the components.
z Replace only with
the same or equivalent type recommended by a Toyota dealer.
z Dispose of used batteries according
to the local laws.
Replace the battery according to the fol- lowing procedure: 1. Remove the cover of the controller as
shown.
248
2. Remove the discharged batteries and the new batteries as shown.
in
put Install the cover.
07 12.25
NOTICE
z Be sure that the positive side and negative side of the controller bat- tery should be faced correctly.
z Do not replace the battery with wet
hands. Water may cause rust.
z Do not touch or move any compo- nents inside of the controller, or it may interfere with proper operation. z Be careful not to bend the electrode
of the controller battery insertion.
z Close the battery case securely.
After replacing the battery, check that the controller operates properly. If the control- ler still does not operate properly, contact your Toyota dealer.
—Turning the rear seat entertainment system on and off
Z17453
Z17455
load screen changes
the “DVD†button is pushed,
To turn on the system, push the “DVD†button or “VIDEO†button. When disc player operation screen. When the “VIDEO†button is pushed, the images and sounds from the personal au- dio machine are output. The “DVD†button is effective only when a disc is inserted.
the the DVD
to
To turn off the system, push the “OFF†button. When the front audio system is turned off, the rear audio system and the DVD player will be turned off simultaneously.
249
07 12.25
Z18033
—Front audio system operation The rear DVD player can be operated through the front audio system.
entertainment
Vehicles with navigation system—The rear be seat can switched ON and OFF by pushing the “Rear†switch on the front audio system.
system
250
—Rear system lock The audio system controls in the instru- ment panel allow the operation of the rear seat entertainment system by rear seat passengers to be disabled. Turning on the rear system lock prevents small children from using the remote con- troller or operation panel of the DVD play- er unit to operate the rear seat entertain- ment system during driving. Turn the “AUDIO CONTROL†knob repeatedly until “RSE†is displayed. Next, turn the “AUDIO CONTROL†knob until “ON†is displayed, and the “AUDIO CONTROL†knob.
the audio system on. Push
then push
07 12.25
Z18031E
Z17443
the “INFO†button
Vehicles with navigation system— Push screen to “Screen Settingâ€. Push Setting†screen turn on system lockâ€. Then push “OKâ€.
the “ON†switch on
to
to change
the
the “Screen “Rear
the
is displayed
When the rear system lock is on and any button is pushed on the remote controller or the operation panel, the screen shown above for approximately 6
seconds. Even when the rear system lock is turned on during play mode, images and sounds continue without interruption. The condition of the rear system lock is maintained, even when the engine switch is turned off.the
—DVD player The DVD player can play audio CDs/ MP3 CDs, DVD video discs, CD texts, dts−CDs and video CDs. For appropriate discs for this player, see “Audio/video system operating hints†on page 280 in this Section. The DVD player works when the engine switch is in the “ACC†or “ON†position. To turn on the DVD player, a disc must be loaded in the player. To turn off the player, eject the disc. Error messages If the player malfunctions, your audio sys- tem will display following error messages. If the screen: It indicates that the disc is dirty, damaged or it was inserted upside down. Clean the disc or insert it correctly. If “REGION CODE ERROR†appears on the screen: It indicates that the DVD re- gion code is not set properly. the If screen: There the player. Eject the disc. Set the disc again. If the malfunction still exists, take your vehicle to your Toyota dealer.
“DVD ERROR†appears on inside
“DISC CHECK†appears on
is a problem
251
07 12.25
CY17062
INSERTING THE DISC Insert a disc into the slot with the label side up. “DISC†indicator light turns on while the disc is loaded. If the label faces down, the disc cannot be played. In this case, “DISC CHECK†and disc number appear on the screen.
252
8 cm (3 in.) compact disc singles Your compact disc player needs an adap- tor to play compact disc singles. Compact disc singles are about 8 cm (3 in.) in diameter−smaller than standard discs.
If a disc which is not playable is inserted, “DISC CHECK†will also appear on the screen. For appropriate discs for this play- er, see “Audio/video system operating hints†on page 280 in this Section. The player will play the track or chapter, and it will play from the beginning of the track or chapter again after it reaches the end.
NOTICE
Never try to disassemble or oil any part of the DVD player. Do not insert anything other than a disc into the slot.
07 12.25
—DVD player operation switches
Z17485
Z17461
Z17456
EJECTING THE DISC
Push the “
†button.
The DVD player can be operated with the controller buttons directly. 1. “DVD†button 2. “SET UP†button 3. “MENU†button 4. “AUDIO†button 5. “SUB TITLE†button 6. “ANGLE†button 7. “SIZE†button 8. “SEARCH†button 9. “TOP MENU†button 10. “" â€, “
â€, “AA†and “""†buttons
The player can also be operated with the switches on the screen. To operate the switches on the screen, select the switch by the joystick and push the “ENT†button. You cannot select the switches on the screen by touching them directly. When the switch is selected by the joys- tick, the outline of the switch changes to blue. Push the switch will be highlighted in green.
“ENT†button, and
the
253
07 12.25
Z17462
Z18008
Z17402
TURNING THE OPERATION SWITCHES ON AND OFF To turn on the operation switches, push the “OPTION†button on the controller.
Top page (DVD video operation switch)
Top page (video CD)
Z17401
Z18009
254
Second page switch)
(DVD
video operation
Second page (video CD)
07 12.25
There are operation switches on the “Page 1†and “Page 2†screens. To change the screen, push the “Page 1†or “Page 2†switch on the screen.
Z17404
Z18010
If “ you select a switch, it the switch cannot work.
†appears on the screen when indicates that
On the screen
Z17462
Controller
255
07 12.25
To turn off the switches on the screen, push the “OPTION†button on the control- ler once again or push the “Hide Buttons†on the screen.
256
—DVD player operation NOTE: The playback condition of some DVD video discs may be determined by the DVD video software producer. This DVD player plays discs as the software producer intended. Therefore, some functions may not work properly. Be sure to read the instruction manual for the DVD video disc separately provided. For detailed information about DVD video discs, see “—DVD video disc information†on page 276 this Section. Precautions for DVD video discs When recording on a DVD video, video CD or audio tracks may not record in some cases while the menu is displayed. As audio will not play in this case, verify that the video tracks are playing and then activate playback. The title/chapter number and playback time display may not appear while playing back certain DVD video discs.
in
CAUTION
Conversational speech on some DVDs is recorded at a low volume to em- phasize the impact of sound effects. If you adjust the volume assuming that the conversations represent the maximum volume level available for the DVD, you may be startled by louder sound effects or when you change to a different audio source. Loud sounds may have a significant impact on the human body or pose a driving hazard. Keep in mind when you adjust the volume.
this
07 12.25
TURNING THE MENU SCREEN FOR THE DISC ON OR OFF To turn on the menu screen for the disc, push the “Top Menu†or the “Menu†switch on the screen. You can also turn on the menu screen by pushing the “MENU†or “TOP MENU†button on the controller. For the operation of the menu screen, see the separate manual for the DVD disc.