- 2009 Pontiac VIBE Owners Manuals
- Pontiac VIBE Owners Manuals
- 2008 Pontiac VIBE Owners Manuals
- Pontiac VIBE Owners Manuals
- 2007 Pontiac VIBE Owners Manuals
- Pontiac VIBE Owners Manuals
- 2006 Pontiac VIBE Owners Manuals
- Pontiac VIBE Owners Manuals
- 2004 Pontiac VIBE Owners Manuals
- Pontiac VIBE Owners Manuals
- 2005 Pontiac VIBE Owners Manuals
- Pontiac VIBE Owners Manuals
- 2003 Pontiac VIBE Owners Manuals
- Pontiac VIBE Owners Manuals
- 2010 Pontiac VIBE Owners Manuals
- Pontiac VIBE Owners Manuals
- Download PDF Manual
-
the ignition.
2009 - Pontiac Vibe Owner Manual
(cid:129) (cid:129) (cid:129) (cid:129) 4-26
Instruments and Controls
OnStar service is provided subject to the OnStar Terms and Conditions included in the OnStar Subscriber glove box literature. Some services such as Remote Door Unlock or Stolen Vehicle Location Assistance may not be available until the owner of the vehicle registers with OnStar. After the first prepaid year, contact OnStar to select a monthly or annual subscription payment plan. If a payment plan is not selected, the OnStar system and all services, including airbag notification and emergency services, may be deactivated and no longer available. For more information visit www.onstar.com (U.S.) or www.onstar.ca (Canada), or press the OnStar button to speak with an advisor. Not all OnStar services are available on all vehicles. To check if this vehicle is able to provide the services described below, or for a full description of OnStar services
and system limitations, see the OnStar Owner’s Guide in the glove box or visit www.onstar.com (U.S.) or www.onstar.ca (Canada), contact OnStar at 1-888-4-ONSTAR (1-888-466-7827) or TTY 1-877-248-2080, or press the OnStar button to speak with an OnStar advisor 24 hours a day, 7 days a week. OnStar Services Available with the Safe & Sound Plan (cid:129) Automatic Notification of
Airbag Deployment Link to Emergency Services
(cid:129) Roadside Assistance (cid:129) Stolen Vehicle Location
Assistance
(cid:129) Remote Door Unlock/Vehicle
Alert
(cid:129) OnStar Hands-Free Calling with
30 trial minutes
(cid:129) OnStar Virtual Advisor (U.S. Only)
OnStar Services Included with Directions & Connections Plan (cid:129) All Safe and Sound Plan Services (cid:129) Driving Directions - Advisor
Delivered (cid:129) RideAssist
Information and Convenience Services
OnStar Hands-Free Calling OnStar Hands-Free Calling allows eligible OnStar subscribers to make and receive calls using voice commands. Hands-Free Calling is fully integrated into the vehicle, and can be used with OnStar Pre-Paid Minute Packages. Most vehicles include 30 trial minutes good for 60 days. Hands-Free Calling can also be linked to a Verizon Wireless service plan in the U.S. or a Bell Mobility service plan in Canada, depending on eligibility.
2009 - Pontiac Vibe Owner Manual
(cid:129) (cid:129) Instruments and Controls
4-27
To find out more, refer to the OnStar Owner’s Guide in the vehicle’s glove box, visit www.onstar.com or www.onstar.ca, or speak with an OnStar advisor by pressing the OnStar button or calling 1-888-4-ONSTAR (1-888-466-7827). OnStar Virtual Advisor OnStar Virtual Advisor is a feature of OnStar Hands-Free Calling that uses minutes to access location-based weather, local traffic reports, and stock quotes. Press the phone button and give a few simple voice commands to browse through the various topics. See the OnStar Owner’s Guide for more information. This feature is only available in the continental U.S. How OnStar Service Works The OnStar system can record and transmit vehicle information. This information is automatically sent to an OnStar Call Center when the OnStar button is pressed, the emergency button is pressed, or if
the airbags deploy. This information usually includes the vehicles GPS location and, in the event of a crash, additional information regarding the crash that the vehicle was involved in (e.g. the direction from which the vehicle was hit). When the Virtual Advisor feature of OnStar Hands-Free Calling is used, the vehicle also sends OnStar the vehicles GPS location so they can provide services where it is located. OnStar service cannot work unless the vehicle is in a place where OnStar has an agreement with a wireless service provider for service in that area. OnStar service also cannot work unless the vehicle is in a place where the wireless service provider OnStar has hired for that area has coverage, network capacity and reception when the service is needed, and technology that is compatible with the OnStar service. Not all services are available everywhere, particularly in remote or enclosed areas, or at all times.
Location information about the vehicle is only available if the GPS satellite signals are unobstructed and available. The vehicle must have a working electrical system, including adequate battery power, for the OnStar equipment to operate. There are other problems OnStar cannot control that may prevent OnStar from providing OnStar service at any particular time or place. Some examples are damage to important parts of the vehicle in a crash, hills, tall buildings, tunnels, weather or wireless phone network congestion. Your Responsibility Increase the volume of the radio if the OnStar advisor cannot be heard. If the light next to the OnStar buttons is red, the system may not be functioning properly. If the light appears clear (no light is appearing), your OnStar subscription has expired and all services have been deactivated. Press the OnStar button to confirm that the OnStar equipment is active.
2009 - Pontiac Vibe Owner Manual
4-28
Instruments and Controls
✍ NOTES
2009 - Pontiac Vibe Owner Manual
Lighting
Lighting Exterior Lamps Controls
Lighting Exterior Lamps Controls .....5-1
Daytime Running Lamps (DRL) ....................5-2
Automatic Headlamp System .............................5-2
Fog Lamps .........................5-2
Instrument Panel Brightness .........................5-3
Dome Lamp(s) ....................5-3
Entry Lighting .....................5-3
Reading Lamps ..................5-4
Battery Run-Down Protection .........................5-42009 - Pontiac Vibe Owner Manual
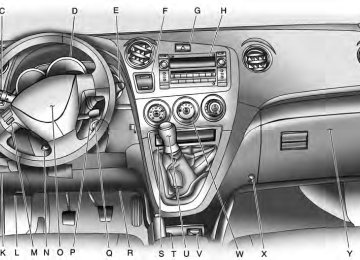
The lever on the left side of the steering column operates the exterior lamps. P / ; (Exterior Lamps): Turn the outside band of the lever to operate the lamps. For vehicles sold in the U.S., P appears on the instrument panel cluster when the exterior lamps are on. For vehicles first sold in Canada, ; appears in the instrument panel cluster. See Lights On Reminder on page 4-23.
Lighting
5-1
The exterior lamp switch has three positions: ( (Off): Turns off all lamps, except the Daytime Running Lamps (DRL). ; (Parking Lamps): Turns on the parking lamps together with the following: (cid:129) Sidemarker Lamps
Taillamps License Plate Lamp Instrument Panel Lights
5 (Headlamps): Turns on the headlamps, together with the previously listed lamps and lights.
Headlamps on Reminder A tone sounds when the ignition is turned to LOCK/OFF, the driver door is opened and the key is removed from the ignition while the lamps are on.
(cid:129) (cid:129) (cid:129) 5-2
Lighting
Daytime Running Lamps (DRL) Daytime Running Lamps (DRL) can make it easier for others to see the front of your vehicle during the day. Fully functional DRL are required on all vehicles first sold in Canada. The DRL system makes the headlamps come on at a reduced brightness when the following conditions are met:
The ignition is on with the engine running. The exterior lamps switch is off. The parking brake is released.
When the exterior lamp switch is turned to the headlamp position, the DRL go off and the headlamps come on. The other lamps that come on with the headlamps also come on.
The headlamps automatically switch from DRL to the regular headlamps depending on the darkness of the surroundings. See “Automatic Headlamp System” following. DRL also comes on if only the parking lamps are being used.
Automatic Headlamp System When it is dark enough outside, the automatic headlamp system turns on the low-beam headlamps at the normal brightness along with other lamps such as the taillamps, sidemarker, parking lamps and instrument panel lights. An indicator light on the instrument panel comes on when the headlamps are on. See Instrument Panel Cluster on page 4-12.
If the vehicle is driven through a parking garage, overcast weather, or a tunnel, the automatic headlamp system may turn on. There is a delay before the lights turn on when starting the car at night. Do not cover the automatic light sensor, located on the top left corner of the instrument panel. If the sensor is covered the headlamps will stay on continuously.
Fog Lamps # (Fog Lamps): For vehicles with fog lamps, move the band on the turn signal/multifunction lever to # to turn them on. The fog lamps only come on when the headlamps are on low beam. Some localities have laws that require the headlamps to be on along with the fog lamps.
2009 - Pontiac Vibe Owner Manual
(cid:129) (cid:129) (cid:129) Instrument Panel Brightness
Use the trip odometer knob located on the right side of the instrument panel cluster to adjust the instrument panel brightness. Turn the knob clockwise or counterclockwise to brighten or dim the instrument panel. The brightness of the instrument panel lights decreases when the headlamps are on.
Dome Lamp(s) The interior lamps control is located on the overhead lamp. To change the interior lamps setting, slide the switch to one of the following positions: OFF: Turns the lamp off. ON: Keeps the lamp on all the time. Door: Turns the lamp on when any door or the liftgate is opened. The lamp goes off when all the side doors and the liftgate are closed.
If the lamp switch is in the door position and a door is left open, the lamps will go off automatically after 20 minutes.
Lighting
5-3
Entry Lighting After all the doors and liftgate are closed, and the key is out of the ignition, in LOCK/OFF or ACC/ACCESSORY, the light remains on for about 15 seconds and then goes out, except under the following conditions:
The ignition is turned to ACC/ACCESSORY or ON/RUN after all the doors and liftgate are closed.
(cid:129) All the doors and the liftgate are
locked and the light is still on.
When any door is unlocked with the key or Remote Keyless Entry (RKE) system transmitter, the light comes on for 15 seconds, even if the door is not opened.
2009 - Pontiac Vibe Owner Manual
(cid:129) 5-4
Lighting
Reading Lamps For vehicles with a sunroof, there is a reading lamp near the sunroof switch. OFF: Turns the lamp off. ON: Keeps the lamp on all the time. Door: Turns the lamp on when any door or the liftgate is opened. The lamp goes off when all the side doors and the liftgate are closed.
Battery Run-Down Protection The vehicle has a battery saver feature designed to protect the vehicle’s battery. This feature will only work with the dome lamp in the Door position. When any interior lamp is left on and the ignition is turned off, the battery rundown protection system automatically turns the lamp off after 20 minutes. This prevents draining of the battery.
2009 - Pontiac Vibe Owner Manual
Infotainment
Audio System(s) Audio System(s) .................6-1
Setting the Clock ................6-2
Radio(s) .............................6-3
Using an MP3 ....................6-9
XM Radio Messages .........6-12
Audio Steering Wheel Controls ..........................6-13
Radio Reception ...............6-14
Fixed Mast Antenna ..........6-14
XM™ Satellite Radio Antenna System ..............6-14Audio System(s) Determine which radio the vehicle has and read the following pages to become familiar with its features.
{ CAUTION
Taking your eyes off the road for extended periods could cause a crash resulting in injury or death to you or others. Do not give extended attention to entertainment tasks while driving.
This system provides access to many audio and non audio listings.
Infotainment
6-1
To minimize taking your eyes off the road while driving, do the following while the vehicle is parked: (cid:129) Become familiar with the operation and controls of the audio system.
(cid:129) Set up the tone, speaker
adjustments, and preset radio stations.
For more information, see Defensive Driving on page 8-17.
2009 - Pontiac Vibe Owner Manual
6-2
Infotainment
Setting the Clock The radio has a CLOCK button for adjusting the time and date. The date does not automatically display. To see the date press CLOCK while the radio is on. The date with display times out after a few seconds and goes back to the normal radio and time display. To adjust the time and date: 1. Turn the ignition key to
ACC/ACCESSORY or ON/RUN.
2. Press the PWR VOL
(Power/Volume) knob to turn on the radio.
3. Press the CLOCK button, and the HR, MIN, MM, DD, YYYY (hour, minute, month, day, and year) categories display.
4. Press the button under the
category to be adjusted.
5. To increase the time or date,
do one of the following: turn the TUNE ADJ (Tune/Adjust) knob clockwise, press SEEK/TRACK y, press FWD ( (Forward), or continue to press the button under the category to be adjusted.
6. To decrease the time or date,
do one of the following: turn the TUNE ADJ knob counterclockwise, press SEEK/TRACK z, or press REV ) (Reverse).
7. To save the settings, press
the CLOCK button, or let the display time out.
To change the time default setting from 12 hour to 24 hour, and to change the date default setting from month/day/year to day/month/year: 1. Press the CLOCK button
and then the button below the forward arrow label on the display. The 12H and 24H, and the date MMDD (month and day) and DDMM (day and month) categories will display.
2. Press the button below the 12H or 24H label, and the date MMDD (month and day) or DDMM (day and month) label to choose how the radio displays the time and date.
3. To save the settings, press
the CLOCK button, or let the screen time out.
2009 - Pontiac Vibe Owner Manual
Radio(s)
Radio with CD (MP3) shown, Radio with CD (Base) similar
Playing the Radio PWR VOL (Power/Volume): Press to turn the radio on and off. Turn the PWR VOL knob to adjust the volume.
CLOCK: Press to adjust the time. See Setting the Clock on page 6-2
for more information.2009 - Pontiac Vibe Owner Manual
Infotainment
6-3
Finding a Station BAND: Press to select AM, FM, or XM. TUNE ADJ (Tune/Adjust): Turn to select radio stations. y SEEK TRACKz: Press to go to the previous or next radio station. The radio only stops at stations with a strong signal. SCAN: Press to enter scan mode. The radio will display Scanning, then goes to the next station, plays for a few seconds, then continues on to the next station. Press SCAN again to stop scanning. The radio only stops at stations with a strong signal. INFO (Information) (FM-RDS, XM™ Satellite Radio Service, and MP3 Features): Press to display information for the current FM-RDS, XM station, or MP3 song. Choose from Channel, Song, Artist, and CAT (category). NO INFO displays when information is not available from the station.
6-4
Infotainment
Setting Preset Stations FAV (Favorites): Press to select up to six pages of favorites. Each page contains six favorite stations, and each page of favorites can contain any combination of AM, FM, or XM™ stations.
For vehicles without XM, only four pages of favorites are available. To setup the number of favorites pages: 1. Press the MENU button to
display the radio setup menu.
2. Press the button located below
the FAV 1-6 label.
3. Select the desired number of
favorites pages by pressing the button located below the displayed page numbers.
4. Press the FAV button, or let the menu time out, to return to the radio screen.
To store a radio station as a favorite: 1. Tune to the desired radio station. 2. Press the FAV button to
display the page where it can be stored.
3. Press and hold one of the
six buttons until a beep sounds.
4. Repeat the steps to store another
radio station.
Setting the Tone (Bass/Midrange/Treble) To adjust the bass, midrange, and treble: 1. Press the TUNE ADJ knob. 2. Turn the TUNE ADJ knob, or press the button below BASS, MID, or TREB so it is highlighted.
3. Press the TUNE ADJ knob
to select BASS, MID, or TREB.
4. Turn the TUNE ADJ knob
to adjust the level.
5. Press the TUNE ADJ knob to set
the adjustment.
EQ (Equalization): To select customized equalization settings: 1. Press EQ. 2. Press the button below the label: POP, ROCK, COUNTRY, TALK, JAZZ, and CLASSICAL. Adjusting the Speakers (Balance/Fade) To adjust the balance or fade, perform the following steps: 1. Press the TUNE ADJ knob. 2. Turn the TUNE ADJ knob
or press the button below BAL FADE so it is highlighted.
3. Press the TUNE ADJ knob to
select the tone to adjust.
4. Turn the TUNE ADJ knob to adjust the audio balance to the right or the left speakers and the fade to adjust the audio volume to the front or rear speakers.
5. Press the TUNE ADJ knob to set
the adjustment.
2009 - Pontiac Vibe Owner Manual
Scanning Categories (CAT) (XM Satellite Radio Service Only) To scan a desired category: 1. Press the CAT button to enter
the category select mode.
2. Turn the TUNE ADJ knob to
select a category.
3. Press y or z for two seconds
to scan the stations in the selected category.
4. Press y or z again to stop
scanning.
NOT FOUND displays if the desired category cannot be found.
Infotainment
6-5
XM Satellite Radio Service XM is a satellite radio service that is based in the 48 contiguous United States and 10 Canadian provinces. XM Satellite Radio has a wide variety of programming and commercial-free music, coast-to-coast, and in digital-quality sound. During your trial or when you subscribe, you will get unlimited access to XM Radio Online for when you are not in your vehicle. A service fee is required to receive the XM service. For more information, contact XM at www.xmradio.com or call 1-800-929-2100 in the U.S. and www.xmradio.ca or call 1-877-438-9677 in Canada.
Finding a Category (CAT) Station (XM Satellite Radio Service Only) If CAT times out and is no longer on the display, return to Step 1. To select and find a desired category: 1. Press the CAT button. 2. Turn the TUNE ADJ knob to
select a category.
3. Press y or z to go to the
category’s first station, when the desired category is displayed. 4. Press y or z to go to another
station within the selected category.
5. Press CAT to exit the category select mode or wait for CAT to time out.
NOT FOUND displays if the desired category cannot be found.
2009 - Pontiac Vibe Owner Manual
6-6
Infotainment
Radio Data System (RDS) The audio system has Radio Data System (RDS). RDS features are available for use only on FM stations that broadcast RDS information. With RDS: (cid:129) Stations can be selected based
on programming.
(cid:129) Stations with traffic
announcements can be selected. (cid:129) Announcements concerning local and national emergencies can be received.
(cid:129) Messages display from radio
stations.
RDS relies on receiving specific information from radio stations and only works when the information is available. In rare cases, a radio station could broadcast incorrect information that causes the radio features to work improperly. Contact the radio station if this happens.
When the radio is tuned to an RDS station, the station name or call letters display instead of the frequency. RDS stations can also provide the time of day, a program type (PTY) for current programming, and the name of the program being broadcast.
RDS Messages ALERT: Displays when local or national emergency announcements are received. If the radio tunes to a related network station for the announcement, it returns to the original station when the announcement ends. The announcement should be heard even if the volume is low or a CD is playing. If a CD is playing, it will stop playing during the announcement.
The RDS alert feature is not supported by all RDS radio stations.
The RDS alert feature cannot be turned off.
(cid:129) Alert is not affected by tests of the
emergency broadcast system. MSG (Message): Displays if the current RDS station has a message. The message displays the artist, song title, call in phone numbers, etc. If the entire message does not display, parts of the message appear every three seconds until the message is completed. MSG disappears from the display once the completed message has displayed.
Radio Messages for XM Only See XM Radio Messages on page 6-12 later in this section for further detail.
2009 - Pontiac Vibe Owner Manual
(cid:129) (cid:129) TUNE ADJ: Turn the TUNE ADJ knob to select tracks on the CD. y SEEK TRACK z: Press y to go to the start of the current track, if more than ten seconds have played. Press z to go to the next track. Holding or pressing y or z multiple times causes the player to continue moving backward or forward through the tracks on the CD. ( FWD REV ) (Fast Forward/ Fast Reverse): Press and hold ( to advance playback quickly within a track. Release to resume playing the track. Press and hold ) to reverse playback quickly within a track. Release to resume playing the track. BAND: Press to listen to the radio when a CD is playing.
Infotainment
6-7
CD/AUX (CD/Auxiliary): Press to play a CD when listening to the radio.
Press the CD/AUX button again and the system begins playing audio from the connected portable audio player. If a portable audio player is not connected, “No Input Device Found” displays.
See “Using the Auxiliary Input Jack” later in this section. INFO (Information): Press to switch the display between the track number, elapsed time of the track, and the time. When the ignition is off, press this button to display the time. EQ (Equalization): Press to select an equalization setting while playing a CD. See “EQ” listed previously for more information. If an EQ setting is selected for a CD, it is activated each time a CD is played.
Playing a CD The CD player can play the smaller 3 inch (8 cm) single CDs with an adapter ring. 1. Insert a CD label side up
partway into the slot.
2. The CD player pulls the CD in
and begins playing.
3. The CD symbol and track
number displays.
4. The CD stays in the player if the
ignition or radio is turned off. 5. If the CD was the last source
selected, it resumes playing when the radio is turned on.
Y (EJECT): Press and release to eject a CD. Once ejected it can be removed. If the CD is not removed after several seconds the CD player automatically pulls the disc back into the player and starts playing.
2009 - Pontiac Vibe Owner Manual
6-8
Infotainment
Care of CDs The sound quality of the CD player can be reduced because of:
The CD-R quality. The method of recording the CD-R. The quality of the music that has been recorded on the CD-R. The way the CD-R has been handled.
Store CD-R(s) in their original cases or other protective cases and away from dust and direct sunlight. The CD player scans the bottom surface of the disc. If the surface of a CD is damaged, such as cracked, broken, or scratched, the CD may not play properly or at all. Do not touch the bottom side of a CD while handling it; this could damage the surface. Pick up CDs by grasping the outer edges or the edge of the hole and the outer edge.
To clean a CD, use a soft lint free cloth, or dampen a clean soft cloth in a mild neutral detergent solution mixed with water. Wipe the CD from the center to the edge.
If a label is added to a CD,
Care of The CD Player Use a marking pen to identify CDs, do not add labels. Do not use CD lens cleaners; they could damage the CD player. Notice: or more than one CD is inserted into the slot at a time, or an attempt is made to play scratched or damaged CDs, the CD player could be damaged. While using the CD player, use only CDs in good condition without any label, load one CD at a time, and keep the CD player and the loading slot free of foreign materials, liquids, and debris. If an error displays, see “CD Messages” later in this section.
Playing an MP3 CD-R Disc Radios with the MP3 feature are capable of playing an MP3 CD-R disc. For more information on how to play an MP3 CD-R disc, see Using an MP3 later in this section.
CD Messages If the CD ejects, it could be for one of the following reasons: The CD player is very hot. When the temperature returns to normal, the CD should play. The road is very rough. When the road becomes smoother, the CD should play. The CD is dirty, scratched, wet, or upside down. The air is very humid. If so, wait about an hour and try again. The format of the CD might not be compatible. See Using an MP3 later in this section.
2009 - Pontiac Vibe Owner Manual
(cid:129) (cid:129) (cid:129) (cid:129) (cid:129) (cid:129) (cid:129) (cid:129) (cid:129) (cid:129) A problem may have occurred
while burning the CD. The label could be caught in the CD player.
If any error occurs repeatedly or if an error cannot be corrected, contact your dealer/retailer. If the radio displays an error message, write it down and provide it to your dealer/retailer when reporting the problem.
Using the Auxiliary Input Jack The radio has an auxiliary input jack located on the lower right side of the faceplate. This is not an audio output; do not plug the headphone set into the front auxiliary input jack. An external audio device such as an iPod, laptop computer, MP3 player, CD changer, etc. can be connected to the auxiliary input jack for use as another audio source.
To use a portable audio player, connect a 3.5 mm (1/8 inch) cable to the radio’s front auxiliary input jack. When a device is connected, press the radio CD/AUX button to begin playing audio from the device over the vehicle speakers. PWR VOL (Power/Volume): Turn to adjust the volume. Additional volume adjustments may have to be made from the portable device if the volume is too quiet or not loud. BAND: Press to listen to the radio when a portable audio device is playing. CD/AUX (CD/Auxiliary): Press to play a CD when a portable audio device is playing. Press again and the system begins playing audio from the connected portable audio player.
2009 - Pontiac Vibe Owner Manual
Infotainment
6-9
Using an MP3
MP3 CD-R Disc MP3 Format The MP3 player will only play CD-R discs. It can read and play a maximum of: 50 folders 11 folders in depth 50 playlists 10 sessions 255 filesAll folders, playlists, sessions and files over the maximum are ignored. Record an MP3 disc: (cid:129) Onto a CD-R disc. (cid:129) Record playlists with an .m3u or
.wpl extension.
(cid:129) Do not mix standard audio and
MP3 files on the same disc.
(cid:129) Record the entire disc at once.
Finalize the disc when recording an MP3 disc with multiple sessions.
(cid:129) (cid:129) (cid:129) (cid:129) (cid:129) (cid:129) (cid:129) 6-10
Infotainment
Root Directory The root directory is treated as a folder. All .mp3 files in the root directory are accessed before folders in the root directory.
Empty Directory or Folder Empty folders and directories do not display. The system ignores empty directories and folders and advances to the next directory or folder that has .mp3 files in it.
No Folder On a CD that contains only .mp3
files in the root directory the next and previous folder functions do not work. On a CD that contains playlists and .mp3 files the next and previous folder functions search playlists first and then search .mp3 files in the root folder.Order of Play CDs that have playlists play the tracks in the following order: 1. After the first track in the first playlist ends, play continues sequentially through all tracks in each playlist
2. After the last track of the last
playlist ends, play restarts from the first track of the first playlist.
CDs that do not have playlists play the tracks in the following order: 1. The first file in the root directory
plays.
2. After all files from the root
directory have played, files in the folders play.
3. After playing the last file from the last folder, play restarts with the first file in the root directory.
File System and Naming The radio display shows, track names that are shorter than 39 characters. Names that are longer are shortened. The track name appears as:
The song name that is in the ID3 tag. The file name without the file extension if the song name is not in the ID3 tag.
Preprogrammed Playlists Playlists are accessed before files or folders in the root directory. Preprogrammed playlists created by WinAmp™, MusicMatch™, or Real Jukebox™ software can be accessed and are treated as special folders containing compressed audio song files.
2009 - Pontiac Vibe Owner Manual
(cid:129) (cid:129) 3. The CD stays in the player if the
ignition or radio is turned off. 4. If the CD was the last source
selected, it resumes playing when the radio is turned on.
Y (EJECT): Press and release to eject a CD. Once the disc is ejected it can be removed. If the CD is not removed after several seconds the CD player automatically pulls the disc back into the player and starts playing. y SEEK TRACK z: Press to go to the start of the current track, if more than ten seconds have played. Press z to go to the next track. Holding or pressing y or z multiple times will cause the player to continue moving backward or forward through the tracks on the CD.
Infotainment
6-11
( FWD REV ) (Fast Forward/ Fast Reverse): Press and hold ) to advance playback quickly within a track. Release ( to resume playing the track. Press and hold ) to reverse playback quickly within a track. Release ( to resume playing the track. BAND: Press to listen to the radio when a CD is playing. INFO (Information): Press when an MP3 CD is loaded, then press the button below the Song, Artist, Album, or Folder label to view the information. CD/AUX (CD/Auxiliary): Press to play a CD when listening to the radio.
Press the CD/AUX button again and the system begins playing audio from the connected portable audio player. If a portable audio player is not connected, “No Input Device Found” displays.
Music Navigator The music navigator feature lets MP3 CDs play in order by artist or album.
The MP3 player scans the disc to sort the files by artist and album ID3 tag information. It can take several minutes to scan the disc depending on the number of MP3 files recorded to the CD-R. The radio starts playing while the disc is being scanned. (cid:129) After the scan is finished,
the disc starts playing.
Playing an MP3
The MP3 player can play the smaller 3 inch (8 cm) single CDs with an adapter ring. 1. Insert a CD label side uppartway into the slot.
2. The CD player pulls the CD in
and begins playing.
2009 - Pontiac Vibe Owner Manual
(cid:129) (cid:129) (cid:129) 6-12
Infotainment
RDM (Random): Press the button below the RDM label to hear the tracks in random order. S c (Previous Folder): Press the button below to go to the first track in the previous folder. c T (Next Folder): Press the button below to go to the first track in the next folder. h (Music Navigator): Press the button below to play MP3 files in order by artist or album. SORT: Press the button below the SORT label to change between playback by artist or album while using the Music Navigator. BACK: Press the button below the BACK label to return to the main music navigator screen. S T (Previous/Next): Press the button below to go to the next or previous artist or album in alphabetical order while using the Music Navigator.
XM Radio Messages XL (Explicit Language Channels): These channels, or any others, can be blocked at a customer’s request, by calling 1-800-852-XMXM (9696). Updating: The encryption code in the receiver is being updated, and no action is required. This process should take no longer than 30 seconds. No Signal: The system is functioning correctly, but the vehicle is in a location that is blocking the XM™ signal. When the vehicle is moved into an open area, the signal should return. Loading XM: The audio system is acquiring and processing audio and text data. No action is needed. This message should disappear shortly.
CH Off Air: This channel is not currently in service. Tune to another channel. CH Unavail: This previously assigned channel is no longer assigned. Tune to another station. If this station was one of the presets, choose another station for that preset button. No Info: No artist, song title, category, or text information is available at this time on this channel. The system is working properly. No Info: No text or informational messages are available at this time on this channel. The system is working properly. Not Found: There are no channels available for the selected category. The system is working properly.
2009 - Pontiac Vibe Owner Manual
Audio Steering Wheel Controls
Infotainment
6-13
ª«(Next/Previous): Press to select the next or previous radio station, CD track, or MP3 folder. (cid:129) Press ª or « to go to the next
or previous preset station.
(cid:129) Press and hold ª or « until a beep is heard to go to the next or previous radio station. Only stations with a strong signal will be selected.
(cid:129) Press ª or « to go to the next
For vehicles with audio steering wheel controls some audio controls can be adjusted at the steering wheel. They include the following: − q + (Volume): Press to decrease or increase the volume.
or previous CD track.
(cid:129) Press and hold ª or « until a beep is heard to go to the next or previous MP3 folder.
MODE: Press to turn the audio system on or to select between AM, FM, XM, CD, or AUX.
Press and hold to turn the audio system off.
XM Locked: The XM™ receiver in your vehicle may have previously been in another vehicle. For security purposes, XM™ receivers cannot be swapped between vehicles. If this message is received after having your vehicle serviced, check with your dealer/retailer. Radio ID: If tuned to channel 0, this message alternates with the XM™ Radio eight digit radio ID label. This label is needed to activate the service. Unknown: If this message is received when tuned to channel 0, there may be a receiver fault. Consult with your dealer/retailer. Chk XMRcvr: If this message does not clear within a short period of time, the receiver may have a fault. Consult with your dealer/retailer.
2009 - Pontiac Vibe Owner Manual
6-14
Infotainment
Radio Reception Frequency interference and static can occur during normal radio reception if items such as cell phone chargers, vehicle convenience accessories, and external electronic devices are plugged into the accessory power outlet. If there is interference or static, unplug the item from the accessory power outlet.
AM The range for most AM stations is greater than for FM, especially at night. The longer range can cause station frequencies to interfere with each other. For better radio reception, most AM radio stations boost the power levels during the day, and then reduce these levels during the night. Static can also occur when things like storms and power lines interfere with radio reception. When this happens, try reducing the treble on the radio.
FM Stereo FM stereo gives the best sound, but FM signals only reach about 10 to 40 miles (16 to 65 km). Tall buildings or hills can interfere with FM signals, causing the sound to fade in and out.
XM™ Satellite Radio Service XM Satellite Radio Service gives digital radio reception from coast-to-coast in the 48 contiguous United States, and in Canada. Just as with FM, tall buildings or hills can interfere with satellite radio signals, causing the sound to fade in and out. In addition, traveling or standing under heavy foliage, bridges, garages, or through tunnels could cause loss of the XM signal for a period of time. The radio may display NO XM SIGNAL to indicate interference.
Fixed Mast Antenna The fixed mast antenna can withstand most car washes without being damaged. If the mast should ever become slightly bent, straighten it out by hand. If the mast is badly bent, replace it. Check occasionally to make sure the mast is still tightened to the antenna base located on the roof of the vehicle. If tightening is required, tighten by hand. XM™ Satellite Radio Antenna System The XM Satellite Radio antenna is located on the roof of the vehicle. Keep this antenna clear of snow and ice build up for clear radio reception. If the vehicle has a sunroof, the performance of the XM system may be affected if the sunroof is open. Loading items onto the roof of the vehicle can interfere with the performance of the XM system. Make sure the XM Satellite Radio antenna is not obstructed.
2009 - Pontiac Vibe Owner Manual
Climate Controls
7-1
Climate Controls Climate Control System The heating, cooling, and ventilation for the vehicle can be controlled with this system.
Climate Controls
Climate Controls Climate Control System ......7-1
Outlet Adjustment ...............7-3
Passenger Compartment Air Filter ............................7-4Fan Control 9 (Fan): Turn the center knob toward 4 to turn the system on or increase fan speed.
If the airflow seems low when the fan is at the highest setting, the passenger compartment air filter may need to be replaced. For more information, see Passenger Compartment Air Filter on page 7-4
and Scheduled Maintenance on page 11-4.2009 - Pontiac Vibe Owner Manual
7-2
Climate Controls
Temperature Control Turn the right knob clockwise or counterclockwise to increase or decrease the temperature inside the vehicle.
Air Delivery Mode Control Turn the left knob to select from the following modes: H (Vent): Air is directed to the upper instrument panel outlets. ) (Bi-Level): Air is directed to the upper instrument panel outlets and the floor outlets. 6 (Floor): Air is directed to the floor and side window outlets. - (Defog): Air is directed between the windshield, side windows, instrument panel outlets and the floor outlets.
Use the defog mode to clear the inside of the windshield of fog or moisture and to warm the passengers. The air conditioning compressor runs automatically in this setting without pressing A/C, unless the outside temperature is at or below 32°F (0°C). 1 (Defrost): Air is directed to the windshield, instrument panel outlets and the side windows.
Use the defrost mode to remove fog or frost from the outside of the windshield more quickly. The air conditioning compressor runs automatically in this setting without pressing A/C, unless the outside temperature is at or below 32°F (0°C).
Do not drive the vehicle until all the windows are clear.
Air Conditioning For vehicles with this feature, there will be the following controls: A/C (Air Conditioning): Press to turn the air conditioning system on or off. An indicator light shows that it is on. MAX A/C (Maximum Air Conditioning): Press the A/C and recirculation buttons at the same time to select MAX A/C.
On hot days, open the windows to let hot inside air escape; then close them. The vehicle will cool quicker and the A/C system operates more efficiently. Because the A/C system removes moisture from the air, it is normal for a small amount of water to drip under the vehicle while idling or just after turning the engine off.
2009 - Pontiac Vibe Owner Manual
Rear Window Defogger The rear window defogger uses a warming grid to clear fog from the rear window. It will only work when the ignition is in the ON/RUN position. = (Rear Defogger): Press to turn the rear window defogger on or off. An indicator light shows that it is on. The rear window defogger stays on until it is manually turned off. Clear any snow from the rear window. If the ignition is turned off, while the rear window defogger is on, the defogger turns back on automatically when the ignition is in the ON/RUN position again. Notice: Do not use a razor blade or sharp object to clear the inside rear window. Do not adhere anything to the defogger grid lines in the rear glass. These actions may damage the rear defogger. Repairs would not be covered by your warranty.
Climate Controls
7-3
Outlet Adjustment Use the air outlets located in the center and outboard sides of the instrument panel, to change the direction of the air flowing through the vents.
Operation Tips (cid:129) Clear away any ice, snow or
leaves from the outside air inlets at the base of the windshield.
(cid:129) Use of non-GM approved hood deflectors can adversely affect the performance of the system.
(cid:129) Keep the area under the
front seats clear of objects for more effective air circulation. If the airflow seems low when the fan is at the highest setting, the passenger compartment air filter might need to be replaced. For more information, see Passenger Compartment Air Filter later in this section.
Recirculation ? (Recirculation): Press to turn the recirculation mode on or off. An indicator light shows that it is on. This mode recirculates the air inside the vehicle and helps to heat or cool the air more quickly. It can be used to prevent outside air and odors from entering the vehicle.
Press the button again to turn the recirculation mode off and the outside air mode on. Recirculation is automatically turned off when the climate control system mode knob is turned to defog, defrost, or is positioned between modes.
2009 - Pontiac Vibe Owner Manual
(cid:129) 7-4
Climate Controls
Passenger Compartment Air Filter Both outside and recirculated air are routed through a passenger compartment air filter. Pollen, dust particles and other contaminants are removed by the filter. Airflow reductions indicate that the filter needs to be replaced. For a replacement filter see your dealer/ retailer. See Scheduled Maintenance on page 11-4 for replacement intervals.
The access panel for the air filter is behind the glove box. To replace the filter:
2. Push the side fastener to release
and remove the filter cover.
1. Open the glove box door. Push
each side of the glovebox in and pull out to remove.
2009 - Pontiac Vibe Owner Manual
Climate Controls
7-5
3. Remove the air filter. 4. Install a new air filter and
reassemble the unit by reversing the steps.
Replacing the air filter is recommended, but will not damage the vehicle if it is not.
2009 - Pontiac Vibe Owner Manual
7-6
Climate Controls
✍ NOTES
2009 - Pontiac Vibe Owner Manual
Driving and Operating
Starting and Operating Your Vehicle New Vehicle Break-In .........8-2
Ignition Positions ................8-2
Retained Accessory Power (RAP) .....................8-4
Starting the Engine .............8-4
Engine Coolant Heater .......8-5
Automatic Transmission Operation (Four Speed) ....8-6
Automatic Transmission Operation (Five Speed) .....8-8
Manual Transmission Operation ........................8-11
Parking Brake ...................8-12
Shifting Into Park ..............8-13
Shifting Out of Park ..........8-14Parking the Vehicle (Manual Transmission) ....8-15
Parking Over Things That Burn ........................8-16
Engine Exhaust .................8-16
Running the Vehicle While Parked ..................8-17Driving Your Vehicle Defensive Driving ..............8-17
Drunk Driving ....................8-18
Control of a Vehicle ..........8-18
Braking .............................8-19
Antilock Brake System (ABS) .................8-20
Traction Control System (TCS) .................8-21
All-Wheel Drive (AWD) System ............................8-22
StabiliTrak® System ..........8-22
Steering ............................8-23
Off-Road Recovery ............8-24
Passing .............................8-25
Loss of Control .................8-25
Driving at Night .................8-26Driving and Operating
8-1
Driving in Rain and on Wet Roads ......................8-27
Before Leaving on a Long Trip ........................8-28
Highway Hypnosis .............8-28
Hill and Mountain Roads ...8-28
Winter Driving ...................8-29
If Your Vehicle is Stuck in Sand, Mud, Ice, or Snow ...8-31
Rocking Your Vehicle to Get It Out .......................8-31
Loading the Vehicle ..........8-32
Fuel Fuel ..................................8-36
Gasoline Octane ...............8-36
Gasoline Specifications .....8-36
California Fuel ..................8-36
Additives ...........................8-37
Fuels in Foreign Countries ........................8-37
Filling the Tank .................8-38
Filling a Portable Fuel Container ........................8-402009 - Pontiac Vibe Owner Manual
8-2
Driving and Operating
Starting and Operating Your Vehicle New Vehicle Break-In Notice: The vehicle does not need an elaborate break-in. But it will perform better in the long run if you follow these guidelines: (cid:129) Do not drive at any one
constant speed, fast or slow, for the first 500 miles (805 km). Do not make full-throttle starts. Avoid downshifting to brake or slow the vehicle.
(cid:129) Avoid making hard stops for the first 200 miles (322 km) or so. During this time the new brake linings are not yet broken in. Hard stops with new linings can mean premature wear and earlier replacement. Follow this breaking-in guideline every time you get new brake linings.
(cid:129) Do not tow a trailer during
break-in. See Towing a Trailer on page 9-77 for the trailer towing capabilities of your vehicle and more information. Following break-in, engine speed and load can be gradually increased.
Ignition Positions The ignition switch has four different positions. To shift out of P (Park), turn the ignition to ON/RUN and apply the brake pedal.
Notice: Using a tool to force the key to turn in the ignition could cause damage to the switch or break the key. Use the correct key, make sure it is all the way in, and turn it only with your hand. If the key cannot be turned by hand, see your dealer/retailer.
2009 - Pontiac Vibe Owner Manual
Driving and Operating
8-3
ON/RUN: The ignition switch stays in this position when the engine is running. This position can be used to operate the electrical accessories, including the ventilation fan and 115 volt power outlet, as well as to display some warning and indicator lights. The transmission is also unlocked in this position on automatic transmission vehicles.
The battery could be drained if you leave the key in the ACC/ ACCESSORY or ON/RUN position with the engine off. You may not be able to start the vehicle if the battery is allowed to drain for an extended period of time. START: This position starts the engine. When the engine starts, release the key. The ignition switch will return to ON/RUN for normal driving.
LOCK/OFF: This is the only position from which you can remove the key. This locks the steering wheel, ignition and automatic transmission. Push in the ignition switch as you turn the key toward you.
On vehicles with an automatic transmission, the shift lever must be in P (Park) to turn the ignition switch to the LOCK/OFF position.
A warning tone will sound if the driver door is opened with the key in the ignition.
The ignition switch can bind in the LOCK/OFF position with your wheels turned off center. If this happens, move the steering wheel from right to left while turning the key to ACC/ACCESSORY. If this doesn’t work, then the vehicle needs service.
{ CAUTION
On manual transmission vehicles, turning the key to LOCK/OFF and removing it will lock the steering column and result in a loss of ability to steer the vehicle. This could cause a collision. If you need to turn the engine off while the vehicle is moving, turn the key only to ACC/ ACCESSORY. Do not push the key in while the vehicle is moving.
ACC/ACCESSORY: This position provides power to some of the electrical accessories. It unlocks the steering wheel and ignition. To move the key from ACC/ACCESSORY to LOCK/OFF, push in the key and then turn it to LOCK/OFF.
A warning tone will sound when the driver door is opened when the ignition is still in ACC/ACCESSORY or LOCK/OFF and the key is in the ignition.
2009 - Pontiac Vibe Owner Manual
8-4
Driving and Operating
Retained Accessory Power (RAP) These vehicle accessories may be used for less than a minute after the engine is turned off. (cid:129) Power Windows, if equipped (cid:129) Sunroof, if equipped The power windows and sunroof will continue to work for less than a minute or until either front door is opened. The radio will work when the key is in ON/RUN or ACC/ ACCESSORY. Starting the Engine Automatic Transmission Move the shift lever to P (Park) or N (Neutral). The engine will not start in any other position. To restart when you are already moving, use N (Neutral) only. Notice: Shifting into P (Park) with the vehicle moving could damage the transmission. Shift into P (Park) only when your vehicle is stopped.
Manual Transmission The shift lever should be in NEUTRAL and the parking brake engaged. Hold the clutch pedal to the floor and start the engine. The vehicle will not start if the clutch pedal is not all the way down.
Starting Procedure 1. With your foot off the accelerator pedal, turn the ignition to START. When the engine starts, let go of the key. The idle speed will go down as the engine gets warm. Vehicles equipped with the 1.8L engine have a Computer-Controlled Cranking System. This feature assists in starting the engine and protects components. If the ignition key is turned to the START position, and then released when the engine begins cranking, the engine will continue cranking for a about 30 seconds or until the vehicle starts. If the engine does
not start and the key is held in START for many seconds, cranking will be stopped after 25 seconds to prevent cranking motor damage. To prevent gear damage, this system also prevents cranking if the engine is already running. Engine cranking can be stopped by turning the ignition switch to ACC/ ACCESSORY or LOCK/OFF. Vehicles equipped with the 2.4L engine should not be cranked for more than 30 seconds at a time. This may overheat the starter and wiring systems. Notice: Holding the key in START for longer than 15 seconds at a time will cause the battery to be drained much sooner. And the excessive heat can damage the starter motor. Wait about 15 seconds between each try to help avoid draining the battery or damaging the starter.
2009 - Pontiac Vibe Owner Manual
Notice: The engine is designed to work with the electronics in the vehicle. If electrical parts or accessories are added, you could change the way the engine operates. Before adding electrical equipment, check with your dealer/retailer. If you do not, the engine might not perform properly. Any resulting damage would not be covered by the vehicle warranty.
Engine Coolant Heater The engine coolant heater, if available, can help in cold weather conditions at or below 0°F (−18°C) for easier starting and better fuel economy during engine warm-up. Plug in the coolant heater at least four hours before starting the vehicle.
Driving and Operating
8-5
To Use the Engine Coolant Heater 1. Turn off the engine. 2. Open the hood and unwrap the
electrical cord. The electrical cord is located on the driver side of the engine compartment.
3. Plug it into a normal, grounded
110-volt AC outlet.
{ CAUTION
Plugging the cord into an ungrounded outlet could cause an electrical shock. Also, the wrong kind of extension cord could overheat and cause a fire. You could be seriously injured. Plug the cord into a properly grounded three-prong 110-volt AC outlet. If the cord will not reach, use a heavy-duty three-prong extension cord rated for at least 15 amps.
2. If the engine does not start, wait about 15 seconds and try again to start the engine by turning the ignition to START. Wait about 15 seconds between each try. When the engine has run about 10 seconds to warm up, the vehicle is ready to be driven. Do not run the engine at high speed when it is cold. If the weather is below freezing (32°F or 0°C), let the engine run for a few minutes to warm up.
3. If the engine still will not start, or
starts but then stops, it could be flooded with too much gasoline. Try pushing the accelerator pedal all the way to the floor and holding it there as you hold the key in START for about three seconds. If the vehicle starts briefly but then stops again, do the same thing, but this time keep the pedal down for five or six seconds. This clears the extra gasoline from the engine.
2009 - Pontiac Vibe Owner Manual
8-6
Driving and Operating
4. Before starting the engine, be
sure to unplug and store the cord as it was before to keep it away from moving engine parts. If you do not, it could be damaged.
The length of time the heater should remain plugged in depends on several factors. Ask a dealer/retailer in the area where you will be parking the vehicle for the best advice on this.
Automatic Transmission Operation (Four Speed)
{ CAUTION
The shift lever is located on the console between the seats. P (Park): This position locks the front wheels. It is the best position to use when you start the engine because the vehicle cannot move easily.
It is dangerous to get out of the vehicle if the shift lever is not fully in P (Park) with the parking brake firmly set. The vehicle can roll. Do not leave the vehicle when the engine is running unless you have to. If you have left the engine running, the vehicle can move suddenly. You or others could be injured. To be sure the vehicle will not move, even when you are on fairly level ground, always set the parking brake and move the shift lever to P (Park). See Shifting Into Park on page 8-13. If you are pulling a trailer, see Towing a Trailer on page 9-77.
Make sure the shift lever is fully in P (Park) before starting the engine. The vehicle has an automatic transmission shift lock control system.
2009 - Pontiac Vibe Owner Manual
N (Neutral): In this position, the engine does not connect with the wheels. To restart the vehicle when it is already moving, use N (Neutral) only. Also, use N (Neutral) when the vehicle is being towed.
{ CAUTION
Shifting into a drive gear while the engine is running at high speed is dangerous. Unless your foot is firmly on the brake pedal, the vehicle could move very rapidly. You could lose control and hit people or objects. Do not shift into a drive gear while the engine is running at high speed.
Notice: Shifting out of P (Park) or N (Neutral) with the engine running at high speed may damage the transmission. The repairs would not be covered by the vehicle warranty. Be sure the engine is not running at high speed when shifting the vehicle.
Driving and Operating
8-7
D (Drive): This position is for normal driving. It provides the best fuel economy. If you need more power for passing, and you are: (cid:129) Going less than 35 mph
(56 km/h), push the accelerator pedal about halfway down.
(cid:129) Going about 35 mph (56 km/h) or more, push the accelerator all the way down.
Notice: If the vehicle seems to start up rather slowly or not shift gears when you go faster, and you continue to drive the vehicle that way, you could damage the transmission. Have the vehicle serviced right away. You can drive in L2 (Low) when you are driving less than 35 mph (56 km/h) and D (Drive) for higher speeds until then. 2 (Second): This position reduces vehicle speed more than D (Drive) without using the brakes. You can use 2 (Second) on hills.
You must fully apply the regular brake first and move the shift lever to the right before you can shift from P (Park) when the ignition key is in ON/RUN. If you cannot shift out of P (Park), ease pressure on the shift lever, then push the shift lever all the way into P (Park) as you maintain brake application. Then move the shift lever to the right and move the shift lever into another gear. See Shifting Out of Park on page 8-14. R (Reverse): Use this gear to back up. Notice: Shifting to R (Reverse) while the vehicle is moving forward could damage the transmission. The repairs would not be covered by the vehicle warranty. Shift to R (Reverse) only after the vehicle is stopped. To rock the vehicle back and forth to get out of snow, ice or sand without damaging the transmission, see If Your Vehicle is Stuck in Sand, Mud, Ice, or Snow on page 8-31.
2009 - Pontiac Vibe Owner Manual
8-8
Driving and Operating
It can help control vehicle speed as you go down steep mountain roads, but then you would also want to use the brakes off and on. L (Low): This position reduces vehicle speed even more than 2 (Second) without using the brakes. You can use it on very steep hills, or in deep snow or mud. If the shift lever is put in L (Low), the transmission will not shift into low gear until the vehicle is going slow enough.
Automatic Transmission Operation (Five Speed)
{ CAUTION
The shift lever is located on the console between the seats. P (Park): This position locks the front wheels. It is the best position to use when starting the engine because the vehicle cannot move easily.
It is dangerous to get out of the vehicle if the shift lever is not fully in P (Park) with the parking brake firmly set. The vehicle can roll. Do not leave the vehicle when the engine is running unless you have to. If you have left the engine running, the vehicle can move suddenly. You or others could be injured. To be sure the vehicle will not move, even when you are on fairly level ground, always set the parking brake and move the shift lever to P (Park). See Shifting Into Park on page 8-13. If you are pulling a trailer, see Towing a Trailer on page 9-77.
Make sure the shift lever is fully in P (Park) before starting the engine. The vehicle has an automatic transmission shift lock control system.
2009 - Pontiac Vibe Owner Manual
Driving and Operating
8-9
N (Neutral): In this position, the engine does not connect with the wheels. To restart the engine when the vehicle is already moving, use N (Neutral) only. Also, use N (Neutral) when the vehicle is being towed.
{ CAUTION
Shifting into a drive gear while the engine is running at high speed is dangerous. Unless your foot is firmly on the brake pedal, the vehicle could move very rapidly. You could lose control and hit people or objects. Do not shift into a drive gear while the engine is running at high speed.
Notice: Shifting out of P (Park) or N (Neutral) with the engine running at high speed may damage the transmission. The repairs would not be covered by the vehicle warranty. Be sure the engine is not running at high speed when shifting the vehicle. D (Drive): This position is for normal driving. It provides the best fuel economy from the vehicle. If you need more power for passing, and you are: (cid:129) Going less than 35 mph
(55 km/h), push the accelerator pedal about halfway down.
(cid:129) Going about 35 mph (55 km/h) or more, push the accelerator all the way down.
You must fully apply the regular brake first and move the shift lever to the right before shifting from P (Park) while the ignition key is in ON/RUN. If you cannot shift out of P (Park), ease pressure on the shift lever and push the shift lever all the way into P (Park) as you maintain brake application. Then move the shift lever into another gear. See Shifting Out of Park on page 8-14. R (Reverse): Use this gear to back up. Notice: Shifting to R (Reverse) while the vehicle is moving forward could damage the transmission. The repairs would not be covered by the vehicle warranty. Shift to R (Reverse) only after the vehicle is stopped. To rock your vehicle back and forth to get out of snow, ice, or sand without damaging the transmission, see If Your Vehicle is Stuck in Sand, Mud, Ice, or Snow on page 8-31.
2009 - Pontiac Vibe Owner Manual
8-10
Driving and Operating
Driver Shift Control (DSC) DSC mode allows you to choose the top gear limit of the vehicle’s transmission and the vehicle’s speed while driving down hill or towing a trailer. To use this feature, do the following: 1. Move the shift lever from
D (Drive) left to S (Shift Control). While driving in this mode, the transmission will remain in the driver selected range. When coming to a stop, the vehicle will automatically shift into 1 (First) gear.
2. Move the shift lever forward to
increase the gear range, or rearward to decrease the gear range available based upon your current driving conditions and needs.