- 2000 Nissan Sentra Owners Manuals
- Nissan Sentra Owners Manuals
- 1999 Nissan Sentra Owners Manuals
- Nissan Sentra Owners Manuals
- 2010 Nissan Sentra Owners Manuals
- Nissan Sentra Owners Manuals
- 2003 Nissan Sentra Owners Manuals
- Nissan Sentra Owners Manuals
- 2009 Nissan Sentra Owners Manuals
- Nissan Sentra Owners Manuals
- 1996 Nissan Sentra Owners Manuals
- Nissan Sentra Owners Manuals
- 1998 Nissan Sentra Owners Manuals
- Nissan Sentra Owners Manuals
- 2006 Nissan Sentra Owners Manuals
- Nissan Sentra Owners Manuals
- 2002 Nissan Sentra Owners Manuals
- Nissan Sentra Owners Manuals
- 1997 Nissan Sentra Owners Manuals
- Nissan Sentra Owners Manuals
- 2005 Nissan Sentra Owners Manuals
- Nissan Sentra Owners Manuals
- 2011 Nissan Sentra Owners Manuals
- Nissan Sentra Owners Manuals
- 2001 Nissan Sentra Owners Manuals
- Nissan Sentra Owners Manuals
- 2007 Nissan Sentra Owners Manuals
- Nissan Sentra Owners Manuals
- 2012 Nissan Sentra Owners Manuals
- Nissan Sentra Owners Manuals
- 2008 Nissan Sentra Owners Manuals
- Nissan Sentra Owners Manuals
- 2004 Nissan Sentra Owners Manuals
- Nissan Sentra Owners Manuals
- Download PDF Manual
-
Information on trailer towing and required towing equipment should be obtained from dealers who special- ize in providing trailers or other towing equipment.
Tongue load Keep the tongue load between 9 and 11% of the total trailer load. If the tongue load becomes excessive, rearrange cargo to al- low for proper tongue load.
TI1012M
Maximum gross vehicle weight/maximum gross axle weight The gross vehicle weight of the towing vehicle must not exceed the gross vehicle weight rating (GVWR) shown on the F.M.V.S.S. certification label. The gross ve- hicle weight equals the combined weight of the unloaded vehicle, passengers, luggage, hitch, trailer tongue load and any other optional equipment. In addition, front or rear gross axle weight must not exceed the gross axle weight rating (GAWR) shown on the F.M.V.S.S. certification label.
9-16
TOWING LOAD / SPECIFICATION CHART
MAXIMUM TOWING LOAD
MAXIMUM TONGUE LOAD
UNIT: lb (kg)
1,000 (454)
110 (49)
Trailer hitch Choose a proper hitch for your vehicle and trailer. Make sure the trailer hitch is securely attached to the vehicle to help avoid per- sonal injury or property damage due to sway caused by crosswinds, rough road surfaces or passing trucks. c Axle-mounted hitches should not be
used.
c The hitch should not be attached to or the impact-
the operation of
affect absorbing bumper.
c Do not modify the vehicle exhaust sys- tem, brake system, etc. when the hitch is installed.
c To reduce the possibility of additional damage if your vehicle is struck from the rear, remove the hitch when not in use.
Z X
After the hitch is removed, seal the bolt holes to prevent exhaust fumes, water or dust from entering the passenger compartment.
c Regularly check that all hitch mounting
bolts are securely mounted.
Tire pressures c When towing a trailer, inflate the vehicle tires to the recommended cold tire pres- sure indicated on the tire placard (lo- cated on the driver side center pillar.)
c Trailer tire condition, size, load rating and proper inflation pressure should be in accordance with the trailer and tire manufacturers’ specifications.
Safety chain Always use a suitable chain between your vehicle and the trailer. The chain should be crossed and should be attached to the hitch, not to the vehicle bumper or axle. Be sure to leave enough slack in the chain to permit turning corners. Trailer lights Trailer lights should comply with federal and/ or local regulations. When wiring the
vehicle for towing, connect the stop and tail light pickup into the vehicle electrical circuit. Trailer brakes If your trailer is equipped with a braking system, make sure it conforms to federal and/or local regulations and that it is prop- erly installed.
CAUTION
Never connect a trailer brake system directly to the vehicle brake system.
Pre-towing tips c Be certain your vehicle maintains a level position when a loaded and/or unloaded trailer is hitched. Do not drive the vehicle if it has an abnormal nose-up or nose- down condition; check for improper tongue load, overload, worn suspension or other pos- sible causes of either condition.
c Always secure items in the trailer to
prevent load shifts while driving.
c Be certain your rear view mirrors con- form to all federal, state or local regula- tions. If not, install any mirrors required for towing before driving the vehicle.
9-17
Trailer towing tips In order to gain skill and an understanding of the vehicle’s behavior, you should prac- tice turning, stopping and backing up in an area which is free from traffic. Steering, stability, and braking performance are somewhat different than under normal driv- ing conditions. c Always secure items in the trailer to
prevent load shift while driving.
c Avoid abrupt starts, acceleration or stops. c Avoid sharp turns or lane changes. c Always drive your vehicle at a moderate
speed.
c Always block the wheels on both vehicle and trailer when parking. Parking on a slope is not recommended; however, if you must do so, and if your vehicle is equipped with automatic transmission, first block the wheels and apply the park- ing brake, and then move the transmis- sion shift lever into the P position. If you move the shift lever to the P position before blocking the wheels and applying the parking brake, transmission damage could occur.
Z X
c When going down a hill, shift into a lower gear and use the engine braking effect. When ascending a long grade, down- shift the transmission to a lower gear and reduce speed to reduce chances of engine overloading and/or overheating. c If the engine temperature coolant rises to an extremely high temperature when the air conditioning system is on, turn off the air conditioner. Coolant heat can be addi- tionally vented by opening the windows, switching the fan control to high and set- ting the temperature control to the HOT position.
c Trailer towing requires more fuel than
normal circumstances.
c Avoid towing a trailer for your vehicle’s
first 500 miles (800 km).
c Have your vehicle serviced more often than at intervals specified in the recom- mended Maintenance Schedule.
c When making a turn, your trailer wheels will be closer to the inside of the turn than your vehicle wheels. To compen- sate for this, make a larger than normal turning radius during the turn.
c Crosswinds and rough roads adversely affect vehicle/trailer handling, possibly causing vehicle sway. When being passed by larger vehicles, be prepared for possible changes in crosswinds that could affect vehicle handling. If swaying does occur, firmly grip the steering wheel, steer straight ahead, and imme- diately (but gradually) reduce vehicle speed. This combination helps to stabi- lize the vehicle. Never increase speed. c Be careful when passing other vehicles. Passing while towing a trailer requires considerably more distance than normal passing. Remember the length of the trailer must also pass the other vehicle before you can safely change lanes.
c To maintain engine braking efficiency and electrical charging performance, do not use fifth gear (manual transmission) or overdrive (automatic transmission).
c Avoid holding the brake pedal down too long or too frequently. This could cause the brakes to overheat, resulting in re- duced braking efficiency.
When towing a trailer, change the oil in the transmission more frequently. See the Maintenance Schedule.
9-18
UNIFORM TIRE QUALITY GRADING
DOT Quality Grades: All passenger car tires must conform to Federal Safety Require- ments in addition to these grades. Treadwear Treadwear grade is a comparative rating based on tire wear rate when tested under controlled conditions on specified govern- ment test courses. For example, a tire graded 150 would wear one and a half (1-1/2) times as well on the government course as a tire graded 100. However, relative tire performance depends on actual driving conditions, and may vary signifi- cantly from the norm due to variations in driving habits, service practices and differ- ences in road characteristics and climate. Traction A, B and C Traction grades are A (the highest), B and C. They represent a tire’s ability to stop on wet pavement as measured under controlled con- ditions, on specified government test sur- faces of asphalt and concrete. A tire marked with a C may have poor traction performance.
WARNING
The traction grade assigned to your vehicle tires is based on straight line
Z X
braking traction tests and does not include cornering (turning) traction. Temperature A, B and C Temperature grades are A (the highest), B, and C. They represent a tire’s resistance to heat build-up, and its ability to dissipate heat when tested under controlled condi- tions on a specified indoor laboratory test wheel. Sustained high temperature can cause tire material to degenerate, reducing tire life. Excessive temperatures can lead to sudden tire failure. Grade C corresponds to a performance level which all passenger car tires must meet under the Federal Motor Vehicle Safety Standard No. 109. Grades A and B represent higher levels of perfor- mance on laboratory test wheels than the minimum required by law.
WARNING
The temperature grade for this tire is established for a tire that is properly inflated and not overloaded. Excessive speed, under inflation, or excessive loading, either separately or in combi- nation, can cause heat build-up and possible tire failure problems.
EMISSION CONTROL SYSTEM WARRANTY
REPORTING SAFETY DEFECTS ( USA)
Your NISSAN is covered by the following emission warranties. For USA 1) Emission Defects Warranty 2) Emissions Performance Warranty For Canada Emission Control System Warranty Details of these warranties may be found with other vehicle warranties in your war- ranty information booklet that comes with your NISSAN. If you did not receive a warranty booklet, or it has become lost, you may obtain a replacement by writing to: c Nissan Motor Corporation, in USA
Consumer Affairs Department P.O. Box 191
Gardena, CA. 90247
c Nissan Canada Inc.P.O. Box 1709
Station ‘‘B’’ Mississauga, Ontario, L4Y 4H6If you believe that your vehicle has a defect which could cause a crash or could cause injury or death, you should immediately inform the National Highway Traffic Safety Administration (NHTSA) in addition to noti- fying NISSAN. If NHTSA receives similar complaints, it may open an investigation, and if it finds that a safety defect exists in a group of vehicles, it may order a recall and remedy campaign. However, NHTSA cannot be- come involved in individual problems be- tween you, your dealer, or NISSAN. To contact NHTSA, you may either call the Auto Safety Hotline toll-free at 1- 800-424- 9393 (or 366-0123 in the Washington, D.C. area) or write to: NHTSA, U.S. Department of Transportation, Washington, D.C. 20590. You can also obtain other information about motor vehicle safety from the Hotline. You may notify NISSAN by contacting our Consumer Affairs Department, toll-free, at 1-800-NISSAN-1. In Hawaii call (808) 531-0231.
9-19
Z X
A Genuine Nissan Service Manual is the best source of service and repair information for your vehicle. Filled with wiring diagrams, illus- trations and step-by-step diagnostic and ad- justment procedures, this manual is the same one used by the factory trained technicians working at your Nissan dealership. Also avail- able are Genuine NISSAN Owner’s Manuals. For current pricing and availability of a Genu- ine NISSAN Service Manual or Genuine NIS- SAN Owner’s Manual, contact: In the USA: See your NISSAN dealer or contact:
Dyment Distribution Services 20770 Westwood Dr. Strongsville OH 44136
In a hurry? Call 1-800-247-5321 and charge your purchase to Visa/Master Card. In Canada: To purchase a copy of a Genuine NISSAN Service Manual or Owner’s Manual please contact your nearest NISSAN Dealer. For the phone number and location of a NISSAN Dealer in your area call the Nissan Satisfaction Center at 1-800-387-0122 and a bilingual NIS- SAN representative will assist you. Also available are Genuine NISSAN Service and Owner’s Manuals for older Nissan models.
9-20
Z X
10 Index
Air bag (See supplemental restraint system) Air bag warning light (If so equipped) ....... 2-20
Air cleaner housing filter............................ 7-19
Air conditionerAir conditioner operation ........................ 3-5
Air conditioner specification label......... 9-13
Heater and air conditioner controls ........ 3-3
Servicing air conditioning ....................... 3-9Air conditioning system refrigerant and lubricant recommendations.......................... 9-8
Air flow charts .............................................. 3-6
Anchor point locations ............................... 2-32
Antenna (manual) ...................................... 3-17
Anti-lock brake system (ABS) .................. 4-16
Audio systemAM-FM radio ........................................ 3-11
AM-FM radio with cassette player........ 3-13Automatic
Automatic power window switch ......... 1-16
Automatic transmission fluid................. 7-11
Driving with an automatic transmission............................................ 4-6Battery........................................................ 7-15
Belts (See drive belts) BrakeAnti-lock brake system (ABS) .............. 4-16
Brake fluid............................................. 7-13
Brake booster ....................................... 7-22
Brake wear indicators ................... 1-7, 7-22
Brake pedal .......................................... 7-21
Parking brake check............................. 7-21
Parking brake operation ....................... 4-11
Break-in schedule ...................................... 4-13
Bulb check/instrument panel ....................... 1-5
Bulb replacement....................................... 7-26Capacities and recommended fuel/lubricants............................................... 9-2
Cassette player (See audio system) CB radio or car phone ............................... 3-18
Child restraints for infants and small children............................................. 2-28
Child safety rear door lock .......................... 2-7
Cigarette lighter (accessory) and ashtray . 1-13
Cleaning exterior and interior ...................... 6-2
Clock-radio................................................. 3-13Clutch pedal............................................... 7-23
Cold weather driving cautions ................... 4-18
ControlsAudio controls ............................. 3-10, 3-13
Heater and air conditioner...................... 3-3Coolant
Capacities and recommended fuel/lubricants.......................................... 9-2
Changing engine coolant........................ 7-6
Checking engine coolant level ............... 7-5
Engine coolant temperature gauge ....... 1-3
Corrosion protection .................................... 6-5
Cruise control............................................. 4-12
Cup holder ................................................. 1-14Daytime running light system (Canada only) ............................................ 1-11
Defogger switchRear window defogger switch .............. 1-10
Dimensions and weights............................ 9-10
Door locks.................................................... 2-2
Freeing a frozen door lock ................... 4-18
Drive belts.................................................. 7-17
DrivingCold weather driving cautions .............. 4-18
Z X
Driving with automatic transmission............................................ 4-6
Driving with manual transmission........... 4-9
Precautions when driving ..................... 4-16
Precautions when starting and driving ... 4-2Economy-fuel ............................................. 4-14
Emission control information label............. 9-13
Emission control system warranty............. 9-19
EngineBefore starting the engine ...................... 4-5
Capacities and recommended fuel/lubricants.......................................... 9-2
Changing engine coolant........................ 7-6
Changing engine oil................................ 7-9
Changing engine oil filter...................... 7-10
Checking engine coolant level ............... 7-5
Checking engine oil level ....................... 7-8
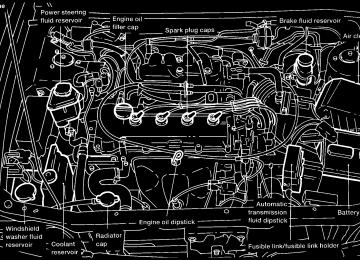
Engine compartment check locations ......................................... 7-3, 7-4
Engine coolant temperature gauge ....... 1-3
Engine cooling system ........................... 7-5
Engine oil................................................ 7-8
Engine oil and oil filter recommendation ..................................... 9-5
Engine oil viscosity ................................. 9-5
Engine serial number ........................... 9-12
Engine specifications.............................. 9-9
Starting the engine ............................... 4-11
Exhaust gas (Carbon monoxide)................. 4-2Flashers (See hazard warning flasher switch) Flat tire......................................................... 5-2
Fluid (Checking)Automatic transmission fluid................. 7-11
Brake fluid............................................. 7-13
Engine coolant........................................ 7-5
Engine oil................................................ 7-8
Power steering fluid.............................. 7-13
Window washer fluid ............................ 7-14
F.M.V.S.S. certification label ..................... 9-12
Front fog light switch ................................. 1-12
Front seats................................................. 2-13
FuelCapacities and recommended fuel/lubricants.......................................... 9-2
Fuel economy ....................................... 4-14
Fuel filler cap ........................................ 2-11
Fuel filler lid lock operation .................. 2-11
Fuel gauge.............................................. 1-4
Fuel octane rating................................... 9-3
Fuel recommendation............................. 9-3
Fuses ......................................................... 7-23Gas station information............................ 10-10
GaugeEngine coolant temperature gauge ........ 1-3
Fuel gauge.............................................. 1-410-2
Odometer................................................ 1-3
Speedometer .......................................... 1-3
Tachometer............................................. 1-3
Trip odometer ......................................... 1-3Gear selection (See shifting) General maintenance .................................. 8-2
Glove box..................................................... 2-9Hazard warning flasher switch .................. 1-13
Head restraints .......................................... 2-14
Headlight aiming adjustment ..................... 7-26
Headlight and turn signal switch ............... 1-11
Headlights .................................................. 7-25
Heater and air conditionerHeater and air conditioner controls ........ 3-3
Heater operation..................................... 3-4
Hood release ............................................... 2-8Ignition switch .............................................. 4-4
Increasing fuel economy .......................... 4-14
Indicator lights and chimes (See warning/ indicator lights and chimes) Inside mirror............................................... 2-35
Instrument brightness control .................... 1-12
Interior light ................................................ 1-17Z X
J
Jump starting ............................................... 5-7
Key............................................................... 2-2
Keyless entry system (See multi-remote control system)Labels
Air conditioner specification label......... 9-13
Emission control information label........ 9-13
Engine serial number ........................... 9-12
F.M.V.S.S. Certification label ............... 9-12
Vehicle identification number plate ...... 9-11
Warning labels (for SRS) ..................... 2-20License plate
Installing license plate .......................... 9-14
Light
Air bag warning light............................. 2-20
Bulb check/instrument panel .................. 1-5
Bulb replacement.................................. 7-26
Front fog light switch ............................ 1-12
Headlight aiming adjustment ................ 7-26
Headlight and turn signal switch .......... 1-11
Headlights............................................. 7-25
Interior light........................................... 1-17
Light bulbs ............................................ 7-25Trunk light ............................................ 1-17
Warning/indicator lights and chimes ...... 1-5Lock
Child safety rear door lock ..................... 2-7
Door locks............................................... 2-2
Fuel filler lid lock operation .................. 2-11
Power door lock...................................... 2-3
Trunk lid lock operation .......................... 2-9Maintenance
General maintenance ............................. 8-2
Inside the vehicle.................................... 8-3
Outside the vehicle................................. 8-2
Periodic maintenance schedules............ 8-5
Seat belt maintenance.......................... 2-27
Under the hood and vehicle ................... 8-4
Manual antenna ......................................... 3-17
Meters and gauges...................................... 1-2
MirrorInside mirror.......................................... 2-35
Outside mirror control........................... 2-34
Vanity mirror ......................................... 2-35
Multi-remote control system ........................ 2-4Octane rating (See fuel) Odometer ..................................................... 1-3
10-3
Oil
Capacities and recommended fuel/lubricants.......................................... 9-2
Changing engine oil................................ 7-9
Changing engine oil filter...................... 7-10
Checking engine oil level ....................... 7-8
Engine oil................................................ 7-8
Engine oil and oil filter recommendation ..................................... 9-5
Opener lever for trunk lid............................. 2-9
Outside mirror control ................................ 2-34
Overdrive switch .......................................... 4-8
OverheatIf your vehicle overheats ........................ 5-9
Owner’s manual order form....................... 9-20Parking
Parking brake check............................ 7-21
Parking brake operation ....................... 4-11
Parking/parking on hills ........................ 4-15
Periodic maintenance schedules................. 8-5
PowerPower door lock...................................... 2-3
Power steering fluid.............................. 7-13
Power windows..................................... 1-15Precautions
Maintenance precautions ....................... 7-2
Precautions on seat belt usage............ 2-22
Precautions when driving ..................... 4-16Z X
Precautions when starting and driving ... 4-2
Push starting................................................ 5-8Quick reference (See gas station information)
Radio
AM-FM radio......................................... 3-11
AM-FM radio with cassette player........ 3-13
CB radio or car phone.......................... 3-18
Rear seat ................................................... 2-15
Rear window defogger switch ................... 1-10
Refrigerant recommendation ....................... 9-8
Registering your vehicle in another country.......................................... 9-11
Remote keyless entry system (See multi- remote control system) Reporting safety defects (USA)................. 9-19Safety
Child safety rear door lock ..................... 2-7
Reporting safety defects (USA)............ 9-19
Seat adjustment......................................... 2-13
Seat beltPrecautions on seat belt usage............ 2-22
Seat belt extenders .............................. 2-27Seat belt maintenance.......................... 2-27
Seat belts.............................................. 2-22
Shoulder belt height adjustment........... 2-25
2-point type without retractor (rear center lap belt)............................. 2-26
3-point type with retractor..................... 2-23Seats
Front seats............................................ 2-13
Rear seat .............................................. 2-15
Service manual order form ........................ 9-20
Shifting ......................................................... 4-7
Spark plug replacement............................. 7-18
Speedometer ............................................... 1-3
SRS warning label ..................................... 2-20
StartingBefore starting the engine ...................... 4-5
Jump starting .......................................... 5-7
Precautions when starting and driving ... 4-2
Push starting........................................... 5-8
Starting the engine ............................... 4-11Steering
Power steering fluid.............................. 7-13
Tilting steering wheel............................ 2-34
Sun roof ..................................................... 1-16
Supplemental restraint system (Air bag system) (If so equipped).............. 2-15
SwitchAutomatic power window switch .......... 1-16
Front fog light switch ............................ 1-12
Hazard warning flasher switch ............. 1-13
Headlight and turn signal switch .......... 1-11
Ignition switch ......................................... 4-410-4
Overdrive switch ..................................... 4-8
Rear window defogger switch .............. 1-10
Windshield wiper and washer switch ..... 1-9Tachometer.................................................. 1-3
Theft warning ............................................... 1-8
Three way catalyst....................................... 4-2
Tilting front seat ......................................... 2-14
Tilting steering wheel................................. 2-34
Timing chain ................................................ 9-9
TireFlat tire.................................................... 5-2
Tire chains ............................................ 7-33
Tire placard........................................... 9-13
Tire pressure ........................................ 7-32
Tire rotation .......................................... 7-33
Types of tires........................................ 7-32
Uniform tire quality grading .................. 9-18
Wheel/tire size ...................................... 9-10
Wheels and tires................................... 7-32Towing
Tow truck towing .................................. 5-10
Trailer towing ........................................ 9-15
Towing load/specification chart ............ 9-16Transmission
Automatic transmission fluid................. 7-11
Driving with automatic transmission............................................ 4-6Z X
Driving with manual transmission........... 4-9
Travel (See registering your vehicle in another country) Trip odometer .............................................. 1-3
Trunk lid lock operation ............................... 2-9
Trunk light .................................................. 1-17Uniform tire quality grading ....................... 9-18
Vanity mirror .............................................. 2-35
Vehicle dimensions and weights ............... 9-10
Vehicle identificationVehicle identification number (chassis number) .................................. 9-11
Vehicle identification number plate ...... 9-11
Vehicle loading information ....................... 9-14
Vehicle recovery ........................................ 5-11
Ventilators .................................................... 3-2Warning
Air bag warning light............................. 2-20
Hazard warning flasher switch ............. 1-13
Theft warning.......................................... 1-8
Warning/indicator lights and chimes ...... 1-5
Wheel/tire size ........................................... 9-10
Wheels and tires........................................ 7-32
Window washer fluid.................................. 7-14
WindowsLocking passengers’ windows.............. 1-15
Rear power windows ............................ 1-16
Manual .................................................. 1-15
Power windows..................................... 1-15Wiper
Windshield wiper and washer switch ..... 1-9
Wiper blades......................................... 7-2010-5
Z X
GAS STATION INFORMATION QUICK REFERENCE
Recommended fuel: Unleaded gasoline, at least 87 AKI (RON 91). For further information on items such as gaso- hol, see ‘‘Fuel recommendation’’ in the ‘‘Tech- nical and consumer information’’ section. Recommended engine oil: c API SG or SH and Energy Conserving II c API Certification Mark c SAE 5W-30 viscosity oil is preferred for all
ambient temperatures.
See ‘‘Engine oil and oil filter recommenda- tion’’ in the ‘‘Technical and consumer infor- mation’’ section. Tire cold pressure: See tire placard affixed to the driver side center pillar. Recommended new vehicle break-in procedure: During the first 1,000 miles (1,600 km) of vehicle use, follow the recommendations out- lined in the “BREAK-IN SCHEDULE Informa- tion found in the “Starting and Driving” section of this Owner’s Manual. Follow these recom- mendations for the future reliability and economy of your new vehicle. Failure to follow these recommendations may result in vehicle damage or shortened engine life.
AGS0600
Z X
Foreword
The inside pages of this manual contain a minimum of 50% recycled fibers, including 10% post-consumer fibers.
Welcome to the growing family of new NISSAN owners. This vehicle is delivered to you with confidence. It was produced using the latest techniques and strict quality control. This manual was prepared to help you understand the operation and maintenance of your vehicle so that you may enjoy many miles of driving pleasure. Please read through this manual before operating your vehicle. A separate ‘‘Warranty Information Booklet’’ explains details about the warranties covering your vehicle. Your NISSAN dealer knows your vehicle best. When you require any service or have any questions, he will be glad to assist you with the extensive resources available to him. IMPORTANT SAFETY INFORMATION REMINDERS FOR SAFETY! Follow these five important driving rules to help ensure a safe and complete trip for you and your passengers! c NEVER drive under the influence of alcohol or drugs. c ALWAYS observe posted speed limits and never drive too
NOTES ON THE INFORMATION CONTAINED IN THIS OWNER’S MANUAL This owner’s manual contains descriptions and operating instructions for all systems, features and optional equipment that might appear in any model of this vehicle built for any destination in North America, including the continental United States, Canada and Hawaii. Therefore, you may very well find information in this manual that does not apply to your vehicle.
fast for conditions.
c ALWAYS use your seat belts and appropriate child restraint
systems.
c ALWAYS provide information about the proper use of ve-
hicle safety features to all occupants of the vehicle.
c ALWAYS review this Owner’s Manual for important safety
information.
© 1996 NISSAN NORTH AMERICA, INC.
TORRANCE, CALIFORNIA
All rights reserved. No part of this Owner’s Manual may be reproduced or stored in a retrieval system, or transmitted in any form, or by any means, electronic, mechanical, photocopying, recording or otherwise, without the prior written permission of Nissan North America, Inc.
MODIFICATION OF YOUR VEHICLE This vehicle should not be modified. Modification could affect its performance, safety or durability, and may even violate govern- mental regulations. In addition, damage or performance prob- lems resulting from modifications may not be covered under NISSAN warranties.
All information, specifications and illustrations in this manual are those in effect at the time of printing. NISSAN reserves the right to change specifications or design without notice and without obligation.
Z B13-D X
Welcome To The World Of NISSAN
AFW0001
Your new Nissan is the result of our dedication to produce the finest in safe, reliable and economi- cal transportation. Your vehicle is the product of a successful worldwide company that manufac- tures cars and trucks in over 20 countries and distributes them in 150 nations. Nissan vehicles are designed and manufactured by Nissan Motor Co., Ltd. which was founded in Tokyo, Japan in 1933, and Nissan affiliates world wide, collectively growing to become the fourth largest automaker in the world. In addition to cars and trucks, Nissan also makes textile machinery, forklift trucks, marine engines, boats and other products. Nissan has made a substantial and growing investment in North America, starting with the opening of Nissan Motor Corporation in U.S.A. in
1960 and continuing with the production of some cars and trucks at one of the world’s most modern manufacturing facilities in Smyrna, Ten- nessee, vehicle styling at Nissan Design Interna- tional in San Diego, California, and engineering at Nissan Research and Development in Farm- ington Hills, Michigan. Nissan Motor Corporation in U.S.A. and its deal- ers employ about 50,000 Americans. Nissan is also a substantial contributor to the Canadian economy. Nissan Canada Inc. and its 200 dealers and suppliers employ approximately 4,000 people. These include company employ- ees and the staffs of Nissan dealers all across Canada. In addition, many Canadians work for companies that supply Nissan and Nissan deal- ers with materials and services ranging from
The inside pages of this manual contain a minimum of 50% recycled fibers, including 10% post-consumer fibers.
to the supply of
operation of port facilities and transportation ser- vices, lubricants, parts and accessories. Nissan pioneered the use of electronics and computers in automobiles, and has led the indus- try in improving both performance and fuel effi- ciency through new engine designs and the use of synthetic materials to reduce vehicle weight. The company has also developed ways to build quality into its vehicles at each stage of the production process, both through extensive use of automation and — most importantly — through an awareness that people are the cen- tral element in quality control. From the time the parts arrived from our suppli- ers until you took delivery of your new Nissan, dozens of checks were made to ensure that only the best job was being done in producing and delivering your vehicle. Nissan also takes great care to ensure that when you take your Nissan to your dealer for maintenance, the service techni- cian will perform his work according to the quality standards that have been established by the factory. Safety has also been built into your Nissan. As you know, seat belts are an integral part of the safety systems that will help protect you and your passengers in the event of a sudden stop or an accident. We urge you to use the belts every time you drive the vehicle.
Z X
The Nissan story of growth and achievement reflects our major goal: to provide you, our customer, with a vehicle that is built with quality and craftsmanship — a product that we can be proud to build and you can be proud to own. NOTE: For Canada, some vehicles are not equipped with a Supplemental Air Bag System. Your vehicle may not have a Driver and Passenger-side Supplemental Air Bag. For additional information see the ‘‘Pre- driving checks and adjustments’’ sec- tion of this manual.
Z X
NISSAN CUSTOMER CARE PROGRAM
NISSAN CARES ... Both NISSAN and your NISSAN dealer are dedicated to serving all your automotive needs. Your satisfaction with your vehicle and your NISSAN dealer are our primary concerns. Your NISSAN dealer is always available to assist you with all your automobile sales and service needs.
if
However, there is something that your NISSAN dealer cannot assist you with or you would like to provide NISSAN directly with comments or questions, please contact our (NISSAN’s) Consumer Affairs De- partment using our toll-free number: For U.S. mainland customers
1-800-NISSAN-1 (1-800-647-7261)
For Hawaii customers
(808) 531-0231 (Oahu Number)
For Canada customers
1-800-387-0122
The Consumer Affairs Department will ask for the following infor- mation: — Your name, address, and telephone number — Vehicle identification number (on dashboard) — Date of purchase — Current odometer reading — Your NISSAN dealer’s name — Your comments or questions
OR You can write to NISSAN with the information on the left at: For U.S. mainland and Alaska customers
Nissan Motor Corporation in U.S.A. Consumer Affairs Department P.O. Box 191
Gardena, California 90247For Hawaii customers
Nissan Motor Corporation in Hawaii 2880 Kilihau St. Honolulu, Hawaii 96819
For Canada customers Nissan Canada Inc. P.O. Box 1709, Station ‘‘B’’ Mississauga, Ontario L4Y 4H6
We appreciate your interest in NISSAN and thank you for buying a quality NISSAN vehicle.
Z X
Z X
Contents
Instruments and controls
Pre-driving checks and adjustments
Heater, air conditioner and audio system
Starting and driving
In case of emergency
Appearance and interior care
Do-it-yourself operations
Maintenance schedule
Technical and consumer information
Index
10
Z X
1 Instruments and controls
Meters and gauges .............................................. 1-2
Speedometer and odometer ................................ 1-3
Tachometer (If so equipped)................................ 1-3
Engine coolant temperature gauge...................... 1-3
Fuel gauge ........................................................... 1-4
Warning/indicator lights and chimes .................... 1-5
Theft warning (If so equipped) ............................. 1-8
Windshield wiper and washer switch ................... 1-9
Rear window defogger switch ............................ 1-10
Headlight and turn signal switch ........................ 1-11
Instrument brightness control............................. 1-12
Front fog light switch (If so equipped) ............... 1-12Hazard warning flasher switch ........................... 1-13
Cigarette lighter (accessory) and ashtray .......... 1-13
Cup holder.......................................................... 1-14
Power windows (If so equipped)........................ 1-15
Sun roof (If so equipped) ................................... 1-16
Interior light......................................................... 1-17
Trunk light (If so equipped) ................................ 1-17Z X
METERS AND GAUGES
1-2
AIC0641
Z X
SPEEDOMETER AND ODOMETER
TACHOMETER (If so equipped) ENGINE COOLANT
TEMPERATURE GAUGE
AIC0603
AIC0604
AIC0699
Speedometer The speedometer indicates vehicle speed. Odometer The odometer records the total distance the vehicle has been driven. Trip Odometer The trip odometer records the distance of individual trips. Before each trip, set the trip odometer to zero by pushing the reset button.
Tachometer The tachometer indicates engine speed in revolutions per minute (rpm).
CAUTION
When engine speed approaches the red zone, shift to a higher gear. Engine speed in the red zone may cause seri- ous engine damage.
Engine Coolant Temperature Gauge The gauge indicates the engine coolant temperature. The engine coolant temperature varies with the outside air temperature and driving conditions.
1-3
Z X
FUEL GAUGE
AIC0605M
AIC0606
CAUTION
If the gauge indicates engine coolant temperature over the normal range, stop the vehicle as soon as safely pos- sible. If the engine is overheated, con- tinued operation of the vehicle may seriously damage the engine. See the ‘‘In case of emergency’’ section for the immediate action required.
Fuel Gauge The gauge indicates the approximate fuel level in the tank. The gauge may move slightly during brak- ing, turning, acceleration, or going up or down hills. The gauge needle remains in approximately the same position, even after the ignition key is turned to OFF. Refill the fuel tank before the gauge registers Empty (E).
1-4
Z X
WARNING/INDICATOR LIGHTS AND CHIMES
or
Brake warning light
Low washer fluid warning light (For Canada)
Cruise indicator light (if so equipped)
Turn signal/hazard indicator lights
or
Anti-lock brake warning light (if so equipped)
Air bag warning light (if so equipped)
High beam indicator light (Blue)
O/D OFF Overdrive off indicator light
Seat belt warning light
Charge warning light
Malfunction indicator light
Door ajar warning light (if so equipped)
Engine oil pressure warning light
Low fuel warning light (if so equipped)
Checking bulbs Apply the parking brake and turn the ignition key to ON without starting the engine. The following lights will come on:
or
or
If equipped, the following lights come on briefly and then go off:
, O/D OFF,
or
If any light fails to come on, it may indicate a burned-out bulb or an open
circuit in the electrical system. Have the system repaired promptly.
‘‘Engine oil’’ tions’’ section.
in the ‘‘Do-it-yourself opera-
Engine oil pressure warning light
This light warns of low engine oil pressure. If the light flickers or comes on during normal driving, pull off the road in a safe area, stop the engine immediately and call a NISSAN dealer or other authorized repair shop. The oil pressure warning light is not designed to indicate a low oil level. Use the dipstick to check the oil level. See
1-5
CAUTION
Running the engine with the oil pres- sure warning light on could cause seri- ous damage to the engine.
Charge warning light
If the light comes on while the engine is running, it may indicate a problem with the charging system. Turn the engine off and check the generator belt. If the belt is loose,
Z X
broken, or missing, or if the light remains on, see your NISSAN dealer immediately.
CAUTION
Do not continue driving if the generator belt is loose, broken or missing.
Low fuel warning light (If so equipped)
This light comes on when the fuel in the tank is getting low. Refuel as soon as it is con- venient, preferably before the fuel gauge reaches E. fuel There should be a small reserve of remaining in the tank when the fuel gauge reaches E.
Door ajar warning light (If so equipped)
This light comes on when any of the doors and/or back door are not closed securely while the ignition key is ON.
Seat belt warning light and chime
The light and chime remind you to fasten seat belts. The light illuminates whenever
the ignition key is turned to ON, and re- mains illuminated until the driver’s seat belt is fastened. At the same time, the chime sounds for about seven seconds unless the driver’s seat belt is securely fastened. Refer to “Seat belts” in the “Pre-driving checks and adjustments” section for pre- cautions on seat belt usage.
Air bag warning light (If so equipped)
the air bag light
When the ignition key is in the ON or START position, illuminates for about 7 seconds and then turns off. This means the system is operational. If any of the following conditions occur, the air bag needs servicing and your vehicle must be taken to your nearest authorized NISSAN dealer: 1. The air bag light does not come on and remain on for 7 seconds and then go off as described above.
2. The air bag light flashes intermittently or
remains on.
3. The air bag light does not come on at all. Unless checked and repaired, the Supple-
1-6
mental Restraint System (Air bag system) may not function properly. For additional details on the Supplemental Restraint Sys- tem (Air bag system), see the ‘‘Pre-driving checks and adjustments’’ section.
Low washer light (For Canada)
fluid warning
This light comes on when the washer fluid is at a low level. Add washer fluid as necessary. See the ‘‘Do-it-yourself operations’’ section. Brake warning light functions for both the parking
or This light brake and the foot brake systems. The light comes on when the parking brake is applied, and also warns of a low brake fluid level. If the light comes on while the engine is running with the parking brake not applied, stop the vehicle and perform the following: 1. Check the brake fluid level. Add brake fluid as necessary. See ‘‘Brake and clutch fluid’’ in the ‘‘Do-it-yourself opera- tions’’ section.
2. If the brake fluid level is correct, have the your
system checked
by
warning NISSAN dealer.
Z X
WARNING
c If you judge it to be safe, drive care- fully to the nearest service station for repairs. Otherwise, have your vehicle towed because driving it could be dangerous.
c Pressing the brake pedal with the engine stopped and/or low brake fluid level may increase your stop- ping distance and braking will require greater pedal effort as well as pedal travel.
or
Anti-lock brake warning light (If so equipped)
If the light comes on while the engine is running, it may indicate something wrong with the anti-lock portion of the brake sys- tem. Have the system checked by your Nissan dealer. Turn off the engine, and start it again by slowly turning the ignition key (quickly doing so may cause the ABS light to stay on when there is nothing wrong). If the light stays on, have the system checked
by your NISSAN dealer. If an abnormality occurs in the system, the anti-lock function ceases, but the regular braking system continues to operate. If the light comes on while you are driv- ing, contact your NISSAN dealer for re- pair. O/D OFF Overdrive off indicator light
(Automatic transmission models only)
This light comes on when the overdrive position. switch is pushed to the OFF Turn signal/hazard indicator lights
The appropriate light flashes when the turn signal lever switch is activated. Both lights flash when the hazard switch is turned on.
High beam indicator light
This blue light comes on when the headlight high beam is on and goes out when the low beam is selected.
1-7
Cruise indicator light (If so equipped)
The light comes on while the vehicle speed is controlled by the cruise control system. Key reminder chime A chime sounds if the driver side door is opened while the key is left in the ignition switch. Remove the key and take it with you when leaving the vehicle. Light reminder chime A chime sounds when the driver side door is opened if the headlights or parking lights are on (ignition switch is turned off). Turn the headlight control switch off before you leave the vehicle. Brake pad wear warning The disc brake pads have audible wear warnings. When a brake pad requires re- placement, it makes a high pitched scraping sound when the vehicle is in motion, whether or not is de- pressed. Have the brakes checked as soon as possible if the warning sound is heard.
the brake pedal
Z X
THEFT WARNING (If so equipped)
Malfunction indicator light
If the MIL comes on or blinks while the engine is running, it may indicate a potential emission control problem.
CAUTION
control
emission
c Continued operation without having the system checked and repaired as necessary could lead to poor driveability, re- duced fuel economy, and possible damage to the emission control sys- tem which may affect your warranty coverage.
c Although the vehicle is still drive- able, see your nearest NISSAN dealer as soon as possible. To avoid system damage, do not drive at speeds above 45 MPH (72 km/h). If possible, avoid hard acceleration or deceleration.
IC0005
The theft warning system provides visual and audio alarm signals if parts of the vehicle are disturbed. How to activate the theft warning system 1. Close all windows. 2. Remove the key from the ignition switch. 3. Close all doors, hood and trunk lid. Lock button on the all doors by pressing the multi-remote controller. At this time, the turn signal lights blink twice, indicat- ing all doors are locked.
1-8
The system can be activated even if the windows are open. 4. Confirm that
the SECURITY indicator light in the instrument cluster illuminates. c The SECURITY light stays on for about 30 seconds and then begins to flash once every three seconds. The system is now activated.
The theft warning system is NOT activated if one of the following occurs: c The door is unlocked or the ignition key is turned to the ACC or ON position during the 30 seconds in which the SECURITY light stays on.
c The SECURITY light blinks at a steady 1/2 second on - 1/2 second off rate because a door, the trunk, or the hood is open and the key is not in the ACC or ON position. When the ignition key is turned to the ACC or ON position, the SECU- RITY light turns off.
Theft warning system operation The theft warning system emits the follow- ing alarm: c The headlights blink and the horn sounds
Z X
intermittently. In addition, the starter mo- tor does not operate.
c The alarm automatically turns off after 2
to 3 minutes. However, the alarm reacti- vates if the vehicle is tampered with again. The alarm can be shut off by unlocking a door or trunk lid with the key button on the or by pressing the multi-remote controller.The alarm is activated by: c opening the door or trunk lid without using the key (even if the door is un- locked by releasing the door inside lock switch) or opening the trunk lid by oper- ating the opener lever.
c opening the hood. How to stop the alarm The alarm stops only by unlocking a door or the trunk lid with the key or by pressing button on the multi-remote control- the ler. The alarm does not stop if the ignition switch is turned to ACC or ON position. If the system does not operate as de- scribed above, have it checked by your NISSAN dealer.
WINDSHIELD WIPER AND WASHER SWITCH
AIC0629
WARNING
In freezing temperatures the washer solution may freeze on the windshield and obscure your vision. Warm the windshield with the defroster before you wash the windshield.
Push the lever down to operate the wiper. Pull the lever toward you to operate the washer. The ignition switch must be in the ON position for the wipers or washer to be activated. Operating the washer automati- cally cycles the wipers several times.
CAUTION
c Do not operate the washer continu-
ously for more than 30 seconds.
c Do not operate the washer if the res-
ervoir tank is empty.
1-9
Z X
REAR WINDOW DEFOGGER SWITCH
AIC0611
To defog the rear window glass, start the engine and push the rear window defogger switch on. (The indicator light comes on.) Push the switch again to turn the defogger off. The rear window defogger switch automati- cally turns off in approximately 15 minutes.
CAUTION
When cleaning the inner side of the rear window, be careful not to scratch or damage the electrical conductors.
1-10
Z X
HEADLIGHT AND TURN SIGNAL SWITCH
position:
Lighting Turn the switch to the The front clearance, tail, license plate and instrument panel lights come on. Turn the switch to the The headlights come on and all the other lights remain on. To select the high beam function, push the lever forward. The high beam lights come on and the indicator light illuminates. Pull it back to select the low beam.
position:
Passing signal Pulling and releasing the lever flashes the headlights’ high beams on and off. Daytime running light system (For Canada) The headlight high beams illuminate after starting the engine, even if the headlight control switch is in the OFF position. The headlights are not as bright as they are with the headlight switch in the If the parking brake is applied before the engine is started, the daytime running lights do not illuminate. The daytime running lights
position.
1-11
AIC0609
illuminate once the parking brake is re- leased. Thereafter, the daytime running lights do not turn off when using the parking brake at a stop signal, etc.
WARNING
When the daytime running light system is active, tail lights on your vehicle are not on. It is necessary at dusk to turn on your headlights. Failure to do so could cause an accident injuring your- self and others.
Z X
INSTRUMENT BRIGHTNESS CONTROL
FRONT FOG LIGHT SWITCH (If so equipped)
Turn signal Move the lever up or down to signal the turning direction. When the turn is com- pleted, the turn signals cancel automati- cally. Lane change signal To signal a lane change, move the lever up or down to the point where the indicator light begins to flash, but the lever does not latch.
AIC0608
AIC0618
The instrument brightness control operates when the headlight switch is in the
or
position.
Turn the control to adjust the brightness of instrument panel lights.
position.
To turn the front fog lights on, rotate the switch to the To turn them off, turn the switch toward the back of the vehicle to the OFF position. The low-beam headlight function must be on for the fog lights to operate. The fog lights automatically turn off whenever the high-beam headlight function is selected.
1-12
Z X
HAZARD WARNING FLASHER SWITCH
CIGARETTE LIGHTER (ACCESSORY) AND ASHTRAY
c Some state laws may prohibit the use of the hazard warning flasher switch while driving.
c Turn signals do not work when the hazard warning flasher lights are on.
The flashers can be actuated with the igni- tion switch in either the OFF or ON position.
IC1193M
Push the switch on to warn other drivers when you must stop or park under emergency condi- tions. All turn signal lights flash.
WARNING
c When stalled or stopped on the road- way under emergency conditions, move the vehicle well off the road.
c Do not use the hazard warning flash- ers while moving on the highway un- less unusual circumstances force you to drive so slowly that your vehicle might become a hazard to other traffic.
AIC0607
The cigarette lighter element is an acces- sory. A genuine NISSAN cigarette lighter or equivalent can be purchased from your lo- cal NISSAN dealer.
1-13
Z X
The cigarette lighter operates when the ignition switch is in the ACC or ON position. Push the lighter in all the way. When the lighter is heated, it springs out. Return the lighter to its original position after use.
CAUTION
The cigarette lighter socket is a power source for the cigarette lighter element only. The use of the cigarette lighter socket as a power source for any other accessory is not recommended.
WARNING
The cigarette lighter should not be used while driving in order that full attention may be given to the driving operation.
CUP HOLDER
c Avoid abrupt starting and braking when the cup holder is being used to prevent spilling the drink. If the liquid is hot, it can scald you or your pas- senger.
AIC0087
To open, pull the cup holder. To close, push the cup holder in fully. The cup holder and the ashtray cannot be used at the same time. Close the ashtray before using the cup holder.
WARNING
c The driver should not pull out the cup holder or remove or insert cups into the cup holder while driving in order that full attention may be given to the driving operation.
1-14
Z X
POWER WINDOWS (If so equipped)
AIC0630
AIC0612
AIC0613
MANUAL WINDOW OPERATION (If so equipped) The side windows can be opened or closed by turning the hand crank on each door. To open the window, turn the crank counter- clockwise. To close the window, turn the crank clockwise.
The power windows operate only when the ignition key is in the ON position. To open the window, lightly tap the driver side button until the desired position is reached. To close the window, lift the switch upward. The driver side control panel is equipped with switches to open or close all the windows. Locking passengers’ windows When the window lock button is depressed, only the driver side window can be opened or closed. Push it again to cancel the win- dow lock function.
1-15
The passenger side switch opens or closes only the corresponding window. To open the window, push the switch downward. To close the window, lift the switch upward.
WARNING
c Make sure that all passengers have their hands, etc. inside the vehicle before closing the windows.
c Do not leave children unattended in- side the vehicle. They could unknow- ingly activate switches.
Z X
SUN ROOF (If so equipped)
AIC0614
AIC0615
AIC0616
Rear power windows (If so equipped) The rear power window switches open or close only the corresponding window. To open the window, push the switch down- ward. To close the window, lift the switch upward.
Automatic power window switch To fully open the driver side window, press the automatic power window switch down and release it; it need not be held. The window automatically opens all the way.
The sun roof only operates when the igni- tion key is in the ON position. Sliding the sun roof To open the roof, push the switch toward DOWN/OPEN. To close the roof, push the switch toward UP/CLOSE. Tilting the sun roof Close the sun roof by pushing the switch toward UP/CLOSE. Continuing to push the UP/CLOSE button tilts the sun roof up.
1-16
Z X
To tilt the sun roof down, push the switch toward DOWN/OPEN. Continuing to push the DOWN/OPEN switch opens the sun roof. Sun shade Open and close the sun shade by sliding it forward or backward.
WARNING
c Be extremely careful not to have any part of your body in the sun roof opening while it is closing.
c Do not stand up or extend any por- tion of your body out of the opening while driving.
c Remove water drops, snow,
ice or sand from the sun roof before opening.
c Do not place any heavy object on the
sun roof or surrounding area.
NOTE: Leaving the interior light switch in the ON position for extended periods of time results in a discharged battery. TRUNK LIGHT (If so equipped) The light illuminates when the trunk lid is opened. When the trunk lid is closed, the light goes off. For bulb replacement proce- dures, refer to “Bulb replacement” in the ‘‘Do-it-yourself operations’’ section.
INTERIOR LIGHT
SIC0025
The interior light has a three-position switch. The interior light operates regardless of ignition key position. c When the switch is in the OFF position, the interior light does not illuminate, re- gardless of door position.
c When the switch is in the center j illuminates
the interior
position, when a door is opened.
light
c When the switch is in the ON position, the interior light illuminates, regardless of door position.
1-17
Z X
MEMO
1-18
Z X
2 Pre-driving checks and adjustments
Key ....................................................................... 2-2
Door locks ............................................................ 2-2
Multi-remote control system (If so equipped) ...... 2-4
Child safety rear door lock ................................... 2-7
Hood release ........................................................ 2-8
Glove box ............................................................. 2-9
Trunk lid lock operation........................................ 2-9
Fuel filler lid lock operation ................................ 2-11
Front Seats......................................................... 2-13
Supplemental restraint system (Air bag system) (If so equipped) ...................... 2-15
Warning labels (If so equipped) ......................... 2-20
Air bag warning light (If so equipped)................ 2-20
Seat belts ........................................................... 2-22
Child restraints for infants and small children.... 2-28
Tilting steering wheel ......................................... 2-34
Outside mirror control......................................... 2-34
Inside mirror ....................................................... 2-35
Vanity mirror (If so equipped) ............................ 2-35Z X
KEY
DOOR LOCKS
APD0619
A key number plate is supplied with your key. Record the key number that is on the key number plate and keep it in a safe place (such as your wallet), NOT IN THE CAR. If you lose your keys, see your NISSAN dealer for duplicates by using the key num- ber. NISSAN does not record key numbers so it is very important to keep track of your key number plate. A key number is only necessary when you have lost all keys and do not have one to duplicate from. If you still have a key, this key can be duplicated by your NISSAN dealer or a locksmith shop.
APD0622
Locking front door with key To lock the door, turn the key towards the front of the vehicle. To unlock, turn it towards the rear.
2-2
PD1160M
Locking the door without key To lock the door from the outside without a key, move the inside lock knob to the Lock position, then close the door. When locking the door this way, be certain not to leave the key inside the vehicle.
Z X
WARNING
c Always have the doors locked while driving. Along with the use of seat belts, this provides greater safety in the event of an accident by helping to prevent persons from being thrown from the vehicle. This also helps keep children and others from unintention- ally opening the doors, and will help keep out intruders.
c Before opening any door, always look for and avoid oncoming traffic.
c Do not leave children unattended in a locked vehicle. They may inadvert- ently activate switches.
APD0608
POWER DOOR LOCK (If so equipped) Moving the door lock/unlock button toward the rear of the vehicle on the driver’s door armrest locks all doors. Moving the door lock/unlock button toward the front of the vehicle unlocks all doors.
WARNING
c Before opening the door, always look
for and avoid oncoming traffic.
2-3
Z X
MULTI-REMOTE CONTROL SYSTEM (If so equipped) It is possible to lock/unlock all doors, turn the interior light on or off, and activate the panic alarm by using the remote controller from outside the car. Be sure to remove the key from the vehicle before locking the doors and leaving it. The remote controller can operate at a distance of approximately 49 ft (15 m) from the vehicle. (The effective distance depends upon the conditions around the vehicle.) As many as four remote controllers can be used with one vehicle. For information con- cerning the purchase and use of additional remote controllers, contact your NISSAN dealer.
CAUTION:
Listed below are conditions or occur- rences which will damage the remote controller:
c Do not allow the remote controller to
become wet.
c Do not drop the remote controller. c Do not strike the remote controller
sharply against another object.
c Do not place the remote controller for an extended period in an area where temperatures exceed 140°F (60°C).
Locking doors 1. Close all the doors. 2. Push the controller.
button on the multi-remote
3. All the doors lock. 4. The hazard indicators flash twice. c When the
button is pushed with all doors locked, the hazard indicators flash twice as a reminder that the doors are already locked.
2-4
Z X
into the ignition or by locking the doors with the multi-remote controller. Using the panic alarm If you are near your vehicle and feel threat- ened, you may activate the alarm to call attention as follows: 1. Push the
button on the remote con-
troller for longer than 1.5 seconds.
Unlocking doors 1. Push the
button on the multi-remote controller. Only the driver side door un- locks.
2. Push the
button on the multi-remote
controller again within 5 seconds. The passenger doors unlock.
3. The interior light stays on for 30 seconds. The interior light can be turned off without waiting for 30 seconds by inserting the key
2-5
APD0616
2. The theft warning alarm and headlights
stay on for 30 seconds.
3. The alarm stops when any of the key functions are used. For example, when the button is pushed, or the button is pushed for longer than 1.5
seconds on the multi-remote controller, the panic alarm function is cancelled.or the
Z X
BATTERY REPLACEMENT
Replace the two batteries as follows: 1. Remove the screw and open the lid. 2. Replace the batteries with new ones. Insert the batteries as illustrated above.
APD0623
Recommended batteries: Sanyo CR2016
or equivalent.3. Close the lid securely and install
the
screw.
4. Press the
button, then the
button
2-6
two or three times to check the multi- remote controller operation.
If the batteries are removed for any rea- son other than replacement, perform step 4 above. c An improperly disposed battery can hurt the environment. Always confirm local regulations for battery disposal. c The multi-remote controller is water- resistant; however, if it does get wet, immediately wipe completely dry.
c The operational range of the multi- remote controller extends to approxi- mately 49 ft (15 m) from the vehicle. This range may vary with conditions.
FCC Notice: This device complies with FCC rules part 15. Operation is subject to the following two conditions: (1) This device may not cause harmful interference and (2) This device must accept any interference that may be received, including interference that may cause undesired operation. The transmitter has been tested and complies with FCC and DOC/MDC rules. Changes or modifications not expressly
Z X
approved by the party responsible for compliance could void the user’s author- ity to operate the device.
PD1161M
CHILD SAFETY REAR DOOR LOCK (4-door only) Child safety locks help prevent doors from being opened accidentally, especially when small children are in the vehicle. The child safety lock levers are located on the edge of the rear doors. When the lever is in the lock position, the rear door can be opened only from the outside.
2-7
Z X
HOOD RELEASE
1. Pull
the hood lock release handle s1
located below the instrument panel. The hood springs up slightly.2. Pull up on the lever s2 at the front of the hood with your fingertips and raise the hood.
SPA0004
APD0618
3. Insert
the support
rod into the slot marked with the arrow on the underside of the hood.
4. When closing the hood, reset the support rod to its original position, lower the hood to approximately 12 inches above the latch and release it. This allows proper engagement of the hood latch.
2-8
Z X
GLOVE BOX
TRUNK LID LOCK OPERATION
APD0601
Open the glove box by pulling the handle.
WARNING
Keep glove box lid closed while driving