- 2009 Nissan Altima Owners Manuals
- Nissan Altima Owners Manuals
- 2002 Nissan Altima Owners Manuals
- Nissan Altima Owners Manuals
- 1999 Nissan Altima Owners Manuals
- Nissan Altima Owners Manuals
- 2004 Nissan Altima Owners Manuals
- Nissan Altima Owners Manuals
- 2003 Nissan Altima Owners Manuals
- Nissan Altima Owners Manuals
- 1997 Nissan Altima Owners Manuals
- Nissan Altima Owners Manuals
- 2010 Nissan Altima Owners Manuals
- Nissan Altima Owners Manuals
- 1996 Nissan Altima Owners Manuals
- Nissan Altima Owners Manuals
- 2005 Nissan Altima Owners Manuals
- Nissan Altima Owners Manuals
- 1998 Nissan Altima Owners Manuals
- Nissan Altima Owners Manuals
- 2008 Nissan Altima Owners Manuals
- Nissan Altima Owners Manuals
- 2007 Nissan Altima Owners Manuals
- Nissan Altima Owners Manuals
- 2001 Nissan Altima Owners Manuals
- Nissan Altima Owners Manuals
- 2000 Nissan Altima Owners Manuals
- Nissan Altima Owners Manuals
- 2011 Nissan Altima Owners Manuals
- Nissan Altima Owners Manuals
- 2012 Nissan Altima Owners Manuals
- Nissan Altima Owners Manuals
- 2006 Nissan Altima Owners Manuals
- Nissan Altima Owners Manuals
- Download PDF Manual
-
HomeLink姞 button a second time to com- plete the training process. (Some garage door openers may require you to do this procedure a third time to complete the train- ing.)
The garage door opener should now recognize the HomeLink姞 Universal Transceiver and acti- vate when the HomeLink姞 button is pressed. The remaining two buttons may now be programmed (if not yet programmed, follow steps 2 through 4
in the “Programming HomeLink姞” procedures earlier in this section). REPROGRAMMING A SINGLE HOMELINK姞 BUTTON To reprogram a HomeLink姞 Universal Transceiver button, complete the following. 1. Press and hold the desired HomeLink姞 but- ton. Do not release the button until step 4
has been completed.2. When the indicator light begins to flash slowly (after 20 seconds), position the hand-held transmitter 1 - 3 inches (26 - 76
mm) away from the HomeLink姞 surface.2-54 Instruments and controls
墌 REVIEW COPY—2009 Altima (alt) Owners Manual—USA_English (nna) 09/08/08—tbrooks 墍
3 Pre-driving checks and adjustments
Keys . . . . . . . . . . . . . . . . . . . . . . . . . . . . . . . . . . . . . . . . . . . . . 3-2
NISSAN Intelligent Key™ . . . . . . . . . . . . . . . . . . . . . . . . 3-2
NISSAN vehicle immobilizer system keys . . . . . . . . . . 3-3
Doors . . . . . . . . . . . . . . . . . . . . . . . . . . . . . . . . . . . . . . . . . . . . 3-4
Locking with key. . . . . . . . . . . . . . . . . . . . . . . . . . . . . . . . 3-4
Locking with inside lock knob . . . . . . . . . . . . . . . . . . . . 3-5
Locking with power door lock switch . . . . . . . . . . . . . 3-5
Automatic Door Locks . . . . . . . . . . . . . . . . . . . . . . . . . . 3-5
Child safety rear door lock (Sedan only). . . . . . . . . . . 3-6NISSAN Intelligent Key™ With Door and Trunk Request Switches . . . . . . . . . . . . . . . . . . . . . . . . . . . . . . . . . 3-6
Operating range. . . . . . . . . . . . . . . . . . . . . . . . . . . . . . . . 3-8
Door locks/unlocks precaution . . . . . . . . . . . . . . . . . . . 3-9
NISSAN Intelligent Key™operation. . . . . . . . . . . . . . . . 3-9
How to use the remote keyless entry function . . . . . . . . . . . . . . . . . . . . . . . . . . . . . . . . . . . . . . 3-12
Warning signals . . . . . . . . . . . . . . . . . . . . . . . . . . . . . . . 3-15
Troubleshooting guide . . . . . . . . . . . . . . . . . . . . . . . . . 3-16NISSAN Intelligent Key™ Without Door and Trunk Request Switches . . . . . . . . . . . . . . . . . . . . . . . . . . . . . . . . 3-18
Operating range. . . . . . . . . . . . . . . . . . . . . . . . . . . . . . . 3-19How to use the remote keyless entry function . . . . . . . . . . . . . . . . . . . . . . . . . . . . . . . . . . . . . . 3-19
Warning signals . . . . . . . . . . . . . . . . . . . . . . . . . . . . . . . 3-22
Troubleshooting guide . . . . . . . . . . . . . . . . . . . . . . . . . 3-23
Hood . . . . . . . . . . . . . . . . . . . . . . . . . . . . . . . . . . . . . . . . . . . 3-24
Trunk lid . . . . . . . . . . . . . . . . . . . . . . . . . . . . . . . . . . . . . . . . . 3-24
Opener operation. . . . . . . . . . . . . . . . . . . . . . . . . . . . . . 3-24
Interior trunk lid release . . . . . . . . . . . . . . . . . . . . . . . . 3-25
Fuel-filler door . . . . . . . . . . . . . . . . . . . . . . . . . . . . . . . . . . . 3-26
Opener operation. . . . . . . . . . . . . . . . . . . . . . . . . . . . . . 3-26
Fuel-filler cap . . . . . . . . . . . . . . . . . . . . . . . . . . . . . . . . . 3-26
Tilting/telescopic steering column . . . . . . . . . . . . . . . . . . 3-28
Tilt operation . . . . . . . . . . . . . . . . . . . . . . . . . . . . . . . . . . 3-28
Telescopic operation. . . . . . . . . . . . . . . . . . . . . . . . . . . 3-28
Sun visors . . . . . . . . . . . . . . . . . . . . . . . . . . . . . . . . . . . . . . . 3-28
Vanity mirrors . . . . . . . . . . . . . . . . . . . . . . . . . . . . . . . . . 3-29
Mirrors . . . . . . . . . . . . . . . . . . . . . . . . . . . . . . . . . . . . . . . . . . 3-29
Rearview mirror (if so equipped). . . . . . . . . . . . . . . . . 3-29
Automatic anti-glare rearview mirror (if so equipped) . . . . . . . . . . . . . . . . . . . . . . . . . . . . . . . 3-30
Outside mirrors . . . . . . . . . . . . . . . . . . . . . . . . . . . . . . . 3-30墌 REVIEW COPY—2009 Altima (alt) Owners Manual—USA_English (nna) 09/08/08—debbie 墍
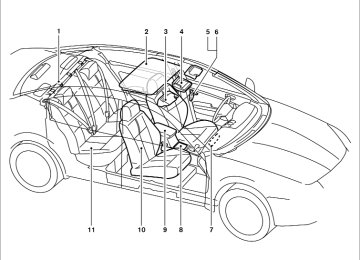
Never leave these keys in the vehicle. As many as four Intelligent Keys can be regis- tered and used with one vehicle. The new keys must be registered by a NISSAN dealer prior to use with the Intelligent Key and NISSAN Vehicle Immobilizer System of your vehicle. Since the registration process requires erasing all memory in the Intelligent Key components when register- ing new keys, be sure to take all Intelligent Keys that you have to the NISSAN dealer. A key number plate is supplied with your keys. Record the key number and keep it in a safe place (such as your wallet), not in the vehicle. If you lose your keys, see a NISSAN dealer for duplicates by using the key number. NISSAN does not record key numbers so it is very important to keep track of your key number plate. A key number is only necessary when you have lost all keys and do not have one to duplicate from. If you still have a key, your NISSAN dealer can duplicate it.
CAUTION
● Do not allow the Intelligent Key, which contains electrical components, to come into contact with water or salt water. This could affect the system function.
● Do not drop the Intelligent Key. ● Do not strike the Intelligent Key sharply
against another object.
● Do not place the Intelligent Key for an extended period in an area where tem- peratures exceed 140°F (60°C).
● Do not attach the Intelligent Key with a
key holder that contains a magnet.
● Do not place the Intelligent Key near equipment that produces a magnetic field, such as a TV, audio equipment and personal computers.
KEYS
WPD0363
Two Intelligent Keys
1. 2. Mechanical keys (inside Intelligent
Keys) Key number plate
3. NISSAN INTELLIGENT KEY™ Your vehicle can only be driven with the Intelligent Key which are registered to your vehicle’s Intelli- gent Key components and NISSAN Vehicle Im- mobilizer System components.
3-2 Pre-driving checks and adjustments
墌 REVIEW COPY—2009 Altima (alt) Owners Manual—USA_English (nna) 09/08/08—debbie 墍
SPA1951
Mechanical key The Intelligent Key contains the mechanical key. To remove the mechanical key, release the lock knob on the back of the Intelligent Key. To install the mechanical key, firmly insert it into the Intelligent Key until the lock knob returns to the lock position. Use the mechanical key to lock or unlock the doors, trunk lid, glove box and rear seatback lock. See “Doors” and “Trunk lid” later in this section, “Storage” in the “Instruments and controls” sec- tion and “Seats” in the “Safety — Seats, seat belts and supplemental restraint system” section.
CAUTION
Always carry the mechanical key installed in the Intelligent Key slot. Valet hand-off When you have to leave a key with a valet, give them the Intelligent Key itself and keep the me- chanical key with you to protect your belongings. To prevent the glove box and the trunk from being opened during valet hand-off, follow the proce- dures below: 1. Push the trunk cancel switch to the OFF
position.
2. Remove the mechanical key from the Intelli-
gent Key.
3. Lock the glove box and the rear seats with
the mechanical key.
4. Hand the Intelligent Key to the valet and
keep the mechanical key with you.
See “Trunk lid” later in this section, “Storage” in the “Instruments and controls” section and “Seats” in the “Safety — seats, seat belts and supplemental restraint system” section.
NISSAN VEHICLE IMMOBILIZER SYSTEM KEYS You can only drive your vehicle using the master keys which are registered to the NISSAN Vehicle Immobilizer System components in your vehicle. The master key can be used for all the locks. Never leave these keys in the vehicle. Additional or replacement keys: If you still have a key, the key number is not necessary when you need extra NISSAN Vehicle Immobilizer System keys. Your dealer can dupli- cate your existing key. This is because the regis- tration process will erase the memory of all key codes previously registered into the NISSAN Ve- hicle Immobilizer System. Do not allow the immobilizer system key, which contains an electrical transponder, to come into contact with salt water. This could affect system function.
Pre-driving checks and adjustments 3-3
墌 REVIEW COPY—2009 Altima (alt) Owners Manual—USA_English (nna) 09/08/08—debbie 墍
Opening and closing windows (if so equipped) The driver’s door key operation allows you to open and close windows equipped with auto- matic operation at the same time. ● To open the windows, turn the door key toward the rear of the vehicle for longer than 1 second after the door is unlocked.
DOORS
WARNING
● Always have the doors locked while driving. Along with the use of seat belts, this provides greater safety in the event of an accident by helping to prevent persons from being thrown from the vehicle. This also helps keep children and others from unintentionally open- ing the doors, and will help keep out intruders.
● Before opening any door, always look
for and avoid oncoming traffic.
● Do not leave children unattended inside the vehicle. They could unknowingly ac- tivate switches or controls. Unattended children could become involved in seri- ous accidents.
3-4 Pre-driving checks and adjustments
Driver’s side
LPD0181
LOCKING WITH KEY The power door lock system allows you to lock or unlock all doors at the same time. Turning the key toward the front 䊊1 of the vehicle locks all doors. Turning the key one time toward the rear 䊊2 of the vehicle unlocks that door. From that position, returning the key to neutral 䊊3 (where the key can only be removed and inserted) and turning it toward the rear again within five seconds unlocks all doors 䊊4 .
墌 REVIEW COPY—2009 Altima (alt) Owners Manual—USA_English (nna) 09/08/08—debbie 墍
WPD0291
WPD0381
Inside lock
LOCKING WITH INSIDE LOCK KNOB To lock the door without the key, move the inside lock knob to the lock position 䊊1 , then close the door. To unlock the door without the key, move the inside lock knob to the unlock position 䊊2 .
Door lock switch
LOCKING WITH POWER DOOR LOCK SWITCH To lock all the doors without a key, push the door lock switch (driver’s or front passenger’s side) to the lock position 䊊1 . When locking the door this way, be certain not to leave the key inside the vehicle.
To unlock all the doors without a key, push the door lock switch (driver’s or front passenger’s side) to the unlock position 䊊2 .
Lockout protection When the power door lock switch (driver’s or front passenger’s side) is moved to the lock position with the Intelligent Key in the port and any door open, all doors will lock and unlock automatically. With the Intelligent Key left in the vehicle (not in the Intelligent Key port) and any door open, all doors will unlock automatically and a chime will sound after the door is closed. AUTOMATIC DOOR LOCKS ● All doors lock automatically when the vehicle
speed reaches 15 MPH (24 km/h).
● All doors unlock automatically when the ig- nition is placed in the OFF position (Intelli- gent Key equipped vehicles) or when the key is removed from the ignition switch (me- chanical key equipped vehicles).
The automatic lock and unlock functions can be deactivated or activated indepen- dently of each other. To deactivate or activate the automatic door lock or unlock system, per- form the following procedure: 1. Close all doors. 2. Place the ignition switch in the ON position.
Pre-driving checks and adjustments 3-5
墌 REVIEW COPY—2009 Altima (alt) Owners Manual—USA_English (nna) 09/08/08—debbie 墍
3. Do one of the following within 20 seconds of
performing Step #2: ● To change AUTO UNLOCK settings: push and hold the power door lock switch position (UNLOCK) for more to the than 5 seconds.
● To change AUTO LOCK settings: push and hold the power door lock switch to the position (LOCK) for more than 5 seconds.
4. When activated, the hazard indicator will flash twice. When deactivated, the hazard indicator will flash once.
5. The ignition switch must be placed in the OFF and ON position again between each setting change.
3-6 Pre-driving checks and adjustments
LIC0716
CHILD SAFETY REAR DOOR LOCK (Sedan only) Child safety locks help prevent the rear doors from being opened accidentally, especially when small children are in the vehicle.The child safety lock levers are located on the edge of the rear doors. When the lever is in the unlock position 䊊1 , the door can be opened from the outside or the inside. When the lever is in the lock position 䊊2 , the door can be opened only from the out- side.
NISSAN INTELLIGENT KEY™ WITH DOOR AND TRUNK REQUEST SWITCHES
WARNING
● Radio waves could adversely affect electric medical equipment. Those who use a pacemaker should contact the electric medical equipment manufac- turer for the possible influences before use.
● The Intelligent Key transmits radio waves when the buttons are pushed. The FAA advises the radio waves may affect aircraft navigation and communi- cation systems. Do not operate the In- telligent Key while on an airplane. Make sure the buttons are not operated unin- tentionally when the unit is stored for a flight.
The Intelligent Key can operate all the door locks using the remote controller function or pushing the request switch on the vehicle without taking the key out from a pocket or purse. The operating environment and/or conditions may affect the Intelligent Key operation.
Be sure to read the following before using the Intelligent Key.
墌 REVIEW COPY—2009 Altima (alt) Owners Manual—USA_English (nna) 09/08/08—debbie 墍
CAUTION
● Be sure to carry the Intelligent Key with
you when operating the vehicle.
● Never leave the Intelligent Key in the
vehicle when you leave the vehicle.
The Intelligent Key is always communicating with the vehicle as it receives radio waves. The Intel- ligent Key transmits weak radio waves. Environ- mental conditions may interfere with the opera- tion of the Intelligent Key under the following operating conditions: ● When operating near a location where strong radio waves are transmitted, such as a TV tower, power station and broadcasting station.
● When in possession of wireless equipment, such as a cellular telephone, transceiver, and CB radio.
● When the Intelligent Key is in contact with or
covered by metallic materials.
● When any type of radio wave remote control
is used nearby.
● When the Intelligent Key is placed near an electric appliance such as a personal com- puter.
● When the vehicle is parked near a parking
meter.
In such cases, correct the operating conditions before using the Intelligent Key function or use the mechanical key.
If
Although the life of the battery varies depending on the operating conditions, the battery’s life is approximately 2 years. the battery is dis- charged, replace it with a new one. When the Intelligent Key battery is almost dis- charged, insert the Intelligent Key into the Intelli- gent Key port to start the engine. Replace the discharged battery with a new one as soon as possible. For more details, see “Push-button ig- nition switch” in the “Starting and driving” sec- tion. Since the Intelligent Key is continuously receiving radio waves, if the key is left near equipment which transmits strong radio waves, such as sig- nals from a TV and personal computer, the bat- tery life may become shorter. For information regarding replacement of a bat- tery, see “Battery” in the “Maintenance and do-it- yourself” section. Because the steering wheel is locked electrically, unlocking the steering wheel with the ignition switch in the LOCK position is impossible when the vehicle battery is completely discharged. Un-
locking the steering wheel is impossible even if the Intelligent Key is inserted into the Intelligent Key port. Pay special attention that the vehicle battery is not completely discharged.
As many as 4 Intelligent Keys can be registered and used with one vehicle. For information about the purchase and use of additional Intelligent Keys, contact a NISSAN dealer.
CAUTION
● Do not allow the Intelligent Key, which contains electrical components, to come into contact with water or salt water. This could affect the system function.
● Do not drop the Intelligent Key. ● Do not strike the Intelligent Key sharply
against another object.
● Do not change or modify the Intelligent
Key.
● Wetting may damage the Intelligent Key. If the Intelligent Key gets wet, im- mediately wipe until it is completely dry. ● Do not place the Intelligent Key for an extended period in an area where tem- peratures exceed 140°F (60°C).
Pre-driving checks and adjustments 3-7
墌 REVIEW COPY—2009 Altima (alt) Owners Manual—USA_English (nna) 09/08/08—debbie 墍
● Do not attach the Intelligent Key with a
key holder that contains a magnet.
● Do not place the Intelligent Key near equipment that produces a magnetic field, such as a TV, audio equipment and personal computers.
If an Intelligent Key is lost or stolen, NISSAN recommends erasing the ID code of that Intelli- gent Key from the vehicle. This may prevent the unauthorized use of the Intelligent Key to operate the vehicle. For information regarding the erasing procedure, contact a NISSAN dealer.
When the Intelligent Key battery is discharged or strong radio waves are present near the operat- ing location, the Intelligent Key system’s operat- ing range becomes narrower, and the Intelligent Key may not function properly. The operating range is within 31.50 in (80 cm) from each request switch 䊊1 . If the Intelligent Key is too close to the door glass, handle or rear bumper, the request switches may not function. When the Intelligent Key is within the operating range, it is possible for anyone, even someone who does not carry the Intelligent Key, to push the request switch to lock/unlock the doors.
WPD0465
Coupe shown Sedan similar
OPERATING RANGE The Intelligent Key functions can only be used when the Intelligent Key is within the specified operating range from the request switch 䊊1 .
3-8 Pre-driving checks and adjustments
墌 REVIEW COPY—2009 Altima (alt) Owners Manual—USA_English (nna) 09/08/08—debbie 墍
● Do not pull the door handle before pushing the door handle request switch. The door will be unlocked but will not open. Release the door handle once and pull it again to open the door.
WPD0375
DOOR LOCKS/UNLOCKS PRECAUTION ● Do not push the door handle request switch with the Intelligent Key held in your hand as illustrated. The close distance to the door handle will cause the Intelligent Key system to have difficulty recognizing that the Intelli- gent Key is outside the vehicle.
● After locking with the door handle request switch, verify the doors are securely locked by testing them.
● To prevent the Intelligent Key from being left inside the vehicle, make sure you carry the key with you and then lock the doors.
WPD0432
Coupe shown, Sedan similar
NISSAN INTELLIGENT KEY™OPERATION You can lock or unlock the doors without taking the key out of your pocket or bag. When you carry the Intelligent Key with you, you can lock or unlock all doors by pushing the door handle request switch within the range of opera- tion.
Pre-driving checks and adjustments 3-9
墌 REVIEW COPY—2009 Altima (alt) Owners Manual—USA_English (nna) 09/08/08—debbie 墍
CAUTION
● After locking the doors using the re- quest switch, make sure that the doors have been securely locked by operating the door handle or the trunk opener switch.
● When locking the doors using the re- quest switch, make sure to have the Intelligent Key in your possession be- fore operating the request switch to prevent the Intelligent Key from being left in the vehicle.
● The request switch is operational only when the Intelligent Key has been de- tected by the Intelligent Key system.
Lockout protection To prevent the Intelligent Key from being acci- dentally locked in the vehicle, lockout protection is equipped with the Intelligent Key. When the driver’s side door is open, the doors are locked, and then the Intelligent Key is put inside the vehicle and all the doors are closed; the lock will automatically unlock and the door buzzer sounds.
WPD0433
Coupe shown, Sedan similar
Locking doors 1. Move the selector lever to the P (Park) posi- tion, push the ignition switch to the LOCK position and make sure you carry the Intelli- gent Key with you.
2. Close all doors. 3. Push any door handle request switch 䊊1
while carrying the Intelligent Key with you.
4. All doors and the trunk will lock.
5. The hazard warning lights flash twice and
the outside buzzer sounds twice.
3-10 Pre-driving checks and adjustments
WPD0369
NOTE: ● Doors lock with the door handle request switch while the ignition switch is not in the LOCK position.
● Doors do not lock by pushing the door handle request switch while any door is open. However, doors lock with the me- chanical key even if any door is open.
● Doors do not lock with the door handle request switch with the Intelligent Key inside the vehicle and a beep sounds to warn you. However, when an Intelligent Key is inside the vehicle, doors can be locked with an- other Intelligent Key.
墌 REVIEW COPY—2009 Altima (alt) Owners Manual—USA_English (nna) 09/08/08—debbie 墍
NOTE: The doors may not lock when the Intelli- gent Key is in the same hand that is oper- ating the request switch to lock the door. Put the Intelligent Key in a purse, pocket or your other hand.
CAUTION
The lockout protection may not function under the following conditions: ● When the Intelligent Key is placed on
top of the instrument panel.
● When the Intelligent Key is placed on
top of the rear parcel shelf.
● When the Intelligent Key is placed in-
side the glove box or a storage bin.
● When the Intelligent Key is placed in-
side the door pockets.
● When the Intelligent Key is placed on or
under the spare tire area.
● When the Intelligent Key is placed in-
side or near metallic materials.
WPD0432
Coupe shown, Sedan similar
Unlocking doors 1. Carry the Intelligent Key. 2. Push the door handle request switch 䊊1 . 3. The hazard warning lights flash once and the
outside buzzer sounds once.
4. Push the door handle request switch 䊊1
again within 5 seconds to unlock all doors.If a door handle is pulled while unlocking the doors, that door may not be unlocked. Returning the door handle to its original position will unlock the door. If the door does not unlock after return-
WPD0369
ing the door handle, push the door handle re- quest switch to unlock the door.All doors will be locked automatically unless one of the following operations is performed within 1
minute after pushing the request switch. ● Opening any door. ● Pushing the ignition switch. The interior light timer illuminates for 30 seconds when a door is unlocked and the room light switch is in the DOOR position. The interior light can be turned off without waiting for 30 seconds by performing one of the follow- ing operations.Pre-driving checks and adjustments 3-11
墌 REVIEW COPY—2009 Altima (alt) Owners Manual—USA_English (nna) 09/08/08—debbie 墍
● Placing the ignition switch in the ON posi-
tion.
● Locking the doors with the remote controller. ● Switching the room light switch to the OFF
position.
3-12 Pre-driving checks and adjustments
When all doors are locked and the trunk lid is closed with the Intelligent Key inside the trunk, the outside buzzer will sound and the trunk will open. HOW TO USE THE REMOTE KEYLESS ENTRY FUNCTION The remote keyless entry function can operate all door locks using the remote keyless function of the Intelligent Key. The remote keyless function can operate at a distance of 33 ft (10 m) away from the vehicle. The operating distance de- pends upon the conditions around the vehicle. The remote keyless entry function will not func- tion under the following conditions: ● When the Intelligent Key is not within the
operational range.
● When the doors or the trunk are open or not
closed securely.
● When the Intelligent Key battery is dis-
charged.
CAUTION
When locking the doors using the Intelli- gent Key, be sure not to leave the key in the vehicle.
WPD0406
Opening the trunk lid 1. Push the trunk opener request switch 䊊A for more than 1 second while carrying the Intel- ligent Key with you.
2. The trunk will unlatch. A chime will sound
four times.
3. Raise the trunk lid to open the trunk. Lockout protection
To prevent the Intelligent Key from being acci- dentally locked in the trunk, lockout protection is equipped with the Intelligent Key.
墌 REVIEW COPY—2009 Altima (alt) Owners Manual—USA_English (nna) 09/08/08—debbie 墍
CAUTION
After locking the doors using the Intelli- gent Key, be sure that the doors have been securely locked by operating the door handles.
Locking doors 1. Place the ignition switch in the LOCK posi-
WPD0359
tion.
2. Close all doors.
3. Push the
Key.
button on the Intelligent
4. The hazard warning lights flash twice and
the horn beeps once.
5. All doors will be locked.
WPD0360
Unlocking doors
1. Push the
button on the Intelligent Key.
2. The hazard warning lights flash once.
3. Push the
button again within five sec-
onds to unlock all doors.
All doors will be locked automatically unless one of the following operations is performed within one minute after pushing the ● Opening any doors. ● Pushing the ignition switch.
button:
Pre-driving checks and adjustments 3-13
墌 REVIEW COPY—2009 Altima (alt) Owners Manual—USA_English (nna) 09/08/08—debbie 墍
The interior light illuminates for 15 seconds when a door is unlocked and the room light switch is in the DOOR position. The light can be turned off without waiting for 15
seconds by performing one of the following op- erations: ● Placing the ignition switch in the ON posi-tion.
● Locking the doors with the Intelligent Key. ● Switching the room light switch to the OFF
position.
Opening windows (if so equipped) The Intelligent Key allows you to open windows equipped with automatic operation simulta- neously.
● To open the windows, press the
but- ton on the Intelligent Key longer than three seconds after all doors are unlocked.
button on the Intelligent Key.
The door windows will open while pressing the The door windows cannot be closed by using the Intelligent Key.
3-14 Pre-driving checks and adjustments
WPD0364
WPD0361
Releasing the trunk lid Push the button for longer than 0.5 sec- ond to open the trunk lid. The trunk release button will not operate when the ignition switch is in the ON position or when the trunk cancel switch is in the OFF position. See “Cancel switch” in the “Pre-driving checks and adjustments” section.
Using the panic alarm If you are near your vehicle and feel threatened, you may activate the panic alarm to call attention by pushing and holding the button on the Intelligent Key for longer than 0.5 seconds. The panic alarm and headlights will stay on for 25
seconds. The panic alarm stops when: ● it has run for 25 seconds, or ● any button is pushed on the Intelligent Key. ● pressing the request switch on the driver or passenger door with the Intelligent Key in range of the door handle.墌 REVIEW COPY—2009 Altima (alt) Owners Manual—USA_English (nna) 09/08/08—debbie 墍
The hazard warning lights will flash once and the horn will sound once to confirm that the horn beep feature has been reactivated. Deactivating the horn beep feature does not si- lence the horn if the alarm is triggered. WARNING SIGNALS To help prevent the vehicle from moving unex- pectedly by erroneous operation of the Intelligent Key or to help prevent the vehicle from being stolen, a chime or buzzer sounds from inside and outside the vehicle and a warning is displayed in the instrument panel. When a chime or beep sounds or a warning is displayed, be sure to check the vehicle and the Intelligent Key. See the troubleshooting guide that follows and “Vehicle information display indicator lights and warnings” in the “Instruments and controls” sec- tion.
WPD0362
Silencing the horn beep feature If desired, the horn beep feature can be deacti- vated using the Intelligent Key.
To deactivate: Press and hold the and
buttons for at least two seconds. The hazard warning lights will flash three times to confirm that the horn beep feature has been deactivated.
To activate: Press and hold the and once more.
buttons for at least two seconds
Pre-driving checks and adjustments 3-15
墌 REVIEW COPY—2009 Altima (alt) Owners Manual—USA_English (nna) 09/08/08—debbie 墍
TROUBLESHOOTING GUIDE Verify the location of all Intelligent Keys that are programmed for the vehicle. If another Intelligent Key is in range or inside the vehicle, the vehicle system may respond differently than expected.
Symptom
Possible Cause
Remedy
When pushing the ignition switch to stop the engine
The SHIFT P warning appears on the dis- play and the inside warning chime sounds continuously.
The shift selector is not in the P (Park) position.
Shift the shift selector to the P (Park) position.
When opening the driver’s door to get out of the vehicle
The inside warning chime sounds continuously.
When closing the door after getting out of the vehicle
When closing the door with the inside lock knob turned to LOCK
The NO KEY warning appears on the display, the outside chime sounds 3 times and the inside warning chime sounds for approximately 3 seconds. The NO KEY warning appears on the dis- play and the outside chime sounds continuously. The shift “P” warning light appears on the display and the outside chime sounds continuously. The outside chime sounds for approximately 3 seconds and all the doors unlock.
The ignition switch is in the ACC position.
The Intelligent Key is in the Intelligent Key port.
The ignition switch is in the ACC or ON position.
The ignition switch is in the ACC position and the shift selector is not in the P (Park) position. The ignition switch is in the OFF position and the shift selector is not in the P (Park) position. The Intelligent Key is inside the vehicle or trunk.
Push the ignition switch to the OFF position. Remove the Intelligent Key from the Intelli- gent Key port. Push the ignition switch to the OFF position.
Move the shift selector to the P (Park) posi- tion and push the ignition switch to the OFF position. Move the shift selector to the P (Park) position.
Carry the Intelligent Key with you.
3-16 Pre-driving checks and adjustments
墌 REVIEW COPY—2009 Altima (alt) Owners Manual—USA_English (nna) 09/08/08—debbie 墍
Symptom
Possible Cause
Remedy
When pushing the door handle request switch to lock the door
The outside chime sounds for approximately 2 seconds.
The Intelligent Key is inside the vehicle or trunk. A door is not closed securely. The door handle request switch is pushed before the door is closed.
When closing the trunk lid
The outside chime sounds for approximately 10 seconds and the trunk lid opens.
The Intelligent Key is inside the trunk.
Carry the Intelligent Key with you.
Close the door securely. Push the door handle request switch after the door is closed. Carry the Intelligent Key with you.
Pre-driving checks and adjustments 3-17
墌 REVIEW COPY—2009 Altima (alt) Owners Manual—USA_English (nna) 09/08/08—debbie 墍
NISSAN INTELLIGENT KEY™ WITHOUT DOOR AND TRUNK REQUEST SWITCHES
WARNING
● Radio waves could adversely affect electric medical equipment. Those who use a pacemaker should contact the electric medical equipment manufac- turer for the possible influences before use.
● The Intelligent Key transmits radio waves when the buttons are pushed. The FAA advises the radio waves may affect aircraft navigation and communi- cation systems. Do not operate the In- telligent Key while on an airplane. Make sure the buttons are not operated unin- tentionally when the unit is stored for a flight.
The Intelligent Key can operate all the door locks using the remote controller function. The operat- ing environment and/or conditions may affect the Intelligent Key operation.
Be sure to read the following before using the Intelligent Key.
CAUTION
● Be sure to carry the Intelligent Key with
you when operating the vehicle.
3-18 Pre-driving checks and adjustments
● Never leave the Intelligent Key in the
vehicle when you leave the vehicle.
The Intelligent Key is always communicating with the vehicle as it receives radio waves. The Intel- ligent Key transmits weak radio waves. Environ- mental conditions may interfere with the opera- tion of the Intelligent Key under the following operating conditions: ● When operating near a location where strong radio waves are transmitted, such as a TV tower, power station and broadcasting station.
● When in possession of wireless equipment, such as a cellular telephone, transceiver, and CB radio.
● When the Intelligent Key is in contact with or
covered by metallic materials.
● When any type of radio wave remote control
is used nearby.
● When the Intelligent Key is placed near an electric appliance such as a personal com- puter.
● When the vehicle is parked near a parking
meter.
In such cases, correct the operating conditions before using the Intelligent Key function or use the mechanical key.
Although the life of the battery varies depending on the operating conditions, the battery’s life is approximately 2 years. the battery is dis- charged, replace it with a new one.
If
When the Intelligent Key battery is almost dis- charged, insert the Intelligent Key into the Intelli- gent Key port to start the engine. Replace the discharged battery with a new one as soon as possible. For more details, see “Push-button ig- nition switch” in the “Starting and driving” sec- tion.
Since the Intelligent Key is continuously receiving radio waves, if the key is left near equipment which transmits strong radio waves, such as sig- nals from a TV and personal computer, the bat- tery life may become shorter. For information regarding replacement of a bat- tery, see “Battery” in the “Maintenance and do-it- yourself” section. Because the steering wheel is locked electrically, unlocking the steering wheel with the ignition switch in the LOCK position is impossible when the vehicle battery is completely discharged. Un- locking the steering wheel is impossible even if the Intelligent Key is inserted into the Intelligent
墌 REVIEW COPY—2009 Altima (alt) Owners Manual—USA_English (nna) 09/08/08—debbie 墍
Key port. Pay special attention that the vehicle battery is not completely discharged.
As many as 4 Intelligent Keys can be registered and used with one vehicle. For information about the purchase and use of additional Intelligent Keys, contact a NISSAN dealer.
CAUTION
● Do not allow the Intelligent Key, which contains electrical components, to come into contact with water or salt water. This could affect the system function.
● Do not drop the Intelligent Key. ● Do not strike the Intelligent Key sharply
against another object.
● Do not change or modify the Intelligent
Key.
● Wetting may damage the Intelligent Key. If the Intelligent Key gets wet, im- mediately wipe until it is completely dry. ● Do not place the Intelligent Key for an extended period in an area where tem- peratures exceed 140°F (60°C).
● Do not attach the Intelligent Key with a
key holder that contains a magnet.
● Do not place the Intelligent Key near equipment that produces a magnetic field, such as a TV, audio equipment and personal computers.
If an Intelligent Key is lost or stolen, NISSAN recommends erasing the ID code of that Intelli- gent Key from the vehicle. This may prevent the unauthorized use of the Intelligent Key to operate the vehicle. For information regarding the erasing procedure, contact a NISSAN dealer. OPERATING RANGE The Intelligent Key functions can only be used when the Intelligent Key is within the specified operating range. When the Intelligent Key battery is discharged or strong radio waves are present near the operat- ing location, the Intelligent Key system’s operat- ing range becomes narrower, and the Intelligent Key may not function properly. The operating range is within 33 ft (10 m) of the vehicle.
HOW TO USE THE REMOTE KEYLESS ENTRY FUNCTION The remote keyless entry function can operate all door locks using the remote keyless function of the Intelligent Key. The remote keyless function can operate at a distance of 33 ft (10 m) away from the vehicle. The operating distance de- pends upon the conditions around the vehicle. The remote keyless entry function will not func- tion under the following conditions: ● When the Intelligent Key is not within the
operational range.
● When the doors or the trunk are open or not
closed securely.
● When the Intelligent Key battery is dis-
charged.
CAUTION
When locking the doors using the Intelli- gent Key, be sure not to leave the key in the vehicle.
Pre-driving checks and adjustments 3-19
墌 REVIEW COPY—2009 Altima (alt) Owners Manual—USA_English (nna) 09/08/08—debbie 墍
CAUTION
After locking the doors using the Intelli- gent Key, be sure that the doors have been securely locked by operating the door handles.
Locking doors 1. Place the ignition switch in the LOCK posi-
WPD0359
tion.
2. Close all doors.
3. Push the
Key.
button on the Intelligent
4. The hazard warning lights flash twice and
the horn beeps once.
5. All doors will be locked.
3-20 Pre-driving checks and adjustments
WPD0360
Unlocking doors
1. Push the
button on the Intelligent Key.
2. The hazard warning lights flash once.
3. Push the
button again within five sec-
onds to unlock all doors.
All doors will be locked automatically unless one of the following operations is performed within one minute after pushing the ● Opening any doors. ● Pushing the ignition switch.
button:
墌 REVIEW COPY—2009 Altima (alt) Owners Manual—USA_English (nna) 09/08/08—debbie 墍
The interior light illuminates for 15 seconds when a door is unlocked and the room light switch is in the DOOR position. The light can be turned off without waiting for 15
seconds by performing one of the following op- erations: ● Placing the ignition switch in the ON posi-tion.
● Locking the doors with the Intelligent Key. ● Switching the room light switch to the OFF
position.
WPD0364
WPD0361
Releasing the trunk lid Push the button for longer than 0.5 sec- ond to open the trunk lid. The trunk release button will not operate when the ignition switch is in the ON position or when the trunk cancel switch is in the OFF position. See “Cancel switch” in the “Pre-driving checks and adjustments” section.
Using the panic alarm If you are near your vehicle and feel threatened, you may activate the panic alarm to call attention button on the by pushing and holding the Intelligent Key for longer than 0.5 seconds. The panic alarm and headlights will stay on for 25
seconds. The panic alarm stops when: ● it has run for 25 seconds, or ● any button is pushed on the Intelligent Key. ● pressing the request switch on the driver or passenger door with the Intelligent Key in range of the door handle.Pre-driving checks and adjustments 3-21
墌 REVIEW COPY—2009 Altima (alt) Owners Manual—USA_English (nna) 09/08/08—debbie 墍
The hazard warning lights will flash once and the horn will sound once to confirm that the horn beep feature has been reactivated. Deactivating the horn beep feature does not si- lence the horn if the alarm is triggered. WARNING SIGNALS To help prevent the vehicle from moving unex- pectedly by erroneous operation of the Intelligent Key or to help prevent the vehicle from being stolen, a chime or buzzer sounds from inside and outside the vehicle and a warning is displayed in the instrument panel. When a chime or beep sounds or a warning is displayed, be sure to check the vehicle and the Intelligent Key. See the troubleshooting guide that follows and “Vehicle information display indicator lights and warnings” in the “Instruments and controls” sec- tion.
WPD0362
Silencing the horn beep feature If desired, the horn beep feature can be deacti- vated using the Intelligent Key.
To deactivate: Press and hold the and
buttons for at least two seconds. The hazard warning lights will flash three times to confirm that the horn beep feature has been deactivated.
To activate: Press and hold the and once more.
buttons for at least two seconds
3-22 Pre-driving checks and adjustments
墌 REVIEW COPY—2009 Altima (alt) Owners Manual—USA_English (nna) 09/08/08—debbie 墍
TROUBLESHOOTING GUIDE Verify the location of all Intelligent Keys that are programmed for the vehicle. If another Intelligent Key is in range or inside the vehicle, the vehicle system may respond differently than expected.
Symptom
Possible Cause
Remedy
When pushing the ignition switch to stop the Hybrid System
The SHIFT P warning appears on the dis- play and the inside warning chime sounds continuously.
When opening the driver’s door to get out of the vehicle
The inside warning chime sounds continuously.
When closing the door after getting out of the vehicle
When closing the door with the inside lock knob turned to LOCK
When closing the trunk lid
The NO KEY warning appears on the display, the outside chime sounds 3 times and the inside warning chime sounds for approximately 3 seconds. The NO KEY warning appears on the dis- play and the outside chime sounds continuously. The outside chime sounds for approximately 3 seconds and all the doors unlock. The outside chime sounds for approximately 10 seconds and the trunk lid opens.
The shift selector is not in the P position.
The ignition switch is in the ACC position.
The Intelligent Key is in the Intelligent Key port.
The ignition switch is in the ACC or ON position.
Shift the shift selector to the P position.
Push the ignition switch to the OFF position. Remove the Intelligent Key from the Intelli- gent Key port. Push the ignition switch to the OFF position.
The ignition switch is in the ACC position and the shift selector is not in the “P” (Park) position. The Intelligent Key is inside the vehicle or trunk.
The Intelligent Key is inside the trunk.
Move the shift selector to the “P” (Park) position and push the ignition switch to the OFF position. Carry the Intelligent Key with you.
Carry the Intelligent Key with you.
Pre-driving checks and adjustments 3-23
墌 REVIEW COPY—2009 Altima (alt) Owners Manual—USA_English (nna) 09/08/08—debbie 墍
HOOD
TRUNK LID
WPD0441
LPD0394
WARNING
OPENER OPERATION
● Make sure the hood is completely closed and latched before driving. Fail- ure to do so could cause the hood to fly open and result in an accident.
● If you see steam or smoke coming from the engine compartment, to avoid injury do not open the hood.
WARNING
● Do not drive with the trunk lid open. This could allow dangerous exhaust gases to be drawn into the vehicle. See “Ex- haust gas” in the “Starting and driving” section of this manual.
䊊1 Pull the hood lock release handle located below the driver’s side instrument panel; the hood springs up slightly.
䊊2
Lift the lever at the front of the hood with your fingertips and raise the hood.
䊊3 Remove the support rod from the clamp. 䊊4
Insert the support rod into the hole on the passenger’s side of the hood.
䊊5 When closing the hood, return the hood rod to its original position. Lower the hood ap- proximately 12 inches (30 cm) above the latch and release it. This allows proper en- gagement of the hood latch.
3-24 Pre-driving checks and adjustments
墌 REVIEW COPY—2009 Altima (alt) Owners Manual—USA_English (nna) 09/08/08—debbie 墍
● Closely supervise children when they are around cars to prevent them from playing and becoming locked in the trunk where they could be seriously in- jured. Keep the car locked, with the rear seatback and trunk lid securely latched when not in use, and prevent children’s access to car keys.
To open the trunk lid, push the opener switch down. To close the trunk lid, lower and push the trunk lid down securely.
NOTE: You can open the trunk lid with the Intelli- gent Key. Refer to “NISSAN Intelligent Key™” earlier in this section.
LPD0395
LPD0396
Cancel switch (if so equipped) When the switch, located inside the glove box, is in the OFF position, the power to the trunk lid will be cancelled. The trunk can only be opened with the master key or keyfob. The trunk lid cannot be opened when: ● using the trunk lid release switch, ● the trunk open request switch is pressed, when the Intelligent Key is in range of the vehicle or
● the HOLD button on the Intelligent Key is
pushed.
INTERIOR TRUNK LID RELEASE
WARNING
Closely supervise children when they are around cars to prevent them from playing and becoming locked in the trunk where they could be seriously injured. Keep the car locked, with the rear seatback and trunk lid securely latched when not in use, and prevent children’s access to car keys.
The interior trunk lid release mechanism provides a means of escape for children and adults in the event they become locked inside the trunk.
Pre-driving checks and adjustments 3-25
墌 REVIEW COPY—2009 Altima (alt) Owners Manual—USA_English (nna) 09/08/08—debbie 墍
FUEL-FILLER DOOR
To open the trunk from the inside, pull the illumi- nated release handle until the lock releases and push up on the trunk lid. The release handle is made of a material that glows in the dark after a brief exposure to ambient light. The handle is located inside the trunk compart- ment on the interior of the trunk lid.
LPD0397
OPENER OPERATION The fuel-filler door release is located on the floor to the left of the driver’s seat. To open the fuel- filler door, pull up the release. To lock, close the fuel-filler door securely.
Coupe
LPD0448
FUEL-FILLER CAP The fuel-filler cap is a ratcheting type. Turn the cap counterclockwise to remove. To tighten, turn the cap clockwise until ratcheting clicks are heard. For the Coupe model, put the fuel-filler cap on the cap holder 䊊1 while refueling. For the Sedan model, around the hook 䊊1 while refueling.
loop the tether strap
3-26 Pre-driving checks and adjustments
墌 REVIEW COPY—2009 Altima (alt) Owners Manual—USA_English (nna) 09/08/08—debbie 墍
● Use only an original equipment type fuel-filler cap as a replacement. It has a built-in safety valve needed for proper operation of the fuel system and emis- sion control system. An incorrect cap can result in a serious malfunction and possible injury. It could also cause the malfunction indicator light to come on. ● Never pour fuel into the throttle body to
attempt to start your vehicle.
● Do not fill a portable fuel container in the vehicle or trailer. Static electricity can cause an explosion of flammable liquid, vapor or gas in any vehicle or trailer. To reduce the risk of serious injury or death when filling portable fuel containers: – Always place the container on the
ground when filling.
– Do not use electronic devices when
filling.
– Keep the pump nozzle in contact with the container while you are fill- ing it.
– Use only approved portable fuel con-
tainers for flammable liquid.
LPD0449
Sedan
WARNING
● Gasoline is extremely flammable and highly explosive under certain condi- tions. You could be burned or seriously injured if it is misused or mishandled. Always stop the engine and do not smoke or allow open flames or sparks near the vehicle when refueling.
● Fuel may be under pressure. Turn the cap a third of a turn, and wait for any “hissing” sound to stop to prevent fuel from spraying out and possibly causing personal injury. Then remove the cap.
CAUTION
● If fuel is spilled on the vehicle body, flush it away with water to avoid paint damage.
● Insert the fuel-filler cap straight into the fuel-filler tube, then tighten until the fuel-filler cap clicks. Failure to tighten the fuel-filler cap properly may cause the Malfunction Indicator Light
(MIL) to illuminate. If the light illuminates because the fuel-filler cap is loose or missing, tighten or install the cap and continue to drive the vehicle. The light should turn off after a
If the
few driving trips. light does not turn off after a few driving trips, have the vehicle inspected by a NISSAN dealer. ● For additional
information, see the “Malfunction Indicator Light (MIL)” in the “Instruments and Controls” section earlier in this manual.
Pre-driving checks and adjustments 3-27
墌 REVIEW COPY—2009 Altima (alt) Owners Manual—USA_English (nna) 09/08/08—debbie 墍
TILTING/TELESCOPIC STEERING COLUMN
SUN VISORS
LPD0398
TILT OPERATION Pull the lever 䊊1 all the way toward you and adjust the steering wheel up or down in direction 䊊2 to the desired position. Lock the wheel by releasing the lever and ensure that the lever has returned to its original position.
WARNING
Do not adjust the steering wheel while driving. You could lose control of your vehicle and cause an accident.
3-28 Pre-driving checks and adjustments
TELESCOPIC OPERATION Pull the lever 䊊1 all the way toward you and adjust the steering wheel forward or backward in direction 䊊3 , to the desired position. Lock the wheel by releasing the lever and ensure that the lever has returned to its original position.
WARNING
Do not adjust the steering wheel any closer to you than is necessary for proper steering operation and comfort. The driv- er’s air bag inflates with great force. If you are unrestrained, leaning forward, sitting sideways or out of position in any way, you are at greater risk of injury or death in a crash. You may also receive serious or fatal injuries from the air bag if you are up against it when it inflates. Always sit back against the seatback and as far away as practical from the steering wheel. Always use the seat belts.
WPD0435
Coupe shown, sedan similar
䊊1 To block glare from the front, swing down the
main sun visor.
䊊2 To block glare from the side, remove the sun visor from the center mount and swing the sun visor to the side.
墌 REVIEW COPY—2009 Altima (alt) Owners Manual—USA_English (nna) 09/08/08—debbie 墍
䊊3 Slide the extension sun visor (if so equipped)
in or out as needed.
CAUTION
Do not store the sun visor before returning the extension to its original position.
MIRRORS
LPD0389
Coupe shown, sedan similar
VANITY MIRRORS To access the vanity mirror, pull the sun visor down and flip open the mirror cover. Some vanity mirrors are illuminated and turn on when the mirror cover is open.
WPD0126
REARVIEW MIRROR (if so equipped) The night position 䊊1 reduces glare from the headlights of vehicles behind you at night. Use the day position 䊊2 when driving in daylight hours.WARNING
Use the night position only when neces- sary, because it reduces rear view clarity.
Pre-driving checks and adjustments 3-29
墌 REVIEW COPY—2009 Altima (alt) Owners Manual—USA_English (nna) 09/08/08—debbie 墍
To turn on the automatic anti-glare feature, press the button again. The indicator light will turn on. For information on HomeLink姞 Universal Trans- ceiver operation, see “HomeLink姞 Universal Transceiver” in the “Instrument and controls” sec- tion of this manual. For information on the compass and outside tem- perature display, see “Compass and outside temperature display” in the “Instrument and con- trols” section of this manual.
NOTE: Do not hang any objects over the sensors 䊊2 or apply glass cleaner to the sensors. Doing so will reduce the sensitivity of the sensors, resulting in improper operation. OUTSIDE MIRRORS
WARNING
● Objects viewed in the outside mirror on the passenger side are closer than they appear. Be careful when moving to the right. Using only this mirror could cause an accident. Use the inside mirror or glance over your shoulder to properly judge distances to other objects.
LPD0346
Electric control type The outside mirror remote control only operates when the ignition switch is in the ACC or ON position. Rotate the control lever to select the right or left mirror. Adjust the mirror to the desired position by moving the control lever. Heated mirrors (if so equipped) Some outside mirrors can be heated to defrost, defog, or de-ice for improved visibility. For addi- tional information, see “Rear window and outside mirror (if so equipped) defroster switch” in the “Instrument and controls” section of this manual.
WPD0333
AUTOMATIC ANTI-GLARE REARVIEW MIRROR (if so equipped) The inside mirror is designed so that it automati- cally dims according to the intensity of the head- lights of the vehicle following you. The automatic anti-glare feature operates only when the ignition switch is in the ON position. The indicator light 䊊1 will automatic anti-glare feature is operating.
illuminate when the
To turn off the automatic anti-glare feature, press the button. The indicator light will turn off.
3-30 Pre-driving checks and adjustments
墌 REVIEW COPY—2009 Altima (alt) Owners Manual—USA_English (nna) 09/08/08—debbie 墍
WPD0056
Manual folding outside mirrors (if so equipped) Pull the outside mirror toward the door to fold it.
Pre-driving checks and adjustments 3-31
墌 REVIEW COPY—2009 Altima (alt) Owners Manual—USA_English (nna) 09/08/08—debbie 墍
4 Monitor, climate, audio, phone and voice recognition systems
Control panel buttons (if so equipped) . . . . . . . . . . . . . . . 4-2
Setting up the start-up screen . . . . . . . . . . . . . . . . . . . 4-3
How to use the SETUP button . . . . . . . . . . . . . . . . . . . 4-3
button. . . . . . . . . . . . . . . . . . . . . . . . . . . . . . . . . . . 4-7
RearView Monitor (if so equipped). . . . . . . . . . . . . . . . . . . 4-8
How to read the displayed lines . . . . . . . . . . . . . . . . . . 4-8
Adjusting the screen . . . . . . . . . . . . . . . . . . . . . . . . . . . . 4-9
Operating tips. . . . . . . . . . . . . . . . . . . . . . . . . . . . . . . . . . 4-9
Vents . . . . . . . . . . . . . . . . . . . . . . . . . . . . . . . . . . . . . . . . . . . 4-10
Heater and air conditioner (manual) (if so equipped) . . . . . . . . . . . . . . . . . . . . . . . . . . . . . . . . . . 4-11
Controls. . . . . . . . . . . . . . . . . . . . . . . . . . . . . . . . . . . . . . 4-11
Heater operation . . . . . . . . . . . . . . . . . . . . . . . . . . . . . . 4-12
Air conditioner operation . . . . . . . . . . . . . . . . . . . . . . . 4-13
Air flow charts. . . . . . . . . . . . . . . . . . . . . . . . . . . . . . . . . 4-14Heater and air conditioner (automatic) (if so equipped) . . . . . . . . . . . . . . . . . . . . . . . . . . . . . . . . . . 4-18
Automatic operation . . . . . . . . . . . . . . . . . . . . . . . . . . . 4-18
Manual operation . . . . . . . . . . . . . . . . . . . . . . . . . . . . . . 4-19
Operating tips. . . . . . . . . . . . . . . . . . . . . . . . . . . . . . . . . 4-20
Servicing air conditioner. . . . . . . . . . . . . . . . . . . . . . . . . . . 4-20
Audio system (if so equipped). . . . . . . . . . . . . . . . . . . . . . 4-21
Radio . . . . . . . . . . . . . . . . . . . . . . . . . . . . . . . . . . . . . . . . 4-21FM radio reception . . . . . . . . . . . . . . . . . . . . . . . . . . . . 4-21
AM radio reception . . . . . . . . . . . . . . . . . . . . . . . . . . . . 4-21
Satellite radio reception (if so equipped) . . . . . . . . . 4-22
Audio operation precautions . . . . . . . . . . . . . . . . . . . . 4-22
FM/AM radio with compact disc (CD) player. . . . . . 4-27
FM/AM/SAT radio with compact disc (CD) changer (if so equipped) . . . . . . . . . . . . . . . . . . . . . . . 4-32
FM/AM/SAT radio with compact disc (CD) changer (if so equipped) . . . . . . . . . . . . . . . . . . . . . . . 4-38
CD care and cleaning . . . . . . . . . . . . . . . . . . . . . . . . . . 4-43
Steering wheel switch for audio control (if so equipped) . . . . . . . . . . . . . . . . . . . . . . . . . . . . . . . 4-44
Antenna . . . . . . . . . . . . . . . . . . . . . . . . . . . . . . . . . . . . . . 4-45
Car phone or CB radio . . . . . . . . . . . . . . . . . . . . . . . . . . . . 4-45
Bluetooth姞 Hands-Free Phone System without Navigation System (if so equipped) . . . . . . . . . . . . . . . . . 4-46
Regulatory Information . . . . . . . . . . . . . . . . . . . . . . . . . 4-48
Using the system . . . . . . . . . . . . . . . . . . . . . . . . . . . . . . 4-48
Control buttons . . . . . . . . . . . . . . . . . . . . . . . . . . . . . . . 4-50
Getting started . . . . . . . . . . . . . . . . . . . . . . . . . . . . . . . . 4-51
List of voice commands . . . . . . . . . . . . . . . . . . . . . . . . 4-53
Speaker adaptation (SA) mode. . . . . . . . . . . . . . . . . . 4-58
Troubleshooting guide . . . . . . . . . . . . . . . . . . . . . . . . . 4-60墌 REVIEW COPY—2009 Altima (alt) Owners Manual—USA_English (nna) 09/08/08—debbie 墍
Bluetooth姞 Hands-Free Phone System with Navigation System (if so equipped) . . . . . . . . . . . . . . . . . 4-61
Regulatory Information . . . . . . . . . . . . . . . . . . . . . . . . . 4-62
Voice commands . . . . . . . . . . . . . . . . . . . . . . . . . . . . . . 4-63
Pairing procedure . . . . . . . . . . . . . . . . . . . . . . . . . . . . . 4-63
Phone download . . . . . . . . . . . . . . . . . . . . . . . . . . . . . . 4-64
Making a call. . . . . . . . . . . . . . . . . . . . . . . . . . . . . . . . . . 4-66
Receiving a call . . . . . . . . . . . . . . . . . . . . . . . . . . . . . . . 4-66
During a call . . . . . . . . . . . . . . . . . . . . . . . . . . . . . . . . . . 4-67
Phone setting . . . . . . . . . . . . . . . . . . . . . . . . . . . . . . . . . 4-68Nissan Voice Recognition System (if so equipped) . . . 4-69
Using the system . . . . . . . . . . . . . . . . . . . . . . . . . . . . . . 4-69
System features . . . . . . . . . . . . . . . . . . . . . . . . . . . . . . . 4-70
Bluetooth姞 Hands-Free Phone System voice commands. . . . . . . . . . . . . . . . . . . . . . . . . . . . . . . . . . . . 4-71
Navigation system voice commands (if so equipped) . . . . . . . . . . . . . . . . . . . . . . . . . . . . . . . 4-72
Voice recognition settings . . . . . . . . . . . . . . . . . . . . . . 4-72
Troubleshooting guide . . . . . . . . . . . . . . . . . . . . . . . . . 4-73墌 REVIEW COPY—2009 Altima (alt) Owners Manual—USA_English (nna) 09/08/08—debbie 墍
CONTROL PANEL BUTTONS (if so equipped)
WARNING
● Do not disassemble or modify this sys- tem. If you do, it may result in accidents, fire, or electrical shock.
● Do not use this system if you notice any abnormality, such as a frozen screen or lack of sound. Continued use of the system may result in accident, fire or electric shock.
● In case you notice any foreign object in the system hardware, spill liquid on it, or notice smoke or smell coming from it, stop using the system immediately and contact your nearest NISSAN dealer. Ignoring such conditions may lead to accidents, fire or electrical shock.
1.
brightness control button
6.
DEST button*
LHA0746
(P. 4-7) TILT button* INFO button* SETUP button (P. 4-3)
2. 3. 4. 5. MAP button*
*For Navigation system control buttons, refer to the separate Navigation System Owner’s Manual.
4-2 Monitor, climate, audio, phone and voice recognition systems
墌 REVIEW COPY—2009 Altima (alt) Owners Manual—USA_English (nna) 09/08/08—tbrooks 墍
When you use this system, make sure the engine is running. If you use the system with the engine not running (ignition ON or ACC) for a long time, it will use up all the battery power, and the engine will not start.
Reference symbols:
SETUP button — This is a button on the control panel.
“Display” key — This is a select key on the touch- screen. By touching this key you can proceed to the next function. SETTING UP THE START-UP SCREEN With the ignition to ACC or ON, the SYSTEM START-UP warning is displayed on the screen. Read the warning and touch the “I agree” key (English) or the “Enter” (Français) key.
If you do not touch the “I agree” key, the Naviga- tion system will not proceed to the next step display.
If you do not press a button or touch a screen key for more than 1 minute on the START-UP screen, the screen will change to the audio screen auto- matically.
To proceed to the next step, refer to the separate Navigation System Owner’s Manual.
LHA0747
HOW TO USE THE SETUP BUTTON When the SETUP button is pressed, the settings screen will appear on the display. You can select and/or adjust several features and modes that are available for your vehicle. Touch one of the setting item keys to select each item to be set.functions,
Monitor, climate, audio, phone and voice recognition systems 4-3
墌 REVIEW COPY—2009 Altima (alt) Owners Manual—USA_English (nna) 09/08/08—debbie 墍
● Press the
button. The message “Re- suming display” will appear and the Display “ON” key will be automatically turned on, the amber indicator will illuminate.
LHA0748
LHA0749
Display settings Touch the “Display” key. The display screen will appear. Display/brightness/contrast: Touch the “–” key or the “+” key to adjust the brightness and contrast of the screen. The new settings are automatically saved when you exit the setting screen by touching the “Back” key or pressing any other mode button.
Display off:
Touch the Display “ON” key. The indicator of the display turns off; touch the “Back” key to accept the change. The message above will be dis- played briefly. When the audio, or any mode button on the control panel is operated, the dis- play turns on for that operation. If one of the control panel buttons is pressed, the display will automatically turn off after 5 seconds.
To turn the screen on, ● Press the SETUP button and then touch the
display “ON” key, or
4-4 Monitor, climate, audio, phone and voice recognition systems
墌 REVIEW COPY—2009 Altima (alt) Owners Manual—USA_English (nna) 09/08/08—debbie 墍
Clock Format:
key or the
Touch the key to choose either the 12-hour clock display or the 24-hour clock display. Offset Adjust: Touch the “–” key or the “+” key to adjust the time by increasing or decreasing per minute. Daylight Saving Time: When this item is turned on, the daylight saving time, application is enabled. To turn off daylight saving time, touch the Daylight Saving Time “ON” key; touch it again to enable daylight saving.
LHA0750
Clock Adjusting the time: The following display will appear when pressing the SETUP button, then touching the “Clock” key. On-screen Clock: When this item is turned on, a clock is always displayed in the upper right corner of the screen. This clock will indicate the time almost exactly because it is always adjusted by the GPS system. To turn off the clock in the upper right corner of the screen touch the On-screen Clock “ON” key, touch it again to display the clock.
LHA1005
Time Zone:
Touch the “Time Zone” key, the Time Zone screen will appear.
Select one of the following zones, depending on the current location. Touch the “ON” key for the particular time zone. ● Pacific zone ● Mountain zone ● Central zone ● Eastern zone ● Atlantic zone ● Newfoundland zone
Monitor, climate, audio, phone and voice recognition systems 4-5
墌 REVIEW COPY—2009 Altima (alt) Owners Manual—USA_English (nna) 09/08/08—debbie 墍
After selection, touch the “Back” key the Clock screen will appear. Pacific zone has been set as the initial (default) setting.
LHA1006
LHA0751
Beep setting Touch the “Volumes/Tones” key. Touch the But- ton Beeps “ON” key to turn on or turn off the beep sound. To accept the changes touch the “Back” key. With this option on, a beep will sound if any button is pressed or any key is touched. The amber indicator will be illuminated.
Language/units The following display will appear when pressing the SETUP button, the “Language/Units” key.
touching
then
4-6 Monitor, climate, audio, phone and voice recognition systems
墌 REVIEW COPY—2009 Altima (alt) Owners Manual—USA_English (nna) 09/08/08—debbie 墍
Voice recognition settings For information on the voice recognition settings, see “Voice Recognition System (if so equipped)” later in this section. Audio settings For information on the audio settings, see “Audio System” later in this section. Navigation settings Refer to the separate Navigation System Own- er’s Manual for information regarding these set- tings.
BUTTON
To change the display brightness, press the button. Pressing the button again will change the display to the day or the night display. Then, adjust the brightness by touching the If no operation is done within 10 seconds, the display will return to the previous display.
key or the
key.
LHA1007
LHA1008
Select Language: Touch the “Select Language” key. From the fol- lowing display, select the English “ON” key or the Français “ON” key for your language preference. If you select the “Français” key, French language will be displayed. To obtain a French Owner’s Manual, please see “Owner’s Manual / Service Manual order information” in the “Technical and consumer information” section.
Select Units:
Touch the “Select Units” key. From the following display, select the US “ON” key or the Metric “ON” key for your units preference.
Unit: US — mile, °F, MPG Metric: — km, °C, L/100 km
The settings are automatically saved when you exit the menu by touching the “Back” key. Phone settings For information on the phone settings, see “Bluetooth姞 Hands-Free Phone System with Navigation (if so equipped)” later in this section.
Monitor, climate, audio, phone and voice recognition systems 4-7
墌 REVIEW COPY—2009 Altima (alt) Owners Manual—USA_English (nna) 09/08/08—debbie 墍
REARVIEW MONITOR (if so equipped)
When the shift selector is shifted into the R (Reverse) position, the monitor display shows the view directly to the rear of the vehicle.
WARNING
● The system is designed as an aid to the driver in detecting large stationary ob- jects to help avoid damaging the ve- hicle. The system will not detect small objects below the bumper, and may not detect objects close to the bumper or on the ground.
● The RearView Monitor is a convenience but it is not a substitute for proper back- ing. Always turn and check that it is safe to do so before backing up. Always back up slowly.
● Objects viewed in the RearView Moni- tor differ from actual distance because a wide-angle lens is used.
● Make sure that the trunk is securely
closed when backing up.
● Do not put anything on the rearview camera. The rearview camera is in- stalled beside the license plate light.
● When washing the vehicle with high- pressure water, be sure not to spray it around the camera. Otherwise, water may enter the camera unit causing wa- ter condensation on the lens, a mal- function, fire or an electric shock.
● Do not strike the camera. It is a preci- sion instrument. Otherwise, it may mal- function or cause damage resulting in a fire or an electric shock.
CAUTION
There is a plastic cover over the camera. Do not scratch the cover when cleaning dirt or snow from the cover. HOW TO READ THE DISPLAYED LINES Lines which indicate the vehicle clearance and distances to objects with reference to the bumper line 䊊A are displayed on the monitor.
4-8 Monitor, climate, audio, phone and voice recognition systems
LHA0437
They are indicated as reference distances to objects. The lines and colors in the display indi- cate distances from the back bumper line 䊊A in the illustration. 䊊1 1.5 ft (0.5 m) red 䊊2 3 ft (1 m) yellow 䊊3 7 ft (2 m) green 䊊4 10 ft (3 m) green The vehicle clearance lines are wider than the actual clearance.墌 REVIEW COPY—2009 Altima (alt) Owners Manual—USA_English (nna) 09/08/08—debbie 墍
LHA1013
ADJUSTING THE SCREEN To adjust the quality of the screen, press the SETUP button. ● To adjust the Brightness, Tint, Contrast, Dis- play ON/OFF and Color of the RearView Monitor, press the SETUP button with the