- Download PDF Manual
-
Contents
A-Z
OWNER'S MANUAL. MINI.
Online Edition for Part no. 01 40 2 964 625 - X/15
MINI Owner's Manual for Vehicle Thank you for choosing a MINI. The more familiar you are with your vehicle, the better control you will have on the road. We therefore strongly suggest: Read this Owner's Manual before starting off in your new MINI. Also use the Integrated Owner's Manual in your vehicle. It con‐ tains important information on vehicle operation that will help you make full use of the technical features available in your MINI. The manual also contains information designed to en‐ hance operating reliability and road safety, and to contribute to maintaining the value of your MINI. Any updates made after the editorial deadline can be found in the appendix of the printed Owner's Handbook for Vehicle. Get started now. We wish you driving fun and inspiration with your MINI.
Online Edition for Part no. 01 40 2 964 625 - X/15
© 2015 Bayerische Motoren Werke Aktiengesellschaft Munich, Germany Reprinting, including excerpts, only with the written consent of BMW AG, Munich. US English X/15, 11 15 490
Printed on environmentally friendly paper, bleached without chlorine, suitable for recycling.Online Edition for Part no. 01 40 2 964 625 - X/15
MOBILITY 176 Refueling 178 Fuel 180 Wheels and tires 194 Engine compartment 196 Engine oil 200 Coolant 202 Maintenance 204 Replacing components 216 Breakdown assistance 221 Care REFERENCE 228 Technical data 233 Appendix 238 Everything from A to Z
Contents
The fastest way to find information on a partic‐ ular topic or item is by using the index, refer to page 238.
Cockpit Onboard monitor Voice activation system Integrated Owner's Manual in the vehicle
Information AT A GLANCE 14
18
26
29
CONTROLS Opening and closing 34
Adjusting 49
Transporting children safely 58
Driving 62
Displays 76
95
Lights 100 Safety 116 Driving stability control systems 120 Driving comfort 138 Climate control 145 Interior equipment 147 Digital compass 153 Storage compartments DRIVING TIPS 160 Things to remember when driving 163 Loading 166 Saving fuelOnline Edition for Part no. 01 40 2 964 625 - X/15
Information
Information Using this Owner's Manual The fastest way to find information on a partic‐ ular topic is by using the index. An initial overview of the vehicle is provided in the first chapter. Updates made after the editorial deadline Updates made after the editorial deadline can lead to differences between the printed Own‐ er's Manual and the following Owner's Man‐ uals: ▷ Integrated Owner's Manual in the vehicle. ▷ Online Owner's Manual. ▷ MINI Motorer’s Guide App. Information to updates made after the editorial deadline can be found in the appendix of the printed Owner's Manual for the vehicle. User's manual for Navigation, Entertainment, Communication Owner's Manual for Navigation, Entertainment, and Communication can be obtained as printed book from the service center. The topics of Navigation, Entertainment, and Communication can also be called up via the following media: ▷ Integrated Owner's Manual on the Control
Display.
▷ MINI Motorer’s Guide App.
Additional sources of in‐ formation A dealer’s service center will be glad to answer additional questions at any time.
Internet Information about MINI, e.g., on technology, is available on the Internet: www.miniusa.com MINI Motorer’s Guide app The Owner's Manual is available in many coun‐ tries as an app for iOS or Android in the respec‐ tive Store.
Symbols and displays Symbols in the Owner's Manual
Indicates precautions that must be followed
precisely in order to avoid the possibility of personal injury and serious damage to the vehicle. ◄ Marks the end of a specific item of information. "..." Identifies Control Display texts used to select individual functions. ›...‹ Verbal instructions to use with the voice activation system.. ››...‹‹ Identifies the answers generated by the voice activation system.
Refers to measures that can be taken to
help protect the environment. Action steps Action steps to be carried out are presented as numbered list. The steps must be carried out in the defined order. 1. First action step. 2. Second action step. Enumerations Enumerations without mandatory order or al‐ ternative possibilities are presented as list with bullet points.
Online Edition for Part no. 01 40 2 964 625 - X/15
▷ First possibility. ▷ Second possibility. Symbols on vehicle components
Indicates that you should consult the
relevant section of this Owner's Manual for information on a particular part or assembly.
Vehicle features and op‐ tions This Owner's Manual describes all models and all standard, country-specific and optional equipment that is offered in the model series. Therefore, in this Owner's Manual, we also de‐ scribe and illustrate features that are not avail‐ able in your vehicle, for example, because of the selected optional features or the country- specific version. This also applies to safety-related functions and systems. The respectively applicable country provisions must be observed when using the respective features and systems. For any options and equipment not described in this Owner's Manual, refer to the Supple‐ mentary Owner's Manuals. On right-hand drive vehicles, some control ele‐ ments are arranged differently from what is shown in the illustrations.
Status of the Owner's Manual Basic information The manufacturer of your vehicle pursues a policy of constant development that is con‐ ceived to ensure that our vehicles continue to embody the highest quality and safety stan‐ dards. In rare cases, therefore, the features de‐
Information
scribed in this Owner's Manual may differ from those in your vehicle. Updates made after the editorial deadline Updates made after the editorial deadline can lead to differences between the printed Own‐ er's Manual and the following Owner's Man‐ uals: ▷ Integrated Owner's Manual in the vehicle. ▷ Online Owner's Manual. ▷ MINI Motorer’s Guide App. Information to updates made after the editorial deadline can be found in the appendix of the printed Owner's Manual for the vehicle.
Own safety Manufacturer The manufacturer of this MINI is Bayerische Motoren Werke Aktionengesellschaft, BMW AG. Warranty Your vehicle is technically configured for the operating conditions and registration require‐ ments applying in the country of first delivery also known as homologation. If your vehicle is to be operated in a different country it might be necessary to adapt your vehicle to poten‐ tially differing operating conditions and permit requirements. If your vehicle does not comply with the homologation requirements in a cer‐ tain country you may not be able to lodge war‐ ranty claims for your vehicle there. Further in‐ formation on warranty is available from a dealer’s service center. Maintenance and repairs Advanced technology, e.g., the use of modern materials and high-performance electronics, requires suitable maintenance and repair work.
Online Edition for Part no. 01 40 2 964 625 - X/15
Information
The manufacturer of your vehicle recommends that you entrust corresponding procedures to a MINI dealer’s service center. If you choose to use another service facility, the manufacturer of your vehicle recommends use of a facility that performs work, e.g. maintenance and repair, according to MINI specifications with properly trained personnel, referred to in this Owner's Manual as "another qualified service center or repair shop". If work is performed improperly, e.g. mainte‐ nance and repair, there is a risk of subsequent damage and related safety risks. Parts and accessories The manufacturer of your vehicle recommends the use of parts and accessory products ap‐ proved by the manufacturer of the MINI. Approved parts and accessories, and advice on their use and installation are available from a MINI dealer's service center. MINI parts and accessories were tested by the manufacturer of the MINI for their safety and suitability in MINI vehicles. The manufacturer of your vehicle warrants gen‐ uine MINI parts and accessories. The manufacturer of your vehicle does not evaluate whether each individual product from another manufacturer can be used with MINI vehicles without presenting a safety hazard, even if a country-specific official approval was issued. The manufacturer of your vehicle does not evaluate whether these products are suita‐ ble for MINI vehicles under all usage conditions. California Proposition 65 Warning California laws require us to state the following warning: Engine exhaust and a wide variety of automo‐ bile components and parts, including compo‐ nents found in the interior furnishings in a vehi‐ cle, contain or emit chemicals known to the State of California to cause cancer and birth de‐ fects and reproductive harm. In addition, cer‐
tain fluids contained in vehicles and certain products of component wear contain or emit chemicals known to the State of California to cause cancer and birth defects or other repro‐ ductive harm. Battery posts, terminals and re‐ lated accessories contain lead and lead com‐ pounds. Wash your hands after handling. Used engine oil contains chemicals that have caused cancer in laboratory animals. Always protect your skin by washing thoroughly with soap and water. Service and warranty We recommend that you read this publication thoroughly. Your vehicle is covered by the fol‐ lowing warranties: ▷ New Vehicle Limited Warranty. ▷ Rust Perforation Limited Warranty. ▷ Federal Emissions System Defect Warranty. ▷ Federal Emissions Performance Warranty. ▷ California Emission Control System Limited
Warranty.
Detailed information about these warranties is listed in the Service and Warranty Information Booklet for US models or in the Warranty and Service Guide Booklet for Canadian models. Your vehicle has been specifically adapted and designed to meet the particular operating con‐ ditions and homologation requirements in your country and continental region in order to de‐ liver the full driving pleasure while the vehicle is operated under those conditions. If you wish to operate your vehicle in another country or re‐ gion, you may be required to adapt your vehi‐ cle to meet different prevailing operating con‐ ditions and homologation requirements. You should also be aware of any applicable war‐ ranty limitations or exclusions for such country or region. In such case, please contact Cus‐ tomer Relations for further information.
Online Edition for Part no. 01 40 2 964 625 - X/15
Maintenance Maintain the vehicle regularly to sustain the road safety, operational reliability and the New Vehicle Limited Warranty. Specifications for required maintenance meas‐ ures: ▷ MINI Maintenance system ▷ Service and Warranty Information Booklet
for US models
▷ Warranty and Service Guide Booklet for
Canadian models
If the vehicle is not maintained according to these specifications, this could result in serious damage to the vehicle. Such damage is not covered by the MINI New Vehicle Limited War‐ ranty.
Data memory Many electronic components on your vehicle are equipped with data memories that tempo‐ rarily or permanently store technical informa‐ tion about the condition of the vehicle, events and faults. This technical information generally records the state of a component, a module, a system or the environment: ▷ Operating mode of system components, fill
levels for instance.
▷ Status messages for the vehicle and from its individual components, e.g., wheel rotation speed/vehicle speed, deceleration, trans‐ verse acceleration.
▷ Malfunctions and faults in important system
components, e.g., lights and brakes.
▷ Responses by the vehicle to special situa‐ tions such as airbag deployment or engag‐ ing the stability control system.
▷ Ambient conditions, such as temperature. This data is purely technical in nature and is used to detect and correct faults and to opti‐ mize vehicle functions. Motion profiles over routes traveled cannot be created from this
Information
data. When service offerings are used, e.g., re‐ pair services, service processes, warranty claims, quality assurance, this technical infor‐ mation can be read out from the event and fault memories by employees of a dealer’s service center or another qualified service cen‐ ter or repair shop, including the manufacturer, using special diagnostic tools. You can obtain further information there if you need it. After an error is corrected, the information in the fault memory is deleted or overwritten on a continuous basis. With the vehicle in use there are situations where you can associate these technical data with individuals if combined with other infor‐ mation, e.g., an accident report, damage to the vehicle, eye witness accounts — possibly with the assistance of an expert. Additional functions that are contractually agreed with the customer - such as vehicle emergency locating - you can transmit certain vehicle data from the vehicle.
Event Data Recorder EDR This vehicle is equipped with an event data re‐ corder EDR. The main purpose of an EDR is to record, in certain crash or near crash-like situa‐ tions, such as an air bag deployment or hitting a road obstacle, data that will assist in under‐ standing how a vehicle’s systems performed. The EDR is designed to record data related to vehicle dynamics and safety systems for a short period of time, typically 30 seconds or less. The EDR in this vehicle is designed to record such data as: ▷ How various systems in your vehicle were
operating.
▷ Whether or not the driver and passenger
safety belts were fastened.
▷ How far, if at all, the driver was depressing
the accelerator and/or brake pedal. ▷ How fast the vehicle was traveling.
Online Edition for Part no. 01 40 2 964 625 - X/15
Information
These data can help provide a better under‐ standing of the circumstances in which crashes and injuries occur. EDR data are recorded by your vehicle only if a nontrivial crash situation occurs; no data are re‐ corded by the EDR under normal driving condi‐ tions and no personal data, e. g., name, gen‐ der, age, and crash location, are recorded. However, other parties, such as law enforce‐ ment, could combine the EDR data with the type of personally identifying data routinely ac‐ quired during a crash investigation. To read data recorded by an EDR, special equipment is required, and access to the vehi‐ cle or the EDR is needed. In addition to the ve‐ hicle manufacturer, other parties, such as law enforcement, that have the special equipment, can read the information if they have access to the vehicle or the EDR.
Vehicle identification number
The vehicle identification number can be found in the engine compartment. The vehicle identification number can also be found behind the windshield.
Reporting safety defects For US customers The following only applies to vehicles owned and operated in the US. If you believe that your vehicle has a defect which could cause a crash or could cause injury or death, you should immediately inform the National Highway Traffic Safety Administration NHTSA, in addition to notifying MINI of North America, LLC, P.O. Box 1227, Westwood, New Jersey 07675-1227, Telephone 1-800-831-1117. If NHTSA receives similar complaints, it may open an investigation, and if it finds that a safety defect exists in a group of vehicles, it may order a recall and remedy campaign. However, NHTSA cannot become involved in individual problems between you, your dealer, or MINI of North America, LLC. To contact NHTSA, you may call the Vehicle Safety Hotline toll-free at 1-888-327-4236
(TTY: 1-800-424-9153); go to http://www.safe‐ rcar.gov; or write to: Administrator, NHTSA, 400
Seventh Street, SW., Washington, DC 20590. You can also obtain other information about motor vehicle safety from http://www.safe‐ rcar.gov For Canadian customers Canadian customers who wish to report a safety-related defect to Transport Canada, De‐ fect Investigations and Recalls, may telephone the toll-free hotline 1-800-333-0510. You can also obtain other information about motor ve‐ hicle safety from http://www.tc.gc.ca/roadsaf‐ ety.10
Online Edition for Part no. 01 40 2 964 625 - X/15
Information
Online Edition for Part no. 01 40 2 964 625 - X/15
11
WATCH ME.
Online Edition for Part no. 01 40 2 964 625 - X/15
AT A GLANCE
CONTROLS
DRIVING TIPS
MOBILITY
REFERENCE
Online Edition for Part no. 01 40 2 964 625 - X/15
AT A GLANCE
Cockpit
Cockpit Vehicle features and op‐ tions This chapter describes all standard, country- specific and optional features offered with the series. It also describes features that are not
necessarily available in your car, e. g., due to the selected options or country versions. This also applies to safety-related functions and sys‐ tems. The respectively applicable country provi‐ sions must be observed when using the respec‐ tive features and systems.
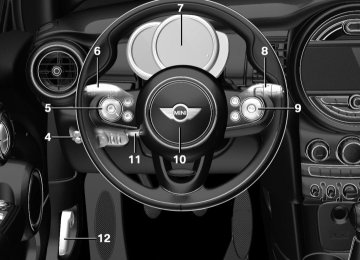
All around the steering wheel
1 Power windows 45
2 Exterior mirror operation 55
3 Central locking system 40
4 LightsFront fog lights 98
Rear fog lights 98
Lights off Daytime running lights 97
Parking lights 95
Low beams 95
Automatic headlight control 96
Corner-illuminating lights 97
High-beam Assistant 97
Instrument lighting 985 Steering wheel buttons, left
14
Online Edition for Part no. 01 40 2 964 625 - X/15
Cockpit
AT A GLANCE
Camera-based cruise control on/ off 120
Cruise control on/off 126Cleaning windows 69
Rear window wiper 70
Store speed 120, 126
Cleaning rear window 70
9 Steering wheel buttons, right Voice activation 26
Telephone
Confirm the selection 85
Move selection up 85
Move selection down 85
Increase volume
Reduce volume
10 Horn 11 Adjust the steering wheel 57
12 Unlock hood 194Pause, continue cruise con‐ trol 120, 126
Set speed 120, 126Reduce distance 120
Increase distance 120
6 Steering column stalk, left
Turn signal 67
High beams, head‐ light flasher 67
High-beam Assistant 97Roadside parking lights 96
On-board computer 85
7 Instrument cluster 76
8 Steering column stalk, rightWindshield wipers 68
Rain sensor 69
Online Edition for Part no. 01 40 2 964 625 - X/15
15
AT A GLANCE
Cockpit
All around the center console
Hazard warning system 216
Intelligent Safety 109
2 Control Display 18
3 Radio/Multimedia 4 Glove compartment 153
5 Climate control 138PDC Park Distance Control 128
Rearview camera 131
Parking assistant 133
Auto Start/Stop function 64Start/stop the engine and switch the ignition on/off 62
DSC Dynamic Stability Con‐ trol 116
Head-up Display 907 Steptronic transmission selector lever 72
Manual transmission selector lever 71
8 Controller with buttons 19
9 Parking brake 66
10 Driving Dynamics Control 11816
Online Edition for Part no. 01 40 2 964 625 - X/15
Cockpit
AT A GLANCE
All around the roofliner
Emergency Request
Indicator lamp, front-seat pass. airbag 102
Reading lights 99
Ambient light 99
Glass sunroof 47
Interior lights 98
Online Edition for Part no. 01 40 2 964 625 - X/15
17
AT A GLANCE
Onboard monitor
Onboard monitor Vehicle features and op‐ tions This chapter describes all standard, country- specific and optional features offered with the series. It also describes features that are not necessarily available in your car, e. g., due to the selected options or country versions. This also applies to safety-related functions and sys‐ tems. The respectively applicable country provi‐ sions must be observed when using the respec‐ tive features and systems.
The concept The onboard monitor combines the functions of a multitude of switches. Thus, these func‐ tions can be operated from a central location.
WARNING Operating the integrated information sys‐ tem and communication devices while driving can distract from traffic. It is possible to lose control of the vehicle. There is risk of an acci‐ dent. Only use the systems or devices when the traffic situation allows. If necessary stop and use the systems and devices while the vehicle is stationary.◀
Overview of control ele‐ ments Control elements
1 Control Display 2 Controller with buttons and, depending on
the equipment version, with touchpad
Control Display Information ▷ To clean the Control Display, follow the care
instructions.
▷ Do not place objects close to the Control
Display; otherwise, the Control Display can be damaged.
▷ In the case of very high temperatures on
the Control Display, e.g. due to intense so‐ lar radiation, the brightness may be re‐ duced down to complete deactivation. Once the temperature is reduced, e.g. through shadow or climate control system, the normal functions are re-established.
Switching on 1. Switch on the ignition. 2. Press the controller.
18
Online Edition for Part no. 01 40 2 964 625 - X/15
Onboard monitor
AT A GLANCE
3. Move in four directions.
Switching off
Press button.
1. 2. "Turn off control display"
Controller with navigation system The buttons can be used to open the menus di‐ rectly. The controller can be used to select menu items and enter the settings. Some functions of the onboard monitor can be operated using the touchpad on the controller: 1. Turn.
2. Press.
Buttons on controller
Press button MENU RADIO MEDIA NAV TEL BACK OPTION
Function Open the main menu. Opens the Radio menu. Opens the Multimedia menu. Opens the Navigation menu. Opens the phone menu. Displays the previous display. Opens the Options menu.
Controller without navigation system The buttons can be used to open the menus di‐ rectly. The controller can be used to select menu items and enter the settings. 1. Turn.
Online Edition for Part no. 01 40 2 964 625 - X/15
19
AT A GLANCE
Onboard monitor
2. Press.
3. Move in two directions.
Buttons on controller
Press button Function MENU AUDIO
Open the main menu. Open audio menu last listened to, switch between audio menus. Opens the phone menu. Open previous panel. Opens the Options menu.
TEL BACK OPTION
Operating concept Opening the main menu
Press button.
The main menu is displayed. All onboard monitor functions can be called up via the main menu. Selecting menu items Highlighted menu items can be selected. 1. Turn the controller until the desired menu
item is highlighted.
2. Press the controller. Menu items in the Owner's Manual In the Owner's Manual, menu items that can be selected are set in quotation marks, e.g., "Settings". Changing between panels After a menu item is selected, e.g., "Radio", a new panel is displayed. Panels can overlap. ▷ Move the controller to the left.
Closes current display and shows previous display. Reopens previous display by pressing BACK button. In this case, the current panel is not closed.
20
Online Edition for Part no. 01 40 2 964 625 - X/15
Onboard monitor
AT A GLANCE
▷ Move the controller to the right.
Opens new display on top of previous screen.
2. Turn the controller until the desired setting
is displayed.
Arrows pointing to the left or right indicate that additional panels can be opened. Opening the Options menu
Press button.
The "Options" menu is displayed.
Additional options: move the controller to the right repeatedly until the "Options" menu is displayed. Options menu The "Options" menu consists of various areas: ▷ Screen settings, e.g., "Split screen". ▷ Control options for the selected main
menu, e.g., for "Radio".
▷ If applicable, further operating options for
the selected menu, e.g., "Store station".
Changing settings 1. Select a field.
3. Press the controller. Activating/deactivating the functions Several menu items are preceded by a check‐ box. It indicates whether the function is acti‐ vated or deactivated. Selecting the menu item activates or deactivates the function.
Function is activated. Function is deactivated.
Touchpad Some functions of the onboard monitor can be operated using the touchpad on the controller: Selecting functions On the Control Display: "Settings" 1. 2. "Touchpad" 3. Select the desired function.
▷ "Speller": enter letters and numbers. ▷ "Interactive map": viewing the interac‐
tive map.
▷ "Audio feedback": pronounces entered
letters and numbers.
Entering letters and numbers Entering letters requires some practice at the beginning. When entering, pay attention to the following:
Online Edition for Part no. 01 40 2 964 625 - X/15
21
AT A GLANCE
Onboard monitor
Example: setting the clock Setting the clock On the Control Display:
1.
Press button. The main menu is dis‐
played.
2. Turn the controller until
"Settings" is highlighted, and then press the controller.
▷ The system distinguishes between upper and lower-case letters and numbers. For entries, it may be necessary to change be‐ tween upper and lower-case letters, num‐ bers and characters, refer to page 25.
▷ Enter characters as they are displayed on
the Control Display.
▷ Always enter associated characters, such as accents or periods so that the letter can be clearly recognized. Possible input depends on the set language. Where necessary, en‐ ter special characters via the controller. ▷ To delete a character, slide to the left on
the touchpad.
▷ To enter a blank space, slide to the right in
the center of the touchpad.
▷ To enter a hyphen, slide to the right in the
upper area of the touchpad.
▷ To enter an underscore, swipe to the right
in the lower area of the touchpad. Operating the interactive map The interactive map in the navigation system can be moved via the touchpad. Function Interactive map.
Controls Swipe into respective direction. Drag in or out on the touchpad with fingers. Tap once.
Enlarge/shrink in‐ teractive map. Display menu.
3.
If necessary, move the controller to the left to display "Time/Date".
4. Turn the controller until "Time/Date" is
highlighted, and then press the controller.
5. Turn the controller until "Time:" is high‐
lighted, and then press the controller.
Changing settings You may change Control Display settings, for example the volume, via touchpad. Swipe left or right accordingly.
6. Turn the controller to set the hours and
press the controller.
7. Turn the controller to set the minutes and
press the controller.
22
Online Edition for Part no. 01 40 2 964 625 - X/15
Onboard monitor
AT A GLANCE
Status information Status field The following information is displayed in the status field at the top right: ▷ Time. ▷ Current entertainment source. ▷ Sound output, on/off. ▷ Wireless network reception strength. ▷ Phone status. ▷ Traffic bulletin reception. Status field symbols The symbols are grouped as follows: Radio symbols
Symbol Meaning
HD Radio station is being received. Satellite radio is switched on.
Telephone symbols
Symbol Meaning
Incoming or outgoing call. Missed call. Wireless network reception strength. Symbol flashes: network search. Wireless network is not available. Bluetooth is switched on. Roaming is active. Text message was received. Check the SIM card. SIM card is blocked.
Symbol Meaning
SIM card is missing. Enter PIN.
Entertainment symbols
Symbol
Meaning
DVD changer.
Music collection. Gracenote® database. AUX-IN port. USB audio interface. Mobile phone audio interface.
Additional symbols
Symbol Meaning
Spoken instructions are turned off.
Split screen General information Additional information can be displayed on the right side of the split screen, e.g., information from the on-board computer. In the divided screen view, the so-called split screen, this information remains visible even when you change to another menu. Switching the split screen on and off On the Control Display:
Press button.
1. 2. "Split screen"
Online Edition for Part no. 01 40 2 964 625 - X/15
23
AT A GLANCE
Onboard monitor
Selecting the display On the Control Display:
Press button.
1. 2. "Split screen" 3. Move the controller until the split screen is
selected.
4. Press the controller or select "Split screen
content".
5. Select the desired menu item.
Programmable memory buttons General information The onboard monitor functions can be stored on the programmable memory buttons and called up directly, e.g., radio stations, naviga‐ tion destinations, phone numbers and menu entries. Settings are stored for the profile currently used. Saving a function 1. Highlight function via the onboard monitor.
2.
Press and hold the desired button,
until a signal sounds. Running a function Press button.
The function will work immediately. This means, e.g., that the number is dialed when a phone number is selected.
Displaying the button assignment Touch buttons with bare fingers. Do not wear gloves or use objects. The key assignment is displayed at top edge of screen.
Deleting the button assignments 1. Press buttons 1 and 6 simultaneously for
approx. 5 seconds.
2. "OK"
Deleting personal in the vehicle The concept Depending on the usage, the vehicle saves per‐ sonal data, such as stored radio stations. These personal data can be permanently deleted via the onboard monitor. General information Depending on the equipment package, the fol‐ lowing data can be deleted: ▷ Personal Profile settings. ▷ Stored radio stations. ▷ Stored Favorites buttons. ▷ Travel and on-board computer information.
24
Online Edition for Part no. 01 40 2 964 625 - X/15
Onboard monitor
AT A GLANCE
Switching between cases, letters and numbers Depending on the menu, you can switch be‐ tween entering upper and lower case, letters and numbers: Symbol
or
Function Enter the letters. Enter the numbers. Tip controller up.
Without navigation system
Select symbol.
Entry comparison Entering names and addresses: choice is nar‐ rowed down with every letter entered and let‐ ters may be added automatically. Entries are continuously compared with data stored in the vehicle. ▷ Only those letters are offered during input
for which data is available.
▷ Destination search: place names can be en‐ tered in all languages that are available on the Control Display.
▷ Music collection. ▷ Navigation, e.g. stored destinations. ▷ Phone book. ▷ Voice notes Altogether, the deletion of the data can take up to 30 minutes. Functional requirement Data can only be deleted while stationary. Deleting data Heed and follow the instructions on the Control Display. 1. Switch on the ignition. 2. 3. Open "Options". 4. "Delete all personal data" 5. "Continue" 6. "OK"
"Settings"
Entering letters and numbers General information On the Control Display: 1. Turn the controller: select letters or num‐
bers.
2. Select additional letters or numbers if
needed.
3. "OK": confirm the entry.
Symbol Function
Press the controller: delete the letter or number. Press the controller for an extended period: delete all letters or numbers.
Online Edition for Part no. 01 40 2 964 625 - X/15
25
AT A GLANCE
Voice activation system
Voice activation system Vehicle features and op‐ tions This chapter describes all standard, country- specific and optional features offered with the series. It also describes features that are not necessarily available in your car, e. g., due to the selected options or country versions. This also applies to safety-related functions and sys‐ tems. The respectively applicable country provi‐ sions must be observed when using the respec‐ tive features and systems.
The concept ▷ Most functions displayed on the Control Display can be operated by voice com‐ mands via the voice activation system. The system supports you with announcements during input.
▷ Functions that can only be used when the vehicle is stationary cannot be used via the voice activation system.
▷ The system uses a special microphone on
the driver's side.
▷ ›...‹ Verbal instructions in the Owner's
Manual to use with the voice activation sys‐ tem.
Requirements Via the Control Display, set a language that is also supported by the voice activation system so that the spoken commands can be identi‐ fied. Set the language, refer to page 89.
Using voice activation Activating the voice activation system
Press button on the steering wheel.
1. 2. Wait for the signal. 3. Say the command.
A command that is recognized by the voice activation system is announced and dis‐ played in the instrument cluster.
This symbol in the instrument cluster indi‐
cates that the voice activation system is active. If no other commands are available, operate the function via the onboard monitor. Terminating the voice activation system
Briefly press the button on the steering wheel or ›Cancel‹.
Possible commands Most menu items on the Control Display can be voiced as commands. The available commands depend on the menu that is currently displayed on the Control Dis‐ play. There are short commands for many functions. You may select lists such as phone lists via voice activation. Read these lists out loud ex‐ actly as they show in the respective list. Having possible commands read aloud You can have available commands read out loud for you: ›Voice commands‹ E. g. if the commands for the settings are read out loud.
"Settings" menu is displayed, the
26
Online Edition for Part no. 01 40 2 964 625 - X/15
Voice activation system
AT A GLANCE
Executing functions using short commands Execute functions on the main menu via short commands. It almost doesn't matter which menu item is selected, e.g., ›Vehicle status‹. Help dialog for the voice activation system Calling up help dialog: ›Help‹ Additional commands for the help dialog: ▷ ›Help with examples‹: announces informa‐
tion about the current operating options and the most important commands for them.
▷ ›Help with voice activation‹: information about the principle of operation for the voice activation system is announced.
One example: opening the tone settings Via the main menu The commands of the menu items are spoken just as they are selected via the controller. 1. Turn on the Entertainment sound output if
needed.
›Radio‹ ›Tone‹
Press button on the steering wheel.
2. 3. 4. Via short command The desired tone settings can also be started via a short command. 1. Turn on the Entertainment sound output if
needed.
2. 3.
›Tone‹
Press button on the steering wheel.
Setting the voice dialog Set system to standard dialog or use a short version. The short version of the voice dialog plays back short messages in abbreviated form. On the Control Display: 1. 2. "Language/Units" 3. "Speech type:" 4. Select setting.
"Settings"
Adjusting the volume Turn the volume button during the spoken in‐ structions until the desired volume is set. ▷ The volume remains constant even if the volume of other audio sources is changed.
▷ The volume is stored for the profile cur‐
rently used.
Information on Emer‐ gency Requests Do not use the voice activation system to ini‐ tiate an Emergency Request. In stressful situa‐ tions, the voice and vocal pitch can change. This can unnecessarily delay the establishment of a phone connection.
Environmental condi‐ tions ▷ Say the commands, numbers, and letters
smoothly and with normal volume, empha‐ sis, and speed.
▷ Always say commands in the language of
the voice activation system.
▷ Keep the doors, windows, and glass sun‐ roof closed to prevent noise interference.
Online Edition for Part no. 01 40 2 964 625 - X/15
27
AT A GLANCE
Voice activation system
▷ Avoid making other noise in the vehicle
while speaking.
28
Online Edition for Part no. 01 40 2 964 625 - X/15
Integrated Owner's Manual in the vehicle
AT A GLANCE
Integrated Owner's Manual in the vehicle Vehicle features and op‐ tions This chapter describes all standard, country- specific and optional features offered with the series. It also describes features that are not necessarily available in your car, e. g., due to the selected options or country versions. This also applies to safety-related functions and sys‐ tems. The respectively applicable country provi‐ sions must be observed when using the respec‐ tive features and systems.
Owner's Manual Search for information and descriptions by en‐ tering terms selected from the index. Select components
1. 2. Turn the controller: open
3. Press the controller. 4. Selecting desired range:
Press button.
"Vehicle
info".
▷ "Quick reference" ▷ "Search by pictures" ▷ "Owner's Manual"
Integrated Owner's Manual in the vehicle The Integrated Owner's Manual can be dis‐ played on the Control Display. It specifically de‐ scribes features and functions found in the ve‐ hicle. Components of the Integrated Owner's Manual The Integrated Owner's Manual consists of three parts, which offer various levels of infor‐ mation or possible access. Quick Reference Guide The Quick Reference Guide provides informa‐ tion how to operate the car, how to use basic vehicle functions or what to do in case of a breakdown. This information can also be dis‐ played while driving. Search by images Image search provides information and de‐ scriptions. This is helpful when the terminology for a feature is not at hand.
Leafing through the Owner's Manual Page by page with link access Turn the controller until the next or previous page is displayed. Page by page without link access Scroll through the pages directly while skipping the links. Highlight the symbol once. Now simply press the controller to browse from page to page.
Scroll back.
Online Edition for Part no. 01 40 2 964 625 - X/15
29
AT A GLANCE
Integrated Owner's Manual in the vehicle
To alternate permanently between the last dis‐ played function and the Owner's Manual re‐ peat steps 4 & 5. Opens a new display every time. Programmable memory buttons General information The Owner's Manual can be stored on the Pro‐ grammable memory buttons and called up di‐ rectly. Storing 1. Select "Owner's Manual" via the onboard
monitor.
2.
Press and hold the desired button,
until a signal sounds.
Executing
Press button. The Owner's Manual is displayed im‐
mediately.
Scroll forward.
Context help - Owner's Manual to the temporarily selected function You may open the relevant information di‐ rectly. Opening via the onboard monitor To move directly from the application on the Control Display to the options menu:
1.
Press button or move the controller to
the right repeatedly until the "Options" menu is displayed.
2. "Display Owner's Manual" Opening when a Check Control message is displayed Directly from the Check Control message on the Control Display: "Display Owner's Manual" Changing between a function and the Owner's Manual To switch from a function, e. g., radio, to the Owner's Manual on the Control Display and to alternate between the two displays:
1.
Press button or move the controller to
the right repeatedly until the "Options" menu is displayed.
2. "Display Owner's Manual" 3. Select the desired page in the Owner's
Manual.
4.
5.
30
Press button again to return to last
displayed function.
Press button to return to the page of
the Owner's Manual displayed last.
Online Edition for Part no. 01 40 2 964 625 - X/15
Integrated Owner's Manual in the vehicle
AT A GLANCE
Online Edition for Part no. 01 40 2 964 625 - X/15
31
HANDLE ME.
Online Edition for Part no. 01 40 2 964 625 - X/15
AT A GLANCE
CONTROLS
DRIVING TIPS
MOBILITY
REFERENCE
Online Edition for Part no. 01 40 2 964 625 - X/15
CONTROLS
Opening and closing
Overview
Opening and closing Vehicle features and op‐ tions This chapter describes all standard, country- specific and optional features offered with the series. It also describes features that are not necessarily available in your car, e. g., due to the selected options or country versions. This also applies to safety-related functions and sys‐ tems. The respectively applicable country provi‐ sions must be observed when using the respec‐ tive features and systems.
Remote control/key General information The vehicle is supplied with two remote con‐ trols with integrated key. Every remote control holds a replaceable bat‐ tery. You may set the key functions depending on the optional features and country-specific ver‐ sion. For Settings, refer to page 43. The vehicle stores personal settings for every remote control. Personal Profile, refer to page 36. The remote controls hold information on re‐ quired maintenance. Service data in the remote control, refer to page 202
1 Unlocking 2 Locking 3 Unlock the tailgate 4 Panic mode
Integrated key
Press button, arrow 1, and remove the key, ar‐ row 2. The integrated key fits the driver's door lock.
Replacing the battery 1. Remove integrated key from remote con‐
trol.
2. Slide the key into the opening and raise the
cover.
34
Online Edition for Part no. 01 40 2 964 625 - X/15
Opening and closing
CONTROLS
The battery compartment is accessible.
3. Slide the key in the cover of the battery
compartment and raise the cover.
Emergency detection of remote control It is possible to switch on the ignition or start the engine in situations such as the following: ▷ Interference of radio transmission to re‐ mote control by external sources e.g., by radio masts.
▷ Empty battery in remote control. ▷ Interference from radio transmissions
through mobile devices in close proximity to remote control.
▷ Interference of radio transmission by a
charging process of a mobile device, for ex‐ ample charging of a mobile phone.
A Check Control message is displayed if an at‐ tempt is made to switch on the ignition or start the engine. Starting the engine via emergency detection of the remote control
4.
Insert a battery of the same type with the positive side facing up. Insert lid and cover.
5. 6. Push key into the remote control until it en‐
gages.
Have old batteries disposed of by a dealer’s service center or another quali‐ fied service center or repair shop or
take them to a collection point.
New remote controls New remote controls are available from a dealer’s service center or another qualified service center or repair shop. Loss of the remote controls The lost remote control can be blocked by a dealer’s service center or another qualified service center or repair shop.
Steptronic transmission: if a corresponding Check Control message appears, hold the re‐ mote control, as shown, against the marked area on the steering column and press the Start/Stop button within 10 seconds while pressing the brake. Manual transmission: if a corresponding Check Control message appears, hold the remote con‐ trol, as shown, against the marked area on the steering column and press the Start/Stop but‐ ton within 10 seconds while pressing the clutch.
Online Edition for Part no. 01 40 2 964 625 - X/15
35
CONTROLS
Opening and closing
Personal Profile The concept Using Personal Profile, individual settings for several drivers can be saved and called up again at a later time. General information There are three profiles with which personal ve‐ hicle settings can be stored. Every remote con‐ trol has one of these profiles assigned. If the vehicle is unlocked using a remote con‐ trol, the assigned personal profile will be acti‐ vated. All settings stored in the profile are auto‐ matically applied. If several drivers use their own remote control, the vehicle will adjust the personal settings dur‐ ing unlocking. These settings are also restored, if the vehicle has been used in the meantime by a person with a different remote control. Changes to the settings are automatically saved in the profile currently activated. If another profile is selected via the onboard monitor, the settings saved in it will be applied automatically. The new profile is assigned to the remote control currently used. There is an additional profile available that is not assigned to any remote control: It can be used to apply settings in the vehicle without changing the personal profiles. Adjusting The settings for the following systems and func‐ tions are saved in the active profile. The scope of storable settings is country- and equipment- dependable. ▷ Unlocking and locking. ▷ Lights. ▷ Radio. ▷ Instrument cluster. ▷ Programmable memory buttons. ▷ Volumes, tone.
▷ Control Display. ▷ Climate control. ▷ Navigation. ▷ Park Distance Control PDC. ▷ Rearview camera ▷ Head-up Display. ▷ Driving Dynamics Control. ▷ Intelligent Safety. Profile management Opening profiles Regardless of the remote control in use a differ‐ ent profile may be activated. On the Control Display: 1. 2. "Profiles" 3. Select a profile. The following functions are executed: ▷ All settings stored in the called-up profile
"Settings"
are automatically applied.
▷ The called-up profile is assigned to the re‐
mote control being used at the time.
▷ If the profile is already assigned to a differ‐ ent remote control, this profile will apply to both remote controls. It cannot be differen‐ tiated anymore between the settings for the two remote controls.
Renaming profiles A personal name can be assigned to every pro‐ file to avoid confusion between the profiles. On the Control Display: 1. 2. "Profiles"
"Settings"
The current profile is selected.
3. Open "Options". 4. "Rename current profile"
36
Online Edition for Part no. 01 40 2 964 625 - X/15
Opening and closing
CONTROLS
Resetting profiles The settings of the active profile are reset to their default values. On the Control Display: 1. 2. "Profiles"
"Settings"
The current profile is selected.
3. Open "Options". 4. "Reset current profile" Exporting profiles Most settings of the active profile can be ex‐ ported. This can be helpful for securing and retrieving personal settings, before delivering the vehicle to a workshop, for example. Profiles can be taken to another vehicle equipped with the Personal Profile function. Export is made via the USB port to a USB de‐ vice. Popular file systems for USB devices are sup‐ ported. FAT32 and exFAT are the recom‐ mended formats for profile export. Other for‐ mats may not support the export. 1. 2. "Profiles" 3. "Export profile" 4. "USB device" Importing profiles Profiles stored on a USB device can be im‐ ported via the USB interface. Existing settings are overwritten with the im‐ ported profile. 1. 2. "Profiles" 3. "Import profile" 4. "USB device"
"Settings"
"Settings"
"Settings"
Using the guest profile The guest profile is for individual settings that are saved in none of the three personal profiles. This can be useful for drivers who are using the vehicle temporarily and do not have their own profile. 1. 2. "Profiles" 3. "Guest" 4. Adjust the settings. The guest profile cannot be renamed. It is not assigned to the current remote control. Display profile list during start The profile list can be displayed during each start to select the desired profile. 1. 2. "Profiles" 3. Open "Options". 4. "Display user list at startup"
"Settings"
Using the remote con‐ trol Information WARNING People or animals in the vehicle can lock the doors from the inside and lock themselves in. The vehicle can then not be opened from the outside. There is risk of injuries. Take the remote control along so that the vehicle can be opened from the outside.◀
Unlocking
Press button on the remote control.
▷ The vehicle is unlocked. ▷ The interior lights are switched on, when it is dark outside, the courtesy lamps are also
Online Edition for Part no. 01 40 2 964 625 - X/15
37
CONTROLS
Opening and closing
switched on. This function is not available, if the interior lamps were switched off man‐ ually.
▷ The welcome lamps are switched on, if this
function was activated. On 3-door models: Press button on the remote control
twice in direct succession. When the door is opened, the window is low‐ ered more to make it easier to enter the vehi‐ cle. You can set how the vehicle is to be unlocked. Create the settings, refer to page 43. The alarm system, refer to page 43, is switched off. Convenient opening
Press and hold this button on the re‐ mote control after unlocking.
The windows and the glass sunroof are opened, as long as the button on the remote control is pressed. Locking
WARNING Unlocking from the inside is only possible
with special knowledge. If people must spend a longer time in the vehi‐ cle while it is very hot or cold outside, there is risk of injuries or danger to life. Do not lock the vehicle from the outside when there are people in it.◀ The driver's door must be closed.
Press button on the remote control.
The alarm system, refer to page 43, is switched on. If the vehicle horn honks twice when you lock the car, this means that the engine or ignition is still switched on. In this case, the engine or ig‐
nition must be switched off by means of the Start/Stop button. Switching on interior lights and courtesy lights
Press button on the remote control with the vehicle locked.
The courtesy lamps are only switched on when it is dark outside. This function is not available, if the interior lamps were switched off man‐ ually. If the button is pressed within 10 seconds of when the vehicle was locked Interior motion sensor and tilt alarm sensor of the anti-theft warning system, refer to page 45, are turned off. After locking, wait 10 seconds before press‐ ing the button again. Panic mode You can trigger the alarm system if you find yourself in a dangerous situation.
Press button on the remote control for at least 3 seconds.
To switch off the alarm: press any button. Unlocking the tailgate
Press button on the remote control for approx. 1 second.
The tailgate opens slightly, regardless of whether the vehicle was previously locked or unlocked. To avoid locking it into the vehicle, do not place the remote control in the cargo area. Depending on the features and the country version, it is also possible to have door un‐ locked. Create the settings, refer to page 43. If the doors were not unlocked, the tailgate is locked again as soon as it closes.
38
Online Edition for Part no. 01 40 2 964 625 - X/15
Opening and closing
CONTROLS
CAUTION Sharp-edged or pointed objects can hit the rear window and heat conductors while driving. There is risk of property damage. Cover the edges and ensure that pointed objects do not hit the rear window.◀
Malfunction Remote control detection by the vehicle can among others be malfunctioning under the fol‐ lowing circumstances: ▷ The battery of the remote control is dis‐
charged. Replace the battery, refer to page 34.
▷ Interference of the radio connection from transmission towers or other equipment with high transmit power.
▷ Shielding of the remote control due to
metal objects.
▷ Interference of the radio connection from mobile phones or other electronic devices in direct proximity.
Do not transport the remote control together with metal objects or electronic devices. In the case of a malfunction, unlock and lock the vehicle using the integrated key, refer to page 39. For US owners only The transmitter and receiver units comply with part 15 of the FCC/Federal Communication Commission regulations. Operation is governed by the following: FCC ID: ▷ LX8766S. ▷ LX8766E. ▷ LX8CAS. ▷ LX8CAS2. ▷ MYTCAS4. Compliance statement:
This device complies with part 15 of the FCC Rules. Operation is subject to the following two conditions: ▷ This device may not cause harmful interfer‐
ence, and
▷ this device must accept any interference re‐
ceived, including interference that may cause undesired operation.
Any unauthorized modifications or changes to these devices could void the user's authority to operate this equipment.
Without remote control From the outside
WARNING Unlocking from the inside is only possible
with special knowledge. If people must spend a longer time in the vehi‐ cle while it is very hot or cold outside, there is risk of injuries or danger to life. Do not lock the vehicle from the outside when there are people in it.◀
CAUTION The door lock is permanently joined with
the door. The door handle can be moved. When pulling the door handle with the integrated key inserted, paint or key can be damaged. There is risk of property damage. Re‐ move the integrated key before pulling the outside door handle.◀ Unlock or lock the driver's door via the door lock using the integrated key, refer to page 34. The other doors must be unlocked or locked from the inside. 1. Remove lid on the door lock.
Online Edition for Part no. 01 40 2 964 625 - X/15
39
CONTROLS
Opening and closing
To do this, slide the integrated key into the opening from below and remove the lid.
2. Unlock or lock door lock. Alarm system The alarm system is not armed if the vehicle is locked with the integrated key. The alarm system is triggered when the door is opened, if the vehicle was unlocked via the door lock. In order to terminate this alarm, un‐ lock vehicle with the remote control or switch on the ignition, if needed, through emergency detection of the remote control, refer to page 35. From the inside Locking and unlocking
Press button. Vehicle is locked.
Press button. The vehicle is unlocked.
Pressing the buttons for the central locking sys‐ tem locks and unlocks the doors and the tail‐
gate when the front doors are closed, but they are not secured against theft. The fuel filler flap remains unlocked. In the event of a severe accident, the vehicle is automatically unlocked. The hazard warning system and interior lights come on. Unlocking and opening ▷
Press the central locking system button to unlock the doors to‐ gether, and then pull the door handle above the armrest.
▷ Front doors: pull the door handle on the
door to open the door. The other doors re‐ main locked.
▷ Back doors: pull twice on the door handle
on the door to be opened; the first time un‐ locks the door, the second time opens it. The other doors remain locked.
Tailgate Information WARNING Body parts can be jammed when operat‐ ing the tailgate. There is risk of injuries. Make sure that the area of movement of the tailgate is clear during opening and closing.◀
CAUTION Sharp-edged or pointed objects can hit the rear window and heat conductors while driving. There is risk of property damage. Cover the edges and ensure that pointed objects do not hit the rear window.◀
CAUTION The tailgate swings back and up when it opens. There is risk of property damage. Make sure that the area of movement of the tailgate is clear during opening and closing.◀
40
Online Edition for Part no. 01 40 2 964 625 - X/15
Opening and closing
CONTROLS
To avoid locking it into the vehicle, do not place the remote control in the cargo area. Opening from the outside When the tailgate is opened, make sure there is sufficient clearance to prevent damage.
▷ Unlock the vehicle and press the button on
the tailgate.
▷
Press button on the remote control for approx. 1 second.
As the case may be, the doors are also un‐ locked. Unlocking with the remote control, refer to page 38.
The tailgate is unlocked and can be swung up‐ ward. Opening from the inside
With the vehicle is stationary, press the button in the driver's floor area.
Closing
Comfort Access The concept The vehicle can be accessed without activating the remote control. All you need to do is to have the remote control with you, such as in your pants pocket. The vehicle automatically detects the remote control when it is in close proximity or in the car's interior. Comfort Access supports the following func‐ tions: ▷ Unlocking/locking of the vehicle. ▷ Convenient closing. ▷ Separate unlocking of the tailgate. ▷ Start the engine. Information To avoid locking it into the vehicle, do not place the remote control in the cargo area. Functional requirements ▷ There are no sources of interference
nearby.
▷ To lock the vehicle, the remote control
must be located outside of the vehicle near the doors.
▷ The next unlocking and locking cycle is not
possible until after approx. 2 seconds.
▷ The engine can only be started if the re‐
mote control is in the vehicle.
Recessed grips on the inside trim of the tailgate can be used to conveniently pull down the tail‐ gate.
Online Edition for Part no. 01 40 2 964 625 - X/15
41
CONTROLS
Opening and closing
Unlocking
Convenient closing
WARNING With convenient closing, body parts can be jammed. There is risk of injuries. Make sure that the area of movement of the doors is clear during convenient closing.◀
On the driver's or front passenger's door han‐ dle, press the button. This corresponds to pressing the remote control button: Locking
On the driver's or front passenger's door han‐ dle, press the button. This corresponds to pressing the remote control button: If a door was unlocked and opened from the inside via the door opener, all other doors con‐ tinue to be locked. This is the case, if the vehi‐ cle was locked automatically after driving off or via the central locking system button. In this case, all doors are unlocked, when pressing the button on the door handle. The button must be pressed again for locking. To save battery power, ensure that all power consumers are turned off before locking the ve‐