- 2012 Mercedes-Benz CL Class Owners Manuals
- Mercedes-Benz CL Class Owners Manuals
- 2008 Mercedes-Benz CL Class Owners Manuals
- Mercedes-Benz CL Class Owners Manuals
- 2011 Mercedes-Benz CL Class Owners Manuals
- Mercedes-Benz CL Class Owners Manuals
- 2007 Mercedes-Benz CL Class Owners Manuals
- Mercedes-Benz CL Class Owners Manuals
- 2002 Mercedes-Benz CL Class Owners Manuals
- Mercedes-Benz CL Class Owners Manuals
- 2013 Mercedes-Benz CL Class Owners Manuals
- Mercedes-Benz CL Class Owners Manuals
- 2004 Mercedes-Benz CL Class Owners Manuals
- Mercedes-Benz CL Class Owners Manuals
- 2000 Mercedes-Benz CL Class Owners Manuals
- Mercedes-Benz CL Class Owners Manuals
- 2010 Mercedes-Benz CL Class Owners Manuals
- Mercedes-Benz CL Class Owners Manuals
- 2006 Mercedes-Benz CL Class Owners Manuals
- Mercedes-Benz CL Class Owners Manuals
- 2003 Mercedes-Benz CL Class Owners Manuals
- Mercedes-Benz CL Class Owners Manuals
- 2005 Mercedes-Benz CL Class Owners Manuals
- Mercedes-Benz CL Class Owners Manuals
- 2009 Mercedes-Benz CL Class Owners Manuals
- Mercedes-Benz CL Class Owners Manuals
- 2001 Mercedes-Benz CL Class Owners Manuals
- Mercedes-Benz CL Class Owners Manuals
- Download PDF Manual
-
120
Example display in audio CD mode
Example display in audio DVD mode
1 Current playback option 2 Track number 3 Disc number 4 Disc name (only if saved on the disc) 5 Track name (only if saved on the disc) 6 Track time 7 Graphic time and track display 8 Sound settings 9 Medium selection a To call up track listing b Disc type c Playback options
1 Current playback option 2 Track number 3 Disc number 4 Disc name (only if saved on the disc) 5 Track name (only if saved on the disc) 6 Track time 7 Graphic time and track display 8 Sound settings 9 Medium selection a To call up track listing b Stop function c Pause (“Play” appears if paused) d Disc type e Playback options
Example display in MP3 mode
Stop function
Pause function
Control systems COMAND audio CD/audio DVD/MP3
1 Current playback option 2 Medium type 3 Disc number (not on PCMCIA card) 4 Track name 5 Current folder path 6 Current folder 7 Track time 8 Graphic time and track display 9 Sound settings a Medium selection b Folder listing c Track listing d Playback options
i This function is only available in audio DVD mode. 왘 Stopping playback: Select “Audio” 씮
“Audio” 씮 “DVD-Audio” 씮 “Stop”.
왘 Restarting playback: Select “Audio” 씮 “Audio” 씮 “DVD-Audio” 씮 “Play”. Playback starts at the beginning of the DVD.
In audio CD, audio DVD and MP3 mode 왘 Pausing playback: Press F briefly.
왘 Continuing playback: Press F
again briefly.
Only in audio DVD mode 왘 Pausing playback:
Select “Audio” 씮 “Audio” 씮 “DVD-Au- dio” 씮 “Pause”. The “Pause” screen changes to “Play”. 왘 Continuing playback: Select “Audio” 씮 “Audio” 씮 “DVD-Audio” 씮 “Play”. The “Play” screen changes to “Pause”.
121
Control systems COMAND audio CD/audio DVD/MP3
Selecting CD/DVD/MP3 media
Selecting a track
Selecting by skipping to tracks 왘 Skipping forwards or backwards to
a track (in CD or DVD mode only): Rotate ymz.
i Skipping forwards through the tracks skips to the next track. Skipping backwards through the tracks skips to the beginning of the current track if the track has been playing for more than 8 seconds. If the track has been playing for less than 8 seconds, it skips to the start of the previ- ous track. If you have switched on the “Random Tracks” playback option, the order of the tracks is ran- dom.
왘 Select “Audio” 씮 “Audio”. 왘 Select “CD”, “DVD-Audio” or “MP3”.
COMAND begins playback.
왘 In audio CD, audio DVD and MP3
mode: Select “Changer”.
or 왘 In audio CD and audio DVD mode only: Press n when the main area is selected. The media list appears. The dot R in- dicates the current medium.
왘 Select a medium or folder.
COMAND changes the medium.
왘 Select station preset by rotating ymz
or sliding qmr and press n.
or 왘 Enter a magazine tray number with the
telephone keypad using the A - 9 buttons.
122
Selecting from the track list 왘 Select “Audio” 씮 “Audio”. 왘 Select “CD”, “DVD-Audio” or “MP3”.
Selecting a track using the COMAND controller 왘 Select “Tracks”, “Tracks A-Z” or “Track
list”.
or 왘 Only in MP3 mode: Press n when the
main area is selected. The track list of the current folder ap- pears. The dotR indicates the current track.
왘 Select a track by rotating ymz or slid-
ing qmr.
i In MP3 mode, the list shows all the tracks in alphabetical order.
Selecting a track using the telephone keypad 왘 Press > on the telephone keypad
(컄 page 86).
왘 Enter track number using the A -
9 buttons.
Fast forward/rewind
왘 Select main area. 왘 Slide and hold omp until desired place
is reached.
Selecting a folder
i This function is only available in audio MP3 mode. 왘 Select “Audio” 씮 “Audio” 씮 “MP3” 씮
“Folder”.
or 왘 Press n when main area is selected. The track list of the current folder ap- pears.
Control systems COMAND audio CD/audio DVD/MP3
This is what the illustration in the right column is showing as well.
1 Back folder symbol 2 Current track symbol 3 Track symbol 왘 Selecting one folder higher: Select
the Q symbol. The display changes to the next folder up in the folder structure on the disc.
1 Back folder symbol 2 Current folder symbol 3 Folder symbol containing tracks 왘 Selecting a folder: Select desired
folder. You will see the tracks in the folder.
왘 Select a track.
The track is played and the correspond- ing folder is now the active folder.
123
Control systems COMAND audio CD/audio DVD/MP3
Setting the audio format
Playback options
This function lets you choose the audio for- mat that you would like COMAND to play and is only available in DVD-Audio mode.
i The tracks on an audio DVD can be stored in various audio formats. The number of audio for- mats depends on the audio DVD. 왘 Select “Audio” 씮 “Audio” 씮 “DVD-Au-
dio” 씮 “Group”.
i The “Group” menu item cannot be selected if only one audio format is saved on the DVD.
The list of available audio formats appears. A dot R indicates the format currently se- lected. 왘 Changing setting: Slide qmr or
rotate ymz.
왘 Exiting menu: Slide omp.
The following options are available: 앫 “Normal Track Sequence”
Tracks playback in the order on the disc (e.g. track 1, 2, 3, etc.).
앫 “Random Tracks”
Tracks playback in a random order (e.g. track 3, 8, 5, etc.).
앫 “Random Folder” (in MP3 mode only)
Tracks in the active folder and any sub- folders playback in random order.
앫 “Repeat Folder” (in MP3 mode only) Tracks in the active folder will be re- peated until you switch the function off.
왘 Selecting an option: Select “Audio”
씮 “Audio”.
왘 Select “CD”, “DVD-Audio” or “MP3”.
The option list appears. A dot R indi- cates which option is switched on.
왘 Select an option and press n.
The option is switched on. For all op- tions except “Normal Track Sequence”, you will see a corresponding indicator in the main area.
i The “Normal Track Sequence” option is au- tomatically activated when you select a different medium. If an option is activated, it remains acti- vated after COMAND is switched on/off.
124
왔 COMAND AUX You can connect an external audio or video source (AUX) to COMAND.
Audio AUX
Audio and Video AUX jacks
The Audio and Video AUX jacks to which external audio/video sources can be con- nected are located in the glove box.
Switching to Audio AUX mode 왘 Select “Audio” 씮 “Audio”씮 “AUX”.
The Audio AUX menu appears. You will hear the medium in the external audio source if it has been connected and switched to play.
Control systems COMAND AUX
i Please refer to the corresponding operating instructions for information about how to oper- ate the external audio source.
You can adjust the following settings in Au- dio AUX mode: 앫 Volume (컄 page 94) 앫 Balance and fader (컄 page 96) 앫 Treble and bass (컄 page 95) 앫 Surround sound (컄 page 96)
1 Video AUX jack 2 Audio AUX jack, left channel 3 Audio AUX jack, right channel
125
Control systems COMAND AUX
Video AUX
Automatic picture fade-out If a video is playing when the vehicle is shifted from park position P into neutral position N, drive position D or reverse gear R the picture is faded out automati- cally and the following message appears in the display: “In order not to distract driver, picture is faded out while the vehicle is in motion”. When the vehicle is shifted back into P, the picture comes on again.
Switching to Video AUX mode 왘 Select “Video” 씮 “Video”씮 “AUX”.
The Video AUX menu appears. You will see the medium in the external audio source if it has been connected and switched to play.
126
Screen settings
Setting brightness, contrast and color 왘 Show the menu system, if necessary
(컄 page 131).
왘 Select “Video” 씮 “AUX”씮 “AUX”.
The menu appears.
왘 Select a setting: Slide qmr or turn
i Please refer to the corresponding operating instructions for information about how to oper- ate the external video source.
ymz.
왘 Press n.
You can adjust the following settings in Video AUX mode: 앫 Screen settings (컄 page 126) 앫 Volume (컄 page 94) 앫 Balance and fader (컄 page 96) 앫 Treble and bass (컄 page 95) 앫 Surround sound (컄 page 96)
왘 Changing settings: Slide qmr or turn
ymz until you reach the desired set- ting.
왘 Saving settings: Press n.
Changing the picture format 왘 Show the menu system, if necessary
(컄 page 131).
왘 Select “Video” 씮 “AUX”씮 “AUX”.
The DVD-V menu appears. The dotRin front of a menu item - “16:9 Optimized”, “4:3” or “Wide- screen” indicates the current format.
왘 Changing the format: Slide qmr or turn ymz, until you reach the desired setting.
왘 Saving the format: Press n.
Control systems COMAND AUX
127
COMAND can playback video DVDs meet- ing the following requirements: 앫 Correct regional code 앫 NTSC or PAL TV standard The appropriate information is usually giv- en either on the DVD or the DVD box. The factory setting of COMAND is regional code 1. The setting can be changed at an authorized Mercedes-Benz Center. This will allow you to playback video DVDs with other regional codes, as long as they com- ply with the NTSC or PAL TV standard.
Control systems COMAND video DVD
Warning!
Notes about video DVD operation
COMAND can playback commercially available, prerecorded video DVDs that bear the following label. You will usually find the label on the DVD booklet, the inlay, or the DVD itself.
i Video DVDs differ from recordable DVD-R and DVD-RW discs.
i There may be playback problems when play- ing copied DVDs. There is a large variety of discs, disc-writing soft- ware and writers available. This variety means that there is no guarantee that the system will be able to play discs that you have written/copied yourself.
Some DVDs may not comply with the NTSC or PAL TV playback standards. Sound, picture and other playback prob- lems may occur when you play such DVDs.
COMAND is classified as a Class 1 laser product. You must not open the casing. There is a risk of exposure to invisible laser radiation if you open the casing, or if the casing is faulty or damaged. COMAND does not contain any parts that you are able to maintain yourself. For safety reasons, all maintenance work must be car- ried out by qualified technicians.
Automatic picture fade-out
If a video DVD is playing when the vehicle is shifted from park position P into neutral position N, drive position D or reverse gear R the picture is faded out automati- cally and the following message appears in the display: “In order not to distract driver, picture is faded out while the vehicle is in motion”. When the vehicle is shifted back into park position P, the picture comes on again.
128
Notes about handling DVDs
앫 Only use a pen designed for such a pur-
Inserting or ejecting DVDs
Control systems COMAND video DVD
pose to label discs.
앫 Place discs back in their boxes after
use.
앫 Protect discs from heat and direct sun-
light.
Functional limitations
Depending on the DVD, it is possible that certain functions or actions may be tempo- rarily or permanently unavailable. If you try to utilize such functions or carry out such actions, you will see the 7 symbol in the display.
Warning!
Only insert or eject a DVD when the vehicle is stationary. There is a risk of accident by being distracted from road and traffic condi- tions if you load a DVD while the vehicle is in motion.
Bear in mind that at a speed of just 30 mph (approximately 50 km/h), your vehicle is covering a distance of 44 feet (approximate- ly 14 m) every second.
왘 Inserting a DVD (컄 page 116). or 왘 Ejecting a DVD (컄 page 118).
! Do not affix stickers or labels to the discs. These could peel away and damage COMAND. COMAND is designed to hold discs which com- ply with the IEC 60908 standard. You can there- fore only use discs with a maximum thickness of 1.3 mm. If you insert thicker discs, e.g. those that contain data on both sides (DVD on one side and audio data on the other), they cannot be ejected and can damage COMAND. Do not use discs with an 8 cm diameter, even if they have an adapter. Only use round discs with a 12 cm diameter. 앫 Only hold discs by the edge. 앫 Handle discs carefully to prevent play-
back problems.
앫 Avoid getting scratches, fingerprints
and dust on discs.
앫 Clean discs from time to time with a
commercially-available cleaning cloth. Do not wipe them with a circular mo- tion, but only in straight lines from the center outwards.
129
Control systems COMAND video DVD
Submenu overview of video DVD
Pause/Play Pause playback Continue playback Restart playback
Stop Pause Playback Stop playback
Changer Select medium
Sound Treble Bass Balance/Fader 3D Sound
DVD-V DVD Functions Brightness Contrast Color 16:9 Optimized 4:3
Widescreeni The M shortcut button takes you directly to the previously set disc mode (audio CD/DVD, MP3-CD/DVD or video DVD). The number of times you have to press the shortcut button de- pends on the previously set mode.
Switching to video DVD mode
왘 Insert a DVD (컄 page 116). or 왘 Select “Video” 씮 “Video” 씮 “Video
DVD”.
or 왘 Press the M shortcut button once or
twice.
130
Hiding/showing the DVD control menu
Hiding/showing the menu system
Fast forward/rewind
Control systems COMAND video DVD
왘 Hiding the menu: Slide qmr. 왘 Showing the menu: Slide qmr. or 왘 Wait for approximately 8 seconds.
왘 Showing the menu: Press n. 왘 Hiding the menu: Press n when the
main menu area is selected.
Control menu 1 Disc type 2 Current track 3 Current scene 4 Elapsed track time 5 Show the menu system
Menu system 1 Video DVD options 2 Pause 3 Stop 4 Medium selection 5 Sound settings
왘 Slide omp and hold until you get to the
desired scene.
Selecting the DVD medium
왘 Select “Video” 씮 “Video” 씮 “Video
DVD”.
왘 Show the menu system, if necessary
(컄 page 131).
왘 Select “Changer”.
The media list appears. The dotR indi- cates the current medium.
왘 Select a medium.
COMAND changes the medium.
131
Control systems COMAND video DVD
Stop playback
Pause playback
Selecting scene/chapter
왘 Select “Video” 씮 “Video” 씮 “Video
왘 Select “Video” 씮 “Video” 씮 “Video
DVD”.
DVD”.
왘 Show the menu system, if necessary
(컄 page 131).
왘 Show the menu system, if necessary
(컄 page 131).
왘 Pause playback: Select “Pause”. In the display, “Pause” changes to “Play”.
왘 Continue playback: Select “Play”. Play is continued from the point at which it was stopped.
왘 Stop play: Select “Stop”.
In the display, “Pause” changes to “Play”.
왘 Continue playback: Select “Play”. Play is continued from the point at which it was stopped.
왘 Stop playback: Select “Stop” again
while playback is stopped.
or 왘 Select “Stop” twice in quick succession
during playback.
왘 Resume playback: Select “Play”.
Playbacks starts again from the beginning.
132
Entering scene/chapter using the COMAND controller 왘 Make sure that the control menu is
shown (컄 page 131).
왘 Skipping forwards or back: Slide
omp or turn ymz.
Entering the scene/chapter using the telephone keypad 왘 Press > on the telephone keypad
(컄 page 140).
왘 Enter scene/chapter using the A -
9 buttons. COMAND tunes in to the scene/chap- ter entered.
Selecting film/track
Screen settings
i This function is only available if the DVD is comprised of several film/tracks. 왘 Select “Video” 씮 “Video” 씮 “Video
DVD”.
왘 Show the menu system, if necessary
(컄 page 131).
왘 Select “DVD-V” 씮 “DVD Functions” 씮
“Title selection”. A selection list appears.
왘 Select a film/track.
Setting brightness, contrast and color 왘 Select “Video” 씮 “Video” 씮 “Video
DVD”.
왘 Show the menu system, if necessary
(컄 page 131).
왘 Select “DVD-V” 씮 “Brightness” 씮
“Contrast”or “Color”.
왘 Changing settings: Slide qmr or turn
ymz until you reach the desired set- ting.
왘 Saving settings: Press n.
Control systems COMAND video DVD
Changing the picture format 왘 Select “Video” 씮 “Video” 씮 “Video
DVD”.
왘 Show the menu system, if necessary
(컄 page 131).
왘 Select “DVD-V”.
The DVD-V menu appears. The dotRin front of a menu item - “16:9 Optimized”, “4:3” or “Wide- screen” indicates the current format. 왘 Changing the format: Slide qmr or turn ymz, until you reach the desired setting.
왘 Saving the format: Press n.
133
Control systems COMAND video DVD
DVD menu
The DVD menu is the menu stored on the DVD itself. It is structured in various ways according to the individual DVD and per- mits certain actions and settings.
Calling up the DVD menu 왘 Select “Video” 씮 “Video” 씮 “Video
DVD”.
왘 Show the menu system, if necessary
(컄 page 131).
왘 Select “DVD-V” 씮 “DVD Functions” 씮
“Menu”. The DVD menu appears.
Selecting menu items in the DVD menu 왘 Slide qmr or omp. 왘 Confirming the selection: Press n.
The selection menu appears.
134
왘 Reconfirming the selection: Select
“Select”. COMAND carries out the action de- fined by the selected DVD menu item.
i Depending on the DVD, it is possible the menu item “Play” either has no function or has no function in certain parts of the DVD menu.
Stopping the film or skipping to the beginning/end of a scene
왘 Select a menu item of your choice from
the DVD menu. The selection menu appears.
1 Stop film 2 Skip to the end of a scene 3 Skip to the beginning of a scene 왘 Stopping the film: Select “Stop”. 왘 Skipping to the end of a scene:
Select H.
왘 Skipping to the beginning of a
scene: Select G.
Control systems COMAND video DVD
i Depending on the DVD, it is possible the menu items H and G either have no func- tion or have no function in certain parts of the DVD menu.
Switching to the next highest DVD menu level
왘 Press the L back button in the cen-
ter console.
or 왘 Select the corresponding menu item in
the DVD menu.
or 왘 Select a menu item of your choice from
the DVD menu.
왘 Select the menu item “Go up” in the se-
lection menu.
i Depending on the DVD, it is possible the menu item “Go up” either has no function or has no function in certain parts of the DVD menu.
Back to the film
Setting the language and audio format
왘 Press the L back button until you
can see the film.
or 왘 Select the corresponding menu item in
the DVD menu.
or 왘 Select a menu item of your choice from
the DVD menu.
왘 Select the menu item “Back (to the
film)” in the selection menu.
i Depending on the DVD, it is possible the menu item “Back (to the film)” either has no function or has no function in certain parts of the DVD menu.
i This function is not available for all DVDs. If it is available, you can set the language for the DVD menu and the audio language and/or the audio format. The number of settings you can make is determined by the content of the DVD. It may also be possible to make the settings in the DVD menu (컄 page 134). 왘 Select “Video” 씮 “Video” 씮 “Video
DVD”.
왘 Show the menu system, if necessary
(컄 page 131).
왘 Select “DVD-V” 씮 “DVD Functions”. 왘 Select “Menu Language” or “Audio Lan-
guage”. In both cases a selection list will ap- pear. The dotRin front of an entry indicates the current language.
컄컄
135
Control systems COMAND video DVD
컄컄
왘 Changing the setting: Slide qmr or turn ymz, until you reach the desired setting.
왘 Saving a setting: Press n. 왘 Exiting the menu: Slide omp.
136
Subtitles and camera angles
Interactive content
i DVDs may include interactive content (e.g. a video game). In a video game you can control the play by selecting and initiating actions. The type and number of actions depends on the DVD. 왘 Selecting an action: Slide qmr or
omp, or turn ymz, until you reach the desired setting.
왘 Initiating an action: Press n.
A menu appears, the first entry “Se- lect” is highlighted.
왘 Press n.
i This function is not available for all DVDs. The number of settings you can make is deter- mined by the content of the DVD. It may also be possible to make the settings in the DVD menu (컄 page 134). 왘 Select “Video” 씮 “Video” 씮 “Video
DVD”.
왘 Show the menu system, if necessary
(컄 page 131).
왘 Select “DVD-V” 씮 “DVD Functions”. 왘 Select “Subtitles” or “Camera angle”. In both cases a selection list will ap- pear. The dotRin front of an entry indicates the current language.
왘 Changing the setting: Slide qmr or turn ymz, until you reach the desired setting.
왘 Saving a setting: Press n. 왘 Exiting the menu: Slide omp.
왔 COMAND telephone* Safety precautions
Warning!
Some jurisdictions prohibit the driver from using a mobile telephone while driving. Whether or not prohibited by law, for safety reasons, the driver should not use the mo- bile telephone while the vehicle is in motion. Stop the vehicle in a safe location before placing or answering a call.
If you nonetheless choose to use the mobile phone1 while driving, please use the hands- free feature and be sure to pay attention to the traffic situation at all times. Use the mo- bile phone only when road, weather and traf- fic conditions permit. Otherwise, you may not be able to observe traffic conditions and could endanger yourself and others.
Bear in mind that at a speed of just 30 mph (approximately 50 km/h), your vehicle is covering a distance of 44 feet (approxima- tely 14 m) every second.
1 Observe all legal requirements.
Warning!
Never operate radio transmitters equipped with a built-in or attached antenna (i.e. with- out being connected to an external antenna) from inside the vehicle while the engine is running. Doing so could lead to a malfunc- tion of the vehicle’s electronic system, pos- sibly resulting in an accident and/or personal injury.
General notes
i USA only: This device complies with Part 15 of the FCC Rules. Operation is subject to the following two conditions: (1) This device may not cause harmful interfer-
ence, and
(2) this device must accept any interference re-
ceived, including interference that may cause undesired operation.
Any unauthorized modification to this device could void the user’s authority to operate the equipment.
Control systems COMAND telephone*
i Canada only: This device complies with RSS-210 of Industry Canada. Operation is subject to the following two conditions: (1) This device may not cause interference, and (2) this device must accept any interference re-
ceived, including interference that may cause undesired operation of the device. Any unauthorized modification to this device could void the user’s authority to operate the equipment.
Calls disconnected while the vehicle is in motion A call may be disconnected if: 앫 there is insufficient network coverage 앫 you move from one transmitter/receiv- er area (cell) into another and no chan- nels are free or the cell is full
137
Control systems COMAND telephone*
Operating options
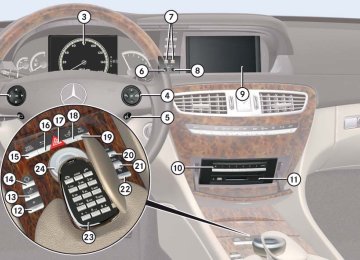
i The components and operating principles of COMAND can be found on (컄 page 83) and (컄 page 92).
i Various mobile phone cradles can be in- stalled in the front center armrest, see separate installation instructions for the mobile phone cradle. These mobile phone cradles can be ob- tained from an authorized Mercedes-Benz Cen- ter. For more information about telephone (컄 page 519). When the mobile phone is inserted in the cradle, you can operate the telephone us- ing the following devices: 앫 mobile phone keypad 앫 COMAND telephone keypad 앫 buttons s and t on the multi- function steering wheel (컄 page 283)
앫 Voice Control (컄 page 308) 앫 Bluetooth® headset (컄 page 153)
Please note that these functions are only available with Mercedes-Benz approved mobile phones. Please contact an autho- rized Mercedes-Benz Center for informa- tion on features available for your mobile phone of choice. You can control other functions of the mo- bile phone via the COMAND, instrument cluster control system (컄 page 294) or Voice Control.
i In order for the functions described in this section to work correctly, the Bluetooth® head- set must be linked to COMAND (컄 page 176). Please make sure any Bluetooth® headset linked with the mobile phone is switched off or that the headset is linked with COMAND before you in- sert the mobile phone in the cradle (컄 page 519) and use the telephone functions with COMAND.
The descriptions in this section assume that the mobile phone is inserted in the cradle. Exceptions to this are clearly stated.
Unless otherwise indicated, the descrip- tions and illustrations in this section refer to COMAND and the telephone keypad. Operation using the mobile phone and Bluetooth® headset is described in the re- spective separate Operating Instructions.
Caller ID COMAND can display the telephone num- ber and the name of the caller, e.g. for an incoming call and also in other menus or displays. For the telephone number to be displayed, the caller must transmit their telephone number. This is also the case for name displays. For this, the telephone number and the name of the caller must also be saved in the mo- bile phone book.
138
Control systems COMAND telephone*
Functional restrictions You will not be able to use the telephone, or you may have to wait a while, in the fol- lowing situations: 앫 If the telephone has not yet logged into
the network. The telephone automatically tries to log into a network. If no network is available, you will also not be able to make a “911” emergency call. If you attempt to make an outgoing call, the “No Service” message will appear for a short while.
앫 If the mobile phone is not inserted in
the cradle.
앫 SIM card is not inserted in GSM type
phone.
Notes about COMAND telephone fea- tures using a Bluetooth® connection Many of the Mercedes-Benz approved mo- bile phones, cradles and adaptors avail- able for use in your vehicle utilize Bluetooth® technology to communicate with each other and the vehicle. Depend- ing on your phone brand and model, the number of in-vehicle or on-display COMAND telephone features supported via Bluetooth® communication, and thus available for your use, may vary. The descriptions and illustrations in this section are based on the use of fully com- patible Mercedes-Benz approved mobile phones and cradles that do not utilize Blue- tooth® technology to communicate with each other. If your vehicle is equipped with integrated Bluetooth® functionality than a Bluetooth® capable mobile phone, head- set, Laptop, PDA, etc. is required to utilize those features.
For additional information about Mercedes-Benz approved Bluetooth® mo- bile phones and related accessories please contact the Mercedes-Benz Customer As- sistance Center at 1-800-FOR-MERCedes or your nearest authorized Mercedes-Benz Center.
Switching telephone on or off
왘 Switching on: Insert mobile phone
into cradle when COMAND is switched on.
or 왘 Switch on the mobile phone
(see mobile phone operating instruc- tions).
왘 Switching off: Select “Telephone” 씮
“Telephone” 씮 “Telephone OFF”.
or 왘 Switch off mobile phone (see mobile
phone operating instructions).
139
Control systems COMAND telephone*
Activating telephone mode
왘 Select “Telephone” 씮 “Telephone”. or 왘 Press s on telephone keypad.
Telephone keypad
1 Telephone keypad 2 Folding cover
140
왘 Entering characters: Select “Tele-
phone”.
왘 Open cover 2. 왘 Enter characters using A - #.
i You can enter the * character by pressing > once. Pressing this button again within 1.5 seconds enters the + character. 왘 Deleting individual characters:
Press *.
왘 Deleting an entire word or number: Press and hold * until the word or number is deleted.
With the telephone keypad you can: 앫 Enter and clear numbers and special
characters.
앫 Reject, accept, connect and end calls. 앫 Select preset radio stations and enter the frequency manually (컄 page 101). 앫 Select preset satellite radio stations
and enter the channel number (컄 page 109).
앫 Select a medium from the DVD chang-
er (컄 page 122).
앫 Select a track from CD, DVD-Audio or
MP3 (컄 page 123).
앫 Select a scene/chapter from a video
DVD (컄 page 132).
앫 Select a street in the navigation entry
(컄 page 208).
Control systems COMAND telephone*
Placing a “911” emergency call before entering PIN/PIN2, PUK/PUK2 or un- lock code
Placing a “911” emergency call after entering PIN/PIN2, PUK/PUK2 or un- lock code
Entering the number using the COMAND controller 왘 Select “Telephone” 씮 “Dial 911”.
Entering the number using the tele- phone keypad 왘 Enter digits 9-1-1 (컄 page 140). 왘 Press s.
Entering the number using the COMAND controller 왘 Select “Telephone”. 왘 Select all the digits in sequence. 왘 Select “S”.
Entering the number using the tele- phone keypad 왘 Enter digits 9-1-1 (컄 page 140). 왘 Press s.
“911” emergency call
i The “911” emergency call system is a public service. Using it without due cause is a criminal offense.
i This function places a call to the local 911 provider. It does not initiate a Tele Aid call.
The following conditions must be fulfilled in order to make a “911” emergency call: 앫 The phone is switched on. 앫 A mobile network is available. 앫 There is a valid SIM card in the phone (not necessary in all mobile networks).
i If no SIM card is inserted in the mobile phone, you can only initiate a “911” emergency call by using COMAND and the mobile phone.
If you cannot make an emergency call, you must initiate rescue measures yourself. The “911” emergency call is a public ser- vice. Any misuse is punishable by law.
141
Entering using the telephone keypad 왘 Enter digits using the R - 9 but-
tons (컄 page 140).
왘 Confirming an entry: Press n or
press s.
Control systems COMAND telephone*
Confirming the emergency call After the digits have been entered, you will see the question “Do you want to dial the 911 emergency number?”. 왘 Use COMAND controller to select
“Yes”. The telephone makes the connection. 왘 Wait until the emergency call center answers and describe the emergency situation.
Entering the PIN
i Your PIN code (Personal Identification Num- ber code) prevents unauthorized persons from using your GSM mobile phone. The PIN code is a number string, which you have to enter when switching on the telephone. The PIN entry applies only to GSM mobile phones.
Entering using the COMAND controller 왘 Select “Telephone”. 왘 Entering: Select all the digits in se-
quence.
왘 Deleting a digit: Select ) and briefly
press n.
왘 Deleting an entire number: Select ) and press and hold n until the number is deleted.
왘 Confirming an entry: Press n.
142
Control systems COMAND telephone*
Entering the PIN2
Entering the PUK/PUK2
Entering the unlock code
i The PIN2 entry applies only to GSM mobile phones.
i The PUK/PUK2 entry (Personal Unblocking Key) applies only to GSM mobile phones.
The phone may request the PIN2 in order to use certain functions. A corresponding message appears in the display. 왘 Enter PIN2 digits into mobile phone.
If you enter the PIN or PIN2 incorrectly three times, the SIM card will be locked. A corresponding message appears in the display. It is necessary to enter the PUK/PUK2 to unlock it. The PUK and/or PUK2 are provided by your telephone ser- vice provider. 왘 Enter PUK/PUK2 digits into mobile
phone.
Many mobile phones can be protected from unauthorized use with an unlock code (see mobile phone operating instructions). If you wish to use the phone functions when the unlock code is active, a screen appears requesting that you enter the un- lock code. You cannot use the phone func- tions (except “911” emergency call) until you have entered the unlock code. 왘 Proceed in the same way as entering
the PIN (컄 page 142).
143
Control systems COMAND telephone*
Telephone submenu overview
i The components and operating principles of COMAND can be found on (컄 page 83).
Name (only when the mo- bile phone is insert- ed in the cradle) Display COMAND phone book
Data/Connections Call lists
(not during a call)
Text message (not during a call)
DTMF (only during a call)
Mic OFF/ON (only during a call)
앫 Address book 앫 Bluetooth®
Display call list se- lection: 앫 Calls received 앫 Calls dialed
Call up SMS inbox
Send numerical se- quence
Switch hands-free microphone on/off
144
Main telephone menu
왘 Calling up main menu: Select “Tele-
phone”.
or 왘 Press s on the telephone keypad
(컄 page 140).
i If you press s when the main telephone menu has already been called up, the “Calls Di- aled” list will appear (컄 page 146).
2 Symbol mailbox 3 Symbol
1 Numbers/characters to enter tele-
phone number
for new voice message in
for unread SMS messag-
es in SMS inbox (컄 page 179)
4 Signal strength and network status
display 앫 Network status “READY” = mobile
phone is logged in with its own provider’s network
앫 Network status “READY ROAM” = mobile phone is logged in with an- other provider’s network
앫 Network status “No Service” = No
network available
5 To show COMAND phone book
(“Name”) (컄 page 154)
6 To call up text message (SMS)
(컄 page 179)
7 To display call list selection
(컄 page 146)
Control systems COMAND telephone*
Mailbox
symbol in the example illustration The above indicates that your mailbox contains new voice messages. You will have to call the mailbox in order to retrieve the mes- sages. You can call your mailbox by: 앫 speed dialing (컄 page 150) 앫 entering a telephone number using the
telephone keypad (컄 page 149)
앫 entering the telephone number using the COMAND controller (컄 page 149)
i Once connection with your mailbox has been established, the mailbox system will guide you through the next steps.
145
Control systems COMAND telephone*
Call lists
COMAND can display the following calls in separate lists: 앫 Calls received 앫 Calls dialed
Calling up a list 왘 Select “Call Lists” from main telephone
menu.
왘 Select “Calls Received” or “Calls Di-
aled”. The corresponding list appears.
i The “Calls Received” and “Calls Dialed” menu items do not function if the respective list has no entries. The “Call Lists” menu item does not function if neither list has any entries.
146
You will see the telephone number of caller 6 if 앫 the caller transmitted the telephone number 앫 no caller data is saved in either the COMAND address book or the phone book on the mo- bile phone
An unknown caller 5 has not transmitted his or her telephone number. i In the list of dialed calls, you will see the name of the person called if you have saved his or her telephone number and name in the COMAND address book or in the phone book on the mobile phone. If no data has been saved, you will see the telephone number. 왘 Switching to list display: Select
“123” or “ABC”. The display changes to telephone num- ber or name display.
왘 Closing list: Slide omp and
select “Back”.
왘 Selecting a list entry: Slide qmr or
rotate ymz and select entry.
Illustration: list of calls received 1 To close list 2 To switch list display (“123” or “ABC”) 3 To call up options 4 Name or telephone number of a caller 5 Unknown caller 6 Telephone number of a caller
i In the list of calls received, you will see the name of caller 4 if 앫 the caller transmitted the telephone number 앫 the name and telephone number are saved
in the COMAND address book or in the phone book on the mobile phone
앫 the telephone number is saved in the same
way in which the caller transmits it
Displaying details of a list entry COMAND can also show a shortened list entry in its entirety. 왘 Select list entry (컄 page 146). 왘 Slide omp and select “Options” 씮
“Details”. The detailed view appears.
왘 Closing detailed view: Slide qmr or
omp or press n.
Saving a list entry in the address book
i List entries that show a telephone number are neither saved in the COMAND address book, nor in the phone book on the mobile phone. You can save such entries in the COMAND address book. You can also save list entries in the COMAND address book which have already been saved in the phone book on the mobile phone.
Saving as a new entry in the COMAND address book 왘 Slide omp or rotate ymz and select
list entry (컄 page 146).
왘 Select “Options” 씮 “Save” 씮 “New En-
try”.
i “Save” does not function if the selected list entry is already saved in the COMAND address book. 왘 Select a number category, e.g. “Home”. 왘 Select a telephone category, e.g. “Land
Line”.
왘 Select “Save”.
The input menu appears with the data fields. The data field for the telephone number is filled in automatically. The data field for the last name is also filled in automatically if the entry to be saved contains a name.
왘 If you would like to save the entry
now: Select ?.
Control systems COMAND telephone*
1 Data field 2 Input mark (cursor) 3 Input characters 왘 If you want to change the available characters: Proceed as described in the “Changing data field” paragraph in the “Assigning a New Entry in the Ad- dress Book” section (컄 page 158).
147
Control systems COMAND telephone*
Adding to an existing entry in the COMAND address book 왘 Slide omp or rotate ymz and select
list entry (컄 page 146).
왘 Select “Options” 씮 “Save” 씮 “Add”.
i “Save” does not function if the selected list entry is already saved in the COMAND address book. 왘 Select a number category to add,
e.g. “Home”.
왘 Select a telephone category to add,
e.g. “Land Line”.
왘 Select “Save”.
The search menu for COMAND address book entries appears.
왘 Search for desired entry.
i There is a detailed description of searching for an COMAND address book entry in the “Searching for an address book entry” section (컄 page 166).
148
왘 Press n when you have finished
Incoming call
searching. COMAND saves the data if there are fewer than four numbers assigned to the entry you are searching for in the selected number category. If four numbers are saved for the entry you are searching for, a prompt will ap- pear asking whether you want to over- write one of the existing numbers.
왘 Select “Yes” or “No”.
If you select “Yes”, a selection list will appear containing the four existing numbers.
왘 Select the number to be overwritten.
COMAND overwrites the selected num- ber with the new data.
Rejecting or accepting the call 왘 Rejecting: Select “Reject”. or 왘 Press t on the telephone keypad or
on the multifunction steering wheel.
i If you have a CDMA/TDMA mobile phone and reject a call, only the ring tone will stop. The call itself can only be ended by the caller. 왘 Accepting: Select “Accept”. or 왘 Press s on the telephone keypad or
on the multifunction steering wheel.
or 왘 Press ! on the multifunction steer-
ing wheel.
왘 Use the mobile phone (see mobile
phone operating instructions).
or
왘 Use the Bluetooth® headset
(see headset operating instructions).
i The use of a Bluetooth® headset requires Bluetooth® to be activated and the Bluetooth® headset to be authorized (컄 page 176). If you have accepted the call using COMAND, the telephone keypad, the mul- tifunction steering wheel or the mobile phone, the call will be conducted via the hands-free system. The volume of the call can be adjusted (컄 page 94). If you have accepted the call using the Bluetooth® headset, the call will be con- ducted via the headset. Further operating functions can be found in the “Functions during a single-call con- nection” section (컄 page 151). You can also accept a call if the COMAND display is showing a screen oth- er than the telephone mode screen. After accepting the call, you will see the caller’s data in a window. 왘 Closing window: Slide qmr or omp
or press n.
Making an outgoing call
i If you place an outgoing call and receive a busy signal, the telephone automatically starts to redial as long as the provider and the mobile phone support this function (see mobile phone operating instructions). While the call is connecting, you can also send character strings (컄 page 152).
Entering the telephone number using the COMAND controller 왘 Switching screen to telephone
mode: Call up main telephone menu (컄 page 145).
왘 Entering digits: Select desired digits by rotating ymz or sliding omp and press n.
왘 Deleting individual digits: Select )
and briefly press n.
Control systems COMAND telephone*
왘 Deleting an entire telephone num- ber: Select ) and press and hold n until the telephone number is deleted.
왘 Connecting a call: Select “S”.
Entering a telephone number using the telephone keypad 왘 Switching screen to telephone
mode: Call up main telephone menu (컄 page 145).
왘 Use telephone keypad to enter digits.
i A detailed description of how to enter digits using the telephone keypad can be found on (컄 page 86). 왘 Connecting a call: Press s.
149
Control systems COMAND telephone*
Redial 왘 Switching screen to telephone
mode: Call up main telephone menu (컄 page 145).
왘 Use COMAND controller to select
“S”.
or 왘 Press s on the telephone keypad
(컄 page 86). The list of dialed numbers appears. The most recently dialed number is at the top.
왘 Select desired entry. 왘 Connecting a call: Press n.
i If the list of dialed calls contains no entries, the “S” menu item cannot be selected and the s button on the telephone keypad does not function.
150
Placing a call to a call list entry or COMAND phone book entry 왘 Call up a call list and select an entry
(컄 page 146).
or 왘 Call up COMAND phone book and se-
lect an entry (컄 page 154).
왘 Connecting a call: Press n.
Speed dialing You can save telephone numbers in the speed-dial preset locations on the mobile phone and call up the speed-dial presets (see mobile phone operating instructions).
i By default, the mailbox number is preset in the speed dial memory unless you have modified it. For more information on the mailbox (컄 page 145). You can also call up speed-dial numbers using COMAND.
i Operation during call connection depends on the speed-dial preset position called up.
Calling up speed-dial presets using the COMAND controller 왘 Switching screen to telephone
mode: Call up main telephone menu (컄 page 145).
왘 Entering number of a speed-dial pre-
set: Select all the digits in sequence. 왘 Deleting individual digits:
Select ) and briefly press n.
왘 Deleting entire number:
Select ) and press n until the number is deleted.
왘 Connecting a call (speed-dial pre-
sets 1 -99): Select “S”.
or 왘 Connecting a call (speed-dial pre-
sets 100 - 999): Select “#” after the digits 씮 “S”. In both cases, the telephone connects the call to the saved telephone num- ber. If the speed-dial memory contains no telephone numbers, you will see a corresponding message.
왘 Deleting message: Press n.
Calling up speed-dial numbers using the telephone keypad 왘 Switching screen to telephone
mode: Call up main telephone menu (컄 page 145).
왘 Single-digit numbers: Press and hold
the A - 9 buttons.
or 왘 Single- and two-digit numbers: Enter number using the A - 9 buttons.
왘 Press s. or 왘 Three-digit numbers: Enter number
using the A - 9 buttons.
왘 Press #, and then s.
In all three cases, COMAND connects the call to the saved telephone num- ber. If the speed-dial memory contains no telephone numbers, you will see a corresponding message.
왘 Deleting message: Press n.
Control systems COMAND telephone*
Functions during a single-call connection
Illustration: telephone mode during a call 1 Symbol for active telephone con-
nection (also visible in other operating modes)
2 Signal strength display 3 To switch hands-free microphone on or
off
4 Length of call display 5 To send character strings 6 To end a call 7 Person you are calling
151
Control systems COMAND telephone*
i The name of the person you are speaking with can only be seen in display 7 if his or her telephone number and name have been saved in the COMAND address book or phone book on the mobile phone. The telephone number must also be saved in the same way in which the per- son you are talking to transmits it.
왘 Switching on microphone:
Select “Mic ON”.
or 왘 Press F shortcut button.
The > symbol disappears.
Switching the hands-free microphone on or off 왘 Switching screen to telephone
mode: Call up main telephone menu (컄 page 145).
왘 Switching off microphone:
Select “Mic OFF” and press n.
or 왘 Press F shortcut button.
If the microphone is switched off, the > symbol appears in the main area.
Sending a character string via DTMF
i This function is not possible with every mo- bile phone. If the mobile phone supports the function, you can use it during the call connec- tion and also during a call.
Answering machines or other devices can be controlled by character strings (e.g. for remote query functions).
Sending character strings via the DTMF menu 왘 During a call, select “DTMF”.
The DTMF dialing display appears.
152
1 Back to the call display 2 Character entry 3 To call up the phone book 왘 Sending individual characters:
Rotate ymz or slide omp and select desired character. Each character you select can be seen in the main area and is sent immediate- ly.
왘 Sending a phone book entry as a
character string: Select “Name”. 왘 Select desired phone book entry.
Ending an active call 왘 Ending a call: Select “4 END” in the
call display.
The entry is immediately sent as a char- acter string.
or 왘 Press t on the telephone keypad or
i Telephone numbers containing the + char- acter may impair the function. 왘 Switching back to the call display:
Select “Y”.
on the multifunction steering wheel. The COMAND display will change to the previously selected display, if applicable.
Sending character strings via the tele- phone keypad 왘 Press corresponding button on tele-
phone keypad. Each character you select is immedi- ately sent.
i The + character may impair the function.
Control systems COMAND telephone*
Transferring a call
From the hands-free system to the Bluetooth® headset
i The use of a Bluetooth® headset requires Bluetooth® to be activated and the Bluetooth® headset to be authorized (컄 page 176). The call transfer is controlled by pressing the PTT button on the Bluetooth® headset (see headset operating instructions). Nor- mally, it is sufficient to press the PTT but- ton once, but under certain circumstances you may have to press it a second time. Once the call has been transferred to the Bluetooth® headset, all the functions will be available to you which are described in the “Functions during a single-call connec- tion” section (컄 page 151). Exception: “Switching the hands-free mi- crophone on or off” function (컄 page 152).
153
From the mobile phone to the hands-free system 왘 Insert mobile phone into cradle.
Once the call has been transferred to the hands-free feature, all the functions will be available to you which are de- scribed in the “Functions during a sin- gle-call connection” section (컄 page 151).
COMAND phone book
The COMAND phone book contains both the COMAND address book entries and mobile phone entries that have at least one telephone number. The COMAND address book entries are permanently available even when a mobile phone is not inserted in the cradle. When the mobile phone is inserted in the cradle, COMAND will read the phone book entries in the mobile phone and compares them with the COMAND address book en- tries.
Control systems COMAND telephone*
From the Bluetooth® headset to the hands-free system On most Bluetooth® headsets, you press the PTT button on the headset twice quick- ly to transfer the call (see headset operat- ing instructions).
From the hands-free system to the mo- bile phone 왘 If the mobile phone has a folding up- per section: Flip upper section open.
왘 Take mobile phone out of cradle.
The “No telephone inserted” message appears on the COMAND display. Sub- sequent operation is only possible us- ing the mobile phone.
154
If any of the telephone numbers of a phone book entry in the mobile phone are the same as an address book entry, COMAND will only display the address book entry. If the entries are not the same, the CO- MAND phone book will show the phone book entry in the mobile phone.
Calling up the COMAND phone book 왘 Select “Telephone” 씮 “Name”.
The COMAND phone book appears.
Illustration: a phone book with name dis- play and smart speller activated 1 Category symbol 2 Upper entry from address book (with-
out category symbol)
3 Symbol + for several telephone num- bers (subentries) under the main entry
4 Symbol
for summarized entries
from the mobile phone with the same name but different telephone numbers
5 Smart speller 6 Voice entry symbol 7 To close the phone book
Control systems COMAND telephone*
Entries with category symbol 1 come from the mobile phone. The following cate- gory symbols are possible: 앫
= symbol for “Mobile” category = symbol for “Home” category = symbol for “Work” category = symbol for “Fax” category = symbol for “Pager” category = symbol for “Main” category or for unknown category or for phone entries that are saved on the SIM card of a GSM mobile phone
앫
앫
앫
앫
앫
Entries without a category symbol or with the symbol come from the COMAND address book. Entries with the entry. Voice entries can be added to the address book (컄 page 173). This function is available in vehicles with Voice Control.
symbol contain a voice
155
Control systems COMAND telephone*
Switching between the smart speller and the list 왘 Switching from the smart speller to the list: Slide mq repeatedly or press n until the smart speller is hidden.
or 왘 Rotate ymz or slide omp and
select ?. The smart speller is hidden.
156
i The following options are available under “Options” menu item 4: 앫 Displaying details about an entry
(컄 page 158)
앫 Creating a new entry in the address book
(컄 page 158)
앫 Deleting an entry (컄 page 160) 앫 Saving a phone book entry from mobile phone in the address book (컄 page 160)
앫 Adding a telephone number to an address
book entry (컄 page 162)
왘 Switching from the list to the smart
speller: Select “Back” from the list.
or 왘 Press back button L in the center
console (컄 page 84).
왘 Changing phone book display in the
list: Select “123” or “ABC”. The screen changes to telephone num- ber or name display.
Illustration: list of phone book entries with name display and hidden smart speller 1 Back to smart speller 2 To switch phone book display (“123” or
“ABC”)
3 Symbol + for several telephone num- bers (subentries) under the main entry, subentry list is closed
4 To call up options 5 Symbol / for open subentry list 6 List of phone book entries 7 Subentry list with category symbols
and telephone numbers
Closing the COMAND phone book 왘 In the smart speller, select “Back”. or 왘 Press back button L in the center
console (컄 page 84).
Selecting an entry in the COMAND phone book
Selecting entries using the smart speller 왘 Switch from the list to the smart speller
if necessary.
왘 Changing smart speller language:
Select !.
왘 Select desired language.
왘 Changing smart speller character
set: Select #. Depending on the previous setting, you will change to letters with special char- acters or to numbers with special char- acters.
왘 Entering characters: Select the char- acters of the entry you are searching for one by one.
왘 Deleting individual characters: Se-
lect ) and briefly press n. Each time you enter or delete a charac- ter, the closest match will be displayed at the top of the list.
왘 Deleting an entire entry: Select ) and press and hold n until the entry is deleted.
왘 Canceling search: Switch from the
smart speller to the list. The entry at the top of the list is auto- matically highlighted.
Control systems COMAND telephone*
Selecting using the list 왘 If necessary, switch from the smart
speller to the list.
왘 Rotate ymz or slide qmr until the de-
sired entry is highlighted.
Selecting subentries 왘 Select an entry with the + symbol and
press n. The + symbol changes to / and the subentries are displayed.
왘 Rotate ymz or slide qmr until the de-
sired subentry is highlighted.
157
Control systems