- 2012 Mercedes-Benz CL Class Owners Manuals
- Mercedes-Benz CL Class Owners Manuals
- 2008 Mercedes-Benz CL Class Owners Manuals
- Mercedes-Benz CL Class Owners Manuals
- 2011 Mercedes-Benz CL Class Owners Manuals
- Mercedes-Benz CL Class Owners Manuals
- 2007 Mercedes-Benz CL Class Owners Manuals
- Mercedes-Benz CL Class Owners Manuals
- 2002 Mercedes-Benz CL Class Owners Manuals
- Mercedes-Benz CL Class Owners Manuals
- 2013 Mercedes-Benz CL Class Owners Manuals
- Mercedes-Benz CL Class Owners Manuals
- 2004 Mercedes-Benz CL Class Owners Manuals
- Mercedes-Benz CL Class Owners Manuals
- 2000 Mercedes-Benz CL Class Owners Manuals
- Mercedes-Benz CL Class Owners Manuals
- 2010 Mercedes-Benz CL Class Owners Manuals
- Mercedes-Benz CL Class Owners Manuals
- 2006 Mercedes-Benz CL Class Owners Manuals
- Mercedes-Benz CL Class Owners Manuals
- 2003 Mercedes-Benz CL Class Owners Manuals
- Mercedes-Benz CL Class Owners Manuals
- 2005 Mercedes-Benz CL Class Owners Manuals
- Mercedes-Benz CL Class Owners Manuals
- 2009 Mercedes-Benz CL Class Owners Manuals
- Mercedes-Benz CL Class Owners Manuals
- 2001 Mercedes-Benz CL Class Owners Manuals
- Mercedes-Benz CL Class Owners Manuals
- Download PDF Manual
-
rotate ymz.
왘 Confirming selection: Press n.
268
왘 Confirming selection: Press n.
왘 Switching on or off: Press n. or 왘 Select “Vehicle” 씮 “Vehicle” 씮 “Trunk
Opening-height Restriction”. A checkmark appears when the trunk opening-height restriction is switched on.
왔 COMAND automatic climate control i The components and operating principles of COMAND can be found on (컄 page 83).
Warning!
Control systems COMAND automatic climate control
The following automatic climate control functions can be operated via COMAND:
Warning!
When operating the automatic climate con- trol, the air that enters the passenger com- partment through the air vents can be very hot or very cold (depending on the set tem- perature). This may cause burns or frostbite to unprotected skin in the immediate area of the air vents.
Always keep sufficient distance between un- protected parts of the body and the air vents. If necessary, use the air distribution adjustment (컄 page 271) to direct the air to air vents in the vehicle interior that are not in the immediate area of unprotected skin.
Follow the recommended settings for heat- ing and cooling given on the following pages and pages in the “Controls in detail” part (컄 page 491) Otherwise the windows could fog up, impairing visibility and endangering you and others.
You can operate the automatic climate control via COMAND or via the buttons on the automatic climate control panel (컄 page 491). Some of the special climate control func- tions can only be set via COMAND.
Function Temperature Air distribution Air volume Switching off cooling (“AC OFF”) Central climate control (“Mono”) Footwell temperature Air flow from air vents
Page 270
271
271
272
273
274
275269
Control systems COMAND automatic climate control
The automatic climate control menu is called up via the climate control settings.
Setting temperature
왘 Changing temperature: Slide qmr or
Use the temperature controls %$ (컄 page 491) in the center console or COMAND climate control settings to sepa- rately adjust the air temperature on each side of the passenger compartment. 왘 Select climate control settings 씮 Tem-
perature, left or right and then press n.
rotate ymz.
왘 Exiting menu: Press n, back
button L in the center console (컄 page 84) or slide omp. The setting is saved.
Climate control settings with functions (submenus) 1 Temperature, left 2 Air distribution, left 3 Air volume, left 4 Central menu, climate control 5 Air volume, right 6 Air distribution, right 7 Temperature, right
270
Control systems COMAND automatic climate control
Adjusting air distribution
왘 Changing air distribution:
Adjusting air volume
You can adjust the air distribution sepa- rately for the driver’s and front passenger’s side.
i When you change the air distribution, the au- tomatic function of the climate control system is switched off. 왘 Select climate control settings 씮 Air
distribution, left or right.
Rotate ymz. The symbol for air distribution changes. The direction and size of the arrows represent the air distribution.
or 왘 Switching back to automatic mode:
Rotate ymz and select “AUTO”. 왘 Exiting menu: Press n, back
button L in the center console (컄 page 84) or slide omp. The setting is saved.
Use buttons Q (컄 page 491) in the cen- ter console or COMAND climate control settings to separately adjust the air vol- ume on each side of the passenger com- partment.
i When you change the air volume, the auto- matic function of the climate control system is switched off. 왘 Select climate control settings 씮 Air
volume, left or right.
컄컄
271
Control systems COMAND automatic climate control
컄컄
왘 Changing air volume: Slide qmr or
rotate ymz.
Central climate control menu via COMAND
or 왘 Switching back to automatic mode:
Rotate ymz and select “AUTO”. 왘 Exiting menu: Press n, back
button L in the center console (컄 page 84) or slide omp. The setting is saved.
The central climate control menu is in the center of the climate control settings. When the automatic climate control is switched on, you will see “on” in the cen- tral menu. The following functions can only be operated in the central climate control menu via COMAND:
Function Switching off cooling (“AC OFF”) Central climate control (“Mono”) Footwell temperature Air flow from air vents
Page 272
273
274
275왘 Select climate control settings 씮 Cen-
tral menu.
Switching cooling on or off The cooling function, only operational when the engine is running, cools the vehi- cle interior down to the selected tempera- ture. The cooling function also dehumidifies the air in the vehicle interior, thus preventing the windows from fogging up.
272
Control systems COMAND automatic climate control
i Condensation may drip out from underneath the vehicle. This is normal and not an indication of a malfunction.
The “AC OFF” function is used to permanent- ly switch off the cooling function of the au- tomatic climate control system.
왘 Selecting “ACOFF”: Slide qmr or
rotate ymz.
왘 Confirming selection: Press n.
A checkmark appears when the cooling is switched off.
Warning!
If you turn off the cooling function, the vehicle will not be cooled when weather conditions are warm. The windows can fog up more quickly. Window fogging may impair visibility and endanger you and others.
왘 Select climate control settings 씮 Cen-
tral climate control menu.
“AC OFF” appears in the central menu of the climate control settings.
! If the air conditioning cannot be turned on again, this indicates that the air conditioning is losing refrigerant. The compressor has turned it- self off. Have the air conditioning checked at the nearest authorized Mercedes-Benz Center.
Selecting “Mono” mode “Mono” is used to adjust the climate zones for the entire vehicle at the same time. When the “Mono” function is switched on and you change the climate on the driver’s side, these changes will be carried out in the same manner for all climate zones. 왘 Select climate control settings 씮 Cen-
tral climate control menu.
왘 Selecting “Mono”: Slide qmr or
rotate ymz.
왘 Confirming selection: Press n.
A checkmark appears when the func- tion has been selected.
왘 Exiting menu: Press back button L
in the center console (컄 page 84) or slide omp.
273
Control systems COMAND automatic climate control
The “Mono” function is automatically switched off when you: 앫 change an automatic climate control setting for the front passenger’s side using COMAND
앫 operate a button from the automatic climate control for the front passen- ger’s side
앫 operate one of the buttons for the rear
climate control system
Adjusting footwell temperature
i In automatic mode, this setting optimizes the footwell temperature when outside tempera- tures are low.
The “Footwell Temperature” function is used to adjust the temperature difference between the footwell and the rest of the passenger compartment. The higher the selected value, the higher the temperature in the footwell will be. 왘 Select climate control settings 씮 Cen-
tral climate control menu.
왘 Selecting “Footwell Temperature”: Slide qmr or rotate ymz and then press n.
왘 Changing temperature difference:
Slide qmr or rotate ymz.
왘 Exiting menu: Press n, back
button L in the center console (컄 page 84) or slide omp. The setting is saved.
274
Adjusting air flow from air vents
i In automatic mode, this setting optimizes the air flow when outside temperatures are high.
The “Airflow” setting defines air distribu- tion and air volume in automatic mode: 앫 “Focused” (default setting, increased
air flow)
앫 “Medium” (reduced air flow) 앫 “Diffuse” (minimal air flow)
i When the interior ambient temperature of the vehicle is very hot and the automatic climate control is cooling the interior, the setting for air flow is temporarily overridden. 왘 Select climate control settings 씮 Cen- tral climate control menu 씮 “Airflow”. A selection list appears. The current setting is indicated by a dot R.
왘 Changing air flow: Slide qmr or
rotate ymz.
왘 Confirming selection: Press n.
Control systems COMAND automatic climate control
275
Control systems COMAND seats
When adjusting the seats, observe the safety notes in the section “Seats” (컄 page 368).
Selecting a seat You must first select the seat for which you would like to make adjustments.
Operating seats via COMAND
i The components and operating principles of COMAND can be found on (컄 page 83). The following seat adjustments can be made via COMAND:
Settings Lumbar support (CL 550) Drive-dynamic multicontour seats*
Page 277
278276
Example illustration (vehicles with Drive-dy- namic multicontour seat*) 왘 Selecting seat: Slide omp or
rotate ymz.
왘 Confirming selection: Press n.
1 Seat menu button 왘 Press O.
The main area is active.
왘 Switching to the bottom menu line:
Slide qmr.
Exiting menu There are several ways to exit the seat menu. 왘 Press O again. or 왘 Press any shortcut button. or 왘 Select another main function from the
main menu line.
Lumbar support (CL 550)
To support the spine, you can adjust the curvature of the front seat backrests. 왘 Press O.
The main area of the COMAND display is active. A scale appears.
Control systems COMAND seats
왘 Select seat (컄 page 276). 왘 Adjusting lumbar support:
Slide omp or rotate ymz until desired setting is reached.
왘 Confirming selection: Press n. 왘 Switching to the bottom menu line:
Slide omp.
왘 Confirming selection: Press n.
i After you have pressed O, the seat last adjusted is active.
1 Scale 2 Cursor 3 Current seat 4 Current setting
277
Control systems COMAND seats
Drive-dynamic multicontour seats*
i If PRE-SAFE® has been activated, the air pressure in the air chambers (on the sides of the seat cushion and backrest) of the drive-dynamic multicontour seats is increased.
Drive-dynamic multicontour seats allow several individual support adjustments and can automatically adjust lateral support to your driving style (컄 page 281).
i Whether adjustments are being made manu- ally or automatically, noises may be heard from air pumping into or releasing from the air chambers.
Multicontour adjustments To support the spine, you can individually adjust the backrest contour of the front seats by regulating the air pressure in the air chambers. The settings are made on the COMAND display. You can adjust the following air chambers: 앫 sides of seat cushion 앫 sides of backrest 앫 backrest curvature in lumbar area 앫 backrest curvature in shoulder area
Adjusting sides of seat cushion This function is used to adjust the air chambers in the sides of the seat cushion. 왘 Select seat (컄 page 276). 왘 Selecting “Seat sides”: Slide omp or
rotate ymz.
왘 Confirming selection: Press n.
A scale appears.
278
1 Scale 2 Cursor 3 Current setting 왘 Slide qmr or rotate ymz until desired
setting is reached.
왘 Saving setting: Press n.
Adjusting backrest sides This function is used to adjust the air chambers in the backrest sides. 왘 Select seat (컄 page 276). 왘 Selecting “Seatback Sides”:
Slide qmr or rotate ymz.
왘 Confirming selection: Press n.
A scale appears.
왘 Slide qmr or rotate ymz until desired
setting is reached.
왘 Saving setting: Press n.
Control systems COMAND seats
Adjusting backrest curvature in lumbar area This function is used to adjust the air chambers in the lumbar area of the back- rest. 왘 Select seat (컄 page 276). 왘 Selecting “Lumbar”: Slide omp or
rotate ymz.
왘 Confirming selection: Press n.
Cross-hairs appear. You can use them to make two settings: 앫 vertical: shift the point of greatest
curvature upward or downward
앫 horizontal: adjust the degree of
curvature
컄컄
279
Control systems COMAND seats
컄컄
왘 Slide qmr or omp until desired setting
is reached.
왘 Saving setting: Press n.
Adjusting backrest curvature in shoul- der area This function is used to adjust the air chambers in the shoulder area of the back- rest. 왘 Select seat (컄 page 276). 왘 Selecting “Shoulders”: Slide omp or
rotate ymz.
왘 Confirming selection: Press n.
A scale appears.
왘 Slide qmr or rotate ymz until desired
setting is reached.
왘 Saving setting: Press n.
280
Drive-dynamic function The Drive-dynamic multicontour seat elec- tronically controls the air pressure in the air chambers of the backrest side bolsters. This function improves driving comfort and pleasure. 왘 Select seat (컄 page 276). 왘 Selecting “Driv. dyn. seat”:
Slide omp or rotate ymz.
왘 Confirming selection: Press n.
A scale appears. You can choose be- tween: 앫 “0”: off 앫 “1”: level 1
앫 “2”: level 2Control systems COMAND seats
왘 Slide qmr or rotate ymz until desired
setting is reached.
The current setting is indicated by a solid circle.
왘 Saving setting: Press n.
왘 Slide qmr or rotate ymz until desired
setting is reached.
왘 Saving setting: Press n.
i Depending on the setting, the massage function runs for about 7 to 10 minutes.
Pulse mode 왘 Select seat (컄 page 276). 왘 Selecting “Pulse Mode”: Slide omp
or rotate ymz.
왘 Confirming selection: Press n. A list appears. You can choose be- tween different types of massage:
281
Control systems Instrument cluster control system
The control system is activated as soon as the SmartKey in the starter switch is turned to position 2 or as soon as the KEYLESS-GO* start/stop button (컄 page 366) is in position 2. The control system enables you to: 앫 call up information about your vehicle 앫 change vehicle settings For example, you can use the control sys- tem to find out when your vehicle is next due for service, to call up statistical data on your vehicle, and much more.
Warning!
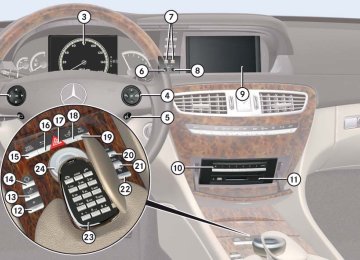
Multifunction display
A driver’s attention to the road and traffic conditions must always be his/her primary focus when driving.
For your safety and the safety of others, se- lecting features through the multifunction steering wheel should only be done by the driver when traffic and road conditions per- mit it to be done safely.
Bear in mind that at a speed of just 30 mph (approximately 50 km/h), your vehicle is covering a distance of 44 feet (approximate- ly 14 m) every second.
The control system relays information to the multifunction display.
1 Line for main menus 2 Text field in multifunction display Settings, functions, submenus as well as any malfunctions are shown to you in the text field.
282
Multifunction steering wheel
The displays in the multifunction display and the settings in the control system are controlled using the buttons on the multi- function steering wheel.
1 Multifunction display 2 s to take a call
to dial to redial
t to end a call
to reject an incoming call
æ to increase volume ç to decrease volume F to mute
3 ! to accept a call
to activate Voice Control
4 L back/to cancel Voice Control 5 $ to scroll up
% to scroll down & to scroll to the right ( to scroll to the left # to confirm selection
The information available in the multifunc- tion display is arranged in menus and ac- companying functions and submenus. For example, in the “Settings” menu, you will
Control systems Instrument cluster control system
find functions for making settings to your vehicle. There are functions for calling up information and for making settings to your vehicle. It is helpful to think of the menus as being arranged in a circular pattern: 왘 Press ( or & repeatedly to
switch menus.
The number of menus available in the sys- tem depends on which optional equipment is installed in your vehicle. 왘 Press button L to return to the next
highest menu level.
From a menu’s highest level, you will al- ways see the screen from the “Trip” menu that was last active. When you press L again, you switch to the standard display (컄 page 286). For information about warning and mal- function messages appearing in the multi- function display (컄 page 622).
283
Control systems Instrument cluster control system
Menus
Trip (컄 page 286) Standard display
Fuel consumption statistics since start
Fuel consumption statistics since last reset Resetting fuel consumption statistics Distance to empty Digital speedometer
1 CL 63 AMG and CL 65 AMG only.
284
Navi (컄 page 287) Showing route guidance in- structions, current direction traveled
Audio (컄 page 289) Selecting radio station
Selecting satellite radio channel Operating DVD changer/ audio CD/ audio DVD/MP3
Operating Video DVDAMG1 (컄 page 291) Gear currently engaged Engine oil temperature Vehicle supply voltage RACETIMER
Overall analysis
Lap analysis
Control systems Instrument cluster control system
Telephone* (컄 page 294) Assistance* (컄 page 298) Dialing a number from the phone book
Displaying the distance graphic*, DISTRONIC Plus*
Redialing
Answering a call
Ending a call or rejecting an incoming call
Activating/deactivating PRE-SAFE® Brake* (vehicles with DISTRONIC Plus* only) Switching on or off Rear View Camera* automatically Switching on or off Blind Spot Assist*
Service (컄 page 299) Calling up vehicle malfunction, warning and system status messages stored in memory Checking tire inflation pres- sure
Calling up maintenance service display Checking engine oil level (CL 600)
Settings (컄 page 301) Setting daytime running lamp mode (USA only)
Switching additional speedometer on or off
Switching on or off radar sensors*
285
Control systems Instrument cluster control system
Trip menu
i The menu overview can be found on (컄 page 284). In the “Trip” menu, you can show an addi- tional display for the speedometer and call up or reset your vehicle’s statistical data.
Standard display In the standard display, the trip odometer and main odometer are shown in the multifunction display. 왘 Press ( or & to select the “Trip”
menu.
1 Main odometer 2 Trip odometer
286
Fuel consumption statistics since start 왘 Press ( or & to select the “Trip”
menu.
Fuel consumption statistics since last reset 왘 Press ( or & to select the “Trip”
왘 Press % to select “From Start”.
menu.
왘 Press % or $ to select “Since
Reset”.
1 Distance driven since start 2 Time elapsed since start 3 Average speed since start 4 Average fuel consumption since start
i All values that are based on the last start are reset when you turn off the vehicle’s engine for more than four hours (컄 page 415).
i If you turn the SmartKey to position 1 or 2 again during this time, the values will not be re- set. After 9 999 hours or 99999 miles (kilome- ters), the fuel consumption statistics after start are automatically reset.
1 Distance driven since last reset 2 Time elapsed since last reset 3 Average fuel consumption since last re-
set
4 Average speed since last reset
i After 9999 hours or 99999 miles (kilome- ters), the fuel consumption statistics since last reset are automatically reset.
Resetting fuel consumption statistics 왘 Press ( or & to select the “Trip”
Distance to empty 왘 Press ( or & to select the “Trip”
menu.
menu.
왘 Press % or $ to select the func-
tion you wish to reset.
왘 Press #.
Illustration: Reset trip odometer 왘 Press % to select “Yes” and confirm
with #.
왘 Press % or $ to select “Range”. The calculated remaining driving range based on the current fuel tank level ap- pears in the multifunction display.
i If only very little fuel is left in the tank, a fuel pump is shown instead of the range.
Digital speedometer 왘 Press ( or & to select the “Trip”
menu.
왘 Press % or $ to select the digital
speedometer.
Control systems Instrument cluster control system
Navi menu
i The menu overview can be found on (컄 page 284). The display in the “Navi” menu depends on whether route guidance is active or not. 왘 Press ( or & to select the “Navi”
menu.
Route guidance not active The multifunction display shows the direc- tion of travel and the name of the street you are currently driving on, if known by the navigation system.
1 Digital speedometer
1 Direction of travel 2 Street you are currently driving on
287
Control systems Instrument cluster control system
Route guidance active The image on the multifunction display de- pends on whether you are being notified of a driving maneuver.
No notification of driving maneuver
Example illustration 1 Distance to destination 2 Symbol for “follow the course of the
road”
3 Distance to next driving maneuver 4 Street you are currently driving on
288
Notification of driving maneuver with- out lane recommendation
Example illustration 1 Street into which the driving maneuver
leads
2 Symbol for “driving maneuver” 3 Distance to driving maneuver and visu-
al distance display
When you are being notified of a driving maneuver, you will see a visual distance display 3 next to the driving maneuver symbol. The visual distance display is re- duced from bottom to top the closer you come to the announced driving maneuver.
Navigation status displays in the instru- ment cluster While route guidance is active, the follow- ing messages may be shown on the multi- function display: 앫 <
You have reached your destination.
앫 “Area of dest. reached”
You have arrived in the area of your destination. The message appears, for example, for relatively large POIs.
앫 “New Route…”
COMAND calculates a new route, e.g. because you have deviated from the calculated route or due to a detour re- port. Afterward, COMAND continues route guidance.
앫 “Calculating Route”
Audio menu
COMAND is calculating a route. After- ward, COMAND starts route guidance.
앫 “Off Map”
The vehicle’s location is outside of the digital map’s range. The vehicle is in an off-map position (컄 page 238).
앫 “Off Mapped Road”
The vehicle is either on a road that has not been digitized (컄 page 238) or on the side of a road, e.g. in a parking space.
앫 “No Route”
COMAND cannot calculate a route to the selected destination.
앫 “Direction of Dest.”
The vehicle has gone off the map dur- ing route guidance (컄 page 238).
i The menu overview can be found on (컄 page 284). The functions in the “Audio” menu operate the audio equipment which you currently have turned on. If no audio equipment is currently turned on, the message: “Audio OFF” is shown in the multifunction display.
Selecting radio station 왘 Turn on COMAND and select “Radio”
(컄 page 98).
왘 Press ( or & to select the
“Audio” menu.
왘 Selecting a preset station: Briefly
press % or $.
왘 Selecting a station using the search
function: Press and hold % or $.
Control systems Instrument cluster control system
1 Station frequency 2 Waveband 왘 Press æ or ç to adjust the vol-
ume.
i You can only change the frequency band and save new stations using COMAND (컄 page 98).
289
Control systems Instrument cluster control system
Selecting satellite radio channel The satellite radio is treated as a radio ap- plication. 왘 Turn on COMAND and select
“Sat Radio” (컄 page 104).
왘 Press ( or & to select the
“Audio” menu.
왘 Press % or $ to select a station.
1 Channel number and/or name 2 SAT mode 왘 Press æ or ç to adjust the
volume.
290
i A subscription to SIRIUS Satellite Radio ser- vice provider is required for the satellite radio op- eration. Contact an authorized Mercedes-Benz Center for details and availability for your vehi- cle. For more information on satellite radio (컄 page 104).
Operating DVD changer/audio CD/ audio DVD/MP3
왘 Turn on COMAND and select “CD”, “DVD-Audio” or “MP3” (컄 page 112). 왘 Press ( or & to select the “Au-dio” menu.
왘 Press % or $ to select a track.
왘 Press æ or ç to adjust the vol-
ume.
i When you play a CD or DVD with text, the multifunction display shows the name and num- ber of the track. For MP3s, only the track is shown.
Operating video DVD 왘 Turn on COMAND and select “Video”
씮 “Video” 씮 “Video DVD” (컄 page 130).
왘 Press ( or & to select the “Au-
dio” menu.
Example: audio CD 1 Current track
1 Current scene 2 Disc number 왘 Press % or $ to select a scene.
Control systems Instrument cluster control system
AMG menu
i This function is only available in CL 63 AMG and CL 65 AMG only.
The main screen of the AMG menu shows you 앫 the gear currently engaged 앫 the engine oil temperature 앫 the vehicle supply voltage 왘 Press ( or & to select the
“AMG” menu.
If the engine reaches the overspeed range in the manual shift program, you will see “up” 2 next to gear indicator 1 as a re- minder to upshift.
RACETIMER
Warning!
i The engine oil temperature value and unit will be shown in blue if the engine oil tempera- ture has not yet reached 176°F (80°C). During this time, avoid driving at full engine speed.
Use buttons % or $ to select the fol- lowing functions in the AMG menu:
The RACETIMER feature is for use only on roads and in conditions where high speed driving is permitted. Racing on public roads is prohibited under all circumstances and the driver is and must always remain re- sponsible for following posted speed limits.
Function RACETIMER Overall analysis Lap analysis
Page 291
293
294The RACETIMER allows you to time and save driving stretches in hours, minutes and seconds. 왘 Press ( or & to select the
“AMG” menu.
왘 Press % to select the RACETIMER.
컄컄
1 Gear indicator 2 Upshift indicator “up” 3 Engine oil temperature 4 Vehicle supply voltage
291
Control systems Instrument cluster control system
컄컄
1 Gear indicator 2 RACETIMER 3 Seconds display 4 Lap
i You can start the RACETIMER when the en- gine is running or the starter switch is in position 2 (컄 page 365).
i While the RACETIMER is being displayed, you cannot adjust the audio volume using but- tons æ or ç. 왘 Starting RACETIMER: Press æ. 왘 Displaying intermediate time:
Press ç. The intermediate time is shown for 5 seconds.
292
왘 Stopping RACETIMER: Press æ. 왘 To select a different display, press
$, ( or &.
i When you stop the vehicle and turn the Smartkey to position 1 (컄 page 365) or, in vehi- cles with KEYLESS-GO*, turn off the engine and do not open the driver’s door, the RACETIMER stops timing. Timing is resumed when you switch the ignition back on or restart the engine and then press æ button.
i When you switch on the Night View Assist* (컄 page 481) while the RACETIMER is operating, the RACETIMER will continue to run in the back- ground but cannot be operated with the multi- function steering wheel buttons. To stop the RACETIMER, switch off the Night View Assist* first.
Saving lap time and starting a new lap
i You can save up to 16 laps. 왘 Press button ç while the timer is
running. The intermediate time will be shown for 5 seconds.
왘 Press button ç within 5 seconds. The intermediate time shown will be saved as a lap time. The RACETIMER begins timing the new lap. The new lap begins to be timed as soon as the intermediate time is called up.
1 Gear indicator 2 RACETIMER 3 Best lap time
Resetting current lap 왘 Press button æ while the timer is
The reset menu appears in the multi- function display.
running. The timer stops.
왘 Press button ç.
The lap time is reset to “0”.
Deleting all laps
i It is not possible to delete a single saved lap. 왘 Press button æ while the timer is
running. The timer stops.
왘 Press button ç for at least
3 seconds.
왘 Press button æ to start timer again.
The saved laps are deleted.
or 왘 Press #.
왘 Press % to select “Yes” and confirm
with #. The saved laps are deleted.
Control systems Instrument cluster control system
Overall analysis
i These functions are only available if you have saved at least one lap and have stopped the RACETIMER. 왘 Press ( or & to select the
“AMG” menu.
왘 Press $ repeatedly until the overall analysis appears in the multifunction display.
1 Overall analysis of RACETIMER 2 Overall driving time 3 Maximum speed 4 Overall distance driven 5 Average speed 왘 To select a different display, press
$, ( or &.
293
Control systems Instrument cluster control system
Lap analysis
왘 Press $ or % to see other lap
Telephone menu*
i These functions are only available if you have saved at least two laps and have stopped RACETIMER. 왘 Press ( or & to select the
“AMG” menu.
왘 Press $ repeatedly until the lap
analysis appears in the multifunction display.
analyses.
왘 To select a different display, press
( or &.
i Each lap is shown in its own submenu. The fastest lap is indicated by flashing symbol 1.
1 Lap number 2 Lap time 3 Maximum speed 4 Lap length 5 Average speed during lap
294
i The menu overview can be found on (컄 page 284). You can use the functions in the “Tele- phone” menu to operate your telephone, provided it is inserted in the cradle and switched on.
Warning!
Some jurisdictions prohibit the driver from using a mobile telephone while driving. Whether or not prohibited by law, for safety reasons, the driver should not use the mo- bile telephone while the vehicle is in motion. Stop the vehicle in a safe location before placing or answering a call.
If you nonetheless choose to use the mobile phone while driving, please use the hands- free feature and be sure to pay attention to the traffic situation at all times. Use the mo- bile phone only when road, weather and traf- fic conditions permit.
Otherwise, you may not be able to observe traffic conditions and could endanger your- self and others.
Bear in mind that at a speed of just 30 mph (approximately 50 km/h), your vehicle is covering a distance of 44 feet (approxima- tely 14 m) every second.
Warning!
Never operate radio transmitters equipped with a built-in or attached antenna (i.e. with- out being connected to an external antenna) from inside the vehicle while the engine is running. Doing so could lead to a malfunc- tion of the vehicle’s electronic system, pos- sibly resulting in an accident and/or personal injury.
i Various mobile phone cradles can be in- stalled in the front center armrest, see separate installation instructions for the mobile phone cradle. These mobile phone cradles can be ob- tained from an authorized Mercedes-Benz Cen- ter. For more information about telephone (컄 page 519).
Logging-on to a network 왘 Switch on the telephone and COMAND
(컄 page 83).
왘 Press ( or & to select the “Tele-
phone” menu.
Which messages appear in the multifunc- tion display depends on whether your tele- phone is switched on or off. 앫 If the telephone is off, the message in the multifunction display is: “Telephone OFF”.
앫 If the telephone is not inserted in the cradle, the message in the multifunc- tion display is: “No telephone inserted”.
Control systems Instrument cluster control system
앫 If the PIN or unlock code is not yet en- tered, the message in the multifunction display is “Please enter PIN” or “Enter unlock code”.
앫 If the telephone is switched on, the telephone will then search for a net- work. During this time, the multifunc- tion display is blank. If no network available, the multifunction display reads “No Service”.
앫 If the telephone is on, as soon as the
telephone has found a network, “Ready” or “Ready (Roaming)” appears in the multifunction display.
295
Control systems Instrument cluster control system
Entering the PIN or unlock code 왘 Enter the PIN or unlock code using the
telephone keypad, Voice Control or telephone*. The telephone will then search for a network.
You may carry out the following functions:
Function Dialing a number from the phone book Redialing Answering a call Ending a call or rejecting an in- coming call
Page 296
297
297
297296
Dialing a number from the mobile phone book If your telephone is ready to receive calls, you may select and dial a number from the phone book at any time. 왘 Log on to the network (컄 page 295).
왘 Press % or $ or # to switch
to the phone book.
왘 Press % or $ to select the de-
sired name. The stored names are displayed in as- cending alphabetical order.
i When you insert a Mercedes-Benz approved mobile phone into the cradle*, the control sys- tem reads in the phone book that is saved on the SIM card or in the phone book of the mobile phone. This can take several minutes, depending on how many entries each phone book contains. When you press %, $, (, & or # during the download of the phone book the message “Reading telephone data, please wait...” appears in the multifunction display. When the message: “Reading telephone data, please wait...” disappears, the phone book has been loaded.
i If you do not want to dial from the phone book, press t or L. In the multifunction display appears again “Ready” or “Ready (Roam- ing)”.
i If you press and hold % or $ for more than 1 second, the system scrolls rapidly through the list of names. If you press and hold % or $ for more than 4 seconds, the control system shows the first four entries of the letter next used. Release the button to stop the quick search. The search stops automatically at the end of the list.
왘 Press s or # to start dialing. If several entries are present for the same name, they are all shown. 왘 Select the desired entry. 왘 Press s or # to start dialing. The message “Connecting call…” ap- pears on the multifunction display, as well as the dialed telephone number or name as long as it is stored in the phone book. The dialed number is saved in the “Di- aled numbers” list. Once a connection has been estab- lished, the name appears on the multi- function display, provided that it has been stored in the phone book, other- wise the dialed telephone number ap- pears.
Redialing The control system stores the most recent- ly dialed phone numbers. This eliminates the need to search through your entire phone book. 왘 Log on to the network (컄 page 295). 왘 Press s to switch to the number and/or name last dialed in the redial memory.
왘 Press % or $ to select the de-
sired number and/or name.
왘 Press s or # to start dialing. Once a connection has been estab- lished, the name appears in the multi- function display, provided that it has been stored in the phone book, other- wise the dialed telephone number ap- pears.
Control systems Instrument cluster control system
Answering a call When your telephone is ready to receive calls, you can answer a call at any time with the ignition on. When you are in the “Telephone” menu, you will see the follow- ing message on the multifunction display:
왘 Press s.
i The caller’s number appears only if it is transmitted. The caller’s name appears only if the number and the name are stored in the phone book.
Ending a call or rejecting an incoming call 왘 Press t.
297
Control systems Instrument cluster control system
Assistance menu*
i The menu overview can be found on (컄 page 284). In the “Assistance” menu, you can change the settings of your driving systems.
Displaying distance graphic*, DISTRONIC Plus* For information about displaying distance graphic (컄 page 448).
Activating/deactivating PRE-SAFE® Brake* (vehicles with DISTRONIC Plus* only) 왘 Press ( or & to select the
“Assistance” menu.
왘 Press % or $ to select the
“PRE-SAFE Brake” function.
왘 Press #.
298
Switching on or off Rear View Camera*
i The image from the Rear View Camera is shown on the COMAND display. 왘 Press ( or & to select the
“Assistance” menu.
왘 Press % or $ to select the
“Rearview Camera” function.
왘 Press #.
왘 Press # again if you would like to
change the current status.
1 PRE-SAFE® Brake* indicator : 왘 Press # again if you would like to
change the current status. After the function has been activated, indicator : appears on the left-hand side of the multifunction dis- play.
For more information (컄 page 75).
The following settings are available:
“On when in Reverse”
“Disabled”
The Rear View Camera au- tomatically switches on when reverse gear is en- gaged. The Rear View Camera is not switched on.
Switching on or off Blind Spot Assist* 왘 Press ( or & to select the
“Assistance” menu.
왘 Press % or $ to select the “Blind
Spot Assist” function.
왘 Press #.
왘 Press # again if you would like to
change the current status.
Control systems Instrument cluster control system
Service menu
i The menu overview can be found on (컄 page 284). The “Service” menu is used for 앫 calling up messages 앫 checking tire inflation pressure elec-
tronically with the Advanced TPMS
앫 calling up the maintenance service in-
dicator display
앫 check engine oil level*
299
Control systems Instrument cluster control system
Calling up vehicle malfunction, warning and system status messages stored in memory Use the vehicle status message memory menu to scan malfunction and warning messages that may be stored in the sys- tem. Such messages appear in the multi- function display and are based on conditions or system status the vehicle’s system has recorded. The vehicle status message memory menu only appears if there are any messages stored.
performed on the vehicle and by bringing the vehicle to an authorized Mercedes-Benz Center to address the malfunction and warning messages (컄 page 622).
왘 Press ( or & to select the
“Service” menu. If conditions have occurred causing status messages to be recorded, the number of messages appears in the multifunction display: “2 messages”.
왘 Press % or $ to select the mes-
sage.
Warning!
왘 Press # to confirm.
Checking tire inflation pressure For information about checking tire infla- tion pressure (컄 page 572).
Calling up the maintenance service in- dicator display For information about calling up the main- tenance service indicator display (컄 page 592).
Checking engine oil level (CL 600 and CL 65 AMG) For information about checking engine oil level (컄 page 555).
i See the “Practical hints” section for mal- function and warning messages (컄 page 622).
i If you turn the SmartKey in the starter switch to position 0 and then back to position 2, all messages will be deleted from the message memory.
Malfunction and warning messages are only indicated for certain systems and are inten- tionally not very detailed. The malfunction and warning messages are simply a remind- er with respect to the operation of certain systems and do not replace the owner’s and/or driver’s responsibility to maintain the vehicle’s operating safety by having all required maintenance and safety checks
300
Settings menu
i The menu overview can be found on (컄 page 284). In the “Settings” menu, you can: 앫 switch the daytime running lamps on or
off (USA only)
앫 switch the additional speedometer on
or off
앫 switch the radar sensors* on or off
(USA only)
Setting daytime running lamp mode (USA only)
i This function is not available in countries where the daytime running lamp mode is manda- tory and therefore in a constant mode. 왘 Press ( or & to select the “Set-
tings” menu.
왘 Press % or $ to select the “Day-
time Running Lamps” function.
왘 Press #.
왘 Press # again if you would like to
change the current status. Depending on the previous status, the daytime running lamps will be switched on or off.
With “Daytime Running Lamps” mode se- lected and the exterior lamp switch at po- sition M or *, the low beam headlamps are switched on when the en- gine is running. In low ambient light conditions the follow- ing lamps will switch on additionally: 앫 Parking lamps 앫 Tail lamps 앫 License plate lamps 앫 Side marker lamps For more information on the daytime run- ning lamp mode (컄 page 393).
i If you turn the exterior lamp switch to anoth- er position, the corresponding lamp(s) will switch on.
Control systems Instrument cluster control system
i Make sure that the light switch is set to B or * when you switch off the day- time running lamps while driving at night.
Showing or hiding additional speedometer You can have an additional digital speed- ometer shown on the multifunction dis- play. The speed is shown in the unit of kilometers/hour (USA) or miles/hour (Canada). 왘 Press ( or & to select the “Set-
tings” menu.
왘 Press % or $ to select the “Add.
Speedometer” function.
왘 Press #. 왘 Press # again if you would like to
change the current status. Depending on the previous status, the additional speedometer will be switched on or off.
301
Control systems Instrument cluster control system
Switching on or off radar sensors* If your vehicle is equipped with DISTRONIC Plus*, BAS Plus*, or Park Assist* it is equipped with a radar sensor system which you can switch on and off. When travelling in Canada in a vehicle not registered in Canada, you must switch off the radar sensor system. Canadian law does not permit the use of the radar sensor system for vehicles from outside of Cana- da. When you switch off the radar sensor system, the following functions are deactivated: 앫 BAS Plus* (컄 page 68) 앫 PRE-SAFE® Brake* (컄 page 75) 앫 DISTRONIC Plus* (컄 page 443) 앫 Park Assist* (컄 page 467) 앫 Advanced Parking Guidance*
(컄 page 471)
앫 Blind Spot Assist* (컄 page 485)
302
i USA only: This device has been approved by the FCC as a “Vehicular Radar System”. The radar sensor is intended for use in an automotive radar system only. Removal, tampering, or altering of the de- vice will void any warranties, and is not permitted by the FCC. Do not tamper with, alter, or use in any non-approved way. Any unauthorized modification to this device could void the user’s authority to operate the equipment.
i Canada only: This device complies with RSS-210 of Industry Canada. Operation is subject to the following two conditions: (1) This device may not cause interference, and (2) this device must accept any interference re-
ceived, including interference that may cause undesired operation of the device.
Removal, tampering, or altering of the device will void any warranties, and is not permitted. Do not tamper with, alter, or use in any non-approved way. Any unauthorized modification to this device could void the user’s authority to operate the equipment.
왘 Press ( or & to select the “Set-
tings” menu.
왘 Press % or $ to select the “Ra-
dar Sensors” function.
왘 Press #. 왘 Press # again if you would like to
change the current status. Depending on the previous status, the radar sensors will be switched on or off.
i The selected status of the radar sensors re- mains stored in memory even if the engine is turned off and restarted.
i The following message appears in the multi- function display if the radar sensors are switched off and you attempt to activate DISTRONIC Plus*, Park Assist* or PRE-SAFE® Brake*: “Radar Sensors (See Oper. Manual) Disabled”
The navigation system does not supply any information on stop signs, yield signs, traffic regulations or traffic safety rules. Their ob- servance always remains in the driver’s per- sonal responsibility. DVD maps do not cover all areas nor all routes within an area.
Traffic regulations always have priority over any route recommendations given.
Bear in mind that at a speed of just 30 mph (approximately 50 km/h), your vehicle is covering a distance of 44 feet (approximately 13.5 m) every second.
왔 Voice Control Operating safety
Warning!
Please devote your attention first and fore- most to the traffic situation you are in. While the system permits hands-free phone oper- ation, attention to traffic may be diverted not only by physical operation of a phone, but also by the distraction of a phone con- versation while driving. As such, for safety reasons, we encourage the driver to stop the vehicle in a safe place before answering or placing a phone call.
For safety reasons, you should only select a destination when the vehicle is stationary.
While the navigation system provides direc- tional assistance, the driver must remain fo- cused on safe driving behavior, especially attention to traffic and street signs, and should utilize the system’s audio cues while driving.
Control systems Voice Control
Warning!
Navigation announcements are intended to direct you while driving without diverting your attention from the road and driving.
Please always use this feature instead of consulting the map display for directions. Consulting the symbols or map display for directions may cause you to divert your at- tention from driving and increase your risk of an accident.
Warning!
Please do not use the Voice Control System in an emergency, as the tone of your voice may change in a stressful situation. This could cause a delay in completing your phone call in a timely manner. This could distract you in an emergency situation and cause you to be involved in an accident.
303
Control systems Voice Control introduction
The Voice Control System gives you the ca- pability to control the following systems on your vehicle using spoken commands: 앫 Telephone* (컄 page 308) 앫 Navigation (컄 page 315) 앫 Address book (컄 page 325) 앫 Audio (컄 page 329) (AM/FM radio,
CD/DVD changer, MP3 player)
The commands and digit sequences can be spoken without pausing between the indi- vidual words. If an unavailable or incorrect command is used, the Voice Control Sys- tem will prompt you for a new command by asking “Please repeat” or “Please repeat your entry”. In order to provide for a safe and comfort- able dialog, the Voice Control System ac- knowledges important commands.
You control these systems using spoken commands. Moreover, controls such as the buttons on the multifunction steering wheel (컄 page 306) allow you to keep your hands on the steering wheel. The command vocabulary consists of approximately 300 ready to use phrases. The Voice Control System recognizes com- mands and number sequences, irrespec- tive of the speaker. To optimize speech recognition for your voice follow the indi- vidualization process (컄 page 350). You can use the Voice Control System to call up all of COMAND’s main menu items, with the exception of the main menus for “Vehicle” and “Navi”.
304
Spelling
Command types
Active System
Control systems Voice Control introduction
The active system is the system currently shown in the COMAND display. If, for example, you listen to the radio while the telephone system is active on the COMAND display, you have to switch to the radio using the command “Radio” be- fore you can operate the radio.
You may not need to spell the entire name (street, intersection, city or point of inter- est) especially if the name is lengthy. Spell- ing the first three to five characters of the name should be sufficient for the system to recognize the name provided it is avail- able on the navigation DVD. The selection appearing on the COMAND display is sorted based on your recognized voice input and a matching algorithm. You can use the commands “Next page” or “Previous page” to scroll up or down in the list. Use the command “Correction” to start over by again spelling the name. Speak each character as clearly as you can, especially when they sound very simi- lar (d or e).
The Voice Control System commands can be categorized as: 앫 General Commands
These are commands always available to you as soon as the Voice Control System is activated (for example “Help” commands).
앫 Local Commands
These are commands specific to the currently active system shown in the COMAND display (for example commands to control the CD/DVD changer).
For a complete list of commands (컄 page 335).
i During Voice Control System operation visu- al help windows also appear in the COMAND dis- play (컄 page 307).
305
Control systems Voice Control introduction
Controls
Operation via the multifunction steering wheel
306
Item
1 ! to activate Voice Control
to accept a call
2 L to cancel Voice Control 3 æ to increase volume ç to decrease volume s to take a call
to dial to redial
t to end a call
to reject an incoming call
i Voice Control can be cancelled at any time, even during a dialog. Please note that if the Voice Control System is cancelled during a dialog, then the complete procedure is stopped and Voice Control is cancelled.
Activating Voice Control 왘 Switch on COMAND (컄 page 83). 왘 Press !.
An audible tone (beep) confirms the activation of the system.
왘 Speak a command.
Cancelling Voice Control 왘 Press L. or 왘 Speak the command “Cancel”
(except for speaking voice entries, entering a city or carrying out individu- alization).
or 왘 Press any COMAND button.
Setting volume level 왘 Activate Voice Control. 왘 Speak a command, for example “Help”. 왘 Press æ or ç. The volume is in- creased or decreased during voice out- put.
or 왘 Set volume for voice output using the COMAND volume thumbwheel on the lower part of the front central console (컄 page 94).
Displays
COMAND Display In addition to the acoustic help function, a visual help function (컄 page 257) is avail- able on the COMAND display. Upon activating the Voice Control, the most important available commands for the currently active system appear on the COMAND display.
When the Voice Control System requires additional information from the user, a se- lection list is shown on the COMAND dis- play in the address book and navigation system.
1 COMAND display
Multifunction display For example: telephone numbers are shown on the multifunction display while dialing when the main “Telephone” menu is selected in the instrument cluster con- trol system.
Control systems Voice Control introduction
1 Multifunction display
Symbols
The following symbols are found in follow- ing Voice Control System pages: s This symbol stands for commands and voice entries you are speaking. t This symbol stands for voice output
by the system.
u This symbol indicates that informa-
tion is available on the COMAND display.
307
Control systems Voice Control telephone
Warning!
Warning!
Telephone operation
Some jurisdictions prohibit the driver from using a mobile telephone while driving. Whether or not prohibited by law, for safety reasons, the driver should not use the mo- bile telephone while the vehicle is in motion. Stop the vehicle in a safe location before placing or answering a call.
If you nonetheless choose to use the mobile phone while driving, please use the hands- free feature and be sure to pay attention to the traffic situation at all times. Use the mo- bile phone only when road, weather and traf- fic conditions permit. Otherwise, you may not be able to observe traffic conditions and could endanger yourself and others.
Bear in mind that at a speed of just 30 mph (approximately 50 km/h), your vehicle is covering a distance of 44 feet (approxima- tely 14 m) every second.
Never operate radio transmitters equipped with a built-in or attached antenna (i.e. with- out being connected to an external antenna) from inside the vehicle while the engine is running. Doing so could lead to a malfunc- tion of the vehicle’s electronic system, pos- sibly resulting in an accident and/or personal injury.
i Various mobile phone cradles can be in- stalled in the front center armrest, see separate installation instructions for the mobile phone cradle. These mobile phone cradles can be ob- tained from an authorized Mercedes-Benz Cen- ter. For more information about telephone (컄 page 519).
The Voice Control System gives you the following capabilities: 앫 Enter a telephone unlock code 앫 Dial a phone number by speaking the
telephone number
앫 Store names and numbers in the
COMAND address book
앫 Dial a phone number by speaking the name of an COMAND address book en- try
앫 Delete an address book entry from the
address book
앫 Have the system read out the phone book of the address book entry by en- try
앫 Manage and access an automated an-
swering system/voice mail box
앫 Redial names and numbers
308
The Voice Control System detects whether 앫 your telephone is switched on 앫 the corresponding mobile network is
logged in
앫 it is possible to dial If dialing is not possible, the Voice Control System will advise you accordingly.
i You can continue operating your mobile phone using the telephone keypad or keypad on your phone.
Before you can operate the telephone us- ing the Voice Control System, you have to activate the Voice Control (컄 page 306).
Telephone commands
For a complete list of commands (컄 page 335).
“Telephone” Use the command “Telephone” to activate the telephone main menu. Use this com- mand if you want the digits you are enter- ing to appear on the COMAND display.
“Help telephone”