- 2012 Mercedes-Benz CL Class Owners Manuals
- Mercedes-Benz CL Class Owners Manuals
- 2008 Mercedes-Benz CL Class Owners Manuals
- Mercedes-Benz CL Class Owners Manuals
- 2011 Mercedes-Benz CL Class Owners Manuals
- Mercedes-Benz CL Class Owners Manuals
- 2007 Mercedes-Benz CL Class Owners Manuals
- Mercedes-Benz CL Class Owners Manuals
- 2002 Mercedes-Benz CL Class Owners Manuals
- Mercedes-Benz CL Class Owners Manuals
- 2013 Mercedes-Benz CL Class Owners Manuals
- Mercedes-Benz CL Class Owners Manuals
- 2004 Mercedes-Benz CL Class Owners Manuals
- Mercedes-Benz CL Class Owners Manuals
- 2000 Mercedes-Benz CL Class Owners Manuals
- Mercedes-Benz CL Class Owners Manuals
- 2010 Mercedes-Benz CL Class Owners Manuals
- Mercedes-Benz CL Class Owners Manuals
- 2006 Mercedes-Benz CL Class Owners Manuals
- Mercedes-Benz CL Class Owners Manuals
- 2003 Mercedes-Benz CL Class Owners Manuals
- Mercedes-Benz CL Class Owners Manuals
- 2005 Mercedes-Benz CL Class Owners Manuals
- Mercedes-Benz CL Class Owners Manuals
- 2009 Mercedes-Benz CL Class Owners Manuals
- Mercedes-Benz CL Class Owners Manuals
- 2001 Mercedes-Benz CL Class Owners Manuals
- Mercedes-Benz CL Class Owners Manuals
- Download PDF Manual
-
Control systems COMAND audio CD/audio DVD/MP3
Setting the audio format
Playback options
This function lets you choose the audio for- mat that you would like COMAND to play and is only available in DVD-Audio mode.
i The tracks on an audio DVD can be stored in various audio formats. The number of audio for- mats depends on the audio DVD. 왘 Select “Audio” 씮 “Audio” 씮 “DVD-Au-
dio” 씮 “Group”.
i The “Group” menu item cannot be selected if only one audio format is saved on the DVD.
The list of available audio formats appears. A dot R indicates the format currently se- lected. 왘 Changing setting: Slide qmr or
rotate ymz.
왘 Exiting menu: Slide omp.
The following options are available: 앫 “Normal Track Sequence”
Tracks playback in the order on the disc (e.g. track 1, 2, 3, etc.).
앫 “Random Tracks”
Tracks playback in a random order (e.g. track 3, 8, 5, etc.).
앫 “Random Folder” (in MP3 mode only)
Tracks in the active folder and any sub- folders playback in random order.
앫 “Repeat Folder” (in MP3 mode only) Tracks in the active folder will be re- peated until you switch the function off.
왘 Selecting an option: Select “Audio”
씮 “Audio”.
왘 Select “CD”, “DVD-Audio” or “MP3”.
The option list appears. A dot R indi- cates which option is switched on.
왘 Select an option and press n.
The option is switched on. For all op- tions except “Normal Track Sequence”, you will see a corresponding indicator in the main area.
i The “Normal Track Sequence” option is au- tomatically activated when you select a different medium. If an option is activated, it remains acti- vated after COMAND is switched on/off.
119
Control systems COMAND telephone*
Safety precautions
Warning!
Some jurisdictions prohibit the driver from using a cellular telephone while driving. Whether or not prohibited by law, for safety reasons, the driver should not use the cellu- lar telephone while the vehicle is in motion. Stop the vehicle in a safe location before placing or answering a call.
If you nonetheless choose to use the mobile phone1 while driving, please use the hands- free feature and be sure to pay attention to the traffic situation at all times. Use the mo- bile phone only when road, weather and traf- fic conditions permit. Otherwise, you may not be able to observe traffic conditions and could endanger yourself and others.
Bear in mind that at a speed of just 30 mph (approximately 50 km/h), your vehicle is covering a distance of 44 feet (approxima- tely 14 m) every second.
1 Observe all legal requirements.
120
Warning!
Never operate radio transmitters equipped with a built-in or attached antenna (i.e. with- out being connected to an external antenna) from inside the vehicle while the engine is running. Doing so could lead to a malfunc- tion of the vehicle’s electronic system, pos- sibly resulting in an accident and/or personal injury.
General notes
Calls disconnected while the vehicle is in motion A call may be disconnected if: 앫 there is insufficient network coverage 앫 you move from one transmitter/receiv- er area (cell) into another and no chan- nels are free or the cell is full
Operating options
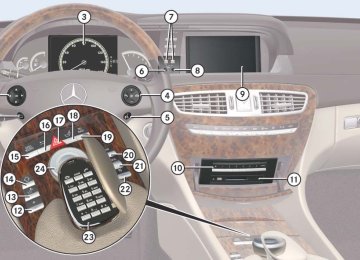
i The components and operating principles of COMAND can be found on (컄 page 81) and (컄 page 89).
i Various mobile phone cradles can be in- stalled in the front center armrest, see separate installation instructions for the mobile phone cradle. These mobile phone cradles can be ob- tained from an authorized Mercedes-Benz Cen- ter. For more information about telephone (컄 page 479). When the mobile phone is inserted in the cradle, you can operate the telephone us- ing the following devices: 앫 mobile phone keypad 앫 COMAND telephone keypad 앫 buttons s and t on the multi- function steering wheel (컄 page 257)
앫 Voice Control (컄 page 278) 앫 Bluetooth® headset (컄 page 136)
Please note that these functions are only available with Mercedes-Benz approved mobile phones. Please contact an autho- rized Mercedes-Benz Center for informa- tion on features available for your mobile phone of choice. You can control other functions of the mo- bile phone via the COMAND, instrument cluster control system (컄 page 265) or Voice Control.
i In order for the functions described in this section to work correctly, the Bluetooth® head- set must be linked to COMAND (컄 page 232). Please make sure any Bluetooth® headset linked with the mobile phone is switched off or that the headset is linked with COMAND before you in- sert the mobile phone in the cradle (컄 page 479) and use the telephone functions with COMAND.
The descriptions in this section assume that the mobile phone is inserted in the cradle. Exceptions to this are clearly stat- ed. Unless otherwise indicated, the descrip- tions and illustrations in this section refer to COMAND and the telephone keypad.
Operation using the mobile phone and Bluetooth® headset is described in the re- spective separate Operating Instructions.
Caller ID COMAND can display the telephone num- ber and the name of the caller, e.g. for an incoming call and also in other menus or displays. For the telephone number to be displayed, the caller must transmit their telephone number. This is also the case for name displays. For this, the telephone number and the name of the caller must also be saved in the mo- bile phone book.
Control systems COMAND telephone*
Functional restrictions You will not be able to use the telephone, or you may have to wait a while, in the fol- lowing situations: 앫 If the telephone has not yet logged into
the network. The telephone automatically tries to log into a network. If no network is available, you will also not be able to make a “911” emergency call. If you attempt to make an outgoing call, the “No Service” message will appear for a short while.
앫 If the mobile phone is not inserted in
the cradle.
앫 SIM card is not inserted in GSM type
phone
121
Control systems COMAND telephone*
Switching telephone on or off
Activating telephone mode
왘 Switching on: Insert mobile phone
왘 Select “Telephone” 씮 “Telephone” 씮
“Telephone”.
or 왘 Press s on telephone keypad.
Telephone keypad
into cradle when COMAND is switched on.
or 왘 Switch on the mobile phone
(see mobile phone operating instruc- tions).
왘 Switching off: Select “Telephone” 씮
“Telephone” 씮 “Telephone OFF”.
or 왘 Switch off mobile phone (see mobile
phone operating instructions).
1 Telephone keypad 2 Folding cover
With the telephone keypad you can: 앫 Enter and clear numbers and special
characters
앫 Reject, accept, connect and end calls 왘 Entering characters: Select “Tele-
phone” 씮 “Telephone” 씮 “Telephone”.
왘 Fold up cover 2. 왘 Enter characters using A - #.
i You can enter the * character by pressing > once. Pressing this button again within 1.5 seconds enters the + character. 왘 Deleting individual characters:
Press *.
왘 Deleting an entire word or number: Press and hold * until the word or number is deleted.
122
Control systems COMAND telephone*
Placing a “911” emergency call before entering PIN/PIN2, PUK/PUK2 or un- lock code
Placing a “911” emergency call after entering PIN/PIN2, PUK/PUK2 or un- lock code
Entering the number using the COMAND controller 왘 Select “Telephone” 씮 “Telephone” 씮
“Telephone” 씮 “Dial 911”.
Entering the number using the COMAND controller 왘 Select “Telephone” 씮 “Telephone” 씮
“Telephone”.
Entering the number using the tele- phone keypad 왘 Enter digits 9-1-1 (컄 page 122). 왘 Press s.
왘 Select all the digits in sequence. 왘 Select “S”.
Entering the number using the tele- phone keypad 왘 Enter digits 9-1-1 (컄 page 122). 왘 Press s.
“911” emergency call
i The “911” emergency call system is a public service. Using it without due cause is a criminal offense.
i This function places a call to the local 911 provider. It does not initiate a Tele Aid call.
The following conditions must be fulfilled in order to make a “911” emergency call: 앫 The phone is switched on. 앫 A mobile network is available. 앫 There is a valid SIM card in the phone (not necessary in all mobile networks).
i If no SIM card is inserted in the mobile phone, you can only initiate a “911” emergency call by using COMAND and the mobile phone.
If you cannot make an emergency call, you must initiate rescue measures yourself. The “911” emergency call is a public ser- vice. Any misuse is punishable by law.
123
Entering using the telephone keypad 왘 Entering: Enter digits (컄 page 122). 왘 Confirming an entry: Press n or
press s.
Control systems COMAND telephone*
Confirming the emergency call After the digits have been entered, you will see the question “Do you want to dial the 911 emergency number?”. 왘 Use COMAND controller to select
“Yes”. The telephone makes the connection. 왘 Wait until the emergency call center answers and describe the emergency situation.
124
Entering the PIN
i Your PIN code (Personal Identification Num- ber code) prevents unauthorized persons from using your GSM mobile phone. The PIN code is a number string, which you have to enter when switching on the telephone. The PIN entry applies only to GSM mobile phones.
Entering using the COMAND controller 왘 Select “Telephone” 씮 “Telephone” 씮
“Telephone”.
왘 Entering: Select all the digits in se-
quence.
왘 Deleting a digit: Select ) and briefly
press n.
왘 Deleting an entire number: Select ) and press and hold n until the number is deleted.
왘 Confirming an entry: Press n.
Control systems COMAND telephone*
Entering the PIN2
Entering the PUK/PUK2
Entering the unlock code
i The PIN2 entry applies only to GSM mobile phones.
i The PUK/PUK2 entry (Personal Unblocking Key) applies only to GSM mobile phones.
The phone may request the PIN2 in order to use certain functions. A corresponding message appears in the display. 왘 Enter PIN2 digits into mobile phone.
If you enter the PIN or PIN2 incorrectly three times, the SIM card will be locked. A corresponding message appears in the display. It is necessary to enter the PUK/PUK2 to unlock it. The PUK and/or PUK2 are provided by your telephone ser- vice provider. 왘 Enter PUK/PUK2 digits into mobile
phone.
Many mobile phones can be protected from unauthorized use with an unlock code (see mobile phone operating instructions). If you wish to use the phone functions when the unlock code is active, a screen appears requesting that you enter the un- lock code. You cannot use the phone func- tions (except “911” emergency call) until you have entered the unlock code. 왘 Proceed in the same way as entering
the PIN (컄 page 124).
125
Control systems COMAND telephone*
Telephone submenu overview
i The components and operating principles of COMAND can be found on (컄 page 81).
Name (only when the mobile phone is inserted in the cradle) Display COMAND phone book
Call lists (not during a call)
DTMF (only during a call)
Mic OFF/ON (only during a call)
Text message (not during a call)
Display call list selection: 앫 Calls received 앫 Calls dialed
Send numerical se- quence
Switch hands-free mi- crophone on/off
Call up SMS inbox
126
Main telephone menu
왘 Calling up main menu: Select “Tele- phone” 씮 “Telephone” 씮 “Telephone”.
or 왘 Press s on the telephone keypad
(컄 page 122).
i If you press s when the main telephone menu has already been called up, the “Calls Di- aled” list will appear (컄 page 128).
2 Symbol mailbox 3 Symbol
1 Numbers/characters to enter tele-
phone number
for new voice message in
for unread SMS messag-
es in SMS inbox (컄 page 145)
4 Signal strength and network status
display 앫 Network status “READY” = mobile
phone is logged in with its own provider’s network
앫 Network status “READY ROAM” = mobile phone is logged in with an- other provider’s network
앫 Network status “No Service” = No
network available
5 To show COMAND phone book
(“Name”) (컄 page 137)
6 To call up text message (SMS)
(컄 page 145)
7 To display call list selection
(컄 page 128)
Control systems COMAND telephone*
Mailbox
The symbol in the example illustration above indicates that your mailbox contains new voice messages. You will have to call the mailbox in order to retrieve the mes- sages. You can call your mailbox by: 앫 Speed dialing (컄 page 132) 앫 Entering a telephone number using the
telephone keypad (컄 page 131)
앫 Entering the telephone number using the COMAND controller (컄 page 131)
i Once connection with your mailbox has been established, the mailbox system will guide you through the next steps.
127
Control systems COMAND telephone*
Call lists
COMAND can display the following calls in separate lists: 앫 Calls received 앫 Calls dialed
i The list of incoming calls contains received calls as well as missed calls.
Calling up a list 왘 Select “Call List” from main telephone
menu.
왘 Select “Calls Received” or “Calls Di-
aled”. The corresponding list appears.
i The “Calls Received” and “Calls Dialed” menu items do not function if the respective list has no entries. The “Call List” menu item does not function if neither list has any entries.
128
You will see the telephone number of caller 6 if 앫 the caller transmitted the telephone number 앫 no caller data is saved in either the COMAND address book or the phone book on the mo- bile phone
An unknown caller 5 has not transmitted his or her telephone number. i In the list of dialed calls, you will see the name of the person called if you have saved his or her telephone number and name in the COMAND address book or in the phone book on the mobile phone. If no data has been saved, you will see the telephone number. 왘 Switching to list display: Select
“123” or “ABC”. The display changes to telephone num- ber or name display.
왘 Closing list: Slide omp and
select “Back”.
왘 Selecting a list entry: Slide qmr or
rotate ymz and select entry.
Illustration: list of incoming calls 1 To close list 2 To switch list display (“123” or “ABC”) 3 To call up options 4 Name or telephone number of a caller 5 Unknown caller 6 Telephone number of a caller
i In the list of calls received, you will see the name of caller 4 if 앫 the caller transmitted the telephone number 앫 the name and telephone number are saved
in the COMAND address book or in the phone book on the mobile phone
앫 the telephone number is saved in the same
way in which the caller transmits it
Displaying details of a list entry COMAND can also show a shortened list entry in its entirety. 왘 Select list entry (컄 page 128). 왘 Slide omp and select “Options” 씮
“Details”. The detailed view appears.
왘 Closing detailed view: Slide qmr or
omp or press n.
Saving a list entry in the address book
i List entries that show a telephone number are neither saved in the COMAND address book, nor in the phone book on the mobile phone. You can save such entries in the COMAND address book. You can also save list entries in the COMAND address book which have already been saved in the phone book on the mobile phone.
Saving as a new entry in the COMAND address book 왘 Slide omp or rotate ymz and select
list entry (컄 page 128).
왘 Select “Options” 씮 “Save” 씮 “New En-
try”.
i “Save” does not function if the selected list entry is already saved in the COMAND address book. 왘 Select a number category, e.g. “Home”. 왘 Select a telephone category, e.g. “Land
Line”.
왘 Select “Save”.
The input menu appears with the data fields. The data field for the telephone number is filled in automatically. The data field for the last name is also filled in automatically if the entry to be saved contains a name.
왘 If you would like to save the entry
now: Select ?.
Control systems COMAND telephone*
1 Data field 2 Input mark (cursor) 3 Input characters 왘 If you want to change the available characters: Proceed as described in the “Changing data field” paragraph in the “Assigning a New Entry in the Ad- dress Book” section (컄 page 140).
129
Control systems COMAND telephone*
Adding to an existing entry in the COMAND address book 왘 Slide omp or rotate ymz and select
list entry (컄 page 128).
왘 Select “Options” 씮 “Save” 씮 “Add”.
i “Save” does not function if the selected list entry is already saved in the COMAND address book. 왘 Select a number category to add,
e.g. “Home”.
왘 Select a telephone category to add,
e.g. “Land Line”.
왘 Select “Save”.
The search menu for COMAND address book entries appears.
왘 Search for desired entry.
i There is a detailed description of searching for an COMAND address book entry in the “Searching for an address book entry” section (컄 page 217). 왘 Press n when you have finished
searching.
130
COMAND saves the data if there are fewer than four numbers assigned to the entry you are searching for in the selected number category. If four numbers are saved for the entry you are searching for, a prompt will ap- pear asking whether you want to over- write one of the existing numbers.
왘 Select “Yes” or “No”.
If you select “Yes”, a selection list will appear containing the four existing numbers.
왘 Select the number to be overwritten.
COMAND overwrites the selected num- ber with the new data.
Incoming call
Rejecting or accepting the call 왘 Rejecting: Select “Reject”. or 왘 Press t on the telephone keypad or
on the multifunction steering wheel.
i If you have a CDMA/TDMA mobile phone and reject a call, only the ring tone will stop. The call itself can only be ended by the caller. 왘 Accepting: Select “Accept”. or 왘 Press s on the telephone keypad or
on the multifunction steering wheel.
or 왘 Press ! on the multifunction steer-
ing wheel.
왘 Use the mobile phone (see mobile
phone operating instructions).
or
왘 Use the Bluetooth® headset
(see headset operating instructions).
i The use of a Bluetooth® headset requires Bluetooth® to be activated and the Bluetooth® headset to be authorized (컄 page 232). If you have accepted the call using COMAND, the telephone keypad, the mul- tifunction steering wheel or the mobile phone, the call will be conducted via the hands-free system. The volume of the call can be adjusted (컄 page 91). If you have accepted the call using the Bluetooth® headset, the call will be con- ducted via the headset. Further operating functions can be found in the “Functions during a single-call con- nection” section (컄 page 133). You can also accept a call if the COMAND display is showing a screen oth- er than the telephone mode screen. After accepting the call, you will see the caller’s data in a window. 왘 Closing window: Slide qmr or omp
or press n.
Making an outgoing call
i If you place an outgoing call and receive a busy signal, the telephone automatically starts to redial as long as the provider and the mobile phone support this function (see mobile phone operating instructions). While the call is connecting, you can also send character strings (컄 page 134).
Entering the telephone number using the COMAND controller 왘 Switching screen to telephone
mode: Call up main telephone menu (컄 page 127).
왘 Entering digits: Select desired digits by rotating ymz or sliding omp and press n.
왘 Deleting individual digits: Select )
and briefly press n.
왘 Deleting an entire telephone num- ber: Select ) and press and hold n until the telephone number is deleted.
왘 Connecting a call: Select “S”.
Control systems COMAND telephone*
Entering a telephone number using the telephone keypad 왘 Switching screen to telephone
mode: Call up main telephone menu (컄 page 127).
왘 Use telephone keypad to enter digits.
i A detailed description of how to enter digits using the telephone keypad can be found on (컄 page 84). 왘 Connecting a call: Press s.
131
Control systems COMAND telephone*
Redial 왘 Switching screen to telephone
mode: Call up main telephone menu (컄 page 127).
왘 Use COMAND controller to select
“S”.
or 왘 Press s on the telephone keypad
(컄 page 84). The list of dialed numbers appears. The most recently dialed number is at the top.
왘 Select desired entry. 왘 Connecting a call: Press n.
i If the list of dialed calls contains no entries, the “S” menu item cannot be selected and the s button on the telephone keypad does not function.
132
Placing a call to a call list entry or COMAND phone book entry 왘 Call up a call list and select an entry
(컄 page 128).
or 왘 Call up COMAND phone book and se-
lect an entry (컄 page 137).
왘 Connecting a call: Press n.
Speed dialing You can save telephone numbers in the speed-dial preset locations on the mobile phone and call up the speed-dial presets (see mobile phone operating instructions).
i By default, the mailbox number is preset in the speed dial memory unless you have modified it. For more information on the mailbox (컄 page 127). You can also call up speed-dial numbers using COMAND.
i Operation during call connection depends on the speed-dial preset position called up.
Calling up speed-dial presets using the COMAND controller 왘 Switching screen to telephone
mode: Call up main telephone menu (컄 page 127).
왘 Entering number of a speed-dial pre-
set: Select all the digits in sequence. 왘 Deleting individual digits:
Select ) and briefly press n.
왘 Deleting entire number:
Select ) and press n until the number is deleted.
왘 Connecting a call (speed-dial pre-
sets 1 -99): Select “S”.
or 왘 Connecting a call (speed-dial pre-
sets 100 - 999): Select “#” after the digits 씮 “S”. In both cases, the telephone connects the call to the saved telephone num- ber. If the speed-dial memory contains no telephone numbers, you will see a corresponding message.
왘 Deleting message: Press n.
Calling up speed-dial numbers using the telephone keypad 왘 Switching screen to telephone
mode: Call up main telephone menu (컄 page 127).
왘 Single-digit numbers: Press and hold
A - 9 buttons.
or 왘 Single- and two-digit numbers: Enter number using the A - 9 buttons.
왘 Press s. or 왘 Three-digit numbers: Enter number
using the A - 9 buttons.
왘 Press #, and then s.
Control systems COMAND telephone*
Functions during a single-call connec- tion
Illustration: telephone mode during a call 1 Symbol for active telephone con-
nection (also visible in other operating modes)
2 Signal strength display 3 To switch hands-free microphone on or
In all three cases, COMAND connects the call to the saved telephone num- ber. If the speed-dial memory contains no telephone numbers, you will see a corresponding message.
off
4 Length of call display 5 To send character strings 6 To end a call 7 Person you are calling
왘 Deleting message: Press n.
133
왘 Press F shortcut button.
Sending a character string via DTMF
If the microphone is switched off, the > symbol appears in the main ar- ea.
왘 Switching on microphone:
Select “Mic ON”.
or 왘 Press F shortcut button.
The > symbol disappears.
i This function is not possible with every mo- bile phone. If the mobile phone supports the function, you can use it during the call connec- tion and also during a call.
Answering machines or other devices can be controlled by character strings (e.g. for remote query functions).
Sending character strings via the DTMF menu 왘 During a call, select “DTMF”.
The DTMF dialing display appears.
Control systems COMAND telephone*
i The name of the person you are speaking with can only be seen in display 7 if his or her telephone number and name have been saved in the COMAND address book or phone book on the mobile phone. The telephone number must also be saved in the same way in which the per- son you are talking to transmits it.
Switching the hands-free microphone on or off 왘 Switching screen to telephone
mode: Call up main telephone menu (컄 page 127).
왘 Switching off microphone:
Select “Mic OFF” and press n.
or
134
Control systems COMAND telephone*
왘 Sending a phone book entry as a
character string: Select “Name”. 왘 Select desired phone book entry.
Ending an active call 왘 Ending a call: Select “4 END” in the
call display.
The entry is immediately sent as a char- acter string.
or 왘 Press t on the telephone keypad or
i Telephone numbers containing the + char- acter may impair the function. 왘 Switching back to the call display:
Select “Y”.
on the multifunction steering wheel. The COMAND display will change to the previously selected display, if applicable.
Sending character strings via the tele- phone keypad 왘 Press corresponding button on tele-
phone keypad. Each character you select is immedi- ately sent.
i The + character may impair the function.
1 Back to the call display 2 Character entry 3 To call up the phone book 왘 Sending individual characters:
Rotate ymz or slide omp and select desired character. Each character you select can be seen in the main area and is sent immediate- ly.
135
From the mobile phone to the hands-free system 왘 Insert mobile phone into cradle.
Once the call has been transferred to the hands-free feature, all the functions will be available to you which are de- scribed in the “Functions during a sin- gle-call connection” section (컄 page 133).
From the Bluetooth® headset to the hands-free system On most Bluetooth® headsets, you press the PTT button on the headset twice quick- ly to transfer the call (see headset operat- ing instructions).
From the hands-free system to the mo- bile phone 왘 If the mobile phone has a folding up- per section: Flip upper section open.
왘 Take mobile phone out of cradle.
The “No telephone inserted” message appears on the COMAND display. Sub- sequent operation is only possible us- ing the mobile phone.
Control systems COMAND telephone*
Transferring a call
From the hands-free system to the Bluetooth® headset
i The use of a Bluetooth® headset requires Bluetooth® to be activated and the Bluetooth® headset to be authorized (컄 page 232). The call transfer is controlled by pressing the PTT button on the Bluetooth® headset (see headset operating instructions). Nor- mally, it is sufficient to press the PTT but- ton once, but under certain circumstances you may have to press it a second time. Once the call has been transferred to the Bluetooth® headset, all the functions will be available to you which are described in the “Functions during a single-call connec- tion” section (컄 page 133). Exception: “Switching the hands-free mi- crophone on or off” function (컄 page 134).
136
COMAND phone book
The COMAND phone book contains both the COMAND address book entries and mobile phone entries that have at least one telephone number. The COMAND address book entries are permanently available even when a mobile phone is not inserted in the cradle. When the mobile phone is inserted in the cradle, COMAND will read the phone book entries in the mobile phone and compares them with the COMAND address book en- tries.
If any of the telephone numbers of a phone book entry in the mobile phone are the same as an address book entry, COMAND will only display the address book entry. If the entries are not the same, the CO- MAND phone book will show the phone book entry in the mobile phone.
Calling up the COMAND phone book 왘 Select “Telephone” 씮 “Telephone” 씮
“Telephone” 씮 “Name”. The COMAND phone book appears.
Control systems COMAND telephone*
Illustration: a phone book with name dis- play and smart speller activated 1 Category symbol 2 Upper entry from address book (with-
out category symbol)
3 Symbol + for several telephone num- bers (subentries) under the main entry
4 Symbol
for summarized entries
from the mobile phone with the same name but different telephone numbers
5 Smart speller 6 Voice entry symbol 7 To close the phone book
137
Control systems COMAND telephone*
Entries with category symbol 1 come from the mobile phone. The following cate- gory symbols are possible: 앫
= symbol for “Mobile” category = symbol for “Home” category = symbol for “Work” category = symbol for “Fax” category = symbol for “Pager” category = symbol for “Main” category or for unknown category or for phone entries that are saved on the SIM card of a GSM mobile phone
앫
앫
앫
앫
앫
Entries without a category symbol or with the symbol come from the COMAND address book. Entries with the entry. Voice entries can be added to the address book (컄 page 224). This function is available in vehicles with Voice Control.
symbol contain a voice
138
Switching between the smart speller and the list 왘 Switching from the smart speller to the list: Slide mq repeatedly or press n until the smart speller is hidden.
or 왘 Rotate ymz or slide omp and
select ?. The smart speller is hidden.
Illustration: list of phone book entries with name display and hidden smart speller 1 Back to smart speller 2 To switch phone book display (“123” or
“ABC”)
3 Symbol + for several telephone num- bers (subentries) under the main entry, subentry list is closed
4 To call up options 5 Symbol / for open subentry list 6 List of phone book entries 7 Subentry list with category symbols
and telephone numbers
Control systems COMAND telephone*
i The following options are available under “Options” menu item 4: 앫 Displaying details about an entry
(컄 page 140)
앫 Creating a new entry in the address book
(컄 page 140)
앫 Deleting an entry (컄 page 142) 앫 Saving a phone book entry from mobile phone in the address book (컄 page 142)
앫 Adding a telephone number to an address
book entry (컄 page 144)
왘 Switching from the list to the smart
speller: Select “Back” from the list.
or 왘 Press back button L in the center
console (컄 page 82).
왘 Changing phone book display in the
list: Select “123” or “ABC”. The screen changes to telephone num- ber or name display.
Closing the COMAND phone book 왘 In the smart speller, select “Back”. or 왘 Press back button L in the center
console (컄 page 82).
Selecting an entry in the COMAND phone book
Selecting entries using the smart speller 왘 Switch from the list to the smart speller
if necessary.
왘 Changing smart speller language:
Select !.
왘 Select desired language. 왘 Changing smart speller character
set: Select #. Depending on the previous setting, you will change to letters with special char- acters or to numbers with special char- acters.
왘 Entering characters: Select the char- acters of the entry you are searching for one by one.
왘 Deleting individual characters: Se-
lect ) and briefly press n. Each time you enter or delete a charac- ter, the closest match will be displayed at the top of the list.
왘 Deleting an entire entry: Select ) and press and hold n until the entry is deleted.
왘 Canceling search: Switch from the
smart speller to the list. The entry at the top of the list is auto- matically highlighted.
Selecting using the list 왘 If necessary, switch from the smart
speller to the list.
왘 Rotate ymz or slide qmr until the de-
sired entry is highlighted.
139
Starting to dial the number of an entry 왘 Select entry (컄 page 139). 왘 Press n. or 왘 Press s on the telephone keypad. A list appears if the entry contains sub- entries. 왘 Select desired subentry. 왘 Press n again. or 왘 Press s on the telephone key-
pad.
Assigning a New Entry in the Address Book
i This function is used to create a new entry in the address book and to enter the data (first name, last name and telephone number) manu- ally. 왘 Select “Options” 씮 “New Entry” in the
COMAND phone book list.
왘 Selecting a number category: Select a category, e.g. “Home”.
왘 Selecting a telephone category: Select a category, e.g. “Land Line”.
왘 Confirming selection: Select “Save”. The input menu appears with the data fields.
Control systems COMAND telephone*
Selecting subentries 왘 Select an entry with the + symbol and
press n. The + symbol changes to / and the subentries are displayed.
왘 Rotate ymz or slide qmr until the de-
sired subentry is highlighted.
Displaying details of an entry COMAND can also show a shortened entry in its entirety. For entries featuring suben- tries, the detailed view is only available for the subentries and not for the main entry. 왘 Select entry (컄 page 139). 왘 Select “Options” 씮 “Details”.
The detailed view appears.
왘 Closing detailed view: Slide qmr or omp or press n or back button L in the center console (컄 page 82).
140
왘 Toggling upper and lower case for the input characters: Select & or (.
왘 Changing language for the input
characters: Select !. 왘 Select desired language. 왘 Changing character set for the input
characters: Select #. Depending on the previous setting, you will change to letters with special char- acters or to numbers with special char- acters.
왘 Displaying special characters as in- put characters: Select ! 씮 “Sym- bols”.
왘 Returning input characters to nor- mal characters: Select ! 씮 the desired language.
왘 Moving cursor in the data field:
Select Y or Z.
Control systems COMAND telephone*
왘 Deleting individual characters:
Select ) and briefly press n. The character to the left of the cursor is deleted.
왘 Deleting an entire entry: Select ) and press and hold n until the entry is deleted.
왘 Saving an entry: Select ?. 왘 Canceling an entry: Select “Back”.
If one of the data fields contains data, a prompt will appear asking whether you want to save the entry. 왘 Select “Yes” or “No”.
The entry will either be saved or not, depending on your selection.
141
1 Data field 2 Input mark (cursor) 3 Input characters 왘 Changing data field: Slide qmr re-
peatedly until desired data field is high- lighted.
or 왘 Select [ or ] repeatedly until de-
sired data field is highlighted.
왘 Entering data into a field: Select all characters one by one from the input characters line 3.
Control systems COMAND telephone*
Deleting an entry
i It is not possible to delete a phone book en- try from the mobile phone using the COMAND phone book.
The deletion rules may vary, depending on the entry selected: 앫 Upper entry selected from the address
book: the entry is deleted from the COMAND phone book and also from the address book, if the address book entry only contains telephone numbers.
앫 Subentry of an address book entry se-
lected: the subentry is deleted from the COMAND phone book and from the ad- dress book.
142
왘 Deleting: Select entry (컄 page 139). 왘 Select “Options” 씮 “Delete”.
A prompt appears asking whether the entry should be deleted.
왘 Select “Yes” or “No”.
Once “Yes” has been selected, the en- try will be deleted according to the rules mentioned above.
Saving a phone book entry from the mobile phone in the address book
i This function is used to save an existing phone book entry from the mobile phone in the address book. The following options are avail- able: 앫 Saving as a new address book entry 앫 Adding a telephone number to an existing
address book entry
Saving as a new address book entry 왘 Select phone book entry from mobile
phone (컄 page 139).
i All entries with the following category sym- bols are phone book entries in the mobile phone. 앫 앫 앫 앫 앫 앫
= symbol for “Mobile” category = symbol for “Home” category = symbol for “Work” category = symbol for “Fax” category = symbol for “Pager” category = symbol for “Main” category
왘 Select “Options” 씮 “Save” 씮 “New En-
try”.
왘 Selecting a number category: Select a category, e.g. “Home”.
왘 Selecting a telephone category: Select a category, e.g. “Land Line”.
왘 Confirming selection: Select “Save”. The input menu appears with the data fields. The data field for the telephone number is filled in automatically. The data field for the last name is also filled when the entry to be saved contains a name.
1 Data field 2 Input mark (cursor) 3 Input characters 왘 Proceed as described in the “Changing data field” paragraph in the “Assigning a New Entry in the Address Book” sec- tion (컄 page 140).
Control systems COMAND telephone*
Adding a telephone number to an exist- ing address book entry 왘 Select phone book entry from mobile
phone (컄 page 139).
i All entries with the following category sym- bols are phone book entries in the mobile phone. 앫 앫 앫 앫 앫 앫
= symbol for “Mobile” category = symbol for “Home” category = symbol for “Work” category = symbol for “Fax” category = symbol for “Pager” category = symbol for “Main” category
왘 Select “Options” 씮 “Save” 씮 “Add”. 왘 Selecting a number category: Select a category, e.g. “Home”.
왘 Selecting a telephone category: Select a category, e.g. “Land Line”.
왘 Confirming selection: Select “Save”. The search menu for address book en- tries appears.
왘 Search for desired entry using smart
speller function.
i There is a detailed description of how to search for an address book entry in the “Search- ing for an address book entry” section (컄 page 217). 왘 After selecting an entry, press n.
If there are fewer than four numbers assigned to the selected entry in the selected number category, COMAND will save the data. If four numbers are saved for the se- lected entry, a prompt will appear ask- ing whether you want to overwrite one of the existing numbers.
왘 Select “Yes” or “No”.
If you select “Yes”, a selection list will appear containing the four existing numbers.
왘 Select number to be overwritten.
COMAND overwrites the selected num- ber with the new data.
143
Control systems COMAND telephone*
Adding a telephone number to an ad- dress book entry
i This function is used to add a telephone number to an existing address book entry. The telephone number can be entered manually. 왘 Select address book entry
(컄 page 139).
왘 Confirming selection: Select “Save”. If four numbers are saved for the entry in the selected number category, a prompt will appear asking whether one of the existing numbers should be over- written. 왘 Select “Yes” or “No”.
i All entries with the symbol are address book entries. 왘 Select “Options” 씮 “Add Number”.
symbol or without a
i “Add Number” does not function if you have selected the main entry for an address book en- try with subentries. 왘 Selecting a number category: Select a category, e.g. “Home”.
왘 Selecting a telephone category: Select a category, e.g. “Land Line”.
If you select “Yes”, a selection list will appear containing the four ex- isting numbers.
왘 Select number to be overwritten. The input menu appears with the data field for entering the new tele- phone number.
왘 Entering digits: Select all digits one
by one from the input characters. 왘 Moving cursor in the data field:
Select Y or Z.
왘 Deleting individual digits: Select )
and briefly press n. The digit to the left of the cursor is de- leted.
왘 Deleting an entire number:
Select ) and press and hold n until the number is deleted.
왘 Saving entry: Select ?. 왘 Canceling an entry: Select “Back”. If you have already entered data, a prompt will appear asking whether the entry should be saved. 왘 Select “Yes” or “No”.
The entry will either be saved or not, depending on your selection.
144
SMS messages (Short Message Service)
Inbox
SMS functions The following functions are available: 앫 Receive 앫 Read The following conditions must be fulfilled in order to use the functions: 앫 The mobile phone is inserted in the cra-
dle and switched on.
앫 The PIN has been entered (only GSM
mobile phones).
앫 The mobile phone is logged into a mo-
bile network.
앫 Mobile phone book must be download-
ed and available in COMAND.
Control systems COMAND telephone*
i “Text Message” does not function if the SMS inbox contains no SMS messages. The SMS inbox only shows the messages which are re- ceived while the mobile phone is inserted in the cradle.
Calling up the SMS inbox 왘 Select “Telephone” 씮 “Telephone”. The main telephone menu appears.
1 Symbol
for unread messages in the
SMS inbox
i The symbol only appears for those mes- sages which are received while the mobile phone is inserted in the cradle. 왘 Select “Text Message”. The SMS inbox appears.
1 Date and time the highlighted SMS
message was received
2 To call up options 3 Highlighted SMS message 4 Symbol 5 Back to main telephone menu
for unread SMS message
145
Control systems COMAND telephone*
i The SMS messages are sorted by the date and time they were received. The most recent message is at the top of the list. If the name and telephone number of the sender is saved in the address book or phone book of the mobile phone, you will see the name of the sender in the SMS inbox. Otherwise, you will see the telephone number of the sender.
Selecting an SMS message 왘 Rotate ymz or slide qmr and then
press n.
Showing abbreviated sender display in full 왘 Select SMS message 씮 “Options” 씮
“Details”. The detailed view appears.
왘 Closing detailed view: Slide qmr or
press n.
Calling an SMS sender 왘 Select SMS message 씮 “Options” 씮
“Call”. The telephone connects the call.
Saving SMS sender as new COMAND address book entry 왘 Selecting an SMS message: In the SMS inbox, select a message 씮 “Op- tions” 씮 “Save Number” 씮 “New En- try”.
왘 Selecting a number category: Select a category, e.g. “Home”.
왘 Selecting a telephone category: Select a category, e.g. “Land Line”.
왘 Saving: Select “Save”.
The input menu appears with the data fields. The data field for the telephone number is filled in automatically.
146
1 Data field 2 Input mark (cursor) 3 Input characters 왘 Proceed as described in the “Changing data field” paragraph in the “Assigning a New Entry in the Address Book” sec- tion (컄 page 140).
Adding an SMS sender’s telephone num- ber to an existing address book entry 왘 Selecting an SMS message: In the SMS inbox, select a message 씮 “Op- tions” 씮 “Save Number” 씮 “Add”.
왘 Proceed as described in the “Selecting a number category” paragraph in the “Adding a telephone number to an ex- isting address book entry” section (컄 page 143).
Exiting the SMS inbox 왘 Select “Back”.
The main telephone menu appears.
Reading an SMS message 왘 In the SMS inbox, select an SMS mes-
sage and press n. The SMS message appears.
Using data in a text message
i If the SMS message contains telephone numbers or navigable address data, you can se- lect this data and place a telephone call or trans- fer the address data to the navigation system. 왘 Selecting data from the text:
Rotate ymz or slide qmr.
왘 Using data: Press n 씮 “Use”.
If you have selected a telephone num- ber, the telephone connects the call. If you have selected a navigable ad- dress, it is transferred to the navigation system.
Calling an SMS sender 왘 Press n 씮 “Call”.
The telephone connects the call.
i This function is not possible with all SMS senders.
Control systems COMAND telephone*
Saving SMS sender as new address book entry
i This function is not possible with all SMS senders. 왘 Press n 씮 “Save Number” 씮 “New
Entry”.
왘 Proceed as described in the “Selecting a number category” paragraph in the “Saving SMS sender as new address book entry” section (컄 page 146).
Adding an SMS sender’s telephone num- ber to an existing address book entry 왘 Press n 씮 “Save Number” 씮 “Add”. 왘 Proceed as described in the “Selecting a number category” paragraph in the “Adding a telephone number to an ex- isting address book entry” section (컄 page 143).
Closing an SMS message and returning to SMS inbox 왘 Press n 씮 “Back”.
147
COMAND may give incorrect navigation commands if the data in the digital map does not correspond with the actual road/traffic situation. DVD maps do not cover all areas nor all routes within an area. For example, if the traffic routing has been changed or the direction of a one-way road has been reversed.
For this reason, you must always observe applicable road and traffic rules and regula- tions during your journey. Road and traffic rules and regulations always have priority over the navigation commands generated by the system.
Warning!
Navigation announcements are intended to direct you while driving without diverting your attention from the road and driving.
Please always use this feature instead of consulting the map display for directions. Consulting the symbols or map display for directions may cause you to divert your at- tention from driving and increase your risk of an accident.
Control systems COMAND navigation
Safety precautions
Warning!
For safety reasons, only enter a destination when the vehicle is stationary. When the ve- hicle is in motion, a passenger should enter the destination. Study manual and select route before driving.
Bear in mind that at a speed of just 30 mph (approximately 50 km/h), your vehicle is covering a distance of 44 feet (approximate- ly 14 m) every second.
COMAND calculates the route to the desti- nation without taking account of the follow- ing, for example: 앫 Traffic lights 앫 Stop and right-of-way signs 앫 Parking or stopping prohibited areas 앫 Lane merging 앫 Other road and traffic rules and regula-
tions
앫 Narrow bridges
148
Control systems COMAND navigation (introduction)
왔 COMAND navigation (introduction) Map software
Updating the map software
The digital maps generated by the map software become outdated in the same way as conventional road maps. Optimum route guidance can only be provided by the navigation system in conjunction with the most up-to-date map software. Information about new map software ver- sions can be obtained from an authorized Mercedes-Benz Center.
You can update the map software yourself using a DVD.
Notes about handling DVDs 앫 Only hold discs by the edge. 앫 Handle discs carefully to prevent read
problems.
앫 Avoid getting scratches, fingerprints
and dust on discs.
앫 Use a commercially-available cleaning cloth to clean discs. Do not wipe them with a circular motion, but only in straight lines from the center out- wards.
앫 Place discs back in their boxes after
use.
앫 Protect discs from heat and direct sun-
light.
Updating process
The updating process has the following phases: 앫 Loading a DVD into the DVD changer
(컄 page 150)
앫 Updating process (컄 page 151)
i The updating process can take between 10 and 60 minutes, depending on the size of the map software. If the radio was switched on be- fore you started the updating process, you can still adjust the volume. You can also use COMAND to operate the automatic air condition- ing and to cancel the process. Other functions are not operational. If possible, carry out the update when the vehicle is stationary.
149
Control systems COMAND navigation (introduction)
i If you carry out the update with the engine switched off and the vehicle battery has insuffi- cient power, COMAND may automatically switch off during the process in order to protect the bat- tery. If this occurs, restart the update with the engine running period. Similarly, if the SmartKey position is unintentionally switched to 0, restart the update.
Warning!
Never leave the engine running in an en- closed space. The exhaust gases contain carbon monoxide. Inhaling exhaust gases constitutes a health hazard and could lead to loss of consciousness or even death.
150
왘 Switch on COMAND (컄 page 81). 왘 Press one of the magazine tray
buttons 2. If a disc is loaded, it will be ejected.
왘 Take disc out of slot 1. 왘 Wait until LED for magazine button 2
which you pressed flashes quickly.
왘 Slide DVD into slot 1 with printed side
facing upwards. COMAND loads the DVD.
Loading a DVD into the DVD changer
1 Disc slot 2 Magazine tray buttons 1 – 6
i Each magazine tray button 2 indicates the status of the corresponding magazine tray by means of an LED. 앫 LED off = magazine tray is empty 앫 LED constantly lit = magazine tray is loaded 앫 LED flashes = CD/DVD changer requesting
disc to be loaded
Control systems COMAND navigation (introduction)
Updating
왘 Select “Yes” or “No”.
After you have loaded the DVD, you will see a message to the effect that the disc does not contain a recognizable audio for- mat. 왘 Confirming message: Press n.
COMAND checks whether the map software on the DVD is compatible with the vehicle’s navigation system and whether it is compatible with the cur- rent system software.
Map software is compatible with the navigation system and the current sys- tem software COMAND now checks whether the map data on the DVD is already installed.
Map data is not yet installed You will see a comparison of the version statuses in the display and a prompt will appear asking whether you want to contin- ue with the update.
If you select “No”, COMAND automati- cally ejects the DVD and the map data is not updated. 왘 Take DVD out of the slot. If you select “Yes”, the map data is up- dated.
Map data is already installed You will see a message that the map data is already installed and a prompt will ap- pear asking you whether you want to con- tinue with the update. 왘 Select “Yes” or “No”.
If you select “No”, COMAND automati- cally ejects the DVD and the map data is not updated. 왘 Take DVD out of slot. If you select “Yes”, the existing map data is saved again.
Updating the map data While the update is running, you will see a message to this effect and a progress bar. The progress bars fills up from left to right during the update.
1 Progress bar You can either cancel the update or allow it to run to the end without canceling. 왘 Canceling an update on the DVD
changer: Press corresponding maga- zine tray button 2 (컄 page 150). The DVD will be ejected in both cases.
왘 Take DVD out of slot.
151
Control systems COMAND navigation (introduction)
i If the update is canceled, the navigation sys- tem remains fully operational with the previous map data. You can restart the update at a later date. It will then continue from the point where it was canceled. 왘 To allow the update to run to the end without canceling: Take no fur- ther action. If the update is successfully complet- ed, you will see a message to this ef- fect.
왘 Confirming message: Press n.
COMAND ejects the DVD.
왘 Take DVD out of slot.
The update is complete.
i The navigation system remains fully opera- tional with the previous map data.
The update may not be successfully com- pleted for the following reasons: 앫 DVD dirty or scratched
왘 Clean DVD.
See the “Notes about handling DVDs” section (컄 page 149).
왘 Restart update.
앫 Overheating due to excessive tempera-
tures in the vehicle interior 왘 Wait until vehicle interior has
cooled down.
왘 Restart update.
If the update is not successfully complet- ed, you will see a message that the map update is not possible. 왘 Confirming message: Press n.
앫 The storage medium (hard disk) inte-
grated in COMAND is defective. 왘 Consult an authorized Mercedes-Benz Center.
COMAND ejects the DVD.
왘 Take DVD out of slot.
152
Map software is not compatible with the navigation system You will see a message that the update is not possible. 왘 Confirming message: Press n.
COMAND ejects the DVD.
왘 Take DVD out of slot. 왘 Load a DVD which is compatible with
the vehicle’s navigation system.
Map software is not compatible with the current system software You will see a message that the system software and the map software are not compatible. 왘 Confirming message: Press n.
COMAND ejects the DVD.
왘 Take DVD out of slot. 왘 Have the system software updated at an authorized Mercedes-Benz Center.
i The map software cannot be updated until the system software has been updated.
Control systems COMAND navigation (introduction)
General notes
Operational readiness of the navigation system following a system software update by an authorized Mercedes-Benz Center After a system software update by an au- thorized Mercedes-Benz Center, the in- stalled map software may no longer be compatible. If this is the case, the naviga- tion system will not be operational. You will know if this is the case, when the following message will appear when you switch to navigation mode: “The system software has been updated. The map soft- ware must be updated now. Please insert the DVD with the map software.” 왘 Updating map software: Proceed as
described in the “Updating the map software” section (컄 page 149). Use map software which is compatible with the system software.
i Please note that the update must be allowed to run to the end in this case. If you interrupt it, the navigation system will continue to be non-op- erational.
Initial use or use following a system software update In both these cases, the navigation system must determine the position of the vehicle. You may have to drive for a while before precise route guidance is possible.
GPS reception Correct functioning of the navigation sys- tem depends on GPS reception, among other things. In certain situations, GPS re- ception may be impaired, there may be in- terference or no reception at all, e.g. in tunnels, in multistory parking garages or there is snow covering the trunk lid where the GPS antenna is located. If there is snow on the trunk lid it should be removed.
Route guidance after vehicle transpor- tation COMAND has to redetermine the position of the vehicle if the vehicle has been trans- ported (e.g. by ferry, by train or after tow- ing). Positioning takes place automatically even when COMAND is switched off. The dura- tion varies from one case to another. Route guidance may be restricted as fol- lows during vehicle positioning: 앫 Navigation announcements, route
guidance displays and displayed street names are not consistent with the ac- tual location of the vehicle.
앫 COMAND does not generate navigation
announcements.
앫 Instead of the route guidance displays, you see the “Off Road” display and a di- rection arrow. The direction arrow shows the compass heading to the des- tination.
153
Input restrictions
The input restrictions are imposed starting at a particular vehicle speed. The restric- tions are canceled as soon as the speed drops below a certain value. When the restriction is active, certain oper- ations or entries are not possible. You will notice this by the fact that some menu items cannot be selected or certain operations will not be possible.
Control systems COMAND navigation (introduction)
When positioning is complete, route guid- ance is once again possible using naviga- tion announcements and route guidance displays.
Interrupting the journey during route guidance The following applies if you interrupt the journey during route guidance and contin- ue the journey later: 앫 COMAND resumes route guidance au- tomatically if you continue the journey within 2 hours.
앫 Route guidance is canceled if you con-
tinue the journey after more than 2 hours. It will be necessary to resume the canceled route guidance manually (컄 page 203).
i The journey is interrupted if you park the ve- hicle and switch off COMAND. The journey is continued when you switch COMAND back on and start driving on.
Hard disk errors COMAND has an integrated hard disk on which the map software is saved. If an area of the hard disk has an error, COMAND can no longer access the map data in this area, for example, when calcu-