- 2012 Mercedes-Benz CL Class Owners Manuals
- Mercedes-Benz CL Class Owners Manuals
- 2008 Mercedes-Benz CL Class Owners Manuals
- Mercedes-Benz CL Class Owners Manuals
- 2011 Mercedes-Benz CL Class Owners Manuals
- Mercedes-Benz CL Class Owners Manuals
- 2007 Mercedes-Benz CL Class Owners Manuals
- Mercedes-Benz CL Class Owners Manuals
- 2002 Mercedes-Benz CL Class Owners Manuals
- Mercedes-Benz CL Class Owners Manuals
- 2013 Mercedes-Benz CL Class Owners Manuals
- Mercedes-Benz CL Class Owners Manuals
- 2004 Mercedes-Benz CL Class Owners Manuals
- Mercedes-Benz CL Class Owners Manuals
- 2000 Mercedes-Benz CL Class Owners Manuals
- Mercedes-Benz CL Class Owners Manuals
- 2010 Mercedes-Benz CL Class Owners Manuals
- Mercedes-Benz CL Class Owners Manuals
- 2006 Mercedes-Benz CL Class Owners Manuals
- Mercedes-Benz CL Class Owners Manuals
- 2003 Mercedes-Benz CL Class Owners Manuals
- Mercedes-Benz CL Class Owners Manuals
- 2005 Mercedes-Benz CL Class Owners Manuals
- Mercedes-Benz CL Class Owners Manuals
- 2009 Mercedes-Benz CL Class Owners Manuals
- Mercedes-Benz CL Class Owners Manuals
- 2001 Mercedes-Benz CL Class Owners Manuals
- Mercedes-Benz CL Class Owners Manuals
- Download PDF Manual
-
225
Importing data from external Bluetooth® devices
You can import vCards from external Bluetooth® devices into the address book. Please keep the following in mind: 앫 Bluetooth® is activated in COMAND (컄 page 232) and in the device con- cerned.
앫 The external device must be able to
send vCards by Bluetooth®.
앫 The external device is inside the vehi-
cle, switched on and authorized (컄 page 232).
왘 Importing: Start data transfer on the external device (see operating instruc- tions of the device concerned). If there is no address book entry with the same first name and last name, COMAND imports the data. If there is already an address book en- try with the same first name and last name, a prompt will appear asking whether the existing data should be overwritten.
왘 Select “Yes” or “No”.
The existing address book entry will be overwritten or not, depending on your selection.
Control systems COMAND address book
i There is a detailed description of how to search for an address book entry in the “Search- ing for an address book entry” section (컄 page 217). 왘 After selecting an entry, press n.
COMAND saves the data if there are fewer than four numbers assigned to the selected entry in the selected num- ber category. Otherwise, you will see a prompt asking whether one of the ex- isting numbers should be overwritten.
왘 Select “Yes” or “No”.
If you select “Yes”, a selection list will appear containing the four existing numbers.
왘 Select the number to be overwritten.
COMAND overwrites the selected num- ber with the new data.
226
Control systems COMAND system settings
왔 COMAND system settings Systems settings menu overview
i The components and operating principles of COMAND can be found on (컄 page 81).
Display (컄 page 227) Display settings
Time (컄 page 227) Time settings
Voice Control (컄 page 229) Voice Control settings
Language (컄 page 231) Language settings
Favorite (컄 page 231) Assign favorite button
Services (컄 page 232) Bluetooth® settings
Reset (컄 page 227) Reset COMAND to factory settings
Display settings
Switching the display on or off 왘 Switching off: Select “Vehicle” 씮
“Display OFF”.
왘 Switching back on: Rotate ymz or
slide qmr.
Setting the display design 왘 Select “Vehicle” 씮 “System Settings”
씮 “Display”.
왘 Select “Day Mode”, “Night Mode” or
“Automatic”.
i In the “Automatic” setting, COMAND ana- lyzes the automatic vehicle light sensor and switches between the display design automati- cally.
Time settings
Setting the time
i The correct time must be set for the follow- ing navigation system functions to operate cor- rectly: 앫 Route guidance on routes with time-depen-
dent traffic guidance
앫 Calculation of estimated arrival time 왘 Select “Vehicle” 씮 “System Settings”
씮 “Time” 씮 “Time”.
컄컄
227
Control systems COMAND system settings
컄컄
왘 Selecting hour or minute(s):
Slide omp.
왘 Setting value: Rotate ymz or
slide qmr.
왘 Saving setting: Press n.
i The increment value for setting the minutes depends on the situation. If GPS reception is available, it is 30 minutes. If GPS reception is not available, it is one minute.
228
Setting the time zone and switching be- tween Daylight Saving Time and stan- dard time
i The correct time zone and Daylight Saving Time/standard time must be set for the follow- ing navigation system functions to operate cor- rectly: 앫 Route guidance on routes with time-depen-
dent traffic guidance
앫 Calculation of estimated arrival time 왘 Setting time zone: Select “Vehicle” 씮 “System Settings” 씮 “Time” 씮 “Time Zone”. The country list appears. The dot R in front of a list entry indicates the cur- rent setting.
왘 Select the country in which you are cur-
rently driving. A time zone list may also be displayed, depending on the country selected.
왘 Select desired time zone.
Subsequent operation depends on: 앫 whether your navigation system has
GPS reception
앫 which country you have previously set You may either: 앫 manually switch between “Daylight
Savings Time (Summer)” and “Standard time (Winter)” in a list
or 앫 switch automatic Daylight Saving Time to standard time changeover (and vice versa) on or off
왘 Switching manually: Select “Daylight Savings Time (Summer)” or “Standard time (Winter)”. The dot R in front of a list entry indi- cates the current setting.
왘 Switching automatic changeover on or off: Select “Automatic Daylight Sav- ings Time”. You have switched the function on or off. A checkmark appears when the function is switched on.
왘 Saving setting and exit the menu:
Slide omp.
i If you have switched off the automatic changeover function, you must change Daylight Saving Time to standard time and vice versa yourself.
Setting the date 왘 Select “Vehicle” 씮 “System Settings”
씮 “Time” 씮 “Date”.
왘 Selecting month, day or year:
Slide omp.
왘 Setting value: Rotate ymz or
slide qmr.
왘 Saving setting: Press n.
Setting the time/date format 왘 Select “Vehicle” 씮 “System Settings”
씮 “Time” 씮 “Format”. The format list appears. The dots R in front of the list entries indicate the cur- rent setting.
왘 Changing format setting:
Select desired format.
왘 Saving setting and exit the menu:
Slide omp.
Control systems COMAND system settings
Voice Control settings
Switching help window on or off 왘 Select “Vehicle”씮 “System Settings”
씮 “Voice Control”.
왘 Select “Help Window”.
You can switch the help window on or off. A checkmark appears when the help window is switched on.
Individualization Using individualization, you can fine-tune Voice Control to your own voice and thus improve voice recognition. The ability of the system to recognize the commands of other users does not deteriorate as a re- sult. Individualization consists of two parts. You train the system to recognize digits in the first part and specific commands in the second part.
229
Deleting existing individualization data 왘 Select “Vehicle” 씮 “System Settings” 씮 “Voice Control” 씮 “Delete individu- alization”. A prompt appears asking whether you really do want to delete.
왘 Select “Yes” or “No”.
The individualization data will either be deleted or not, depending on your se- lection.
Control systems COMAND system settings
Starting new individualization
왘 Select “Yes” or “No”.
i It is only possible to start individualization with the vehicle stationary. After starting the session, the system will guide you through the in- dividualization by means of acoustic instruc- tions. 왘 Select “Vehicle” 씮 “System Settings” 씮 “Voice Control” 씮 “Start new indi- vidualization”. A prompt appears asking whether you would like further information.
왘 Select “Yes” or “No”.
If you select “No”, the first part of indi- vidualization begins. If you select “Yes”, an information dis- play will be shown with audio instruc- tion. 왘 Closing display: Select “OK”.
The first part of individualization be- gins.
At the end of the first part, you will see a prompt asking whether you want to begin the second part.
230
If you select “No”, individualization will be canceled. The data from the first part is saved automatically. If you select “Yes”, the second part be- gins.
Individualization is completed at the end of the second part. You will see a message to this effect. The data from the second part is saved automatically.
Canceling during the first or second part of individualization 왘 Select “Cancel”.
A prompt appears asking whether you really do want to cancel.
왘 Select “Yes” or “No”.
If you select “Yes”, individualization will be canceled. The data from the part at which you exited is not saved. If you select “No”, the part at which you stopped begins again.
Setting the system language
Assigning the favorite button
왘 Select “Vehicle” 씮 “System Settings”
씮 “Language”. The language list appears. A dot R in- dicates the current setting.
왘 Changing setting: Select desired lan-
guage. The language is set.
1 Favorite button You can assign the following predefined functions to the favorite button P: 앫 “Rear Window Sunshade” (컄 page 242) You can use the favorite button to ex- tend or retract the rear window sun- shade. This is the default setting.
앫 “Display OFF” (컄 page 227)
You can use the favorite button to switch the COMAND display on or off.
앫 “Tow-away Alarm” (컄 page 78)
Control systems COMAND system settings
You can use the favorite button to acti- vate or deactivate the tow-away alarm (Depending on production date, your vehicle may not be equipped with the tow-away alarm).
앫 “Repeat Navigation Command”
(컄 page 202) You can use the favorite button to re- call the last announcement issued by the navigation system.
왘 Select “Vehicle” 씮 “System Settings”
씮 “Favorite”.
The list of predefined functions appears. The dot R in front of the list entry indi- cates the current setting. 왘 Changing setting: Rotate ymz and
select desired function.
왘 Saving setting and exit the menu:
Press n.
231
Control systems COMAND system settings
Bluetooth® settings
Connecting Bluetooth® devices
i To connect a Bluetooth® device, the Bluetooth® function must be activated in COMAND and in the device concerned. The Bluetooth® device must also be set to “visible” or “findable” in order for COMAND to find and display it. For the setting procedures, please see the operating instructions for the Bluetooth® device.
It is possible to establish a Bluetooth® con- nection between COMAND and the follow- ing types of device: 앫 Mobile phone (only for transferring
business cards)
앫 Headset 앫 Laptop/PDA You can connect up to twelve devices to COMAND but only one device can be ac- tive at a time. The connection process includes search- ing for the device and its subsequent au- thorization.
General information about Bluetooth® Bluetooth® technology is the standard for short-range wireless technologies, suitable for transmitting voice and data. It is possi- ble to connect Bluetooth® devices wire- lessly. Bluetooth® can be used to exchange vCards or make calls using a headset. Bluetooth® technology uses the freely available ISM (Industrial Scientific Medi- cal) wireless network that works at 2.45 GHz. Ranges of up to ten meters are possible with Bluetooth®.
Activate or deactivate Bluetooth® 왘 Select “Vehicle” 씮 “System Settings”
씮 “Services” 씮 “Deactivate Blue- tooth”. You have activated or deactivated Bluetooth®. A checkmark appears when Bluetooth® is deactivated.
232
Calling up the Bluetooth® device list and searching for devices 왘 Calling up the list: Select “Vehicle” 씮
“System Settings” 씮 “Services” 씮 “Search for Bluetooth devices”. When you call up the list for the first time after switching on COMAND, the search for devices in the reception range starts automatically. You will see a display to this effect. The device list appears after a short while. 왘 Canceling search:
Select “Cancel”.
The second time you call up the list, and each time thereafter, the device list ap- pears immediately if COMAND has not been switched off and on again in the meantime. 왘 Starting search manually:
select “Update”.
Control systems COMAND system settings
i If the device list already contains twelve au- thorized devices, you must revoke authorization for one of the authorized devices. Then you must switch this device off and then restart the search. Any new devices for which you would like to search will otherwise not appear in the list.
Displaying details of a Bluetooth® de- vice 왘 Call up Bluetooth® device list
(컄 page 232).
왘 Select desired device. 왘 Select “Details”.
The detailed display for this device ap- pears.
왘 Closing detailed display: Slide qmr
or press n.
Authorizing a Bluetooth® device 왘 Call up Bluetooth® device list
(컄 page 232).
왘 Select unauthorized device. 왘 Select “Authorize”.
The input menu for the passkey ap- pears.
i The passkey is any one to sixteen-digit num- ber which you can set yourself. You must enter the same number in COMAND and also in the de- vice to be authorized.
i On devices which do not have an input key- pad (e.g. headsets), the passkey is predeter- mined. In this case, it is not necessary to enter the number on the device itself. You will usually find the passkey in the operating instructions for the device.
컄컄
The device list can contain the following devices: 앫 All detected devices, whether autho-
rized or not.
앫 All authorized devices, whether detect-
ed or not.
1 Authorized and detected device – de-
vice and padlock symbol are the same color
2 Device which was not detected, but
which has been authorized in the past – device and padlock symbol are differ- ent colors (the device may be switched off or not in the vehicle, for example)
3 Newly detected device - not yet autho-
rized (no symbol)
233
Control systems COMAND system settings
컄컄
왘 Entering passkey into COMAND:
Select the digits one by one.
왘 Deleting digits: Select ) and briefly
De-authorizing a Bluetooth® device 왘 Call up Bluetooth® device list
(컄 page 232).
press n.
왘 Canceling entry into COMAND:
Select “Back”.
왘 Confirming entry into COMAND:
Select ?.
왘 If necessary, enter the same passkey into the Bluetooth® device (see the op- erating instructions for the device). The device is authorized.
왘 Select authorized device. 왘 Select “De-authorize”.
A prompt appears asking whether you really want to de-authorize this device.
왘 Select “Yes” or “No”.
If you select “Yes”, the device will be de-authorized.
i If you de-authorize a device which has been authorized in the past and which is not detected in the search, this device will no longer be dis- played in the device list. Devices which have been authorized in the past but which are not detected in the search are ei- ther not switched on or not in the vehicle.
Reset
i You can reset COMAND back to its factory settings. In this case, all personal data (e.g. address book entries, entries in the destination memory and the list of last destinations of the navigation sys- tem), among other things, is deleted. 왘 Select “Vehicle” 씮 “System Settings”
씮 “Reset”. A prompt appears asking whether you really want to reset. 왘 Select “Yes” or “No”.
If you select “Yes” another prompt will appear asking whether you really want to reset.
왘 Select “Yes” or “No”.
If you select “Yes”, COMAND will be re- set and restarted.
234
왔 COMAND vehicle menu In this menu, you can program the follow- ing vehicle functions:
Function Exterior Lighting Delayed Switch-off Locator Lighting Exterior Mirror Convenience Settings Automatic Locking Easy Entry/Exit Feature Interior Ambient Light Interior Lighting Delayed Switch-off Rear-window Sunshade Trunk Opening-height Restriction* Tow-away Alarm
Page 235
236
237238
239
240
241242
242
243Control systems COMAND vehicle menu
Setting night security illumination
왘 Selecting “Exterior Lighting Delayed
(Exterior Lighting Delayed Switch-off)
i The components and operating principles of COMAND can be found on (컄 page 81). Use this function to set whether and how long you would like the exterior lighting to illuminate during darkness after exiting the vehicle and both doors closed. The exterior lighting automatically goes out after the delayed switch-off time has expired. You can select: 앫 “0 sec.”, the delayed switch-off feature
is deactivated
앫 “15 sec.”, “30 sec.”, “45 sec.”, or
“60 sec.”, the delayed switch-off fea- ture is activated
i You can reactivate this function within 10 minutes by opening a door. 왘 Select “Vehicle”.
The main area is active.
Switch-off” menu: Slide omp or rotate ymz.
왘 Confirming selection: Press n.
왘 Selecting length of time: Slide qmr
or rotate ymz.
왘 Confirming selection: Press n. or 왘 Select “Vehicle” 씮 “Vehicle” 씮 “Exte-
rior Lighting Delayed Switch-off”. A selection list appears. The current setting is indicated by a dot R.
컄컄
235
Control systems COMAND vehicle menu
컄컄
Locator lighting on/off
왘 Select “Vehicle”.
i The components and operating principles of COMAND can be found on (컄 page 81). With the locator lighting feature activated and the exterior lamp switch in position *(컄 page 363), the following lamps will switch on during darkness when the vehi- cle is unlocked from the outside: 앫 Parking lamps 앫 Tail lamps 앫 License plate lamps 앫 Front fog lamps 앫 Door entry lamps in the mirror 앫 Side marker lamps The locator lighting switches off when the driver’s door is opened. If you do not open a door after unlocking the vehicle with the SmartKey, the lamps will switch off automatically after approxi- mately 40 seconds.
The main area is active.
왘 Selecting “Locator Lighting” func-
tion: Slide omp or rotate ymz. 왘 Confirming selection: Press n.
왘 Switching locator lighting on or off:
Press n.
or 왘 Select “Vehicle” 씮 “Vehicle” 씮 “Loca-
tor Lighting”. A checkmark appears when the locator lighting is switched on.
왘 Selecting length of time: Slide qmr
or rotate ymz.
왘 Confirming selection: Press n. To activate night security illumination: 왘 Select delayed switch-off period (see
above).
왘 Turn the exterior lamp switch to
position * before turning off the en- gine.
236
왘 Confirming selection: Press n. To activate locator lighting: 왘 Make sure the function “Locator Light-
ing” is set.
왘 Turn the exterior lamp switch to
position * when exiting the vehicle.
Exterior mirror convenience settings
i The components and operating principles of COMAND can be found on (컄 page 81). In the “Exterior Mirror Convenience Set- tings” menu, you can switch the following exterior mirror functions on or off: 앫 Exterior mirrors automatically fold in
when the vehicle is locked
앫 Exterior mirror on front passenger’s
side automatically tilts downward when the vehicle is reversing
왘 Select “Vehicle”.
The main area is active.
왘 Selecting “Exterior Mirror Conve-
nience Settings” menu: Slide omp or rotate ymz.
왘 Confirming selection: Press n.
Control systems COMAND vehicle menu
왘 Selecting “Fold in automatically when locking” or “Lower mirror when reversing”: Rotate ymz. 왘 Confirming selection: Press n. 왘 Slide omp to exit. or 왘 Select “Vehicle” 씮 “Vehicle” 씮 “Exte-
rior mirror Convenience Settings”. A selection list appears.
컄컄
237
Control systems COMAND vehicle menu
컄컄
Automatic locking on/off
왘 Switching automatic locking on or
왘 Selecting a function: Slide qmr or
rotate ymz. A checkmark appears in the corre- sponding box when the option has been selected.
왘 Confirming selection: Press n. 왘 Slide omp to exit.
i The components and operating principles of COMAND can be found on (컄 page 81). Use this function to activate or deactivate the automatic central locking (컄 page 334). With the automatic central locking system activated, the vehicle is centrally locked at vehicle speeds of ap- proximately 9 mph (15 km/h). 왘 Select “Vehicle”.
The main area is active.
왘 Selecting “Automatic Locking” func-
tion: Slide omp or rotate ymz.
off: Press n.
or 왘 Select “Vehicle” 씮 “Vehicle” 씮 “Auto-
matic Locking”. A checkmark appears when automatic locking is switched on.
왘 Confirming selection: Press n. 왘 Slide omp to exit.
238
Activating easy-entry/exit feature
i The components and operating principles of COMAND can be found on (컄 page 81). Use this function to activate and deacti- vate the easy-entry/exit feature (컄 page 344). The following settings are available for the easy-entry/exit feature:
OFF
Steering Column & Seat
The easy-entry/exit feature is deactivated. Both the steering col- umn and the driver’s seat are moved.
Control systems COMAND vehicle menu
Warning!
왘 Select “Vehicle”.
The main area is active.
You must make sure no one can become trapped or injured by the moving steering wheel and driver’s seat when the easy-en- try/exit feature is activated.
To stop seat/steering wheel movement, do one of the following: 앫 Press seat adjustment switch
(컄 page 340).
앫 Move steering wheel adjustment stalk
(컄 page 351).
앫 Press one of the memory position but-
tons or the memory button M (컄 page 358).
Do not leave children unattended in the ve- hicle, or with access to an unlocked vehicle. Children could open the driver’s door and unintentionally activate the easy-entry/exit feature, which could result in an accident and/or serious personal injury.
왘 Selecting “Easy Entry/Exit Feature”
menu: Slide omp or rotate ymz.
왘 Confirming selection: Press n. or 왘 Select “Vehicle” 씮 “Vehicle” 씮 “Easy
Entry/Exit Feature”.
컄컄
239
Control systems COMAND vehicle menu
컄컄
왘 Confirming selection: Press n.
Setting interior ambient lighting
A selection list appears. The current setting is indicated by a dot R.
왘 Selecting a setting: Slide qmr or
rotate ymz.
왘 Confirming selection: Press n.
i The components and operating principles of COMAND can be found on (컄 page 81). You can adjust the brightness of the interi- or lighting on a scale of “0” (off) to “5” (bright). 왘 Select “Vehicle”.
The main area is active.
왘 Selecting “Interior Ambient Light”
menu: Slide omp or rotate ymz. 왘 Confirming selection: Press n.
왘 Confirming selection: Press n. or 왘 Select “Vehicle” 씮 “Vehicle” 씮 “Interi-
or Ambient Light”.
왘 Adjusting brightness: Slide qmr or
rotate ymz.
왘 Confirming selection: Press n.
왘 Adjusting brightness: Slide omp or
rotate ymz.
240
Control systems COMAND vehicle menu
왘 Confirming selection: Press n.
왘 Select “Vehicle” 씮 “Vehicle” 씮 “Interi-
A selection list appears. The current setting is indicated by a dot R.
or Lighting Delayed Switch-off”. A selection list appears. The current setting is indicated by a dot R.
왘 Selecting length of time: Slide qmr
or rotate ymz.
왘 Confirming selection: Press n. or
왘 Selecting length of time: Slide qmr
or rotate ymz.
왘 Confirming selection: Press n.
Setting interior lighting delayed switch-off
i The components and operating principles of COMAND can be found on (컄 page 81). Use this function to set whether and how long you would like the interior lighting to remain lit during darkness after you have removed the SmartKey from the starter switch. You can select: 앫 “0 sec.”, the delayed switch-off feature
is deactivated
앫 “15 sec.”, “30 sec.”, “45 sec.”, or
“60 sec.”, the delayed switch-off fea- ture is activated 왘 Select “Vehicle”.
The main area is active.
왘 Selecting “Interior Lighting Delayed
Switch-off” menu: Slide omp or rotate ymz.
241
Control systems COMAND vehicle menu
Extending or retracting rear window sunshade
i The components and operating principles of COMAND can be found on (컄 page 81). This function is used to extend or retract the rear sunshade.
i You can program this function using the fa- vorite button (컄 page 231).
i At temperatures below -4°F (-20°C), the rear window sunshade is switched off. 왘 Select “Vehicle”.
The main area is active.
왘 Selecting “Rear-window Sunshade” function: Slide omp or rotate ymz.
242
Trunk opening-height restriction* on/off
i The components and operating principles of COMAND can be found on (컄 page 81). You can select whether the trunk lid should open fully or only to the height of the roof. 왘 Select “Vehicle”.
The main area is active.
왘 Selecting “Trunk Opening-height Re-
striction” function: Slide omp or rotate ymz.
왘 Extending or retracting rear window
sunshade: Press n.
or 왘 Select “Vehicle” 씮 “Vehicle” 씮
“Rear-window Sunshade”.
왘 Confirming selection: Press n.
왘 Confirming selection: Press n. or 왘 Select “Vehicle” 씮 “Vehicle” 씮 “Trunk
Opening-height Restriction”. A checkmark appears when the trunk opening-height restriction is switched on.
왘 Confirming selection: Press n.
Switching the tow-away alarm on/off
Depending on vehicle production date, your vehicle may not be equipped with the tow-away alarm.
i The components and operating principles of COMAND can be found on (컄 page 81).
i You can program the tow-away alarm func- tion (컄 page 231) using the favorite button in the center console. When you press the favorite button, you can switch the functions on or off.
To prevent triggering the tow-away alarm feature (컄 page 78), switch off the tow-away alarm before towing the vehicle, or when parking on a surface subject to movement, such as a ferry or auto train. 왘 Select “Vehicle”.
The main area is active.
왘 Selecting “Tow-away Alarm” func-
tion: Slide omp or rotate ymz. 왘 Confirming selection: Press n.
Control systems COMAND vehicle menu
or 왘 Select “Vehicle” 씮 “Vehicle” 씮
“Tow-away Alarm”. A checkmark appears when the tow-away alarm is switched on.
왘 Confirming selection: Press n.
243
Control systems COMAND automatic climate control
i The components and operating principles of COMAND can be found on (컄 page 81).
Warning!
The following automatic climate control functions can be operated via COMAND:
Warning!
When operating the automatic climate con- trol, the air that enters the passenger com- partment through the air vents can be very hot or very cold (depending on the set tem- perature). This may cause burns or frostbite to unprotected skin in the immediate area of the air vents.
Always keep sufficient distance between un- protected parts of the body and the air vents. If necessary, use the air distribution adjustment (컄 page 246) to direct the air to air vents in the vehicle interior that are not in the immediate area of unprotected skin.
Follow the recommended settings for heat- ing and cooling given on the following pages and pages in the “Controls in detail” part (컄 page 453) Otherwise the windows could fog up, impairing visibility and endangering you and others.
You can operate the automatic climate control via COMAND or via the buttons on the automatic climate control panel (컄 page 453). Some of the special climate control func- tions can only be set via COMAND.
Function Temperature Air distribution Air volume Switching off cooling (“AC OFF”) Central climate control (“Mono”) Footwell temperature Air flow from air vents
Page 245
246
246
247
248
249
249244
Control systems COMAND automatic climate control
Setting temperature
왘 Changing temperature: Slide qmr or
Use the temperature controls %$ (컄 page 453) in the center console or COMAND climate control settings to sepa- rately adjust the air temperature on each side of the passenger compartment. 왘 Select climate control settings 씮 Tem-
perature, left or right and then press n.
rotate ymz.
왘 Exiting menu: Press n, back
button L in the center console (컄 page 82) or slide omp. The setting is saved.
The automatic climate control menu is called up via the climate control settings.
Climate control settings with functions (submenus) 1 Temperature, left 2 Air distribution, left 3 Air volume, left 4 Central menu, climate control 5 Air volume, right 6 Air distribution, right 7 Temperature, right
245
Control systems COMAND automatic climate control
Adjusting air distribution
You can adjust the air distribution sepa- rately for the driver’s and front passenger’s side.
i When you change the air distribution, the au- tomatic function of the climate control system is switched off. 왘 Select climate control settings 씮 Air
distribution, left or right.
왘 Changing air distribution:
Rotate ymz. The symbol for air distribution changes. The direction and size of the arrows represent the air distribution. 왘 Exiting menu: Press n, back
button L in the center console (컄 page 82) or slide omp. The setting is saved.
Adjusting air volume
Use buttons Q (컄 page 453) in the cen- ter console or COMAND climate control settings to separately adjust the air vol- ume on each side of the passenger com- partment.
i When you change the air volume, the auto- matic function of the climate control system is switched off. 왘 Select climate control settings 씮 Air
volume, left or right.
246
왘 Changing air volume: Slide qmr or
rotate ymz.
Central climate control menu via COMAND
Control systems COMAND automatic climate control
왘 Exiting menu: Press n, back
button L in the center console (컄 page 82) or slide omp. The setting is saved.
The central climate control menu is in the center of the climate control settings. When the automatic climate control is switched on, you will see “on” in the cen- tral menu. The following functions can only be operated in the central climate control menu via COMAND:
Function Switching off cooling (“AC OFF”) Central climate control (“Mono”) Footwell temperature Air flow from air vents
Page 247
248
249
249왘 Select climate control settings 씮 Cen-
tral menu.
Switching cooling on or off The cooling function, only operational when the engine is running, cools the vehi- cle interior down to the selected tempera- ture. The cooling function also dehumidifies the air in the vehicle interior, thus preventing the windows from fogging up.
i Condensation may drip out from underneath the vehicle. This is normal and not an indication of a malfunction.
The “AC OFF” function is used to permanent- ly switch off the cooling function of the au- tomatic climate control system.
247
Control systems COMAND automatic climate control
Warning!
“AC OFF” appears in the central menu of the climate control settings.
If you turn off the cooling function, the vehicle will not be cooled when weather conditions are warm. The windows can fog up more quickly. Window fogging may impair visibility and endanger you and others.
왘 Select climate control settings 씮 Cen-
tral climate control menu.
왘 Selecting “ACOFF”: Slide qmr or
rotate ymz.
왘 Confirming selection: Press n.
A checkmark appears when the cooling is switched off.
! If the air conditioning cannot be turned on again, this indicates that the air conditioning is losing refrigerant. The compressor has turned it- self off. Have the air conditioning checked at the nearest authorized Mercedes-Benz Center.
Selecting “Mono” mode “Mono” is used to adjust the climate zones for the entire vehicle at the same time. When the “Mono” function is switched on and you change the climate on the driver’s side, these changes will be carried out in the same manner for all climate zones. 왘 Select climate control settings 씮 Cen-
tral climate control menu.
왘 Selecting “Mono”: Slide qmr or
rotate ymz.
왘 Confirming selection: Press n.
A checkmark appears when the func- tion has been selected.
248
왘 Exiting menu: Press back button L
in the center console (컄 page 82) or slide omp.
The “Mono” function is automatically switched off when you: 앫 change an automatic climate control setting for the front passenger’s side using COMAND
앫 operate a button from the automatic climate control for the front passen- ger’s side
앫 operate one of the buttons for the rear
climate control system
Control systems COMAND automatic climate control
Adjusting footwell temperature
왘 Changing temperature difference:
i In automatic mode, this setting optimizes the footwell temperature when outside tempera- tures are low.
The “Footwell Temperature” function is used to adjust the temperature difference between the footwell and the rest of the passenger compartment. The higher the selected value, the higher the temperature in the footwell will be. 왘 Select climate control settings 씮 Cen-
tral climate control menu.
왘 Selecting “Footwell Temperature”: Slide qmr or rotate ymz and then press n.
Slide qmr or rotate ymz.
왘 Exiting menu: Press n, back
button L in the center console (컄 page 82) or slide omp. The setting is saved.
Adjusting air flow from air vents
i In automatic mode, this setting optimizes the air flow when outside temperatures are high.
The “Airflow” setting defines air distribu- tion and air volume in automatic mode: 앫 “Focused” (default setting, increased
air flow)
앫 “Medium” (reduced air flow) 앫 “Diffuse” (minimal air flow)
i When the interior ambient temperature of the vehicle is very hot and the automatic climate control is cooling the interior, the setting for air flow is temporarily overridden. 왘 Select climate control settings 씮 Cen- tral climate control menu 씮 “Airflow”.
A selection list appears. The current setting is indicated by a dot R.
왘 Changing air flow: Slide qmr or
rotate ymz.
왘 Confirming selection: Press n.
249
Control systems COMAND seats
When adjusting the seats, observe the safety notes in the section “Seats” (컄 page 339).
Selecting a seat You must first select the seat for which you would like to make adjustments.
Operating seats via COMAND
i The components and operating principles of COMAND can be found on (컄 page 81). The following seat adjustments can be made via COMAND:
Settings Lumbar support (CL 550) Drive-dynamic multicontour seats*
Page 251
252250
Example illustration (vehicles with Drive-dy- namic multicontour seat*) 왘 Selecting seat: Slide omp or
rotate ymz.
왘 Confirming selection: Press n.
1 Seat menu button 왘 Press O.
The main area is active.
왘 Switching to the bottom menu line:
Slide qmr.
Exiting menu There are several ways to exit the seat menu. 왘 Press O again. or 왘 Press any shortcut button. or 왘 Select another main function from the
main menu line.
Lumbar support (CL 550)
To support the spine, you can adjust the curvature of the front seat backrests. 왘 Press O.
The main area of the COMAND display is active. A scale appears.
Control systems COMAND seats
왘 Select seat (컄 page 250). 왘 Adjusting lumbar support:
Slide omp or rotate ymz until desired setting is reached.
왘 Confirming selection: Press n. 왘 Switching to the bottom menu line:
Slide omp.
왘 Confirming selection: Press n.
i After you have pressed O, the seat last adjusted is active.
1 Scale 2 Cursor 3 Current seat 4 Current setting
251
Control systems COMAND seats
Drive-dynamic multicontour seats*
i If PRE-SAFE® has been activated, the air pressure in the air chambers (on the sides of the seat cushion and backrest) of the drive-dynamic multicontour seats is increased.
Drive-dynamic multicontour seats allow several individual support adjustments and can automatically adjust lateral support to your driving style (컄 page 255).
i Whether adjustments are being made manu- ally or automatically, noises may be heard from air pumping into or releasing from the air chambers.
Multicontour adjustments To support the spine, you can individually adjust the backrest contour of the front seats by regulating the air pressure in the air chambers. The settings are made on the COMAND display. You can adjust the following air chambers: 앫 sides of seat cushion 앫 sides of backrest 앫 backrest curvature in lumbar area 앫 backrest curvature in shoulder area
Adjusting sides of seat cushion This function is used to adjust the air chambers in the sides of the seat cushion. 왘 Select seat (컄 page 250). 왘 Selecting “Seat sides”: Slide omp or
rotate ymz.
왘 Confirming selection: Press n.
A scale appears.
252
1 Scale 2 Cursor 3 Current setting 왘 Slide qmr or rotate ymz until desired
setting is reached.
왘 Saving setting: Press n.
Adjusting backrest sides This function is used to adjust the air chambers in the backrest sides. 왘 Select seat (컄 page 250). 왘 Selecting “Seatback Sides”:
Slide qmr or rotate ymz.
왘 Confirming selection: Press n.
A scale appears.
왘 Slide qmr or rotate ymz until desired
setting is reached.
왘 Saving setting: Press n.
Control systems COMAND seats
Adjusting backrest curvature in lumbar area This function is used to adjust the air chambers in the lumbar area of the back- rest. 왘 Select seat (컄 page 250). 왘 Selecting “Lumbar”: Slide omp or
rotate ymz.
왘 Confirming selection: Press n.
Cross-hairs appear. You can use them to make two settings: 앫 vertical: shift the point of greatest
curvature upward or downward
앫 horizontal: adjust the degree of
curvature
컄컄
253
Control systems COMAND seats
컄컄
Adjusting backrest curvature in shoul- der area This function is used to adjust the air chambers in the shoulder area of the back- rest. 왘 Select seat (컄 page 250). 왘 Selecting “Shoulders”: Slide omp or
rotate ymz.
왘 Slide qmr or omp until desired setting
왘 Confirming selection: Press n.
왘 Slide qmr or rotate ymz until desired
is reached.
왘 Saving setting: Press n.
A scale appears.
setting is reached.
왘 Saving setting: Press n.
254
Drive-dynamic function The Drive-dynamic multicontour seat elec- tronically controls the air pressure in the air chambers of the backrest side bolsters. This function improves driving comfort and pleasure. 왘 Select seat (컄 page 250). 왘 Selecting “Driv. dyn. seat”:
Slide omp or rotate ymz.
왘 Confirming selection: Press n.
A scale appears. You can choose be- tween: 앫 “0”: off 앫 “1”: level 1
앫 “2”: level 2Control systems COMAND seats
왘 Slide qmr or rotate ymz until desired
setting is reached.
The current setting is indicated by a solid circle.
왘 Saving setting: Press n.
왘 Slide qmr or rotate ymz until desired
setting is reached.
왘 Saving setting: Press n.
i Depending on the setting, the massage function runs for about 7 to 10 minutes.
Pulse mode 왘 Select seat (컄 page 250). 왘 Selecting “Pulse Mode”: Slide omp
or rotate ymz.
왘 Confirming selection: Press n. A list appears. You can choose be- tween different types of massage:
255
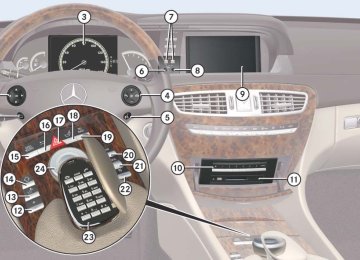
Control systems Instrument cluster control system
The control system is activated as soon as the SmartKey in the starter switch is turned to position 2 or as soon as the KEYLESS-GO* start/stop button (컄 page 337) is in position 2. The control system enables you to: 앫 call up information about your vehicle 앫 change vehicle settings For example, you can use the control sys- tem to find out when your vehicle is next due for service, to call up statistical data on your vehicle, and much more.
Warning!
Multifunction display
A driver’s attention to the road and traffic conditions must always be his/her primary focus when driving.
For your safety and the safety of others, se- lecting features through the multifunction steering wheel should only be done by the driver when traffic and road conditions per- mit it to be done safely.
Bear in mind that at a speed of just 30 mph (approximately 50 km/h), your vehicle is covering a distance of 44 feet (approximate- ly 14 m) every second.
The control system relays information to the multifunction display.
1 Line for main menus 2 Text field in multifunction display Settings, functions, submenus as well as any malfunctions are shown to you in the text field.
256
Multifunction steering wheel
The displays in the multifunction display and the settings in the control system are controlled using the buttons on the multi- function steering wheel.
1 Multifunction display 2 s to take a call
to dial to redial
t to end a call
to reject an incoming call
æ to increase volume ç to decrease volume F to mute
3 ! to accept a call
to activate Voice Control
4 L back/to cancel Voice Control 5 $ to scroll up
% to scroll down & to scroll to the right ( to scroll to the left # to confirm selection
The information available in the multifunc- tion display is arranged in menus, each containing a number of functions or sub- menus. For example, in the “Settings”
Control systems Instrument cluster control system
menu, you will find functions for making settings to your vehicle. There are func- tions for calling up information and for making settings to your vehicle. It is helpful to think of the menus as being arranged in a circular pattern: 왘 Press & or ( repeatedly to
switch menus.
The number of menus available in the sys- tem depends on which optional equipment is installed in your vehicle. 왘 Press button L to return to the next
highest menu level.
From a menu’s highest level, you will al- ways see the screen from the “Trip” menu that was last active. When you press L again, you switch to the standard display (컄 page 260). For information about warning and mal- function messages appearing in the multi- function display (컄 page 580).
257
Control systems Instrument cluster control system
Menus
Navi (컄 page 261) Showing route guidance in- structions, current direction traveled
Audio (컄 page 263) Selecting radio station
Telephone* (컄 page 265) Dialing a number from the phone book
Selecting satellite radio chan- nel (USA only) Operating DVD changer/ audio CD/ audio DVD/MP3
Redialing
Answering a call
Ending a call or rejecting an in- coming call
Trip (컄 page 260) Standard display
Fuel consumption statistics since start Fuel consumption statistics since the last reset Resetting fuel consumption statistics Distance to empty Digital speedometer
258
Control systems Instrument cluster control system
Assistance* (컄 page 268) Displaying the distance graphic*, DISTRONIC Plus*
Activating/deactivating PRE-SAFE® Brake* (vehicles with DISTRONIC Plus* only) Switching on the Dynamic Rear View Monitor* automatically
Service (컄 page 269) Calling up vehicle malfunction, warning and system status messages stored in memory Checking tire inflation pressure
Settings (컄 page 271) Setting daytime running lamp mode (USA only)
Switching additional speedometer on or off
Calling up maintenance service display
Switching radar sensors* on or off (USA only)
Checking engine oil level (CL 600)
259
Control systems Instrument cluster control system
Trip menu
i The menu overview can be found on (컄 page 258). In the “Trip” menu, you can show an addi- tional display for the speedometer and call up or reset your vehicle’s statistical data.
Standard display In the standard display, the trip odometer and main odometer are shown in the multifunction display. 왘 Press ( or & to select the “Trip”
menu.
1 Main odometer 2 Trip odometer
260
Fuel consumption statistics since start 왘 Press ( or & to select the “Trip”
menu.
Fuel consumption statistics since last reset 왘 Press ( or & to select the “Trip”
왘 Press % to select “After start”.
menu.
왘 Press % or $ to select “After re-
set”.
1 Distance driven since start 2 Time elapsed since start 3 Average speed since start 4 Average fuel consumption since start
i All values that are based on the last start are reset when you turn off the vehicle’s engine for more than four hours (컄 page 387).
i If you turn the SmartKey to position 1 or 2 again during this time, the values will not be re- set. After 999 hours or 9999 miles (kilometers), the fuel consumption statistics after start are au- tomatically reset.
1 Distance driven since last reset 2 Time elapsed since last reset 3 Average fuel consumption since last re-
set
4 Average speed since last reset
i After 9999 hours or 99,999 miles (kilome- ters), the fuel consumption statistics since last reset are automatically reset.
Control systems Instrument cluster control system
Resetting fuel consumption statistics 왘 Press ( or & to select the “Trip”
Distance to empty 왘 Press ( or & to select the “Trip”
menu.
menu.
왘 Press % or $ to select the func-
tion you wish to reset.
왘 Press #.
왘 Press % or $ to select “Range”. The calculated remaining driving range based on the current fuel tank level ap- pears in the multifunction display.
Navi menu
i The menu overview can be found on (컄 page 258). The display in the “Navi” menu depends on whether route guidance is active or not. 왘 Press ( or & to select the “Navi”
menu.
Illustration: Reset trip odometer 왘 Press % to select “Yes” and confirm
with #.
i You can reset the trip odometer by pressing and holding the L button. The trip odometer is then reset without confirmation.
Digital speedometer 왘 Press ( or & to select the “Trip”
menu.
왘 Press % or $ to select the digital
speedometer.
Route guidance not active The multifunction display shows the direc- tion of travel and the name of the street you are currently driving on, if known by the navigation system.
1 Digital speedometer
1 Direction of travel 2 Street you are currently driving on
261
Control systems Instrument cluster control system
Route guidance active The image on the multifunction display de- pends on whether you are being notified of a driving maneuver.
No notification of driving maneuver
Example illustration 1 Distance to destination 2 Symbol for “follow the course of the
road”
3 Distance to next driving maneuver 4 Street you are currently driving on
262
Notification of driving maneuver with- out lane recommendation
Example illustration 1 Street into which the driving maneuver
leads
2 Symbol for “driving maneuver” 3 Distance to driving maneuver and visu-
al distance display
When you are being notified of a driving maneuver, you will see a visual distance display 3 next to the driving maneuver symbol. The visual distance display is re- duced from bottom to top the closer you come to the announced driving maneuver.
Navigation status displays in the instru- ment cluster While route guidance is active, the follow- ing messages may be shown on the multi- function display: 앫 <
You have reached your destination.
앫 “Area of dest. reached”
You have arrived in the area of your destination. The message appears, for example, for relatively large POIs.
앫 “New Route…”
COMAND calculates a new route, e.g. because you have deviated from the calculated route or due to a detour re- port. Afterward, COMAND continues route guidance.
앫 “Calculating Route”
Audio menu
i The menu overview can be found on (컄 page 258). The functions in the “Audio” menu operate the audio equipment which you currently have turned on. If no audio equipment is currently turned on, the message: “Audio off” is shown in the multifunction display.
COMAND is calculating a route. After- ward, COMAND starts route guidance.
앫 “Off Map”
The vehicle’s location is outside of the digital map’s range. The vehicle is in an off-map position (컄 page 201).
앫 “Off Road”
The vehicle is either on a road that has not been digitized (컄 page 201) or on the side of a road, e.g. in a parking space.
앫 “No Route”
COMAND cannot calculate a route to the selected destination.
앫 “Direction of Dest.”
The vehicle has gone off the map dur- ing route guidance (컄 page 201).
Control systems Instrument cluster control system
Selecting radio station 왘 Turn on COMAND and select “Radio”
(컄 page 95).
왘 Press ( or & to select the
“Audio” menu.
왘 Press % or $ to select a station.
1 Station frequency 2 Waveband 왘 Press æ or ç to adjust the vol-
ume.
i You can only change the frequency band and save new stations using COMAND (컄 page 95).
263
Control systems Instrument cluster control system
Selecting satellite radio channel (USA only) The satellite radio is treated as a radio ap- plication. 왘 Turn on COMAND and select
“Sat Radio” (컄 page 100).
왘 Press ( or & to select the
“Audio” menu.
왘 Press % or $ to select a station.
1 Channel number and/or name 2 SAT mode 왘 Press æ or ç to adjust the
volume.
264
i A subscription to SIRIUS satellite radio ser- vice provider is required for the satellite radio op- eration. Contact an authorized Mercedes-Benz Center for details and availability for your vehi- cle. For more information on satellite radio (컄 page 100).
Operating DVD changer/audio CD/ audio DVD/MP3
왘 Turn on COMAND and select “CD”, “DVD-Audio” or “MP3” (컄 page 107). 왘 Press ( or & to select the “Au-dio” menu.
왘 Press % or $ to select a track.
Example: audio CD 1 Current track 왘 Press æ or ç to adjust the vol-
ume.
i When you play a CD or DVD with text, the multifunction display shows the name and num- ber of the track. For MP3s, only the track is shown.
Telephone menu*
i The menu overview can be found on (컄 page 258). You can use the functions in the “Tele- phone” menu to operate your telephone, provided it is inserted in the cradle and switched on.
Otherwise, you may not be able to observe traffic conditions and could endanger your- self and others.
Bear in mind that at a speed of just 30 mph (approximately 50 km/h), your vehicle is covering a distance of 44 feet (approxima- tely 14 m) every second.
Warning!
Warning!
Never operate radio transmitters equipped with a built-in or attached antenna (i.e. with- out being connected to an external antenna) from inside the vehicle while the engine is running. Doing so could lead to a malfunc- tion of the vehicle’s electronic system, pos- sibly resulting in an accident and/or personal injury.
Some jurisdictions prohibit the driver from using a cellular telephone while driving. Whether or not prohibited by law, for safety reasons, the driver should not use the cellu- lar telephone while the vehicle is in motion. Stop the vehicle in a safe location before placing or answering a call.
If you nonetheless choose to use the mobile phone while driving, please use the hands- free feature and be sure to pay attention to the traffic situation at all times. Use the mo- bile phone only when road, weather and traf- fic conditions permit.
Control systems Instrument cluster control system
i Various mobile phone cradles can be in- stalled in the front center armrest, see separate installation instructions for the mobile phone cradle. These mobile phone cradles can be ob- tained from an authorized Mercedes-Benz Cen- ter. For more information about telephone (컄 page 479).
Logging-on to a network 왘 Switch on the telephone and COMAND
(컄 page 81).
왘 Press ( or & to select the “Tele-
phone” menu.
Which messages appear in the multifunc- tion display depends on whether your tele- phone is switched on or off. 앫 If the telephone is off, the message in the multifunction display is: “Telephone OFF”.
앫 If the telephone is not inserted in the cradle, the message in the multifunc- tion display is: “No telephone inserted”.
265
Control systems Instrument cluster control system
앫 If the PIN or unlock code is not yet en- tered, the message in the multifunction display is “Please enter PIN” or “Enter unlock code”.