- 2012 Mercedes-Benz CL Class Owners Manuals
- Mercedes-Benz CL Class Owners Manuals
- 2008 Mercedes-Benz CL Class Owners Manuals
- Mercedes-Benz CL Class Owners Manuals
- 2011 Mercedes-Benz CL Class Owners Manuals
- Mercedes-Benz CL Class Owners Manuals
- 2007 Mercedes-Benz CL Class Owners Manuals
- Mercedes-Benz CL Class Owners Manuals
- 2002 Mercedes-Benz CL Class Owners Manuals
- Mercedes-Benz CL Class Owners Manuals
- 2013 Mercedes-Benz CL Class Owners Manuals
- Mercedes-Benz CL Class Owners Manuals
- 2004 Mercedes-Benz CL Class Owners Manuals
- Mercedes-Benz CL Class Owners Manuals
- 2000 Mercedes-Benz CL Class Owners Manuals
- Mercedes-Benz CL Class Owners Manuals
- 2010 Mercedes-Benz CL Class Owners Manuals
- Mercedes-Benz CL Class Owners Manuals
- 2006 Mercedes-Benz CL Class Owners Manuals
- Mercedes-Benz CL Class Owners Manuals
- 2003 Mercedes-Benz CL Class Owners Manuals
- Mercedes-Benz CL Class Owners Manuals
- 2005 Mercedes-Benz CL Class Owners Manuals
- Mercedes-Benz CL Class Owners Manuals
- 2009 Mercedes-Benz CL Class Owners Manuals
- Mercedes-Benz CL Class Owners Manuals
- 2001 Mercedes-Benz CL Class Owners Manuals
- Mercedes-Benz CL Class Owners Manuals
- Download PDF Manual
-
i If the alarm stays on for more than 30 seconds, a call to the Response Center is ini- tiated automatically by the Tele Aid system (컄 page 482) provided Tele Aid service was sub- scribed to and properly activated and that neces- sary mobile phone, power supply and GPS coverage are available. 왘 Arming: Lock your vehicle with the
SmartKey or KEYLESS-GO*. The tow-away alarm is automatically armed after about 30 seconds.
왘 Disarming: Unlock your vehicle with
the SmartKey or KEYLESS-GO*.
i When you unlock your vehicle, the tow-away protection disarms automatically. The tow-away alarm remains disarmed until you lock your vehicle again.
To prevent triggering the tow-away alarm feature, switch off the tow-away alarm be- fore towing the vehicle, or when parking on
a surface subject to movement, such as a ferry or auto train. To switch off the tow-away alarm, see “Switching the tow-away alarm on/off” (컄 page 243).
Canceling the alarm
To cancel the alarm, do one of the follow- ing: 왘 Insert the SmartKey or SmartKey with
KEYLESS-GO* in the starter switch.
왘 Press the Œ or ‹ button on the
SmartKey or SmartKey with KEYLESS-GO*.
In vehicles with KEYLESS-GO*: 왘 Grasp an outside door handle.
The SmartKey with KEYLESS-GO must be within 3 ft (1 m) of the vehicle.
왘 Press the KEYLESS-GO start/stop but-
ton (컄 page 337). The SmartKey with KEYLESS-GO must be inside the vehicle.
78
Control systems
COMAND operating safety COMAND introduction COMAND FM/AM radio COMAND satellite radio (USA only) COMAND audio CD/audio DVD/MP3
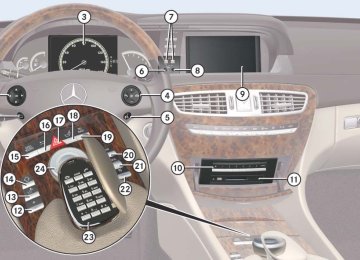
COMAND telephone* COMAND navigation COMAND address book COMAND system settings COMAND vehicle menu COMAND automatic climate control COMAND seats Instrument cluster control system Voice Control79
Control systems COMAND operating safety
Warning!
Warning!
Warning!
Any alteration of electronic components or software can cause malfunctions.
Radio, satellite radio (USA only), amplifier, CD changer, navigation module, telephone and voice control systems* are intercon- nected. Therefore, if one of the components is not operational, or has not been re- moved/ replaced properly, the function of other components could be impaired.
Such conditions might seriously impair the operating safety of your vehicle.
We recommend to have any service work on electronic components carried out by an au- thorized Mercedes-Benz Center.
In order to avoid distraction which could lead to an accident, the driver should enter system settings while the vehicle is at a standstill, and operate the system only when permitted by road, weather and traffic conditions.
Bear in mind that at a speed of just 30 mph (approximately 50 km/ h), your car covers a distance of 44 feet (approximately 14 m) ev- ery second.
COMAND supplies you with information to help you select your route more easily and guide you conveniently and safely to your- destination. For safety reasons, we encour- age the driver to stop the vehicle in a safe place before answering or placing a call, or consulting the COMAND screen to read nav- igational maps, instructions, or downloaded information.
While the navigation system provides direc- tional assistance, the driver must remain fo- cused on safe driving behavior, especially attention to traffic and street signs, and should utilize the system’s audio cues while driving.
The navigation system does not supply any information on stop signs, yield signs, traffic regulations or traffic safety rules. Their ob- servance always remains in the driver’s per- sonal responsibility. DVD maps do not cover all areas nor all routes within an area.
80
왔 COMAND introduction COMAND (Cockpit Management and Data System) is an information and operating center for vehicle sound and communica- tions systems, including the radio and nav- igation system, as well as other optional equipment (satellite radio, telephone*, etc.).
Availability of functions while the vehi- cle is in motion
For safety reasons, certain COMAND func- tions are not available while the vehicle is in motion or they are only available to a limited extent. You will notice this, for ex- ample, by the fact that certain menu items cannot be selected or that the COMAND display shows a corresponding message.
Control systems COMAND introduction
Switching COMAND on or off
COMAND components
왘 Press the o shortcut button in the
center console (컄 page 82). COMAND calls up the menu last select- ed.
i When you switch off COMAND, you also switch off the currently playing audio source. During a telephone call, you cannot switch off COMAND.
In your vehicle, COMAND can be used to operate: 앫 audio functions 앫 the navigation system 앫 the telephone* and communication
functions (SMS*)
앫 various vehicle settings COMAND consists of the following: 앫 COMAND shortcut buttons 앫 COMAND display 앫 telephone* keypad 앫 COMAND controller
81
Control systems COMAND introduction
COMAND shortcut buttons
Function
i During Dynamic Rear View Monitor* opera- tion (컄 page 439) it is not possible to operate the COMAND shortcut buttons.
1 P Favorite button 2 M Shortcut button for:
Use the COMAND shortcut buttons to se- lect main functions directly.
앫 CD/DVD 앫 radio
3 L Back button 4 O Seat menu 5 N Shortcut button for:
앫 telephone* 앫 navigation
6 o COMAND on/off
button
7 , Volume control 8 F Mute button
Page 231
115
96
89
250120
156
8191
91Example: 왘 Switching directly to Radio or CD
menu: Press M once or twice.
82
COMAND display In the COMAND display, you will find the function currently selected and the corre- sponding menus. The COMAND display is divided into several areas.
1 Status line 2 Main functions 3 Main area 4 Submenus 5 Climate control settings A white bar under the main functions 2 in- dicates the active area. Once you have selected a main function 2, the main area 3 is active.
i The layout of the menus may vary depending on your vehicle’s equipment. This manual shows the menus for a fully equipped vehicle.
Instrument cluster multifunction display This section describes features and con- trols via the COMAND controller, display and shortcut buttons only. Please refer to the “Instrument cluster control system” section of this manual (컄 page 256) for function descriptions and operation of the instrument cluster multi- function display and multifunction steering wheel buttons as they relate to COMAND features described in this section.
Control systems COMAND introduction
Adjusting COMAND display illumina- tion
Swiveling COMAND display
1 Knob 왘 Brightening illumination: Turn
knob 1 clockwise.
왘 Dimming illumination: Turn knob 1
counterclockwise.
1 Button for swiveling display to the left 2 Button for swiveling display to the right You can swivel the COMAND display to the left or right. The buttons are on the right-hand side of the instrument cluster.
83
Control systems COMAND introduction
Telephone keypad* With the help of the telephone keypad, you can use your mobile phone if it is inserted in the cradle.
COMAND controller Use the COMAND controller to select menu functions shown on the COMAND display.
In this way, you can move through the menus, select menu items or exit menus. You can move through the menus either by rotating or sliding the controller.
Operating COMAND controller
1 COMAND controller You can operate the COMAND controller as follows: 앫 press briefly or press and hold 앫 rotate to the left or right 앫 slide to the left, right, up, down or
diagonally
1 Telephone keypad 2 Folding cover
84
Control systems COMAND introduction
Symbol
How to use the COMAND controller 왘 Press briefly.
왘 Press and hold until the selected ac-
tion has been carried out.
왘 Rotate.
ymz
왘 Slide.
qmr
왘 Slide and hold. 왘 Slide.
왘 Slide and hold.
왘 Slide and hold.
omp
wmx
Function 앫 Select menu item. 앫 Exit full-screen image with Navi. 앫 Save a station. 앫 Accept a destination for navigation. 앫 Move through vertical or horizontal menus. 앫 Move through text. 앫 Program settings. 앫 Move through vertical menus. 앫 Exit horizontal menus. 앫 Move through a navigation map. 앫 Move through horizontal menus. 앫 Exit vertical menus. 앫 Fast forward or reverse for audio CD or audio DVD playback. 앫 Move through a navigation map. 앫 Move through a navigation map.
85
Control systems COMAND introduction
Operating COMAND
Menu overview The illustration below shows the structure of the main functions and their main menus.
Each main function has a main menu. Each menu item in turn has several submenu items.
Navi Map Display Mode
Page Audio
159 FM/AM Radio 161 Sat Radio (USA only) CD DVD-Audio MP3
Audio OFFPage Telephone* 95 Telephone* 100 Address Book*
107 Telephone OFF* 107
107
94Page Vehicle
120 Exterior Lighting Delayed Switch-off 214 Locator Lighting
122 Exterior Mirror Convenience Settings
Automatic Locking Easy Entry/Exit Feature Interior Lighting Delayed Switch-off Interior Ambient Light Rear Window Sunshade* Trunk Opening-height Restriction* Tow-away Alarm
Page 235
236237
238
239
241
240
242
242
24386
Calling up the main menu
Vertical menus
Horizontal menus
Control systems COMAND introduction
Illustration: audio main menu You can call up the main menu of a main function in the following manner: 왘 Moving to the main function line:
Slide qm.
왘 Selecting a main function: Slide omp
or rotate ymz.
왘 Confirming selection: Press n.
왘 Moving through the menu:
Slide rmq or rotate ymz.
왘 Moving through the menu:
Slide omp or rotate ymz.
왘 Selecting a menu item: Press n. 왘 Exiting a menu without making a se- lection: Slide omp in the opposite di- rection of the list orientation or press back button L.
왘 Selecting a menu item: Press n. 왘 Exiting a menu without making a se- lection: Slide rmq in the opposite di- rection of the list orientation or press back button L.
87
Control systems COMAND introduction
Entering characters
Illustration: entering a navigation destina- tion
Selecting characters 왘 Slide omp or rotate ymz. 왘 Confirming selection: Press n.
COMAND completes your entry as soon as it can be clearly identified. In this case, you do not need to switch to the list.
Deleting individual characters 왘 Select and press ) repeatedly in the
bottom line.
88
Deleting entire words or numbers 왘 Press and hold ) in the bottom line until the word or number is deleted.
Exiting character entry 왘 Select and press “Back” in the bottom
line.
or 왘 Press back button L in the center
console (컄 page 82).
Switching to the list 왘 Slide qm. or 왘 Select and press ? in the second line
from the bottom.
왘 Exiting list: Slide om to select “Back”.
Accepting first entry 왘 Press n until you exit the character
entry window.
Selecting list item
Illustration: list of towns and cities for navi- gation 1 Symbol for other selection options
(e.g. county)
왘 Selecting a line: Slide rmq or
rotate ymz.
왘 Confirming selection: Press n.
Additional selection options are avail- able for list entries featuring symbol 1. For example, cities marked with symbol 1 indicate that the select- ed country has more than one city fea- turing that name. Confirming such a list entry opens up another submenu.
Example of how to use COMAND In the descriptions below, the main func- tions always serve as the starting point for locating the individual menu items. Example: “Audio” 씮 “Audio” 씮 “FM/AM Radio” 씮 “Radio” 씮 “Save Station”
i In the COMAND display, you will see the submenu previously called up for each main menu.
If you already see one of the submenus on the screen (e.g. the “Audio” 씮 “Audio” 씮 “Radio” submenu), it is not necessary to perform the first steps. The individual steps for the above-men- tioned example are described below.
Back button
1 Back button 왘 Switching to the next highest menu:
Press L briefly. COMAND switches to the next highest menu level within the currently active operating mode.
왘 Switching to the main menu: Press
and hold L. You will hear a signal, and COMAND switches to the main menu of the cur- rently active operating mode.
Control systems COMAND introduction
왘 Switching to the main function line:
Slide qm.
왘 Selecting “Audio” main function:
Slide omp or rotate ymz.
왘 Confirming selection: Press n.
The audio operating mode last selected appears.
왘 Selecting “Audio” in the main menu:
Slide qm.
왘 Confirming selection: Press n.
A selection list with the functions of the “Audio” main menu appears.
컄컄
89
Control systems COMAND introduction
컄컄
왘 Selecting “FM/AM Radio”:
Slide qm or rotate ymz.
왘 Selecting “Radio”: Slide mr or
rotate ymz.
왘 Confirming selection: Press n. The FM/AM Radio menu appears.
왘 Confirming selection: Press n.
The Radio submenu appears.
왘 Select “Save Station” from selection list by rotating ymz or sliding rmq.
왘 Select desired position.
왘 Confirming selection: Press n.
The selected station is saved at the designated position. The display switches back to the Radio display.
90
Main menus of COMAND
i The components and operating principles of COMAND can be found on (컄 page 81).
Sound 왘 Muting: Press the F shortcut but- ton in the center console (컄 page 82). The sound of the current audio source is switched on or is muted.
i When the sound is muted, you will see the symbol F in the status line. When you change the audio source, the sound is automati- cally switched on. You will be able to hear an- nouncements from the navigation system even when the sound is muted.
Switching off navigation announce- ments entirely 왘 Canceling navigation message:
Briefly press F shortcut button dur- ing an announcement.
왘 Switching off navigation messages:
Press and hold F during an an- nouncement until the announcement is switched off. You will see the message “The driving instructions have been muted.” for a short while.
i The announcements remain switched off even if you start a new route guidance or if COMAND is switched off/on with the o but- ton. If you switch COMAND off by removing the SmartKey from the starter switch and then switch the ignition back on after more than 3 minutes, the announcements are automatical- ly switched back on.
Control systems COMAND introduction
Adjusting volume
1 Thumbwheel 왘 Adjusting: Turn , thumbwheel.
The volume of the currently selected audio source changes.
91
Control systems COMAND introduction
Volume of navigation announcements You can adjust the volume of the naviga- tion announcements independently from the volume of the respective audio source. During a navigation announcement: 왘 turn thumbwheel , or 왘 press æ or ç on the multifunc-
tion steering wheel.
Adjusting volume for telephone calls In hands-free mode, you can adjust the vol- ume of a telephone call while the call is currently active. During a telephone call: 왘 turn thumbwheel , or 왘 press æ or ç on the multifunc-
tion steering wheel.
92
Selecting sound settings You can select different sound settings for each individual audio source. The respec- tive sound menu can be found via the sub- menu for which you wish to make settings. Example: “Audio” 씮 “Audio” 씮 “FM/AM Radio” 씮 “Sound”
Adjusting treble or bass 왘 Select “Sound” 씮 “Treble” or “Bass”.
The setting last selected is indicated by an outlined bar.
Adjusting treble and bass 1 Setting last selected 2 Current setting 왘 Changing setting: Slide rmq or
rotate ymz until desired treble or bass setting is reached.
왘 Exiting menu: Press n, L or
slide omp. The setting is saved.
Adjusting balance or fader Balance is used to determine whether the sound focus should be shifted toward the driver’s side or the passenger’s side. Fader is used to determine whether the sound focus should be shifted toward the front or rear of the vehicle 왘 Select “Sound” 씮 “Balance/Fader”.
The setting last selected is indicated by an outlined bar.
Adjusting balance and fader 1 Current setting indicated by orange
cross-hair symbol
왘 Changing setting: Slide rmq or omp until desired balance/fader setting is reached.
왘 Exiting menu: Press n or L.
The setting is saved.
Surround sound With surround sound, you can choose be- tween “LOGIC7® ON” and “LOGIC7® OFF”. Harman/kardon LOGIC7® surround sound is available for the following operating modes: 앫 Audio DVD (MLP, DTS, PCM, and Dolby
Digital audio formats)
앫 Audio CD 앫 MP3
앫 Radio (FM, AM, WB, Satellite (USA only))앫 PCMCIA
Control systems COMAND introduction
i Since some DVDs contain both stereo as well as multi-channel audio formats, it may be necessary to adapt the audio format (컄 page 119).
i The “LOGIC7® ON” function of the har- man/kardon LOGIC7® surround sound system makes it possible to play discrete 5.1 and stereo recordings with optimal surround sound for ev- ery passenger. Music on CDs or audio DVDs with high-resolution surround formats such as MLP, DTS or Dolby Digital is played back optimally. For an ideal sound experience on all seats, LOGIC7® distributes 5.1 surround information via the 13-channel system architecture. The re- sult is a sound as intended by the sound engi- neers during the original recording. harman/kardon LOGIC7® converts all two-chan- nel stereo sound material into multi-channel sur- round sound. With the help of LOGIC7®, surround information stored during the original recording are read out and distributed through the 13 channels. No effects are created during this process; only that which was already there becomes audible. In addition, harman/kardon LOGIC7® moves the perceived sound source away from the individual loudspeakers, thus generating a natural 360° sound experience for every passenger.
93
Control systems COMAND introduction
i By selecting “LOGIC7® OFF”, all compatible formats as they are present on the medium are played back. Due to the vehicle’s spatial charac- teristics, an optimal sound experience is not en- sured on all seats.
Adjusting surround sound With surround sound, you can choose be- tween “LOGIC7® ON” and “LOGIC7® OFF”. 왘 Select “Sound” 씮 “3D Sound”.
Adjusting surround sound 1 Current setting
94
앫 With some stereo recordings, the resulting sound may deviate from conventional stereo playback.
Switching off/on the audio source
i When you insert an audio CD or audio DVD, it automatically becomes the active audio source. 왘 Switching off: Select “Audio” 씮 “Au-
dio” 씮 “Audio OFF”. The audio source is switched off; “Au- dio OFF” appears in the display.
왘 Switching on: Select “Audio”, then the
desired audio source.
or 왘 Load CD/DVD (컄 page 111) or a
PCMCIA card (컄 page 112).
왘 Selecting a setting: Slide rmq or
rotate ymz.
왘 Saving setting: Press n.
The setting is saved and the menu is closed.
왘 Exiting menu without saving chang-
es: Press L or slide omp.
i Please note the following: 앫 For an ideal sound experience at all seats, the balance and fader should be adjusted to the center of the passenger compartment with LOGIC7® switched on.
앫 The best sound results are achieved by play- ing high-quality audio CDs and audio DVDs.
앫 For MP3 tracks, the bit rate should be at
least 128 kbit/s.
앫 Surround sound does not function for
mono-signal sources.
앫 In the event of poor radio reception quality,
e.g. inside a tunnel, you should switch off LOGIC7®, as a dynamic switch from Stereo to Mono could occur, resulting in temporary sound distortion.
Control systems COMAND FM/AM radio
Only use the COMAND when road and traffic conditions permit you to do so. Otherwise you could be involved in an accident in which you or others could be injured.
왔 COMAND FM/AM radio
Warning!
Please devote your attention first and fore- most to the traffic situation you are in.
Before your journey, please familiarize your- self with the radio functions.
Submenu overview
i The components and operating principles of COMAND can be found on (컄 page 81).
Radio (except Weather Band) Station List (in FM waveband only) Save Station Frequency Entry Show Station Info (in FM waveband only)
Presets (except Weather Band) Autostore
Channel (only Weather Band) Channel list
FM or AM or WB
Sound
Switch to FM waveband
Treble
Preset station list
Switch to AM waveband Bass Switch to Weather Band Balance/Fader
3D Sound
95
Control systems COMAND FM/AM radio
Switching to radio mode
왘 Select “Audio”씮 “Audio”씮 “FM/AM
Radio”.
or 왘 Press the M shortcut button once or
twice. The radio display appears once you have switched to radio mode. You will hear the station/channel last tuned in in the previously selected waveband, provided that the station/channel can be received.
i The number of times you have to press the M shortcut button depends on the operating mode currently selected.
96
Switching wavebands
You can switch between the FM, AM and WB (Weather Band) wavebands. 왘 Select “Audio”씮 “Audio”씮 “FM/AM
Radio”씮 “FM” or “AM” or “WB”. You will hear the station last tuned in on the selected waveband.
Selecting stations/channels
You have the following selection options: 앫 The station list 앫 The search function 앫 The station presets 앫 The manual frequency entry 앫 The channel list
Selecting stations using the station list
i The station list is only available for the FM waveband. It contains all the stations that can be currently received and is sorted by station fre- quencies.
Illustration: radio mode in FM waveband 1 Main area with frequency display 2 Preset position of selected station 3 Frequency of selected station 4 Name of selected station 5 Sound settings 6 To switch to Weather Band 7 To switch to AM waveband 8 Selected waveband 9 Preset options a Radio options
i Station name display 4 is available for the FM waveband and can only be seen when it is switched on (컄 page 99) and if the station trans- mits a name.
왘 Select “Audio”씮 “Audio”씮 “FM/AM
Radio”씮 “FM”.
Selecting stations using station pre- sets
Selecting stations by entering the fre- quency manually
Control systems COMAND FM/AM radio
왘 Select “Radio”씮 “Station List”.
The station list appears. The dot R in front of a list entry indicates the cur- rently selected station. A number in front of the list entry indicates the pre- set position in the station preset mem- ory.
왘 Select a station by rotating ymz or
sliding qmr and press n.
Selecting stations/channels using the search function 왘 Slide omp or rotate ymz when the
main area is selected. Depending on the direction in which the controller is being slid or rotated, the system searches upward or down- ward and stops at the next receivable station/channel.
i This function is not available for Weather Band. 왘 Select “Audio” 씮 “Audio” 씮 “FM/AM
Radio” 씮 “FM” or “AM”.
왘 Select “Presets”. or 왘 Press n when the main area is select-
ed. The preset menu appears. The dot R in front of a preset position indicates that the currently selected station is saved there.
왘 Select station preset by rotating ymz
or sliding qmr and press n.
i This function is not available for Weather Band. 왘 Select “Audio”씮“Audio”씮“FM/AM
Radio”씮“FM” or “AM”.
왘 Select “Radio”씮“Frequency Entry”.
The menu for manual frequency entry appears.
왘 Exiting menu without making an en- try: Press L back button in the cen- ter console (컄 page 82).
왘 Increasing or decreasing number:
Slide qmr or rotate ymz.
i You can only select currently permitted numbers. 왘 Selecting the next number:
Slide mp.
왘 Confirming frequency entry:
Press n. COMAND tunes in to the frequency en- tered.
컄컄
97
Control systems COMAND FM/AM radio
컄컄
i If you enter a frequency in the AM waveband which is outside the frequency range, COMAND tunes in to the next lowest frequency.
Selecting channels using the channel list
i This function is only available for Weather Band. 왘 Select “Audio” 씮 “Audio” 씮 “FM/AM
Radio” 씮 “WB” 씮 “Channel”.
or 왘 Press n when the main area is select-
ed. The channel list appears. The dot R in front of a list entry indicates the cur- rently selected channel.
왘 Select channel by rotating ymz or
sliding qmr and press n.
Saving stations
i Twenty stations can be saved in each wave- band except for Weather Band.
You have the following options: 앫 Saving stations manually 앫 Saving stations using Autostore
Saving stations manually
Option 1
왘 Select “Audio” 씮 “Audio” 씮 “FM/AMRadio” 씮 “FM” or “AM”.
왘 Select “Radio ”씮 “Save Station”.
Option 2
왘 Press n when the main area is select-ed.
Option 3
왘 Select “Audio” 씮 “Audio” 씮 “FM/AMRadio” 씮 “FM” or “AM”.
왘 Select “Presets”. All three of these will call up a station pre- set screen. The dot R in front of a preset position indicates that the currently select- ed station is saved there.
98
왘 Selecting a preset position:
Slide qmr or rotate ymz.
Saving a station to a selected preset po- sition If you have called up the station preset screen using option 1: 왘 Press n briefly. In options 2 and 3: 왘 Press and hold n until you hear a sig-
nal. The station is saved.
Saving using autostore
Station name display
i This function is not available for Weather Band. The Autostore function saves receivable stations as presets in order of their reception quality. All stations saved manually in the preset memory will be lost if COMAND finds 20 sta- tions. If COMAND finds less than 20 stations, for example 9, then the stations saved in preset po- sitions 1 – 9 will be over written.
Option 1
왘 Press n when the main area is select-ed.
왘 Select “Autostore”.
Option 2
왘 Select “Audio” 씮 “Audio” 씮 “FM/AMRadio” 씮 “FM” or “AM”.
왘 Select “Presets” 씮 “Autostore”.
Option 3
왘 Select “Audio” 씮 “Audio” 씮 “FM/AM Radio” 씮 “Radio” 씮 “Save Station” 씮 “Autostore”.i In the FM waveband, COMAND can show the name of the station currently tuned in. Sta- tion name display 1 can only be seen when it is switched on and if the station transmits a name.
1 Station name display 왘 Switching the station name display on/off: Select “Audio” 씮 “Audio” 씮 “FM/AM Radio” 씮 “FM” 씮 “Radio” 씮 “Show Station Info”.
Control systems COMAND FM/AM radio
The display is switched on or off, de- pending on the previous setting. When the display is switched on, a check- mark appears in front of the “Show Station Info” menu item.
99
Control systems COMAND satellite radio (USA only)
Warning!
Please devote your attention first and fore- most to the traffic situation you are in.
Before your journey, please familiarize your- self with the radio functions.
Submenu overview
i The components and operating principles of COMAND can be found on (컄 page 81).
Only use the COMAND when road and traffic conditions permit you to do so. Otherwise you could be involved in an accident in which you or others could be injured.
Presets Station presets
Info Show program info
Category Select category
Sound Treble Bass Balance/Fader 3D Sound
Sat Radio Channel List Save Channel Channel Entry Service
100
Control systems COMAND satellite radio (USA only)
i Satellite radio service may be unavailable or interrupted from time to time for a variety of rea- sons, such as environmental or topographic con- ditions and other things we can’t control. Service might also not be available in certain places (e.g., in tunnels, parking garages, or within or next to buildings) or near other technologies. In such situations, the satellite radio’s main menu shows the “Acquiring signal...” screen. At this point, the radio’s functions are restricted to manual channel number entry (컄 page 104) and service info display (컄 page 106).
Introduction to Satellite radio
i A subscription to SIRIUS satellite radio ser- vice provider is required for the satellite radio op- eration described in this chapter. Contact an authorized Mercedes-Benz Center for details and availability for your vehicle.
SIRIUS Satellite Radio provides 100 chan- nels, so called streams, of digital-quality radio, among others music, sports, news, and entertainment free of commercials. SIRIUS Satellite Radio uses a fleet of high-power satellites to broadcast 24 hours per day, coast-to-coast, in the contiguous US. This diverse, satellite-delivered program- ming is available for a monthly subscrip- tion fee. For more information and service availabil- ity call the SIRIUS Service Center (컄 page 106), or go to www.siriusradio.com.
Switching to satellite radio
왘 Select “Audio” 씮 “Audio” 씮 “Sat Ra-
dio”.
or 왘 Press the M shortcut button once or twice. The Satellite radio menu appears if it was the last active radio mode. The screen which then appears de- pends on the activation status of the satellite radio service. The following options are possible: 앫 Satellite radio service is not activat-
ed
앫 Only the preview channel is activat-
ed
앫 Satellite radio service is fully acti-
vated
101
Control systems COMAND satellite radio (USA only)
Satellite radio service is not activated The telephone number of the SIRIUS Ser- vice Center and the twelve-digit electronic serial number (SIRIUS-ID) of the particular receiver are displayed.
Only the preview channel is activated The satellite radio preview channel ap- pears.
Main satellite radio menu
This information is required when calling the SIRIUS Service Center for an activation request.
i Credit card information is also required for your application. The activation process takes approximately 5 to 10 minutes after calling the SIRIUS Service Center. 왘 Closing screen: Press n.
i If only the preview channel is activated, you cannot tune in another channel. If you try to do this, you will see the screen described in the sec- tion “Satellite radio service is not activated” (컄 page 102).
Satellite radio service is fully activated The main satellite radio menu appears. You will hear the channel last tuned in, provid- ed that it can be received.
1 Main area with channel display 2 Preset position of selected channel 3 Selected channel 4 Selected program category 5 Sound settings 6 To select program category 7 Channel number of selected channel 8 Other channel information 9 Preset options a Satellite radio options
102
i Main area 1 can show all channels includ- ed in your subscription. Which channels are shown depends on the selected program category 4. Note that categories and channels shown in illus- trations are dependent on programming content delivered by the service provider. Programming content is subject to change. Therefore, channel and categories shown in illus- trations and descriptions contained in this man- ual may differ from the channels and categories delivered by the service provider.
Control systems COMAND satellite radio (USA only)
Selecting program category
Tuning in channels
i The channels are categorized. Categories al- low you to tune to stations broadcasting a cer- tain type of program. 왘 Select “Audio” 씮 “Audio” 씮 “Sat Ra-
dio” 씮 “Category”. The category list appears.
i If only the preview channel is activated, only certain categories are available on the list. Which categories these are depend on the service provider. 왘 Select category by rotating ymz or
sliding qmr and press n. When selecting a channel using the channel search function or the channel list, you have access to the channels you subscribe to and which are includ- ed in the selected category.
i When you select the category “All Chan- nels”, you have access to all the channels you subscribe to, regardless of category, when you are tuning in a channel using the channel search function or the channel list.
You have the following selection options: 앫 The channel search function 앫 The channel presets 앫 The manual channel number entry 앫 The channel list
Tuning in channels using channel search function
i This function is not possible when only the preview channel is activated. If you try to tune in a channel in this instance, you will see the screen described in the section “Satellite radio service is not activated” (컄 page 102). 왘 Slide omp or rotate ymz when the
main area is selected. Depending on the direction in which the controller is being pressed or rotat- ed, the system searches upward or downward and stops at the next receiv- able channel.
103
Control systems COMAND satellite radio (USA only)
i Which channels are found by the channel search function depends on which channels you have subscribed to and the program category you have selected (컄 page 103).
Tuning in channels using channel pre- sets 왘 Select “Audio” 씮 “Audio” 씮 “Sat Ra-
dio” 씮 “Presets”.
or 왘 Press n when the main area is select-
ed. The preset menu appears. The dot R in front of a preset position indicates that this is the channel currently select- ed and being listened to.
104
Tuning in channels using manual chan- nel number entry
i This function is not possible when only the preview channel is activated. If you try to tune in a channel in this instance, you will see the screen described in the section “Satellite radio service is not activated” (컄 page 102). 왘 Select “Audio” 씮 “Audio” 씮 “Sat Ra- dio” 씮 “Sat Radio” 씮 “Channel Entry”. The menu for manual channel number entry appears.
왘 Exiting menu without making an en- try: Press L back button in the cen- ter console (컄 page 82).
왘 Increase or decreasing number:
Slide qmr or rotate ymz.
왘 Selecting next number: Slide omp. 왘 Confirming channel entry: Press n. Further operation depends on whether the selected channel number is valid or if the channel is included in your sub- scription.
왘 Select station preset and briefly
press n. COMAND tunes in the corresponding channel as long as it is included in your subscription and is still available. If the channel is not included in your subscription, you will see the message described in the section “Satellite radio service is not activated” (컄 page 102). If the channel is no longer available or only the preview channel is activated, you will see the message “Invalid Chan- nel”.
왘 Closing message: Press n.
Control systems COMAND satellite radio (USA only)
Channel number is valid and channel is included in subscription COMAND tunes in the channel entered.
Channel number is invalid You will see the message “Invalid Chan- nel”. 왘 Closing message: Press n.
Channel number is valid but channel is not included in subscription You will see the screen described in the section “Satellite radio service is not acti- vated” (컄 page 102). 왘 Closing display: Press n.
Tuning in channels using the channel list 왘 Select “Audio” 씮 “Audio” 씮 “Sat Ra- dio” 씮 “Sat Radio” 씮 “Channel List”. The channel list appears. The dot R in front of a list entry indicates the cur- rently selected channel.
왘 Select channel by rotating ymz or
sliding qmr and press n.
i The contents of the channel list depends on which channels are included in your subscription and which program category you have selected (컄 page 103). If only the preview channel is acti- vated, the channel list contains only the preview channel.
Saving channels
i There are twenty preset positions available. Option 1
왘 Select “Audio” 씮 “Audio” 씮 “Sat Ra- dio” 씮 “Sat Radio” 씮 “Save Channel”.Option 2
왘 Press n when the main area is select-ed.
Option 3
왘 Select “Audio” 씮 “Audio” 씮 “Sat Ra-dio” 씮 “Presets”.
All three of these will call up a preset menu. The dot R in front of a preset posi- tion indicates that this is the channel cur- rently selected and being listened to.
105
Control systems COMAND satellite radio (USA only)
왘 Selecting a preset position:
Slide qmr or rotate ymz.
Saving a channel to a selected preset position If you have called up the channel preset screen using option 1: 왘 Press n briefly. In options 2 and 3: 왘 Press and hold n until you hear a sig-
nal. The channel is saved.
106
Show program info
Channel update
왘 Select “Audio” 씮 “Audio” 씮 “Sat Ra-
dio” 씮 “Info”.
i If the program provider does not offer any in- formation, the “Info” menu item cannot be se- lected.
You will see a screen that may contain the following information: 앫 Selected program category 앫 Selected channel 앫 Artist of the track currently being
played
앫 Name of current track
i The program provider determines what in- formation is displayed on the screen. COMAND shows no more than two lines per item of infor- mation. If an item of information is too long, COMAND shortens it. 왘 Closing screen: Slide omp or
press n.
The service provider may conduct a chan- nel update. During the update, the message “Updating channels...” will appear on the display. No functions can be operated in satellite radio mode during the update.
Calling SIRIUS Service Center
i It may be necessary to call the SIRIUS Ser- vice Center if, for example: 앫 You want to cancel the subscription or
re-subscribe at a later date.
앫 You forget to pay the bill. 앫 You sell the car to another person. 왘 Select “Audio” 씮 “Audio” 씮 “Sat Ra-
dio” 씮 “Sat Radio” 씮 “Service”. The telephone number of the SIRIUS Service Center and the twelve-digit electronic serial number (SIRIUS-ID) of the particular receiver are displayed.
왘 Closing screen: Slide omp or
press n.
왔 COMAND audio CD/audio DVD/MP3
Safety precautionsWarning!
Control systems COMAND audio CD/audio DVD/MP3
Notes about MP3 mode
Warning!
COMAND is classified as a Class 1 laser product. You must not open the casing. There is a risk of exposure to invisible laser radiation if you open the casing, or if the casing is faulty or damaged. COMAND does not contain any parts that you are able to maintain yourself. For safety reasons, all maintenance work must be car- ried out by qualified technicians.
Bear in mind that at a speed of just 30 mph (approximately 50 km/h), your vehicle is covering a distance of 44 feet (approximate- ly 14 m) every second.
Only carry out the following when the vehi- cle is stationary: 앫 Inserting a disc 앫 Ejecting a disc There is a risk of accident by being distract- ed from road and traffic conditions if you load a CD/DVD while the vehicle is in mo- tion.
Permissible media for MP3 files 앫 CD-R and CD-RW 앫 DVD-R and DVD-RW 앫 PCMCIA card (컄 page 112)
Permissible file systems 앫 ISO9660/Joliet for CDs 앫 UDF for DVDs 앫 FAT16 or FAT32 for PCMCIA cards with
storage medium
107
Control systems COMAND audio CD/audio DVD/MP3
Multisession CDs For multisession CDs, the first session type of the CD determines how COMAND will process the CD. For example, if the first session type is ac- cording to the audio CD standard and the second session type is according to the data CD standard containing MP3 tracks, COMAND will treat the CD as a conven- tional audio CD. This means that it is only possible to access the audio CD tracks. Access to the MP3 tracks is not possible. Similarly, if the first session type is accord- ing to the data CD standard containing MP3 tracks and the second session type is according to the audio CD standard, COMAND will treat the CD as a data CD. This means that it is only possible to ac- cess the MP3 tracks. Access to the audio CD tracks is not possible.
File structure on a disc When you create an MP3 disc, the MP3 tracks can be organized in folders. A folder can also contain other folders. A disc can contain a maximum of 255 folders. Each folder can contain a maximum of 255 tracks and 255 folders. A disc can contain a maximum of 4000 tracks. Usual- ly this number will not be reached because each minute of an MP3 track requires ap- proximately 1 MB of storage space.
Track and folder names When you create an MP3 disc, you can as- sign names to the MP3 tracks and folders. COMAND uses these names for the corre- sponding display in MP3 mode. Empty fold- ers or folders which contain data other than MP3 tracks are not displayed by COMAND. If MP3 files are saved in the root directory itself (uppermost directory on storage me- dium), the root directory will also be treat-
108
ed as a folder. COMAND will then show the name of the root directory as the folder name. You must observe the following when as- signing track names: 앫 Track names must have at least one
character.
앫 Track names must have the extension
“mp3”.
앫 There must be a period between the
track name and the extension. Example of a correct track name: Track1.mp3
i COMAND does not support ID3 tags.
Control systems COMAND audio CD/audio DVD/MP3
Permissible MP3 formats COMAND supports the MPEG1 Audio Lay- er 3 format.
i This format is generally known as “MP3”.
Permissible bit and sampling rates 앫 Fixed and variable bit rates up to
320 kbit/s
앫 Sampling rates of 24 kHz – 48 kHz
i Only use MP3 tracks with a bit rate of at least 128 kbit/s and a sampling rate of at least 44.1 kHz. Smaller rates can cause a noticeable deterioration in sound quality. This is especially the case if you have activated a surround sound function.
Notes on copyright The music tracks that you create for MP3 mode and can play back in MP3 mode are generally subject to copyright protection in accordance with the applicable interna- tional and national regulations. In many countries, reproductions are not permitted without the prior consent of the copyright holder, not even for private use. Make sure that you know the applicable copyright regulations and that you comply with these. If you own these rights yourself, e.g. for your own compositions and recordings, or the copyright holder has granted you per- mission, these restrictions do not apply.
Notes about audio DVD operation
COMAND can playback commercially available, prerecorded audio DVDs that bear the following label. You will usually find the label on the DVD booklet, the inlay, or the DVD itself.
i Audio DVDs differ from recordable DVD-R and DVD-RW discs.
i COMAND cannot playback video DVDs.
109
Control systems COMAND audio CD/audio DVD/MP3
Data on audio DVDs are stored either in uncompressed format or in lossless com- pressed format. The sound quality on au- dio DVDs is therefore better than on recordable DVDs that contain MP3 data because the MP3 format uses a lossy type of compression. You cannot delete data from or record additional data to commercially available, prerecorded audio DVDs. Please note the following information about CDs/DVDs and pay special atten- tion to the notes on copied and/or self-written CDs/DVDs.
Notes about CDs/DVDs
i Audio CDs with copy protection are not compatible with the CD audio standard and therefore may not be able to be played by COMAND. There may be playback problems when playing copied discs. There is a large variety of discs, disc-writing soft- ware and writers available. This variety means that there is no guarantee that the system will be able to play discs that you have written/copied yourself. There may be playback problems if you use CD-R or CD-RW type discs you have copied yourself with a storage capacity of more than 700 MB. These CDs are not compatible with currently ap- plicable standards.
! Do not affix stickers or labels to the discs. These could peel away and damage COMAND. COMAND is designed to hold discs which com- ply with the IEC 60908 standard. You can there- fore only use discs with a maximum thickness of 1.3 mm. If you insert thicker discs, e.g. those that contain data on both sides (DVD on one side and audio data on the other), they cannot be ejected and can damage COMAND. Do not use discs with an 8-cm diameter, even if they have an adapter. Only use round discs with a 12-cm diameter.
110
Control systems COMAND audio CD/audio DVD/MP3
Notes about handling CDs/DVDs
Inserting CDs and DVDs
앫 Only hold discs by the edge. 앫 Handle discs carefully to prevent play-
Warning!
Loading the CD/DVD changer The CD/DVD changer can hold up to a to- tal of 6 audio CDs or DVDs.
back problems.
앫 Avoid getting scratches, fingerprints
and dust on discs.
앫 Clean discs from time to time with a
commercially-available cleaning cloth. Do not wipe them with a circular mo- tion, but only in straight lines from the center outwards.
앫 Only use a pen designed for such a pur-
pose to label discs.
앫 Place discs back in their boxes after
use.
앫 Protect discs from heat and direct sun-
light.
Only insert a CD or DVD when the vehicle is stationary. There is a risk of accident by be- ing distracted from road and traffic condi- tions if you load a CD/DVD while the vehicle is in motion.
Bear in mind that at a speed of just 30 mph (approximately 50 km/h), your vehicle is covering a distance of 44 feet (approximate- ly 14 m) every second.
i If the CD/DVD has a printed side, this must face upwards when the CD/DVD is inserted. If neither side is printed, the side to be played should face downwards.
1 Disc slot 2 Load button (all magazine trays) 3 Magazine tray buttons 1 – 6
i Each magazine tray button 3 indicates the status of the corresponding magazine tray by means of an LED. 앫 LED off = magazine tray is empty 앫 LED constantly lit = magazine tray is loaded 앫 LED flashes = CD/DVD changer requesting
disc to be loaded
111
Control systems COMAND audio CD/audio DVD/MP3
Loading an individual magazine tray 왘 Press desired magazine tray button 3.
If a disc is loaded, it will be ejected.
왘 Take disc out of slot 1. 왘 Wait until LED for magazine tray
button 3 which you pressed flashes quickly.
왘 Insert disc into slot 1.
The DVD changer draws the disc in and begins playback if: 앫 it has been loaded correctly 앫 it is a permissible type of disc
Loading all six magazine trays 왘 Press load button 2.
The DVD changer checks the load sta- tus of all magazine trays and switches to the first empty tray.
왘 Wait until LED for corresponding maga-
zine tray button 3 flashes quickly.
왘 Insert disc into slot 1.
The DVD changer switches to the next empty magazine tray.
i If a disc is not inserted within approximately 15 seconds COMAND resumes playback of the last disc. 왘 Repeat last two steps until all trays are
loaded. The DVD changer will play the last disc you loaded if: 앫 it has been loaded correctly 앫 it is a permissible type of disc
Inserting a PCMCIA card
i COMAND supports commercially available PCMCIA cards or PCMCIA card adapters with storage media that may not be designed for the temperatures which occur in the vehicle. You should therefore remove the PCMCIA card from the vehicle when not in use since extreme tem- peratures could damage these devices.
112
1 Slot for PCMCIA card 왘 Insert PCMCIA card into slot 1.
The side with the contact must point towards the slot. If the PCMCIA card contains a storage medium with MP3 tracks, COMAND switches to MP3 mode.
Control systems COMAND audio CD/audio DVD/MP3
Ejecting CDs and DVDs
Warning!
i If you eject one disc while playing another disc, the DVD changer interrupts playback. Play- back continues once the disc has been ejected. 왘 Ejecting one disc: Press desired mag-
Ejecting a PCMCIA card
Only eject a disc when the vehicle is station- ary. You may otherwise be distracted from the traffic conditions and could cause an ac- cident.
Ejecting from the DVD changer
1 Disc slot 2 Magazine tray buttons 1 – 6
3 Eject button (all discs)azine tray button 2.
왘 Take disc out of slot 1.
If you do not take the disc out of slot 1, the DVD changer will draw it back automatically in approximately 15 seconds.
왘 Ejecting all discs: Press eject
button 3. The DVD changer switches to the first loaded tray and ejects the disc.
왘 Take disc out of slot 1.
The DVD changer switches to the next loaded magazine tray and ejects the disc.
왘 Repeat last step until magazine is emp-
ty.
1 Eject button 2 Slot for PCMCIA card 왘 Press eject button 1 twice. The PCMCIA card is ejected.
왘 Take PCMCIA card out of slot 2.
113
Control systems COMAND audio CD/audio DVD/MP3
Submenu overview
i The components and operating principles of COMAND can be found on (컄 page 81).
CD or DVD-A or MP3
Pause/Stop/Play (audio DVD mode only)
Normal Track Sequence Pause playback
Random Tracks
Stop playback
Restart playback
Random folder (MP3 mode only) Repeat folder (MP3 mode only) Group (DVD-Audio mode only)
114
Tracks/Track List/Tracks A-Z Show track list (audio CD mode and audio DVD mode) Display alphabetical track listing (MP3 mode only)
Folders (MP3 mode only) Select folder
Changer
Sound
Select medium
Treble
Bass
Balance/Fader
3D Sound
Switching to audio CD, audio DVD or MP3 mode
왘 Load CD/DVD (컄 page 111) or
PCMCIA card (컄 page 112).
or 왘 Select “Audio” 씮 “Audio”, then “CD”,
“DVD-Audio” or “MP3”.
or 왘 Press the M shortcut button once or
twice.
i The M shortcut button takes you directly to the previously set disc mode (audio CD, audio DVD or MP3-CD/DVD). The number of times you have to press the shortcut button de- pends on the previously set mode.
Control systems COMAND audio CD/audio DVD/MP3
Example display in audio CD mode
Example display in audio DVD mode
1 Current playback option 2 Track number 3 Disc number 4 Disc name (only if saved on the disc) 5 Track name (only if saved on the disc) 6 Track time 7 Graphic time and track display 8 Sound settings 9 Medium selection a To call up track listing b Disc type c Playback options
1 Current playback option 2 Track number 3 Disc number 4 Disc name (only if saved on the disc) 5 Track name (only if saved on the disc) 6 Track time 7 Graphic time and track display 8 Sound settings 9 Medium selection a To call up track listing b Stop function c Pause (“Play” appears if paused) d Disc type e Playback options
115
Control systems COMAND audio CD/audio DVD/MP3
Example display in MP3 mode
Stop function
Pause function
i This function is only available in audio DVD mode. 왘 Stopping playback: Select “Audio” 씮
“Audio” 씮 “DVD-Audio” 씮 “Stop”.
왘 Restarting playback: Select “Audio” 씮 “Audio” 씮 “DVD-Audio” 씮 “Play”. Playback starts at the beginning of the DVD.
In audio CD, audio DVD and MP3 mode 왘 Pausing playback: Press F briefly.
왘 Continuing playback: Press F
again briefly.
Only in audio DVD mode 왘 Pausing playback:
Select “Audio” 씮 “Audio” 씮 “DVD-Au- dio” 씮 “Pause”. The “Pause” screen changes to “Play”. 왘 Continuing playback: Select “Audio” 씮 “Audio” 씮 “DVD-Audio” 씮 “Play”. The “Play” screen changes to “Pause”.
1 Current playback option 2 Medium type 3 Disc number (not on PCMCIA card) 4 Track name 5 Current folder path 6 Current folder 7 Track time 8 Graphic time and track display 9 Sound settings a Medium selection b Folder listing c Track listing d Playback options
116
Control systems COMAND audio CD/audio DVD/MP3
Selecting CD/DVD/MP3 media
Selecting a track
왘 Select “Audio” 씮 “Audio”. 왘 Select “CD”, “DVD-Audio” or “MP3”.
COMAND begins playback.
왘 In audio CD, audio DVD and MP3
mode: Select “Changer”.
or 왘 In audio CD and audio DVD mode only: Press n when the main area is selected. The media list appears. The dot R in- dicates the current medium.
왘 Select a medium or folder.
COMAND changes the medium.
Selecting by skipping to tracks 왘 Skipping forwards or backwards to
a track (in CD or DVD mode only): Rotate ymz.
i Skipping forwards through the tracks skips to the next track. Skipping backwards through the tracks skips to the beginning of the current track if the track has been playing for more than 8 seconds. If the track has been playing for less than 8 seconds, it skips to the start of the previ- ous track. If you have switched on the “Random Tracks” playback option, the order of the tracks is ran- dom.
Selecting from the track list 왘 Select “Audio” 씮 “Audio”. 왘 Select “CD”, “DVD-Audio” or “MP3”. 왘 Select “Tracks”, “Tracks A-Z” or “Track
list”.
or
왘 Only in MP3 mode: Press n when the
main area is selected. The track list of the current folder ap- pears. The dotR indicates the current track.
왘 Select a track by rotating ymz or slid-
ing qmr.
i In MP3 mode, the list shows all the tracks in alphabetical order.
Fast forward/rewind
왘 Select main area. 왘 Slide and hold omp until desired place
is reached.
117
Control systems COMAND audio CD/audio DVD/MP3
Selecting a folder
i This function is only available in audio MP3 mode. 왘 Select “Audio” 씮 “Audio” 씮 “MP3” 씮
“Folder”.
or 왘 Press n when main area is selected. The track list of the current folder ap- pears. This is what the illustration in the right column is showing as well.
118
1 Back folder symbol 2 Current track symbol 3 Track symbol 왘 Selecting one folder higher: Select
the Q symbol. The display changes to the next folder up in the folder structure on the disc.
1 Back folder symbol 2 Current folder symbol 3 Folder symbol containing tracks 왘 Selecting a folder: Select desired fold-
er. You will see the tracks in the folder.
왘 Select a track.
The track is played and the correspond- ing folder is now the active folder.