- 2009 Hyundai Santa FE Owners Manuals
- Hyundai Santa FE Owners Manuals
- 2005 Hyundai Santa FE Owners Manuals
- Hyundai Santa FE Owners Manuals
- 2004 Hyundai Santa FE Owners Manuals
- Hyundai Santa FE Owners Manuals
- 2010 Hyundai Santa FE Owners Manuals
- Hyundai Santa FE Owners Manuals
- 2006 Hyundai Santa FE Owners Manuals
- Hyundai Santa FE Owners Manuals
- 2003 Hyundai Santa FE Owners Manuals
- Hyundai Santa FE Owners Manuals
- 2007 Hyundai Santa FE Owners Manuals
- Hyundai Santa FE Owners Manuals
- 2008 Hyundai Santa FE Owners Manuals
- Hyundai Santa FE Owners Manuals
- 2012 Hyundai Santa FE Owners Manuals
- Hyundai Santa FE Owners Manuals
- Download PDF Manual
-
OOWWNNEERR''SS MMAANNUUAALL
Santa Fe
Operation Maintenance Specifications
All information in this Owner's Manual is current at the time of publication. However, Hyundai reserves the right to make changes at any time so that our policy of continual product improvement may be carried out.
This manual applies to all Hyundai models and includes descriptions and explanations of optional as well as standard equipment. As a result, you may find material in this manual that does not apply to your specific vehi- cle.
CAUTION: MODIFICATIONS TO YOUR HYUNDAI
Your Hyundai should not be modified in any way. Such modifications may adversely affect the per- formance, safety or durability of your Hyundai and may, in addition, violate conditions of the limited warranties covering the vehicle. Certain modifications may also be in violation of regulations estab- lished by the U.S. Department of Transportation and other federal or state agencies.
TWO-WAY RADIO OR CELLULAR TELEPHONE INSTALLATION
Your vehicle is equipped with electronic fuel injection and other electronic components. It is possible for an improperly installed/adjusted two-way radio or cellular telephone to adversely affect electronic systems. For this reason, we recommend that you carefully follow the radio manufacturer's instruc- tions or consult your Hyundai dealer for precautionary measures or special instructions if you choose to install one of these devices.
F2
SAFETY AND VEHICLE DAMAGE WARNING
This manual includes information titled as WARNING, CAUTION and NOTICE. These titles indicate the following:
WARNING
This indicates that a condition may result in harm, serious injury or death to you or other persons if the warning is not heeded. Follow the advice provided with the warning.
CAUTION
This indicates that a condition may result in damage to your vehicle or its equipment if the caution is not heeded.Follow the advice provided with the caution.
✽✽ NOTICE This indicates that interesting or helpful information is being provided.
F3
FOREWORD
Thank you for choosing Hyundai. We are pleased to welcome you to the growing number of discriminating people who drive Hyundais. The advanced engineering and high-quality construction of each Hyundai we build is something of which we're very proud.
Your Owner's Manual will introduce you to the features and operation of your new Hyundai. It is suggested that you read it care- fully because the information it contains can contribute greatly to the satisfaction you receive from your new car.
The manufacturer also recommends that all service and maintenance on your car be performed by an authorized Hyundai deal- er. Hyundai dealers are prepared to provide high-quality service, maintenance and any other assistance that may be required.
HYUNDAI MOTOR AMERICA
Note : Because future owners will also need the information included in this manual, if you sell this Hyundai, please leave the man-
ual in the vehicle for their use. Thank you.
CAUTION
Severe engine and transaxle damage may result from the use of poor quality fuels and lubricants that do not meet Hyundai specifications.You must always use high quality fuels and lubricants that meet the specifications listed on Page 8-4 in the Vehicle Specifications section of the Owner's Manual.
Copyright 2009 Hyundai Motor America. All rights reserved. No part of this publication may be reproduced, stored in any retrieval system or transmitted in any form or by any means without the prior written permission of Hyundai Motor America.
F4
Guide to Hyundai Genuine Parts 1. What are Hyundai Genuine Parts?
Hyundai Genuine Parts are the same parts used by Hyundai Motor Company to manufacture vehicles. They are designed and tested for the optimum safety, performance, and reli- ability to our customers.
2. Why should you use genuine parts? Hyundai Genuine Parts are engi- neered and built to meet rigid manu- facturing requirements. Using imita- tion, counterfeit or used salvage parts is not covered under the Hyundai New Vehicle Limited Warranty or any other Hyundai warranty.
In addition, any damage to or failure of Hyundai Genuine Parts caused by the installation or failure of an imitation, counterfeit or used salvage part is not covered by any Hyundai Warranty.
3. How can you tell if you are purchas-
ing Hyundai Genuine Parts? Look for the Hyundai Genuine Parts Logo on the package (see below). Hyundai Genuine Parts exported to are packaged with labels written only in English. Hyundai Genuine Parts are only sold through Hyundai Dealerships.
authorized
A100A03L
A100A01L
A100A02L
A100A04L
F5
table of contents
Introduction
Your vehicle at a glance
Safety system of your vehicle
Features of your vehicle
Driving your vehicle
What to do in an emergency
Maintenance Specifications, Consumer information and Reporting safety defeccts Index
Introduction
How to use this manual / 1-2
Fuel requirements / 1-2
Vehicle handling instructions / 1-4
Vehicle break-in process / 1-5
Vehicle data collection and event data recorders / 1-5
Indicator symbols on the instrument cluster / 1-6Introduction
HOW TO USE THIS MANUAL A010000AUN We want to help you get the greatest possible driving pleasure from your vehi- cle. Your Owner’s Manual can assist you in many ways. We strongly recommend that you read the entire manual. In order to minimize the chance of death or injury, you must read the WARNING and CAU- TION sections in the manual. Illustrations complement the words in this manual to best explain how to enjoy your vehicle. By reading your manual, you will learn about features, important safety information, and driving tips under vari- ous road conditions. The general layout of the manual is pro- vided in the Table of Contents. A good place to start is the index; it has an alpha- betical listing of all information in your manual. Sections: This manual has eight sections plus an index. Each section begins with a brief list of contents so you can tell at a glance if that section has the information you want.
You’ll find various WARNINGS, CAU- TIONS, and NOTICES in this manual. These were prepared to enhance your personal safety.You should carefully read and follow ALL procedures and recom- mendations provided in these WARN- INGS, CAUTIONS and NOTICES.
WARNING
A WARNING indicates a situation in which harm, serious bodily injury or death could result if the warning is ignored.
CAUTION
A CAUTION indicates a situation in which damage to your vehicle could result if the caution is ignored.
✽✽ NOTICE A NOTICE indicates interesting or help- ful information is being provided.
FUEL REQUIREMENTS Your new vehicle is designed to use only unleaded fuel having a pump octane number((RTM)/2) of 87 or higher.
Your new vehicle is designed to obtain maximum performance with UNLEADED FUEL, as well as minimize exhaust emis- sions and spark plug fouling.
CAUTION
Never add any fuel system cleaning agents to the fuel tank other than what has been specified. (Consult an authorized HYUNDAI dealer for details.)
21
WARNING
• Do not "top off" after the nozzle automatically shuts off when refueling.
(cid:129) Tighten the cap until it clicks, oth-
erwise the Check Engine light will illuminate.
(cid:129) Always check that the fuel cap is installed securely to prevent fuel spillage in the event of an acci- dent.
Introduction
A020103AUN Gasoline containing alcohol and methanol Gasohol, a mixture of gasoline and ethanol (also known as grain alcohol), and gasoline or gasohol containing methanol (also known as wood alcohol) are being marketed along with or instead of leaded or unleaded gasoline. Do not use gasohol containing more than 10% ethanol, and do not use gasoline or gasohol containing any methanol. Either of these fuels may cause drivability prob- lems and damage to the fuel system. Discontinue using gasohol of any kind if drivability problems occur. Vehicle damage or driveability problems may not be covered by the manufactur- er’s warranty if they result from the use of: 1. Gasohol containing more than 10%
ethanol.
2. Gasoline or gasohol containing
methanol.
3. Leaded fuel or leaded gasohol.
"E85" fuel is an alternative fuel com- posed of 85 percent ethanol and 15 per- cent gasoline, and is manufactured exclusively for use in Flexible Fuel Vehicles. “E85” is not compatible with your vehicle. Use of “E85” may result in poor engine performance and damage to your vehicle's engine and fuel system. HYUNDAI recommends that customers do not use fuel with an ethanol content exceeding 10 percent.
CAUTION
Your New Vehicle Limited Warranty does not cover damage to the fuel system or any performance prob- lems caused by the use of “E85”fuel.
CAUTION
Never use gasohol which contains methanol. Discontinue use of any gasohol product which impairs dri- vability.
1 3
Introduction
A020104AUN Use of MTBE We recommend that fuels containing MTBE (Methyl Tertiary Butyl Ether) over 15.0% vol. (Oxygen Content 2.7% weight) should not be used in your vehi- cle. Fuel containing MTBE over 15.0% vol. (Oxygen Content 2.7% weight) may reduce vehicle performance and produce vapor lock or hard starting.
CAUTION
Your New Vehicle Limited Warranty may not cover damage to the fuel system and any performance prob- lems that are caused by the use of fuels containing methanol or fuels containing MTBE (Methyl Tertiary Butyl Ether) over 15.0% vol. (Oxygen Content 2.7% weight.)
A020105AUN Do not use methanol Fuels containing methanol (wood alco- hol) should not be used in your vehicle. This type of fuel can reduce vehicle per- formance and damage components of the fuel system.
A020106AUN Gasolines for cleaner air To help contribute to cleaner air, we rec- ommend that you use gasolines treated with detergent additives, which help pre- vent deposit formation in the engine. These gasolines will help the engine run cleaner and enhance performance of the Emission Control System.
A020107AUN Operation in foreign countries If you are going to drive your vehicle in another country, be sure to: (cid:129) Observe all regulations regarding reg-
istration and insurance.
(cid:129) Determine that acceptable fuel is avail-
able.
VEHICLE HANDLING INSTRUCTIONS As with other vehicles of this type, failure to operate this vehicle correctly may result in loss of control, an accident or vehicle rollover. Specific design characteristics (higher ground clearance, track, etc.) give this vehicle a higher center of gravity than other types of vehicles. In other words they are not designed for cornering at the same speeds as conventional 2-wheel drive vehicles. Avoid sharp turns or abrupt maneuvers. Again, failure to oper- ate this vehicle correctly may result in loss of control, an accident or vehicle rollover. Be sure to read the “Reducing the risk of a rollover” driving guide- lines, in section 5 of this manual.
41
VEHICLE BREAK-IN PROCESS A030000AUN No special break-in period is needed. By following a few simple precautions for the first 600 miles (1,000 km) you may add to the performance, economy and life of your vehicle. (cid:129) Do not race the engine. (cid:129) While driving, keep your engine speed (rpm, or revolutions per minute) between 2,000 rpm and 4,000 rpm.
(cid:129) Do not maintain a single speed for long periods of time, either fast or slow. Varying engine speed is needed to properly break-in the engine.
(cid:129) Avoid hard stops, except in emergen- cies, to allow the brakes to seat prop- erly.
(cid:129) Don't let the engine idle longer than 3
minutes at one time.
(cid:129) Don't tow a trailer during the first 1,200
miles (2,000 km) of operation.
Introduction
VEHICLE DATA COLLECTION AND EVENT DATA RECORDERS A040000AFD This vehicle is equipped with an event data recorder (EDR). The main pur- pose of an EDR is to record, in certain crash or near crash-like situations, such as an air bag deployment or hit- ting a road obstacle, data that will assist in understanding how a vehi- cle's systems performed. The EDR is designed to record data related to vehicle dynamics and safety systems for a short period of time, typically 30
seconds or less. The EDR in this vehi- cle is designed to record such data as: * How various systems in your vehicleThese data can help provide a better understanding of the circumstances in which crashes and injuries occur. NOTE: EDR data are recorded by your vehicle only if a nontrivial crash situa- tion occurs; no data are recorded by the EDR under normal driving condi- tions and no personal data (e.g., name, gender, age, and crash loca- tion) are recorded. However, other parties, such as law enforcement, could combine the EDR data with the type of personally identifying data routinely acquired during a crash investigation.
were operating:
* Whether or not the driver and pas- were
belts
senger safety buckled/fastened;
* How far (if at all) the driver was depressing the accelerator and/or brake pedal; and,
* How fast the vehicle was traveling.
To read data recorded by an EDR, spe- cial equipment is required, and access to the vehicle or the EDR is needed. In addition to the vehicle manufacture, other parties, such as law enforce- ment, that have the special equip- ment, can read the information if they have access to the vehicle or the EDR.
1 5
Introduction
INDICATOR SYMBOLS ON THE INSTRUMENT CLUSTER A050000BFD
Door ajar warning light
Air bag warning light
Cruise indicator
Tailgate open warning light
Seat belt warning light
Parking brake & Brake fluid warning light
Engine oil pressure warning light
Cruise SET indicator
Low fuel level warning light
High beam indicator
AWD system warning light*
Shift pattern indicator
Turn signal indicator
AWD LOCK indicator*
Low tire pressure telltale / TPMS(Tire Pressure Monitoring System) malfunction indicator
ESC indicator
Low windshield washer fluid level warning light*
ECO
ECO indicator*
ESC OFF indicator
Charging system warning light
*: if equipped ❈: For more detailed explanations, refer
to section 4, “Instrument cluster”.
ABS warning light
Malfunction indicator*
61
Your vehicle at a glance
Interior overview / 2-2
Instrument panel overview / 2-3
Engine compartment / 2-4Your vehicle at a glance
INTERIOR OVERVIEW
B010000AFD
22
1. Door lock/unlock button ............................4-8
2. Outside rearview mirror control switch*.....4-38
3. Central door lock switch* ..........................4-8
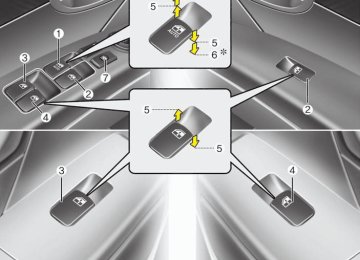
4. Power window lock button*.....................4-15
5. Power window switches..........................4-13
6. Fuse box ..................................................7-47
7. ESC OFF button .....................................5-28
8. AWD Lock button....................................5-17
9. Instrument panel illumination..................4-41
10. Front fog light button* ...........................4-60
11. AC inverter button* ...............................4-93
12. Hood release lever ...............................4-17
13. Steering wheel tilt .................................4-26
14. Seat ........................................................3-2
* : if equippedOCM010001N
INSTRUMENT PANEL OVERVIEW
B020000AFD
Your vehicle at a glance
1. Instrument cluster ...........................4-40
2. Light control / Turn signals ..............4-57
3. Wiper/Washer..................................4-61
4. Steering wheel audio controls* .......4-99
5. Auto cruise controls* .......................5-33
6. Driver’s air bag................................3-45
7. Ignition switch ...................................5-4
8. Steering wheel ................................4-26
9. Digital clock ........................................4-94
10. Audio system*..............................4-104
11. Hazard warning flasher switch......4-56
12. Climate control system* ........4-67/4-76
13. Seat warmer* ................................3-10
14. Shift lever................................5-7/5-10
15. Cigarette lighter.............................4-89
16. Power outlet ..................................4-92
17. Ashtray ..........................................4-89
18. Passenger’s air bag ......................3-45
19. Vent controls .................................4-70
20. Glove box ......................................4-86
21. Parking brake pedal ......................5-24
22. Brake pedal...................................5-23
23. Accelerator pedal ............................5-6
* : if equippedOCM010002N
2 3
Your vehicle at a glance
ENGINE COMPARTMENT
1. Engine coolant reservoir..................7-16
2. Engine oil filler cap ..........................7-14
3. Brake fluid reservoir.........................7-18
4. Air cleaner .......................................7-22
5. Fuse box ..........................................7-47
6. Negative battery terminal ................7-29
7. Positive battery terminal ..................7-29
8. Radiator cap ....................................7-17
9. Engine oil dipstick............................7-14
10. Power steering fluid reservoir ........7-19
11. Windshield washer fluid reservoir..7-20* The actual engine room in the vehicle may differ from the illustration.
OXM079001
42
Seat / 3-2
Seat belts / 3-17
Child restraint system / 3-28
Airbag-supplemental restraint system / 3-36Safety system of your vehicle
Safety system of your vehicle
SEAT
Manual seat
Power seat
C010000AFD
23
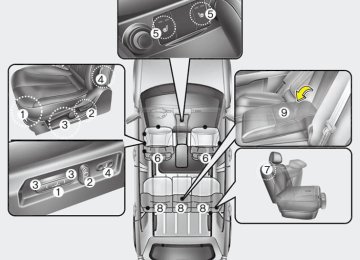
Front seat (1) Forward and backward (2) Seatback angle (3) Seat cushion height (Driver’s seat) (4) Lumbar support (Driver’s seat)* (5) Seat warmer* (6) Headrest
Rear seat (7) Seatback angle and folding (8) Headrest (9) Armrest
* if equipped
OCM030001N
WARNING - Loose objects Loose objects in the driver’s foot area could interfere with the opera- tion of the foot pedals, possibly causing an accident. Do not place anything under the front seats.
WARNING - Uprighting
seat
When you return the seatback to its upright position, hold the seatback and return it slowly and be sure there are no other occupants around the seat. If the seatback is returned without being held and controlled, the back of the seat could spring forward resulting in accidental injury to a person struck by the seatback.
WARNING - Driver respon- sibility for front seat pas- senger
Riding in a vehicle with a front seat- back reclined could lead to serious or fatal injury in an accident. If a front seat is reclined during an accident, the occupant’s hips may slide under the lap portion of the seat belt applying great force to the unprotected abdomen. Serious or fatal internal injuries could result. The driver must advise the front passenger to keep the seatback in an upright position whenever the vehicle is in motion.
Safety system of your vehicle
WARNING - Driver’s seat
(cid:129) Never attempt to adjust seat while the vehicle is moving. This could result in loss of control, and an accident causing death, serious injury, or property dam- age.
(cid:129) Do not allow anything to interfere with the normal position of the seatback. Storing items against a seatback or in any other way interfering with proper locking of a seatback could result in serious or fatal injury in a sudden stop or collision.
(cid:129) Always drive and ride with your seatback upright and the lap por- tion of the seat belt snug and low across the hips. This is the best position to protect you in case of an accident.
(cid:129) In order to avoid unnecessary and perhaps severe air bag injuries, always sit as far back as possible from the steering wheel while maintaining comfortable control of the vehicle. It is recom- mended that your chest is at least 10 inches (250 mm) away from the steering wheel.
3 3
WARNING
After adjusting the seat, always check that it is securely locked into place by attempting to move the seat forward or reverse without using lever. Sudden or unexpected movement of the driver's seat could cause you to lose control of the vehicle result- ing in an accident.
lock release
the
(Continued) (cid:129) When resetting the seatback to the upright position, make sure it is securely latched by pushing it forward and backwards.
(cid:129) To avoid the possibility of burns, do not remove the carpet in the cargo area. Emission control devices beneath this floor gener- ate high temperatures.
Safety system of your vehicle
WARNING - Rear seat-
backs
(cid:129) The rear seatback must be securely latched. If not, passen- gers and objects could be thrown forward resulting in serious injury or death in the event of a sudden stop or collision.
(cid:129) Luggage and other cargo should be laid flat in the cargo area. If objects are large, heavy, or must be piled, they must be secured. Under no circumstances should cargo be piled higher than the seatbacks. Failure to follow these warnings could result in serious injury or death in the event of a sudden stop, collision or rollover. (cid:129) No passenger should ride in the cargo area or sit or lie on folded seatbacks while the vehicle is moving. All passengers must be properly seated in seats and restrained properly while riding. (Continued)
43
Safety system of your vehicle
OCM030002
OCM030003
OCM030004
Front seat adjustment - Manual C010101AUN Forward and backward To move the seat forward or backward: 1. Pull the seat slide adjustment lever under the front edge of the seat cush- ion up and hold it.
2. Slide the seat to the position you
desire.
3. Release the lever and make sure the
seat is locked in place.
Adjust the seat before driving, and make sure the seat is locked securely by trying to move forward and backward without using the lever. If the seat moves, it is not locked properly.
C010102AUN Seatback angle To recline the seatback: 1. Lean forward slightly and lift up on the seatback recline lever located on the outside of the seat at the rear.
2. Carefully lean back on the seat and adjust the seatback of the seat to the position you desire.
3. Release the lever and make sure the seatback is locked in place. (The lever MUST return to its original position for the seatback to lock.)
C010103AUN Seat cushion height (for driver’s seat) To change the height of the seat cushion, push the lever that is located on the out- side of the seat cushion upwards or downwards. (cid:129) To lower the seat cushion, push down
the lever several times.
(cid:129) To raise the seat cushion, pull up the
lever several times.
3 5
Safety system of your vehicle
OCM030005
C010105AFD Lumbar support (for driver’s seat,if equipped) The lumbar support can be adjusted by moving the lever on the outside of the dri- ver’s seatback. Pivoting the lever increas- es or decreases lumbar support.
Front seat adjustment - power (if equipped) The front seat can be adjusted by using the control switches located on the out- side of the seat cushion. Before driving, adjust the seat to the proper position so as to easily control the steering wheel, pedals and switches on the instrument panel.
WARNING
The power seat is operable with the ignition OFF. Therefore, children should never be left unattended in the vehicle.
CAUTION
(cid:129) The power seat is driven by an electric motor. Stop operating once the adjustment is complet- ed. Excessive operation may damage the electrical equipment. (cid:129) When in operation, the power seat consumes a large amount of electrical power. To prevent unnecessary charging system drain,don’t adjust the power seat longer than necessary while the engine is not running.
(cid:129) Do not operate two or more power seat control switches at the same time. Doing so may result in power seat motor or electrical component malfunction.
63
Safety system of your vehicle
OCM030006
OCM030007
OCM030008
Forward and backward Push the control switch forward or back- ward to move the seat to the desired position. Release the switch once the seat reaches the desired position.
Seatback angle Push the control switch forward or back- ward to move the seatback to the desired angle. Release the switch once the seat reaches the desired position.
Seat height (for driver’s seat) Pull the front portion of the control switch up to raise or down to lower the front part of the seat cushion. Pull the rear portion of the control switch up to raise or down to lower the rear part of the seat cushion. Release the switch once the seat reach- es the desired position.
3 7
Safety system of your vehicle
OCM030009
OJM069015
Lumbar support (for driver’s seat) The lumbar support can be adjusted by pressing the button.
C010104BFD Headrest The driver's and front passenger's seats are equipped with a headrest for the occupant's safety and comfort. The headrest not only provides comfort for the driver and front passenger, but also helps to protect the head and neck in the event of a collision.
83
WARNING
(cid:129) For maximum effectiveness in case of an accident, the headrest should be adjusted so the middle of the headrest is at the same height of the center of gravity of an occupant's head. Generally, the center of gravity of most peo- ple's head is similar with the height of the top of their eyes. Also, adjust the headrest as close to your head as possible. For this reason, the use of a cushion that holds the body away from the seatback is not recommended.
(cid:129) Do not operate the vehicle with the headrests removed as severe injury to the occupants may occur in the event of an accident. Headrests may provide protec- tion against neck injuries when properly adjusted.
(cid:129) Do not adjust the headrest posi- tion of the driver's seat while the vehicle is in motion.
Safety system of your vehicle
HNF2041-1
OCM030010
OCM030011
Active headrest (if equipped) The active headrest is designed to move forward and upward during a rear impact. This helps prevent the driver's and front passenger’s heads from moving back- ward and thus helps minimize neck injuries. For your safety, the active headrest can’t be removed. If there is any problem with the active headrest, take your vehicle to an authorized HYUNDAI dealer and have the system checked.
Forward and backward adjustment (if equipped) The headrest may be adjusted forward to 3 different positions by pulling the head- rest forward to the desired detent. To adjust the headrest to it’s furthest back- wards position, pull it fully forward to the farthest position and release it. Adjust the headrest so that it properly supports the head and neck.
Adjusting the height up and down To raise the headrest, pull it up to the desired position (1). To lower the head- rest, push and hold the release button (2) on the headrest support and lower the headrest to the desired position (3).
3 9
(cid:129) Each time you push the button, the temperature setting of the seat is changed as follows : OFF → HIGH ( →
) → LOW (
(cid:129) The seat warmer defaults to the OFF position whenever the ignition switch is turned on.
: HIGH
: LOW
Safety system of your vehicle
OCM030012
OCM029145N-2
Removal To remove the headrest, raise it as far as it can go then press the release button (1) while pulling upward (2). To reinstall the headrest, put the head- rest poles (3) into the holes while press- ing the release button (1). Then adjust it to the appropriate height.
WARNING
Make sure the headrest locks in position after adjusting it to proper- ly protect the occupants.
C010107AFD Seat warmer (if equipped) The seat warmer is provided to warm the front seats during cold weather. With the ignition switch in the ON position, push either of the switches to warm the driver's seat or the front passenger's seat. During mild weather or under conditions where the operation of the seat warmer is not needed, keep the switches in the "OFF" position.
10
✽✽ NOTICE With the seat warmer switch in ON position, the heating system in the seat turns off or on automatically depending on the seat temperature.
CAUTION
(cid:129) When cleaning the seats, do not use an organic solvent such as thinner, benzene, alcohol and gasoline. Doing so may damage the surface of the heater or seats. (cid:129) To prevent overheating the seat warmer, do not place blankets, cushions or seat covers on the seats while the seat warmer is in operation.
(cid:129) Do not place heavy or sharp objects on seats equipped with seat warmers.Damage to the seat warming components could occur.
WARNING - Seat warmer
burns
Passengers should use extreme caution when using seat warmers due to the possibility of excess heating or burns. In particular, the driver must exercise extreme care for the following types of passen- gers: 1. Infants, children, elderly or hand- icapped persons, or hospital out- patients
2. Persons with sensitive skin or
those that burn easily
3. Fatigued individuals 4. Intoxicated individuals 5. Individuals taking medication that can cause drowsiness or sleepiness (sleeping pills, cold tablets, etc.)
Safety system of your vehicle
Type A
Type B
OMG039017
OHM038010
C010108AUN Seatback pocket (if equipped) The seatback pocket is provided on the back of the front passenger’s and driver’s seatbacks.
3 11
Safety system of your vehicle
WARNING - Seatback pockets
Do not put heavy or sharp objects in the seatback pockets. In an acci- dent they could come loose from the pocket and injure vehicle occu- pants.
WARNING
For proper operation of the occu- pant classification system: (cid:129) Do not place any items cumula- tively weighing over 2.2 lbs (1 kg) in the seatback pocket or on the seat.
(cid:129) Do not hang onto the front pas-
senger seat.
12
OCM030062N
OJM069015R
Rear seat adjustment Seatback angle To recline the seatback: 1. Pull up the seatback recline lever. 2. Hold the lever and adjust the seatback of the seat to the position you desire. 3. Release the lever and make sure the seatback is locked in place. (The lever MUST return to its original position for the seatback to lock.)
Headrest The rear seat(s) is equipped with head- rests in all the seating positions for the occupant's safety and comfort. The headrest not only provides comfort for passengers, but also helps protect the head and neck in the event of a collision.
Safety system of your vehicle
Removal The headrest can’t be removed. If there is any problem with the headrest, take your vehicle to an authorized HYUNDAI dealer and have the system checked.
WARNING
(cid:129) For maximum effectiveness in case of an accident, the headrest should be adjusted so the middle of the headrest is at the same height of the center of gravity of an occupant's head. Generally, the center of gravity of most peo- ple's head is similar with the height of the top of their eyes. Also adjust the headrest as close to your head as possible. For this reason, the use of a cushion that holds the body away from the seatback is not recommended.
(cid:129) Do not operate the vehicle with the headrests removed. Severe injury to an occupant may occur in the event of an accident. Headrests may provide protec- tion against severe neck injuries when properly adjusted.
OCM030060N
Adjusting the height up and down To raise the headrest, pull it up to the desired position (1). To lower the head- rest, push and hold the release button (2) on the headrest support and lower the headrest to the desired position (3).
3 13
Safety system of your vehicle
OCM052035
Armrest To use the armrest, pull it forward from the seatback.
Folding the rear seat The rear seatbacks can be folded to facil- itate carrying long items or to increase the luggage capacity of the vehicle.
WARNING
The purpose of the fold-down rear seatbacks is to allow you to carry longer objects that could not be accommodated in the cargo area. Never allow passengers sit on top of the folded down seatback while the vehicle is moving. This is not a proper seating position and no seat belts are available for use. This could result in serious injury or death in case of an accident or sud- den stop. Objects carried on the folded down seatback should not extend higher than the top of the front seatbacks. This could allow cargo to slide forward and cause injury or damage during sudden stops.
1. Insert the rear seat belt buckle in the pocket between the rear seat back and cushion, and make sure the rear seat belt webbing does not get in the way when folding the rear seat.
2. Set the front seatback to the upright position and if necessary, slide the front seat forward.
3.Lower the rear headrests to the lowest
position.
14
OCM030063N
Also, unfold the headrest manually.
OCM030065N
OCM030064N 4.Pull on the seatback folding lever, then fold the seat toward the front of the vehicle. The headrest will fold forward. When you return the seatback to its upright position, always be sure it has locked into position by pushing on the top of the seatback.
Safety system of your vehicle
WARNING
When you return the rear seatback to its upright position after being folded down: Be careful not to damage the seat belt webbing or buckle. Do not allow the seat belt webbing or buckle to get caught or pinched in the rear seat. Ensure that the seat- back is completely locked into its upright position by pushing on the top of the seatback. Otherwise, in an accident or sudden stop, the seat could fold down and allow cargo to enter the passenger com- partment, which could result in serious injury or death.
WARNING - Uprighting
seat
When you return the seatback to its upright position, hold the seatback and return it slowly. If the seatback is returned without holding it, the back of the seat could spring for- ward resulting in injury caused by being struck by the seatback.
3 15
Safety system of your vehicle
CAUTION - Damaging rear seat belt buckles
When you fold the rear seatback, insert the buckle in the pocket between the rear seatback and cushion.Doing so can prevent the buckle from being damaged by the rear seatback.
CAUTION - Rear seat belts When returning the rear seatbacks to the upright position, remember to return the rear shoulder belts to their proper position.
WARNING - Cargo
Cargo should always be secured to prevent it from being thrown about the vehicle in a collision and caus- ing injury to the vehicle occupants. Do not place objects in the rear seats, since they cannot be proper- ly secured and may hit the front seat occupants in a collision.
WARNING - Cargo loading Make sure the engine is off, the automatic transaxle is in P (Park) and the parking brake is securely applied whenever loading or unloading cargo. Failure to take these steps may allow the vehicle to move if the shift lever is inadver- tently moved to another position.
16
SEAT BELTS C020100AUN Seat belt restraint system
WARNING
(cid:129) For maximum restraint system protection, the seat belts must always be used whenever the car is moving.
(cid:129) Seat belts are most effective the
when seatbacks are upright position.
in
be
always
(cid:129) Children age 12 and younger must properly restrained in the rear seat. Never allow children to ride in the front passenger seat. If a child over 12
must be seated in the front seat, he/she must be properly belted and the seat should be moved as far back as possible.(cid:129) Never wear the shoulder belt under your arm or behind your back. An improperly positioned shoulder belt can cause serious injuries in a crash. The shoulder belt should be positioned midway over your shoulder across your collarbone.
(Continued)
(Continued) (cid:129) Avoid wearing twisted seat belts. A twisted belt can't do its job as well. In a collision, it could even cut into you. Be sure the belt webbing is straight and not twist- ed.
(cid:129) Be careful not to damage the belt webbing or hardware. If the belt webbing or hardware is dam- aged, replace it.
WARNING
Seat belts are designed to bear upon the bony structure of the body, and should be worn low across the front of the pelvis or the pelvis, chest and shoulders, as applicable; wearing the lap section of the belt across the abdominal area must be avoided. Seat belts should be adjusted as firmly as possible, consistent with comfort, to provide the protection for which they have been designed. A slack belt will greatly reduce the protection afforded to the wearer.
(Continued)
Safety system of your vehicle
(Continued) Care should be taken to avoid con- tamination of the webbing with pol- ishes, oils and chemicals, and par- ticularly battery acid. Cleaning may safely be carried out using mild soap and water. The belt should be replaced if webbing becomes frayed, contaminated or damaged. It is essential to replace the entire assembly after it has been worn in a severe impact even if damage to the assembly is not obvious. Belts should not be worn with straps twisted. Each seat belt assembly must only be used by one occu- pant; it is dangerous to put a belt around a child being carried on the occupant's lap.
WARNING
No modifications or additions should be made by the user which will either prevent the seat belt adjusting devices from operating to remove slack, or prevent the seat belt assembly from being adjusted to remove slack.
3 17
If the driver's seat belt is disconnected after the ignition switch is turned to the ON position, the seat belt warning light will operate for approximately 6 seconds. But if it is fastened within the 6 seconds, the warning light will turn off immediately. If the driver's seat belt is not fastened when the vehicle speed exceeds 6 mph (10 km/h), the seat belt warning light and chime will operate for approximately 11
times with a pattern of 6 seconds on and 24 seconds off until the belt is fastened or the vehicle speed decreases below 3
mph (5 km/h).Safety system of your vehicle
1GQA2083
Seat belt warning As a reminder to the driver, the seat belt warning light will blink for approximately 6 seconds each time you turn the ignition switch ON regardless of belt fastening. If the driver's seat belt is not fastened when the ignition switch is turned on, the seat belt warning light and the seat belt warning chime will operate for approxi- mately 6 seconds. But if it is fastened within the 6 seconds, the warning light will blink till the 6 seconds and the warn- ing chime will turn off immediately.
18
B180A01NF
C020102AFD-EU Seat belt - Driver's 3-point system with emergency locking retractor To fasten your seat belt: To fasten your seat belt, pull it out of the retractor and insert the metal tab (1) into the buckle (2). There will be an audible "click" when the tab locks into the buckle. The seat belt automatically adjusts to the proper length only after the lap belt por- tion is adjusted manually so that it fits snugly around your hips. If you lean for- ward in a slow, easy motion, the belt will extend and let you move around. If there is a sudden stop or impact, however, the belt will lock into position. It will also lock if you try to lean forward too quickly.
✽✽ NOTICE If you are not able to pull out the seat belt from the retractor, firmly pull the belt out and release it. Then you will be able to pull the belt out smoothly.
Safety system of your vehicle
Release the button to lock the anchor into position. Try sliding the height adjuster to make sure that it has locked into position.
WARNING
(cid:129) Verify the shoulder belt anchor is locked into position at the appro- priate height. Never position the shoulder belt across your neck or face. Improperly positioned seat belts can cause serious injuries in an accident.
(cid:129) Failure to replace seat belts after an accident could leave you with damaged seat belts that will not provide protection in the event of another collision leading to per- sonal injury or death. Replace your seat belts after being in an accident as soon as possible.
3 19
OCM030026
Height adjustment (Front) You can adjust the height of the shoulder belt anchor to one of 4 positions for max- imum comfort and safety. If the height of the adjusting seat belt is too near your neck, you will not be getting the most effective protection. The shoul- der portion should be adjusted so that it lies across your chest and midway over your shoulder nearest the door and not your neck. To adjust the height of the seat belt anchor, lower or raise the height adjuster into an appropriate position. To raise the height adjuster, pull it up (1). To lower it, push it down (3) while press- ing the height adjuster button (2).
Safety system of your vehicle
B200A01NF
WARNING
You should place the lap belt por- tion as low as possible and snugly across your hips, not on your waist. If the lap belt is located too high on your waist, it may increase the chance of injury in the event of a collision. Both arms should not be under or over the belt. Rather, one should be over and the other under, as shown in the illustration. Never wear the seat belt under the arm near the door.
20
When the seat belt is fully extended from the retractor to allow the installation of a child restraint system, the seat belt oper- ation changes to allow the belt to retract, but not to extend (Automatic Locking Retractor Type). Refer to “Using a child restraint system” in this section.
✽✽ NOTICE Although the combination retractor provides the same level of protection for seated passengers in either emergency or automatic locking modes, it is recom- mended that seated passengers use the emergency locking feature for improved convenience. The automatic locking function is intended to facilitate child restraint installation. To convert from the automatic locking feature to the emergency locking operation mode, allow the unbuckled seat belt to fully retract.
C020106AFD Seat belts - Front passenger and rear seat 3-point system with combination locking retractor To fasten your seat belt: Combination retractor type seat belts are installed in the rear seat positions to help accommodate the installation of child restraint systems. Although a combina- tion retractor is also installed in the front passenger seat position, it is strongly recommended that children always be seated in the rear seat. NEVER place any infant restraint system in the front seat of the vehicle. This type of seat belt combines the fea- tures of both an emergency locking retractor seat belt and an automatic lock- ing retractor seat belt. To fasten your seat belt, pull it out of the retractor and insert the metal tab into the buckle. There will be an audible "click" when the tab locks into the buckle. When not securing a child restraint, the seat belt operates in the same way as the driver's seat belt (Emergency Locking Retractor Type). It automatically adjusts to the proper length only after the lap belt portion of the seat belt is adjusted manually so that it fits snugly around your hips.
Safety system of your vehicle
OHM038028N When using the rear center seat belt, the buckle with the “CENTER” mark must be used.
B210A01NF
OCM052031
To release the seat belt: The seat belt is released by pressing the release button (1) in the locking buckle. When it is released, the belt should auto- matically draw back into the retractor. If this does not happen, check the belt to be sure it is not twisted, then try again.
Stowing the rear seat belt The rear seat belt buckles can be stowed in the pocket between the rear seatback and cushion when not in use.
3 21
When the vehicle stops suddenly, or if the occupant tries to lean forward too quickly, the seat belt retractor will lock into position. In certain frontal collisions (or side collisions or rollovers), the pre- tensioner will activate and pull the seat belt into tighter contact against the occu- pant's body. If the system senses excessive seat belt tension on the driver or passenger's seat belt when the pre-tensioner activates, the load limiter inside the pre-tensioner will release some of the pressure on the affected seat belt.
✽✽ NOTICE The pre-tensioner will activate not only in a frontal collision but also in a side collision or rollover, if the vehicle is equipped with a side or curtain air bag.
8KMB3311
The seat belt pre-tensioner system con- sists mainly of the following components. Their locations are shown in the illustra- tion: 1. SRS air bag warning light 2. Retractor pre-tensioner assembly 3. SRS control moduleSafety system of your vehicle
OED030300
Pre-tensioner seat belt Your vehicle is equipped with driver's and front passenger's pre-tensioner seat belts. The purpose of the pre-tensioner is to make sure that the seat belts fit tightly against the occupant's body in certain frontal collisions (or side collisions or rollovers). The pre-tensioner seat belts can be activated, where the frontal colli- sion (or side collisions or rollovers) is severe enough, together with the air bags.
22
WARNING
To obtain maximum benefit from a pre-tensioner seat belt: 1. The seatbelt must be working correctly and adjusted to the proper position. Please read and follow all of the important infor- mation and precautions about your vehicle’s occupant safety features – including seat belts and air bags – that are provided in this manual.
2. Be sure you and your passen- gers always wear seat belts prop- erly.
✽✽ NOTICE • Both the driver's and front passen- ger's pre-tensioner seat belts may be activated in certain frontal collisions (or side collisions or rollovers). The pre-tensioners will not be activat- ed if the seat belts are not being worn at the time of the collision.
• When the pre-tensioner seat belts are activated, a loud noise may be heard and fine dust, which may appear to be smoke, may be visible in the passenger compartment. These are normal oper- ating conditions and are not haz- ardous.
• Although it is harmless, the fine dust may cause skin irritation and should not be breathed for prolonged peri- ods. Wash all exposed skin areas thor- oughly after an accident in which the pre-tensioner seat belts were activat- ed.
• Because the sensor that activates the SRS air bag is connected with the pre- tensioner seat belt, the SRS air bag warning light on the instrument panel will illuminate for approximately 6
seconds after the ignition switch has been turned to the "ON" position, and then it should turn off.Safety system of your vehicle
CAUTION
If the pre-tensioner seat belt is not working properly,this warning light will illuminate even if there is no malfunction of the SRS air bag. If the SRS air bag warning light does not illuminate when the ignition key is turned to "ON", or if it remains illuminated after illuminating for approximately 6 seconds, or if it illuminates while the vehicle is being driven, please have an authorized HYUNDAI dealer inspect the pre-tensioner seat belt or SRS air bag system as soon as possible.
3 23
(Continued) (cid:129) Improper handling of the pre-ten- sioner seat belt assemblies, and failure to heed the warnings not to strike, modify, inspect, replace, service or repair the pre-tension- er seat belt assemblies may lead to improper operation or inadver- tent activation and serious injury. (cid:129) Always wear the seat belts when driving or riding in a motor vehi- cle.
(cid:129) If the vehicle or pre-tensioner seat belt must be discarded, con- tact an authorized HYUNDAI deal- er.
Seat belt precautions
WARNING
All occupants of the vehicle must wear their seat belts at all times. Seat belts and child restraints reduce the risk of serious or fatal injuries for all occupants in the event of a collision or sudden stop. Without a seat belt, occupants could be shifted too close to a deploying air bag, strike the interior structure or be thrown from the vehicle. Properly worn seat belts greatly reduce these hazards. Even with advanced air bags, unbelted occupants can be severe- ly injured by a deploying air bag. Always the precautions about seat belts, air bags and occu- pant seat contained in this manual.
follow
Safety system of your vehicle
WARNING
(cid:129) Pre-tensioners are designed to operate only one time. After acti- vation, pre-tensioner seat belts must be replaced. All seat belts, of any type, should always be replaced after they have been worn during a collision.
(cid:129) The pre-tensioner seat belt assembly mechanisms become hot during activation. Do not touch the pre-tensioner seat belt assemblies for several minutes after they have been activated.
(cid:129) Do not attempt to inspect or replace the pre-tensioner seat belts yourself. This must be done by an authorized HYUNDAI deal- er.
(cid:129) Do not strike the pre-tensioner
seat belt assemblies.
(Continued)
24
✽✽ NOTICE Small children are best protected from injury in an accident when properly restrained in the rear seat by a child restraint system that meets the require- ments of the Federal Motor Vehicle Safety Standards. Before buying any child restraint system, make sure that it has a label certifying that it meets Federal Motor Vehicle Safety Standards 213. The restraint must be appropriate for your child's height and weight. Check the label on the child restraint for this information. Refer to “Child restraint system” in this section.
Infant or small child All 50 states have child restraint laws.You should be aware of the specific require- ments in your state. Child and/or infant seats must be properly placed and installed in the rear seat. For more infor- mation about the use of these restraints, refer to “Child restraint system” in this section.
WARNING
Every person in your vehicle needs to be properly restrained at all times, including infants and chil- dren. Never hold a child in your arms or lap when riding in a vehi- cle. The violent forces created dur- ing a crash will tear the child from your arms and throw the child against the interior. Always use a child restraint appropriate for your child's height and weight.
Safety system of your vehicle
C020301AUN Larger children Children who are too large for child restraint systems should always occupy the rear seat and use the available lap/shoulder belts. The lap portion should be fastened snug on the hips and as low as possible. Check belt fit periodically. A child's squirming could put the belt out of position. Children are afforded the most safety in the event of an accident when they are restrained by a proper restraint system in the rear seat. If a larger child (over age 12) must be seated in the front seat, the child should be securely restrained by the available lap/shoulder belt and the seat should be placed in the rearmost position. Children age 12 and under should be restrained securely in the rear seat. NEVER place a child age 12 and under in the front seat. NEVER place a rear facing child seat in the front seat of a vehicle.
3 25
Safety system of your vehicle
If the shoulder belt portion slightly touch- es the child’s neck or face, try placing the child closer to the center of the vehicle. If the shoulder belt still touches their face or neck they need to be returned to a child restraint system.
WARNING - Shoulder belts on small children
(cid:129) Never allow a shoulder belt to be in contact with a child’s neck or face while the vehicle in motion.
is
(cid:129) If seat belts are not properly worn and adjusted on children, there is a risk of death or serious injury.
C020302AUN Pregnant women The use of a seat belt is recommended for pregnant women to lessen the chance of injury in an accident. When a seat belt is used, the lap belt portion should be placed as low and snugly as possible on the hips, not across the abdomen. For specific recommendations, consult a physician.
WARNING - Pregnant
women
Pregnant women must never place the lap portion of the safety belt over the area of the abdomen where the fetus is located or above the abdomen where the belt could crush the fetus during an impact.
C020303AUN Injured person A seat belt should be used when an injured person is being transported. When this is necessary, you should con- sult a physician for recommendations.
C020304AUN One person per belt Two people (including children) should never attempt to use a single seat belt. This could increase the severity of injuries in case of an accident.
Do not lie down To reduce the chance of injuries in the event of an accident and to achieve max- imum effectiveness of the restraint sys- tem, all passengers should be sitting up and the front and rear seats should be in an upright position when the car is mov- ing. A seat belt cannot provide proper protection if the person is lying down in the rear seat or if the front and rear seats is in a reclined position.
26
WARNING
Riding with a reclined seatback increases your chance of serious or fatal injuries in the event of a col- lision or sudden stop. The protec- tion of your restraint system (seat belts and air bags) is greatly reduced by reclining your seat. Seat belts must be snug against your hips and chest to work proper- ly. The more the seatback is reclined, the greater the chance that an occupant's hips will slide under the lap belt causing serious internal injuries or the occupant's neck could strike the shoulder belt. Drivers and passengers should always sit well back in their seats, properly belted, and with the seat- backs upright.
C020400AUN Care of seat belts Seat belt systems should never be disas- sembled or modified. In addition, care should be taken to assure that seat belts and belt hardware are not damaged by seat hinges, doors or other abuse.
WARNING
When you return the rear seatback to its upright position after the rear seatback was folded down, be care- ful not to damage the seat belt web- bing or buckle. Be sure that the webbing or buckle does not get caught or pinched in the rear seat. A seat belt with damaged webbing or buckle will not be as strong and could possibly fail during a colli- sion or sudden stop, resulting in serious injury.
Safety system of your vehicle
Periodic inspection All seat belts should be inspected peri- odically for wear or damage of any kind. Any damaged parts should be replaced as soon as possible.
C020402AUN Keep belts clean and dry Seat belts should be kept clean and dry. If belts become dirty, they can be cleaned by using a mild soap solution and warm water. Bleach, dye, strong detergents or abrasives should not be used because they may damage and weaken the fabric.
C020403AFD When to replace seat belts Entire in-use seat belt assembly or assemblies should be replaced if the vehicle has been involved in an accident. This should be done even if no damage is visible. Additional questions concern- ing seat belt operation should be directed to an authorized HYUNDAI dealer.
3 27
Safety system of your vehicle
CHILD RESTRAINT SYSTEM C030000AEN-EU Children riding in the car should sit in the rear seat and must always be properly restrained to minimize the risk of injury in an accident, sudden stop or sudden maneuver. According to accident statis- tics, children are safer when properly restrained in the rear seats than in the front seat. Larger children not in a child restraint should use one of the seat belts provided. You should be aware of the specific requirements in your state. Child and/or infant safety seats must be properly placed and installed in the rear seat. You must use a commercially available child restraint system that meets the require- ments of the Federal Motor Vehicle Safety Standards (FMVSS). Child restraint systems are designed to be secured in vehicle seats by lap belts or the lap belt portion of a lap/shoulder belt, or by a LATCH system. Children could be injured or killed in a crash if their restraints are not properly secured. For small children and babies, a child seat or infant seat must be used. Before buying a particular child restraint system, make sure it fits your car seat and seat belts, and fits your child. Follow all the instructions provided by the man- ufacturer when the child restraint system.
installing
28
WARNING
(cid:129) A child restraint system must be placed in the rear seat. Never install a child or infant seat on the front passenger's seat. Should an accident occur and cause the passenger-side air bag to deploy, it could severely injure or kill an infant or child seated in an infant or child seat. Thus only use a child restraint in the rear seat of your vehicle.
(cid:129) A seat belt or child restraint sys- tem can become very hot if it is left in a closed vehicle on a sunny day, even if the outside tempera- ture does not feel hot. Be sure to check the seat cover and buckles before placing a child there.
(cid:129) When the child restraint system is not in use, store it in the lug- gage area or fasten it with a seat belt so that it will not be thrown forward in the case of a sudden stop or an accident.
(cid:129) Children may be seriously injured or killed by an inflating air bag. All children, even those too large for child restraints, must ride in the rear seat.
WARNING
To reduce the chance or serious or fatal injuries: (cid:129) Children of all ages are safer when restrained in the rear seat. A child riding in the front passen- ger seat can be forcefully struck by an inflating air bag resulting in serious or fatal injuries.
(cid:129) Always follow the child restraint system manufacturer’s instruc- tions for installation and use of the child restraint.
(cid:129) Always make sure the child seat is secured properly in the car and your child is securely restrained in the child seat.
(cid:129) Never hold a child in your arms or lap when riding in a vehicle. The violent forces created during a crash will tear the child from your arms and throw the child against the car’s interior.
(cid:129) Never put a seat belt over your- self and a child. During a crash, the belt could press deep into the child causing serious internal injuries.
(Continued)
resulting
(Continued) (cid:129) Never leave children unattended in a vehicle – not even for a short time. The car can heat up very quickly, in serious injuries to children inside. Even very young children may inadver- tently cause the vehicle to move, entangle themselves in the win- dows, or lock themselves or oth- ers inside the vehicle.
(cid:129) Never allow two children, or any two persons, to use the same seat belt.
(cid:129) Children often squirm and repo- improperly. sition themselves Never let a child ride with the shoulder belt under their arm or behind their back. Always prop- erly position and secure children in rear seat.
(cid:129) Never allow a child to stand-up or kneel on the seat or floorboard of a moving vehicle. During a colli- sion or sudden stop, the child can be violently thrown against the vehicles interior, resulting in serious injury.
(Continued)
(Continued) (cid:129) Never use an infant carrier or a child safety seat that "hooks" over a seatback, it may not pro- vide adequate security in an acci- dent.
(cid:129) Seat belts can become very hot, especially when the car is parked in direct sunlight. Always check seat belt buckles before fasten- ing them over a child.
Safety system of your vehicle
Rearward-facing child restraint system
Forward-facing child restraint system
CRS09
OUN026150
C030100AFD Using a child restraint system For small children and babies, the use of a child seat or infant seat is required. This child seat or infant seat should be of appropriate size for the child and should be installed in accordance with the man- ufacturer's instructions. For safety rea- sons, we recommend that the child restraint system be used in the rear seats.
3 29
Safety system of your vehicle
WARNING
Never place a rear-facing child restraint in the front passenger seat, because of the danger that an inflating passenger-side air bag could impact the rear-facing child restraint and kill the child.
Since all passenger seat belts move freely under normal conditions and only lock under extreme or emergency condi- tions (emergency lock mode), you must manually change these seat belts to the auto lock mode to secure a child restraint.
WARNING - Child seat installation
(cid:129) Before
the child installing restraint system, read the instructions supplied by the child restraint system manufacturer.
(cid:129) If the seat belt does not operate as described in this section, have the system checked immediately by your authorized HYUNDAI dealer.
(cid:129) Failure to observe this manual's instructions regarding child restraint system and the instruc- tions provided with the child restraint system could increase the chance and/or severity of injury in an accident.
E2MS103005
C030102BUN-EU Placing a passenger seat belt into the auto lock mode The auto lock mode will help prevent the normal movement of the child in the vehi- cle from causing the seat belt to loosen and compromise the child restraint sys- tem. To secure a child restraint system, use the following procedure.
30
Safety system of your vehicle
OEN036102
3. Pull the shoulder portion of the seat belt all the way out. When the shoulder portion of the seat belt is fully extend- ed, it will shift the retractor to the “Auto Lock” (child restraint) mode.OEN036103
4. Slowly allow the shoulder portion of the seat belt to retract and listen for an audible “clicking” or “ratcheting” sound. This indicates that the retractor is in the “Auto Lock” mode. If no distinct sound is heard, repeat steps 3 and 4.OEN036101
To install a child restraint system on the outboard or center rear seats, do the fol- lowing: 1. Place the child restraint system in the seat and route the lap/shoulder belt around or through the restraint, follow- ing restraint manufacturer’s instructions. Be sure the seat belt web- bing is not twisted.the
2. Fasten the lap/shoulder belt latch into the buckle. Listen for the distinct “click” sound.
Position the release button so that it is easy to access in case of an emergency.
3 31
Safety system of your vehicle
OEN036104
5. Remove as much slack from the belt as possible by pushing down on the child restraint system while feeding the shoulder belt back into the retractor.6. Push and pull on the child restraint system to confirm that the seat belt is holding it firmly in place. If it is not, release the seat belt and repeat steps 2 through 6.