- 2008 Ford Taurus Owners Manuals
- Ford Taurus Owners Manuals
- 2010 Ford Taurus Owners Manuals
- Ford Taurus Owners Manuals
- 2011 Ford Taurus Owners Manuals
- Ford Taurus Owners Manuals
- 1999 Ford Taurus Owners Manuals
- Ford Taurus Owners Manuals
- 2004 Ford Taurus Owners Manuals
- Ford Taurus Owners Manuals
- 2009 Ford Taurus Owners Manuals
- Ford Taurus Owners Manuals
- 2005 Ford Taurus Owners Manuals
- Ford Taurus Owners Manuals
- 2015 Ford Taurus Owners Manuals
- Ford Taurus Owners Manuals
- 1996 Ford Taurus Owners Manuals
- Ford Taurus Owners Manuals
- 2016 Ford Taurus Owners Manuals
- Ford Taurus Owners Manuals
- 2014 Ford Taurus Owners Manuals
- Ford Taurus Owners Manuals
- 2007 Ford Taurus Owners Manuals
- Ford Taurus Owners Manuals
- 2006 Ford Taurus Owners Manuals
- Ford Taurus Owners Manuals
- 1998 Ford Taurus Owners Manuals
- Ford Taurus Owners Manuals
- 2013 Ford Taurus Owners Manuals
- Ford Taurus Owners Manuals
- 2000 Ford Taurus Owners Manuals
- Ford Taurus Owners Manuals
- 1997 Ford Taurus Owners Manuals
- Ford Taurus Owners Manuals
- 2012 Ford Taurus Owners Manuals
- Ford Taurus Owners Manuals
- Download PDF Manual
-
fan control, press the AUTO button. If you are operating in one of the override functions (S, MAX A/C, etc.), automatic fan control will continue unless you press the fan speed button. To return to automatic fan control, press the AUTO button. The EATC will return to automatic operation. If you want to return to any override function, press the button for that function. The fan speed will continue to be automatically controlled.
Manual override buttons
Your EATC has six buttons which allow you to make special selections. The buttons are located along the bottom edge of the EATC and allow you to determine where the air will be discharged. Pressing any override button changes the air discharge location only. It does not affect the ability of the system to control temperature or the fan speed. Return to fully automatic operation by pushing the AUTO button.
MAX A/C button
The MAX A/C feature allows for faster cooling because air is drawn from inside the vehicle. Using inside air causes the fan to sound louder which is normal for this selection. The display window will change to indicate MAX A/C and the airflow will be from the instrument panel registers. To exit, push AUTO or any of the other five manual override buttons.
101
File:06fcipt.ex Update:Tue Jan 23 08:13:16 1996
%*[IP07625(ALL)01/95] [IP07725(ALL)03/95]
[IP07825(ALL)04/95]
[IP07925(ALL)02/95]
[IP08025(ALL)04/95]
[IP08125(ALL)03/95]
[IP08225(ALL)04/95]
[IP08325(ALL)02/95]
VENT button
Press this button to select outside air through the instrument panel registers. The display window will show the set temperature and VENT to the lower right of the temperature. Your EATC will heat the air if the temperature you have selected is warmer than the outside air coming into the vehicle. However, the air will NOT be cooled regardless of the temperature setting. Airflow will be from the instrument panel registers. S (Panel and floor) button
Push this button to get air from the floor and instrument panel registers at the same time. The display will show the set temperature and S. Depending on the selected temperature, the air will be automatically heated or cooled. R (Floor) Airflow will be to the floor when the R (floor) button is pressed. The display window will show the set temperature and R (floor) to the right of the temperature. Fan speed will be automatic unless manually controlled. If you override the fan speed and wish to return to automatic fan control, press AUTO. Then, again select R (floor) for airflow to the floor. P (Floor and defrost)
Press this button to get air to the floor and windshield defrosters at the same time. The display will show the set temperature and P. If the outside temperature is about 50˚F (10˚C) and above, the air will be dehumidified to remove moisture. This will help to prevent fogging in humid weather.
102
File:06fcipt.ex Update:Tue Jan 23 08:13:16 1996
% [IP08425(ALL)07/95]
[IP08525(ALL)02/95]
[IP08625(ALL)04/95]
[IP08725(ALL)05/95]
*[IP08825(ALL)01/95]
*[IP08850(ALL)04/95] *[IP08875(ALL)04/95]
V F-DEF (Front defrost) Press the V F-DEF (front defrost) button to obtain maximum airflow to the windshield. Adjust the temperature setting as required for defrosting. The Display window will show the temperature setting with V to the right of the temperature. When the outside temperature is about 50˚F (10˚C) and above, the air will be dehumidified to remove moisture. This will help prevent fogging in humid weather.
OUTSIDE TEMP button
When this button is pressed, the temperature of the air outside of the vehicle will show in the display window. If the EATC is off, the display will go blank after 4 seconds. If the EATC is on, the outside temperature will be shown until the OUTSIDE Temp button is pressed a second time or another override button is pressed.
NOTE: The outside temperature reading is
most accurate when the vehicle is moving. Higher readings may be obtained when the vehicle is not moving. The readings that you get may not agree with temperatures given on the radio due to differences in vehicle and station locations.
Service
If your EATC is not operating as described here, take it to your dealer to have it checked. System diagnostics are built in which will allow your dealer to readily identify problems that might occur.
103
File:06fcipt.ex Update:Tue Jan 23 08:13:16 1996
[IP08925(ALL)04/95] *[IP09025(ALL)03/95]
[IP09125(ALL)04/95]
*[IP09325(ALL)03/95]
[IP09425(ALL)04/95]
[IP09500(ALL)03/95]
[IP10000(ALL)03/95] *[IP10100(ALL)02/95]
% [IP21650(ALL)04/95]
*[IP21700(ALL)02/95]
[IP21900(ALL)04/95]
Operating tips The following tips will help you to get the most satisfaction from your climate control system. In humid weather, select V F-DEF (front defrost) before driving. This will help to prevent windshield fogging. After a few minutes of operation, switch to any desired selection.
q Do not put objects under the front seats that interfere with the flow of air to the back seat area.
q Remove any snow, ice, or leaves from the air
intake area of your climate control system which could block the air intake. The intake area is located at the bottom of the windshield, under the hood at the passenger side rear corner. If the air conditioner performs well in MAX A/C but not in A/C, this may indicate that the MicronAir쑓 filter (if equipped) needs to be replaced.
MicronAir쑓 Air Filter (If equipped) Your vehicle may have an air filter that removes pollen and road dust from outside air before it is directed to the interior of the vehicle. For maintenance of this filter, see Servicing Your Taurus. Rear Window Defroster and Heated Side View Mirrors The defroster for the rear window clears frost, fog, or thin ice from both the inside and outside of the rear window and activates the heated side view mirrors. The button for the rear defroster and heated side view mirrors is on the instrument panel.
104
File:06fcipt.ex Update:Tue Jan 23 08:13:16 1996
[IP22200(ALL)04/95]
one inch art:0000651-E
[IP22300(ALL)04/95]
%*[IP23000(ALL)09/95]
% [IP23200(ALL)12/95]
[IP23401(ALL)04/95]
quarter page art:0000696-E
[IP23500(ALL)04/95]
The button that controls the rear window defroster and heated side view mirrors Clear away any snow that is on the rear window and side view mirrors before using the defroster. With the engine running, push the defrost button. After 10 minutes, the defroster will turn off. If the window and mirrors are still not clear, push the defroster button again. The defroster will turn off when the ignition key is turned to the OFF position. NOTE: Never use sharp instruments or
window cleaners with abrasives to clean the inside of your rear window. If you do, you may damage the heating elements that are bonded to the inside of the rear window and cause damage to the rear window defroster.
Liftgate Window Wiper and Washer (If equipped)
The liftgate window wiper and washer switches To turn on the liftgate window wiper, press the b switch. To turn the liftgate window wiper off, press the switch again.
105
File:06fcipt.ex Update:Tue Jan 23 08:13:16 1996
[IP23550(ALL)04/95]
%*[IP23600(ALL)01/95] %*[IP23700(ALL)01/95] [IP23800(ALL)12/95]
[IP24200( T)10/95]
one third page art:0000695-C
[IP24500(ALL)12/95]
[IP24600(ALL)12/95]
To turn on the liftgate window washer, press the d switch. When the d switch is pressed, it also turns on the liftgate wiper. The Interior and Exterior Lights Turning On the Exterior Lights
To turn on your headlamps, parking lamps, side markers, license plate lamps and tail lamps, use the knob that is to the left of the steering wheel.
The knob for the headlamps, parking lamps, license plate lamps and tail lamps
To turn on the parking lamps, side markers, license plate lamps and tail lamps, turn the knob to “P” or the first position.
To turn on the headlamps, parking lamps, side markers, license plate lamps and tail lamps, turn the knob to the second position.
106
File:06fcipt.ex Update:Tue Jan 23 08:13:16 1996
[IP25200(ALL)03/95]
one third page art:0001411-B
% [IP25250(ALL)02/89]
*[IP25300(ALL)03/93]
%*[IP25605(ALL)01/95] [IP25610(ALL)03/95] *[IP25615(ALL)03/95]
*[IP25620(ALL)03/95] *[IP25625(ALL)01/95] *[IP25630(ALL)03/95] *[IP25635(ALL)09/95]
Turning on the high beams To change your headlamps from low to high beam, push the turn signal lever away from you. To change them back to low beam, pull the lever toward you. For more information about how the high beam headlamps work, see Steering column controls in the Index. Daytime Running Light System (Canadian and fleet vehicles only) The Daytime Running Light (DRL) system is designed to turn the high beam headlamps on, with a reduced light output and without illuminating the high beam indicator lamp in the instrument panel. The DRL system operates when all of the following conditions are met: q The vehicle is “running.” q The vehicle has a fully released parking
brake.
q The headlamp system is in the OFF position. NOTE: If you have a vehicle with an
automatic lighting system, the DRL system is active until the automatic system turns on the headlamps.
107
File:06fcipt.ex Update:Tue Jan 23 08:13:16 1996
*[IP25636(ALL)09/95]
[IP25637(ALL)01/95]
*[IP25638(ALL)05/95]
%*[IP25640(ALL)08/95] *[IP25650(ALL)08/95]
%*[IP26600(ALL)02/95]
*[IP26700(ALL)02/95]
*[IP26800(ALL)01/95] *[IP26900(ALL)01/95]
[IP27000(ALL)11/94]
NOTE: The high beam indicator will not turn
on in the flash-to-pass mode during nighttime driving.
You may notice that the lights flicker when the vehicle is turned on or off. This is a normal condition.
RWARNING
The Daytime Running Light (DRL) system will not illuminate the tail lamps and parking lamps. Turn on your headlamps at dusk. Failure to do so may result in a collision.
Cleaning the Exterior Lamps
Do not use dry paper towel, chemical solvents or abrasive cleaners to clean the lamps, as these may cause scratches or crack the lamps. Setting the Autolamp Delay System (If equipped)
The autolamp sets the headlamps to turn on and off automatically. You can use the autolamp to:
turn on the lamps automatically at night
turn off the lamps automatically during daylight
keep the lamps on for up to three minutes after you turn the ignition to the OFF position.
108
File:06fcipt.ex Update:Tue Jan 23 08:13:16 1996
[IP27100(ALL)02/95]
one third page art:0000693-C
*[IP27400(ALL)01/95] *[IP27450(ALL)05/95]
*[IP27550(ALL)01/95]
*[IP27650(ALL)01/95]
[IP27750(ALL)02/95]
*[IP27850(ALL)01/95]
[IP27950(ALL)10/95]
*[IP28050(ALL)01/95]
The autolamp system on the left side of the instrument panel
To set the autolamp:
1. Make sure the headlamp knob is in the OFF
position. If the knob for the headlamps is ON, you cancel the autolamp.
2. Turn the ignition key to ON or start your
vehicle.
3. Find the autolamp thumbwheel to the left of the steering wheel on the instrument panel.
4. Turn the autolamp thumbwheel past the stop
to the beginning of the MAX position. The indicator light will come on.
5. The autolamp automatically turns the lamps
on and off for you.
Do not put any articles on top of the photocell that is located in the top right corner of the instrument panel. This photocell controls the autolamp. If you cover it, the photocell reacts as if it is nighttime, and the lamps turn on.
To turn the autolamp off, move the thumbwheel back to OFF.
109
File:06fcipt.ex Update:Tue Jan 23 08:13:16 1996
*[IP28500(ALL)01/95]
*[IP28600(ALL)01/95]
*[IP28650(ALL)01/95]
*[IP28750(ALL)01/95]
%*[IP29800(ALL)01/95]
*[IP30000(ALL)05/95]
% [IP30300(ALL)02/95]
one third page art:0000692-C
You can set the autolamp so the headlamps stay on for up to three minutes after you turn your vehicle off.
To keep the lamps on after you leave your vehicle: q Turn the thumbwheel as far into the MAX
range as you want.
q The further you move the thumbwheel into the DELAY area (toward the MAX position), the longer the lamps will stay on after you leave your vehicle. Similarly, if you move the thumbwheel only slightly into the DELAY area, your lamps will stay on only for a moment after you turn your vehicle off.
Lighting Up the Interior and Instrument Panel
With the light knob in the parking lamps or the headlamps position, you can brighten or dim the lights in the instrument panel. To do this, use the thumbwheel to the left of the steering wheel. This wheel also turns on the interior lights with the light knob on or off.
The thumbwheel that controls the light on the instrument panel
110
File:06fcipt.ex Update:Tue Jan 23 08:13:16 1996
[IP30700(ALL)11/94]
% [IP30925(ALL)03/95]
[IP30950(ALL)03/95]
[IP30975(ALL)11/94]
[IP31025(ALL)02/95]
one third page art:0001410-A
[IP31050(ALL)03/95]
To dim the instrument panel lights, rotate the thumbwheel down. To turn on the interior lights, turn the thumbwheel all the way up. The interior lights also come on when any side door or the liftgate is opened. Dome Lamps
The front dome lamp is located overhead between the driver and front passenger seats. However, if your vehicle is equipped with a power moon roof, the dome lamp is located behind the moon roof.
In the wagon, the rear dome lamp is located overhead near the rear seating positions.
The dome/map lamp
Turn the map lamps on and off with the switches on the lamp. The dome lamp illuminates when any door is opened. If either the driver’s or passenger’s front door is opened using the outside door handle, the light will remain on for 25 seconds after the door has been shut. If any other door is opened or if either of the front doors is opened using the inside handle, the lamp will immediately turn off when the door is closed.
111
File:06fcipt.ex Update:Tue Jan 23 08:13:16 1996
[IP31075(ALL)11/94]
quarter page art:0001377-A
[IP31100(ALL)03/95]
[IP31125(ALL)03/95]
[IP31150(ALL)11/94]
one third page art:0001378-A
The dome lamp
The dome lamp will stay illuminated if the switch is pushed to the ON position. The dome lamp will stay off if the switch is pushed to the OFF position. When the switch is positioned to the door/middle position, the dome lamp will come on when either of the front doors or the liftgate (wagon) is opened.
The rear dome lamp also illuminates when the liftgate is opened and goes off when it is closed.
[IP31175(ALL)11/94]
The map lamps on the moon roof console
Turn each map lamp on the moon roof console on and off with the switch near that lamp.
112
File:06fcipt.ex Update:Tue Jan 23 08:13:16 1996
%*[IP31200(ALL)04/95] *[IP31300(ALL)04/95]
%*[IP31400(ALL)01/95] [IP31500(ALL)11/94]
*[IP31600(ALL)09/95]
%*[IP32600(ALL)03/95] [IP33200(ALL)03/95]
quarter page art:0000247-G
*[IP33750(ALL)05/95]
*[IP33850(ALL)05/95]
Cleaning the Interior Lamps Your interior dome lamps and map lamps are plastic and should be cleaned with a mild detergent diluted in water. Rinse them with clear water. Battery Saver When the ignition is turned off, the vehicle will turn off battery voltage to the interior lights after 40 minutes. This will prevent draining of the battery if those lights have been left on inadvertently or if a door is not completely closed. Battery voltage to these lamps will be restored when the outside front door handles are lifted, the keyless entry keypad is used, the remote entry transmitter is used, any door is opened, the trunk is opened, or the ignition key is turned to the ON position. Clock
The digital clock 1. To set the hour, press and hold the hour button. When the desired hour appears, release the button.
2. To set the minutes, press and hold the
minute button. When the desired minute appears, release the button.
113
File:07fcsct.ex Update:Mon Jan 22 15:52:32 1996
*[SC00400(ALL)01/95]
%*[SC00500(ALL)01/95] *[SC00600(ALL)01/95] *[SC00700(ALL)07/94] *[SC00800(ALL)01/95] *[SC00900(ALL)05/95] *[SC01000(ALL)01/95] %*[SC01100(ALL)01/95] *[SC02201(ALL)03/95]
*[SC02401(ALL)03/95] *[SC02451(ALL)08/95]
%*[SC02800(ALL)08/95] *[SC03100(ALL)05/95]
Steering Column Controls
The controls on the steering column and wheel are designed to give you easy access to the controls while you are driving. The Turn Signal Lever You can use the turn signal lever on the left side of the steering column to: operate the turn signals turn the high beams on/off flash the lamps turn the windshield wipers and washer on/off
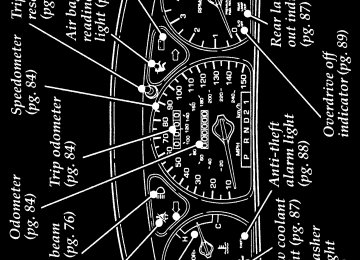
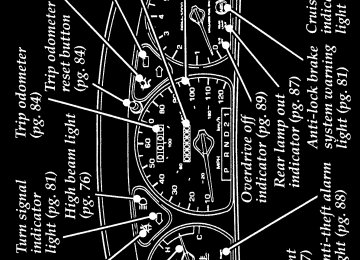
Turn Signals Move the lever up to signal a right turn. Move it down to signal a left turn. The corresponding indicator light in the instrument cluster will flash. If the turn signal stays on after you turn, move the lever back to the center (off) position. For lane changes, move the lever far enough to signal but not to latch. The lever will return to the off position when you release it. High Beams To turn on the high beams, turn the headlamp control knob to the headlamp ON position and push the turn signal lever away from you until it latches. When the high beams are ON, the high beam indicator light on the instrument panel comes on.
115
File:07fcsct.ex Update:Mon Jan 22 15:52:32 1996
*[SC03200(ALL)05/95]
%*[SC03300(ALL)08/95] *[SC03400(ALL)06/95]
[SC03450(ALL)04/95]
one third page art:0001411-B
%*[SC03500(ALL)08/95] *[SC03600(ALL)03/95]
[SC03900(ALL)05/94]
*[SC04000(ALL)01/95]
To turn off the high beams, pull the lever toward you until it latches. The high beam indicator light turns off. Flashing the Lights
To flash the headlamps, pull the lever toward you for a moment and then release it. The headlamps will flash whether the headlamp knob is in the on or off position.
The turn signal lever Windshield Wipers and Washer To turn on the windshield wipers, the ignition key must be turned to the ON or ACC position.
Turn the knob on the end of the turn signal lever away from you to activate the wipers. The first seven detents are interval wipe positions, the eighth detent is the LO position, and the ninth detent is the HI position.
To turn the wipers off, turn the knob toward you to the OFF position.
116
File:07fcsct.ex Update:Mon Jan 22 15:52:32 1996
%*[SC04100(ALL)08/95] *[SC04300(ALL)01/95]
[SC04500(ALL)04/95]
one third page art:0001412-B
*[SC04925(ALL)03/94]
*[SC04950(ALL)08/95] [SC05000(ALL)05/94]
[SC05050(ALL)04/95]
Variable Interval Wipers
In addition to two speed wipers, your vehicle has wipers that you can set to operate at varying intervals. For example, you can set the interval so they wipe less often when it drizzles or more often in heavier rain.
The variable interval wiper on the turn signal lever
To set the interval wipers, turn the knob at the end of the turn signal lever toward or away from you until the wipers are going at the desired interval. Windshield Washer
To clean the windshield, push in the end of the wiper switch knob. For a constant spray, keep the knob pushed in. After you release the knob, the wipers operate for two to three cycles before turning off (if the wipers were off) or returning to HI, LO, or the interval setting selected.
For information about the rear washer on the wagon, see Windshield washer fluid and wipers in the Index.
117
File:07fcsct.ex Update:Mon Jan 22 15:52:32 1996
*[SC05100(ALL)03/95]
*[SC05300(ALL)08/95]
*[SC05350(ALL)08/95]
*[SC05500(ALL)08/95]
%*[SC05520(ALL)03/95] [SC05540(ALL)05/89]
one third page art:0000238-A
If the washer does not work, check the washer fluid level and fill it if it is low. See the Servicing Your Taurus chapter. If there is enough fluid, consult your nearest Ford or Lincoln-Mercury dealer.
Do not try to clean the windshield when the washer fluid container is empty or activate the washers at any time for more than 15 seconds continuously. This could damage the washer pump system.
RWARNING
In freezing weather, the washer solution may freeze on the windshield and obscure your vision. Always warm up the windshield with the defroster before you use the washer fluid. If you cannot see through the windshield clearly, it can increase the risk of being involved in a collision.
For information about refilling the washer fluid or replacing your windshield wiper blades, see Windshield washer fluid and Wipers in the Index. Hazard Flasher
Using the hazard flasher switch
118
File:07fcsct.ex Update:Mon Jan 22 15:52:32 1996
*[SC05560(ALL)03/95]
*[SC05590(ALL)03/95]
%*[SC05600(ALL)01/95] *[SC05800(ALL)05/95]
[SC06000(ALL)02/95]
one third page art:0001403-B
%*[SC06210(ALL)05/95] *[SC06400(ALL)04/95]
The hazard flasher serves as a warning to other drivers to be careful when approaching or passing your vehicle.
The flashers work whether your vehicle is running or not. The flashers work for up to two hours when the battery is fully charged and in good condition without draining the battery excessively. If the flashers run for longer than two hours or if the battery is not fully charged, the battery can be drained. Horn To sound the horn, push the center pad area of the steering wheel.
The horn on the steering wheel Tilt Steering
RWARNING
Never adjust the steering column/wheel when the vehicle is moving. You could lose control of the vehicle and injure someone.
119
File:07fcsct.ex Update:Mon Jan 22 15:52:32 1996
[SC06650(ALL)11/94]
one third page art:0000658-B
*[SC06800(ALL)04/95]
%*[SC07400(ALL)03/91] *[SC07500(ALL)06/95]
*[SC07550(ALL)09/95]
*[SC07600(ALL)06/95]
The lever to tilt the steering wheel
To change the position of the steering column/wheel, pull the release lever on the column toward you. Tip the steering wheel to the desired position. Release the lever to lock the steering wheel in place. Cruise Control (If equipped) If your vehicle has cruise control, you can automatically maintain a constant speed at or above 30 mph (50 km/h).
NOTE: Do not shift to N (Neutral) when using
the cruise control. This will cause the engine to overspeed.
Use of radio transmitting equipment that is not Federal Communications Commission (FCC) or in Canada the Canadian Radio and Telecommunications Commission (CRTC) approved may cause the speed control to malfunction. Therefore, use only properly installed FCC (CRTC in Canada) approved radio transmitting equipment in your vehicle.
120
File:07fcsct.ex Update:Mon Jan 22 15:52:32 1996
[SC08000(ALL)11/94]
one third page art:0001399-B
*[SC08200(ALL)08/95] [SC08400(ALL)11/94]
*[SC08500(ALL)08/95]
*[SC08800(ALL)08/95]
*[SC08900(ALL)08/95]
*[SC09000(ALL)08/95]
The cruise control buttons on the steering wheel
To set the cruise control:
1. Press and release the ON switch. The
CRUISE indicator light in the instrument cluster will illuminate to indicate that speed control is in a standby mode.
2. Accelerate to the desired speed above
30 mph (50 km/h) using the accelerator pedal.
3. Press the SET ACCEL switch and release it immediately to set your speed. If you keep this switch pressed, your speed will continue to increase.
4. Take your foot off the accelerator pedal.
Your vehicle will maintain the speed you set.
If you drive up or down a steep hill, your vehicle may momentarily slow down or speed up, even though the speed control is on. This is normal.
121
File:07fcsct.ex Update:Mon Jan 22 15:52:32 1996
[SC09011(ALL)09/95]
*[SC09100(ALL)08/95]
%*[SC09200(ALL)08/95]
*[SC09300(ALL)08/95]
% [SC09340(ALL)09/95]
NOTE: If your speed increases above your set speed while driving in j (Overdrive) on a downhill grade, you may want to shift to D (Drive) to reduce vehicle speed (or, turn j [Overdrive] off by depressing the O/D OFF switch on the gearshift lever). The cruise control cannot reduce the vehicle speed if it goes above your set speed on a downhill grade. For the best fuel economy during normal driving conditions, leave the gearshift in j (Overdrive), or resume as soon as practical.
RWARNING
Do not use the speed control in heavy traffic or on roads that are winding, slippery, or unpaved.
Accelerating With the Cruise Control Operating
You can use the accelerator pedal to speed up momentarily. When you take your foot off the accelerator, the vehicle will return to the set speed.
NOTE: When driving in hilly terrain, at high
altitudes, or when pulling a trailer, you may want to drive in D (Drive) (or turn j [Overdrive] off by depressing the O/D OFF switch). This will improve cruise control performance.
122
File:07fcsct.ex Update:Mon Jan 22 15:52:32 1996
[SC09350(ALL)03/95]
%*[SC09400(ALL)08/95] *[SC09410(ALL)08/95]
*[SC09415(ALL)08/95]
*[SC09420(ALL)08/95]
% [SC09425(ALL)11/94]
*[SC09430(ALL)08/95]
NOTE: When driving uphill, especially with a heavy load, you may notice your speed decreasing even if you have the cruise control set. If the speed drops more than 8 to 14 mph (13-23 km/h) it is normal for the automatic cruise control feature to be cancelled. You may need to use the accelerator pedal to help your vehicle maintain the selected speed when driving up steep grades.
Resetting the Cruise Control
To reset the cruise control to a lower speed, use one of the following procedures: q COAST — Press and hold the COAST switch.
Release the switch when the vehicle slows down to the desired speed.
q Lightly tap the brake pedal. When the vehicle
attains the desired speed, press the SET ACCEL switch and release it immediately.
q TAP-DOWN — Press and then quickly
release the COAST switch. Each time you “tap” the switch, the set speed will decrease by 1 mph (1.6 km/h). Multiple taps will cause the set speed to decrease in increments of 1 mph (1.6 km/h). For example, if the current set speed is 60 mph (96 km/h) 5 taps of the COAST switch will decrease the vehicle speed and SET it at 55 mph (88 km/h).
If vehicle speed is reduced below 30 mph (50 km/h) by any of the above methods, then you must manually accelerate to a speed over 30 mph (50 km/h) and reset the system.
123
File:07fcsct.ex Update:Mon Jan 22 15:52:32 1996
[SC09435(ALL)02/95]
*[SC09440(ALL)08/95]
*[SC09445(ALL)08/95]
% [SC09450(ALL)11/94]
*[SC10900(ALL)11/95] [SC11000(ALL)04/95]
*[SC11300(ALL)05/95]
%*[SC11315(ALL)08/95] *[SC11325(ALL)08/95] *[SC11400(ALL)10/95]
To reset the cruise control to a higher speed, use one of the following procedures: q ACCEL — Press and hold the SET ACCEL switch. Release the switch when the vehicle has accelerated to the desired speed.
q Depress the accelerator pedal. When the
vehicle attains the desired speed, press the SET ACCEL switch and release it immediately.
q TAP-UP — Press and then quickly release the SET ACCEL switch. Each time you “tap” the switch, the set speed will increase by 1 mph (1.6 km/h). Multiple taps will cause the set speed to increase in increments of 1 mph (1.6 km/h). For example, if the current set speed is 55 mph (88 km/h) 5 taps of the SET ACCEL switch will increase the vehicle speed and SET it at 60 mph (96 km/h).
Cancelling and Resuming a Set Speed
If you press the brake pedal, cruise control is cancelled. You can return to the set speed by pressing the RESUME switch, as long as you did not press the OFF switch. You must be driving at least 30 mph (50 km/h).
Your vehicle will gradually return to the previously set speed and then maintain it. To Turn Off the Cruise Control System
Press the OFF switch.
In addition, the cruise control is turned off each time you turn the vehicle ignition off.
124
File:08fcfvt.ex Update:Mon Jan 22 15:57:12 1996
*[FV00400(ALL)02/95]
%*[FV00500(ALL)01/95] % [FV01700(ALL)11/94]
[FV01800(ALL)02/95]
[FV02200(ALL)10/95]
half page art:0000448-D
Features
Your vehicle has a variety of features designed for your comfort, convenience and safety. Read this chapter to find out about standard and optional features. Doors Childproof Locks
In addition to standard or power locks, your vehicle has childproof locks for the rear doors. If you set these locks, the doors cannot be opened from the inside of the vehicle. The doors can still be opened from the outside when the lock knobs are raised.
The childproof locks for the rear door
125
File:08fcfvt.ex Update:Mon Jan 22 15:57:12 1996
*[FV02300(ALL)03/95]
[FV02500(ALL)02/95]
[FV02700(ALL)02/95]
%*[FV03700(ALL)04/95] [FV03830(ALL)02/95]
[FV03950(ALL)11/94]
one third page art:0000963-F
[FV04000(ALL)04/95]
To set the childproof lock on each rear door, open the rear door.
Find the lever inside the label. Move the lever up to the locked symbol.
To release the childproof lock, open the rear door from the outside. Move the lever down to the unlocked symbol. Power Door Locks (If equipped)
If your vehicle has power door locks, the controls to lock the doors are on the trim panel of the front door. When you close the doors after you set the door locks, the doors remain locked. If the power mechanism ever fails, the manual door lock will override the power controls.
The power locks on the driver’s door
If the key is left in the driver’s or passenger’s outside lock cylinder for a period of time, the power door locks may cycle. This is a protective feature and will not harm the locks. When the key is removed, the locks will function normally.
126
File:08fcfvt.ex Update:Mon Jan 22 15:57:12 1996
[FV04010(ALL)04/95]
[FV04020(ALL)04/95]
[FV04050(ALL)04/95]
[FV04075(ALL)03/95]
[FV04100(ALL)02/95]
[FV04125(ALL)02/95]
[FV04150(ALL)02/95]
[FV04175(ALL)02/95]
one inch art:0001407-A
Central Locking
When you are unlocking the driver or front passenger door with the key, turn it once toward the front of the vehicle to unlock that door only. Turn the key a second time to unlock all doors. Turn the key once toward the rear of the vehicle to lock all doors.
Lock Disable
The lock disable feature helps prevent you from locking the keys in your vehicle. With the key in the ignition (in any switch position) and the driver’s door open, the driver’s door cannot be locked using the front door power lock switch.
Your vehicle can still be locked, while the key is in the ignition, by manually pressing down the lock button.
Power liftgate lock — wagon (If equipped)
The power liftgate lock is on the right inside trim panel in the cargo area. When this lock is pressed, all doors and the liftgate lock.
The power liftgate lock
127
File:08fcfvt.ex Update:Mon Jan 22 15:57:12 1996
%*[FV04251(ALL)09/95]
*[FV04301(ALL)02/95]
[FV04351(ALL)02/95]
one third page art:0000482-C
*[FV04401(ALL)02/95]
*[FV04451(ALL)09/95] *[FV04501(ALL)09/95]
*[FV04551(ALL)02/95] *[FV04601(ALL)05/95]
Using the Keyless Entry System (If equipped)
If your vehicle has the keyless entry system, you can lock or unlock the vehicle doors without using a key. The buttons for the system are near the outside door handle on the driver’s side. See also Remote Entry System which follows this description.
Keyless entry buttons
When you bought your vehicle, you were given a computer code that operates the system for your vehicle. For your convenience, we have duplicated this code in two places.
The code is:
on your owner’s wallet card found in the glove compartment
taped to the computer module
When you use this entry system, the illuminated entry system turns on the interior lights for 25
seconds and the buttons on the keypad light up for 5 seconds. Do not push the buttons with a key, ballpoint pen, pencil or any other hard object. These objects could damage the buttons.128
File:08fcfvt.ex Update:Mon Jan 22 15:57:12 1996
%*[FV04651(ALL)09/95] *[FV04700(ALL)02/95]
*[FV04751(ALL)09/95] *[FV04801(ALL)09/95] *[FV04851(ALL)09/95]
*[FV04901(ALL)09/95] *[FV04951(ALL)09/95]
*[FV05000(ALL)09/95]
*[FV05050(ALL)09/95] *[FV05101(ALL)09/95] *[FV05150(ALL)09/95] *[FV05201(ALL)09/95] *[FV05250(ALL)09/95]
Programming your own entry code
You can program a personal code to unlock your vehicle with the keypad. This code does not replace the permanent code that the dealership gave you. Use your personal code in the same manner as you would your original code.
To program your own code:
1. Select five digits for your personal code.
2. Enter the permanent code that the dealership
gave you.
3. Within five seconds, press 1/2.
4. Within five seconds of pressing 1/2, enter
your personal code, pressing each digit within five seconds of the previous digit. The keyless entry system registers this second code. To open your vehicle, you can now use either code. The module remembers only one personal code at a time. Entering a second personal code will erase the first, replacing it with the new second one.
To erase your personal code:
1. Enter the original permanent code.
2. Press 1/2 within five seconds of Step 1.
3. Wait six seconds.
The keyless entry system automatically erases your personal code. The system will now only respond to the permanent code.
129
File:08fcfvt.ex Update:Mon Jan 22 15:57:12 1996
*[FV05301(ALL)09/95]
%*[FV05350(ALL)09/95]
*[FV05401(ALL)02/95]
*[FV05450(ALL)09/95]
[FV05500(ALL)04/95]
[FV05525(ALL)03/95]
Do not set a code that presents the numbers in sequential order, such as 1/2, 3/4, 5/6, 7/8, 9/0. Studies show that people who idly press the buttons usually press a sequential pattern. Also, do not select a code that uses the same button five times. Thieves can easily figure out these types of codes.
Unlocking the doors with the keyless entry system
You must unlock the driver’s door before you unlock any of the other doors. If you let more than five seconds pass between pressing numbers, the system shuts down, and you have to enter the code again. The system has shut down if the keypad light is out. If the keyless entry system does not work properly, use the key or transmitter(s) to lock and unlock the doors.
1. To unlock the driver’s door, enter the factory
code or your personal code. All codes have five numbers. After you press the fifth number, the driver’s door unlocks.
2. To unlock the passenger’s door(s) and
liftgate (wagon), press the 3/4 button within five seconds of unlocking the driver’s door or re-enter the code to open the driver’s door, then press 3/4.
3. To open the trunk (sedan) or unlock the
liftgate (wagon), enter the five-digit factory code, then press the 5/6 button within 5
seconds.130
File:08fcfvt.ex Update:Mon Jan 22 15:57:12 1996
*[FV05550(ALL)09/95]
*[FV05601(ALL)09/95]
*[FV05650(ALL)02/95]
[FV05701(ALL)03/95]
*[FV05750(ALL)05/95]
*[FV05800(ALL)09/95]
Locking the doors with the keyless entry system
Along with unlocking your doors, you can use the keyless entry system to lock the doors. You can also use the Autolock feature to automatically lock the doors after you get in the vehicle.
To lock all of the doors, press 7/8 and 9/0 at the same time. It is not necessary to first enter the keypad code. This will arm your factory installed anti-theft system, if so equipped.
Arming, disarming and resetting your perimeter anti-theft system (If equipped) from the keyless entry pad
If your vehicle is equipped with the optional factory installed anti-theft system, the keyless entry system will arm it when you use the 7/8
and 9/0 keys to lock the doors, and will disarm or reset a triggered anti-theft alarm when you enter in the five digit code to unlock the driver’s door.NOTE: Doors and the liftgate must be fully
closed for the anti-theft system to arm. Refer to the Anti-Theft System section in this chapter for more details.
131
File:08fcfvt.ex Update:Mon Jan 22 15:57:12 1996
[FV05850(ALL)04/95] *[FV05900(ALL)02/95]
[FV05950(ALL)04/95] *[FV06001(ALL)09/95] *[FV06050(ALL)02/95] *[FV06100(ALL)02/95] *[FV06150(ALL)11/95]
*[FV06200(ALL)09/95] [FV06250(ALL)04/95]
[FV06300(ALL)12/95] *[FV06400(ALL)02/95]
*[FV06450(ALL)02/95]
*[FV06500(ALL)02/95]
*[FV06550(ALL)02/95]
*[FV06575(ALL)04/95]
Autolock (If equipped)
The Autolock feature is part of your remote keyless entry system and is enabled at the factory. With the Autolock feature enabled, all of the doors will automatically lock when:
the vehicle doors and liftgate are fully closed
the ignition key is turned to the ON position
the brake pedal is pressed
you shift through (Reverse)
one second has elapsed after the brake pedal is released
The Autolock feature will repeat when:
a door is opened and then all doors and liftgate are closed
the brake pedal is released
The doors may not lock automatically at the correct time if the driver:
shifts through gears without pressing the brake
shifts through gears quickly after starting the vehicle
releases their foot from the brake while someone has stepped out of the vehicle for a moment
You can deactivate the system by using the buttons for the keyless entry system if you don’t want to use the Autolock feature.
132
File:08fcfvt.ex Update:Mon Jan 22 15:57:12 1996
*[FV06600(ALL)05/95] *[FV06650(ALL)06/95] *[FV06700(ALL)09/95] *[FV06750(ALL)09/95] *[FV06800(ALL)09/95] *[FV06850(ALL)02/95]
*[FV06900(ALL)04/95]
[FV06950(ALL)04/95]
*[FV07000(ALL)02/95] *[FV07050(ALL)02/95] *[FV07100(ALL)02/95] *[FV07150(ALL)02/95] *[FV07200(ALL)02/95] *[FV07250(ALL)02/95] *[FV07300(ALL)02/95] *[FV07350(ALL)02/95] *[FV07400(ALL)02/95]
*[FV07450(ALL)02/95]
To deactivate the Autolock system: 1. Enter your permanent five-digit entry code (not the personal code you may have set).
2. Within 5 seconds, press and hold 7/8. 3. Within 5 more seconds, press and release
3/4.
4. Release 7/8. To reactivate the Autolock system, simply repeat the instructions for deactivating the system. By re-entering the code that deactivates the Autolock, the keyless entry system reinstates the Autolock feature. You can also deactivate or reactivate the Autolock feature by this method: 1. Make sure the anti-theft system is not armed
or triggered, ignition is off, and all doors and liftgate are closed.
2. Turn the ignition key from OFF to RUN. 3. Press the door power unlock button 3 times. 4. Turn the ignition key from RUN to OFF. 5. Press the door power unlock button 3 times. 6. Turn the ignition key back to RUN within 30
seconds of step 2.
7. The horn should chirp once. If not, wait 30
seconds and repeat steps 1 through 6. 8. Press the door power unlock button. 9. Press the door power lock button. 10. The horn will chirp once if the Autolock feature was deactivated, twice (one short chirp followed by a long chirp) if the Autolock feature was activated.
11. Turn the ignition OFF.
133
File:08fcfvt.ex Update:Mon Jan 22 15:57:12 1996
*[FV07550(ALL)03/95] *[FV07600(ALL)02/95]
*[FV07650(ALL)06/95]
*[FV07700(ALL)02/95]
[FV07751(ALL)02/95]
one third page art:0001000-A
%*[FV07801(ALL)02/95]
*[FV07851(ALL)02/95]
[FV07901(ALL)12/95]
[FV07910(ALL)04/95]
Remote Entry System (If equipped)
If your vehicle has the remote entry system, you can lock or unlock the vehicle doors and liftgate without using a key. The remote also has a personal alarm feature. The buttons for the system are located on the two hand held transmitters that came with your vehicle.
The system will work with up to four transmitters. Your vehicle came with two transmitters. Additional transmitters can be ordered from your dealer.
The remote entry features only operate with the ignition in the OFF position.
Remote entry transmitter
Unlocking the doors with the remote entry system
To unlock the driver’s door, press the UNLOCK button.
To unlock the other doors and liftgate (wagon), press the UNLOCK button a second time, within five seconds after the first UNLOCK.
To open the trunk (sedan), press the TRUNK button.
134
File:08fcfvt.ex Update:Mon Jan 22 15:57:12 1996
[FV07920(ALL)04/95]
*[FV07951(ALL)02/95]
[FV08001(ALL)12/95]
[FV08051(ALL)04/95]
%*[FV08100(ALL)02/95] *[FV08151(ALL)02/95]
*[FV08200(ALL)02/95]
To unlock the liftgate (wagon), press the TRUNK button. To open the liftgate, you must press the liftgate release located above the license plate.
Locking the doors with the remote entry system
To lock all the doors and liftgate (wagon), press the LOCK button. This will also arm the factory installed Anti-Theft system.
If you would like a signal that the doors are being locked, press the LOCK button again within five seconds. If all doors and the liftgate are completely closed, the doors and liftgate will lock again, the horn will chirp and the external lamps will flash. If a door or the liftgate is open or ajar, the horn will give two short chirps warning you that a door or the liftgate is open.
Remote entry personal alarm
If you wish to activate the remote entry system personal alarm, press the PANIC button. This will honk the horn and flash the lights for approximately 2 minutes 45 seconds. You can turn it off by pressing the PANIC button again from the transmitter or by turning the ignition to the ON or ACCESSORY position.
When you use the remote entry UNLOCK or PANIC buttons, the illuminated entry system turns on the vehicle’s interior lights for 25
seconds. You can turn these lights off with the remote entry LOCK button or by turning the ignition to the ON or ACCESSORY position.135
File:08fcfvt.ex Update:Mon Jan 22 15:57:12 1996
[FV08251(ALL)04/95]
%*[FV08300(ALL)04/95]
*[FV08351(ALL)04/95]
*[FV08400(ALL)04/95]
%*[FV08451(ALL)02/95] *[FV08500(ALL)02/95]
THIS DEVICE COMPLIES WITH PART 15 OF THE FCC RULES. OPERATION IS SUBJECT TO THE FOLLOWING TWO CONDITIONS: (1) THIS DEVICE MAY NOT CAUSE HARMFUL INTERFERENCE, AND (2) THIS DEVICE MUST ACCEPT ANY INTERFERENCE RECEIVED, INCLUDING INTERFERENCE THAT MAY CAUSE UNDESIRED OPERATION.
Arming and Disarming the Alarm System with Remote Entry
Your Remote Entry System will automatically arm the factory installed Anti-Theft System when the doors are locked, and automatically disarm it when the doors are unlocked. The remote will also reset the anti-theft alarm (when the driver’s door is unlocked or the PANIC button is pressed on a programmed remote entry transmitter) if it was triggered.
The remote entry system may not arm and disarm non-factory installed anti-theft systems.
Replacing the batteries
The remote entry transmitter is powered by two coin type three-volt lithium 2016
batteries (included) that should last for several years of normal use. If you notice a significant decrease in operating range, the batteries should be replaced. Replacement batteries can be purchased at most pharmacies, watch stores or at your Ford or Lincoln-Mercury dealer.136
File:08fcfvt.ex Update:Mon Jan 22 15:57:12 1996
*[FV08551(ALL)02/95]
*[FV08600(ALL)02/95]
[FV08651(ALL)02/95]
quarter page art:0020790-A
%*[FV08700(ALL)02/95] *[FV08751(ALL)06/95]
*[FV08800(ALL)02/95]
NOTE: The operating range of the remote
entry system can also be affected by weather conditions (such as very cold temperatures) or structures around the vehicle (buildings, other vehicles, radio and TV towers, etc.). Typical operating range will allow you to be up to 33
feet (10 meters) away from your vehicle.The transmitter can be snapped apart to replace the batteries by twisting a thin coin between the two halves of the transmitter. DO NOT TAKE THE FRONT PART OF THE TRANSMITTER APART. When installing the new batteries, be sure to place the positive (+) side down as marked. Snap the two halves back together.
Replacing the batteries Replacing lost transmitters In the event a transmitter is lost, you should take all your vehicle’s transmitters to your dealer to have the remote entry system deprogrammed for the lost transmitter. This is necessary to prevent further unauthorized use of the lost transmitter. You can also purchase additional transmitters (up to 4 transmitters can be used) from your dealer. You will need to take all your transmitters to the dealer so they can program them to the remote entry system all at the same time.
137
File:08fcfvt.ex Update:Mon Jan 22 15:57:12 1996
[FV08851(ALL)04/95]
[FV08900(ALL)10/95]
*[FV08951(ALL)09/95]
[FV09551(ALL)04/95] *[FV09600(ALL)05/95]
%*[FV09651(ALL)05/95]
*[FV09700(ALL)02/95]
*[FV09751(ALL)06/95] %*[FV09801(ALL)05/95] *[FV09851(ALL)04/95]
[FV09900(ALL)04/95]
[FV09951(ALL)10/95]
Illuminated Entry System
This system will provide illumination of the vehicle’s interior courtesy lamps when either outside driver’s door keypad is pressed or when the remote entry system is used to unlock the door or sound the personal alarm. The system will automatically turn off after approximately 25 seconds or when the ignition is turned to the RUN or ACC position.
NOTE: The inside lights will not turn off if
you have turned them on with the dimmer thumbwheel or if any door is open.
Perimeter Anti-Theft System (If equipped)
When armed, this system helps protect your vehicle against break-ins or theft.
When an unauthorized entry occurs, the system triggers and will:
flash the headlamps, parking lamps, and theft indicator lamp
honk the horn
Arming the system
The system is ready to arm any time the ignition switch is turned OFF and the alarm is not triggered or sounding. Any of the following events will prearm the anti-theft system: q Pressing the remote entry transmitter LOCK
button to lock the doors (with the doors open or closed).
q Pressing the 7/8 and 9/0 buttons on the
Keyless Entry Keypad at the same time to lock the doors (with the doors open or closed).
138
File:08fcfvt.ex Update:Mon Jan 22 15:57:12 1996
*[FV10001(ALL)04/95]
[FV10050(ALL)04/95]
[FV10100(ALL)12/95]
[FV10201(ALL)12/95]
[FV10251(ALL)12/95]
*[FV10301(ALL)05/95]
*[FV10351(ALL)02/95]
q Opening a door and pressing the power door
lock button to lock the doors.
q Turning the driver’s or front passenger’s door key to the LOCK position to centrally lock all doors (with the doors open or closed).
If a door or liftgate (wagon) is open, the anti-theft system is prearmed and waiting for all doors to close. The THEFT inidcator in the instrument panel will light continuously while the system is prearmed.
Once all doors and liftgate (wagon) are closed, if any were open, the system will begin a 30
second countdown to become armed. The 30
second countdown allows people who may still be in the vehicle time to exit without triggering the alarm. The THEFT indicator will glow steadily until the system is armed. When the system is armed, the THEFT indicator will begin to flash with short flashes every 2 seconds until the system is triggered or disarmed.Remember, all doors and liftgate (wagon) must be fully closed for the anti-theft system to arm. If a door or liftgate (wagon) has been left open or ajar, and you press the remote entry transmitter twice to confirm the doors are locked, two short horn chirps will warn you that the anti-theft system is not arming.
The anti-theft system is designed to work with the factory installed remote entry system. It may not work with other remote entry systems.
When you get a single horn chirp by pressing the LOCK button twice within 5 seconds on your remote entry transmitter, you can be assured that all doors are locked and the anti-theft system is arming.
139
File:08fcfvt.ex Update:Mon Jan 22 15:57:12 1996
[FV10400(ALL)04/95] *[FV10451(ALL)10/95] *[FV10501(ALL)04/95] *[FV10551(ALL)04/95]
[FV10601(ALL)12/95]
*[FV10651(ALL)02/95] *[FV10700(ALL)04/95]
*[FV10751(ALL)02/95]
[FV10800(ALL)09/95]
[FV10802(ALL)04/95]
[FV10806(ALL)10/95]
Disarming the system An armed or activated system can be disarmed if you: q Unlock the doors by pressing the remote
entry transmitter UNLOCK button.
q Unlock the doors by entering the unlock code
on the keyless entry keypad.
q Unlock any door or the liftgate (wagon) with
a key.
q Turn ignition to the ON or ACC position. q Pressing the remote entry PANIC button will
disarm the anti-theft system only when the anti-theft alarm is triggered and sounding.
When unlocking the vehicle with a key, turn the key all the way to the end of its travel or the system may not disarm. NOTE:
the flashing lights and honking horn will shut off automatically within 2
minutes 45 seconds after the system is triggered. It will trigger again if another intrusion occurs. Coded Key Anti-Theft System If your vehicle is equipped with the coded key anti-theft system, you can only use an electronically coded key to start the vehicle. During each vehicle start sequence, the coded key is “read” by the anti-theft system. If the key’s ID code matches that in the anti-theft system, the vehicle is enabled to start. If the key’s ID code does not match the anti-theft system, or if no coded key is detected, then the vehicle is not able to start. Your vehicle was equipped with two electronically coded keys. The coded ignition key is larger than normal due to the electronics located in the head of the140
File:08fcfvt.ex Update:Mon Jan 22 15:57:12 1996
[FV10808(ALL)04/95] *[FV10810(ALL)10/95]
*[FV10812(ALL)10/95] *[FV10814(ALL)10/95]
*[FV10816(ALL)10/95]
*[FV10820(ALL)10/95]
*[FV10825(ALL)10/95]
*[FV10826(ALL)10/95]
key. Additional spare keys, maximum of 14, can be purchased either through your dealership or selected retailers. Be sure to purchase only coded keys with a Ford or Mercury logo on it to ensure proper functionality. If both supplied keys are lost or stolen or only one key has been lost and you want to ensure that key will not start the vehicle, the vehicle must be taken to the dealership for re-initialization. (All keys must be brought to the dealer, if any.) THEFT indicator The indicator provides system proveout and operating status. The system activates the indicator when the ignition switch is placed in the ON or START position. This indicator helps to determine possible fault conditions and/or normal operating proveout. The system will illuminate the indicator for two (2) seconds then go out to acknowledge normal operating conditions. If the indicator does not illuminate at key ON or flashes, have the system serviced. Spare Key Programming Procedure Two electronically coded keys were supplied with your vehicle, use one of these with the procedure below: q Using a coded key that you can start your
engine with, turn the ignition from the ON to the OFF position.
q Within 15 seconds, insert a new key into the
ignition and turn it to ON or START. The vehicle does not have to be started.
If the key has been coded, the theft indicator will illuminate for two seconds. The key can then be used to start the vehicle. Repeat until all chosen keys have been coded (max=16).
141
File:08fcfvt.ex Update:Mon Jan 22 15:57:12 1996
*[FV10828(ALL)10/95]
*[FV10830(ALL)10/95]
*[FV10832(ALL)10/95] [FV10835(ALL)04/95] %*[FV10850(ALL)02/95] %*[FV10900(ALL)02/95] *[FV10950(ALL)02/95]
[FV11001(ALL)02/95]
[FV11050(ALL)02/95] *[FV11100(ALL)08/95]
If the key coding failed, the theft indicator will flash and the vehicle cannot be started. One of 3
causes are possible: q The new key was not inserted within 15seconds or
q All 16 key codes have been stored or q The key does not have an electronic code. Windows Using the Power Windows
Each door has a power control that opens and closes the window on that door. The driver’s door has a master control panel that operates all four windows.
The power windows only operate when the ignition key is in the ON or ACC position or when the ignition has been turned from the ON to the OFF position and/or the key has been removed and no front doors on the vehicle have been opened.
The power window controls are illuminated.
RWARNING
Do not let children play with the power windows. They may seriously hurt themselves. Make sure occupants are clear of the window(s) before closing.
142
File:08fcfvt.ex Update:Mon Jan 22 15:57:12 1996
[FV11150(ALL)04/95]
one third page art:0000417-D
[FV11201(ALL)12/95]
[FV11250(ALL)02/95]
one third page art:0000418-D
[FV11270(ALL)03/95]
[FV11290(ALL)04/95]
The master controls on the driver’s door
Your vehicle is equipped with a “one touch down” feature. This feature allows the driver to fully open the driver’s window by firmly pressing the switch and then releasing. The “one touch down” feature can be stopped by pressing the up or down switch again.
The window controls on the passenger’s door
Accessory Delay
The power windows and moon roof (if equipped) can be operated for 45 seconds after the ignition has been turned to the OFF position if the front doors have not been opened.
143
File:08fcfvt.ex Update:Mon Jan 22 15:57:12 1996
%*[FV11301(ALL)02/95] [FV11351(ALL)03/95]
[FV11400(ALL)02/95]
[FV11451(ALL)02/95]
one third page art:0000419-D
[FV11500(ALL)02/95]
[FV11550(ALL)04/95]
[FV11600(ALL)04/95]
[FV11850(ALL)02/95]
[FV11900(ALL)04/95]
Moon Roof (If equipped) You can use the moon roof in your vehicle in two ways. Move it back to open the glass panel, or you can move it up to ventilate the vehicle.
The moon roof will only operate when the ignition is in the ON or ACC position or when the key has been removed from the ignition and no doors have been opened.
The map lamps and the switches for the moon roof
The roof console SLIDE switch is used to open and close the moon roof.
Press the AUTO portion of the switch and the roof will fully open automatically. Press the switch again during the opening cycle and the roof will stop at that location.
To close the moon roof, press and hold the front portion of the switch. At the fully closed position, the motor automatically turns off.
The roof console TILT switch is used to tilt the moon roof.
To tilt the moon roof into vent position from the closed position, press the UP portion of the switch.
144
File:08fcfvt.ex Update:Mon Jan 22 15:57:12 1996
*[FV12000(ALL)07/95]
*[FV12100(ALL)01/95]
*[FV12200(ALL)01/95]
[FV12300(ALL)11/94]
quarter page art:0000420-B
*[FV12400(ALL)01/95] *[FV12500(ALL)01/95]
*[FV12600(ALL)05/95]
%*[FV12700(ALL)01/95] %*[FV12702(ALL)04/95] *[FV12704(ALL)02/95]
*[FV12705(ALL)05/95]
To close from vent position, press and hold the rear portion of the switch.
RWARNING
Do not let children play with the moon roof. They may seriously hurt themselves.
Occasionally wiping the outside guide rail covers of the moon roof with a clean cloth will help keep the moon roof working properly.
The moon roof Sliding Shade The moon roof has a sliding shade that you can manually open or close to block the sun when the glass panel is shut.
To close the sliding shade, pull the shade toward the front of the vehicle. The shade automatically opens and locks when the moon roof is opened. Seats Head Restraints If you use them properly, head restraints are intended to help protect your head and neck in a collision.
A head restraint helps protect you best if you position it behind your head and not behind your neck.
145
File:08fcfvt.ex Update:Mon Jan 22 15:57:12 1996
*[FV12706(ALL)02/95] *[FV12708(ALL)01/95]
[FV12714(ALL)02/95]
one third page art:0000031-E
*[FV12720(ALL)06/95] [FV12722(ALL)05/94]
[FV12724(ALL)03/92]
one third page art:0010049-B
Standard head restraints
You can adjust the head restraints for your comfort and protection.
Adjusting the standard head restraint
Four-way head restraints
Your vehicle may have a four-way head restraint. It can be adjusted in four directions. You can raise it about two inches (five cm) from its normal position, and you can move it forward up to 60 degrees until you reach the desired position.
Adjusting the four-way head restraint
146
File:08fcfvt.ex Update:Mon Jan 22 15:57:12 1996
%*[FV12900(ALL)08/95] [FV13000(ALL)04/95]
[FV13200(ALL)04/95]
quarter page art:0000421-C
Manual Seats
You can move the front seats forward or backward and tilt the seatback forward or backward.
[FV13300(ALL)04/95]
The front seat adjustment bar
one third page art:0000422-C
*[FV13900(ALL)08/95]
*[FV13950(ALL)08/95]
The handle to recline the back of the driver’s seat
RWARNING
Never adjust the driver’s seat or seatback when the vehicle is moving.
RWARNING
To reduce the risk of serious injury in a collision, always drive and ride with your seatback upright and the lap belt snug and low across the hips.
147
File:08fcfvt.ex Update:Mon Jan 22 15:57:12 1996
*[FV15650(ALL)08/95]
%*[FV21900(ALL)02/95] [FV22000(ALL)02/95]
[FV22200(ALL)02/95]
half page art:0000423-D
RWARNING
Do not pile cargo higher than the seatbacks to avoid injuring people in a collision or sudden stop.
Power Seats (If equipped)
If your vehicle has power seats, you can adjust the driver’s seat in several directions. You can raise or lower the whole front seat, move the seat forward or backward and tilt the front and back of the seat up or down. If your vehicle is equipped with power lumbar support, the lumbar switch also lets you inflate a pad on the seatback.
The seat controls on the driver’s seat
148
File:08fcfvt.ex Update:Mon Jan 22 15:57:12 1996
% [FV22800(ALL)05/94]
[FV22950(ALL)04/89]
[FV23000(ALL)11/94]
one third page art:0000424-B
%*[FV23100(ALL)11/94] *[FV23125(ALL)11/94]
[FV23150(ALL)04/95]
[FV23175(ALL)11/94]
[FV23225(ALL)02/95]
[FV23250(ALL)02/95]
Inflating the lumbar support (If equipped)