- 2008 Ford Taurus Owners Manuals
- Ford Taurus Owners Manuals
- 2010 Ford Taurus Owners Manuals
- Ford Taurus Owners Manuals
- 2011 Ford Taurus Owners Manuals
- Ford Taurus Owners Manuals
- 1999 Ford Taurus Owners Manuals
- Ford Taurus Owners Manuals
- 2004 Ford Taurus Owners Manuals
- Ford Taurus Owners Manuals
- 2009 Ford Taurus Owners Manuals
- Ford Taurus Owners Manuals
- 2005 Ford Taurus Owners Manuals
- Ford Taurus Owners Manuals
- 2015 Ford Taurus Owners Manuals
- Ford Taurus Owners Manuals
- 1996 Ford Taurus Owners Manuals
- Ford Taurus Owners Manuals
- 2016 Ford Taurus Owners Manuals
- Ford Taurus Owners Manuals
- 2014 Ford Taurus Owners Manuals
- Ford Taurus Owners Manuals
- 2007 Ford Taurus Owners Manuals
- Ford Taurus Owners Manuals
- 2006 Ford Taurus Owners Manuals
- Ford Taurus Owners Manuals
- 1998 Ford Taurus Owners Manuals
- Ford Taurus Owners Manuals
- 2013 Ford Taurus Owners Manuals
- Ford Taurus Owners Manuals
- 2000 Ford Taurus Owners Manuals
- Ford Taurus Owners Manuals
- 1997 Ford Taurus Owners Manuals
- Ford Taurus Owners Manuals
- 2012 Ford Taurus Owners Manuals
- Ford Taurus Owners Manuals
- Download PDF Manual
-
fit.
57
File:03fcsrt.ex Update:Mon Jan 22 15:46:18 1996
*[SR29900(ALL)07/95]
*[SR30000(ALL)07/95]
*[SR30100(ALL)07/95]
*[SR30200(ALL)08/95]
To improve the fit of lap and shoulder belts on children who have outgrown child safety seats, Ford recommends use of a belt-positioning booster seat that is labelled as conforming to all Federal motor vehicle safety standards. Belt-positioning booster seats raise the child and provide a shorter, firmer seating cushion that encourages safer seating posture and better fit of lap and shoulder belts on the child. A belt-positioning booster should be used if the shoulder belt rests in front of the child’s face or neck, or if the lap belt does not fit snugly on both thighs, or if the thighs are too short to let the child sit all the way back on the seat cushion when the lower legs hang over the edge of the seat cushion. You may wish to discuss the specific needs of your child with your pediatrician.
RWARNING
Do not use a belt-positioning booster with a lap-only belt.
Lap belts and the lap belt portion of lap and shoulder belts should always be worn snugly and below the hips, touching the child’s thighs.
RWARNING
To reduce the risk of serious injury in a collision, children should always ride with the seatback upright.
58
File:04fcstt.ex Update:Mon Jan 22 15:46:50 1996
*[ST03300(ALL)03/95] %*[ST03400(ALL)01/95] [ST03725(ALL)11/94]
quarter page art:0000017-D
%*[ST04050(ALL)07/95]
% [ST04100(ALL)10/89]
*[ST04175(ALL)08/95]
*[ST04200(ALL)01/95]
%*[ST04300(ALL)05/95]
[ST04325(ALL)04/95]
Starting Your Taurus
Ignition Understanding the Positions of the Ignition
The positions of the key in the ignition
ACCESSORY allows some of your vehicle’s electrical accessories such as the radio and the windshield wipers to operate while the engine is not running.
LOCK locks the steering wheel. It also locks the gearshift for all vehicles with an automatic transaxle.
The automatic transaxle gearshift must be in P (Park) to move the key to the LOCK position.
LOCK is the only position that allows you to remove the key. The LOCK feature helps to protect your vehicle from theft.
If the key is stuck in the LOCK position, move the steering wheel left or right until the key turns freely.
OFF allows you to shut off the engine and all accessories without locking the steering wheel or the automatic transaxle gearshift lever.
59
File:04fcstt.ex Update:Mon Jan 22 15:46:50 1996
*[ST04350(ALL)05/95]
*[ST04375(ALL)03/95]
%*[ST04500(ALL)02/95] [ST06000(ALL)02/95]
*[ST06300(ALL)06/95] *[ST06400(ALL)01/95] [ST06500(ALL)11/94] *[ST06600(ALL)03/95] [ST07310(ALL)05/95]
%*[ST07520(ALL)05/95]
*[ST07525(ALL)06/95]
ON allows you to test your vehicle’s warning lights (except the brake system warning light) to make sure they work before you start the engine. The key returns to the ON position once the engine is started and remains in this position while the engine runs.
START cranks the engine. Release the key once the engine starts so that you do not damage the starter. The key should return to ON when you release it. The START position also allows you to test the brake warning light. Removing the Key From the Ignition
Procedures for removing the key from the ignition will be the same for both the column- and console-mounted gearshifts.
1. Put the gearshift in P (Park).
2. Set the parking brake fully.
3. Turn the ignition to the LOCK position.
4. Remove the key.
If you have difficulty in turning the key, rotate the steering wheel slightly because it may be binding.
If the driver’s door is open while the key is still in the ignition, a warning chime sounds.
RWARNING
Always set the parking brake fully and make sure the gearshift is securely latched in P (Park).
60
File:04fcstt.ex Update:Mon Jan 22 15:46:50 1996
*[ST07575(ALL)01/93]
*[ST08200(ALL)03/95] %*[ST08300(ALL)05/94] *[ST08350(ALL)09/95]
*[ST08400(ALL)01/95] *[ST08500(ALL)08/95]
*[ST08600(ALL)03/95]
[ST08850(ALL)11/94]
*[ST09150(ALL)03/95]
RWARNING
Do not leave children, unreliable adults, or pets alone in your vehicle. They could accidentally injure themselves or others through inadvertent operation of the vehicle. Further, on hot, sunny days, temperatures in a closed vehicle could quickly become high enough to cause severe and possibly fatal injuries to people as well as animals.
Starting Your Vehicle Preparing to Start Your Vehicle
RWARNING
Do not start your vehicle in a closed garage or other enclosed area. Never sit in a stopped vehicle for more than a short period of time with the engine running. Exhaust fumes are toxic. See Guarding Against Exhaust Fumes in this chapter for more instructions.
Before you start your vehicle, do the following: 1. Make sure all occupants in the vehicle
buckle their safety belts. See Safety Restraints in the Index for more details.
2. Make sure your headlamps and other
accessories are turned off and the parking brake is set.
3. Make sure that the gearshift is in P (Park)
before you turn the key.
Before you start your vehicle, you should test the warning lights on the instrument panel to make sure that they work. Refer to the Warning Lights and Gauges chapter.
61
File:04fcstt.ex Update:Mon Jan 22 15:46:50 1996
%*[ST09310(ALL)02/95] *[ST09320(ALL)06/95] *[ST09330(ALL)05/95]
*[ST09340(ALL)03/95] *[ST09350(ALL)06/95]
*[ST09360(ALL)02/95]
*[ST09370(ALL)02/95]
%*[ST09375(ALL)04/95] *[ST09381(ALL)06/95]
*[ST09385(ALL)04/95]
%*[ST09387(ALL)05/95] *[ST09390(ALL)04/95]
Starting Your Engine
To start your engine:
1. Follow the steps under Preparing to Start
Your Vehicle at the beginning of this section.
2. Turn the ignition key to the ON position.
3. DO NOT depress the accelerator pedal when
starting your engine. DO NOT use the accelerator while the vehicle is parked.
4. Turn the key to the START position
(cranking) until the engine starts. Allow the key to return to the ON position after the engine has started. If you have difficulty in turning the key, rotate the steering wheel slightly because it may be binding.
For a cold engine: q At temperatures 10˚F (-12˚C) and below: If
the engine does not start in fifteen (15) seconds on the first try, turn the key to OFF, wait approximately ten (10) seconds so you do not flood the engine, then try again.
q At temperatures above 10˚F (-12˚C): If the engine does not start in five (5) seconds on the first try, turn the key to OFF, wait approximately ten (10) seconds so you do not flood the engine, then try again.
For a warm engine: q Do not hold the key in the START position for more than five (5) seconds at a time. If the engine does not start within five (5) seconds on the first try, turn the key to the OFF position. Wait a few seconds after the starter stops, then try again.
62
File:04fcstt.ex Update:Mon Jan 22 15:46:50 1996
*[ST09400(ALL)08/95]
*[ST09410(ALL)05/95]
[ST09420(ALL)09/95]
%*[ST09480(ALL)04/95] *[ST09492(ALL)04/95] *[ST09494(ALL)04/95] *[ST09496(ALL)04/95] *[ST09497(ALL)04/95] *[ST09498(ALL)04/95]
*[ST09500(ALL)04/95]
[ST10200(ALL)12/95]
Whenever you start your vehicle, release the key as soon as the engine starts. Excessive cranking could damage the starter. After you start the engine, let it idle for a few seconds. Keep your foot on the brake pedal and put the gearshift lever in gear. Release the parking brake. Slowly release the brake pedal and drive away in the normal manner. NOTE: Your vehicle is equipped with an
automatic transaxle and has an interlock that prevents you from shifting out of P (Park) unless your foot is on the brake pedal.
If the engine does not start after two attempts: 1. Turn the ignition key to the OFF position. 2. Press the accelerator all the way to the floor
and hold it.
3. Turn the ignition key to the START position. 4. Release the ignition key when the engine
starts.
5. Release the accelerator gradually as the
engine speeds up. Then drive away in the normal manner.
If the engine still does not start, the fuel pump shut-off switch may have been triggered. For directions on how to reset the switch see Fuel Pump Shut-Off Switch later in this chapter. A computer system controls the engine’s idle speed. When you start your vehicle, the engine’s idle speed normally runs high. These faster engine speeds will make your vehicle coast slightly faster than its normal idle speed. It should, however, slow down after a short time. If it does not, have the idle speed checked by your dealer or a qualified technician.
63
File:04fcstt.ex Update:Mon Jan 22 15:46:50 1996
*[ST10250(ALL)07/95]
*[ST10325(ALL)05/95]
*[ST10350(ALL)05/95]
*[ST10500(ALL)03/95]
%*[ST10600(ALL)06/95] *[ST10700(ALL)03/95]
*[ST10900(ALL)02/95]
If the engine idle speed does not slow down automatically, do not allow your vehicle to idle for more than 10 minutes. Have the vehicle checked.
RWARNING
Extended idling at high engine speeds can produce very high temperatures in the engine and exhaust system, creating the risk of fire or other damage.
RWARNING
Do not park, idle, or drive your vehicle in dry grass or other dry ground cover. The emission system heats up the engine compartment and exhaust system, which can start a fire.
If you consistently start your vehicle in subzero temperatures, use an engine block heater (if your vehicle has this option). Engine Block Heater (If equipped)
Engine block heaters are strongly recommended if you live in a region where temperatures reach -10˚F (-23˚C) or below. An engine block heater warms the engine coolant, which improves starting, warms up the engine faster, and allows the heater-defrost system to respond quickly.
To turn the heater on, simply plug it into a grounded 110-volt outlet. Ford recommends that you use a 110-volt circuit that is protected by a ground fault circuit interrupter.
64
File:04fcstt.ex Update:Mon Jan 22 15:46:50 1996
*[ST11000(ALL)03/95]
*[ST11100(ALL)05/95]
%*[ST11200(ALL)03/95]
%*[ST11300(ALL)11/95] *[ST11400(ALL)11/95]
[ST11500(ALL)10/95]
For best results, plug the heater in at least three hours before you start your vehicle. Using the heater for longer than three hours will not damage the engine, so you can plug it in at night to start your vehicle the following morning.
RWARNING
To prevent electrical shock, do not use your heater with ungrounded electrical systems or two-pronged (cheater) adapters.
If the Engine Cranks but Does Not Start or Does Not Start After a Collision Fuel Pump Shut-off Switch
If the engine cranks but does not start or does not start even after a small collision, the fuel pump shut-off switch may have been activated. The shut-off switch is a device intended to stop the fuel pump when your vehicle has been involved in a substantial jolt.
Once the shut-off switch is activated, you must reset the switch by hand before you can start your vehicle. If you have a sedan, the switch is on the right side of the trunk behind the trunk liner. If you have a wagon, it is behind the service panel on the right side of the cargo area.
65
File:04fcstt.ex Update:Mon Jan 22 15:46:50 1996
[ST11600(ALL)11/94]
half page art:0000399-E
[ST11700(ALL)11/94]
The right side of the trunk in the sedan
one third page art:0000516-E
*[ST11800(ALL)05/95]
Inside the right side service panel in the wagon
RWARNING
If you see or smell fuel, do not reset the switch or try to start your vehicle. Have all the passengers get out of the vehicle and call the local fire department or a towing service.
66
File:04fcstt.ex Update:Mon Jan 22 15:46:50 1996
*[ST11900(ALL)03/95]
*[ST11950(ALL)04/95] *[ST12000(ALL)03/95] *[ST12050(ALL)01/95]
*[ST12100(ALL)03/95]
*[ST12150(ALL)03/95]
*[ST12200(ALL)03/95]
*[ST12225(ALL)01/95] *[ST12250(ALL)09/95]
If your engine cranks but does not start after a collision or substantial jolt:
1. Turn the ignition key to the OFF position.
2. Check under the vehicle for leaking fuel.
3.
If you do not see or smell fuel, push the red reset button on the fuel pump shut-off switch down.
4. Turn the ignition key to the ON position for
a few seconds, then turn it to the OFF position.
5. Check under the vehicle again for leaking fuel. If you see or smell fuel, do not start your vehicle again. If you do not see or smell fuel, you can try to start your vehicle again.
6. Check all vehicle warning lights before
driving the vehicle.
Pushing Vehicles with automatic transaxles cannot be started by pushing. Follow the directions under If Your Vehicle Needs a Jump-Start in the Roadside Emergencies Chapter.
67
File:04fcstt.ex Update:Mon Jan 22 15:46:50 1996
%*[ST12300(ALL)05/95] *[ST12400(ALL)02/95]
*[ST12500(ALL)09/95]
*[ST12600(ALL)05/95]
*[ST12700(ALL)01/95]
*[ST12800(ALL)02/95] *[ST12900(ALL)02/95] *[ST13000(ALL)01/95]
Guarding Against Exhaust Fumes Carbon monoxide, although colorless and odorless, is present in exhaust fumes. Take precautions to avoid its dangerous effects.
RWARNING
Do not start your vehicle in a closed garage or other enclosed area. Never sit in a stopped vehicle for more than a short period of time with the engine running. Exhaust fumes are toxic. See Guarding Against Exhaust Fumes in this chapter for more instructions.
RWARNING
If you smell exhaust fumes inside your vehicle, have your dealer inspect your vehicle immediately. Do not drive if you smell exhaust fumes.
Have the exhaust and body ventilation systems checked whenever:
your vehicle is raised for service
the sound of the exhaust system changes
your vehicle has been damaged in a collision
68
File:04fcstt.ex Update:Mon Jan 22 15:46:50 1996
*[ST13200(ALL)01/95]
*[ST13300(ALL)08/95]
[ST13600(ALL)03/95]
[ST13900(ALL)03/95]
[ST14000(ALL)03/95]
Improve your ventilation by keeping all air inlet vents clear of snow, leaves, and other debris.
If the engine is idling while you are stopped in an open area for long periods of time, open the windows at least one inch (2.5 cm). Also, adjust the heating or air conditioning system to bring in outside air.
If you use the heater, set the fan speed on either medium or HI with the select knob on either R (floor) or VENT.
If you use the air conditioner, set the fan speed on either medium or HI with the select knob on A/C. (Do not use MAX A/C.)
If you use the automatic temperature control, set the fan speed on medium or high and press the S (panel and floor) or R (floor) manual override button. (Do not use AUTO or MAX A/C.)
69
File:05fclgt.ex Update:Tue Jan 23 08:14:15 1996
%*[LG00500(ALL)05/92]
[LG00800(ALL)02/95]
[LG00900(ALL)02/95]
[LG00950( T)02/95] *[LG01100(ALL)05/94]
% [LG02050(ALL)05/95]
[LG02075(ALL)02/95]
Warning Lights and Gauges
In your vehicle, the warning lights and gauges are grouped together on the instrument panel. We call this grouping a cluster. Your vehicle has one of the following clusters:
Standard cluster q Optional cluster
SHO cluster
If you are not sure which cluster your vehicle has, check the diagrams on the following pages. The Standard Cluster The following warning lights and gauges are on the standard cluster. All of the warning lights and gauges alert you to possible problems with your vehicle. Some of the lights listed are optional. The following sections detail what each of these indicators means.
71
F
File:05fclgt.ex Update:Tue Jan 23 08:14:15 1996
*[LG02400(ALL)01/95] %*[LG02500(ALL)07/95] *[LG02510(ALL)09/95]
[LG02550(ALL)12/95]
*[LG02600(ALL)03/95]
[LG02650(ALL)12/95]
[LG02700(ALL)02/95]
one inch art:0000107-B
%*[LG02900(ALL)06/95] *[LG03000(ALL)03/95]
Indicator Lights and Chimes Safety Belt Warning Light and Chime This warning light and chime remind you to fasten your safety belt. The following conditions will take place:
If the driver’s safety belt is not buckled when the key is turned to the ON position, the light will activate for 1 to 2 minutes and the chime will sound for 4 to 8 seconds. If the driver’s safety belt is buckled while the light is on or the chime is sounding, both the light and the chime will turn off. If the driver’s safety belt is buckled before the key is turned to the ON position, the light will briefly activate, then shut off and the chime will not activate.
Safety belt warning light Brake System Warning Light The warning light for the brakes can show two things — that the parking brake is not fully released, or that the brake fluid level is low in the master cylinder reservoir. If the fluid level is low, the brake system should be checked by your dealer or a qualified service technician.
73
File:05fclgt.ex Update:Tue Jan 23 08:14:15 1996
[LG03300(ALL)02/95]
one inch art:0000108-D
*[LG03500(ALL)01/95]
*[LG03700(ALL)05/95]
%*[LG03800(ALL)01/95] *[LG03900(ALL)03/95]
[LG04000(ALL)02/95]
one inch art:0000278-B
Brake system warning light
This light comes on when the parking brake is set, or if it is not set, it comes on briefly when you turn the ignition to the START position. It normally goes off shortly after the engine starts and you release the parking brake. If the light stays on after you have fully released the parking brake, have the hydraulic brake system serviced by your dealer or a qualified service technician.
RWARNING
The BRAKE light indicates that the brakes may not be working properly. Have the brakes checked immediately.
Charging System Light
This light, shown as a battery symbol on your cluster, indicates that your battery is not being charged and that you need to have the electrical system checked.
Charging system light
74
File:05fclgt.ex Update:Tue Jan 23 08:14:15 1996
*[LG04300(ALL)11/94]
*[LG04400(ALL)01/95]
%*[LG04800(ALL)02/95] [LG04900(ALL)02/95]
[LG04950(ALL)02/95]
one inch art:0001025-B
[LG05100(ALL)11/94]
*[LG05105(ALL)03/95] *[LG05200(ALL)03/95] *[LG05300(ALL)11/94]
This light comes on every time you turn your ignition key to the ON or START position. The light should go off when the engine starts and the alternator begins to charge.
If the light stays on or comes on when the engine is running, have the electrical system checked as soon as possible. Engine Oil Pressure Warning Light
This light indicates the engine’s oil pressure, not the oil level. However, if the engine’s oil level is low, it could affect the oil pressure. The light should come on every time the ignition key is turned to the ON or START position, and should turn off after the engine is running.
Engine oil pressure warning light
If the light stays on or turns on when the engine is running, the engine has lost oil pressure and continued operation will cause severe engine damage.
If you lose engine oil pressure:
1. Pull off the road as soon as safely possible.
2. Shut off the engine immediately. If you do
not stop the engine as soon as safely possible, severe engine damage could result.
75
File:05fclgt.ex Update:Tue Jan 23 08:14:15 1996
*[LG05400(ALL)10/95]
*[LG05500(ALL)11/94]
%*[LG06200(ALL)01/95] *[LG06300(ALL)03/95]
[LG06350(ALL)02/95]
[LG06400(ALL)02/95]
one inch art:0000111-B
3. Check the engine’s oil level, following the
instructions on checking and adding engine oil in this Owner Guide. (See Engine oil in the Index.) If you do not follow these instructions, engine damage could result. To ensure an accurate reading, your vehicle should be on level ground.
4.
If the level is low, add only as much oil as necessary to bring it to the full level before you start the engine again. Do not overfill. Do not operate the engine if the light is on, regardless of the oil level. Contact your nearest dealer for further service actions.
High Beam Light
This light comes on when the headlamps are turned to high beam or when you flash the lights.
If your vehicle is equipped with Daylight Running Lamps (DRL), the high beam light will not come on when you flash the lights.
High beam light
76
File:05fclgt.ex Update:Tue Jan 23 08:14:15 1996
%*[LG06500(ALL)03/95] [LG06800(ALL)03/95]
[LG06850(ALL)02/95]
one inch art:0000113-B
%*[LG07000(ALL)05/95] *[LG07100(ALL)07/95]
[LG07200(ALL)03/95]
%*[LG07400(ALL)01/95] *[LG07620(ALL)05/95]
*[LG07640(ALL)05/95]
Door Ajar Light and Chime
This light comes on and a single chime sounds if one of the doors or the liftgate or liftgate window (wagon) is not completely shut and the ignition is in the ON position.
Door ajar light Chime for Headlamps On
This chime sounds if the driver or any passenger door is open when the parking lamps or headlamps are on. The chime sounds until you close the door, turn off the lamps or turn the ignition to the ON position.
A 3-second chime sounds after a 20-second delay if the ignition has been turned to the OFF position, the parking lamps or headlamps are on, and no door has been opened. Air Bag Readiness Light
A problem with the system is indicated by one or more of the following: the readiness light will either flash or stay lit, or it will not light, or a group of five beeps will be heard.
RWARNING
If any of these things happen, even intermittently, have the air bag system serviced at your Ford or Lincoln-Mercury dealer immediately.
77
File:05fclgt.ex Update:Tue Jan 23 08:14:15 1996
[LG07650(ALL)11/94]
one inch art:0000653-C
%*[LG07700(ALL)11/94] *[LG07750(ALL)03/95]
*[LG07775(ALL)05/95]
[LG07800(ALL)02/95]
one inch art:0000282-B
Air bag readiness light Service Engine Soon Warning Light
The Powertrain On-Board Diagnostic II (OBD II) system consists of the hardware and software necessary to monitor the operation of the powertrain. The OBD II system is designed to check the function of the vehicle’s powertrain control system during normal operation. If an emission problem is detected, the Service Engine Soon light (in the cluster) is turned on.
Modification or additions to the vehicle may cause incorrect operation of the OBD II system. Additions such as burglar alarms, cellular phones, and CB radios must be carefully installed. Do not install these devices by tapping into or running wires close to powertrain control system wires or components.
Service engine soon light
78
File:05fclgt.ex Update:Tue Jan 23 08:14:15 1996
[LG07825(ALL)03/95]
[LG07851(ALL)10/95]
*[LG07875(ALL)05/95]
[LG07900(ALL)03/95]
This light comes on when you turn the ignition key to ON, but should turn off when the engine starts. If the light does not come on when you turn the ignition to ON or if it comes on and stays on when you are driving, have your vehicle serviced as soon as possible. This indicates a possible problem with one of the vehicle’s emission control systems. You do not need to have your vehicle towed in.
If the light turns on and off at one (1) second intervals while you are driving the vehicle, it means that the engine is misfiring. If this condition persists, damage could occur to the engine or catalytic converter. Avoid heavy acceleration and have your vehicle serviced at the first opportunity. You do not need to have your vehicle towed in.
If the light turns on and off on rare occasions while you are driving, it means that a malfunction occurred and the condition corrected itself.
An example of a condition which corrects itself occurs when an engine running out of fuel begins to misfire. In this case, the Service Engine Soon Warning Light may turn on and will then set a Diagnostic Trouble Code indicating that the engine was misfiring while the last of the fuel was being consumed. After refueling, the Service Engine Soon Warning Light will turn off after the vehicle has completed three consecutive warm up cycles without a misfire condition occurring. A warm up cycle consists of engine start from a cold condition (engine at ambient temperature) and running until the engine reaches normal operating temperature.
79
File:05fclgt.ex Update:Tue Jan 23 08:14:15 1996
[LG07925(ALL)03/95]
[LG07951(ALL)11/94]
[LG08001(ALL)02/95]
% [LG08010(ALL)12/95]
[LG08015(ALL)12/95]
% [LG08020(ALL)12/95]
one inch art:0000116-C
On the fourth engine start up, the Service Engine Soon Warning Light will turn off as soon as the engine begins to crank. It is not necessary to have the engine serviced.
Under certain conditions, the Service Engine Soon light may come on if the fuel cap is not properly installed. If the Service Engine Soon light comes on and you suspect that the fuel cap is not properly installed, pull off the road as soon as it is safely possible and turn off the engine. Remove and replace the fuel cap, making sure it is properly seated.
After completing the three consecutive warm up cycles and on the fourth engine start up, the Service Engine Soon warning light should turn off. If the light does not go off after the fourth engine restart, have your vehicle serviced by your dealer or a qualified technician. Low Fuel Light
This light comes on when your fuel gauge indicates approximately 1/16 of a tank. The ignition must be turned to the ON position for this light to come on. This light will glow steadily.
Low fuel light
80
File:05fclgt.ex Update:Tue Jan 23 08:14:15 1996
%*[LG08051(ALL)05/95] *[LG08102(ALL)09/95]
*[LG08150(ALL)07/95]
one inch art:0010525-A
% [LG08251(ALL)11/94]
[LG08301(ALL)02/95]
[LG08351(ALL)02/95]
one inch art:0001376-A
%*[LG08391(ALL)02/95]
*[LG08392(ALL)01/95]
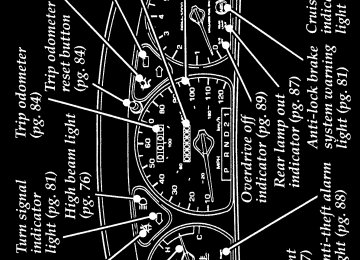
Turn Signal Indicator Lights
The turn signal arrow will flash to indicate the direction in which you are going to be turning.
Cruise Control Indicator Light (If equipped)
This light comes on when the cruise control ON switch is pressed. It turns off when the cruise control OFF switch is pressed or when the ignition is turned to the OFF position.
Cruise control indicator light Anti-lock Brake System Warning Light (If equipped)
This light comes on for a few seconds when you turn the ignition key to the START position. It should go off shortly after the engine starts. If it stays on longer than five (5) seconds, it indicates that your anti-lock brake system may not be working properly. Normal braking is not affected unless the BRAKE system warning light also remains on for longer than six (6) seconds.
81
File:05fclgt.ex Update:Tue Jan 23 08:14:15 1996
[LG08394(ALL)03/95]
one inch art:0000674-D
*[LG08396(ALL)10/93] %*[LG08400(ALL)01/95] [LG08425(ALL)11/94]
[LG08525(ALL)11/94]
*[LG08625(ALL)06/93]
[LG08725(ALL)11/94]
%*[LG08800(ALL)01/95] *[LG08900(ALL)03/95]
*[LG09000(ALL)08/95]
You should have your vehicle serviced immediately by your dealer or qualified service technician to restore the benefits of the anti-lock feature. See Anti-lock brakes in the Index for more information.
Anti-lock brake system warning light Gauges Fuel Gauge The fuel gauge displays approximately how much fuel is in the fuel tank only when the ignition is in the ON position. For proper fuel gauge indication after adding fuel, the ignition should be in the OFF position while the vehicle is being refueled. The fuel gauge indicator may vary slightly when the vehicle is in motion. With the ignition in the OFF position, the fuel gauge indicator may drift from the ignition ON indication. Engine Coolant Temperature Gauge This gauge indicates the temperature of the engine coolant, not the coolant level. If the coolant is not at its proper level or mixture, the gauge indication will not be accurate. The pointer moves from the C (cold) mark into the Normal band as the engine coolant warms up. It is acceptable for the pointer to fluctuate within the Normal band under normal driving
82
File:05fclgt.ex Update:Tue Jan 23 08:14:15 1996
[LG09005(ALL)02/95]
one third page art:0001095-B
[LG09100(ALL)05/95]
*[LG09150(ALL)01/95] *[LG09200(ALL)03/95] *[LG09300(ALL)01/95] *[LG09400(ALL)05/95] *[LG09410(ALL)04/95]
[LG09415(ALL)11/94]
conditions. Under certain driving conditions, such as heavy stop and go traffic or driving up hills in hot weather, the pointer may move to the top of the Normal band.
Engine coolant temperature gauge
If, under any circumstances, the pointer moves above the Normal band, the engine coolant is overheating and continued operation may cause engine damage.
If your engine coolant overheats:
1. Pull off the road as soon as safely possible.
2. Turn off the engine.
3. Let the engine cool.
4. Check the coolant level following the
instructions on checking and adding coolant to your engine, see Engine Coolant in the Index. If you do not follow these instructions, you or others could be injured.
If the coolant continues to overheat, have the cooling system serviced.
83
File:05fclgt.ex Update:Tue Jan 23 08:14:15 1996
%*[LG09800(ALL)01/95] *[LG09900(ALL)01/95]
%*[LG10000(ALL)01/95] *[LG10100(ALL)01/95]
%*[LG10200(ALL)11/94] *[LG10300(ALL)11/94]
%*[LG10320(ALL)02/95] [LG10340(ALL)02/95]
% [LG10350(ALL)12/95]
[LG10360( T)02/95]
[LG10365( T)12/95]
[LG10370( T)02/95]
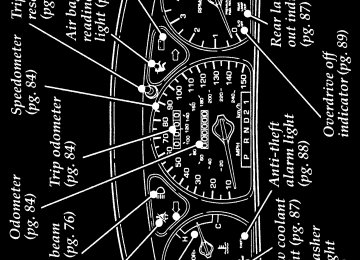
Speedometer
The speedometer tells you how many miles (kilometers) per hour your vehicle is moving. Odometer
The odometer tells you the total number of miles (kilometers) your vehicle has been driven. Trip Odometer
The trip odometer tells you how many miles (kilometers) your vehicle has been driven since the last reset. Press the reset button to return the trip odometer to zero. Tachometer
The tachometer tells you the approximate engine revolutions per minute (how fast the engine is running). You may damage the engine if you drive with the indicator in the red zone. The Optional and SHO Clusters The optional cluster and the SHO cluster have indicator lights that are not on the standard cluster. For details about these lights, read the information below. To learn about the standard warning lights and gauges that come on all clusters, see The Standard Cluster earlier in this chapter.
The optional cluster has a 120 mph (200 km/h) speedometer and a 7,000 rpm tachometer.
The SHO cluster also has a 150 mph (240 km/h) speedometer and an 8,000 rpm tachometer.
84
F
F
File:05fclgt.ex Update:Tue Jan 23 08:14:15 1996
[LG14750(ALL)12/95]
[LG14850(ALL)04/95]
[LG14950(ALL)04/95]
one inch art:0000114-C
[LG15000(ALL)12/95]
% [LG15150(ALL)12/95] *[LG15250(ALL)02/95]
[LG15350(ALL)04/95]
one inch art:0000118-B
% [LG16100(ALL)12/95]
[LG16200(ALL)12/95]
Low Coolant Light and Chime This light indicates that the level of the engine coolant is low inside the coolant reservoir.
Low coolant light
This light comes on for a few seconds when your ignition key is turned to the ON position, but should turn off when the engine starts. If the coolant is low, the light will come on and a single chime will sound. If this light stays on, check the level of coolant inside the coolant reservoir. For instructions on adding coolant mixture, see Engine coolant in the Index. Low Washer Fluid Light This light comes on if the reservoir is less than a quarter full when you turn on the windshield washers.
Low washer fluid light Rear Lamp Out Indicator This light indicates that a rear tail lamp or brakelamp is not functioning. It comes on momentarily when the ignition is turned to the ON position, then goes out.
87
File:05fclgt.ex Update:Tue Jan 23 08:14:15 1996
[LG16220(ALL)02/95]
[LG16260(ALL)04/95]
[LG16280(ALL)02/95]
[LG16300(ALL)02/95]
one inch art:0000117-B
[LG16400(ALL)12/91]
[LG16700(ALL)12/95]
[LG16800(ALL)11/94]
[LG16825(ALL)02/95]
one inch art:0001389-A
This light will come on to show a rear tail lamp burnout when the light switch is turned to the parking lamp or headlamp position.
This light will come on to show a brakelamp burnout only when the brake pedal is pressed.
The light will stay on until the ignition is turned to the OFF position.
Rear lamp out light
NOTE: The warning light may not work or
you may get a false reading if you use trailer lights or use improper replacement bulbs. Anti-Theft Alarm Light
This light is used when you set the anti-theft alarm system. See Anti-theft system in the Index.
Anti-theft alarm light
88
File:05fclgt.ex Update:Tue Jan 23 08:14:15 1996
[LG16950(ALL)12/95]
[LG16975(ALL)02/95]
[LG17025(ALL)02/95]
[LG17050(ALL)02/95]
one inch art:0001009-B
Overdrive Off Indicator This light tells you that the Overdrive Off (O/D OFF) switch on the gearshift lever has been pushed. When the light is on, the transaxle will not shift into overdrive. Depressing the O/D OFF switch located below the gearshift release button on the floor gearshift or located on the end of the column gearshift will return the vehicle to “overdrive on” mode. The transaxle will be in the “overdrive on” mode when the vehicle is started even if the “O/D OFF” mode was selected when the vehicle was last shut off. If the light does not come on when the O/D OFF switch is depressed or if the light flashes when you are driving, have your vehicle serviced at the first opportunity. If this condition persists, damage could occur to the transaxle.
Overdrive off indicator
89
File:06fcipt.ex Update:Tue Jan 23 08:13:16 1996
[IP00400(ALL)05/95]
[IP00410(ALL)04/95]
*[IP00420(ALL)03/95]
%*[IP00430(ALL)09/95]
Instrument Panel Controls
The main controls for the climate control system, clock, and radio are in the oval Integrated Control Panel on the instrument panel.
The controls for the lights and climate control air registers are also on the instrument panel.
Clean the instrument panel lens and woodtone trim with a soft cloth and a glass cleaner. Do not use paper towel or any abrasive cleaner to clean either the lens or the woodtone trim as these may cause scratches.
NOTE: Any cleaner or polish that increases the
gloss (shine) of the upper part of the instrument panel should be avoided. The dull finish in this area is to help protect the driver from undesirable windshield reflection.
91
F
File:06fcipt.ex Update:Tue Jan 23 08:13:16 1996
%*[IP00500(ALL)06/95] *[IP00600(ALL)06/95]
[IP00900(ALL)08/95]
[IP01000(ALL)04/95]
*[IP01100(ALL)06/95]
% [IP03150(ALL)08/95]
[IP03175(ALL)03/95]
one third page art:0000698-E
[IP03200(ALL)08/95]
[IP03250(ALL)08/95]
[IP03300(ALL)08/95]
[IP03351(ALL)08/95]
The Climate Control Systems Your vehicle has one of the following climate control systems: q Manual Heating and Air Conditioning System q Electronic Automatic Temperature Control
(EATC) System
If you are not sure which system your vehicle has, see the diagrams on the following pages. Manual Heating and Air Conditioning System
The knobs that control the manual heating and air conditioning system
Fan speed knob
The fan speed knob controls the volume of air circulated in the vehicle. There are four fan speeds: LO, medium/low (first dot), medium/high (second dot), and HI.
Function selector knob
The function selector knob controls airflow to the inside of the vehicle.
93
File:06fcipt.ex Update:Tue Jan 23 08:13:16 1996
*[IP03401(ALL)08/95] [IP03450(ALL)08/95]
*[IP03501(ALL)08/95] [IP03550(ALL)04/95]
%*[IP03601(ALL)03/95] [IP03650(ALL)03/95]
[IP03701(ALL)08/95]
[IP03750(ALL)08/95]
[IP03801(ALL)04/95]
[IP03850(ALL)04/95]
*[IP03901(ALL)08/95] [IP03950(ALL)04/95]
MAX A/C
MAX A/C uses recirculated air to cool the vehicle. It allows for faster cooling but is noisier than A/C. The airflow will be from the instrument panel registers.
A/C
A/C uses outside air to cool the vehicle. It is quieter that MAX A/C, but not as economical. The airflow will be from the instrument panel registers.
VENT
VENT brings in outside air through the instrument panel registers. It can be used for heating or ventilating.
OFF
In OFF, outside air is shut out and the fan will not operate. S (Panel and floor)
This brings in outside air through the instrument panel registers and the front and rear floor ducts. It can be used for heating or ventilating. R (Floor)
This allows for maximum heating. The airflow is from the front and rear floor ducts.
94
File:06fcipt.ex Update:Tue Jan 23 08:13:16 1996
[IP04001(ALL)04/95]
[IP04050(ALL)04/95]
%*[IP04100(ALL)08/95] [IP04150(ALL)04/95]
[IP04200(ALL)08/95]
[IP04250(ALL)08/95]
%*[IP04700(ALL)04/95]
[IP04725(ALL)12/95]
*[IP04825(ALL)05/95]
P (Floor and defrost)
This brings in outside air through the floor ducts and the windshield defroster ducts. It can be used for heating or ventilation. V (Defrost)
This brings in outside air through the windshield defroster ducts. It can be used to clear ice or fog from the windshield.
Temperature control knob
The temperature control knob may be adjusted from cool (blue range) to warm (red range). Electronic Automatic Temperature Control System
The control for your Electronic Automatic Temperature Control (EATC) is located at the center of the instrument panel in the Integrated Control Panel and will operate only when the ignition is turned to the ON position.
The EATC feature maintains the temperature you select and automatically controls the airflow for your comfort. It also allows you to override the automatic operation with manual override buttons.
95
F
File:06fcipt.ex Update:Tue Jan 23 08:13:16 1996
[IP05025(ALL)03/95]
[IP05125(ALL)03/95]
[IP05225(ALL)02/95]
*[IP05250(ALL)10/95] [IP05275(ALL)10/95]
[IP05325(ALL)10/95]
To turn your EATC on, press the AUTO button or any of the six manual override buttons along the bottom of the control.
To turn your EATC off, press the OFF button. When the system is off, the Display window will be blank (dark).
If you select AUTO, the system will automatically determine fan speed and airflow location. If a manual override button is selected, your selection determines airflow location only. Fan speed remains automatic unless you override it by pressing either side of the FAN speed button located at the extreme left of the control panel.
Temperature selection
The TEMP button at the upper left of the Control is for temperature selection. The a side of the TEMP button will increase the set temperature and the b side of the TEMP button will lower the set temperature. Pressing the button and releasing it will change the set temperature one degree. Holding either side of the button in will rapidly change the temperature setting in one degree increments to either 65˚F (18˚C) or 85˚F (29˚C). Then, the set temperature will jump 5˚F(3˚C) and stop at either 60˚F (16˚C) which is maximum cooling or 90˚F (32˚C) which is maximum heating.
To change the temperature, select any temperature between 6O˚F (16˚C) and 90˚F (32˚C) by pressing the a or b side of the TEMP button. The EATC will display the selected temperature.
97
File:06fcipt.ex Update:Tue Jan 23 08:13:16 1996
[IP05425(ALL)03/95]
[IP05525(ALL)12/95]
one third page art:0001286-D
[IP05625(ALL)02/95]
If you want continuous maximum cooling, press the b side of the TEMP button until 60˚F (16˚C) is shown in the display window. Your EATC will cool at maximum and disregard the 60˚F (16˚C) setting until you select a warmer temperature with the a side of the TEMP button. If you want continuous maximum heating, press the a side of the TEMP button until 90˚F (32˚C) is shown in the display window. Your EATC will provide maximum heat regardless of the 90˚F (32˚C) setting until you select a cooler temperature with the b side of the TEMP button.
The display window
The display window will indicate the selected temperature and the operating function you have chosen: AUTO or one of the six manual overrides. It will also indicate manual control of the fan speed with the word FAN, H, and dots. The display window with all possible displays and their positions are shown here. Normally not all are shown at the same time but are included here to familiarize you with the names and symbols.
98
File:06fcipt.ex Update:Tue Jan 23 08:13:16 1996
[IP05650(ALL)10/95]
[IP05675(ALL)10/95]
*[IP05725(ALL)01/95] [IP05825(ALL)03/95]
[IP05925(ALL)02/95]
one inch art:0001287-B
[IP06025(ALL)03/95]
Changing the display from farenheit to celsius
To change the temperature display from Farenheit to Celsius, depress the MAX A/C and V F-DEF at the same time and hold them down for about a second. To change back to the original setting, repeat the process. If the battery is disconnected, the display will revert to Fahrenheit and must be reset to Celsius.
Automatic operation
Press the AUTO button and select the desired temperature. The selected temperature and AUTO will be shown in the Display window. The EATC will automatically heat or cool to achieve the set temperature. Under normal conditions, your EATC will need no additional attention.
The AUTO temperature display
When in AUTO and weather conditions require heat, air will be sent to the floor. But a feature is included in your EATC to prevent blowing cold air to the floor if the engine coolant is not warm enough to allow heating. The EATC will direct the airflow to the windshield at low fan speed. In 3-1/2 minutes or less, the fan speed will start to increase and the airflow will change to the floor area.
99
File:06fcipt.ex Update:Tue Jan 23 08:13:16 1996
[IP06100(ALL)03/95]
[IP06125(ALL)04/95]
[IP06625(ALL)11/94]
[IP06725(ALL)04/95]
[IP06925(ALL)03/95]
[IP07025(ALL)02/95]
one inch art:0001290-B
When in AUTO and weather conditions require cooling, the EATC will use outside air or recirculated air, depending on the temperature that is selected.
If unusual conditions exist (i.e., window fogging, etc.), the six manual override buttons allow you to select special air discharge locations. The fan speed button allows you to adjust the fan speed to suit your needs.
Fan speed button
Your EATC automatically adjusts the fan speed to the existing conditions. You must press AUTO for automatic fan speed operation. To control the fan speed yourself, use the button which will cancel the automatic fan speed control. The button is located at the left side of the EATC control panel. It is marked H. Press the (-) side for lower speeds. Press the (+) side for higher speeds.
When you press the fan speed button, the fan speed will go to manual control. The display window will show the word FAN, H and a series of dots along with the selected temperature and operating function.
The fan display
100
File:06fcipt.ex Update:Tue Jan 23 08:13:16 1996
[IP07125(ALL)12/95]
*[IP07225(ALL)01/95] [IP07325(ALL)04/95]
*[IP07425(ALL)01/95] [IP07525(ALL)04/95]
You can override the fan speed at any time. If you use the button to control the fan speed, the EATC will continue to control the temperature but you control the fan speed. To return to auto