- 1996 Ford F 150 Owners Manuals
- Ford F 150 Owners Manuals
- 1997 Ford F 150 Owners Manuals
- Ford F 150 Owners Manuals
- 2010 Ford F 150 Owners Manuals
- Ford F 150 Owners Manuals
- 2003 Ford F 150 Owners Manuals
- Ford F 150 Owners Manuals
- 2015 Ford F 150 Owners Manuals
- Ford F 150 Owners Manuals
- 2008 Ford F 150 Owners Manuals
- Ford F 150 Owners Manuals
- 2009 Ford F 150 Owners Manuals
- Ford F 150 Owners Manuals
- 2006 Ford F 150 Owners Manuals
- Ford F 150 Owners Manuals
- 2011 Ford F 150 Owners Manuals
- Ford F 150 Owners Manuals
- 2013 Ford F 150 Owners Manuals
- Ford F 150 Owners Manuals
- 2007 Ford F 150 Owners Manuals
- Ford F 150 Owners Manuals
- 2014 Ford F 150 Owners Manuals
- Ford F 150 Owners Manuals
- 2000 Ford F 150 Owners Manuals
- Ford F 150 Owners Manuals
- 1998 Ford F 150 Owners Manuals
- Ford F 150 Owners Manuals
- Download PDF Manual
-
Maintenance and care
Important emission control information By law, anyone who manufacturers, repairs, services, sells, leases, trades vehicles or supervises a fleet of vehicles is not permitted to intentionally remove an emission control device or prevent it from working. Do not make any unauthorized changes to the vehicle or engine. Changes that cause more unburned fuel to reach the exhaust system can increase the temperature of the engine or exhaust system.
Preparing your vehicle for inspection/maintenance testing In some localities it may become a legal requirement to pass an Inspection/Maintenance test of the on-board diagnostic (OBDII) system. If the vehicle’s powertrain system or battery has just been serviced, the OBD II system is reset to a “not ready for I/M testing condition.” To ready the OBD II system for I/M testing, the law specifies that additional mixed city and highway driving is necessary to complete the check of the OBD II system. The driving modes required to reach the ready condition consist of a minimum of 30 minutes of city and highway driving as described below:
196
f12_readiness_im_testing
• 20 minutes of driving in stop and go city-type traffic with at least four idle periods.
• 10 minutes of driving on an
expressway or highway.
Before completing the above driving modes, the engine must be warmed up and at operating temperature. Once started, the vehicle must not be turned off during the above driving modes.
Maintenance and care
197
Maintenance and care
REPLACING BULBS
Replacing exterior bulbs
f12_replacing_bulbs
It is a good idea to check the operation of the following lamps frequently: • Headlamps • Tail lamps • Brakelamps • High-mount brakelamp • Backup lamps • Hazard flashers • Turn signals • License plate lamp • Fog lamps • Interior overhead lamps
198
Maintenance and care
f12_headlamps_turnsignals
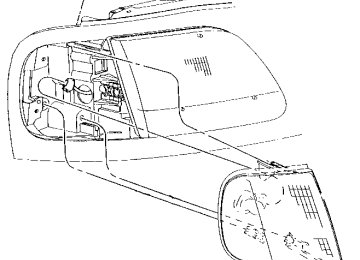
Do not remove lamp bulbs unless they will be replaced immediately. If a bulb is removed for an extended period of time, contaminants may enter the lamp and affect performance. Replacingheadlampbulbs
Handle a halogen headlamp bulb carefully
and keep out of children’s reach. Grasp the bulb only by its plastic base and do not touch the glass. The oil from your hand could cause the bulb to break the next time the headlamps are operated.
1. Make sure that the headlamp control is in the position. 2. Open the hood. 3. At the back of the headlamp, pull clips rearward and up 19 mm (about 3/4 in.) to release the headlamp assembly.
199
Maintenance and care
4. Slide headlamp assembly forward and off of guide ribs to expose the back of the bulb and wiring connector.
5. Remove the electrical connector from the bulb by grasping the wire and pulling it rearward. 6. Remove bulb retainer ring by turning it counterclockwise about 1/4 turn, then slide the ring off the plastic base. 7. Without turning, carefully pull bulb assembly out of headlamp assembly. 8. Insert the glass end of the new bulb into the headlamp assembly socket. When the grooves in the plastic base are aligned, push the bulb into the socket until the plastic base contacts the rear of the socket. 9. Slip bulb retaining ring over the plastic base and lock the ring into the socket by turning it clockwise until you feel a “stop.” 10. Push the electrical connector into the rear of the plastic base until it “snaps.”
200
Maintenance and care
11. Straighten alignment pins, making them parallel with the outer edges of the attachment standoff. 12. Carefully insert the headlamp assembly into the vehicle making sure the alignment pins are inserted into the proper holes and into the guide ribs. 13. Hold the headlamp assembly snugly against the vehicle and push down on the clips to lock the lamp into position.
Replacingparkinglamp/turn signalbulbs 1. Remove screw from the top of lamp assembly.
201
Maintenance and care
2. Disengage lamp assembly (it has a snap fit).
3. Remove the electrical connector from the bulb by grasping the wire and pulling it rearward. 4. Remove bulb retainer ring by turning it counterclockwise about 1/4 turn, then slide the ring off the plastic base. 5. Without turning, carefully pull bulb assembly out of parking lamp assembly. 6. Insert the glass end of the new bulb into the parking lamp assembly socket. When the grooves in the plastic base are aligned, push the bulb into the socket until the plastic base contacts the rear of the socket. 7. Slip bulb retaining ring over the plastic base and lock the ring into the socket by turning it clockwise until you feel a “stop.” 8. Push the electrical connector
202
Maintenance and care
into the rear of the plastic base until it “snaps.”
9. Align top and bottom ribs of parking lamp assembly with corresponding slots on front of vehicle. 10. Push gently until parking lamp assembly seats (you will hear a snap). 11. Replace screw removed in step 1. Replacingfoglampbulbs 1. Disconnect the electrical connector from the back of the foglamp assembly. 2. Twist, then pull the bulb from the foglamp assembly. 3. Install the new bulb. 4. Connect the electrical connector to the back of the foglamp assembly.
f12_foglamps
f12_tail_lamps
203
Maintenance and care
Replacingtaillamp/backup lampbulbs 1. Remove the two bolts from the inside of the tailgate. 2. Carefully pull the tail lamp and backup lamp assembly from the tailgate pillar by releasing the two retaining tabs. 3. Disconnect the bulb connector. 4. Pull out the bulb to be replaced. 5. Install a new bulb. 6. Carefully insert the tail lamp and backup lamp assembly, snapping the two retaining tabs into place. 7. Install the two bolts. Replacinglicenseplatelamp bulbs 1. Carefully pull the license plate lamp lens from the rear bumper. 2. Remove the bulb to be replaced and install a new bulb. 3. Install the license plate lamp lens.
204
f12_dome_lamp
f12_license_plate_lamps
Replacingdomelampbulb(if equipped) 1. Carefully pull the dome lamp lens from the lamp assembly. 2. Remove the dome lamp bulb and replace it with a new bulb. 3. Carefully snap the dome lamp lens into the dome lamp assembly.
Replacingdome/maplampbulb (ifequipped) 1. Carefully pull the dome/map lamp lens from the lamp assembly. 2. Remove the dome/map lamp bulb and replace it with a new bulb. 3. Carefully snap the dome lamp lens into the dome/map lamp assembly.
Replacingenginecompartment lampbulb(ifequipped) 1. Open the hood. 2. Carefully pull the engine compartment lamp bulb from the lamp assembly and replace with a new bulb.
Maintenance and care
f12_dome_map_lamp
f12_engine_compart
f12_exterior_bulb_specs
205
Maintenance and care
Exterior bulb specifications
Function
Number of
Trade number
Front park/turn lamps Foglamps Headlamps Rear turn/sidemarker
bulbs
3157NAK
9006
90073157NAK
AIMING HEADLAMPS The alignment of your headlamps should be checked if: • Oncoming motorists frequently signal you to turn off your vehicle’s high beams when you do not have the high beams on. • The headlamps do not seem to
give you enough light to see clearly at night.
• The headlamp beams are
pointed substantially away from a position slightly down and to the right.
See your Ford dealer for precise headlamp adjustment.
Cleaning and caring for your vehicle Refer to the “Customer Assistance Guide” for a list of Ford-approved cleaners, polishes and waxes.
206
f12_aiming_hlamps
f12_cleaning_your_vehicle
com_cleaning_caring.01
com_washing_vehicle.01
Washing your vehicle Wash your vehicle regularly with cold or lukewarm water. Never use strong detergents or soap. If your vehicle is particularly dirty, use a quality car wash detergent. Always use a clean sponge, washing glove or similar device and plenty of water for best results. To avoid spots, avoid washing when the hood is still warm, immediately after or during exposure to strong sunlight. During winter months, it is especially important to wash the vehicle on a regular basis. Large quantities of dirt and road salt are difficult to remove, and they also cause damage to the vehicle. Remove any exterior accessories, such as antennas, before entering a car wash. • After washing, apply the brakes
several times to dry them.
Waxing your vehicle The best way to determine when the paintwork needs waxing is by noting when water stops beading on the surface. This could be every three or four months, depending on operating conditions. Use only carnauba or synthetic-based waxes. Remove any bugs and tar before waxing vehicle. Use cleaning fluid or alcohol with a clean cloth to remove. Use tar remover to remove any tar spots.
Maintenance and care
com_waxing_vehicle.01
com_repairing_chips
207
Maintenance and care
Repairing paint chips Minor scratches or paint damage from road debris may be repaired with touch-up paint, paint repair foil or aerosol paint spray from the Ford accessory line. Observe the application instructions on the products. Remove particles such as bird droppings, tree sap, insect remains, tar spots, road salt and industrial fallout immediately.
Cleaning the wheels
Wash the wheels with the same detergent you use to clean the body of your vehicle. Do not use acid-based wheel cleaners, steel wool, fuel or strong detergents. Never use abrasives that will damage the finish of special wheel surfaces. Use a tar remover to remove grease and tar.
Cleaning the engine Engines are more efficient when they are clean because grease and
208
f12_cleaning_wheels
com_engine_cleaning.01
dirt buildup act as insulators and keep the engine warmer than normal. Follow these guidelines to clean your engine: • Take care when using a power washer to clean the engine. The high pressure fluid could penetrate the sealed parts and cause damage. • Do not spray with cold water to avoid cracking the engine block. • Cover the highlighted areas to prevent water damage when cleaning the engine.
• Never wash or rinse the engine while it is running; water in the running engine may cause internal damage.
Cleaning plastic exterior parts Use a vinyl cleaner for routine cleaning of plastic. Clean with a tar remover if necessary. Do not clean
Maintenance and care
com_plastic_exterior.01
209
com_exterior_lamps.01
com_wiper_cleaning.01
com_instru-panel_cleaning.01
Maintenance and care
plastic parts with thinners, solvents or petroleum-based cleaners.
Cleaning the exterior lamps Wash the exterior lamps with the same detergent you used to wash the exterior of your vehicle. Use glass cleaner or tar remover if necessary. To avoid scratching the lamps, do not use a dry paper towel, chemical solvents or abrasive cleaners to clean the lamps.
Cleaning the wiper blades If the wiper blades do not wipe properly, clean both the windshield and wiper blades using undiluted windshield wiper solution or a mild detergent. Rinse thoroughly with clean water. To avoid damaging the blades, do not use fuel, kerosene, paint thinner or other solvents.
210
Maintenance and care
Cleaning the instrument panel Clean instrument panel with a damp cloth, then dry with a dry cloth. Any cleaner or polish that increases the gloss of the upper portion of the instrument panel should be avoided. The dull finish in this area is to help protect the driver from undesirable windshield reflection.
Cleaning the interior fabric Remove dust and loose dirt with a whisk broom or a vacuum cleaner. Remove fresh spots immediately. Follow the directions that come with the cleaner.
Cleaning leather seats (if equipped) For routine cleaning, wipe the surface with a soft, damp cloth. For more thorough cleaning, wipe the surface with a leather and vinyl cleaner or a mild soap.
com_int_fabric_cleaning.01
com_leather_seats_cleaning.01
f12_cleaning_safety_belts
211
Maintenance and care
Cleaning and maintaining the safety belts Clean the safety belts with a mild soap solution recommended for cleaning upholstery or carpets. Do not bleach or dye the belts, because these actions may weaken the belt webbing. Check your safety belt system periodically to make sure that it works properly and is not damaged. If the webbing shows any wear, nicks or cuts, have it examined by a qualified technician to determine if replacement is necessary. Always have your safety belt system checked after a collision by a qualified technician. Refer to Safety belt maintenance in the Seating and safety restraints chapter for more information.
212
Capacities and specifications
MOTORCRAFT PART NUMBERS
Component
4.2L
Engine
4.6L
5.4L
f12_motorcraft_part
Spark plug-platinum1
Air filter Fuel filter Oil filter PCV valveAWSF-42EE
AWSF-32PP
AWSF-22F
FA-1632
FG-872
FL-400-S EV-152
BXT-59
(manual)FA-1632
FG-872
FL-820-SEV-98
BXT-59
(manual)FA-1632
FG-872
FL-820-S EV-233
BXT-59
(manual)Battery
BXT-65-750
(automatic)BXT-65-750
(automatic) 1Replacement double platinum spark plug 9EE9 will replace 9E9 and 9EG9 and 9P9 will replace 9P9 and 9PG9 suffixed plugs. Refer to the Engine data chart for spark plug gap specifications.BXT-65-750
(automatic)Vehicle type
Capacity
4WD
F-150
1.65L (3.5 pts.)
2.6L (5.5 pts.)
REFILL CAPACITIES
Fluid
Axle; front
Axle; rear
Ford part
name Ford 22.35
cm (8.8 in) Ring Gear Ford 22.35
cm (8.8 in) and 24.76 cm (9.75 in) Ring Gear Conventional and Traction -Lok(1)213
f12_refill
Capacities and specifications
Ford part
name Ford 26.03
cm (10.25 in) Conventional and Traction Lok (2) Premium Cooling System FluidSuper Premium Motorcraft Motor Oil 5W-30
Unleaded 87
octaneMotorcraft MERCONT Multi-purpose ATF Motorcraft MERCONT Multi-purpose ATF Motorcraft MERCONT Multi-purpose ATF
Fluid
Axle; rear
Engine coolant
Engine oil1
Fuel
Power steering fluid
Transfer case fluid 3(if equipped)
Transmission fluid; automatic
214
Vehicle type
Capacity
F-250
3.3L (7.0 pts.)
4.2L w/o A/C 4.2L with A/C 4.6L w/o A/C 4.6L with A/C 5.4L w/o A/C 5.4L with A/C 4.2L 4.6L 5.4L
14.9L (15.7 qts.) 16.4L (17.3 qts.) 16.9L (17.9 qts.) 18.4L (19.4 qts.) 16.9L (17.9 qts.) 18.3L (19.4 qts.) 5.7L (6.0 qts.) 5.7L (6.0 qts) 5.7L (6.0 qts.)
4x2 Reg. Cab 4x2 SuperCab 4x4 Reg. Cab 4x4 SuperCab Long Wheelbase All
94.6L (25.0 gal) 94.6L (25.0 gal) 92.7L (24.5 gal) 94.6L (25.0 gal) 113.6L (30.0 gal) 2.3L (2.4 pts.)
4-wheel drive transfer case
1.9L (2.0 qts.)
4R70W E4OD (4x2) E4OD (4x4)
13.1L (13.9 qts.) 15.04L (15.9 qts.) 15.51L (16.4 qts.)
Capacities and specifications
Vehicle type
Capacity
5-speed manual
3.5L (3.75 qts.)
All
4.0L (4.25 qts.)
Fluid
Transmission fluid; manual2
Windshield washer fluid
Ford part
name Motorcraft MERCONT Multi-purpose ATF Ultra-clear windshield washer fluid concentrate
(1) Add 118 ml (4 oz.) of additive friction modifier C8AZ-19B546-A, Ford specification EST-M2C118–A, for complete fill of 22.35 cm (8.8
in.) and 24.76 cm (9.75 in) ring gear Traction-Lok axles. (2) Add 236 ml (8 oz.) of additive Friction Modifier C8AZ-19B546-A, Ford Specification EST-M2C118-A, for complete fill of 26.03 cm (10.25 in) Ring Gear Traction-Lok axles. 1Includes filter replacement. 2Fill to 6 mm (3/8 in) below bottom of filler hole. 3Fill to bottom of filler hole.LUBRICANT SPECIFICATIONS
Fluid
Axle lubricant; front
Axle lubricant; rear
Ford part name or equivalent SAE 75W90
High Performance Rear Axle Lubricant
Ford part number
Ford
specification
WSP-M2C201-A
XY-75W90-QL (Thermally Stable) F1TZ-19580-B WSL-M2C192-A
215
f12_lube
Capacities and specifications
Ford
Ford part number
specification C6AZ-19542-AB ESA-M6C25-A
and DOT 3
E2FZ-19549-AA or B XO-5W30-BSP or QSP
ESE-M97B44-A
WSS-M2C153-F
D0AZ-19584-AA or D7AZ-19584-AA XG-1-C
ESB-M1C93-A or ESB-M1C106-B ESA-M1C75-B
E6TZ-19581-A
ESF-M1C60-A
XT-2-BDX or QDX
MERCONT
C9AZ-19550-AC or BC
ESR-M17P5-A
Fluid
Brake fluid and clutch fluid
Engine coolant
Engine oil
Grease; body hinges, latches and seat tracks. Grease; transmission /steering/parking brake linkages and pivots. Brake and clutch pedal shaft. Parking brake cable Power steering fluid, transfer case fluid and transmission fluid (manual and automatic)
Windshield washer fluid
Ford part name or equivalent High Performance DOT 3 brake fluid Premium engine coolant Super Premium Motorcraft Motor Oil 5W30
Multi-Purpose GreasePremium Long-Life Grease
Speedometer cable lubricant Motorcraft MERCONT Multi-purpose ATF
Ultra-clear windshield washer concentrate
216
Capacities and specifications
f12_engine_data
Engine
ENGINE DATA
General
Specifications
Displacement
Bore x stroke
Horsepower
Torque
Required fuel grade Induction system Firing order
Spark plug gap
1-4-2-5-3-6
.137 cm (.054
in) Ignition system E.I. Compression ratio *Not available at time of printing.9.2:1
5.4 L (329.4
CID) 90.2 mm x 105.8 mm N/A*OHV 4.2L V-6
4.2 L (256.2
CID) 96.8 mm x 95.0
mm 205 @ 4750
RPM 260 ft. lb. @ 3000 RPM Unleaded - 87
octane Split port, OHV Tuned runnerSOHC 4.6L V8 SOHC 5.4L V8
4.6 L (280.6
CID) 90.2 mm x 90
mm 210 @ 4400
RPM 290 ft. lb. @ 3250 RPM Unleaded - 87
octaneN/A*
Unleaded - 87
octane Tuned runner and plenum 1-3-7-2-6-5-4-8
.137 cm (.054
in) Coil on plug 9.0:1and plenum 1-3-7-2-6-5-4-8
.137 cm (.054
in) E.I. 9.0:1f12_vehicle_dimensions
217
Capacities and specifications
f12_styleside
VEHICLE DIMENSIONS
STYLESIDE
Dimension
A=Overall height
B=Track front/rear
C=Overall width
D=Wheel base
Regular Cab 4x2
1.84 m (72.7
in) (SWB) 1.83 m (72.4
in) (LWB) 1.66 m (65.4
in)/1.66 m (65.4 in) 1.99 m (78.4 in) 3.04 m (119.9
in)(SWB) 3.51 m (138.5
in)(LWB)Body Style
Regular Cab
Super Cab
Super Cab
4x4
1.91 m (75.5
in) (SWB) 1.90 m(75.1
in) (LWB) 1.66 m (65.4
in)/1.66 m (65.4 in) 1.99 m (78.4 in) 3.04 m (119.9
in)(SWB) 3.51 m (138.5
in)(LWB)4x2
1.84 m (72.7
in) (SWB) 1.83 m (72.4
in)(LWB) 1.66 m (65.4
in)/1.66 m (65.4 in) 1.99 m (78.4 in) 3.51 m (138.5
in)(SWB) 3.99 m (157.1 in) (LWB)4x4
1.91 m (75.5
in) (SWB) 1.90 (75.1
in)(LWB) 1.66 m (65.4
in)/1.66 m (65.4 in) 2.01 m (79.5 in) 3.51 m (138.5
in)(SWB) 3.99 m (157.1
in)(LWB)218
Capacities and specifications
Body Style
Regular Cab
Super Cab
Super Cab
4x4
5.13 m (202.2
in)(SWB) 5.60 m (220.8
in)(LWB)4x2
5.6 m (220.8
in)(SWB) 6.11 m (240.9
in)(LWB)4x4
5.6 m (220.8
in)(SWB) 6.11 m (240.9
in)(LWB)Dimension
E=Overall length
FLARESIDE
Regular Cab 4x2
5.13 m (202.2
in)(SWB) 5.60 m (220.8
in)(LWB)Body Style
Dimension
Regular Cab 4x2
Regular Cab 4x4
A=Overall height B=Track front/rear C=Overall width D=Wheel base E=Overall length
1.84 m (72.7 in) 1.66 m (65.4 in) 2.00 m (79.1 in) 3.04 m (119.9 in) 5.22 m (205.9 in)
1.91 m (75.5 in) 1.66 m (65.4 in) 2.00 m (79.1 in) 3.05 m (120.2 in) 5.26 m (207.4 in)
Super Cab
Super Cab
4x2
1.84 m (72.7 in) 1.66 m (65.4 in) 2.00 m (79.1 in) 3.51 m (138.5 in) 5.7 m (224.5 in)
4x4
1.91 m (75.5 in) 1.66 m (65.4 in) 2.00 m (79.1 in) 3.52 m (138.8 in) 5.74 m (226.0 in)VEHICLE IDENTIFICATION NUMBER (VIN) The Vehicle Identification Number (VIN) is attached to a metal tag and is located on the driver side instrument panel (the tag may be read by looking through the windshield from the outside of the vehicle).
219
f12_flareside
f12_vin
f12_reporting
Reporting safety defects
REPORTING SAFETY DEFECTS If you believe that your vehicle has a defect that could cause a crash, or could cause injury or death, you should immediately inform the National Highway Traffic Safety Administration (NHTSA) in addition to Ford Motor Company.
If NHTSA receives similar complaints, it may open an investigation, and if it finds that a safety defect exists in a group of vehicles, it may order a recall and remedy campaign. However, NHTSA cannot become involved in individual problems between you, your dealer or Ford Motor Company. To contact NHTSA, you may either call the Auto Safety Hotline toll-free at 1–800–424–9393
(202–366–0123 in the Washington D.C. area) or write to: NHTSA U.S. Department of Transportation 400 Seventh Street Washington D.C. 20590
You can also obtain other information about motor vehicle safety from the Hotline.220
Before driving
Introduction
Instrumentation
Controls and features
Seating and safety restraints
Starting and driving
Starting
Driving
Roadside emergencies
Servicing
Maintenance and care
Capacities and specifications
Reporting safety defects
Index
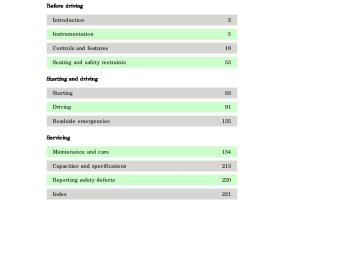
Contents
18
53
83
91
135
154
213
220
221
com_icons.01
com_warn.01
com_breaking_vehicle.01
Introduction
ICONS Indicates a warning. Read the following section on Warnings for a full explanation of them.
Indicates that vehicle information related to recycling and other environmental concerns will follow. We must all play our part in protecting the environment. Correct vehicle usage and the authorized disposal of waste cleaning and lubrication materials are significant steps towards this aim.
WARNINGS How can you reduce the risk of personal injury and prevent possible damage to others, your vehicle and its equipment? In this owner’s guide, answers to such questions are contained in comments highlighted by the warning triangle symbol.
BREAKING-IN YOUR VEHICLE There are no particular breaking-in rules for your vehicle. Simply avoid driving too briskly during the first 1,600 km (1,000 miles) of driving. Vary speeds frequently. This is necessary to give the moving parts a chance to break in. If possible, you should avoid full use of the brakes for the first 1,600 km (1,000 miles). From 1,600 km (1,000 miles) onwards you can gradually
increase the performance of your vehicle up to the permitted maximum speeds.
INFORMATION ABOUT THIS GUIDE The information found in this guide was in effect at the time of printing. Ford may change the contents without notice and without incurring obligation.
Notice to owners of utility type vehicles Before you drive your vehicle, please read this Owner’s Guide carefully. Your vehicle is not a passenger car. As with other vehicles of this type, failure to operate this vehicle correctly may result in loss of control or an accident. Be sure to read Driving off road in the Driving chapter as well as the “Four Wheeling” supplement included with 4WD and utility type vehicles.
Using your vehicle with a snowplow For more information and guidelines for using your vehicle with a snowplow, refer to the Driving chapter.
Using your light truck as an ambulance
Do not use this vehicle as an ambulance.
Introduction
com_info_guide.01
f12_utility_notice
f12_snowplowing
f12_no_ambulance
Introduction
Your vehicle is not equipped with the Ford Ambulance Preparation package.
Instrumentation
Fuel gauge
(pg. 15)
Speed control*
(pg. 33)
Transmission control switch
(pg. 38)
Engine coolant
temperature
gauge (pg. 15)
Speedometer
(pg. 14)
Tachometer*
(pg. 15)
Engine oil
pressure gauge
(pg. 16)
Charging system gauge (pg. 16)
18
18INT 2INT 1
OFFON
OFF
PANEL
DIM
AUTO LAMP
40
4050
5080
8060
6030
3060
60100
10070
70O V E R D R I V E O F F
40
400 0 0 0 0 5
0 0 0 0 0 5120
12020
2080
80
90
90140
14020 km/h 20 km/h
SRS
RES
SET
ACCEL
COAST
Headlamp
control (pg. 18)
Turn signal and
wiper/washer control
(pg. 36)
Driver air bag
(pg. 66)
Instrument panel dimmer switch
(pg. 20)
Instrumentation
f12_inst_warn_lights
Vents
(pg. 25)
Electronic sound system
(pg. 22)
VOL – PUSH ON
AM FM BASS TREB
FM 1
ST
BAL FADE
CLK
AUTO SET
SEEK
TUNE DISCS
SCAN
EJ
DOLBY SYSTEM
TAPE CD
REW
FF
SIDE 1-2
COMP
SHUFFLE
4H
2H
4L
LO
HI
OFF
PANEL
*A/C
*MAX A/C
PANEL & FLOOR
FLOOR FLR & DEF
DEF
COOL
WARM
PASSENGER AIRBAG
ON
OFF
OFF
Auxiliary
power point
(pg. 22)
* if equipped
4WD Control*
(pg. 110)
Climate controls (pg. 25)
Passenger air bag deactivate
switch (pg. 71)
Instrumentation
INSTRUMENT CLUSTER WARNING LIGHTS AND CHIMES Your vehicle is equipped with one of the following instrument clusters:
LOW LOW FUEL FUEL
40
4050
5080
8060
6030
3060
60100
10070
70DOOR DOOR AJAR AJAR
BRAKE
CHECK ENGINE
40
400 0 0 0 0 5
0 0 0 0 0 520
2010
1020 km/h 20 km/h
MPH MPH
0 0 1 0
0 0 1 0120
120140
14080
80
90
90
100
100180
180LOW LOW FUEL FUEL
DOOR AJAR
BRAKE
18
1840
4050
5080
8060
6030
3060
60100
10070
7040
400 0 0 0 0 5
0 0 0 0 0 520
2020 km/h 20 km/h
10
100 0 1 0
0 0 1 0120
120140
14080
80
90
90
100
10018
ABS
FUEL RESET
4x4
LOW LOW
RANGE RANGE
THEFT THEFT
RPMx1000
RPMx1000ABS ABS
CHECK ENGINE
FUEL RESET
LOW
RANGE
4x4
Low fuel Illuminates when the fuel level is low.
LOW FUEL
f12_low_fuel
f12_eng_cool_temp
Engine coolant temperature Illuminates briefly when the ignition key is turned to On (light from optional cluster shown). Illuminates when the engine coolant temperature is high. Stop the engine and check the engine coolant temperature level as soon as possible. Refer to Checking and adding engine coolant and What you should know about fail-safe cooling in the Maintenance and care section.
Oil pressure Illuminates briefly when the ignition key is turned to On (light from base cluster shown). Illuminates when the oil pressure is low. Stop the engine and check the engine oil level as soon as possible. Refer to Checking and adding engine oil in the Maintenance and care section.
Door ajar Illuminates when the ignition switch is in the ON or START position and any door is open.
Charging system Briefly illuminates when the ignition is turned on and the engine is off. The light also illuminates when the battery is not charging properly, requiring electrical system service.
Instrumentation
DOOR AJAR
f12_oil_pressure
com_door-ajar.02
com_charging_system.01
com_brake_system.01
Instrumentation
Brake system warning Extinguishes when the parking brake is released. Illumination after releasing the parking brake indicates low brake fluid level.
Safety belt Illuminates when the ignition is switched on to remind you to fasten your safety belts. For more information, refer to Using the safety restraints properly in the Seating and safety restraints chapter.
Air bag readiness Briefly illuminates when the ignition is turned to On. If the light fails to illuminate, continues to flash or remains on, have the system serviced. For more information, refer to Supplemental restraints system (SRS) in the Seating and safety restraints chapter.
Check engine warning light This light illuminates when the engine’s Emission Control System requires service. It will also illuminate when the ignition key is in the On position and the engine is off. Refer to What you should know about the on-board diagnostic (OBD II) system in the Maintenance and care chapter.
10
BRAKE
com_safety_belt.01
f12_air_bag_readiness
f12_check_engine
f12_tcil_light
CHECK ENGINE
Transmission control indicator light (TCIL) The TCIL (OFF), located on the end of the gearshift lever, may flash steadily if a malfunction has been detected. If the TCIL is flashing, contact your Ford dealer as soon as possible. If this condition persists, damage to the transmission could occur. For more information, refer to the Driving chapter.
4x4 light (if equipped) Illuminates when 4H (Four-Wheel Drive) or 4L (Four-Wheel Drive Low) is engaged.
4x4 low range (if equipped) Illuminates when 4L (Four-Wheel Drive Low) is engaged.
Anti-lock brake system (ABS) Momentarily illuminates when the ignition is turned on and the engine is off. If the light stays on or continues to flash, the ABS needs to be serviced.
Fuel reset Illuminates when the ignition key is turned to the ON position and the fuel pump shut-off switch has been triggered. For more information, refer to Fuel pump shut-off switch in the Roadside emergencies chapter.
Instrumentation
OVERDRIVE OFF
4x4
LOW RANGE
ABS
FUEL RESET
f12_4x4_light
f12_4x4_low
com_anti-lock_brake.01
com_fuel_reset.01
com_anti-theft_alarm.01
11
Instrumentation
Anti-theft system (if equipped) Illuminates when the anti-theft system is arming and flashes when the anti-theft system is armed.
High beams Illuminates when the headlamp high beams are on.
Turn signal Illuminates when the left or right turn signal or the hazard lights are turned on.
LOW FUEL
40
50
80
60
30
60
100
70
DOOR AJAR
BRAKE
CHECK ENGINE
40
0 0 0 0 0 5
20
10
20 km/h
MPH MPH
0 0 1 0
120
140
80
90
100180
LOW FUEL
18
BRAKE
40
50
80
60
30
60
100
70
40
0 0 0 0 0 5
20
10
20 km/h
MPH
0 0 1 0
120
140
80
90
100180
Testing warning lights Turn the ignition key to On without starting the vehicle. The
12
THEFT
com_high_beams.01
com_turn_signal.01
f12_testing_lights
18
ABS
RPMx1000
ABS
CHECK ENGINE
warning and indicator lights shown above will illiminate for a brief time. If any of these lights do not illuminate, contact your dealer for service.
Headlamps on warning chime Sounds when the headlamps are on, the key is out of the ignition and any door is opened.
Key-in-ignition warning chime