- 2010 Ford Expedition Owners Manuals
- Ford Expedition Owners Manuals
- 2000 Ford Expedition Owners Manuals
- Ford Expedition Owners Manuals
- 2005 Ford Expedition Owners Manuals
- Ford Expedition Owners Manuals
- 2006 Ford Expedition Owners Manuals
- Ford Expedition Owners Manuals
- 2007 Ford Expedition Owners Manuals
- Ford Expedition Owners Manuals
- 2012 Ford Expedition Owners Manuals
- Ford Expedition Owners Manuals
- 1997 Ford Expedition Owners Manuals
- Ford Expedition Owners Manuals
- 2009 Ford Expedition Owners Manuals
- Ford Expedition Owners Manuals
- 2002 Ford Expedition Owners Manuals
- Ford Expedition Owners Manuals
- 2011 Ford Expedition Owners Manuals
- Ford Expedition Owners Manuals
- Download PDF Manual
-
40
4050
5080
8060
6030
3060
60100
10070
7040
400 0 0 0 0 5
0 0 0 0 0 520
2020 km/h 20 km/h
10
100 0 1 0
0 0 1 0120
120140
14080
80
90
90
100
100Turn the ignition key to ON without starting the vehicle. The warning and indicator lights shown above will illuminate for a brief time. If any of these lights do not illuminate, contact your dealer for service.
Safety belt warning chime For information on the safety belt warning chime, refer to the Seating and safety restraints chapter.
Supplemental restraint system (SRS) warning chime For information on the SRS warning chime, refer to the Seating and safety restraints chapter.
Instrumentation
CHECK SUSP
THEFT THEFT
RPMx1000
RPMx1000ABS ABS
CHECK ENGINE
FUEL RESET
LOW
RANGE
4x4
exd_testing_warn_lights
com_safety_chime.01
com_srs_chime.01
com_key_chime.01
13
Instrumentation
Key-in-ignition warning chime Sounds when the key is left in the ignition in the OFF/LOCK or ACC position and the driver’s door is opened.
Headlamps on warning chime Sounds when the headlamps are on, the ignition is off (and the key is not in the ignition) and the driver’s door is opened.
INSTRUMENT CLUSTER GAUGES
com_headlamps_chime.01
exd_gauges_intro
40
4050
5080
8060
6030
3060
60100
10070
70com_tachometer.01
40
400 0 0 0 0 5
0 0 0 0 0 520
2010
1020 km/h 20 km/h
MPH
0 0 1 0
0 0 1 0
0 0 1 0120
120140
14080
80
90
90
100
100180
18030
40
4020
THEFT THEFT
RPMx1000
RPMx100040
4060
6050
5080
8060
100
10070
0 0 0 0 0 5
0 0 0 0 0 5120
12080
com_speedometer.01
20 km/h 20 km/h
MPH MPH
10
140
14090
100180
18018
18Speedometer Indicates the current vehicle speed.
14
exd_engine_coolant
exd_fuel_gauge
Tachometer Indicates the engine speed in revolutions per minute.
Engine coolant temperature gauge Indicates the temperature of the engine coolant. At normal operating temperature, the needle remains within the normal zone. If it enters the red section, the engine is overheating. Switch off the engine and allow it to cool. Refer to Checking and adding engine coolant and What you should know about fail-safe cooling in the Maintenance and care chapter.
Fuel gauge For information on the capacity of the fuel tank, refer to the Capacities and specifications chapter. The fuel gauge displays approximately how much fuel is in the fuel tank only when the ignition is ON. For proper fuel gauge indication after adding fuel, turn the ignition switch OFF while refueling the vehicle.
Instrumentation
0 RPMx1000
15
Instrumentation
The fuel gauge indicator may vary slightly when the vehicle is in motion. The most accurate reading is obtained with the vehicle on level ground. With ignition switch OFF, the fuel gage indicator may drift from the ignition switch ON position. Refer the Ignition information in the Controls and features chapter for more information on the positions of the ignition.
Charging system gauge If the pointer moves and stays outside of the normal range, have the vehicle’s electrical system checked as soon as safely possible.
Engine oil pressure gauge Indicates the engine oil pressure in the system. Sufficient pressure exists as long as the needle is in the normal range. If the gauge constantly indicates low pressure at normal engine speed, refer to Checking and adding engine oil in the Maintenance and care chapter. If the gauge indicates a low pressure and the engine oil level is correct, switch off the engine immediately and have the vehicle
16
exd_oil_pressure exd_voltage
18
18checked by your dealer or qualified service technician.
Odometer Registers the total number of miles the vehicle has traveled.
Instrumentation
exd_trip_odometer
exd_odometer
40
4060
6050
5080
8060
100
10070
0 0 0 0 0 5
00 00 00 00 00 55120
12080
30
40
4020
20 km/h 20 km/h
10
MPH MPH
0 0 1 0
0 0 1 0140
14090
100180
180exd_message_center
Trip odometer Registers thenumber of miles traveled on individual journeys. To reset, depress the control.
30
40
4020
40
4060
6050
5080
8060
100
10070
0 0 0 0 0 5
0 0 0 0 0 5120
12080
20 km/h 20 km/h
10
MPH MPH
0 0 1 0
0 0 1140
14090
100180
180TRIP COMPUTER (IF EQUIPPED) With the ignition control in the ON position, the trip computer displays important vehicle information through a constant monitor of vehicle systems. You may select display features on the message center for a display of status. For more information on the overhead console of your vehicle,
km TO EMPTY
17
Instrumentation
refer to trip computer information in the Controls and features chapter.
Selectable features English/metricdisplay Press the E/M control to change to message center display from metric to English units or vice versa.
Compass Press the mode control once for compass only display.
Fuelrange Press the mode control to display the approximate number of kilometers (miles) left to drive before the fuel tank is empty. The indicated distance to empty may be inaccurate with sustained, drastic changes in fuel economy (e.g. towing with a trailer), but will eventually recover.
18
exd_select_features_head exd_compass_display exd_metric_english_select
E/M
exd_fuel_range_select
MODE
exd_economy_fuel_select
Fueleconomy Press the mode control to display your vehicle’s average fuel economy in liters/100 kilometers (miles/gallon). Press the mode control to display the instantaneous fuel economy of your running vehicle. Distance to empty display may be inaccurate if the vehicle is started while parked on an incline. Fuel fills of less than 22.7 liters (six gallons) may not be detected by the trip computer. Off Press the mode control a final time to turn the trip computer display off.
Instrumentation
exd_off_mc
19
Controls and features
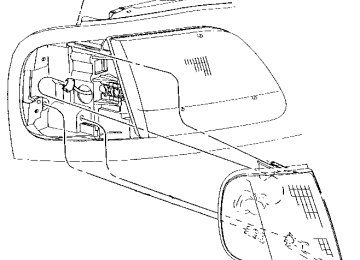
Headlamp/foglamp control Rotate the headlamp control to the desired position:
— OFF. — Parking lamps on.
— Headlamps on.
Foglampcontrol(ifequipped) The headlamp control also operates the foglamps. The foglamps can be turned on only when the headlamps are in the
position.
Pull headlamp control towards you to turn foglamps on. The foglamp (located to the indicator light right of the control) will illuminate.
20
exd_headlamp
exd_autolamp_operation
PANEL
DIM
PANEL
DIM
PULL FOR FOG
Autolamp control (if equipped) The autolamp system provides light sensitive automatic on-off control of the exterior lights normally controlled by the headlamp control. The autolamp system also keeps the lights on for a preselected period of time after the ignition switch is turned to Off. • To turn autolamps on, rotate the control up. The preselected time lapse is adjustable up to approximately three minutes by continuing to rotate the control upward. • To turn autolamps off, rotate the • A small LED illuminates under the autolamp control to indicate that the headlamps have been turned on by the autolamps. • Foglamps are not controlled by the autolamps. In order to turn on the foglamps, you must turn the lamp switch to the
control down until it clicks.
position and pull for fog.
Daytime running light (Canadian vehicles only) The daytime running light system turns the headlamps on, with a reduced light output, when: • the vehicle is running • the parking brake is released • the headlamp system is in the
position
Controls and features
PANEL
DIM
AUTO LAMP
exd_drl
21
Controls and features
The Daytime Running Light (DRL) system will
not illuminate the tail lamps and parking lamps. Turn on your headlamps at dusk. Failure to do so may result in a collision.
the panel.
Panel dimmer control • Turn the control up to brighten • Turn the control down to dim • Rotate the control up until it clicks to turn on the interior lights.
the panel.
exd_ip_dimmer_operation
exd_4wd_control
PANEL
DIM
22
4WD control (if equipped) This control operates the Control Trac 4WD. Refer to Control trac system in the Driving chapter for more information.
Controls and features
VOL – PUSH ON
AM FM BASS TREB
FM 1
ST
BAL FADE
CLK
AUTO SET
SEEK
TUNE DISCS
SCAN
EJ
DOLBY SYSTEM
TAPE CD
REW
FF
SIDE 1-2
COMP
SHUFFLE
A4WD 4H
2H
4L
LO
HI
OFF
*A/C *MAX A/C
A4WD
2H
4H
4L
Auxiliary power point This 12V power point is an additional power source for electrical accessories. Do not plug optional electrical accessories into the cigarette lighter. Use the power point.
exd_power_point
exd_audio_location
23
Controls and features
Audio system
VOL – PUSH ON
AM FM BASS TREB
FM 1
ST
BAL FADE
CLK
AUTO SET
SEEK
TUNE DISCS
SCAN
EJ
DOLBY SYSTEM
TAPE CD
REW
FF
SIDE 1-2
COMP
SHUFFLE
LO
HI
OFF
*A/C *MAX A/C
Refer to the “Audio Guide” in your Owner Portfolio.
Fuel pump shut-off switch Refer to the Roadside emergencies chapter for information on operating the fuel pump shut-off switch.
exd_air_suspension
exd_fuel_pump_shut_off
24
exd_defrost_rear
Controls and features
Air suspension load leveling on/off switch (if equipped) Your vehicle is equipped with an air suspension system that levels your vehicle when carrying heavy loads. Refer to Air suspension load leveling in the Driving chapter for more information.
OFF
25
Controls and features
Rear window defroster Press the defroster control to clear the rear window of thin ice and fog. • The small LED will illuminate when the defroster is activated.
The ignition must be in the ON position to operate the rear window defroster. The defroster turns off automatically after 10 minutes or when the ignition is turned to the OFF position. To manually turn off the defroster before ten minutes have passed, push the control again.
26
exd_parking_brake_location
exd_climate_overview_art
Controls and features
Parking brake For information on the parking brake, refer to Preparing to start the vehicle in the Driving chapter.
BRAKE
exd_title_climate_controls
CLIMATE CONTROL
Operating the instrument panel controls
LO
VOL – PUSH ON
AM FM BASS TREB
FM 1
ST
BAL FADE
CLK
AUTO SET
SEEK
TUNE DISCS
SCAN
EJ
DOLBY SYSTEM
TAPE CD
REW
FF
SIDE 1-2
COMP
SHUFFLE
LO
HI
OFF
*A/C *MAX A/C
HI
COOL
WARM
OFF
PANEL
*A/C
*MAX A/C
PANEL & FLOOR FLOOR FLR & DEF
DEF
exd_vents_climate_controls
27
exd_temperature_control
exd_fan_speed_climate
Controls and features
Instrumentpanelvents There are four vents on the instrument panel. These vents are equipped with dials to adjust the amount and direction of air passing through them.
Temperature Turn temperature control to the desired temperature.
COOL
WARM
28
exd_mode_control
Controls and features
Fanspeed Turn the fan speed control to the desired speed.
LO
HI
exd_airflow
Airflowandairconditioning Turn the mode control to the desired airflow position.
Controlling airflow Select PANEL for air to flow through these vents:
OFF
PANEL
A/C
MAX A/C
PANEL & FLOOR FLOOR FLR & DEF
DEF
VOL – PUSH ON
AM FM BASS TREB
FM 1
ST
BAL FADE
CLK
AUTO SET
SEEK
TUNE DISCS
SCAN
EJ
DOLBY SYSTEM
TAPE CD
REW
FF
SIDE 1-2
COMP
SHUFFLE
LO
HI
OFF
*A/C *MAX A/C
The PANEL position allows outside air to flow through the instrument panel vents.
29
P
VOL – PUSH ON
AM FM BASS TREB
FM 1
ST
BAL FADE
CLK
AUTO SET
SEEK
TUNE DISCS
SCAN
EJ
DOLBY SYSTEM
TAPE CD
REW
FF
SIDE 1-2
COMP
SHUFFLE
LO
HI
OFF
*A/C *MAX A/C
VOL – PUSH ON
AM FM BASS TREB
FM 1
ST
BAL FADE
CLK
AUTO SET
SEEK
TUNE DISCS
SCAN
EJ
DOLBY SYSTEM
TAPE CD
REW
FF
SIDE 1-2
COMP
SHUFFLE
LO
HI
OFF
*A/C *MAX A/C
Controls and features
Select PANEL & FLOOR for air to flow through these vents:
The PANEL & FLOOR position directs outside air to flow between the panel and floor vents. The air conditioning system will function in this mode provided the outside temperature is above 10°C (50°F). Select FLOOR for air to flow through these vents:
The FLOOR position directs outside air to flow through the floor vents.
30
Controls and features
Select FLR & DEF for air to flow through these vents:
VOL – PUSH ON
AM FM BASS TREB
FM 1
ST
BAL FADE
CLK
AUTO SET
SEEK
TUNE DISCS
SCAN
EJ
DOLBY SYSTEM
TAPE CD
REW
FF
SIDE 1-2
COMP
SHUFFLE
LO
HI
OFF
*A/C *MAX A/C
VOL – PUSH ON
AM FM BASS TREB
FM 1
ST
BAL FADE
CLK
AUTO SET
SEEK
TUNE DISCS
SCAN
EJ
DOLBY SYSTEM
TAPE CD
REW
FF
SIDE 1-2
COMP
SHUFFLE
LO
HI
OFF
*A/C *MAX A/C
The FLR & DEF position directs outside air to flow through the floor vents and the windshield defroster vents. The air conditioning system will function in this mode provided the outside temperature is above 10°C (50°F). for air to flow through Select these vents:
position directs outside The air to flow through the windshield defroster vents. The air conditioning system will function in this mode provided the outside temperature is above 10°C (50°F).
exd_ac
31
Controls and features
Airconditioning Select A/C for air conditioned air to flow through these vents:
The A/C mode directs outside air conditioned air to flow through the instrument panel vents. The A/C mode can be used for heating, ventilating and defogging the windows or air conditioning. The A/C system only functions if the outside temperature is above 10°C (50°F). Select MAX A/C for air to flow through these vents:
The MAX A/C mode recirculates the cabin air and directs it to flow through the instrument panel vents. This mode is noisier but more economical than the A/C mode. The air conditioning system only functions if the outside temperature is above 10°C (50°F).
32
VOL – PUSH ON
AM FM BASS TREB
FM 1
ST
BAL FADE
CLK
AUTO SET
SEEK
TUNE DISCS
SCAN
EJ
DOLBY SYSTEM
TAPE CD
REW
FF
SIDE 1-2
COMP
SHUFFLE
LO
HI
OFF
*A/C *MAX A/C
VOL – PUSH ON
AM FM BASS TREB
FM 1
ST
BAL FADE
CLK
AUTO SET
SEEK
TUNE DISCS
SCAN
EJ
DOLBY SYSTEM
TAPE CD
REW
FF
SIDE 1-2
COMP
SHUFFLE
LO
HI
OFF
*A/C *MAX A/C
OFFposition Select the OFF position for all climate control functions to cease. The outside inlet door will close and the fan is shut off. Maximumheating Set mode control to FLOOR, turn temperature control to maximum heat (red) and set fan speed control to HI.
Maximumcooling Set mode control to MAX A/C, turn the temperature control to maximum cool (blue) and set fan speed control to HI.
Controls and features
LO
LO
HI
COOL
WARM
OFF
PANEL
*A/C
*MAX A/C
PANEL & FLOOR FLOOR FLR & DEF
DEF
HI
COOL
WARM
OFF
PANEL
*A/C
*MAX A/C
PANEL & FLOOR FLOOR FLR & DEF
DEF
exd_max_cooling exd_max_heat
exd_ventilating
33
exd_defrosting
exd_aux_ac_controls
Controls and features
Ventilatingwithoutsideair Set mode control to any mode except MAX A/C, turn the temperature control to the desired temperature and turn fan speed control to the desired speed.
Defrostingwindshield Set mode control to DEF, turn temperature control to maximum heat (red) and set fan speed control to HI.
or FLR &
LO
LO
HI
COOL
WARM
OFF
PANEL
*A/C
*MAX A/C
PANEL & FLOOR FLOOR FLR & DEF
DEF
HI
COOL
WARM
OFF
PANEL
*A/C
*MAX A/C
PANEL & FLOOR FLOOR FLR & DEF
DEF
Drive with the climate control system on (in either the heating or air conditioning mode) to reduce humidity in your vehicle. To prevent air intake restriction, remove any snow, ice or leaves from the air intake area located directly under the windshield.
34
Auxiliary A/C controls (if equipped) The auxiliary air conditioning feature provides increased capacity to quickly heat or cool the vehicle. Besides the overhead control panel for the front seat occupants,the auxiliary air conditioning controls allow the rear passengers to control the temperature in the rear of the vehicle through a second control panel above the second row seat.
In order for the auxiliary air conditioning controls to function, the driver’s auxiliary air conditioning control must be set to REAR.
Controls and features
OFF
REAR
HI
COOL
WARM PANEL
FLOOR
35
Controls and features
The instrument panel climate controls must be on in order for the auxiliary air conditioning to operate.
When the auxiliary air conditioning control is set to FLOOR, airflow only occurs from the third row seat floor vent located in the driver’s side rear quarter trim panel. When the auxiliary air conditioning control is set to PANEL, airflow occurs from the instrument panel vents. Turn the fan speed control knob to the desired speed.
36
OFF
LO
HI
COOL
WARM PANEL
FLOOR
LO
HI
Controls and features
Turn the temperature control to the desired temperature.
Turn the mode control to the desired airflow position: • Far left for airflow to the overhead panel registers. • Far right for airflow to the rear • Anywhere between PANEL and FLOOR to vary airflow between the outlets.
floor vent.
Rear console climate controls (if equipped) Depending on the equipment package of your vehicle, the rear console may not be equipped with rear console audio/climate controls. Turn the air distribution control to the desired airflow position.
COOL
WARM
OFF
LO
HI
COOL
WARM PANEL
FLOOR
exd_climate_rear_controls
– VOLUME +
BAND
SEEK
MEMORY
37
Controls and features
Turn the fan speed dial to the desired position.
Select these vents:
for air to flow through
– VOLUME +
BAND
SEEK
MEMORY
– VOLUME +
BAND
SEEK
MEMORY
38
exd_title_steering
Select for air to flow through these vents:
Controls and features
– VOLUME +
BAND
SEEK
MEMORY
39
Controls and features
Positions of the ignition switch 1(Accessory) — allows electrical accessories such as the audio system and wiper/washer to operate when the engine is not running. 2(Lock) — locks the steering wheel and automatic gearshift lever. 3(Off) — shuts off the engine and all accessories without locking the steering wheel. 4(On) — tests the warning lights. Key remains here when engine is running. 5(Start) — cranks the engine. Key returns to 4(On) when released.
40
exd_ignition_positions
exd_speed_control_title
Speed control (if equipped) Toturnspeedcontrolon • Press ON
Toturnspeedcontroloff • Press OFF or • Turn off the vehicle ignition. Once speed control is switched off, the previously programmed set speed will be erased. Tosetaspeed Press SET ACCEL. For speed control to operate, the speed control must be ON and the vehicle speed must be greater than 48 km/h (30 mph).
If you drive up or down a steep hill, your vehicle speed may vary momentarily slower or faster than the set speed. This is normal. Speed control cannot reduce the vehicle speed if it increases above the set speed on a downhill. If
Controls and features
com_speed_off.01
com_speed_on.01
com_set_speed.01
ON
OFF
RES
SET
ACCEL
COAST
41
Controls and features
your vehicle speed is faster than the set speed while driving on a downhill in Overdrive, you may want to shift to the next lower gear to reduce your vehicle speed. If your vehicle slows downs more than 16 km/h (10 mph) below your set speed on an uphill, your speed control will disengage. This is normal. Pressing RES will re-engage it.
Do not use the speed control in heavy traffic or
on roads that are winding, slippery, or unpaved.
Tosetahigherspeed • Press and hold SET ACCEL. Release the switch when the desired vehicle speed is reached, or
• Press and release SET ACCEL. Each press will increase the set speed by 1.6 km/h (1 mph) or • Accelerate with your accelerator pedal, then press SET ACCEL.
You may accelerate with the accelerator pedal at any time during speed control usage. Releasing the accelerator pedal will return your vehicle speed to the previously programmed set speed.
42
RES
SET
ACCEL
COAST
com_speed_up.01
com_slow_down.01
Tosetalowersetspeed • Press and hold COAST. Release
the switch when the desired vehicle speed is reached, or
• Press and release COAST. Each press will decrease the set speed by 1.6 km/h (1 mph) or • Depress the brake pedal. When
the desired vehicle speed is reached press SET ACCEL.
Toreturntoasetspeed • Press RES. For RES to operate, the vehicle speed must be faster than 48 km/h (30 mph).
Todisengagespeedcontrol • Depress the brake pedal. Disengaging the speed control will not erase the previously programmed set speed.
Controls and features
RES
SET
ACCEL
COAST
RES
SET
ACCEL
COAST
com_disengage_speed_control.01
com_resume_feature.01exd_title_washer_wipers
43
exd_washers
exd_wipers
Controls and features
Front windshield wiper/washer controls Frontwipers Rotate the windshield wiper control to the desired interval, low or high speed position.
INT 2INT 1OFF
44
exd_title_rear_washer
Frontwasher For front window washer fluid operation, push (and hold as desired) the front washer control on the end of the stalk.
Controls and features
INT 2INT 1OFF
45
exd_rear_wiper
exd_washer_rear
Controls and features
Rear window wiper/washer controls Rearwasher Rotate (and hold as desired) the rear wiper/washer control to either
position.
From either position, the control will automatically return to the INT2 or OFF position.
INT 2INT 1OFF
Rearwipers For rear wiper operation, rotate the rear window wiper and washer control to the desired position. Select: INT 2 — One second interval rear wiper. INT 1 — Ten second interval rear wiper. OFF — Rear wiper and washer off.
46
exd_highbeams_flashtopass
Flash to pass Pull the stalk towards you to activate the “flash to pass” function.
Turnsignals Push the stalk down to activate the left turn signal; push the stalk up to activate the right turn signal.
Controls and features
INT 2INT 1OFF
exd_title_overdrive
47
exd_deactivating_overdrive
Controls and features
Overdrive control Activatingoverdrive D (Overdrive) is the normal drive position for the best fuel economy. The overdrive function allows automatic upshifts to second, third and fourth gear.
Deactivatingoverdrive Press the transmission control switch on the end of the gearshift lever. The transmission control indicator light (TCIL) (OFF) will illuminate on the end of the gearshift lever. Transmission will operate in gears one through three. To return to normal overdrive mode, press the transmission control switch again. The TCIL (OFF) will no longer be illuminated. When you shut off and re-start your vehicle, the transmission will
48
OVERDRIVE OFF
Controls and features
automatically return to normal D (Overdrive) mode. Deactivate overdrive whenever driving conditions (i.e., city traffic, hilly terrain, etc.) cause the transmission to shift excessively between D (Overdrive) and D(Drive) ranges. Also deactivate D (Overdrive) when: • driving with a heavy load • towing a trailer up or down • additional engine braking is
steep hills
desired
Transmissioncontrolindicator light(TCIL) The TCIL (OFF), located on the end of the gearshift lever, may flash steadily if a malfunction has been detected. If the TCIL is flashing, contact your Ford or Lincoln/Mercury dealer as soon as possible. If this condition persists, damage to the transmission could occur.
Hazard flasher control Use only in an emergency to warn traffic of vehicle breakdown, approaching danger, etc. Depress control to activate all indicators simultaneously. Depress control again to turn off. The hazard lights can be operated when the ignition is off.
OVERDRIVE OFF
exd_hazards
exd_tilt_steering
49
exd_title_overhead
Controls and features
Tilt steering Pull the lever to adjust the steering column angle. Push the lever back up to lock the steering wheel into position.
Never adjust the steering wheel when the vehicle is
moving.
50
The front overhead console and overhead controls provide a variety of available features including: • compass display • trip computer • overhead lamps • storage compartment • garage door opener stowage • moon roof control • auxiliary A/C controls • power quarter window switches The appearance of your vehicle’s overhead console will vary according to your option package.
Compass display (if equipped) The compass reading may be affected when you drive near large buildings, bridges, power lines and powerful broadcast antenna. Magnetic or metallic objects placed in or on the vehicle may also affect compass accuracy. Adjustments may be made to the zone and calibration of the compass.
Controls and features
VENT
VENT
OFF
REAR
HI
COOL
WARMPANEL
FLOOR
MODE
E/M
exd_compass_temp_display
km TO EMPTY
exd_zone_compass_adjust
51
1
15
14
13
12
11
10