- 2015 Chevrolet Camaro Owners Manuals
- Chevrolet Camaro Owners Manuals
- 2000 Chevrolet Camaro Owners Manuals
- Chevrolet Camaro Owners Manuals
- 2014 Chevrolet Camaro Owners Manuals
- Chevrolet Camaro Owners Manuals
- 1993 Chevrolet Camaro Owners Manuals
- Chevrolet Camaro Owners Manuals
- 1999 Chevrolet Camaro Owners Manuals
- Chevrolet Camaro Owners Manuals
- 1996 Chevrolet Camaro Owners Manuals
- Chevrolet Camaro Owners Manuals
- 2012 Chevrolet Camaro Owners Manuals
- Chevrolet Camaro Owners Manuals
- 2016 Chevrolet Camaro Owners Manuals
- Chevrolet Camaro Owners Manuals
- 2001 Chevrolet Camaro Owners Manuals
- Chevrolet Camaro Owners Manuals
- 2011 Chevrolet Camaro Owners Manuals
- Chevrolet Camaro Owners Manuals
- 2010 Chevrolet Camaro Owners Manuals
- Chevrolet Camaro Owners Manuals
- 1994 Chevrolet Camaro Owners Manuals
- Chevrolet Camaro Owners Manuals
- 1995 Chevrolet Camaro Owners Manuals
- Chevrolet Camaro Owners Manuals
- 2002 Chevrolet Camaro Owners Manuals
- Chevrolet Camaro Owners Manuals
- 2013 Chevrolet Camaro Owners Manuals
- Chevrolet Camaro Owners Manuals
- 1998 Chevrolet Camaro Owners Manuals
- Chevrolet Camaro Owners Manuals
- 1997 Chevrolet Camaro Owners Manuals
- Chevrolet Camaro Owners Manuals
- Download PDF Manual
-
Tap Shift allows the driver to manually control the automatic transmission. To use Tap Shift, the shift lever must be in M (Manual Mode). Vehicles with this feature have flags on the top of the steering wheel to indicate to the driver the location of the switches on the back of the steering wheel. Tap the left
Driving and Operating
8-29
switch to downshift, and the right switch to upshift. A display in the Driver Information Center will show which gear the vehicle is in. See Driver Information Center (DIC) on page 4-27 for more information. While using the Tap Shift feature, the vehicle will have firmer, quicker shifting for increased performance. You can use this for sport driving or when climbing or descending hills, to stay in gear longer, or to down shift for more power or engine braking. The transmission will only allow you to shift into gears appropriate for the vehicle speed and engine Revolutions Per Minute (RPM). The transmission will not automatically shift to the next higher gear if the engine RPM is too high. If shifting is prevented for any reason, the message Shift Denied will appear in the DIC, indicating that the transmission has not
shifted gears. While in the Tap Shift mode, the transmission will not automatically downshift on hard acceleration. When coasting to a stop, the V6 transmission will automatically downshift to 1 (First) gear, and the V8 transmission will automatically downshift to 2 (Second) gear. A 1 (first) gear start can be selected using the Tap Shift controls on V8 models When accelerating from a stop the transmissions will hold these gears until the driver manually selects higher gears using the Tap Shift controls. When accelerating the vehicle from a stop in snowy and icy conditions, you may want to shift into second gear. A higher gear ratio allows you to gain more traction on slippery surfaces.
8-30
Driving and Operating
Manual Transmission Shift Pattern (V8 Engines)
Shift Pattern (V6 Engine)
These are the shift patterns for the six-speed manual transmissions.
To operate the transmission: 1 (First): Press the clutch pedal and shift into 1 (First). Then slowly let up on the clutch pedal as you press the accelerator pedal.
You can shift into 1 (First) when you are going less than 64 km/h (40 mph). If you come to a complete stop and it is hard to shift into 1 (First), put the shift lever in Neutral and let up on the clutch. Press the clutch pedal back down. Then shift into 1 (First). 2 (Second): Press the clutch pedal as you let up on the accelerator pedal and shift into 2 (Second). Then, slowly let up on the clutch pedal as you press the accelerator pedal.
3 (Third), 4 (Fourth), 5 (Fifth) and 6 (Sixth): Shift into 3 (Third), 4 (Fourth), 5 (Fifth) and 6 (Sixth) the same way you do for 2 (Second). Slowly let up on the clutch pedal as you press the accelerator pedal.
To stop, let up on the accelerator pedal and press the brake pedal. Just before the vehicle stops, press the clutch pedal and the brake pedal, and shift to Neutral. Neutral: Use this position when you start or idle the engine. The shift lever is in Neutral when it is centered in the shift pattern, not in any gear. R (Reverse): To back up, press down the clutch pedal and shift into R (Reverse). On V8 models, apply pressure to get the lever past 5 (Fifth) and 6 (Sixth) into R (Reverse). Let up on the clutch pedal slowly while pressing the accelerator pedal.
One to Four Shift Light Message (V8 Only)
Driver Information Center
When this message comes on, you can only shift from 1 (First) to 4 (Fourth) instead of 1 (First) to 2 (Second). The message will be displayed in the Driver Information Center.
Driving and Operating
8-31
You must complete the shift into 4 (Fourth) to turn off this feature. This helps you get the best possible fuel economy. After shifting to 4 (Fourth), you may downshift to a lower gear if you prefer. Notice: Forcing the shift lever into any gear except 4 (Fourth) when the 1 TO 4 SHIFT message comes on may damage the transmission. Shift only from 1 (First) to 4 (Fourth) when the message comes on. This message will come on when: • The engine coolant temperature
is higher than 76°C (169°F),
Brakes Antilock Brake System (ABS) This vehicle has the Antilock Brake System (ABS), an advanced electronic braking system that helps prevent a braking skid. When the engine is started and the vehicle begins to drive away, ABS checks itself. A momentary motor or clicking noise might be heard while this test is going on, and it might even be noticed that the brake pedal moves a little. This is normal.
• The vehicle is going 24 to
31 km/h (15 to 19 mph) and • The vehicle is at 21 percent
throttle or less.
If there is a problem with ABS, this warning light stays on. See Antilock Brake System (ABS) Warning Light on page 4-23.
8-32
Driving and Operating
Let us say the road is wet and you are driving safely. Suddenly, an animal jumps out in front of you. You slam on the brakes and continue braking. Here is what happens with ABS: A computer senses that the wheels are slowing down. If one of the wheels is about to stop rolling, the computer will separately work the brakes at each wheel. ABS can change the brake pressure to each wheel, as required, faster than any driver could. This can help the driver steer around the obstacle while braking hard. As the brakes are applied, the computer keeps receiving updates on wheel speed and controls braking pressure accordingly.
Remember: ABS does not change the time needed to get a foot up to the brake pedal or always decrease stopping distance. If you get too close to the vehicle in front of you, there will not be enough time to apply the brakes if that vehicle suddenly slows or stops. Always leave enough room up ahead to stop, even with ABS.
Using ABS Do not pump the brakes. Just hold the brake pedal down firmly and let antilock work. The antilock pump or motor might be heard operating, and the brake pedal might be felt to pulsate, but this is normal.
Braking in Emergencies ABS allows the driver to steer and brake at the same time. In many emergencies, steering can help more than even the very best braking.
Parking Brake
To apply the parking brake, pull up on the parking brake handle. It is not necessary to push in on the release button while applying the parking brake. If the ignition is in the ON/RUN position, the brake system warning light will come on. See Brake System Warning Light on page 4-22.
To release the parking brake: 1. Hold the brake pedal down. 2. Pull the parking brake handle up
until you can press the release button.
3. Hold the release button in as you
move the brake handle all the way down.
Notice: Driving with the parking brake on can overheat the brake system and cause premature wear or damage to brake system parts. Make sure that the parking brake is fully released and the brake warning light is off before driving.
Driving and Operating
8-33
Driving with the parking brake applied will cause a warning chime to sound and the Park Brake message to appear in the DIC. The message will remain on until: • • If you are towing a trailer and you are parking on a hill, see Driving Characteristics and Towing Tips on page 8-49.
the parking brake is released the vehicle comes to a stop.
Brake Assist This vehicle has a Brake Assist feature designed to assist the driver in stopping or decreasing vehicle speed in emergency driving conditions. This feature uses the stability system hydraulic brake
control module to supplement the power brake system under conditions where the driver has quickly and forcefully applied the brake pedal in an attempt to quickly stop or slow down the vehicle. The stability system hydraulic brake control module increases brake pressure at each corner of the vehicle until the ABS activates. Minor brake pedal pulsations or pedal movement during this time is normal and the driver should continue to apply the brake pedal as the driving situation dictates The Brake Assist feature will automatically disengage when the brake pedal is released or brake pedal pressure is quickly decreased.
8-34
Driving and Operating
Ride Control Systems Traction Control System (TCS) The vehicle has a Traction Control System (TCS) that limits wheel spin. The system utilizes engine and braking controls to control wheel spin during acceleration at all driving speeds for maximum driver control regardless of conditions. When the system senses impending wheel slip during acceleration, it signals the throttle control to reduce drive wheel torque. Under extreme situations, such as going from pavement to ice during acceleration, the system will selectively apply the brakes to maintain control. The system may be heard or felt while it is working, but this is normal.
should always be left on, but it may be necessary to turn the system off if the vehicle is stuck in sand, mud or snow and rocking the vehicle is required. Also, turn TCS off while in deep snow or on loose gravel, to assist vehicle motion at lower speeds. See If the Vehicle is Stuck on page 8-11 for more information. See also Winter Driving on page 8-10 for information on using TCS when driving in snowy or icy conditions.
To turn the system off, press and release the StabiliTrak/TCS button located on the console in front of the shift lever.
The TCS/StabiliTrak warning light flashes when the traction control system is limiting wheel spin. The StabiliTrak/TCS warning light comes on solid if there is a problem with the traction control system. See Traction Control System (TCS)/StabiliTrak® Light on page 4-24 for more information. If the light stays on, see your dealer/retailer for service. When the TCS/StabiliTrak warning light is on, the system will not limit wheel spin. Adjust your driving accordingly. TCS automatically comes on whenever the vehicle is started. To limit wheel spin, especially in slippery road conditions, the system
Press and release the StabiliTrak/ TCS button and the traction control system turns off and the TCS warning light comes on. Press and release the button again to turn the system back on. For information on turning StabiliTrak off and on, see StabiliTrak System following.
Driving and Operating
8-35
Launch Control (V8 with Manual Transmission Models Only) Launch Control uses a form of traction control specifically tuned to optimize tire spin while launching the vehicle during closed track events and competitive driving. The feature is activated when the vehicle is at rest while in Competitive Mode. See Competitive Driving Mode on page 8-37 for more information. At rest, if the accelerator pedal is pressed to the floor with the clutch engaged, the RPM is limited to a predetermined level. A smooth, quick release of the clutch while keeping the accelerator pedal on the floor will provide controlled wheel spin for consistent acceleration. Complete shifts as described in Manual Transmission on page 8-30.
When in Competitive Mode the StabiliTrak Off light comes on the instrument panel cluster. Adjust your driving accordingly. See Competitive Driving Mode on page 8-37 for more information. Adding non-dealer/non-retailer accessories can affect the vehicle’s performance. See Accessories and Modifications on page 9-3
for more information.8-36
Driving and Operating
StabiliTrak System The vehicle has an electronic stability control system called StabiliTrak. It is an advanced computer controlled system that assists with directional control of the vehicle in difficult driving conditions. StabiliTrak activates when the computer senses a discrepancy between the intended path and the direction the vehicle is actually traveling. StabiliTrak selectively applies braking pressure at any one of the vehicle’s brakes to help steer the vehicle in the direction which you are steering. If cruise control is being used when StabiliTrak activates, the cruise control will automatically disengage. Press the cruise control button to reengage when road conditions allow. See Cruise Control on page 8-38 for more information.
The StabiliTrak/TCS button is located in front of the shift lever.
When the system activates, the StabiliTrak/Traction Control System (TCS) warning light flashes on the instrument panel cluster. You may also hear a noise or feel vibration in the brake pedal. This is normal. Continue to steer the vehicle in the intended direction.
If there is a problem detected with StabiliTrak, a Service StabiliTrak message displays on the DIC and the StabiliTrak/TCS warning light on the instrument panel cluster comes on. When this message and warning light displays, the system is not operational. Driving should be adjusted accordingly. See Ride Control System Messages on page 4-34 and Traction Control System (TCS)/StabiliTrak® Light on page 4-24 for more information.
Driving and Operating
8-37
Traction Control Off light and the StabiliTrak Off light come on the instrument panel cluster. If the system has been turned off, press and release the StabiliTrak/TCS button to turn the system back on.
Engine Drag Control (EDC) EDC improves vehicle stability by sensing if there is difference in speed between the free rolling front wheels and the rear drive wheels that often occurs when the driver takes their foot off the accelerator pedal on slippery surfaces (snow, ice, etc.). When this is detected, EDC sends more torque to the rear wheels to make sure all four wheels are spinning at similar speeds, making the vehicle more stable.
Competitive Driving Mode
On vehicles with a V8 engine, the driver can select this optional handling mode by pressing the StabiliTrak/TCS button two times quickly while Traction Control and StabiliTrak are turned on. When the system is on, the StabiliTrak Off light comes on and StabiliTrak Competitive Mode will be displayed in the Driver Information Center (DIC). See Ride Control System Messages on page 4-34.
StabiliTrak comes on automatically whenever the vehicle is started. The system should be left on to help assist with directional control of the vehicle. If StabiliTrak needs to be turned off, press and hold the StabiliTrak/TCS button until the
8-38
Driving and Operating
Competitive Driving Mode is designed and recommended for use only during closed track events and at competitive driving venues. The TCS system uses engine and brake systems to control wheel spin during acceleration and cornering while the StabiliTrak system helps maintain directional control of the vehicle by selective brake application. When the StabiliTrak button is pressed again, or the vehicle is restarted, the StabiliTrak and TCS will be turned back on to normal operation. Notice: When traction control is turned off, or Competitive Driving Mode is active, it is possible to lose traction. If you
attempt to shift with the drive wheels spinning with a loss of traction, it is possible to cause damage to the transmission. Do not attempt to shift when the drive wheels do not have traction. Damage caused by misuse of the vehicle is not covered. See the warranty book for additional information.
Limited-Slip Rear Axle Vehicles with a limited-slip rear axle can give more traction on snow, mud, ice, sand or gravel. It works like a standard axle most of the time, but when traction is low, this feature allows the drive wheel with the most traction to move the vehicle.
Cruise Control With cruise control, the vehicle can maintain a speed of about 40 km/h (25 mph) or more without keeping your foot on the accelerator. Cruise control does not work at speeds below 40 km/h (25 mph).
{ WARNING
Cruise control can be dangerous where you cannot drive safely at a steady speed. So, do not use the cruise control on winding roads or in heavy traffic. Cruise control can be dangerous on slippery roads. On such roads, fast changes in tire traction can cause excessive wheel slip, and you could lose control. Do not use cruise control on slippery roads.
Driving and Operating
8-39
5 (On/Off): Press to turn the cruise control system on and off. An indicator light comes on in the instrument panel cluster. \ (Cancel): Press to cancel cruise control without erasing the set speed from memory. RES/+ (Resume/Accel): Move the thumbwheel up to resume a set speed or to accelerate to a higher speed. SET/− (Set/Coast): Move the thumbwheel down to set a speed or to decrease the speed. To set a speed:
1. Press 5 to turn cruise control
on. The indicator light in the instrument panel cluster comes on.
2. Get to the speed desired.
3. Press the thumbwheel toward
SET/− and release it.
4. Take your foot off the accelerator
pedal.
When the brakes are applied, the cruise control shuts off.
Resuming a Set Speed If the cruise control is set at a desired speed and then the brakes are applied, the cruise control is disengaged. The indicator light on the instrument panel cluster goes out when the cruise is no longer engaged. To return to the previously set speed, press the thumbwheel up toward RES/+ briefly when the vehicle has reached a speed of about 40 km/h (25 mph) or more. This accelerates the vehicle to the previously selected speed.
Setting Cruise Control
{ WARNING
If you leave your cruise control on when you are not using cruise, you might hit a button and go into cruise when you do not want to. You could be startled and even lose control. Keep the cruise control switch off until you want to use cruise control.
The cruise control buttons are located on the outboard side of the steering wheel.
8-40
Driving and Operating
Increasing Speed While Using Cruise Control There are two ways to go to a higher speed. • Disengage the cruise control,
•
but do not turn it off. If the cruise control system is already engaged, press the thumbwheel up toward RES/+ and hold it until the vehicle accelerates to the desired speed, and then release the switch. To increase the speed in small amounts, press the thumbwheel up toward RES/+ briefly and then release it. Each time this is done, the vehicle goes about 1.6 km/h (1 mph) faster.
Reducing Speed While Using Cruise Control If the cruise control system is already engaged, • Push the thumbwheel toward
SET/− and hold until the desired lower speed is reached, then release it.
Ending Cruise Control There are three ways to end the cruise control: • Step lightly on the brake pedal
or clutch; when cruise control disengages, the indicator light on the instrument panel cluster goes out.
• Press 5 to turn off the cruise
control system.
• Press \ to disengage the cruise
control.
Erasing Speed Memory The cruise control set speed memory is erased when the cruise control or the ignition is turned off.
• To slow down in very small
amounts, push the thumbwheel toward SET/− briefly. Each time this is done, the vehicle goes about 1.6 km/h (1 mph) slower. Passing Another Vehicle While Using Cruise Control Use the accelerator pedal to increase the vehicle’s speed. When you take your foot off the pedal, the vehicle will slow down to the previously set cruise control speed.
Using Cruise Control on Hills How well the cruise control works on hills depends upon the vehicle’s speed, load, and the steepness of the hills. When going up steep hills, you might have to step on the accelerator pedal to maintain the vehicle’s speed. When going downhill, you might have to brake or shift to a lower gear to maintain the vehicle’s speed. When the brakes are applied the cruise control shuts off.
Driving and Operating
8-41
The display is located in the center of the rear seat back filler panel trim and uses three color-coded lights to provide distance and system information.
Object Detection Systems Ultrasonic Parking Assist For vehicles with the Ultrasonic Rear Parking Assist (URPA) system, it assists the driver with parking and avoiding objects while in R (Reverse). URPA operates at speeds less than 8 km/h (5 mph), and the sensors on the rear bumper detect objects up to 2.4m (8 feet) behind the vehicle, and at least 20 cm (8 inches) off the ground.
{ WARNING
The Ultrasonic Rear Parking Assist (URPA) system does not replace driver vision. It cannot detect:
• objects that are below the
bumper, underneath the vehicle, or if they are too close or far from the vehicle
• children, pedestrians,
bicyclists, or pets.
If you do not use proper care before and while backing; vehicle damage, injury, or death could occur. Even with URPA, always check behind the vehicle before backing up. While backing, be sure to look for objects and check the vehicle’s mirrors.
8-42
Driving and Operating
How the System Works URPA comes on automatically and the display briefly illuminates to indicate the system is working when the shift lever is moved into R (Reverse). If the vehicle is traveling faster then 8 km/h (5 mph) in reverse, the red light on the rear display flashes. Objects must be at least 20 cm (8 inches) off the ground and below trunk level, and within 2.4m (8 feet) from the rear bumper to be detected. The distance may be less during warmer or humid weather. A single beep sounds the first time an object is detected between 1.0 m (40 inches) and 2.4m (8 feet) away. Beeping occurs continuously when the vehicle is 0.6 m (23 inches) or closer to an object.
The following describes how the URPA display lights appear as the vehicle gets closer to a detected object:
Description amber light
amber/amber lights
amber/amber/red lights
and continuous beeping for
five seconds
amber/amber/red lights flashing
and continuous beeping for
five seconds
Metric 2.4 m 1.0 m
0.6 m
0.3 m
English
8 ft 40 in
23 in
1 ft
PARK ASSIST OFF displays on the Driver Information Center (DIC) to indicate that URPA is off. The message disappears after a short period of time.
See Object Detection System Messages on page 4-34 for other URPA messages.
Driving and Operating
8-43
• A tow bar is attached to the
vehicle.
• The vehicle’s bumper is
damaged. Take the vehicle to your dealer/retailer to repair the system.
• Other conditions may affect
system performance, such as vibrations from a jackhammer or the compression of air brakes on a very large truck that is near the vehicle.
If the system is still disabled, after driving forward at least 25 km/h (15 mph), take the vehicle to your dealer/retailer.
Fuel Use of the recommended fuel is an important part of the proper maintenance of this vehicle. To help keep the engine clean and maintain optimum vehicle performance, we recommend the use of gasoline advertised as TOP TIER Detergent Gasoline. Look for the TOP TIER label on the fuel pump to ensure gasoline meets enhanced detergency standards developed by auto companies. A list of marketers providing TOP TIER Detergent Gasoline can be found at www.toptiergas.com.
When the System Does Not Seem to Work Properly If the URPA system does not activate due to a temporary condition, the message PARK ASSIST OFF displays on the DIC and a red light comes on the rear URPA display when the shift lever is moved into R (Reverse). This can occur under the following conditions: • The ultrasonic sensors are not clean. Keep the vehicle’s rear bumper free of mud, dirt, snow, ice and slush. For cleaning instructions, see Exterior Care on page 9-88.
• A trailer was attached to the
vehicle, or an object was hanging out of the trunk during the last drive cycle, making the red light come on in the rear display. Once the attached object is removed, URPA will return to normal operation.
8-44
Driving and Operating
Recommended Fuel If the vehicle has the 3.6L V6 engine (VIN Code V), use regular unleaded gasoline with a posted octane rating of 87 or higher. If the octane rating is less than 87, you might notice an audible knocking noise when you drive, commonly referred to as spark knock. If this occurs, use a gasoline rated at 87 octane or higher as soon as possible. If you are using gasoline rated at 87 octane or higher and you hear heavy knocking, the engine needs service. If the vehicle has the 6.2L V8 engine (VIN Code W) or the 6.2L V8 engine (VIN Code J), use premium unleaded gasoline with a posted octane rating of 91 or higher. For best performance, use premium unleaded gasoline with a posted octane rating of 93. You can also use regular unleaded gasoline rated at 87 octane or higher, but the vehicle’s acceleration could be slightly reduced, and you might notice a
slight audible knocking noise, commonly referred to as a spark knock. If the octane is less than 87, you might notice a heavy knocking noise when you drive. If this occurs, use a gasoline rated at 87 octane or higher as soon as possible. Otherwise, you could damage the engine. If you are using gasoline rated at 87 octane or higher and you hear heavy knocking, the engine needs service.
Gasoline Specifications At a minimum, gasoline should meet ASTM specification D 4814 in the United States or CAN/CGSB-3.5 or 3.511 in Canada. Some gasolines contain an octane-enhancing additive called methylcyclopentadienyl manganese tricarbonyl (MMT). We recommend against the use of gasolines containing MMT. See Fuel Additives on page 8-45 for additional information.
The 8th digit of the Vehicle Identification Number (VIN) shows the code letter or number that identifies the vehicle’s engine. The VIN is at the top left of the instrument panel. See Vehicle Identification Number (VIN) on page 11-1.
California Fuel Requirements If the vehicle is certified to meet California Emissions Standards, it is designed to operate on fuels that meet California specifications. See the underhood emission control label. If this fuel is not available in states adopting California emissions standards, the vehicle will operate satisfactorily on fuels meeting federal specifications, but emission control system performance might be affected. The malfunction indicator lamp could turn on and the vehicle might fail a smog-check test. See Malfunction Indicator Lamp on page 4-19. If this occurs, return to your authorized dealer/retailer for diagnosis. If it is determined that the condition is caused by the type of fuel used, repairs might not be covered by the vehicle warranty.
Driving and Operating
8-45
Fuels in Foreign Countries If you plan on driving in another country outside the United States or Canada, the proper fuel might be hard to find. Never use leaded gasoline or any other fuel not recommended in the previous text on fuel. Costly repairs caused by use of improper fuel would not be covered by the vehicle warranty. To check the fuel availability, ask an auto club, or contact a major oil company that does business in the country where you will be driving.
Fuel Additives To provide cleaner air, all gasolines in the United States are now required to contain additives that help prevent engine and fuel system deposits from forming, allowing the emission control system to work properly. In most cases, you should not have to add anything to the fuel. However, some gasolines contain only the
minimum amount of additive required to meet U.S. Environmental Protection Agency regulations. To help keep fuel injectors and intake valves clean, or if the vehicle experiences problems due to dirty injectors or valves, look for gasoline that is advertised as TOP TIER Detergent Gasoline. Look for the TOP TIER label on the fuel pump to ensure gasoline meets enhanced detergency standards developed by the auto companies. A list of marketers providing TOP TIER Detergent Gasoline can be found at www.toptiergas.com. For customers who do not use TOP TIER Detergent Gasoline regularly, one bottle of GM Fuel System Treatment PLUS, added to the fuel tank at every engine oil change, can help clean deposits from fuel injectors and intake valves. GM Fuel System Treatment PLUS is the only gasoline additive recommended by General Motors. It is available at your dealer/retailer.
8-46
Driving and Operating
Some gasolines that are not reformulated for low emissions can contain an octane-enhancing additive called methylcyclopentadienyl manganese tricarbonyl (MMT); ask the attendant where you buy gasoline whether the fuel contains MMT. We recommend against the use of such gasolines. Fuels containing MMT can reduce the life of spark plugs and the performance of the emission control system could be affected. The malfunction indicator lamp might turn on. If this occurs, return to your dealer/retailer for service.
Gasolines containing oxygenates, such as ethers and ethanol, and reformulated gasolines might be available in your area. We recommend that you use these gasolines, if they comply with the specifications described earlier. However, E85 (85% ethanol) and other fuels containing more than 10% ethanol must not be used in vehicles that were not designed for those fuels. Notice: This vehicle was not designed for fuel that contains methanol. Do not use fuel containing methanol. It can corrode metal parts in the fuel system and also damage plastic and rubber parts. That damage would not be covered under the vehicle warranty.
Filling the Tank
{ WARNING
Fuel vapor burns violently and a fuel fire can cause bad injuries. To help avoid injuries to you and others, read and follow all the instructions on the fuel pump island. Turn off the engine when refueling. Do not smoke near fuel or when refueling the vehicle. Do not use cellular phones. Keep sparks, flames, and smoking materials away from fuel. Do not leave the fuel pump unattended when refueling the vehicle. This is against the law in some places. Do not re-enter the vehicle while pumping fuel. Keep children away from the fuel pump; never let children pump fuel.
Driving and Operating
8-47
{ WARNING
Fuel can spray out on you if you open the fuel cap too quickly. If you spill fuel and then something ignites it, you could be badly burned. This spray can happen if the tank is nearly full, and is more likely in hot weather. Open the fuel cap slowly and wait for any hiss noise to stop. Then unscrew the cap all the way.
Be careful not to spill fuel. Do not top off or overfill the tank and wait a few seconds after you have finished pumping before removing the nozzle. Clean fuel from painted surfaces as soon as possible. See Exterior Care on page 9-88. When replacing the fuel cap, turn it clockwise until it clicks. Make sure the cap is fully installed. The diagnostic system can determine if the fuel cap has been left off or improperly installed.
This would allow fuel to evaporate into the atmosphere. See Malfunction Indicator Lamp on page 4-19.
{ WARNING If a fire starts while you are refueling, do not remove the nozzle. Shut off the flow of fuel by shutting off the pump or by notifying the station attendant. Leave the area immediately.
If a new fuel cap is
Notice: needed, be sure to get the right type of cap from your dealer/ retailer. The wrong type fuel cap might not fit properly, might cause the malfunction indicator lamp to light, and could damage the fuel tank and emissions system. See Malfunction Indicator Lamp on page 4-19.
The fuel cap is located behind a hinged fuel door on the passenger side of the vehicle. To open the fuel door, push the rearward center edge in and release and it will open. When reinstalling the cap, turn it clockwise until it clicks, otherwise the Malfunction Indicator Lamp may turn on. See Malfunction Indicator Lamp on page 4-19.
WARNING (Continued)
• Bring the fill nozzle in contact
with the inside of the fill opening before operating the nozzle. Contact should be maintained until the filling is complete.
• Do not smoke while
pumping fuel.
• Do not use a cellular phone
while pumping fuel.
8-48
Driving and Operating
Filling a Portable Fuel Container
{ WARNING
Never fill a portable fuel container while it is in the vehicle. Static electricity discharge from the container can ignite the fuel vapor. You can be badly burned and the vehicle damaged if this occurs. To help avoid injury to you and others:
• Dispense fuel only into approved containers.
• Do not fill a container while
it is inside a vehicle, in a vehicle’s trunk, pickup bed, or on any surface other than the ground.
(Continued)
Towing General Towing Information Only use towing equipment that has been designed for the vehicle. Contact your dealer/retailer or towing retailer for assistance with preparing the vehicle for towing a trailer. See the following trailer towing information in this section: • For information on driving while
towing a trailer, see Driving Characteristics and Towing Tips. • For maximum vehicle and trailer
weights, see Trailer Towing. • For information on equipment
to tow a trailer, see Towing Equipment.
For information on towing a disabled vehicle, see Towing the Vehicle on page 9-87. For information on towing the vehicle behind another vehicle — such as a motorhome, see Recreational Vehicle Towing on page 9-87.
Driving Characteristics and Towing Tips
{ WARNING The driver can lose control when pulling a trailer if the correct equipment is not used or the vehicle is not driven properly. For example, if the trailer is too heavy, the brakes may not work well — or even at all. The driver and passengers could be seriously injured. The vehicle may also be damaged; the resulting repairs would not be covered by the vehicle warranty. Pull a trailer only if all the steps in this section have been followed. Ask your dealer/ retailer for advice and information about towing a trailer with the vehicle.
The vehicle can tow a trailer if it is equipped with the proper trailer towing equipment. To identify the trailering capacity of the vehicle, see Trailer Towing on page 8-53. Trailering changes handling, acceleration, braking, durability and fuel economy. With the added weight, the engine, transmission, wheel assemblies and tires are forced to work harder and under greater loads. The trailer also adds wind resistance, increasing the pulling requirements. For safe trailering, correctly use the proper trailering equipment. The following information has important trailering tips and rules for your safety and that of your passengers. Read this section carefully before pulling a trailer.
Driving and Operating
8-49
Pulling A Trailer Here are some important points: • There are many laws, including speed limit restrictions that apply to trailering. Check for legal requirements with state or provincial police.
• Do not tow a trailer at all during the first 1 600 km (1,000 miles) the new vehicle is driven. The engine, axle or other parts could be damaged.
• During the first 800 km
(500 miles) that a trailer is towed, do not drive over 80 km/h (50 mph) and do not make starts at full throttle. This reduces wear on the vehicle.
8-50
Driving and Operating
• Vehicles with automatic
transmissions can tow in D (Drive) but M (Manual Mode) is recommended. See “Manual Mode” in Automatic Transmission on page 8-26 for more information. Use a lower gear if the transmission shifts too often. For vehicles with a manual transmission, it is better not to use the highest gear.
• Use the cruise control when
towing.
• Obey speed limit restrictions.
Do not drive faster than the maximum posted speed for trailers, or no more than 90 km/h (55 mph), to reduce wear on the vehicle.
Driving with a Trailer Towing a trailer requires experience. Get familiar with handling and braking with the added trailer weight. The vehicle is now longer and not as responsive as the vehicle is by itself. Check all trailer hitch parts and attachments, safety chains, electrical connectors, lamps, tires and mirror adjustments. If the trailer has electric brakes, start the vehicle and trailer moving and then apply the trailer brake controller by hand to be sure the brakes are working. During the trip, check regularly to be sure that the load is secure, and the lamps and trailer brakes are working properly.
Towing with a Stability Control System When towing, the sound of the stability control system might be heard. The system is reacting to the vehicle movement caused by the trailer, which mainly occurs during cornering. This is normal when towing heavier trailers.
Following Distance Stay at least twice as far behind the vehicle ahead as you would when driving the vehicle without a trailer. This can help to avoid situations that require heavy braking and sudden turns.
Passing More passing distance is needed when towing a trailer. Because the rig is longer, it is necessary to go much farther beyond the passed vehicle before returning to the lane.
Driving and Operating
8-51
Backing Up Hold the bottom of the steering wheel with one hand. Then, to move the trailer to the left, move that hand to the left. To move the trailer to the right, move your hand to the right. Always back up slowly and, if possible, have someone guide you.
Making Turns Notice: Making very sharp turns while trailering could cause the trailer to come in contact with the vehicle. The vehicle could be damaged. Avoid making very sharp turns while trailering. When turning with a trailer, make wider turns than normal. Do this so the trailer won’t strike soft shoulders, curbs, road signs, trees or other objects. Avoid jerky or sudden maneuvers. Signal well in advance.
Turn Signals When Towing a Trailer The arrows on the instrument panel flash whenever signaling a turn or lane change. Properly hooked up, the trailer lamps also flash, telling other drivers the vehicle is turning, changing lanes or stopping. When towing a trailer, the arrows on the instrument panel flash for turns even if the bulbs on the trailer are burned out. For this reason you may think other drivers are seeing the signal when they are not. It is important to check occasionally to be sure the trailer bulbs are still working.
Driving On Grades Reduce speed and shift to a lower gear before starting down a long or steep downgrade. If the transmission is not shifted down, the brakes might have to be used so much that they would get hot and no longer work well.
Vehicles with an automatic transmission can tow in D (Drive). Shift the transmission to a lower gear if the transmission shifts too often under heavy loads and/or hilly conditions. For vehicles with a manual transmission, it is better not to use the highest gear. When towing at high altitude on steep uphill grades, consider the following: Engine coolant will boil at a lower temperature than at normal altitudes. If the engine is turned off immediately after towing at high altitude on steep uphill grades, the vehicle may show signs similar to engine overheating. To avoid this, let the engine run while parked, preferably on level ground, with the automatic transmission in P (Park) for a few minutes before turning the engine off.
8-52
Driving and Operating
For vehicles with manual transmissions, let the engine run while parked, preferably on level ground, with the transmission out of gear and the parking brake applied, for a few minutes before turning the engine off. If the overheat warning comes on, see Engine Overheating on page 9-24.
Parking on Hills
{ WARNING
Parking the vehicle on a hill with the trailer attached can be dangerous. If something goes wrong, the rig could start to move. People can be injured, and both the vehicle and the trailer can be damaged. When possible, always park the rig on a flat surface.
If parking the rig on a hill: 1. Press the brake pedal, but do not shift into P (Park) yet for vehicles with an automatic transmission, or into gear for vehicles with a manual transmission. Turn the wheels into the curb if facing downhill or into traffic if facing uphill.
2. Have someone place chocks
under the trailer wheels.
3. When the wheel chocks are in place, release the brake pedal until the chocks absorb the load.
4. Reapply the brake pedal. Then
apply the parking brake and shift into P (Park) for vehicles with an automatic transmission or into gear for vehicles with a manual transmission.
5. Release the brake pedal.
Leaving After Parking on a Hill 1. Apply and hold the brake pedal
while you: • start the engine, • shift into a gear, and •
release the parking brake.
2. Let up on the brake pedal. 3. Drive slowly until the trailer is
clear of the chocks.
4. Stop and have someone pick up
and store the chocks.
Maintenance When Trailer Towing The vehicle needs service more often when pulling a trailer. See this manual’s Maintenance Schedule or Index for more information. Things that are especially important in trailer operation are automatic transmission fluid, engine oil, axle lubricant, belts, cooling system and brake system. It is a good idea to inspect these before and during the trip. Check periodically to see that all hitch nuts and bolts are tight. Engine Cooling When Trailer Towing The cooling system may temporarily overheat during severe operating conditions. See Engine Overheating on page 9-24.
Trailer Towing Before pulling a trailer, there are three important considerations that have to do with weight: • The weight of the trailer. • The weight of the trailer tongue. • The total weight on your
vehicle’s tires.
Weight of the Trailer How heavy can a trailer safely be? It should never weigh more than 1,000 lbs (454 kg). But even that can be too heavy. It depends on how the rig is used. For example, speed, altitude, road grades, outside temperature and how much the vehicle is used to pull a trailer are all important. It can
Driving and Operating
8-53
depend on any special equipment on the vehicle, and the amount of tongue weight the vehicle can carry. See “Weight of the Trailer Tongue” later in this section for more information. Maximum trailer weight is calculated assuming only the driver is in the tow vehicle and it has all the required trailering equipment. The weight of additional optional equipment, passengers and cargo in the tow vehicle must be subtracted from the maximum trailer weight. Ask your dealer/retailer for our trailering information or advice, or you can write us at our Customer Assistance Offices. See Customer Assistance Offices on page 12-3
for more information.8-54
Driving and Operating
Weight of the Trailer Tongue The tongue load (A) of any trailer is an important weight to measure because it affects the total gross weight of the vehicle. The Gross Vehicle Weight (GVW) includes the curb weight of the vehicle, any cargo carried in it, and the people who will be riding in the vehicle. If there are a lot of options, equipment, passengers or cargo in the vehicle, it will reduce the tongue weight the vehicle can carry, which will also reduce the trailer weight the vehicle can tow. If towing a trailer, the tongue load must be added to the GVW because the vehicle will be carrying that weight, too. See Vehicle Load Limits on page 8-12 for more information about the vehicle’s maximum load capacity.
The trailer tongue (A) should weigh 10 to 15 percent of the total loaded trailer weight (B). After loading the trailer, weigh the trailer and then the tongue, separately, to see if the weights are proper. If they aren’t, adjustments might be made by moving some items around in the trailer.
Total Weight on Your Vehicle’s Tires Be sure the vehicle’s tires are inflated to the upper limit for cold tires. These numbers can be found on the Tire-Loading Information label. See Vehicle Load Limits on page 8-12. Make sure not to go over the GVW limit for the vehicle, including the weight of the trailer tongue.
Towing Equipment Hitches Use the correct hitch equipment. See your dealer/retailer or a hitch dealer for assistance. • The rear bumper on the vehicle
is not intended for hitches. Do not attach rental hitches or other bumper-type hitches to it. Use only a frame-mounted hitch that does not attach to the bumper.
• Will any holes be made in the
body of the vehicle when the trailer hitch is installed? If there are, seal the holes when the hitch is removed. If the holes are not sealed, dirt, water, and deadly carbon monoxide (CO) from the exhaust can get into the vehicle. See Engine Exhaust on page 8-25.
Safety Chains Always attach chains between the vehicle and the trailer. Cross the safety chains under the tongue of the trailer to help prevent the tongue from contacting the road if it becomes separated from the hitch. Leave enough slack so the rig can turn. Never allow safety chains to drag on the ground.
Trailer Brakes Does the trailer have its own brakes? Be sure to read and follow the instructions for the trailer brakes so they are installed, adjusted and maintained properly. Because the vehicle has antilock brakes, do not tap into the vehicle’s brake system. If this is done, both brake systems will not work well, or at all.
Driving and Operating
8-55
Conversions and Add-Ons Add-On Electrical Equipment Notice: Do not add anything electrical to the vehicle unless you check with your dealer/retailer first. Some electrical equipment can damage the vehicle and the damage would not be covered by the vehicle’s warranty. Some add-on electrical equipment can keep other components from working as they should. Add-on equipment can drain the vehicle battery, even if the vehicle is not operating. The vehicle has an airbag system. Before attempting to add anything electrical to the vehicle, see Servicing the Airbag-Equipped Vehicle on page 2-32 and Adding Equipment to the Airbag-Equipped Vehicle on page 2-33.
8-56
Driving and Operating
✍ NOTES
Vehicle Care
General Information General Information ...............9-2
California Proposition 65
Warning .............................9-2
California Perchlorate Materials Requirements ........9-3
Accessories and Modifications .......................9-3Vehicle Checks Doing Your Own Service Work ......................9-4
Hood ...................................9-5
Engine Compartment Overview ............................9-6
Engine Cover .......................9-9
Engine Oil ..........................9-10
Engine Oil Life System .........9-13
Automatic Transmission Fluid ................................9-14
Manual Transmission Fluid ....9-15
Hydraulic Clutch ..................9-15
Engine Air Cleaner/Filter .......9-16
Cooling System ...................9-17
...................9-19
Engine Coolant Engine Overheating .............9-24
Power Steering Fluid ............9-25Washer Fluid ......................9-26
Brakes ...............................9-27
Brake Fluid .........................9-28
Battery ...............................9-29
Rear Axle ...........................9-30
Starter Switch Check ............9-31
Automatic Transmission Shift Lock Control System Check ...................9-32
Ignition Transmission Lock Check .......................9-32
Park Brake and P (Park) Mechanism Check ..............9-32
Wiper Blade Replacement ......9-33
Headlamp Aiming Headlamp Aiming ................9-34
Bulb Replacement ...............9-37
Bulb Replacement Halogen Bulbs ....................9-37
High Intensity Discharge (HID) Lighting ....................9-37
Headlamps, Front Turn Signal and Parking Lamps (Base Vehicle) ...................9-37
Headlamps, Front Turn Signal and Parking Lamps (Up-Level Vehicle) ..............9-38
Daytime Running Lamps (DRL) ....................9-39
Fog Lamps .........................9-40Vehicle Care
9-1
Taillamps, Turn Signal, and Stoplamps .........................9-40
License Plate Lamp .............9-40
Replacement Bulbs ..............9-41
Electrical System Electrical System Overload ...........................9-41
Fuses and Circuit Breakers ...........................9-42
Engine Compartment Fuse Block .......................9-42
Instrument Panel Fuse Block .......................9-45
Rear Compartment Fuse Block .......................9-46Wheels and Tires Tires ..................................9-48
Winter Tires ........................9-48
Tire Sidewall Labeling ..........9-49
Tire Designations .................9-51
Tire Terminology and Definitions .........................9-52
Tire Pressure ......................9-54
Tire Pressure for High-Speed Operation ........9-56
Tire Pressure Monitor System .............................9-56
Tire Pressure Monitor Operation ..........................9-57
Tire Inspection ....................9-61General Information For service and parts needs, visit your dealer/retailer. You will receive genuine GM parts and GM-trained and supported service people. Genuine GM parts have one of these marks:
California Proposition 65
Warning Most motor vehicles, including this one, contain and/or emit chemicals known to the State of California to cause cancer and birth defects or other reproductive harm. Engine exhaust, many parts and systems (including some inside the vehicle), many fluids, and some component wear by-products contain and/or emit these chemicals.9-2
Vehicle Care
Tire Rotation .......................9-61
When It Is Time for New Tires .........................9-62
Buying New Tires ................9-63
Different Size Tires and Wheels .............................9-65
Uniform Tire Quality Grading ............................9-65
Wheel Alignment and Tire Balance .....................9-67
Wheel Replacement .............9-67
Tire Chains .........................9-68
If a Tire Goes Flat ...............9-69
Tire Sealant and Compressor Kit ..................9-71
Storing the Tire Sealant ...........9-77
and Compressor Kit Tire Changing .....................9-77
Compact Spare Tire .............9-83
Jump Starting Jump Starting .....................9-84
Towing Towing the Vehicle ..............9-87
Recreational Vehicle Towing .............................9-87Appearance Care Exterior Care ......................9-88
Interior Care .......................9-92Vehicle Care
9-3
GM Accessories are designed to complement and function with other systems on the vehicle. Your GM dealer/retailer can accessorize the vehicle using genuine GM Accessories. When you go to your GM dealer/retailer and ask for GM Accessories, you will know that GM-trained and supported service technicians will perform the work using genuine GM Accessories. Also, see Adding Equipment to the Airbag-Equipped Vehicle on page 2-33.
California Perchlorate Materials Requirements Certain types of automotive applications, such as airbag initiators, seat belt pretensioners, and lithium batteries contained in remote keyless transmitters, may contain perchlorate materials. Special handling may be necessary. For additional information, see www.dtsc.ca.gov/hazardouswaste/ perchlorate.
Accessories and Modifications Adding non-dealer/non-retailer accessories to the vehicle can affect vehicle performance and safety, including such things as airbags, braking, stability, ride and handling, emissions systems, aerodynamics, durability, and electronic systems like antilock brakes, traction control, and stability control. Some of these accessories could even cause malfunction or damage not covered by the vehicle warranty. Damage to vehicle components resulting from the installation or use of non-GM certified parts, including control module modifications, are not covered under the terms of the vehicle warranty and may affect remaining warranty coverage for affected parts.
9-4
Vehicle Care
Vehicle Checks Doing Your Own Service Work
{ WARNING You can be injured and the vehicle could be damaged if you try to do service work on a vehicle without knowing enough about it. • Be sure you have sufficient knowledge, experience, the proper replacement parts, and tools before attempting any vehicle maintenance task.
(Continued)
WARNING (Continued)
• Be sure to use the proper
nuts, bolts, and other fasteners. English and metric fasteners can be easily confused. If the wrong fasteners are used, parts can later break or fall off. You could be hurt.
If doing some of your own service work, use the proper service manual. It tells you much more about how to service the vehicle than this manual can. To order the proper service manual, see Service Publications Ordering Information on page 12-12.
This vehicle has an airbag system. Before attempting to do your own service work, see Airbag System Check on page 2-34. Keep a record with all parts receipts and list the mileage and the date of any service work performed. See Maintenance Records on page 10-10.
Hood To open the hood:
Vehicle Care
9-5
1. Pull the release handle that is located below the instrument panel to the left of the steering wheel.
2. Pull up on the secondary hood
release. The lever is located near the middle of the hood.
3. Lift the hood. Before closing the hood, be sure all the filler caps are on properly. Then lift the hood to relieve pressure. Pull the hood down on the passenger side to close it firmly.
9-6
Vehicle Care
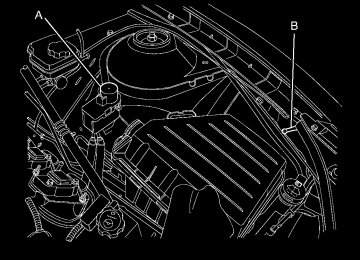
Engine Compartment Overview
3.6 L V6 Engine
Vehicle Care
9-7
H. Engine Oil Dipstick (Out of
View). See Engine Oil on page 9-10.
I. Brake Master Cylinder and
Hydraulic Clutch (if equipped with manual transmission) Reservoir. See Brakes on page 9-27 or Hydraulic Clutch on page 9-15. J. Remote Positive (+) Terminal.
See Battery on page 9-29.
K. Engine Air Cleaner/Filter on
page 9-16.
L. Windshield Washer Fluid
Reservoir. See Washer Fluid on page 9-26.
A. Underhood Electrical Center.
See Engine Compartment Fuse Block on page 9-42.
B. Engine Coolant Recovery Bottle
and Cap. See Engine Coolant on page 9-19.
C. Engine Cover on page 9-9. D. Engine Cooling Fans (Out of View). See Cooling System on page 9-17.
E. Radiator Fill Cap (Out of View).
See Engine Coolant on page 9-19.
F. Power Steering Reservoir and Cap (Out of View). See Power Steering Fluid on page 9-25.
G. Engine Oil Fill Cap. See Engine
Oil on page 9-10.
9-8
Vehicle Care
6.2 L V8 Engine (L99 Engine shown LS3 similar)
A. Underhood Electrical Center.
See Engine Compartment Fuse Block on page 9-42.
B. Engine Coolant Recovery Bottle
and Cap. See Engine Coolant on page 9-19.
C. Engine Oil Dipstick. See Engine
Oil on page 9-10.
D. Engine Oil Fill Cap (Out of View). See Engine Oil on page 9-10.
E. Engine Cover on page 9-9. F. Engine Cooling Fans (Out of View). See Cooling System on page 9-17.
G. Power Steering Reservoir and
Cap (Under Engine Cover). See Power Steering Fluid on page 9-25.
H. Brake Master Cylinder and
Hydraulic Clutch (if equipped with manual transmission) Reservoir. See Brakes on page 9-27 or Hydraulic Clutch on page 9-15.
I. Remote Positive (+) Terminal.
See Battery on page 9-29.
J. Engine Air Cleaner/Filter on
page 9-16.
K. Windshield Washer Fluid
Reservoir. See Washer Fluid on page 9-26.
L. Radiator Fill Cap. See Engine
Coolant on page 9-19.
Vehicle Care
9-9
Engine Cover 3.6 L V6 Engine Cover
To remove: 1. Remove the engine oil fill
cap (B).
2. Lift the engine cover (A) to
disengage one front attachment point.
3. Pull engine cover forward to
disengage from two rear tabs. 4. Reverse Steps 1 through 3 to
reinstall engine cover.
9-10
Vehicle Care
6.2 L V8 Engine Cover (L99 Engine shown LS3 similar)
To remove: 1. Remove the engine oil fill
cap (A).
2. Lift the engine cover (B) to
disengage two front attachment points.
3. Pull engine cover forward to
disengage from horizontal rear attachments.
4. Reverse Steps 1 through 3 to
reinstall engine cover.
Engine Oil Checking Engine Oil It is a good idea to check the engine oil level at each fuel fill. In order to get an accurate reading, the oil must be warm and the vehicle must be on level ground. The engine oil dipstick handle is a yellow loop. See Engine Compartment Overview on page 9-6
for the location of the engine oil dipstick. 1. Turn off the engine and give the oil several minutes to drain back into the oil pan. If this is not done, the oil dipstick might not show the actual level.2. Pull out the dipstick and clean
it with a paper towel or cloth, then push it back in all the way. Remove it again, keeping the tip down, and check the level.
When to Add Engine Oil If the oil is below the cross-hatched area at the tip of the dipstick, add at least one liter/quart of the recommended oil. This section explains what kind of oil to use. For engine oil crankcase capacity, see Capacities and Specifications on page 11-2. Notice: Do not add too much oil. If the engine has so much oil that the oil level gets above the cross-hatched area that shows the proper operating range, the engine could be damaged.
See Engine Compartment Overview on page 9-6 for the location of the engine oil fill cap. Add enough oil to put the level somewhere in the proper operating range. Push the dipstick all the way back in when through.
What Kind of Engine Oil to Use (V6 Engine) Look for three things:
Vehicle Care
9-11
Notice: Use only engine oil identified as meeting GM Standard GM6094M and showing the American Petroleum Institute Certified For Gasoline Engines starburst symbol. Failure to use the recommended oil can result in engine damage not covered by the vehicle warranty.
Cold Temperature Operation If in an area of extreme cold, where the temperature falls below −29°C (−20°F), use either an SAE 5W-30 synthetic oil or an SAE 0W-30 engine oil. Both provide easier cold starting for the engine at extremely low temperatures. Always use an oil that meets the required specification, GM6094M.
• GM6094M
Use only an oil that meets GM Standard GM6094M.
• SAE 5W-30
SAE 5W-30 is best for the vehicle. These numbers on an oil container show its viscosity, or thickness. Do not use other viscosity oils such as SAE 20W-50.
• American Petroleum Institute
(API) starburst symbol
Oils meeting these requirements should have the starburst symbol on the container. This symbol indicates that the oil has been certified by the American Petroleum Institute (API).
9-12
Vehicle Care
What Kind of Engine Oil to Use (V8 Engines) Look for three things:
• GM4718M
This vehicle’s engine requires a special oil meeting GM Standard GM4718M. Oils meeting this standard may be identified as synthetic. However, not all synthetic oils will meet this GM standard. Use only an oil that meets GM Standard GM4718M.
Notice: Using oils that do not have the GM4718M Standard designation can cause engine damage not covered by the vehicle warranty. • SAE 5W-30
SAE 5W-30 is best for the vehicle. These numbers on an oil container show its viscosity, or thickness. Do not use other viscosity oils such as SAE 20W-50.
• American Petroleum Institute
(API) starburst symbol
Oils meeting these requirements should have the starburst symbol on the container. This symbol indicates that the oil has been certified by the American Petroleum Institute (API).
This vehicle’s engine was filled at the factory with a Mobil 1® synthetic oil meeting all requirements for this vehicle. Substitute Engine Oil: When adding oil to maintain engine oil level, oil meeting GM Standard GM4718M might not be available. You can add substitute oil designated SAE 5W-30
with the starburst symbol at all temperatures. Substitute oil not meeting GM Standard GM4718M should not be used for an oil change.Engine Oil Additives / Engine Oil Flushes Do not add anything to the oil. The recommended oils with the starburst symbol that meet GM Standard GM6094M are all that is needed for good performance and engine protection. Engine oil system flushes are not recommended and could cause engine damage not covered by the vehicle warranty.
Engine Oil Life System When to Change Engine Oil This vehicle has a computer system that indicates when to change the engine oil and filter. This is based on engine revolutions and engine temperature, and not on mileage. Based on driving conditions, the mileage at which an oil change is indicated can vary considerably. For the oil life system to work properly, the system must be reset every time the oil is changed.
When the system has calculated that oil life has been diminished, it indicates that an oil change is necessary. A CHANGE ENGINE OIL SOON message comes on. See Engine Oil Messages on page 4-32. Change the oil as soon as possible within the next 1 000 km (600 miles). It is possible that, if driving under the best conditions, the oil life system might not indicate that an oil change is necessary for over a year. However, the engine oil and filter must be changed at least once a year and at this time the system must be reset. Your dealer/ retailer has trained service people who will perform this work using genuine parts and reset the system. It is also important to check the oil regularly and keep it at the proper level. If the system is ever reset accidentally, the oil must be changed at 5 000 km (3,000 miles) since the last oil change. Remember to reset the oil life system whenever the oil is changed.
Vehicle Care
9-13
How to Reset the Engine Oil Life System The Engine Oil Life System calculates when to change the engine oil and filter based on vehicle use. Whenever the oil is changed, reset the system so it can calculate when the next oil change is required. If a situation occurs where the oil is changed prior to a change engine oil message being turned on, reset the system. After changing the engine oil, reset