- 2014 Toyota Tacoma Owners Manuals
- Toyota Tacoma Owners Manuals
- 2005 Toyota Tacoma Owners Manuals
- Toyota Tacoma Owners Manuals
- 2000 Toyota Tacoma Owners Manuals
- Toyota Tacoma Owners Manuals
- 2007 Toyota Tacoma Owners Manuals
- Toyota Tacoma Owners Manuals
- 2016 Toyota Tacoma Owners Manuals
- Toyota Tacoma Owners Manuals
- 2006 Toyota Tacoma Owners Manuals
- Toyota Tacoma Owners Manuals
- 2008 Toyota Tacoma Owners Manuals
- Toyota Tacoma Owners Manuals
- 2009 Toyota Tacoma Owners Manuals
- Toyota Tacoma Owners Manuals
- 2015 Toyota Tacoma Owners Manuals
- Toyota Tacoma Owners Manuals
- 2001 Toyota Tacoma Owners Manuals
- Toyota Tacoma Owners Manuals
- 2012 Toyota Tacoma Owners Manuals
- Toyota Tacoma Owners Manuals
- 2004 Toyota Tacoma Owners Manuals
- Toyota Tacoma Owners Manuals
- 2011 Toyota Tacoma Owners Manuals
- Toyota Tacoma Owners Manuals
- 2003 Toyota Tacoma Owners Manuals
- Toyota Tacoma Owners Manuals
- 2002 Toyota Tacoma Owners Manuals
- Toyota Tacoma Owners Manuals
- 2010 Toyota Tacoma Owners Manuals
- Toyota Tacoma Owners Manuals
- Download PDF Manual
-
on. (P. 329) Set notification of SMS/ MMS/E-mail reception on this system to on. (P. 329)
Enable automatic trans- fer function on the cellu- lar phone.
295
3-2. Using the multimedia system
In other situations
Symptom
Likely cause
Solution
The cellular phone is not close enough to this sys- tem.
Even though all conceivable measures have been taken, the symptom status does not change.
The cellular phone is the most likely cause of the symptom.
Bring the cellular phone closer to this system.
• Turn the cellular phone off, remove and reinstall the battery pack, and then restart the cellular phone. • Enable the cellular phone’s Bluetooth® con- nection. • Stop the cellular phone’s security software and close all applications. • Before using an applica- tion installed on the cellu- lar phone, carefully check its source and how its operation might affect this system.
296
Bluetooth®
■About Bluetooth®
3-2. Using the multimedia system
The Bluetooth® word mark and logos are registered trademarks owned Bluetooth SIG, Inc. and any use of such marks by Panasonic Corporation is under license. Other trademarks and trade names are those of their respective owners.
■When using the Bluetooth® audio system
●In the following conditions, the system may not function.
• If the portable audio player is turned off • If the portable audio player is not connected • If the portable audio player’s battery is low
●There may be a delay if a cellular phone connection is made during
Bluetooth® audio play.
●Depending on the type of portable audio player that is connected to the system, operation may differ slightly and certain functions may not be available.
■When using the hands-free system
●The multimedia system is muted when making a call. ●If both parties speak at the same time, it may be difficult to hear. ●If the received call volume is overly loud, an echo may be heard.
If the Bluetooth® phone is too close to the system, quality of the sound may deteriorate and connection status may deteriorate.
●In the following circumstances, it may be difficult to hear the other party:
• When driving on unpaved roads • When driving at high speeds • If a window is open • If the air conditioning is blowing directly on the microphone • If there is interference from the network of the cellular phone
297
3-2. Using the multimedia system
■Conditions under which the system will not operate
●If using a cellular phone that does not support Bluetooth® ●If the cellular phone is turned off ●If you are outside of cellular phone service coverage ●If the cellular phone is not connected ●If the cellular phone’s battery is low ●When outgoing calls are controlled, due to heavy traffic on telephone
lines, etc.
●When the cellular phone itself cannot be used ●When transferring contact data from the cellular phone
■Bluetooth® antenna
The antenna is built into the display. If the portable audio player is behind the seat or in the glove box or console box, or is touching or covered by metal objects, the connection status may deteriorate. If the cellular phone is behind the seat or in the console box, or touching or covered by metal objects, the connection status may deteriorate.
■Battery charge/signal status
●This display may not correspond exactly with the portable audio player or
cellular phone itself.
●This system does not have a charging function. ●The portable audio player or cellular phone battery will be depleted
quickly when the device is connected to Bluetooth®.
■When using the Bluetooth® audio and hands-free system at the same
time The following problems may occur. ●The Bluetooth® audio connection may be interrupted. ●Noise may be heard during Bluetooth® audio playback.
298
3-2. Using the multimedia system
■About the contact in this system
The following data is stored for every registered cellular phone. When another phone is connecting, you cannot read the registered data. ●Contact data ●Call history ●Favorite ●Message When removing a Bluetooth® phone from the system, the above-mentioned data is also deleted. ■Compatible models
The Bluetooth® audio system supports portable audio players with the fol- lowing specifications ●Bluetooth® specifications:
Ver. 2.0, or higher (Recommended: Ver. 3.0+EDR or higher)
●Profiles:
• A2DP (Advanced Audio Distribution Profile) Ver. 1.0, or higher
(Recommended: Ver. 1.2 or higher) This is a profile to transmit stereo audio or high quality sound to the multimedia system.
• AVRCP (Audio/Video Remote Control Profile) Ver. 1.0 or higher
(Recommended: Ver. 1.4 or higher) This is a profile to allow remote control the A/V equipment.
However, please note that some functions may be limited depending on the type of portable audio player connected. The hands-free system supports cellular phones with the following specifica- tions.
• Bluetooth® specification:
Ver. 2.0 or higher (Recommended: Ver. 3.0+EDR or higher)
299
3-2. Using the multimedia system
●Profiles:
• HFP (Hands Free Profile) Ver. 1.0 or higher (Recommended: Ver. 1.6
or higher) This is a profile to allow hands-free phone calls using a cellular phone or head set. It has outgoing and incoming call functions.
• OPP (Object Push Profile) Ver. 1.1 or higher (Recommended: Ver. 1.2) This is a profile to transfer contact data. When a Bluetooth® compatible cellular phone has both PBAP and OPP, OPP cannot be used.
• PBAP (Phone Book Access Profile) Ver. 1.0 or higher (Recommended:
Ver. 1.1) This is a profile to transfer contact data.
If the cellular phone does not support HFP, you cannot register it with the hands-free system. OPP, PBAP services must be selected individually.
■Certifications for the Bluetooth®
For vehicles sold in U.S.A. FCC ID: ACJ932YEAP01A446
This device complies with Part 15 of the FCC Rules. Operation is subject to the following two conditions: (1) this device may not cause harmful interference, and (2) this device must accept any interference received, including interference that may cause undesired operation.For vehicles sold in Canada
IC: 216J-YEAP01A446
This device complies with Industry Canada licence-exempt RSS stan- dard(s). Operation is subject to the following two conditions: (1) this device may not cause interference, and (2) this device must accept any interfer- ence, including interference that may cause undesired operation of the device. This radio transmitter (identify the device by certification number, or model number if Category II) has been approved by Industry Canada to operate with the antenna types listed below with the maximum permissible gain and required antenna impedance for each antenna type indicated. Antenna types not included in this list, having a gain greater than the maximum gain indicated for that type, are strictly prohibited for use with this device.300
3-2. Using the multimedia system
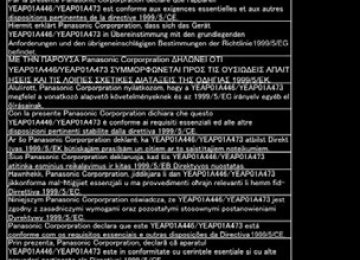
The latest original “DECLARATION of CONFORMITY” (DoC) is available at the address stated.
http://www.ptc.panasonic.de/
301
3-2. Using the multimedia system
■Reconnecting the portable audio player
If the portable audio player is disconnected due to poor reception when the engine switch is in the “ACC” or “ON” position, the system automatically reconnects the portable audio player. If you have switched off the portable audio player yourself, follow the instruc- tions below to reconnect: ●Select the portable audio player again ●Enter the portable audio player
■When you sell your car
Be sure to delete your personal data. (P. 252)
CAUTION
■FCC WARNING
Changes or modifications not expressly approved by the party responsible for compliance could void the user’s authority to operate the equipment. Radio frequency radiation exposure information: This equipment complies with FCC radiation exposure limits set forth for an uncontrolled environment. This equipment should be installed and operated with minimum distance of 7.9 in. (20 cm) between the radiator and your body. This transmitter must not be co-located operating in conjuction with any other antenna or transmitter.
■While driving
Do not use the portable audio player, cellular phone or connect a device to the Bluetooth® system.
302
3-2. Using the multimedia system
CAUTION
■Caution regarding interference with electronic devices
●Your audio unit is fitted with Bluetooth® antennas. People with implantable cardiac pacemakers, cardiac resynchronization therapy-pacemakers or implantable cardioverter defibrillators should maintain a reasonable dis- tance between themselves and the Bluetooth® antennas. The radio waves may affect the operation of such devices.
●Before using Bluetooth® devices, users of any electrical medical device other than implantable cardiac pacemakers, cardiac resynchronization therapy-pacemakers or implantable cardioverter defibrillators should con- sult the manufacturer of the device for information about its operation under the influence of radio waves. Radio waves could have unexpected effects on the operation of such medical devices.
NOTICE
■When leaving the vehicle
Do not leave your portable audio player or cellular phone in the vehicle. The inside of the vehicle may become hot, causing damage to the portable audio player or cellular phone.
303
3-2. Using the multimedia system Listening to Bluetooth® audio
The Bluetooth® audio system enables the user to enjoy music played on a portable player from the vehicle speakers via wireless communication. Select “ When a Bluetooth® device cannot be connected, check the con- nection status on the “Bluetooth Audio” screen. If the device is not connected, either register or reconnect the device. (P. 288)
Audio” on the “Select Audio Source” screen.
Audio control screen
Some titles and controls may not be displayed depending on the type of portable audio player used.
to display
Connection status Battery charge “Select Audio Source” screen appears Selecting a Bluetooth® device Select the play mode selection screen Random playback Repeat play Pause Select Setting the sound (P. 260)
to resume play
Indicators
Connection status
Battery charge
Good
Full
Conditions
Not connected
Empty
304
3-2. Using the multimedia system Using a Bluetooth® phone
The hands-free system is a function that allows you to use your cel- lular phone without touching it. This system supports Bluetooth®. Bluetooth® is a wireless data sys- tem that allows the cellular phone to wirelessly connect to the hands-free system and make/receive calls. Before making a phone call, check the connection status, battery charge, call area and signal strength. (P. 306) If a Bluetooth® device cannot be connected, check the connection status on the phone screen. If the device is not connected, either register or reconnect it. (P. 288)
Phone screen
To display the screen shown below, press the steering wheel or press the Several functions are available to operate on each screen that is dis- played by selecting the 4 tabs.
switch on the
button.
Device name Bluetooth® connection status
305
3-2. Using the multimedia system
■ Microphone
The vehicle’s built in microphone is used when talking on the phone. The person you are speaking to can be heard from the front speakers.
To use the hands-free system, you must register your Bluetooth® phone in the system. (P. 286)
Status display
You can check indicators such as signal strength and battery charge on any screen.
Connection status Signal strength Battery charge
Indicators
Connection status
Battery charge
Call area
Signal strength
Conditions
Good (Blue)
Not connected
Full
“Rm”: Roaming area Excellent
Empty
Poor
306
3-2. Using the multimedia system
Making a call
Once a Bluetooth® phone is registered, you can make a call using the following procedure: ■ Dialing
Display the phone screen. (P. 305) Select the “Dial Pad” tab and enter a phone number. To delete the input phone number, select For the first digit, you can enter “+” by selecting “” for a while. Press the
switch on the steering wheel or select
■ Dialing from the contacts list
You can dial a number from the contact data imported from your cellular phone. The system has one contact for each registered phone. Up to 2500 contacts may be stored in each contact. (P. 308)
Display the phone screen. (P. 305) Select “Contacts” tab. Choose the desired contact to call from the list. Choose the number and then press the steering wheel or select
switch on the
307
3-2. Using the multimedia system
■ When the contact is empty
You can transfer the phone numbers in a Bluetooth® phone to the system. Operation methods differ between PBAP (Phone Book Access Profile) compatible and PBAP incompatible Bluetooth® phones. If the cellular phone does not support either PBAP or OPP (Object Push Profile) service, you cannot transfer contacts.
● For PBAP compatible Bluetooth® phones
When “Automatic Contact/History Transfer” is set to on (P. 322)
Select the “Contacts” tab. Check that a confirmation screen is displayed when the oper- ation is complete. Transfer the contact data to the system using a Bluetooth® phone.
When “Automatic Contact/History Transfer” is set to off
Select the “Contacts” tab. Select the desired item.
“Always” and
Select to transfer new con- tacts from a cellular phone, select then enable “Automatic Transfer”. Select to transfer all the con- tacts from a connected cellular phone only once. Select to cancel transferring.
Check that a confirmation screen is displayed when the oper- ation is complete.
308
3-2. Using the multimedia system
● For PBAP incompatible but OPP compatible Bluetooth® phones
Select the “Contacts” tab. Follow the steps in “Update contacts from phone” from “STEP 2”. (P. 323)
■ Calling using favorites list
You can make a call using numbers registered in the contact.
Display the phone screen. (P. 305) Select “Favorites” tab. Select the desired number to make a call.
309
3-2. Using the multimedia system
■ Dialing from call history
You can make a call using the call history, which has the 3 func- tions below.
: calls which you missed : calls which you received : calls which you made
Display the phone screen. (P. 305) Select “Call History” tab. Select
or the desired entry from the list.
When
is selected
Check that the “Call” screen is displayed.
When the desired contact is selected
Select the desired number. Check that the “Call” screen is displayed.
■Call history list
●If you make a call to or receive a call from a number registered in the
contact, the name is displayed in the call history.
●If you make multiple calls to the same number, only the last call made is
displayed in the call history.
■International calls
You may not be able to make international calls, depending on the mobile phone in use.
310
3-2. Using the multimedia system
Receiving a call
When a call is received, the following screen is displayed together with a sound. ■ To answer the phone
Press the steering wheel or select
switch on the
■ To refuse a call
Press the
switch on the steering wheel or select
■ To adjust the incoming call volume
Turn the “PWR·VOL” knob.
■International calls
Received international calls may not be displayed correctly depending on the cellular phone in use.
311
3-2. Using the multimedia system
Speaking on the phone
The following screen is displayed when speaking on the phone.
■ To adjust the call volume
Select “-” or “+”. You can also adjust the volume using the volume knob.
■ To prevent the other party from hearing your voice
Select “Mute”.
■ Inputting tones
When using phone services such as an answering service or a bank, you can store phone numbers and code numbers in the con- tact.
Select “0-9”. Input the number.
● Release Tones
“Release Tones” appear when a continuous tone signal(s) contain- ing a “w” is registered in the contact list.
Select “Release Tones”.
312
3-2. Using the multimedia system
■Release Tones
●A continuous tone signal is a character string that consists of numbers
and the characters “p” or “w”. (e.g.056133w0123p#1)
●When the “p” pause tone is used, the tone data up until the next pause tone will be automatically sent after 2 seconds have elapsed. When the “w” pause tone is used, the tone data up until the next pause tone will be automatically sent after a user operation is performed.
●Release tones can be used when automated operation of a phone based service such as an answering machine or bank phone service is desired. A phone number with continuous tone signals can be registered in the contact list.
●Tone data after a “w” pause tone can be operated on voice command
during a call.
■ To transfer a call
Select “Handset Mode” to change from a hands-free call to a cellu- lar phone call. Select “Handset Mode” to off from a cellular phone call to a hands- free call.
■ Transmit volume setting
Select “Transmit Volume”. Select the desired level for the transmit volume. Select “OK”.
■ To hang up
Press the
switch on the steering wheel or select
313
3-2. Using the multimedia system
■ Call waiting When a call is interrupted by a third party while talking, an incoming call message will be displayed.
switch on the
To talk with the other party: Press the steering wheel or select To refuse the call: Press the steering wheel or select
switch on the
Every time you press the select party.
switch on the steering wheel or during call waiting, you will be switched to the other
■Transferring calls
●If you transfer from the cellular phone to hands-free, the hands-free screen will be displayed, and you can operate the system using the screen.
●Transfer method and operation may vary according to the cellular phone
used.
●For operation of the cellular phone in use, see the phone’s manual.
■Call waiting operation
Call waiting operation may differ depending on your phone company and cellular phone.
314
3-2. Using the multimedia system
Bluetooth® phone message function
from
forwarded
Received messages can be the connected Bluetooth® phone, enabling checking and replying using the multime- dia system. Depending on the type of Bluetooth® phone connected, received messages may not be transferred to the message inbox. If the phone does not support the message function, this function cannot be used. ■ Displaying “Message Inbox” screen
switch on the steering wheel or press the
Press the button. Select
on the phone screen.
Check that the “Message Inbox” screen is displayed.
■ Receiving a message
When an e-mail/SMS/MMS is received, the incoming message screen pops up with sound and is ready to be operated on the screen.
E-mail: Select to check the message. Select to refuse the message. Select to call the message sender.
315
3-2. Using the multimedia system
■Receiving a message
●Depending on the cellular phone used for receiving messages, or its reg- istration status with the navigation system, some information may not be displayed.
●The pop up screen is separately available for incoming e-mail and SMS/
MMS messages under the following conditions: E-mail: • “Incoming E-mail Display” is set to “Full Screen”. (P. 329) • “E-mail Notification Popup” is set to on. (P. 329) SMS/MMS: • “Incoming SMS/MMS Display” is set to “Full screen”. (P. 329) • “SMS/MMS Notification Popup” is set to on. (P. 329)
■ Checking the messages
Display the “Message Inbox” screen. (P. 315) Select the desired message from the list. Check that the message is displayed.
E-mails: Select “Mark Unread” or “Mark Read” to mark mail unread or read on the “Mes- sage Inbox” screen. This function is available when “Update Message Read Status on Phone” is set to on (P. 329) Select to make a call to the sender. Select to have messages read out. To cancel this function, select “Stop”. Select to display the previous or next message. Select to reply the message.
316
3-2. Using the multimedia system
■Check the messages
●Depending on the type of Bluetooth® phone being connected, it may be
necessary to perform additional steps on the phone.
●Messages are displayed in the appropriate connected Bluetooth®
phone’s registered mail address folder. Select the tab of the desired folder to be displayed.
●Only received messages on the connected Bluetooth® phone can be dis-
played.
●The text of the message is not displayed while driving. ●When “Automatic Message Readout” is set to on, messages will be auto-
matically read out. (P. 329)
●Turn the “PWRVOL” knob to adjust the message read out volume. ●The message read out function is available even while driving.
■ Replying to a message
Display the “Message Inbox” screen. (P. 315) Select the desired message from the list. Select “Quick Message”. Select the desired message. Select “Send”.
● Editing quick reply message
This operation cannot be performed while driving.
Select “Quick Message”. Select Select “OK” when editing is completed.
corresponding to the desired message to edit.
317
3-2. Using the multimedia system
■ Calling the message sender
Calls can be made to an e-mail/SMS/MMS message sender’s phone number.
Display the “Message Inbox” screen. (P. 315) Select the desired message. Select Check that the “Call” screen is displayed.
● Calling from a number within a message
Calls can be made to a number identified in a message’s text area.
Display the “Message Inbox” screen. (P. 315) Select the desired message. Select the text area. Select Check that the “Call” screen is displayed.
corresponding to the desired number.
● Calling from the incoming message screen
P. 314
318
3-2. Using the multimedia system
Using the steering wheel switches (if equipped)
The steering wheel switches can be used to operate a connected cel- lular phone. ■ Operating a telephone using the steering wheel switches
Off hook switch • Make a call • Receive a call • Display “Phone” screen On hook switch • End a call • Refuse a call
319
3-2. Using the multimedia system
Bluetooth® phone settings
You can adjust the hands-free system to your desired settings. ■ “Phone/Message Settings” screen
To display the screen shown below, press the “SETUP” button, and select “Phone” on the “Setup” screen.
the phone connection
Set (P. 286) Sound Settings (P. 320) Contact/Call History Settings (P. 322) Messaging Settings (P. 329) Phone Display Settings (P. 331)
■ Sound setting
Display the “Phone/Message Settings” screen. (P. 320) Select “Sound Settings” on the “Phone/Message Settings” screen.
incoming
the desired
Set the desired ringtone. Adjust the ringtone volume. Adjust the message readout volume. Set SMS/MMS tone. Adjust MMS tone volume. Set the incoming e-mail tone. Adjust incoming e-mail the tone volume. Adjust the default volume of the other party’s voice.
incoming SMS/
the
320
3-2. Using the multimedia system
■To return to the default settings
Select “Default”, and then “Yes”.
321
3-2. Using the multimedia system
Contact/Call history settings
The contact can be transferred from a Bluetooth® phone to the sys- tem. The contact also can be added, edited and deleted. The call history can be deleted and contact and favorites can be changed.
Display the “Phone/Message Settings” screen. (P. 320) Select “Contact/Call History Settings”. Select the desired item to be set.
PBAP
For compatible Bluetooth® phones, select to set automatic contact/history transfer on/off. When set to on, the phone’s contact data and history are automatically transferred. Select to update contacts from the connected phone. (P. 323) Select to sort contacts by the first name or last name field. Select to add contacts to the favorites list. (P. 327) Select to delete contacts from the favorites list. (P. 328) Select images. Select to clear contacts from the call history. Select to add new contacts to the contact list.* (P. 325) Select to edit contacts in the contact list.* (P. 325)
to display contact
322
3-2. Using the multimedia system
Select to delete contacts from the contact list.* (P. 326) Select items.*
reset all setup
to
*: For PBAP compatible Bluetooth® phones only, this function is avail- able when “Automatic Contact/ History Transfer” is set to off. (P. 322)
■ Update contacts from phone
Operation methods differ between PBAP compatible and PBAP incompatible but OPP compatible Bluetooth® phones. If your cellular phone is neither PBAP nor OPP compatible, the contacts cannot be transferred.
● For PBAP Compatible Bluetooth® Phones Select “Update Contacts from Phone”. Check that a confirmation screen is displayed when the oper- ation is complete. This operation may be unnecessary depending on the type of cellu- lar phone. Depending on the type of cellular phone, OBEX authentication may be required when transferring contact data. Enter “1234” into the Bluetooth® phone. If another Bluetooth® device is connected when transferring contact data, depending on the phone, the connected Bluetooth® device may need to be disconnected. Depending on the type of Bluetooth® phone being connected, it may be necessary to perform additional steps on the phone.
323
3-2. Using the multimedia system
● For PBAP Incompatible Bluetooth® Phones Select “Update Contacts from Phone”. Transfer the contact data to the system using a Bluetooth® phone. This operation may be unnecessary depending on the type of cellu- lar phone. Depending on the type of cellular phone, OBEX authentication may be required when transferring contact data. Enter “1234” into the Bluetooth® phone. To cancel this function, select “Cancel”. Select “Done” when it appears on the screen. Check that a confirmation screen is displayed when the oper- ation is complete.
● Updating the contacts in a different way (From the “Call History”
screen) For PBAP compatible Bluetooth® phones, this function is available when “Automatic Contact/History Transfer” is set to off. (P. 322)
Display the phone screen. (P. 305) Select the “Call History” tab and select a contact not yet regis- tered in the contact list. Select “Update Contact”. Select the desired contact. Select a phone type for the phone number.
324
3-2. Using the multimedia system
■ Registering a new contact to the contact list
New contact data can be registered. Up to 4 numbers per person can be registered. For PBAP compatible Bluetooth® phones, this function is available when “Automatic Contact/History Transfer” is set to off. (P. 322)
Select “New Contact”. Enter the name and select “OK”. Enter the phone number and select “OK”. Select the phone type for the phone number. To add another number to this contact, select “Yes”.
● Registering a new contact in a different way (From the “Call His-
tory” screen)
Display the phone screen. (P. 305) Select the “Call History” tab and select a contact not yet regis- tered in the contact list. Select “Add to Contacts”. Follow the steps in “Registering a new contact to the contact list” from “STEP 3”. (P. 325)
■ Editing the contact data
For PBAP compatible Bluetooth® phones, this function is available when “Automatic Contact/History Transfer” is set to off. (P. 322)
Select “Edit Contact”. Select the desired contact. Select
corresponding to the desired name or number.
For editing the name
Follow the steps in “Registering a new contact to the contact list” from “STEP 3”. (P. 325)
For editing the number
Follow the steps in “Registering a new contact to the contact list” from “STEP 4”. (P. 325)
325
3-2. Using the multimedia system
● Editing the contacts in a different way (From the “Contact Details”
screen)
Display the phone screen. (P. 305) Select the “Contacts”, “Call History” tab or the “Favorites” tab and select the desired contact. Select “Edit Contact”. “E-mail Addresses”: Select to display all registered e-mail addresses for the contact. Follow the steps in “Editing the contact data” from “STEP 4”. (P. 325)
■ Deleting the contact data
For PBAP compatible Bluetooth® phones, this function is available when “Automatic Contact/History Transfer” is set to off. (P. 322)
Select “Delete Contacts”. Select the desired contact and select “Delete”. Select “Yes” when the confirmation screen appears.
● Deleting the contact in a different way (From the “Contact Details”
screen)
Display the phone screen. (P. 305) Select the “Contacts”, “Call History” tab or the “Favorites” tab and select the desired contact. Select “Edit Contact”. Select “Yes” when the confirmation screen appears.
326
3-2. Using the multimedia system
■ Favorites list setting
Up to 15 contacts (maximum of 4 numbers per contact) can be reg- istered in the favorites list.
● Registering the contacts in the favorites list
Select “Add Favorite”. Select the desired contact to add to the favorites list. Dimmed contacts are already stored as a favorite. Check that a confirmation screen is displayed when the oper- ation is complete.
When 15 contacts have already been registered to the favorites list When 15 contacts have already been registered to the favor- ites list, a registered contact needs to be replaced. Select “Yes” when the confirmation screen appears to replace a contact. Select the contact to be replaced. Check that a confirmation screen is displayed when the oper- ation is complete.
Registering contacts in the favorites list in a different way (from the “Contacts” screen)
Display the phone screen. (P. 305) Select the “Contacts” tab. Select be registered in the favorites list. When selected, is changed to in the favorites list.
at the beginning of the desired contact list name to
, and the contact is registered
327
3-2. Using the multimedia system
Registering contacts in the favorites list in a different way (from the “Contact Details” screen)
Display the phone screen. (P. 305) Select the “Contacts” tab or the “Call History” tab and select the desired contact. Select “Add Favorite”. Check that a confirmation screen is displayed when the oper- ation is complete.
● Deleting the contacts in the favorites list
Select “Remove Favorite”. Select the desired contacts and select “Remove”. Select “Yes” when the confirmation screen appears. Check that a confirmation screen is displayed when the oper- ation is complete.
Deleting contacts in the favorites list in a different way (from the “Contacts” screen)
Display the phone screen. (P. 305) Select the “Contacts” tab. Select deleted from the favorites. list. When selected, is changed to the list.
at the beginning of the contact list name to be
, and the data is deleted from
Deleting contacts in the favorites list in a different way (from the “Contact Details” screen)
Display the phone screen. (P. 305) Select the “Contacts”, “Call History” tab or the “Favorites” tab and select the desired contact to delete. Select “Remove Favorite”. Select “Yes” when the confirmation screen appears. Check that a confirmation screen is displayed when the oper- ation is complete.
328
3-2. Using the multimedia system
■ Message Settings
Display the “Phone/Message Settings” screen. (P. 320) Select “Messaging Settings”. Select the desired item to be set.
the e-mail notification
Set automatic message trans- fer on/off. Set automatic message read- out on/off. Set the SMS/MMS notification popup on/off. Set popup on/off. Set adding the vehicle signa- ture to outgoing messages on/ off. Set updating message read status on phone on/off. Change the incoming SMS/ MMS display. “Full Screen”: When an SMS/ MMS message is received, the incoming SMS/MMS display screen is displayed and can be operated on the screen. “Drop-Down”: When an SMS/ MMS message is received, a message the upper side of the screen.
is displayed on
329
3-2. Using the multimedia system
Change the incoming e-mail display. “Full Screen”: When an e-mail is received, the incoming e-mail dis- play screen is the displayed and can be operated on the screen. “Drop-Down”: When an e-mail is received, a message is displayed on the upper side of the screen. Set display of messaging account names on the inbox tab on/off. When set to on, messaging account names used on the cellu- lar phone will be displayed. ● Displaying the “Messaging Settings” screen in a different way
Display the phone screen. (P. 305) Select Select “Settings”.
■To return to the default settings
Select “Default”, and then “Yes”.
330
3-2. Using the multimedia system
■ Phone Display Settings
Display the “Phone/Message Settings” screen. (P. 320) Select “Phone Display Settings”. Select the desired item to be set.
Change the incoming call dis- play. “Full Screen”: When a call is received, the hands-free screen is displayed and can be operated on the screen. “Drop-Down”: A message is dis- played on the upper side of the screen. Set display of the contact/his- tory transfer completion mes- sage on/off.
331
3-2. Using the multimedia system
Voice command system
The voice command system enables the hands-free system to be operated using voice commands. Operations of the voice command system can be performed by selecting the menu corresponding to each function on the screen. Even if any menu is selected, commands displayed on all menus can be operated. ■ Using the voice command system
Press the talk switch.
To cancel the voice command system, press and hold the talk switch.
After a beep sounds, say the desired command. On the list screen, you can select the desired command.
■Microphone
P. 306
■When using the microphone
●It is unnecessary to speak directly into the microphone when giving a
command.
●It is not necessary to wait for the confirmation beep before speaking a
command.
332
3-2. Using the multimedia system
●Voice commands may not be recognized if:
• Spoken too quickly. • Spoken at a low or high volume. • The roof or windows are open. • Passengers are talking while voice commands are spoken. • The air conditioning speed is set high. • The air conditioning vents are turned towards the microphone.
●In the following conditions, the system may not recognize the command
properly and using voice commands may not be possible: • The command is incorrect or unclear. Note that certain words, accents
or speech patterns may be difficult for the system to recognize.
• There is excessive background noise, such as wind noise.
■ Casual speech recognization Due to natural language speech recognition technology, this system enables recognition of a command when spoken naturally. However, the system cannot recognize every variation of each command. In some situations, it is possible to omit the command for the proce- dure and directly state the desired operation. Not all voice commands are displayed in the short cut menu. This function is available in English, Spanish and French. ● Expression examples for each function
Command “Call
” “Dial
” Expression examples
Get me
. I need to call at right away. Please dial the number <3334445555>. Ring <3334445555>. 333
3-2. Using the multimedia system Operating the sub woofer (on some Access Cab models)
OFF ON LIGHT ON The sub woofer illumination turns on. In this position, the sub woofer operates.
334
3-2. Using the multimedia system Detachable pole antenna
The antenna can be removed. ■ Removing the antenna
the
Place around the antenna.
included wrench
When not in use, the wrench is stored in glove box.
Loosen the antenna with the wrench and remove it.
335
3-2. Using the multimedia system
■ Installing the antenna
Tighten the antenna by one hand until it will not turn any more.
Using the wrench, tighten the antenna an additional 1/8th turn (20 to 45 degrees) to secure it in place.
After tightening the antenna, remove the wrench.
■About the wrench
●A standard 5/16 in. (8 mm) wrench can also be used to install or remove
the antenna.
●After using the included wrench, store it in the glove box for safekeeping.
336
3-2. Using the multimedia system
NOTICE
■To avoid damaging the antenna
Remove the antenna in the following situations. ●When using an automatic carwash. ●When the antenna will touch the ceiling of a garage, etc. ●When covering the vehicle with a car cover.
■Removing the antenna
●For normal driving, make sure the antenna is installed. ●When removing the antenna to use an automatic carwash, etc., be careful not to lose the antenna. Also, make sure to reinstall the antenna before driving the vehicle.
■Using the wrench
●When installing or removing the antenna, use the included wrench or a
standard 5/16 in. (8 mm) wrench.
●Be careful not to scratch or damage the vehicle body with the wrench. ●Do not over-tighten the antenna.
Over-tightening may damage the antenna.
●Do not use pliers to install or remove the antenna.
Pliers may damage the antenna’s finish.
337
3-3. Using the interior lights Interior lights list
Interior light (P. 339) Personal lights (P. 339)
■Illuminated entry system
When the interior light switch is in the DOOR position, the interior light auto- matically turns on/off according to whether the doors are locked/unlocked and whether the doors are open/closed.
■To prevent the battery from being discharged
If the interior light remains on when the door is not fully closed and the inte- rior light switch is in the DOOR position, the light will go off automatically after 20 minutes.
338
Interior light
3-3. Using the interior lights
Interior light and personal lights
DOOR position OFF ON
Personal lights
On/off
339
3-4. Using the storage features List of storage features
Glove box Overhead console Bottle holders Auxiliary boxes Front console box Cup holders
CAUTION
■Items that should not be left in the storage spaces
Do not leave glasses, lighters or spray cans in the storage spaces, as this may result in the following when cabin temperature becomes high: ●Glasses may be deformed by heat or cracked if they come into contact
with other stored items.
●Lighters or spray cans may explode. If they come into contact with other stored items, the lighter may catch fire or the spray can may release gas, causing a fire hazard.
340
3-4. Using the storage features
Glove box and front console box
Glove box
Pull up the lever.
CAUTION
■Caution while driving
Keep the glove box closed. In the event of sudden braking or sudden swerv- ing, an accident may occur due to an occupant being struck by the open glove box or the items stored inside.
Front console box
Push the button.