- 2009 Toyota Highlander Owners Manuals
- Toyota Highlander Owners Manuals
- 2004 Toyota Highlander Owners Manuals
- Toyota Highlander Owners Manuals
- 2014 Toyota Highlander Owners Manuals
- Toyota Highlander Owners Manuals
- 2010 Toyota Highlander Owners Manuals
- Toyota Highlander Owners Manuals
- 2005 Toyota Highlander Owners Manuals
- Toyota Highlander Owners Manuals
- 2015 Toyota Highlander Owners Manuals
- Toyota Highlander Owners Manuals
- 2003 Toyota Highlander Owners Manuals
- Toyota Highlander Owners Manuals
- 2001 Toyota Highlander Owners Manuals
- Toyota Highlander Owners Manuals
- 2006 Toyota Highlander Owners Manuals
- Toyota Highlander Owners Manuals
- 2011 Toyota Highlander Owners Manuals
- Toyota Highlander Owners Manuals
- 2002 Toyota Highlander Owners Manuals
- Toyota Highlander Owners Manuals
- 2007 Toyota Highlander Owners Manuals
- Toyota Highlander Owners Manuals
- Download PDF Manual
-
1000 km (600 miles) of trailer driving.
PRE−TOWING SAFETY CHECK D Check that your vehicle remains level when a loaded or unloaded trailer is hitched. Do not drive if the vehicle has an abnormal nose−up or nose−down condition, and check improper tongue load, overload, worn suspension or other possible causes.
for
D Make sure the trailer cargo is securely
loaded so that it cannot shift.
2003 HIGHLANDER from Aug. ’02 Prod. (OM48441U)
211
TRAILER LIGHTS D Your vehicle is equipped with a wire harness stored in the rear end under body. Some models are fitted with a socket for trailer lights under the rear bumper. Use either of them to connect and operate the trailer lights. However, the trailer lights must comply with fed- eral, state/provincial and local regula- tions. See your local recreational ve- hicle dealer or rental agency for the correct type of wiring and relays for your trailer. Check for correct operation of the turn signals and stop lights each time you hitch up. Direct splicing may damage your vehicle’s electrical system and cause a malfunction of your lights.
’03 HIGHLANDER_U (L/O 0208)
D Backing with a trailer is difficult and requires practice. Grip the bottom of the steering wheel and move your hand to the left to move the trailer to the left. Move your hand to the right to move the trailer to the right. (This pro- cedure that when backing without a trailer.) Also, just turn the steering wheel a little at time, avoiding sharp or prolonged turning. Have someone guide you when backing to reduce the risk of an acci- dent.
is generally opposite
to
increased when
D Because stopping distance may be in- vehicle−to−vehicle distance creased, should be towing a trailer. For each 16 km/h (10 mph) of speed, allow at least one vehicle and trailer length between you and the ve- hicle ahead. Avoid sudden braking as you may skid, resulting in jackknifing and loss of control. This is especially true on wet or slippery surfaces.
D Avoid jerky starts or sudden accelera-
tion.
D Avoid jerky steering and sharp turns. The trailer could hit your vehicle in a tight turn. Slow down before making a turn to avoid the necessity of sudden braking.
D Remember that when making a turn, the trailer wheels will be closer than the vehicle wheels to the inside of the turn. Therefore, compensate for this by making a turning radius with your vehicle.
than normal
larger
D Crosswinds and rough roads will ad- versely affect handling of your vehicle and trailer, causing sway. Pay attention to the rear from time to time to pre- pare yourself for being passed by large trucks or buses, which may cause your vehicle and trailer to sway. If swaying happens, firmly grip the steering wheel and immediately but gradually. Never increase speed. Steer straight ahead. If you make no extreme correction with the steering or brakes, the vehicle and trailer will stabilize.
reduce speed
D Be careful when passing other ve- hicles. Passing requires considerable distance. After passing a vehicle, do not forget the length of your trailer and be sure you have plenty of room be- fore changing lanes.
D In order to maintain engine braking effi-
ciency, do not use overdrive.
(at
D Because of the added load of the trail- er, your vehicle’s engine may overheat on hot days temperatures over 30_C [85_F]) when going up a long or steep grade with a trailer. If the engine coolant indicates overheating, immediately turn off the air conditioning (if in use), pull off the road and stop in a safe spot. Refer to “If your vehicle overheats” on page 219 in Section 4.
temperature gauge
D Always place wheel blocks under both trailer wheels when the vehicle and parking. Apply the parking brake firmly. Put the transmission in “P”. Avoid park- ing on a slope with a trailer, but if it cannot be avoided, do so only after performing the following:
1. Apply the brakes and hold. 2. Have someone place wheel blocks un- der both the vehicle and trailer wheels. 3. When the wheel blocks are in place, the
release your brakes slowly until blocks absorb the load.
4. Apply the parking brake firmly. 5. Shift into “P” and turn off the engine.
212
2003 HIGHLANDER from Aug. ’02 Prod. (OM48441U)
’03 HIGHLANDER_U (L/O 0208)
When restarting out after parking on a slope: 1. With the transmission in “P” position, start the engine. Be sure to keep the brake pedal depressed.
2. Shift into gear. 3. Release the parking brake and brake pedal and slowly pull or back away from the wheel blocks. Stop and apply your brakes.
4. Have someone retrieve the blocks.
CAUTION
towing speed
D Do not exceed 72 km/h (45 mph) or the posted limit, whichever is lower. Because insta- bility (swaying) of a towing vehicle− trailer in- creases as the speed increases, ex- ceeding 72 km/h (45 mph) may cause loss of control.
combination
usually
D Slow down and downshift before descending steep or long downhill grades. Do not make sudden down- shifts.
long or
D Avoid holding the brake pedal down too frequently. This could cause the brakes to overheat and result in reduced braking effi- ciency.
too
How to save fuel and make your vehicle last longer Improving fuel economy is easy—just take it easy. It will help make your vehicle last longer, too. Here are some specific tips on how to save money on both fuel and repairs: D Keep your tires inflated at the cor- rect pressure. Underinflation causes tire wear and wastes fuel. See page 267 in Section 7−2 for instructions. D Do not carry unneeded weight
in your vehicle. Excess weight puts a heavier the engine, causing greater fuel consumption.
load on
D Avoid lengthy warm−up idling. Once the engine is running smoothly, begin driving—but gently. Remember, howev- er, that on cold winter days this may take a little longer.
D Keep
the automatic
transmission overdrive turned on when engine braking is not required. Driving with the overdrive off will reduce the fuel economy. (For details, see “Automatic transmission” on page 115 in Section 1−6.)
D Accelerate
slowly
smoothly. Avoid jackrabbit starts. Get into high gear as quickly as possible.
and
2003 HIGHLANDER from Aug. ’02 Prod. (OM48441U)
213
’03 HIGHLANDER_U (L/O 0208)
CAUTION
Never turn off the engine to coast down hills. Your power steering and brake booster will not function with- out the emission control system operates properly only when the engine is run- ning.
the engine running. Also,
D Avoid long engine idling. If you have a long wait and you are not in traffic, it is better to turn off the engine and start again later.
D Avoid engine
lugging or over−rev- ving. Use a gear position suitable for the road on which you are travelling.
D Avoid continuous speeding up and slowing down. Stop−and−go driving wastes fuel.
D Avoid unnecessary stopping and braking. Maintain a steady pace. Try to time the traffic signals so you only need to stop as little as possible or take advantage of through streets to avoid traffic lights. Keep a proper dis- tance from other vehicles to avoid sud- den braking. This will also reduce wear on your brakes.
D Avoid heavy traffic or traffic
whenever possible.
jams
D Do not rest your foot on the brake pedal. This causes premature wear, overheating and poor fuel economy.
D Maintain a moderate speed on high- ways. The faster you drive, the greater the fuel consumption. By reducing your speed, you will cut down on fuel con- sumption.
the
D Keep
front wheels
in proper alignment. Avoid hitting the curb and slow down on rough roads. Improper alignment not only causes faster tire wear but also puts an extra load on the engine, which, in turn, wastes fuel. D Keep the bottom of your vehicle free from mud, etc. This not only lessens weight but also helps prevent corro- sion.
D Keep your vehicle tuned−up and in top shape. A dirty air cleaner, improp- er valve clearance, dirty plugs, dirty oil and grease,brakes not adjusted, etc. all lower engine performance and contrib- ute to poor fuel economy. For longer life of all parts and lower operating costs, keep all maintenance work on schedule, and if you often drive under severe conditions, see that your vehicle frequent maintenance. receives more (For scheduled maintenance informa- tion, please refer the “Scheduled Maintenance Guide” or “Owner’s Manu- al Supplement”.)
to
214
2003 HIGHLANDER from Aug. ’02 Prod. (OM48441U)
’03 HIGHLANDER_U (L/O 0208)
SECTION 4
IN CASE OF AN EMERGENCY If your vehicle will not start If your engine stalls while driving If your vehicle overheats If you have a flat tire If your vehicle becomes stuck If your vehicle needs to be towed If you cannot shift automatic transmission selector lever If you lose your keys If you lose your wireless remote control transmitter
. . . . . . . . . . . . . . . . . . . . . . . . . . . . . . . . . . . . . . . . . . . . . . . . . . . . . . . . . . . . . . . . . . . . . . . . . . . . . . . . . . . . . . . . . . . . . . . . . . . . . . . . . . . . . . . . . . . . . . . . . . . . . . . . . . . . . . . . . . . . . . . . . . . . . . . . . . . . . . . . . . . . . . . . . . . . . . . . . . . . . . . . . . . . . . . . . . . . . . . . . . . . . . . . . . . . . . . . . . . . . . . . . . . . . . . . . . . . . . . . . . . . . . . . . . . . . . . . . . . . . . .
216
219
219
220
228
229
234
235
2352003 HIGHLANDER from Aug. ’02 Prod. (OM48441U)
215
’03 HIGHLANDER_U (L/O 0208)
NOTICE
Do not pull−or push−start the vehicle. It may damage the vehicle or cause a collision when the engine starts. Also the three−way catalytic converter may overheat and become a fire haz- ard.
If the engine turns over at its normal speed but will not start— 1. Turn ignition key
the
to
“ACC” or the engine
“LOCK” and again.
try starting
2. If the engine will not start, the engine may be flooded because of repeated cranking. See “(b) Starting a flooded engine” on page 216 for further instruc- tions.
3. If the engine still will not start, it needs repair. Call a Toyota
adjustment or dealer or qualified repair shop.
(b) Starting a flooded engine If the engine will not start, your engine may be flooded because of repeated cranking. If this happens, turn the key to “START” with the accelerator pedal held down. Keep the key and accelerator pedal these positions release them. Then try starting the engine with your foot off the accelerator pedal. If the engine does not start after 15 se- conds of cranking, release the key, wait a few minutes and try again. If the engine still will not start, it needs adjustment or repair. Call a Toyota dealer or qualified repair shop for assistance.
for 15 seconds and
NOTICE
Do not crank for more than 30 se- conds at a time. This may overheat the starter and wiring systems.
to start
followed in
If your vehicle will not start— (a) Simple checks Before making these checks, make sure the correct starting you have procedure given “How the engine” on page 202 in Section 3 and that you have sufficient fuel. If your vehicle is equipped with the engine immobiliser sys- tem, also check whether the other keys will start the engine. If they work, your key may be broken. Have the key checked at your Toyota dealer. If none of your keys work, the system is possibly broken. Call your Toyota dealer. (See “Keys (with engine immobiliser system)” on page 12 in Section 1−2.) If the engine is not turning over or is turning over too slowly— 1. Check the battery
terminals are
that
tight and clean.
2. If the battery terminals are O.K., switch
on the interior light.
3. If the light
is out, dim or goes out when the starter is cranked, the battery is discharged. You may try jump start- ing. See “(c) Jump starting” on page 217 for further instructions.
If the light is O.K., but the engine still will not start, it needs adjustment or repair. Call a Toyota dealer or qualified repair shop.
216
2003 HIGHLANDER from Aug. ’02 Prod. (OM48441U)
’03 HIGHLANDER_U (L/O 0208)
(c) Jump starting To avoid serious personal injury and damage to your vehicle which might re- sult from battery explosion, acid burns, electrical burns, or damaged electronic components, these instructions must be followed precisely. If you are unsure about how to follow this procedure, we strongly that you seek the help of a competent me- chanic or towing service.
recommend
CAUTION
D Batteries
contain
sulfuric
acid which is poisonous and corrosive. Wear protective safety glasses when jump starting, and avoid spilling acid on your skin, clothing, or ve- hicle.
D If you should accidentally get acid on yourself or in your eyes, remove any contaminated clothing and flush the affected area with water im- mediately. Then get immediate medi- cal attention. If possible, continue to apply water with a sponge or cloth while en route to the medical office.
D The gas normally produced by a battery will explode if a flame or spark is brought near. Use only standardized jumper cables and do not smoke or light a match while jump starting.
D Warning: Battery posts,
terminals and related accessories contain lead and lead compounds, chemicals known to the State of California to cause reproductive harm. Wash hands after handling.
cancer
and
NOTICE
The battery used for boosting must be 12 V. Do not jump start unless you are sure that the booster battery is correct.
JUMP STARTING PROCEDURE 1. If
the booster battery
installed in another vehicle, make sure the vehicles are not touching. Turn off all unneces- sary lights and accessories.
is
2. If required, remove all the vent plugs from the booster and discharged batter- ies. Lay a cloth over the open vents on the batteries. (This helps reduce the explosion hazard, personal injuries and burns.)
3. If the engine in the vehicle with the booster battery is not running, start it and let it run for a few minutes. During jump starting, run the engine at about 2000 rpm with the accelerator pedal lightly depressed.
2003 HIGHLANDER from Aug. ’02 Prod. (OM48441U)
217
’03 HIGHLANDER_U (L/O 0208)
Discharged battery
Booster battery
Jumper cable
Positive terminal (“+” mark)
Jumper cable
Positive terminal (“+”mark)
4. Make the cable connections in the or-
der a, b, c, d. a. Connect the clamp of the positive (red) jumper cable to the positive (+) terminal on the discharged battery. b. Connect the clamp at the other end of the positive (red) jumper cable to the positive (+) terminal on the booster battery.
Discharged battery
Negative terminal (“−”mark)
Booster battery
c. Connect the clamp of the negative (black) cable to the negative (−) termi- nal on the booster battery. d. Connect the clamp at the other end of the negative (black) jumper cable to a solid, stationary, unpainted, metallic point of the vehicle with the discharged battery. The recommended connecting points are shown in the following illustrations:
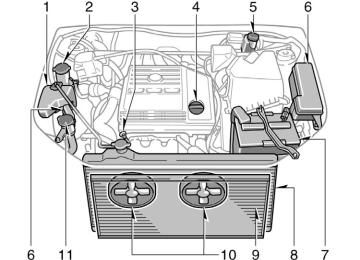
Connecting point for 2AZ−FE engine
218
2003 HIGHLANDER from Aug. ’02 Prod. (OM48441U)
Connecting point for 1MZ−FE engine
’03 HIGHLANDER_U (L/O 0208)
Do not connect it to or near any part that moves when is cranked.
the engine
CAUTION
the connections,
When making to avoid serious injury, do not lean over the battery or accidentally the jumper cables or clamps touch any- thing except the correct battery termi- nals or the ground.
let
5. Start your engine in the normal way. After starting, run it at about 2000 rpm for several minutes with the accelerator pedal lightly depressed.
6. Carefully disconnect the cables in the exact reverse order: the negative cable and then the positive cable.
7. Carefully dispose of the battery cover cloths—they may now contain sulfuric acid.
8. If removed, replace all the battery vent
plugs.
If the cause of your battery discharging is not apparent (for example, lights left on), you should have it checked at your Toyota dealer.
If your engine stalls while driving If your engine stalls while driving... 1. Reduce your speed gradually, keeping a straight line. Move cautiously off the road to a safe place.
2. Turn on your emergency flashers. 3. Turn
ignition key
the
to try starting
“ACC” or the engine
“LOCK”, and again.
If the engine will not start, see “If your vehicle will not start” on page 216.
CAUTION
If the engine is not running, the pow- er assist for the brakes and steering will not work so steering and braking will be much harder than usual.
If your vehicle overheats If your engine coolant temperature gauge indicates overheating, if you ex- perience a loss of power, or if you hear a loud knocking or pinging noise, the engine has probably overheated. You should follow this procedure... 1. Pull safely off the road, stop the ve- turn on your emergency hicle and flashers. Put the transmission in “P” and apply the parking brake. Turn off the air conditioning if it is being used. 2. If coolant or steam is boiling out of the radiator or reservoir, stop the engine. Wait until the steam subsides before opening the hood. If there is no coolant boiling over or steam, leave the engine running and make sure the electric cooling fan is operating. If it is not, turn the ignition off.
CAUTION
injury, keep To help avoid personal the hood closed until there is no steam. Escaping steam or coolant is a sign of very high pressure.
2003 HIGHLANDER from Aug. ’02 Prod. (OM48441U)
219
’03 HIGHLANDER_U (L/O 0208)
6. After
the engine coolant
temperature has cooled to normal, again check the coolant level in the reservoir. If neces- sary, bring it up to half full again. Seri- ous coolant loss indicates a leak in the system. You should have it checked as soon as possible at your Toyota dealer.
3. Look for obvious coolant leaks from the radiator, hoses, and under the vehicle. However, note that water draining from the air conditioning is normal if it has been used.
CAUTION
the engine
When is running, keep hands and clothing away from the moving fan and engine drive belts.
4. If the coolant is leaking, stop the en- gine immediately. Call a Toyota dealer for assistance.
5. If there are no obvious leaks, check the coolant reservoir. If it is dry, add coolant to the reservoir while the en- gine is running. Fill it about half full.
CAUTION
Do not attempt to remove the radiator cap when the engine and radiator are hot. Serious injury could result from scalding hot fluid and steam blown out under pressure.
If you have a flat tire— 1. Reduce your speed gradually, keeping a straight line. Move cautiously off the road to a safe place well away from the traffic. Avoid stopping on the center divider of a highway. Park on a level spot with firm ground.
2. Stop
the engine and
turn on your
emergency flashers.
3. Firmly set the parking brake and put
the transmission in “P”.
4. Have everyone get out of the vehicle
on the side away from traffic.
5. Read oughly.
the
following
instructions
thor-
CAUTION
When jacking, be sure to observe the following to reduce the possibility of personal injury: D Follow jacking instructions. D Do not put any part of your body under the vehicle supported by the jack. Otherwise, personal injury may occur.
D Do not start or run the engine while is supported by the
your vehicle jack.
220
2003 HIGHLANDER from Aug. ’02 Prod. (OM48441U)
D Stop the vehicle on a
level firm ground, firmly set the parking brake and put the transmission in “P”. Block the wheel diagonally opposite to the one being changed if neces- sary.
D Make sure to set the jack properly in the jack point. Raising the ve- hicle with improperly posi- tioned will damage the vehicle or may allow the vehicle to fall off the jack and cause personal injury.
jack
D Never get under the vehicle when the vehicle is supported by the jack alone.
D Use the jack only for lifting your
vehicle during wheel changing.
D Do not raise the vehicle with some-
one in the vehicle.
D When raising the vehicle, do not place any objects on top of or un- derneath the jack.
D Raise the vehicle only high enough
to remove and change the tire.
’03 HIGHLANDER_U (L/O 0208)
—Required tools and spare tire
NOTICE
Do not continue driving with a de- flated tire. Driving even a short dis- tance can damage a tire and wheel beyond repair.
tools and spare
the required
1. Get tire. 1. Jack handle 2. Wheel nut wrench 3. Front towing eyelet 4. Jack 5. Spare tire
To prepare yourself for an emergency, you should familiarize yourself with the use of the jack, each of the tools and their stor- age locations.
2003 HIGHLANDER from Aug. ’02 Prod. (OM48441U)
221
’03 HIGHLANDER_U (L/O 0208)
—Blocking the wheel
Turn the jack joint by hand. To remove: Turn the joint in direction 1
until the jack is free. To store: Turn the joint in direction 2 until the jack is firmly secured to prevent it flying forward during a collision or sudden braking.To remove the spare tire: 1. Hang the deck board on the weather-
strip.
2. Remove the spare tire cover. 3. Loosen the bolt and remove it.
2. Block the wheel diagonally opposite the flat tire to keep the vehicle from rolling when it is jacked up.
When blocking the wheel, place a wheel block in front of one of the front wheels or behind one of the rear wheels.
222
2003 HIGHLANDER from Aug. ’02 Prod. (OM48441U)
’03 HIGHLANDER_U (L/O 0208)
—Removing wheel ornament
—Loosening wheel nuts
3. Remove the wheel ornament. Pry off the beveled end of the wheel nut wrench as shown.
the wheel ornament, using
CAUTION
Do not try to pull off the ornament by hand. Take due care in handling the ornament to avoid unexpected person- al injury.
Steel wheels
Aluminium wheels
4. Loosen all the wheel nuts. Always loosen the wheel nuts before rais- ing the vehicle. Turn the wheel nuts counterclockwise to loosen. To get maximum leverage, fit the wrench to the nut so that the handle is on the right side, as shown above. Grab the wrench near the end of the handle and pull up on the handle. Be careful that the wrench does not slip off the nut. Do not remove the nuts yet—just unscrew them about one−half turn.
2003 HIGHLANDER from Aug. ’02 Prod. (OM48441U)
223
’03 HIGHLANDER_U (L/O 0208)
—Positioning the jack
—Raising your vehicle
CAUTION
Never use oil or grease on the bolts or nuts. The nuts may loose and the wheels may fall off, which could cau- se a serious accident.
5. Position the jack at the correct jack
point as shown.
Make sure the jack level and solid place.
is positioned on a
6. After making sure that no one is in the vehicle, raise it high enough so that the spare tire can be installed. Remember you will need more ground clearance when putting on the spare tire than when removing the flat tire. To raise the vehicle, insert the jack handle into the jack (it is a loose fit) and turn it clockwise. As the jack touches the vehicle and begins to lift, double−check that it is properly positioned.
224
2003 HIGHLANDER from Aug. ’02 Prod. (OM48441U)
’03 HIGHLANDER_U (L/O 0208)
—Changing wheels
CAUTION
Never get under the vehicle when the vehicle jack alone.
is supported by
the
7. Remove the wheel nuts and change
tires. the
it
flat
the spare wheel
tire straight off and put
Lift aside. Roll into position and align the holes in the wheel with the bolts. Then lift up the wheel and get at least the top bolt started through its hole. Wiggle the tire and press it back over the other bolts.
Before putting on wheels, remove any cor- rosion on the mounting surfaces with a wire brush or such. Installation of wheels without good metal−to−metal contact at the mounting surface can cause wheel nuts to loosen and eventually cause a wheel to come off while driving.
2003 HIGHLANDER from Aug. ’02 Prod. (OM48441U)
225
’03 HIGHLANDER_U (L/O 0208)
—Reinstalling wheel nuts
—Lowering your vehicle
CAUTION
Never use oil or grease on the bolts or nuts. Doing so may lead to over- tightening the nuts and damaging the bolts. The nuts may loose and the wheels may fall off, which could cau- se a serious accident. If there is oil or grease on any bolt or nut, clean it.
8. Reinstall all the wheel nuts finger
tight.
Reinstall the wheel nuts (tapered end in- ward) and tighten them as much as you can by hand. Press back on the tire back and see if you can tighten them more.
9. Lower
the vehicle completely and
tighten the wheel nuts.
Turn the jack handle counterclockwise to lower the vehicle. Use only the wheel nut wrench and turn it clockwise to tighten the nuts. Do not use other tools or any additional leverage other than your hands, such as a hammer, pipe or your foot. Make sure the wrench is securely engaged over the nut. Tighten each nut a little at a time in the order shown. Repeat the process until all the nuts are tightening torque, see “Tires” on page 289 in Section 8.)
tight.
(For
the
226
2003 HIGHLANDER from Aug. ’02 Prod. (OM48441U)
’03 HIGHLANDER_U (L/O 0208)
—Reinstalling wheel ornament
CAUTION
D When
lowering
the vehicle, make sure all portions of your body and all other persons around will not be injured as the vehicle is lowered to the ground.
D Have the wheel nuts tightened by torque wrench at 103 N·m (10.5
kgf·m, 76 ft·lbf), as soon as pos- sible after changing wheels. Other- wise, the nuts may loosen and the wheels may fall off, which could cause a serious accident.Steel wheels
10. Reinstall the wheel ornament. 1. Put the wheel ornament into position. 2. Then tap it firmly with the side or heel
of your hand to snap it into place.
CAUTION
Take due care in handling the orna- ment to avoid unexpected personal injury.
Aluminum wheels
2003 HIGHLANDER from Aug. ’02 Prod. (OM48441U)
227
’03 HIGHLANDER_U (L/O 0208)
If your vehicle becomes stuck If your vehicle becomes stuck in snow, mud, sand, etc., then you may attempt to rock the vehicle free by moving it forward and backward. If your vehicle is equipped with the traction control system, turn off the system to become unstuck. (For details, see “Traction control system” on page 119 in Section 1−6.)
CAUTION
Do not attempt to rock the vehicle free by moving it forward and back- ward if people or objects are any- where near the vehicle. During the rocking operation the vehicle may suddenly move forward or backward as it becomes unstuck, causing injury or damage to nearby people or ob- jects.
—After changing wheels 11. Check the air pressure of the re-
placed tire.
Adjust the air pressure to the specification designated on page 289 in Section 8. If the pressure is lower, drive slowly to the nearest service station and fill to the cor- rect pressure. Do not forget to reinstall the tire inflation valve cap as dirt and moisture could get into the valve core and possibly cause air leakage. If the cap is missing, have a new one put on as soon as possible. 12. Restow all the tools and jack secure-
ly.
As soon after changing wheels as pos- sible, tighten the wheel nuts to the torque specified on page 289 in Section 8 with a torque wrench. Have a technician repair the flat tire.
CAUTION
Before driving, make sure all the tools and jack are securely in place in their storage location to reduce the possibility of personal injury during a collision or sudden braking.
NOTICE
to
the
If you rock your vehicle, observe the following precautions to prevent dam- age transmission and other parts. z Do not depress the accelerator ped- al while shifting the selector lever or before the transmission is com- pletely shifted to forward or reverse gear.
z Do not race the engine and avoid
spinning the wheels.
z If your vehicle remains stuck after rocking the vehicle several times, consider other ways such as tow- ing.
228
2003 HIGHLANDER from Aug. ’02 Prod. (OM48441U)
’03 HIGHLANDER_U (L/O 0208)
If your vehicle needs to be towed—
(a) Towing with wheel lift type truck—
(a) Towing with wheel lift type truck—
—From front
—From front
—From rear
—From rear
(b) Using flat bed truck
(b) Using flat bed truck
If towing is necessary, we recommend you to have it done by your Toyota dealer or a commercial tow truck ser- vice. In consultation with them, have your vehicle towed using either (a) or (b). Only when you cannot receive a towing service from a Toyota dealer or com- mercial tow truck service, tow your ve- hicle carefully in accordance with the instructions given in “—Emergency tow- ing” on page 231 in this section. Proper equipment will help ensure that your vehicle is not damaged while being towed. Commercial operators are generally aware of local laws pertaining to towing. Your vehicle can be damaged is towed incorrectly. Although most operators know the correct procedure, it is possible to make a mistake. To avoid damage to your vehicle, make sure the following pre- cautions are observed. If necessary, show this page to the tow truck driver.
the state/provincial and
it
if
Two−wheel drive models
Four−wheel drive models
2003 HIGHLANDER from Aug. ’02 Prod. (OM48441U)
229
’03 HIGHLANDER_U (L/O 0208)
(b) Using flat bed truck Four−wheel drive models— (a) Towing with wheel lift type truck Use a towing dolly under the wheels not lifted by the truck. (b) Using flat bed truck
(c) Towing with sling
type truck
All models— (c) Towing with sling type truck
NOTICE
Do not tow with sling type truck, ei- ther from the front or rear. This may cause body damage.
TOWING PRECAUTIONS: Use a safety chain system for all towing, and abide by the state/provincial and local laws. The wheels and axle on the ground must be in good condition. If they are damaged, use a towing dolly. Two−wheel drive models— (a) Towing with wheel lift type truck From front—Release the parking brake.
NOTICE
When lifting wheels, take care to en- sure adequate ground clearance for towing at the opposite end of the raised vehicle. Otherwise, the bumper and/or underbody of the towed vehicle will be damaged during towing.
From rear— Use a towing dolly under the front wheels.
NOTICE
Never tow a vehicle from the rear with the front wheels on the ground, as this may cause serious damage to the transmission.
230
2003 HIGHLANDER from Aug. ’02 Prod. (OM48441U)
—Emergency towing
Front
Rear
’03 HIGHLANDER_U (L/O 0208)
If towing is necessary, we recommend you to have it done by your Toyota dealer or a commercial tow truck ser- vice. If towing service is not available in an emergency, your vehicle may be tempo- rarily towed by a cable or chain se- cured to one of the emergency towing eyelets on the front of the vehicle or the right emergency towing eyelet un- der the rear of the vehicle. Use extreme caution when towing the vehicle. To towing eyelet, see “—Installing front towing eyelet” on page 232 in this section.
install
front
the
NOTICE
Only use specified towing eyelet; otherwise your vehicle may be dam- aged.
A driver must be in the vehicle to steer it and operate the brakes. Towing in this manner may be done only on hard−surfaced roads for a short dis- tance and at the wheels, axles, drive train, steering and brakes must all be in good condition.
low speeds. Also,
CAUTION
Use extreme caution when towing ve- hicles. Avoid sudden starts or erratic driving maneuvers which would place excessive stress on the emergency towing eyelet and towing cable or chain. The eyelet and towing cable or chain may break and cause serious injury or damage.
NOTICE
Use only a cable or chain specifically intended for use in towing vehicles. Securely fasten the cable or chain to the towing eyelet provided.
Before towing, release the parking brake and put the transmission in “N”. The key must be in “ACC” (engine off) or “ON” (engine running).
CAUTION
If the engine is not running, the pow- er assist for the brakes and steering will not work so steering and braking will be much harder than usual.
2003 HIGHLANDER from Aug. ’02 Prod. (OM48441U)
231
’03 HIGHLANDER_U (L/O 0208)
—Installing front towing eyelet
1. Pull up the deck board and remove the front towing eyelet by turning it coun- towing eyelet terclockwise. location, see tools and spare tire” on page 221 in this sec- tion.)
“—Required
(For
the
2. Remove the front towing eyelet cover the front bumper by pushing the
on outside of the cover.
3. Secure it to the hole on the bumper by
turning clockwise.
232
2003 HIGHLANDER from Aug. ’02 Prod. (OM48441U)
’03 HIGHLANDER_U (L/O 0208)
—Emergency towing eyelet precautions D Before emergency
towing, check
that the eyelet is not broken or damaged and that the installation bolts are not loose.
D Fasten the towing cable or chain se-
curely to the eyelet.
D Do not jerk the eyelet. Apply steady
and even force.
D To avoid damaging the eyelet, do not the side or at a vertical
pull angle. Always pull straight ahead.
from
CAUTION
towing eyelet
the emergency
If is used to get out when your vehicle becomes struck in mud, sand or oth- er condition from which the vehicle cannot be driven out under its own power, make sure to observe the pre- cautions mentioned below. Otherwise, excessive stress will be put on the eyelet and the towing cable or chain may break, causing serious injury or damage. the D If
towing vehicle can hardly move, do not forcibly continue the towing. Contact your Toyota dealer or a commercial tow truck service for assistance.
D Tow the vehicle as straight ahead
as possible.
D Keep away from the vehicle during
towing.
2003 HIGHLANDER from Aug. ’02 Prod. (OM48441U)
233
4. Tighten the front towing eyelet securely
by a wheel nut wrench.
CAUTION
When installing the eyelet on the ve- hicle, be sure to tighten the front eyelet securely. is loose, it may come off when being towed and result in death or serious injury.
If the tightening
’03 HIGHLANDER_U (L/O 0208)
If you cannot shift automatic transmission selector lever
—Tips for towing a stuck vehicle The following methods are effective to get out when your vehicle is struck in mud, sand or other condition from which the vehicle cannot be driven out under its own power. Use extreme caution when towing vehicles. In addition, keep away from the vehicles and towing cable or chain when towing. D Remove the soil and sand in the front
and the back of the tires.
D Place a stone or wood under the tires.
though
If you cannot shift the selector lever out of “P” position to other positions even is de- pressed, use the shift lock override but- ton as follows: 1. Turn
the brake pedal
ignition key
the
to “LOCK” the parking
position. Make sure brake is applied.
2. Pry up the cover with a flat−bladed
screwdriver or equivalent.
3. Insert your finger into the hole to push down the shift lock override button. You can shift out of “P” position only while pushing the but- ton.
4. Shift into “N” position. 5. Insert the cover. 6. Start the engine. For your safety,
keep the brake pedal depressed.
Be sure to have the system checked by your Toyota dealer as soon as possible.
234
2003 HIGHLANDER from Aug. ’02 Prod. (OM48441U)
If you lose your keys You can purchase a new key at your Toyota dealer if you can give them the key number. If your vehicle is equipped with the engine immobiliser system, the dealer will also need your master key. Vehicles with engine immobiliser system— Even if you lose only one key, contact your Toyota dealer to make a new key. If you lose all your master keys, you cannot make new keys; the whole engine immobi- liser system must be replaced. See page 12 in Section 1−2. If your keys are locked in the vehicle and you cannot get a duplicate, many Toyota dealers can still open the door for you, using If you must break a window in, we suggest breaking the smallest side window be- cause it is the least expensive to replace. Be extremely cautious to avoid cuts from the glass.
the suggestion given in “Keys” on
their special
to get
tools.
’03 HIGHLANDER_U (L/O 0208)
If you lose your wireless remote control transmitter You can purchase a new wireless re- mote control transmitter at your Toyota dealer. Have the registered identification numbers of your transmitters deleted from your ve- hicle by your Toyota dealer as soon as possible to avoid the possibility of theft or an accident. Then, have the identification number of your new transmitter registered. At the same time, you must bring all of the remaining transmitters to have them registered again as well. You can use the wireless remote control system with the new transmitter. Contact your Toyota dealer for detailed information.
2003 HIGHLANDER from Aug. ’02 Prod. (OM48441U)
235
’03 HIGHLANDER_U (L/O 0208)
236
2003 HIGHLANDER from Aug. ’02 Prod. (OM48441U)
’03 HIGHLANDER_U (L/O 0208)
SECTION 5
CORROSION PREVENTION AND APPEARANCE CARE Protecting your Toyota from corrosion Washing and waxing your Toyota Cleaning the interior
. . . . . . . . . . . . . . . . . . . . . . . . . . . . . . . . . . . . . . . . . . . . . . . . . . . . . . . . . . . . . . . . . . . . . . . . . . . . . . . . . . . . . . . . . . . . . .
238
239
2412003 HIGHLANDER from Aug. ’02 Prod. (OM48441U)
237
’03 HIGHLANDER_U (L/O 0208)
D Wetness or dampness to certain parts of your vehicle for an extended period of time, may cause corrosion even though other parts of the vehicle may be dry.
D High ambient temperatures can cause corrosion to those components of the vehicle which are prevented from quick−drying due to lack of proper ven- tilation.
The above signifies the necessity to keep your vehicle, particularly the underside, as clean as possible and to repair any dam- age to paint or protective coatings as soon as possible. To help prevent corrosion on your Toyota, follow these guidelines: Wash your vehicle frequently. It is, of course, necessary to keep your vehicle clean by regular washing, but to prevent corrosion, the following points should be observed: D If you drive on salted roads
the winter or if you live near the ocean, you should hose off the undercarriage at least once a month to minimize cor- rosion.
in
D High pressure water or steam is effec- tive for cleaning the vehicle’s underside and wheel housings. Pay particular attention to these areas as it is difficult to see all the mud and dirt. It will do more harm than good to simply wet the mud and debris without removing them. The lower edge of doors, rocker panels and frame members have drain holes which should not be allowed to clog with dirt as these areas can cause corrosion.
trapped water
in
D Wash the underside of the vehicle thor-
oughly when winter is over.
See “Washing and waxing your Toyota” on page 239 for more tips. Check the condition of your vehicle’s paint and trim. If you find any chips or scratches in the paint, touch them up im- mediately to prevent corrosion from start- ing. If the chips or scratches have gone through the bare metal, have a qualified body shop make the repair.
the
Protecting your Toyota from corrosion Toyota, through its diligent research, de- sign and use of the most advanced technology available, has done its part to help prevent corrosion and has provided you with vehicle construction. Now, it is up to you. Proper care of your Toyota can help ensure long− term corrosion prevention. The most common causes of corrosion to your vehicle are: D The accumulation of road salt, dirt and moisture in hard−to−reach areas under the vehicle.
quality
finest
D Chipping of paint, or undercoating caused by minor accidents or by stones and gravel.
Care is especially important if you live in particular areas or operate your ve- hicle under certain environmental condi- tions: D Road salt or dust control chemicals will accelerate corrosion, as will the pres- ence of salt in the air near the sea− coast or in areas of industrial pollution. D High humidity accelerates corrosion es- pecially when temperatures range just above the freezing point.
238
2003 HIGHLANDER from Aug. ’02 Prod. (OM48441U)
’03 HIGHLANDER_U (L/O 0208)
Check the interior of your vehicle. Wa- ter and dirt can accumulate under the floor mats and could cause corrosion. Oc- casionally check under the mats to make sure the area is dry. Be particularly care- ful when transporting chemicals, cleans- ers, fertilizers, salt, etc.; these should be transported in proper containers. If a spill or leak should occur, immediately clean and dry the area. Use mud shields on your wheels. If you drive on salted or gravel roads, mud shields help protect your vehicle. Full−size shields, which come as near to the ground as possible, are the best. We recommend that the fittings and the area where the shields are installed be treated to resist corrosion. Your Toyota dealer will be happy to assist in supplying and installing the shields if they are recommended for your area. Keep your vehicle in a well ventilated garage or a roofed place. Do not park your vehicle in a damp, poorly venti- lated garage. If you wash your vehicle in the garage, or if you drive it in covered with water or snow, your garage may be so damp it will cause corrosion. Even if your garage is heated, a wet vehicle can corrode if the ventilation is poor.
Washing and waxing your Toyota Washing your Toyota Keep your vehicle clean by regular washing. The following cases may cause weakness to the paint or corrosion to the body and parts. Wash your vehicle as soon as pos- sible. D When driving in a coastal area D When driving on a road sprinkled with
antifreeze
D When having coal tar, tree sap, bird
droppings and carcass of an insect
D When driving in the areas where there is a lot of smoke, soot, dust, iron dust and chemical substance
D When the vehicle becomes remarkably
dirty with dust and mud Hand−washing your Toyota Work in the shade and wait until the vehicle body is not hot to the touch.
CAUTION
When cleaning under floor or chassis, be careful not to injure your hands.
1. Rinse off loose dirt with a hose. Re- move any mud or road salt from the underside of the wheel wells.
the vehicle or
in
2. Wash with a mild car−wash soap, mixed according to the manufacturer’s instructions. Use a soft cotton mitt and keep it wet by dipping it frequently into the wash water. Do not rub hard—let the soap and water remove the dirt.
Plastic wheel ornaments: The plastic wheel ornaments are damaged easily by organic substances. If any organic sub- stances splashes an ornament, be sure to wash it off with water and check if the ornament is damaged.
CAUTION
Do not attach the heavily damaged plastic wheel ornament. It may fly off the wheel and cause accidents while the vehicle is moving.
2003 HIGHLANDER from Aug. ’02 Prod. (OM48441U)
239
’03 HIGHLANDER_U (L/O 0208)
Automatic car wash Your vehicle may be washed in an auto- matic car wash, but remember that the paint can be scratched by some type of brushes, unfiltered washing water, or the washing process itself. Scratching reduces paint durability and gloss, especially on darker colors. The manager of the car wash should be able to advise you wheth- er the process is safe for the paint on your vehicle.
NOTICE
With mast type antenna: To prevent damage to the antenna, make sure it is removed before driv- ing your Toyota through an automatic car wash.
Waxing your Toyota Polishing and waxing is recommended to maintain the original beauty of your Toyota’s finish. Once a month or if the vehicle surface does not repel water well, apply wax. 1. Always wash and dry the vehicle be- fore you begin waxing, even if you are using a combined cleaner and wax.
2. Use a good quality polish and wax. If the finish has become extremely weath- ered, use a car−cleaning polish, fol- lowed by a separate wax. Carefully fol- low the manufacturer’s instructions and precautions. Be sure to polish and wax the chrome trim as well as the paint. the vehicle again when water does not bead but remains on the sur- face in large patches.
3. Wax
NOTICE
Always remove the plastic bumpers if your vehicle is re−painted and placed in a high heat paint waxing booth. High temperatures could damage the bumpers.
Aluminum wheels: Use only a mild soap or neutral detergent. Plastic bumpers: Wash carefully. Do not scrub with abrasive cleaners. The bumper faces are soft. Road turpentine or cleaners that are marked safe for painted surfaces.
tar: Remove with
NOTICE
Do not use organic substances (gaso- line, kerosene, benzine or strong sol- vents), which may be toxic or cause damage.
3. Rinse
thoroughly—dried
can cause streaking. In hot weather you may need to rinse each section right after you wash it.
soap
4. To prevent water spots, dry the vehicle using a clean soft cotton towel. Do not rub or press hard—you might scratch the paint.
240
2003 HIGHLANDER from Aug. ’02 Prod. (OM48441U)
’03 HIGHLANDER_U (L/O 0208)
Cleaning the interior
CAUTION
D Vehicles with side airbags:
Be careful not to splash water or spill liquid on the floor. This may prevent the side airbags from acti- vating correctly, resulting in serious injury.
D Do not wash the vehicle floor with water, or allow water to get onto the floor when cleaning the vehicle interior or exterior. Water may get into audio components or other electrical components above or un- der the floor carpet (or mat) and cause a malfunction; and it may cause body corrosion.
Vinyl interior The vinyl upholstery may be easily cleaned with a mild soap or detergent and water. First vacuum over the upholstery to re- move loose dirt. Then, using a sponge or soft cloth, apply the soap solution to the vinyl. After allowing it to soak in for a few minutes to loosen the dirt, remove the dirt and wipe off the soap with a clean damp cloth. If all the dirt do not come off, re- peat the procedure. Commercial foaming− type vinyl cleaners are also available which work well. Follow the manufacturer’s instructions.
NOTICE
Do not use solvent, thinner, gasoline or window cleaner on the interior.
to
foam−type shampoo
Carpets Use a good clean the carpets. Begin by vacuuming thoroughly to remove as much dirt as possible. Several types of foam cleaners are available; some are in aerosol cans and others are powders or liquids which you mix with water to pro- duce a foam. To shampoo the carpets, use a sponge or brush to apply the foam. Rub in overlapping circles. Do not apply water—the best results are obtained by keeping the carpet as dry as possible. Read the shampoo instructions and follow them closely. Seat belts The seat belts may be cleaned with mild soap and water or with lukewarm water. Use a cloth or sponge. As you are clean- ing, check the belts for excessive wear, fraying, or cuts.
NOTICE
z Do not use dye or bleach on the
belts—it may weaken them.
z Do not use the belts until they be-
come dry.
2003 HIGHLANDER from Aug. ’02 Prod. (OM48441U)
241
’03 HIGHLANDER_U (L/O 0208)
z If you use a liquid car freshener, do not apply the liquid onto the ve- hicle’s interior surfaces. It may con- tain ingredients mentioned above. Immediately clean any spill using the method mentioned above.
the
Leather Interior The leather upholstery may be cleaned with neutral detergent for wool. Remove dirt using a soft cloth dampened with 5% solution of neutral detergent for wool. Then thoroughly wipe off all traces of detergent with a clean damp cloth. After cleaning or whenever any part of the leather gets wet, dry with a soft clean cloth. Allow the leather to dry in a venti- lated shaded area.
Windows The windows may be cleaned with any household window cleaner.
NOTICE
When cleaning the inside of the rear window, be careful not to scratch or damage the heater wires or connec- tors.
Air conditioning control panel, car au- dio, instrument panel, console panel, and switches Use a soft damp cloth for cleaning. Soak a clean soft cloth in water or luke- warm water then lightly wipe off dirt.
NOTICE
z Do not use organic substances (sol- vents, kerosene, alcohol, gasoline, etc.) or alkaline or acidic solutions. These chemicals can cause discol- oring, staining or peeling of the surface.
z If you use cleaners or polishing agents, make sure their ingredients do not include the substances men- tioned above.
NOTICE
z If a stain should fail to come out with a neutral detergent, apply a cleaner that does not contain an organic solvent.
z Never use organic substances such as benzine, alcohol or gasoline, or alkaline or acid solutions for clean- ing these could cause discoloring.
leather as
the
z Use of a nylon brush or synthetic fiber cloth, etc. may scratch the fine grained surface of the leather. z Mildew may develop on soiled leath- er upholstery. Be especially careful to avoid oil spots. Try to keep your upholstery always clean.
to direct sunlight z Long exposure may cause the leather surface to harden and shrink. Keep your ve- hicle in a shaded area, especially in the summer.
242
2003 HIGHLANDER from Aug. ’02 Prod. (OM48441U)
’03 HIGHLANDER_U (L/O 0208)
z The interior of your vehicle is apt to heat up on hot summer days, so avoid placing on the upholstery items made of vinyl or plastic or containing wax as these tend to stick to leather when warm.
z Improper cleaning of the leather up- in discolor-
holstery could result ation or staining.
If you have any questions about the cleaning of your Toyota, your local Toyota dealer will be pleased to answer them.
2003 HIGHLANDER from Aug. ’02 Prod. (OM48441U)
243
’03 HIGHLANDER_U (L/O 0208)
244
2003 HIGHLANDER from Aug. ’02 Prod. (OM48441U)
’03 HIGHLANDER_U (L/O 0208)
SECTION 6
VEHICLE MAINTENANCE AND CARE Maintenance requirements General maintenance Does your vehicle need repairing? Emissions Inspection and Maintenance (I/M) programs
. . . . . . . . . . . . . . . . . . . . . . . . . . . . . . . . . . . . . . . . . . . . . . . . . . . . . . . . . . . . . . . . . . . . . . . . . . . . . . . . . . . . . . . . . . . . . . . . . . . . . . . . . . . . . .
246
247
249
250For scheduled maintenance information, please refer to the “Sched- uled Maintenance Guide” or “Owner’s Manual Supplement”.
2003 HIGHLANDER from Aug. ’02 Prod. (OM48441U)
245
’03 HIGHLANDER_U (L/O 0208)
Maintenance requirements Your Toyota vehicle has been designed for fewer maintenance requirements with long- er service intervals to save both your time and money. However, each regular mainte- nance, as well as day−to−day care, is more important than ever before to ensure smooth, trouble−free, safe, and economical drivings. It is the owner’s responsibility to make sure the specified maintenance, including general maintenance service, is performed. Note that both the new vehicle and emis- sion control system warranties specify that proper maintenance and care must be per- formed. See “Owner’s Warranty Informa- tion Booklet” or “Owner’s Manual Supple- ment” for complete warranty information. General maintenance General maintenance items are those day− to−day care practices that are important to your vehicle for proper operation. It is the owner’s responsibility to ensure that the general maintenance items are performed regularly. These checks or inspections can be done either by yourself or a qualified technician, or if you prefer, your Toyota dealer will be pleased to do them at a nominal cost.
Scheduled maintenance The scheduled maintenance items listed in the “Scheduled Maintenance Guide” or “Owner’s Manual Supplement” are those required to be serviced at regular inter- vals. For details of your maintenance schedule, read the “Scheduled Maintenance Guide” or “Owner’s Manual Supplement”. It is recommended that any replacement parts used for maintenance or for the repair of the emission control system be Toyota supplied. The owner may elect to use non−Toyota supplied parts replacement pur- poses without invalidating the emission control system warranty. However, use of replacement parts which are not of equivalent quality may impair the effec- tiveness of the emission control sys- tems. You may also elect to have mainte- nance, replacement, or repair of the emission control devices and system performed by any automotive repair es- tablishment or individual without invali- dating this warranty. See “Owner’s War- ranty Information Booklet” or “Owner’s Manual Supplement” for complete war- ranty information.
for
Where to go for service? Toyota technicians are well−trained spe- cialists and are kept up to date with the latest service information through technical bulletins, service tips, and in−dealership training programs. They learn to work on Toyotas before they work on your vehicle, rather than while they are working on it. You can be confident that your Toyota dealer’s service department performs the best job to meet the maintenance require- ments on your vehicle—reliably and eco- nomically. Your copy of the repair order is proof that all required maintenance has been per- formed for warranty coverage. And if any problems should arise with your vehicle while under warranty, your Toyota dealer will promptly take care of it. Again, be sure to keep a copy of the repair order for any service performed on your Toyota. What about do−it−yourself maintenance? Many of the maintenance items are easy to do yourself if you have a little mechani- cal ability and a few basic automotive tools. Simple instructions for how to per- form them are presented on page 251 in Section 7.
246
2003 HIGHLANDER from Aug. ’02 Prod. (OM48441U)
’03 HIGHLANDER_U (L/O 0208)
If you are a skilled do−it−yourself mechan- ic, the Toyota service manuals are recom- mended. Please be aware that do−it−your- self maintenance can affect your warranty coverage. See “Owner’s Warranty Informa- tion Booklet” or “Owner’s Manual Supple- ment” for the details.