- 2012 Subaru Tribeca Owners Manuals
- Subaru Tribeca Owners Manuals
- 2008 Subaru Tribeca Owners Manuals
- Subaru Tribeca Owners Manuals
- 2007 Subaru Tribeca Owners Manuals
- Subaru Tribeca Owners Manuals
- 2006 Subaru Tribeca Owners Manuals
- Subaru Tribeca Owners Manuals
- 2010 Subaru Tribeca Owners Manuals
- Subaru Tribeca Owners Manuals
- 2011 Subaru Tribeca Owners Manuals
- Subaru Tribeca Owners Manuals
- 2009 Subaru Tribeca Owners Manuals
- Subaru Tribeca Owners Manuals
- Download PDF Manual
-
ing Retractor (A/ELR)
Each passenger’s seatbelt has an Auto- matic/Emergency Locking Retractor (A/ ELR). The Automatic/Emergency Locking Retractor normally functions as an Emer- gency Locking Retractor (ELR). The A/ locking mode ELR has an additional “Automatic Locking Retractor (ALR) mode” intended to secure a child restraint system. When the seatbelt is once drawn out completely and is then retracted even slightly, the retractor locks the seatbelt in that position and the seatbelt cannot be extended. As the belt is rewinding, clicks will be heard which indicate the retractor functions as ALR. When the seatbelt is retracted fully, ALR mode is released.
When securing a child restraint system on the passengers’ seats, the seatbelt must be changed over to the Automatic Locking
Seat, seatbelt and SRS airbags 1-17
Driver’s warning light
Front passenger’s warning light ! Operation If the driver and/or front passenger have/ has not yet fastened the seatbelt(s) when
– CONTINUED –
1-18 Seat, seatbelt and SRS airbags
If
to warn that
the ignition switch is turned to the “ON” position, the seatbelt warning light(s) will the flash for 6 seconds, seatbelt(s) is/are unfastened. the dri- ver’s seatbelt is not fastened, a chime will also sound simultaneously. NOTE . If the driver’s and/or front passen- ger’s seatbelt(s) is/are still not fastened 6 seconds later, the seatbelt warning device operates as follows according to the vehicle speed.
. At speeds lower than approxi- mately 9 mph (15 km/h) The warning light(s) for unfastened seatbelt(s) will alternate between steady illumination and flashing at 15-second intervals. The chime will not sound. . At speeds higher than approxi- mately 9 mph (15 km/h) The warning light(s) for unfastened seatbelt(s) will alternate between flashing and steady illumination at 15-second intervals and the chime will sound while the warning light(s) is/are flashing.
. It is possible to cancel the warning operation that follows the 6-second warning after turning ON the ignition switch. When the ignition switch is
time, however,
the turned ON next complete sequence of the warning operation resumes. For further details about canceling the warning operation, please contact your SUBARU dealer. there is no passenger on the front If passenger’s seat, the seatbelt warning device for the front passenger’s seat will be deactivated. The front passenger’s occupant detection system monitors whether or not there is a passenger on the front passenger’s seat. Observe the following precautions. Failure to do so may prevent the device from functioning correctly or cause the device to fail. . Do not install any accessory such as a table or TV onto the seatback. . Do not store a heavy load in the seatback pocket. . Do not allow the rear seat/second-row seat occupant to place his/her hands or legs on the front passenger’s seatback, or allow him/her to pull the seatback.
If the seatbelt warning device for the front passenger’s seat does not function cor- rectly (e.g., it is activated even when the front passenger’s seat is empty or it is deactivated even when the front passen- ger has not fastened his/her seatbelt), take the following actions.
. Ensure that no article is placed on the seat other than a child restraint system and the child occupant. . Ensure that there is no article left in the seatback pocket.
the seatbelt warning device for front If passenger’s seat still does not function correctly after taking relevant corrective immediately actions described above, contact your SUBARU dealer for an inspection.
& Fastening the seatbelt
WARNING
. Never use a belt that is twisted or reversed. In an accident, this can increase the risk or severity of injury.
. Keep the lap belt as low as possible on your hips. In a colli- sion, this spreads the force of the lap belt over stronger hip bones instead of across the weaker abdomen.
. Seatbelts provide maximum re- straint when the occupant sits well back and upright in the seat. To reduce the risk of sliding under the seatbelt in a collision,
the front seatbacks should be always used in the upright posi- tion while the vehicle is running. If the front seatbacks are not used in the upright position in a collision, the risk of sliding under the lap belt and of the lap belt sliding up over the abdomen will increase, and both can result in serious internal injury or death. . Do not put cushions or any other materials between occupants and seatbacks or seat cushions. If you do so, the risk of sliding under the lap belt and of the lap belt sliding up over the abdomen will increase, and both can result in serious internal injury or death.
Seat, seatbelt and SRS airbags 1-19
! Front seatbelts 1. Adjust the seat position: Driver’s seat: Adjust the seatback to the upright position. Move the seatback as far from the steering wheel as practical while still maintaining full vehicle control. Front passenger’s seat: Adjust the seat- back to the upright position. Move the seat as far back as possible. 2. Sit well back in the seat. 3. Pick up the tongue plate and pull the belt out slowly. Do not let it get twisted. If the belt stops before reaching the buckle, return the belt slightly and pull it out more slowly. If the belt still cannot be unlocked, let the belt retract slightly after giving it a strong pull, then pull it out slowly again.
4.
Insert the tongue plate into the buckle
– CONTINUED –
WARNING
Never place the shoulder belt under the arm or behind the back. If an accident occurs, this can increase the risk or severity of injury.
CAUTION
Metallic parts of the seatbelt can become very hot in a vehicle that has been closed up in sunny weath- er; they could burn an occupant. Do not touch such hot parts until they cool.
1-20 Seat, seatbelt and SRS airbags
until you hear a click.
! Adjusting the front seat shoulder
belt anchor height
neck. If it does, adjust the seatbelt anchor to a lower position. Placing the shoulder belt over the neck may result in neck injury during sudden braking or in a collision.
! Unfastening the seatbelt
5. To make the lap part tight, pull up on the shoulder belt. 6. Place the lap belt as low as possible on your hips, not on your waist.
The shoulder belt anchor height should be adjusted to the position best suited for the driver/front passenger. To lower the an- chor height, push the release button and slide the anchor down. To raise the anchor height, slide the anchor up. Pull down on the anchor to make sure that it is locked in place. Always adjust the anchor height so that the shoulder belt passes over the middle of the shoulder without touching the neck.
WARNING
When wearing the seatbelts, make sure the shoulder portion of the webbing does not pass over your
Push the button on the buckle.
Before closing the door, make sure that the belts are retracted properly to avoid catching the belt webbing in the door. ! Rear seatbelts (5-seater models)/
Second-row seatbelts (7-seater models) – excluding center seatbelt
1. Sit well back in the seat. 2. Pick up the tongue plate and pull the belt out slowly. Do not let it get twisted. If
the belt stops before reaching the buckle, return the belt slightly and pull it out more slowly. If the belt still cannot be unlocked, let the belt retract slightly after giving a strong pull on it, then pull it out slowly again.
4. To make the lap part tight, pull up on the shoulder belt. 5. Place the lap belt as low as possible on your hips, not on your waist.
Insert the tongue plate into the buckle
3. until you hear a click.
Seat, seatbelt and SRS airbags 1-21
! Adjusting the shoulder belt anchor height (rear seats of 5-seater mod- els/second-row seats of 7-seater models)
The shoulder belt anchor height should be adjusted to the position best suited for you. To lower the anchor height, push the release button and slide the anchor down. To raise the anchor height, slide the anchor up. Pull down on the anchor to make sure that it is locked in place. Always adjust the anchor height so that the shoulder belt passes over the middle of the shoulder without touching the neck.
WARNING
When wearing the seatbelts, make sure the shoulder portion of the
– CONTINUED –
1-22 Seat, seatbelt and SRS airbags
webbing does not pass over your neck. If it does, adjust the seatbelt anchor to a lower position. Placing the shoulder belt over the neck may result in neck injury during sudden braking or in a collision.
! Unfastening the seatbelt
NOTE
! Rear center seatbelt (5-seater mod- els)/second-row center seatbelt (7- seater models)
1) Holder
With the seatback folded, attach the tongue plate of each rear/second-row seatbelt to the corresponding holder. Do the same also before someone gets into the third-row seat.
1) Center seatbelt tongue plate 2) Connector (tongue) 3) Connector (buckle) 4) Center seatbelt buckle
Push the button on the buckle.
Before closing the door, make sure that the belts are retracted properly to avoid catching the belt webbing in the door.
Seat, seatbelt and SRS airbags 1-23
WARNING
WARNING
Fastening the seatbelt with the web- bing twisted can increase the risk or severity of injury in an accident. When fastening the belt after it is pulled out from the retractor, espe- cially when inserting the connec- tor’s tongue plate into the mating buckle (on right-hand side), always check that the webbing is not twisted.
If
Be sure to fasten both tongue plates to the respective buckles. the seatbelt is used only as a shoulder (with the connector’s tongue belt plate not fastened to the connec- tor’s buckle on the right-hand side), it cannot properly restrain the wear- er in position in an accident, possi- bly resulting in serious injury or death.
Center seatbelt is stowed in the recess of the ceiling. 1. Remove the connector (tongue) plate from the slot located at the front of the recess by pulling the connector (tongue) plate rearward.
– CONTINUED –
1-24 Seat, seatbelt and SRS airbags
2. Pull out the seatbelt slowly from the overhead retractor.
low as possible on your hips, not on your waist.
! Unfastening the seatbelt
insert
the connector
3. After confirming that the webbing is not twisted, (tongue) attached at the webbing end into the buckle on the right-hand side until a click is heard. Make sure that the “ ” mark on the connector (tongue) and the “ ” mark on the buckle are aligned. If the belt stops before reaching the buckle, return the belt slightly and pull it out more slowly. If the belt still cannot be unlocked, let the belt retract slightly after giving it a strong pull, then pull it out slowly again.
4. Insert the center seatbelt tongue plate in the center seatbelt buckle marked “CENTER” on the left-hand side until it clicks.
Push the release button of the center seatbelt buckle (on the left-hand side) to unfasten the seatbelt.
5. To make the lap part tight, pull up on the shoulder belt. And place the lap belt as
Seat, seatbelt and SRS airbags 1-25
CAUTION
. Do not allow the retractor to roll too quickly. up the seatbelt Otherwise, tongue plates may hit against the trim, resulting in damaged trim.
the metal
. Have the seatbelt fully rolled up so that the tongue plates are neatly stored. A hanging tongue plate can swing and hit against the trim during driving, causing damage to the trim.
– CONTINUED –
2. With the belt held by hand, allow the retractor to roll up the belt slowly. You should hold the webbing end and guide it back into the retractor while it is rolling up. Neatly store the tongue plate in the recess on the ceiling and then insert the con- nector (tongue) plate into the slot located at the front of the recess.
into the slot
Insert a key or other hard pointed 1. object in the connector (buckle) on the right-hand side and push it in, and the connector (tongue) plate will disconnect from the buckle.
1-26 Seat, seatbelt and SRS airbags
! Third-row seatbelt (7-seater mod-
els)
1. Sit well back in the seat. 2. Pick up the tongue plate and pull the belt out slowly. Do not let it get twisted. If the belt stops before reaching the buckle, return the belt slightly and pull it out more slowly. If the belt still cannot be unlocked, let the belt retract slightly after giving a strong pull on it, then pull it out slowly again.
Insert the tongue plate into the buckle
3. until you hear a click.
Push the button on the buckle. NOTE
4. To make the lap part tight, pull up on the shoulder belt. 5. Place the lap belt as low as possible on your hips, not on your waist.
! Unfastening the seatbelt
1) Holder
. Before folding or raising the seat- back of the third-row seat, confirm that the seatbelt is flat against the sidewall at the lower point and the webbing is attached to the holder. . When raising the seatback of the third-row seat, if the seatbelt catches on the seatback, hold the belt forward of the seatback while latching the seatback.
& Seatbelt maintenance To clean the seatbelts, use a mild soap and lukewarm water. Never bleach or dye the belts because this could seriously affect their strength.
Inspect the seatbelts and attachments including the webbing and all hardware periodically for cracks, cuts, gashes, tears, damage, loose bolts or worn areas. Replace the seatbelts even if only minor damage is found.
CAUTION
. Keep the belts free of polishes, oils, chemicals and particularly battery acid.
. Never attempt to make modifica- tions or changes that will prevent the seatbelt from operating prop- erly.
Front seatbelt pretensioners
restrains the front seat occupant.
Seat, seatbelt and SRS airbags 1-27
When a seatbelt pretensioner is activated, an operating noise will be heard and a small amount of smoke will be released. These occurrences are normal and not harmful. This smoke does not indicate a fire in the vehicle.
Once the seatbelt pretensioner has been activated, the seatbelt retractor remains locked. Consequently, the seatbelt can not be pulled out and retracted and therefore must be replaced. NOTE . Seatbelt pretensioners are not de- signed to activate in minor frontal impacts, in minor side impacts or rear impacts. . The seatbelt pretensioners for the driver’s seat and front passenger’s seat operate at the same time as the frontal, and side SRS airbags. If the vehicle rolls over, they operate simul- taneously with the curtain airbag. . Pretensioners are designed to func- tion on a one-time-only basis. In the event that a pretensioner is activated, both the driver’s and front passenger’s seatbelt retractor assemblies must be replaced and only by an authorized SUBARU dealer. When replacing seat-
– CONTINUED –
The driver’s and front passenger’s seat- belts have a seatbelt pretensioner. The seatbelt pretensioners for the driver’s seat and front passenger’s seat operate at the same time as the frontal, and side SRS airbags. they operate simultaneously with the curtain airbag.
the vehicle rolls over,
If
The front and side airbag sensors and the rollover sensor are used as the preten- If a sensor detects a sioner sensors. certain predetermined amount of force during a frontal collision, a side impact collision or a rollover collision of the vehicle, the front seatbelt is quickly drawn back in by the retractor to take up the slack so that the belt more effectively
1-28 Seat, seatbelt and SRS airbags
belt retractor assemblies, use only genuine SUBARU parts. . If either front seatbelt does not retract or cannot be pulled out due to a malfunction or activation of the pretensioner, contact your SUBARU dealer as soon as possible. . If the front seatbelt retractor assem- bly or surrounding area has been damaged, contact your SUBARU dealer as soon as possible. . When you sell your vehicle, we urge you to explain to the buyer that it has seatbelt pretensioners by alerting him to the contents of this section.
WARNING
. To obtain maximum protection, occupants should sit in an up- right position with their seatbelts properly fastened. Refer to “Seat- belts” section in this chapter.
. Do not modify, remove or strike the front seatbelt retractor as- semblies or surrounding area. This could result in accidental activation of the seatbelt preten- sioners or could make the sys- tem inoperative, possibly result- ing in serious injury. Seatbelt pretensioners have no user-ser-
viceable parts. For required ser- vicing of front seatbelt retractors equipped with seatbelt preten- sioners, see your nearest SUBARU dealer.
. When discarding front seatbelt retractor assemblies or scrap- ping the entire vehicle due to collision damage or for other reasons, consult your SUBARU dealer.
& System monitors
SRS airbag system warning light
A diagnostic system continually monitors the readiness of the seatbelt pretensioner while the vehicle is being driven. The seatbelt pretensioners share the control
module with the airbag system. Therefore, if any malfunction occurs in a seatbelt the SRS airbag system pretensioner, warning light will illuminate. The SRS airbag system warning light will show normal system operation by lighting for approximately 6 seconds when the igni- tion switch is turned to the “ON” position.
The following components are monitored by the indicator: . Front sub sensor (Right-hand side) . Front sub sensor (Left-hand side) . Airbag control module (including im- pact and rollover sensors) . Frontal airbag module (Driver’s side) . Frontal airbag module (Front passen- ger’s side) . Side airbag sensor (Center pillar right- hand side) . Side airbag sensor (Center pillar left- hand side) . Side airbag module (Driver’s side) . Side airbag module (Front passenger’s side) . Curtain airbag sensor house right-hand side) . Curtain airbag sensor house left-hand side) . Curtain airbag module (Right side) . Curtain airbag module (Left side)
(Rear wheel
(Rear wheel
. Seatbelt pretensioner (Driver’s side) . Seatbelt pretensioner (Front passen- ger’s side) . Seatbelt buckle switch (Driver’s side) . Seatbelt buckle switch (Front passen- ger’s side) . Driver’s seat position sensor . Front passenger’s seatbelt sensor . Front passenger’s occupant detection system weight sensor . Front passenger’s occupant detection control module . Front passenger’s frontal airbag ON and OFF indicator . All related wiring
tension
WARNING
If the warning light exhibits any of the following conditions, there may be a malfunction in the seatbelt pretensioners and/or SRS airbag system. Immediately take your vehi- cle to your nearest SUBARU dealer to have the system checked. Unless checked and properly repaired, the seatbelt pretensioners and/or SRS airbags will operate improperly (e.g. SRS airbags may inflate in a very minor collision or not inflate in a severe collision), which may in-
crease the risk of injury. . Flashing or flickering of the warn-
ing light
. No illumination of
the warning light when the ignition switch is first turned to the “ON” position the
. Continuous illumination of
warning light
. Illumination of the warning light
while driving
& System servicing
WARNING
. When discarding a seatbelt re- tractor assembly or scrapping the entire vehicle damaged by a collision, consult your SUBARU dealer.
. Tampering with or disconnecting the system’s wiring could result in accidental activation of the seatbelt pretensioner and/or air- bag or could make the system inoperative, which may result in serious injury. The wiring har- nesses of the seatbelt preten- sioner and SRS airbag systems are covered with yellow insula-
Seat, seatbelt and SRS airbags 1-29
tion and the connectors of the system are yellow for easy iden- tification. Do not use electrical test equipment on any circuit related to the seatbelt preten- sioner and airbag systems. For required servicing of the seatbelt pretensioner, see your nearest SUBARU dealer.
CAUTION
The front sub sensors are located on both sides of the radiator panel, and the airbag control module in- cluding the impact sensors is lo- cated under the center console. If you need service or repair in those areas or near the front seatbelt retractors, we recommend that you have an authorized SUBARU dealer perform the work.
the front part of
NOTE If the vehicle is damaged in an accident to the extent that the seatbelt pretensioner does not operate, contact your SUBARU dealer as soon as possible.
– CONTINUED –
1-30 Seat, seatbelt and SRS airbags
& Precautions against vehicle
modification
Always consult your SUBARU dealer if you want to install any accessory parts to your vehicle.
CAUTION
Do not perform any of the following modifications. Such modifications can interfere with proper operation of the seatbelt pretensioners. . Attachment of any equipment (bush bar, winches, snow plow, skid plate, etc.) other than genu- ine SUBARU accessory parts to the front end.
. Modification of
the suspension
system or front end structure.
. Installation of a tire of different size and construction from the tires specified on the vehicle placard attached to the door pillar or specified for individual vehicle models in this Owner’s Manual.
Child restraint systems
(LATCH)”).
if
Children could be endangered in an accident their child restraints are not properly secured in the vehicle. When installing the child restraint system, care- fully follow the manufacturer’s instructions.
According to accident statistics, children are safer when properly restrained in the rear seating positions than in the front seating positions.
All U.S. states and Canadian provinces require that infants and small children be restrained in an approved child restraint system at all times while the vehicle is moving.
While riding in the vehicle, infants and small children should always be placed in an infant or child restraint system in one of the rear seating positions recommended in this Owner’s Manual. You should use an infant or child restraint system that meets Federal Motor Vehicle Safety Stan- dards or Canada Motor Vehicle Safety Standards, is compatible with your vehicle and is appropriate for the child’s age and size. All child restraint systems are de- signed to be secured in vehicle seats by lap belts or the lap belt portion of a lap/ shoulder belt (except those covered under the section in this manual, entitled “In- stallation of child restraint systems by use o f l o w e r a n d t e t h e r a nc h o r ag e s
WARNING
WARNING
Seat, seatbelt and SRS airbags 1-31
Never let a passenger hold a child on his or her lap while the vehicle is moving. The passenger cannot pro- tect the child from injury in a colli- sion, because the child will be caught between the passenger and objects inside the vehicle. Addition- ally, holding a child in your lap or arms in the front seat exposes that child to another serious danger. Since the SRS airbag deploys with considerable speed and force, the child could be injured or even killed.
Children should be properly re- strained at all times. Never allow a child to stand up, or to kneel on any seat. Unrestrained children will be thrown forward during sudden stop or in an accident and can be injured seriously. Additionally, children standing up or kneeling on or in front of the front seat are exposed another serious danger. Since the SRS airbag de- ploys with considerable speed and force, the child could be injured or even killed.
& Where to place a child re-
straint system
The following are SUBARU’s recommen- dations on where to place a child restraint system in your vehicle.
A: Front passenger’s seat install a child restraint You should not system (including a booster seat) due to the hazard to children posed by the passenger’s airbag.
B: Rear outboard seats (5-seater mod- els)/second-row outboard seats (7-sea- ter models) Recommended positions for all types of child restraint systems. In these positions, Automatic/Emergency Locking Retractor (A/ELR) seatbelts and lower anchorages (bars) are provided for installing a child restraint system. Some types of child restraints might not be able to be secured firmly due to projection of the seat cushion. In this seating position, you should use
– CONTINUED –
1-32 Seat, seatbelt and SRS airbags
only a child restraint system that has a bottom base that fits snugly against the contours of the seat cushion and can be securely retained using the seatbelt.
C: Rear center seat (5-seater models)/ second-row center seat (7-seater mod- els) Installing a child restraint system is not recommended, although the A/ELR seat- belt and an upper anchorage (tether anchorage) are provided in this position. Some types of child restraints might not be able to be secured firmly due to projection of the seat cushion. In this seating position, you should use only a child restraint system that has a bottom base that fits snugly against the contours of the seat cushion and can be securely retained using the seatbelt.
D: Third-row seat (7-seater models) Installing a child restraint system is not recommended, although the A/ELR seat- belt and two upper anchorages (tether anchorages) are provided in these posi- tions. These seating positions are not equipped with lower anchorages (bars) for installing LATCH system-type child restraints. How- ever, child restraint devices can be used in these position using the A/ELR seatbelts and upper anchorages (tether an-
chorages) provided. Some types of child restraints might not be able to be secured firmly due to projection of the seat cushion. In this seating position, you should use only a child restraint system that has a bottom base that fits snugly against the contours of the seat cushion and can be securely retained using the seatbelt.
WARNING
Put children aged 12 and under in the rear seat properly restrained at all times. The SRS airbag deploys with considerable speed and force and can injure or even kill children, especially if they are 12 years of age and under and are not restrained or improperly restrained. Because chil- dren are lighter and weaker than adults, their risk of being injured from deployment is greater. Consequently, be sure to secure ALL types of child restraint devices (including forward facing child seats) in the REAR seats at all times. You should choose a restraint de- vice which is appropriate for the child’s age, height and weight. Ac- cording to accident statistics, chil- dren are safer when properly re-
strained in the rear seating posi- tions than in the front seating posi- tions.
WARNING
S I N C E Y O U R V E H I C L E I S EQUIPPED WITH A PASSENGER’S SRS AIRBAG, DO NOT INSTALL A R E A R WA R D FA C I N G C H I L D SAFETY SEAT IN THE FRONT PAS- SENGER’S SEAT. DOING SO RISKS SERIOUS INJURY OR DEATH TO THE CHILD BY PLACING THE CHILD’S HEAD TOO CLOSE TO THE SRS AIRBAG.
& Choosing a child restraint
system
& Installing child restraint sys-
tems with A/ELR seatbelt
WARNING
. Child restraint systems and seat- belts can become hot in a vehicle that has been closed up in sunny weather; they could burn a small child. Check the child restraint system before you place a child in it.
. Do not leave an unsecured child restraint system in your vehicle. Unsecured child restraint sys- tems can be thrown around in- side of the vehicle in a sudden stop, turn or accident; they can strike and injure vehicle occu- pants as well as result in serious injuries or death to the child.
CAUTION
When you install a child restraint system, follow the manufacturer’s instructions supplied with it. After installing the child restraint system, check to ensure that is held securely in position. If it is not held tight and secure, the danger of your
it
Choose a child restraint system that is appropriate for the child’s age and size (weight and height) in order to provide the child with proper protection. The child restraint system should meet all applic- able requirements of Federal Motor Vehi- cle Safety Standards for United States or Canada Motor Vehicle Safety Standards for Canada. It can be identified by looking for the label on the child restraint system or the manufacturer’s statement of com- pliance in the document attached to the system. Also it for you to make sure that the child restraint system is compatible with the vehicle in which it will be used.
is important
Seat, seatbelt and SRS airbags 1-33
child suffering personal injury in the event of an accident may be in- creased.
! Installing a rearward facing child
restraint
to its
the seatback to the upright
1. Slide the seat or seat pair rearmost position. 2. Adjust position. 3. Place the child restraint system in the rear seating position. 4. Run the lap and shoulder belt through or around the child restraint system following the instructions provided by its manufacturer. 5. until you hear a click.
Insert the tongue plate into the buckle
– CONTINUED –
1-34 Seat, seatbelt and SRS airbags
the seatbelt
6. Take up the slack in the lap belt. 7. Pull out fully from the retractor to change the retractor over from the Emergency Locking Retractor (ELR) to the Automatic Locking Retractor (ALR) function. Then, allow the belt to rewind into the retractor. As the belt is rewinding, clicks will be heard which indicate the retractor functions as ALR.
8. Push and pull the child restraint system forward and from side to side to check if it is firmly secured. Sometimes a child restraint can be more firmly secured by pushing it down into the seat cushion and then tightening the seatbelt. 9. Pull at the shoulder portion of the belt to confirm that it cannot be pulled out (ALR properly functioning).
10. To remove the child restraint system, press the release button on the seatbelt buckle and allow the belt to retract completely. The belt will return to the ELR mode.
WARNING
NEVER INSTALL A REARWARD FA- CING CHILD SEAT IN THE FRONT PASSENGER’S SEAT. DOING SO RISKS SERIOUS INJURY OR DEATH TO THE CHILD BY PLACING THE CHILD’S HEAD TOO CLOSE TO THE SRS AIRBAG.
Insert the tongue plate into the buckle
5. until you hear a click.
Seat, seatbelt and SRS airbags 1-35
NOTE When the child restraint system is no longer in use, remove it and restore the ELR function of the retractor. That function is restored by retracting the seatbelt fully. ! Installing forward facing child re-
straint
the seatbelt
6. Take up the slack in the lap belt. 7. Pull out fully from the retractor to change the retractor over from the Emergency Locking Retractor (ELR) to the Automatic Locking Retractor (ALR) function. Then, allow the belt to rewind into the retractor. As the belt is rewinding, clicks will be heard which indicate the retractor functions as ALR.
8. Before having a child sit in the child restraint system, move it back and forth and right and left to check if it is firmly secured. Sometimes a child restraint can be more firmly secured by pushing it down into the seat cushion and then tightening the seatbelt. 9. Pull at the shoulder portion of the belt to confirm that it cannot be pulled out (ALR properly functioning).
– CONTINUED –
to its
the seatback to the upright
1. Slide the seat or seat pair rearmost position. 2. Adjust position. 3. Place the child restraint system in the seating position. 4. Run the lap and shoulder belt through or around the child restraint system following the instructions provided by its manufacturer.
1-36 Seat, seatbelt and SRS airbags
to “Top tether anchorages”
Refer additional instructions.
for
& Installing a booster seat
Rear seat seat (7-seater models)
(5-seater models)/Second-row
Third-row seat (7-seater models)
10. If the child restraint system requires a top tether, latch the hook onto the top tether anchor and tighten the top tether.
11. To remove the child restraint system, press the release button on the seatbelt to retract buckle and allow the belt completely. The belt will return to the ELR mode.
NOTE When the child restraint system is no longer in use, remove it and restore the ELR function of the retractor. That function is restored by allowing the seatbelt to retract fully.
WARNING
. Child restraint systems and seat- belts can become hot in a vehicle that has been closed up in sunny weather; they could burn a small child. Check the child restraint system before you place a child in it.
. Do not leave an unsecured child restraint system in your vehicle. Unsecured child restraint sys- tems can be thrown around in- side of the vehicle in a sudden stop, turn or accident; they can strike and injure vehicle occu- pants as well as result in serious injuries or death to the child.
CAUTION
When you install a child restraint system, follow the manufacturer’s instructions supplied with it. After installing the child restraint system, check to ensure that is held securely in position. If it is not held tight and secure, the danger of your child suffering personal injury in the event of an accident may be in-
it
creased.
to its
1. Slide the seat or seat pair rearmost position. 2. Place the booster seat in the rear seating position and sit the child on it. The child should sit well back on the booster seat. 3. Run the lap and shoulder belt through or around the booster seat and the child following the instructions provided by its manufacturer. 4. Insert the tongue plate into the buckle until you hear a click. Take care not to twist the seatbelt. Make sure the shoulder belt is positioned across the center of child’s shoulder and that the lap belt is positioned as low as possible on the child’s hips.
5. To remove the booster seat, press the release button on the seatbelt buckle and allow the belt to retract.
WARNING
. Never use a belt that is twisted or reversed. In an accident, this can increase the risk or severity of injury to the child.
. Never place the shoulder belt under the child’s arm or behind the child’s back. If an accident occurs, this can increase the risk or severity of injury to the child. . The seatbelt should fit snugly in order to provide full restraint. Loose fitting belts are not as
Seat, seatbelt and SRS airbags 1-37
effective in preventing or redu- cing injury.
. Place the lap belt as low as possible on the child’s hips. A high-positioned lap belt will in- crease the risk of sliding under the lap belt and of the lap belt sliding up over the abdomen, and both can result in serious inter- nal injury or death.
. Make sure the shoulder belt is positioned across the center of child’s shoulder. Placing the shoulder belt over the neck may result in neck injury during sud- den braking or in a collision.
& Installation of child restraint systems by use of lower and tether anchorages (LATCH)
WARNING
. Child restraint systems and seat- belts can become hot in a vehicle that has been closed up in sunny weather; they could burn a small child. Check the child restraint system before you place a child in it.
. Do not leave an unsecured child – CONTINUED –
1-38 Seat, seatbelt and SRS airbags
restraint system in your vehicle. Unsecured child restraint sys- tems can be thrown around in- side of the vehicle in a sudden stop, turn or accident; they can strike and injure vehicle occu- pants as well as result in serious injuries or death to the child.
CAUTION
When you install a child restraint system, follow the manufacturer’s instructions supplied with it. After installing the child restraint system, check to ensure that is held securely in position. If it is not held tight and secure, the danger of your child suffering personal injury in the event of an accident may be in- creased.
it
Some types of child restraint systems can be installed in a rear seating position of your vehicle without use of the seatbelts. Such child restraint systems are secured to the dedicated anchorages provided on the vehicle body. The lower and tether anchorages are sometimes referred to as the LATCH system (Lower Anchors and Tethers for CHildren).
Your vehicle is provided with child restraint system anchors as follows: . Four lower anchorages (bars) and three upper anchorages (tether an- chorages) on the rear seat (5-seater model)/second-row seat (7-seater model)
Lower anchorages for child restraints are provided in the following locations: . 5-seater models: on the rear seats . 7-seater models: on the second-row seats
For each window-side seating position, two lower anchorages are provided. Each lower anchorage is located where the seat cushion meets the seatback.
The tether anchorages (upper an- chorages) are provided for all the seating positions of the rear seat (5-seater mod- els)/second-row seat (7-seater models).
Seat, seatbelt and SRS airbags 1-39
to its
1. Slide the seat or seat pair rearmost position. 2. Make the clearance between the seat cushion and seatback a little wider to locate the two anchorages (bars) for the position where you want to install the child restraint system.
3. While following the instructions sup- plied by the child restraint system manu- facturer, connect the lower hooks onto the lower anchorages located at “ ” marks on the bottom of the seatback. When the hooks are connected, make sure the adjacent seatbelts are not caught.
On each outboard rear/second-row seat, you will find marks “ ” at the bottom of the seatback. Each lower anchorage is located where the seat cushion meets the seatback.
CAUTION
When you install a child restraint system, follow the manufacturer’s instructions supplied with it. After installing the child restraint system, check to ensure that is held securely in position. If it is not held tight and secure, the danger of your child suffering personal injury in the event of an accident may be in- creased.
it
– CONTINUED –
1-40 Seat, seatbelt and SRS airbags
instructions by the child restraint system manufacturer.
Since a top tether can provide additional stability by offering another connection between a child restraint system and the vehicle, we recommend that you use a top tether whenever one is required or avail- able. ! Tether anchorage location ! Rear seat (5-seater models)/Second-
row seat (7-seater models)
Three tether anchorages, i.e., ones for the right, center and left seats, are already installed on the back of each seatback. Open the cover flap to use each ancho- rage.
[If your child restraint system is of a 4. type (which uses flexible attachment tether belts to connect the child restraint system properly to the lower anchorages)] While pushing the child restraint into the seat cushion, pull both left and right lower tether belts up to secure the child restraint system firmly by taking up the slack in the belt. 5. Connect the top tether hook to the tether anchorage and firmly tighten the tether. For information on how to set the top tether, Refer to the following “Top tether anchorages” section.
6. Before seating a child in the child restraint system, try to move seat back and forth and left and right to verify that it is held securely in position. 7. To remove the child restraint system, follow the reverse procedures of installa- tion.
If you have any question concerning this type of child restraint system, ask your SUBARU dealer. & Top tether anchorages Your vehicle is equipped with three top tether anchorages (five in the 7-seater models) so that a child restraint system having a top tether can be installed in a rear seating position. When installing a child restraint system using top tether, proceed as follows, while observing the
! Third-row seat (7-seater models)
! To hook the top tether ! Rear seat (5-seater models)/Second-
row seat (7-seater models)
Seat, seatbelt and SRS airbags 1-41
Two tether anchorages are attached to the rear edge of the cargo area. Open the cover flap to use each ancho- rage.
1. Raise the head restraint to the highest position at the seating position where the child seat has been installed using the seatbelt or lower anchorages; lift up the head restraint while pressing the release button.
2. Open the cover anchorages.
flaps to use the
3. Fasten the top tether hook of the child restraint system to the appropriate upper anchorage. 4. Tighten the top tether securely.
– CONTINUED –
1-42 Seat, seatbelt and SRS airbags
CAUTION
When the child restraint system is to be secured using the top tether, pass the top tether under the head restraint between the head restraint stay posts.
CAUTION
If
Be sure to install the top tether with the head restraint raised to the highest position. the head re- straint is in any of the lower posi- tions, the top tether will touch the head restraint and the resulting slack will prevent its secure installa- tion.
! Third-row seat (7-seater models)
CAUTION
Do not route the top tether over the head restraint. It may happen that the top tether cannot be fastened tightly.
1. Lower the head restraint to its lowest position.
2. Open the lid of the cargo area, then remove the covers for the anchorages.
Seat, seatbelt and SRS airbags 1-43
CAUTION
Do not pass the top tether under the head restraint. The top tether will touch the head restraint and the resulting slack will prevent its se- cure installation.
3. Fasten the top tether hook of the child restraint system to the appropriate upper anchorage. 4. Tighten the top tether securely.
CAUTION
Prevent the top tether from touching cargo in the cargo area. The top tether may become slack if the cargo changes shape or moves.
CAUTION
Do not use the top tether with the head restraint in a raised position, otherwise the top tether cannot be fastened tightly.
1-44 Seat, seatbelt and SRS airbags
*SRS airbag (Supplemental Restraint System airbag)
*SRS: This stands for supplemental re- straint system. This name is used be- cause the airbag system supplements the vehicle’s seatbelts.
Your vehicle is equipped with a crash sensing and diagnostic module, which will record the use of the seatbelt(s) by the driver and front passenger when any of the SRS frontal, side and curtain airbags deploy. & Your vehicle’s SRS config-
uration
The driver’s seat, the front passenger’s seat, and the outboard seats of the rear/ second seating row of your vehicle are each provided with, in addition to a lap/ shoulder belt, one or more airbags as follows: . Frontal airbag (one each for driver’s seat and front passenger’s seat) . Side airbag (one each for driver’s seat and front passenger’s seat) . Curtain airbag (one each for the out- board sides of cabin, extending from driver’s and front passenger’s seats to rear/second seating row)
These SRS airbags are designed only as a supplement to the primary protec- tion provided by the seatbelt.
The system also controls front seatbelt pretensioners. For operation instructions and precautions concerning the seatbelt pretensioner, refer to the “Front seatbelt pretensioners” section in this chapter.
WARNING
. To obtain maximum protection in the event of an accident, the driver and all passengers in the vehicle should always wear seat- belts when the vehicle is moving. The SRS airbag is designed only as a supplement to the primary protection provided by the seat- belt. It does not do away with the need to fasten seatbelts. In com- bination with the seatbelts, it offers the best combined protec- tion in case of a serious accident. Not wearing a seatbelt increases the chance of severe injury or death in a crash even when the vehicle has the SRS airbag. For instructions and precautions concerning the seatbelt system, refer to the “Seatbelts” section in this chapter.
. Do not sit or lean unnecessarily close to the SRS airbag. Because the SRS airbag deploys with considerable speed – faster than the blink of an eye – and force to protect in high speed collisions, the force of an airbag can injure an occupant whose body is too close to SRS airbag. It is also important to wear your seatbelt to help avoid injuries that can result when the SRS airbag contacts an occupant not in proper position such as one thrown forward during pre-acci- dent braking. Even when properly positioned, there remains a possibility that an occupant may suffer minor injury such as abrasions and bruises to the face or arms because of the SRS airbag de- ployment force.
. The SRS airbags deploy with considerable speed and force. Occupants who are out of proper position when the SRS airbag deploys could suffer very serious injuries. Because the SRS airbag needs enough space for deploy- ment, the driver should always sit upright and well back in the
seat as far from the steering wheel as practical while still maintaining full vehicle control and the front passenger should move the seat as far back as possible and sit upright and well back in the seat.
. Do not place any objects over or near the SRS airbag cover or between you and the SRS airbag. If the SRS airbag deploys, those objects could interfere with its proper operation and could be propelled inside the vehicle and cause injury.
WARNING
. Put children aged 12 and under in a rear seat properly restrained at all times. The SRS airbag de- ploys with considerable speed and force and can injure or even kill children, especially if they are 12 years of age and under and are not restrained or improperly restrained. Because children are lighter and weaker than adults, their risk of being injured from deployment is greater. Consequently, we strongly re- commend that ALL children (in- cluding those in child seats and those that have outgrown child restraint devices) sit in a REAR seat properly restrained at all times in a child restraint device or in a seatbelt, whichever is appropriate for the child’s age, height and weight. Always secure ALL types of child restraint devices (including for- ward facing child seats) in one of the rear seating positions recom- mended in this Owner’s Manual. According to accident statistics, children are safer when properly
Seat, seatbelt and SRS airbags 1-45
restrained in the rear seating positions than in the front seat- ing positions. For instructions and precautions concerning the child restraint system, refer to the “Child re- straint systems” section in this chapter.
. NEVER INSTALL A REARWARD FACING CHILD SEAT IN THE FRONT SEAT. DOING SO RISKS SERIOUS INJURY OR DEATH TO THE CHILD BY PLACING THE CHILD’S HEAD TOO CLOSE TO THE SRS AIRBAG.
. Never allow a child to stand up, or to kneel on the front passen- ger’s seat, or never hold a child on your lap or in your arms. The SRS airbag deploys with consid- erable force and can injure or even kill the child.
CAUTION
. When the SRS airbag deploys, some smoke will be released. This smoke could cause breath- ing problems for people with a history of asthma or other breathing trouble. If you or your
– CONTINUED –
1-46 Seat, seatbelt and SRS airbags
passengers have breathing pro- blems after SRS airbag deploys, get fresh air promptly.
. A deploying SRS airbag releases hot gas. Occupants could get burned if they come into direct contact with the hot gas.
NOTE When you sell your vehicle, we urge you to explain to the buyer that it is equipped with SRS airbags by alerting him or her to the applicable section in this Owner’s Manual.
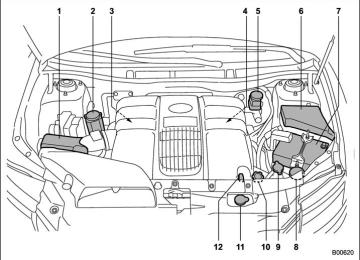
! Components
Seat, seatbelt and SRS airbags 1-47
9) Side airbag sensor (center pillar right-
hand side)
10) Airbag wiring (yellow) 11) Seatbelt pretensioner (driver’s side) 12) Seatbelt pretensioner (front passenger’s
side)
13) Curtain airbag sensor (rear wheel house
right-hand side)
14) Curtain airbag sensor (rear wheel house
left-hand side)
15) Curtain airbag module (right side) 16) Curtain airbag module (left side) 17) Seatbelt buckle switch (front passenger’s
side)
sor
18) Seatbelt buckle switch (driver’s side) 19) Driver’s seat position sensor 20) Front passenger’s seatbelt tension sen-
21) Front passenger’s occupant detection
system weight sensor
22) Front passenger’s occupant detection
23) Front passenger’s frontal airbag ON and
control module
OFF indicator
1) Airbag control module (including impact
and rollover sensors) Frontal airbag module (driver’s side) Frontal airbag module (front passenger’s side) Front sub sensor (left-hand side)
2) 3)
4)
24) SRS airbag system warning light
5) Front sub sensor (right-hand side) 6) Side airbag module (driver’s side) 7) Side airbag module (front passenger’s
side)
8) Side airbag sensor (center pillar left-hand
side)
– CONTINUED –
1-48 Seat, seatbelt and SRS airbags
& Subaru advanced frontal air-
bag system
force of
force of
the deployment
Your vehicle is equipped with a Subaru advanced frontal airbag system that com- plies with the new advanced frontal airbag requirements in the amended Federal Motor Vehicle Safety Standard (FMVSS) No. 208. The Subaru advanced frontal airbag sys- tem automatically determines the deploy- the driver’s SRS frontal ment airbag at the time of deployment as well as to activate the front whether or not passenger’s SRS frontal airbag and, if activated, the SRS frontal airbag at the time of deploy- ment. Your vehicle has warning labels on the driver’s and front passenger’s sun visors beginning with the phrase “EVEN WITH ADVANCED AIR BAGS” and a tag attached to the glove box lid beginning with the phrase “Even with Advanced Air Bags”. Make sure that you carefully read the instructions on the warning labels and tag. Always wear your seatbelt. The Subaru advanced frontal airbag system is a supplemental restraint system and must be used in combination with a seatbelt. All occupants should wear a seatbelt or be seated in an appropriate child restraint
THE CHILD BY PLACING THE CHILD’S HEAD TOO CLOSE TO THE SRS AIRBAG.
system. The driver’s SRS frontal airbag is stowed in the center portion of the steering wheel. The front passenger’s SRS frontal airbag is stowed near the top of the dashboard under an “SRS AIRBAG” mark.
In a moderate to severe frontal collision, the driver’s and front passenger’s SRS frontal airbags deploy and supplement the seatbelts by reducing the impact on the driver’s and front passenger’s head and chest.
WARNING
Never allow a child to stand up, or to kneel on the front passenger’s seat. The SRS airbag deploys with con- siderable force and can injure or even kill the child.
WARNING
NEVER INSTALL A REARWARD FA- CING CHILD SAFETY SEAT IN THE FRONT SEAT. DOING SO RISKS SERIOUS INJURY OR DEATH TO
Seat, seatbelt and SRS airbags 1-49
seatbelt to help avoid injuries that can result when the SRS airbag contacts an occupant not in proper position such as one thrown toward the front of the vehicle during pre- accident braking.
WARNING
WARNING
Never hold a child on your lap or in your arms. The SRS airbag deploys with considerable force and can injure or even kill the child.
The SRS airbag deploys with con- siderable speed and force. Occu- pants who are out of proper position when the SRS airbag deploys could suffer very serious injuries. Be- cause the SRS airbag needs enough space for deployment, the driver should always sit upright and well back in the seat as far from the steering wheel as practical while still maintaining full vehicle control and the front passenger should move the seat as far back as possible and sit upright and well back in the seat. It is also important to wear your
WARNING
Do not put any objects over the steering wheel pad and dashboard. If the SRS frontal airbag deploys, those objects could interfere with its proper operation and could be pro- pelled inside the vehicle and cause injury.
– CONTINUED –
1-50 Seat, seatbelt and SRS airbags
WARNING
Do not attach accessories to the windshield, or fit an extra-wide mir- ror over the rear view mirror. If the SRS airbag deploys, those objects could become projectiles that could seriously injure vehicle occupants.
! Driver’s SRS frontal airbag The driver’s SRS frontal airbag uses a dual stage inflator. The inflator operates in different ways depending on the severity of impact, backward-forward adjustment of the driver’s seat position and whether or not he/she is wearing the seatbelt. The backward-forward adjustment of the driver’s seat position is monitored by the
driver’s seat position sensor under the driver’s seat. Whether or not the driver is wearing the seatbelt is monitored by the seatbelt buckle switch. Observe the following precautions. Failure to do so may cause the seatbelt buckle switch and/or the seat position sensor to malfunction, preventing the Subaru ad- vanced frontal airbag system from func- tioning correctly or causing the system to fail. . Do not place articles/metal objects or install any accessory other than a genuine the driver’s SUBARU accessory under seat. Do not allow the rear seat occupant to kick the driver’s seat or push up its bottom surface with his/her feet. . Do not place a magnet near the seatbelt buckle or under the driver’s seat.
If the seatbelt buckle switch and/or the driver’s seat position sensor have failed, the SRS airbag system warning light will illuminate. Although the driver’s SRS frontal airbag can deploy regardless of the backward-forward adjustment of the driver’s seat position even when the warning light is on, have the system inspected by your SUBARU dealer im- mediately if the SRS airbag system warn- ing light comes on.
NOTE The driver’s SRS side airbag, SRS curtain airbag and seatbelt preten- sioner are not controlled by the Subaru advanced frontal airbag system. ! Front passenger’s SRS frontal air-
bag
The front passenger’s SRS frontal airbag uses a dual stage inflator. The inflator operates in different ways depending on the severity of impact. The total load on the seat is monitored by the occupant detection system’s weight sensor located under the seat. The system has another sensor that monitors the tension of the front passen- ger seatbelt. Using the total seat load and seatbelt tension data from the sensors, the occupant detection system determines whether the front passenger’s SRS frontal airbag should or should not be inflated. The occupant detection system may not inflate the front passenger’s SRS frontal airbag even when the driver’s SRS frontal airbag deploys. This is normal. Observe the following precautions. Failure to do so may prevent the Subaru ad- vanced frontal airbag system from func- tioning correctly or cause the system to fail. . Do not apply any strong impact to the
Have your vehicle inspected at your SUBARU dealer. NOTE The front passenger’s SRS side airbag, SRS curtain airbag and seatbelt pre- tensioner are not controlled by the Subaru advanced frontal airbag sys- tem. ! Passenger’s frontal airbag ON and
OFF indicators
front passenger’s seat such as by kicking. . Do not spill liquid on the front passen- ger’s seat. If liquid is spilled, wipe it off immediately. . Do not remove or disassemble the front passenger’s seat. . Do not install any accessory (such as an audio amplifier) other than a genuine SUBARU accessory under the front pas- senger’s seat. . Do not place anything (shoes, umbrel- la, etc.) under the front passenger’s seat. . The front passenger’s seat must not be used with the head restraint removed. . Do not leave any article including a child restraint system on the front passen- ger’s seat or tongue and buckle engaged when you leave your vehicle. . Do not place a magnet near the seatbelt buckle and the seatbelt retractor.
the seatbelt
If the seatbelt buckle switch and/or front passenger’s occupant detection system have failed, the SRS airbag system warning light will illuminate. Have the system inspected by your SUBARU deal- er immediately if the SRS airbag system warning light comes on. If your vehicle has sustained impact, this may affect the Subaru advanced frontal airbag system.
function of
the proper
: Front passenger’s frontal airbag ON indicator : Front passenger’s frontal airbag OFF indicator
The front passenger’s frontal airbag ON and OFF indicators show you the status of the front passenger’s SRS frontal airbag.
Seat, seatbelt and SRS airbags 1-51
The indicators are located in the center portion of the instrument panel. When the ignition switch is turned to the “ON” position, both the ON and OFF indicators illuminate for 6 seconds during which time the system is checked. Follow- ing the system check, both indicators extinguish for 2 seconds. After that, one of the indicators illuminates depending on the status of the front passenger’s SRS frontal airbag determined by the Subaru advanced frontal airbag system monitor- ing. If the front passenger’s SRS frontal airbag is activated, the passenger’s frontal airbag ON indicator will illuminate while the OFF indicator will remain extinguished. If the front passenger’s SRS frontal airbag the passenger’s frontal is deactivated, airbag ON indicator will remain extin- guished while the OFF indicator will illuminate. With the ignition switch turned to the “ON” position, if both the ON and OFF indica- tors remain lit or extinguished simulta- neously even after the system check period, the system is faulty. Contact your SUBARU dealer immediately for an in- spection.
– CONTINUED –
1-52 Seat, seatbelt and SRS airbags
! Conditions in which front passen-
ger’s SRS frontal airbag is not activated
The front passenger’s SRS frontal airbag will not be activated when any of the following conditions are met regarding the front passenger’s seat: . The seat is empty. . The seat is equipped with a rearward facing child restraint system and an infant is restrained with it. (See WARNING that follows.) . The seat is equipped with a forward facing child restraint system and a small child is restrained with it. (See WARNING that follows.) . The seat is equipped with a booster seat and a small child is in the booster seat. (See WARNING that follows.) . The seat is relieved of the occupant load for a time exceeding the predeter- mined monitoring time period. . The seat is occupied by a child who has outgrown a child restraint system (See WARNING that follows.) or by a small adult. . The front passenger’s occupant detec- tion system is faulty.
WARNING
NEVER INSTALL A REARWARD FA- CING CHILD SEAT IN THE FRONT PASSENGER’S SEAT EVEN IF THE FRONT PASSENGER’S SRS FRON- TAL AIRBAG IS DEACTIVATED. Be sure to install it in one of the rear seating positions recommended in this Owner’s Manual in a correct manner. Also, it is strongly recom- mended that any forward facing child seat or booster seat be in- stalled in one of the rear seating positions recommended in this Owner’s Manual, and that even children who have outgrown a child restraint system be also seated in a REAR seat. This is because children sitting in the front passenger’s seat may be killed or severely injured should the front passenger’s SRS frontal airbag deploy. REAR seats are the safest place for children.
When the front passenger’s seat is occu- pied by a child, observe the following precautions. Failure to do so may increase the load on the front passenger’s seat, activating the front passenger’s SRS frontal airbag even though that seat is occupied by a child.
. Do not place any article on the seat other than the child occupant and a child restraint system. . Do not place more than one child on the seat. . Do not install any accessory such as a table or TV onto the seatback. . Do not store a heavy load in the seatback pocket. . Do not allow the rear/second-row seat occupant to place his/her hands or legs on the front passenger’s seatback, or allow him/her to pull the seatback.
! If the front passenger’s frontal air- bag ON indicator illuminates and the OFF indicator extinguishes even when an infant or a small child is in a child restraint system (including booster seat)
Turn the ignition switch to the “LOCK” the front passenger’s frontal position if airbag ON indicator illuminates and the OFF indicator extinguishes even when an infant or a small child is in a child restraint system (including booster seat). Remove the child restraint system from the seat. By referring to the child restraint manufac- turer’s recommendations as well as the child restraint system installation proce- dures in the “Child restraint systems” section in this chapter, correctly install
the child restraint system. Turn the ignition switch to the “ON” position and make sure that the front passenger’s frontal airbag ON indicator goes out and the OFF indicator comes on.
If still the ON indicator remains illuminated while the OFF indicator extinguishes, take the following actions. . Ensure that no article is placed on the seat other than the child restraint system and the child occupant. . Ensure that there is no article left in the seatback pocket.
If the ON indicator still illuminates while the OFF indicator extinguishes after taking relevant corrective actions described above, relocate the child restraint system to one of the rear seating positions recommended in this Owner’s Manual and immediately contact your SUBARU dealer for an inspection. NOTE When a child who has outgrown a child restraint system or a small adult is seated in the front passenger’s seat, the Subaru advanced frontal airbag system may or may not activate the front passenger’s SRS frontal airbag depending on the occupant’s seating posture. If the front passenger’s SRS
frontal airbag is activated (the ON indicator illuminates while the OFF indicator extinguishes), take the follow- ing actions. . Ensure that no article is placed on the seat other than the occupant. . Ensure that there is no article left in the seatback pocket.
it
If the ON indicator still illuminates while the OFF indicator extinguishes despite the fact that the actions noted above have been taken, seat the child/small adult in the rear seat and immediately contact your SUBARU dealer for an inspection. Even if the system has passed the dealer inspection, is recommended that on subsequent trips the child/small adult always take the rear seat. Children who have outgrown a child restraint system should always wear the seatbelt irrespective of whether the airbag is deactivated or activated. ! Conditions in which front passen- ger’s SRS frontal airbag is activated The front passenger’s SRS frontal airbag will be activated for deployment upon impact when any of the following condi- tions is met regarding the front passen-