- 2006 Subaru Legacy Owners Manuals
- Subaru Legacy Owners Manuals
- 2004 Subaru Legacy Owners Manuals
- Subaru Legacy Owners Manuals
- 2008 Subaru Legacy Owners Manuals
- Subaru Legacy Owners Manuals
- 2005 Subaru Legacy Owners Manuals
- Subaru Legacy Owners Manuals
- 2007 Subaru Legacy Owners Manuals
- Subaru Legacy Owners Manuals
- 2000 Subaru Legacy Owners Manuals
- Subaru Legacy Owners Manuals
- 2003 Subaru Legacy Owners Manuals
- Subaru Legacy Owners Manuals
- 2012 Subaru Legacy Owners Manuals
- Subaru Legacy Owners Manuals
- 2001 Subaru Legacy Owners Manuals
- Subaru Legacy Owners Manuals
- 2010 Subaru Legacy Owners Manuals
- Subaru Legacy Owners Manuals
- 2011 Subaru Legacy Owners Manuals
- Subaru Legacy Owners Manuals
- 2009 Subaru Legacy Owners Manuals
- Subaru Legacy Owners Manuals
- 2002 Subaru Legacy Owners Manuals
- Subaru Legacy Owners Manuals
- Download PDF Manual
-
y.
’s
e c n, ple tio
fi
d s g a tin d o aile r d
P.
y in
Y.
199381_10a_LegOutback_Monitor_ORG_050509.indd 1-2
5/6/09 11:12:19 AM
MSA5B1012A Printed in USA 04/09
Issued 04/092010 LEGACY/OUTBACK Monitor System Owner Reference Guide
Multi-information Display
Dynamic. Progressive. real WorlD versatility. Your Subaru vehicle represents state-of-the-art design and technology, providing you with a satisfying owner experience. Your Multi-Information Display offers essential information on your vehicle and driving operations. This Reference Guide is designed to provide a quick overview on the system and features of your Multi-Information Display. For a comprehensive description on operating this system, please read the Monitor System Owner’s Manual.
Your control panel is your access to the Multi-Information Display. You must stop your vehicle in a safe place before operating the system. Some of the controls and functions cannot be used unless the vehicle is stationary.
info Press this to display the Vehicle Information Screen.
Press this to adjust the brightness/contrast of the image and to display a calendar.
Displaying vehicle information screen
fuel consumPtion To check current fuel consumption rate, average fuel consumption rate and the range you can drive on the remaining fuel, press the INFO button, then select and the information screen will be displayed. FUEL CONS displays instantaneous fuel consumption. AVG CONS-A or -B displays average fuel consumption. RANGE displays the distance you can drive on the fuel in your tank.
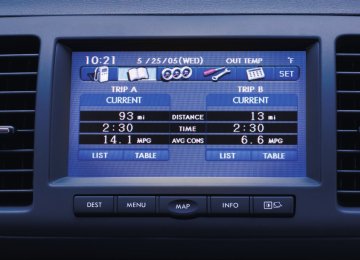
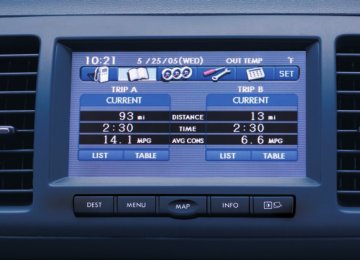
Driving To display the driving record data, press the INFO button, then select . This screen displays your current driving information including distance, time, and average fuel consumption.
199381_10a_LegOutback_Monitor_ORG_050509.indd 3-4
5/6/09 11:12:38 AM
Displaying vehicle information screen
Displaying vehicle information screen
three meters To display the three meters showing the average fuel consumption, current fuel consumption rate and throttle opening percentage (ACCEL), press the INFO button . AVG-A tells you your average fuel and select consumption, FUEL CONS displays immediate fuel consumption, and ACCEL displays the accelerator’s opening angle.
maintenance scheDule information This function monitors maintenance, battery, tire pressure and timing belt. You can schedule checks by time and distance intervals. To access the maintenance schedule, press the INFO button. Then select which function you’d like to schedule.
. Select
calculator To use the calculator, press the INFO button, then select
. Now the screen can be used as a calculator by
touching the screen.
to enter your chosen maintenance schedule
. YES will appear on the screen.
Select date. Select Select it if the date is correct. Then press and press to enter maintenance schedule distance. , and YES will appear; select it if the Select distance is correct. When the maintenance time comes, the monitor will remind you of the date by a message on the screen one month before, one week before or on the day maintenance is due.
199381_10a_LegOutback_Monitor_ORG_050509.indd 5-6
5/6/09 11:12:49 AM
Other settings
Selecting or deselecting BEEP turns the beep sound on or off. You can program the monitor system for other display items and answer back beeps that let you know the door is locking. To use, press the INFO button and then select SET . The screen for mode of function will be displayed. Selecting or deselecting CLOCK turns the time on or off the screen. Selecting or deselecting OUT TEMP turns the outside temperature display on the screen on or off.
Keyless entry To program the Keyless Entry system, press the INFO button, then select SET
locK signal The LOCK SIGNAL notifies you that the door is locking or unlocking by flashing the hazard warning lights. Select or deselect the BACK ANSWER key to activate or deactivate this function.
Other settings
roomlamP (interior light) Roomlamp allows you to choose the delay time before the interior light turns off when the doors are unlocked using the keyless entry system transmitter, or when the doors are closed. Defogger Defogger can be programmed for two operation modes: continuous and 15-minute. When the continuous operation mode is programmed, the rear window defogger will operate for 15 minutes, stop for 2 minutes, and operate again for 15 minutes, and so on. In the 15-minute mode, the defogger will automatically shut off after 15 minutes. You can shut if off before that time if you press the rear window defogger switch again. Deicer Deicer can be programmed for the same two operation modes: continuous and 15-minute. In continuous operation mode, when the windshield wiper deicer is pressed, the deicer will continue to function. In the 15-minute mode, the windshield wiper deicer will automatically shut off after about 15 minutes. Pressing the switch again will shut if off before that time.
touch To adjust the TOUCH PANEL sensing positions, press the INFO button, then select RESET , and the button. Then touch the center of the lower
left crossmark
199381_10a_LegOutback_Monitor_ORG_050509.indd 7-8
5/6/09 11:13:02 AM
For complete information on your Multi-Information Display, please consult your Owner’s Manual.
REAR SEAT ENTERTAINMENT SYSTEM USER GUIDE
The specifications, constructional data and illustrations contained in this publication are not binding. We reserve the right to make alterations without prior
notification.
General information . . . . . . . . . . . . . . . . . . . . . . . . . . . . . . . . . . . . . . . . . . . . . . . . . . . . . . . . . . . . . . . . . . . . . 3
Before using the system . . . . . . . . . . . . . . . . . . . . . . . . . . . . . . . . . . . . . .. . . . . . . . . . . . . . . . . . . . . . . . . . . . . . . . . . 3
System overview . . . . . . . . . . . . . . . . . . . . . . . . . . . . . . . . . . . . . . . . . . . . . . . . . . . . . . . . . . . . . . . . . . . . . . . . 4
Kit contents . . . . . . . . . . . . . . . . . . . . . . . . . . . . . . . . . . . . . . . . . . . . . . . . . . . . . . . . . . . . . . . . . . . . . . . . . . . . . . . . . 4 Main features . . . . . . . . . . . . . . . . . . . . . . . . . . . . . . . . . . . . . . . . . . . . . . . . . . . . . . . . . . . . . . . . . . . . . . . . . . . . . . . . 4 Technical specifications . . . . . . . . . . . . . . . . . . . . . . . . . . . . . . . . . . . . . . . . . . . . . . . . . . . . . . . . . . . . . . . . . . . . . . . . 5
Quick guide . . . . . . . . . . . . . . . . . . . . . . . . . . . . . . . . . . . . . . . . . . . . . . . . . . . . . . . . . . . . . . . . . . . . . . . . . . . . 6
Playing a DVD movie . . . . . . . . . . . . . . . . . . . . . . . . . . . . . . . . . . . . . . . . . . . . . . . . . . . . . . . . . . . . . . . . . . . . . . . . . 6 Using the wireless headphones . . . . . . . . . . . . . . . . . . . . . . . . . . . . . . . . . . . . . . . . . . . . . . . . . . . . . . . . . . . . . . . . . Playing audio/video via game port inputs . . . . . . . . . . . . . . . . . . . . . . . . . . . . . . . . . . . . . . . . . . . . . . . . . . . . . . . . . .
Buttons on the front panel . . . . . . . . . . . . . . . . . . . . . . . . . . . . . . . . . . . . . . . . . . . . . . . . . . . . . . . . . . . . . . 7
Controls and connectors . . . . . . . . . . . . . . . . . . . . . . . . . . . . . . . . . . . . . . . . . . . . . . . . . . . . . . . . . . . . . . . . . . . . . . .
Remote control . . . . . . . . . . . . . . . . . . . . . . . . . . . . . . . . . . . . . . . . . . . . . . . . . . . . . . . . . . . . . . . . . . . . . . . . . 9
Buttons and functions . . . . . . . . . . . . . . . . . . . . . . . . . . . . . . . . . . . . . . . . . . . . . . . . . . . . . . . . . . . . . . . . . . . . . . . . . 9
DISPLAY . . . . . . . . . . . . . . . . . . . . . . . . . . . . . . . . . . . . . . . . . . . . . . . . . . . . . . . . . . . . . . . . . . . . . . . . . . . . . 11
Using the display . . . . . . . . . . . . . . . . . . . . . . . . . . . . . . . . . . . . . . . . . . . . . . . . . . . . . . . . . . . . . . . . . . . . . . . . . . . . 11 Settings for display screen . . . . . . . . . . . . . . . . . . . . . . . . . . . . . . . . . . . . . . . . . . . . . . . . . . . . . . . . . . . . . . . . . . . . 11 12 DISPLAY MENU . . . . . . . . . . . . . . . . . . . . . . . . . . . . . . . . . . . . . . . . . . . . . . . . . . . . . . . . . . . . . . . . . . . . . . . . . . . . Audio control menu . . . . . . . . . . . . . . . . . . . . . . . . . . . . . . . . . . . . . . . . . . . . . . . . . . . . . . . . . . . . . . . . . . . . . . . . 13 Language menu . . . . . . . . . . . . . . . . . . . . . . . . . . . . . . . . . . . . . . . . . . . . . . . . . . . . . . . . . . . . . . . . . . . . . . . . . . . . 13
DVD player
. . . . . . . . . . . . . . . . . . . . . . . . . . . . . . . . . . . . . . . . . . . . . . . . . . . . . . . . . . . . . . . . . . . . . . . . . . 14
Use the DVD player. . . . . . . . . . . . . . . . . . . . . . . . . . . . . . . . . . . . . . . . . . . . . . . . . . . . . . . . . . . . . . . . . . . . . . . . . . 14 Settings for the DVD player . . . . . . . . . . . . . . . . . . . . . . . . . . . . . . . . . . . . . . . . . . . . . . . . . . . . . . . . . . . . . . . . . . . . 14 General Setup . . . . . . . . . . . . . . . . . . . . . . . . . . . . . . . . . . . . . . . . . . . . . . . . . . . . . . . . . . . . . . . . . . . . . . . . . . . . . 15 Audio Setup . . . . . . . . . . . . . . . . . . . . . . . . . . . . . . . . . . . . . . . . . . . . . . . . . . . . . . . . . . . . . . . . . . . . . . . . . . . . . . . 16 Preference . . . . . . . . . . . . . . . . . . . . . . . . . . . . . . . . . . . . . . . . . . . . . . . . . . . . . . . . . . . . . . . . . . . . . . . . . . . . . . . . 17 Password Setup . . . . . . . . . . . . . . . . . . . . . . . . . . . . . . . . . . . . . . . . . . . . . . . . . . . . . . . . . . . . . . . . . . . . . . . . . . . . . 18
Handling DVDs . . . . . . . . . . . . . . . . . . . . . . . . . . . . . . . . . . . . . . . . . . . . . . . . . . . . . . . . . . . . . . . . . . . . . . . . 19
Tip . . . . . . . . . . . . . . . . . . . . . . . . . . . . . . . . . . . . . . . . . . . . . . . . . . . . . . . . . . . . . . . . . . . . . . . . . . . . . . . . . . . . . . .
19
Icon display . . . . . . . . . . . . . . . . . . . . . . . . . . . . . . . . . . . . . . . . . . . . . . . . . . . . . . . . . . . . . . . . . . . . . . . . . . . 20
Meaning of the icons . . . . . . . . . . . . . . . . . . . . . . . . . . . . . . . . . . . . . . . . . . . . . . . . . . . . . . . . . . . . . . . . . . . . . . . . . . 20
Troubleshooting . . . . . . . . . . . . . . . . . . . . . . . . . . . . . . . . . . . . . . . . . . . . . . . . . . . . . . . . . . . . . . . . . . . . . . . 21
Troubleshooting . . . . . . . . . . . . . . . . . . . . . . . . . . . . . . . . . . . . . . . . . . . . . . . . . . . . . . . . . . . . . . . . . . . . . . . . . . . . . 21
Default Settings . . . . . . . . . . . . . . . . . . . . . . . . . . . . . . . . . . . . . . . . . . . . . . . . . . . . . . . . . . . . . . . . . . . . . . . 24
Default Settings . . . . . . . . . . . . . . . . . . . . . . . . . . . . . . . . . . . . . . . . . . . . . . . . . . . . . . . . . . . . . . . . . . . . . . . . . . . . . 24
Before using the system
Note!
• Read through this user manual
carefully before using the device. • Save the user manual for future
reference.
• Follow the instructions in the manual
carefully when using the device.
• Never use the entertainment system in a way that interferes with driving.
Rear Seat Entertainment system EN
General information
Caution!
• Damage caused by unauthorized • Do not recline/move the front seat so repairs or upgrades may void your that it collides with the roof of the car. warranty.
• Do not use chemical solutions, • Do not recline/move the front seat so
cleaning agents or corrosive agents that it collides with child seats. to remove dirt from the display screen. This can cause permanent damage to the screen surface. We recommend using a soft damp lens cleaning cloth to remove dirt or nger prints.
• Do not touch or push the display
screen when using the device.
• Excess force can cause permanent
damage to the display screen.
• Lock the display screen in the closed
position when not in use.
• Do not use DVD or CD disks with
adhesive labels. These labels can come off inside the unit and cause damage.
EN Rear Seat Entertainment system
System overview
Kit contents • 2 head restraints with screens including
DVD player
• 1 remote control • 2 two-channel wireless IR headsets • 6 x AAA batteries (4 for headsets and
2 for the remote control)
• 2 adapter cables for the audio/video
input
• 2 x 3.5 mm extension cables Optional accessories • Additional dual channel wireless IR
Headphones (Part Number H001SAJ330)
Main features • 7" TFT-LCD-screen with head restraint • Built-in DVD player with support for DVD, VCD, AUDIO CD-R/RW and MP3 CD. • Built-in Wireless Headphone IR Transmitter • 1 Audio/Video Input in each headrest • Full function wireless remote control • OSD (On Screen Display). Graphic menu used to adjust picture quality, image, and clarity. • Integrated with the vehicle's audio system.
Audio can be output through the vehicle's speakers. • Primary function controls integrated to front bezel.
Technical specifications
Display Resolution Dot pitch Viewing angle Brightness Contrast ratio Power
Power consumption Panel dimensions Built-in temperature control system
Rear Seat Entertainment system EN
System overview
7.0" widescreen, TFT LED active matrix 800 (W) x 480 (H) x 3 (R.G.B.) 0.0635 (W) x 0.1905 (H) mm 50°/70°/70°/70° (from above/below/left/right) 450 cd/m² 500:1 12V DC (negative ground) Active (DVD being played): approx. 20W Max (start-up and insertion of disc): approx. 32W 165 x 5.5 x 104 mm (W x D x H) If temperature is greater than +175℉ (+80℃), system will power down.
Note!
Temperature control system monitors the temperature of the circuit board inside the device and not the ambient temperature outside in the passenger compartment.
EN Rear Seat Entertainment system
Quick guide
Playing a DVD movie
– Activate the entertainment system by
pressing the switch (1) on the front panel and inserting a DVD (2).
Using the wireless headphones
– Activate the wireless headsets with the
power switch (1).
– Select CH A if sitting behind the right seat or CH B if sitting behind the left seat (2).
– Adjust the volume (3). Battery Replacement
Playing audio/video via game port inputs
– Connect the device you want to use via
the mini-jack/TRCA wiring (1).
– Insert the mini-jack cable into the port
underneath the front panel (2).
– Activate the entertainment system by pressing the power switch (3) on the front panel.
– Then press the S button for signal source (4) on the front panel until "AUX-AUDIO/VIDEO INPUT" appears at the top left corner of the screen.
Rear Seat Entertainment system EN
Buttons on the front panel
Controls and connectors
1 POWER CONTROL
Switches the screen on/off.
2 Title
Press to return to the DVD root menu.
3 Play/Pause
Play/pause playback of the disc.
4 STOP
Stops disc playback. • Press the Stop button twice and
then Play to play the disc from the beginning.
• Press the Stop button and then
Play to resume playing from the last stopped place.
5 Signal source
Switches between signal sources DVD, LEFT INPUT/RIGHT INPUT and AUX AUDIO/VIDEO INPUT. If LEFT INPUT/RIGHT INPUT is selected as signal source for one screen, the screen menus, display and audio will be controlled by the other screen and remote control.
7 IR transmitter
9 Navigation buttons
Opens the main menu.
6 Menu
Transfers audio to the wireless headsets. 8 IR sensor
Receives infrared signals from the remote control.
Press to navigate Rewind/Fast-forward/
Next/Previous tracks and make
selections in DVD title menus. In DVD
or screen menus they are used to adjust
and select options.
Press to confirm menu options
10 OK button
EN Rear Seat Entertainment system
Buttons on the front panel
11 Headset socket
3.5 mm standard socket for headsets.
12 Eject
When the power is on, eject the disc by pressing the eject button next to the DVD slot.
13 A/V input
3.5 mm audio/video input jack. Use with supplied adapter cable.
14 DVD slot
Buttons and functions
Rear Seat Entertainment system EN
Remote control
1 LEFT/RIGHT
8 Navigation buttons
Press to select and control the screen on the left or right side. 2 POWER CONTROL
Moves the option or cursor to the left/right/up/down.
9 OK
Press to power the selected screen on or Press to confirm selection. off. 10 Back
3 Signal source
Switch between the different signal sources (DVD, LEFT INPUT/RIGHT INPUT and AUX AUDIO/VIDEO INPUT) for the selected screen by pressing the S button several times.
4 AUDIO
Search backwards.
11 Forward
Search forward.
12 ZOOM
Zooms in or out of the image. Use the navigation buttons to pan in the zoomed image.
Hold for 1 sec. to enable/disable RSE audio output to the vehicle’s audio system.
13 REPEAT
5 MUTE
Press once to mute the audio. Press again to restore the audio at the previous volume level. 6 VOLUME +/-
Increases or reduces the audio level.
7 MENU
Opens the main menu. Activates the DVD player’s menu.
Repeat playback of different parts of a DVD, CD or MP3 (track/chapter/option).
14 DISC MENU
Switches between available subtexts during playback of VCD 2.0. Path to DVD title option menu.
15 SUBTITLE
Switches between the subtext languages if applicable.
EN Rear Seat Entertainment system
Remote control
16 A-B
Gives the option to repeat playback of a DVD or CD from point A to point B. Set point A by pressing once, press again to set point B. Press again to clear set points.
17 Number buttons
Direct access to CD track, DVD chapter and used when setting password.
18 DISPLAY
19 TITLE
Shows current media information.
On certain DVDs it is possible to select title. Select desired title with this button.
Return to previous chapter or track.
21 Next track
Goes to next chapter or track.
22 Play/Pause
Starts playback or starts a function. Pauses playback when button is pressed again.
23 STOP
Stops playback.
10
20 Previous track
Battery Replacement
Using the display 1 It is possible to set the display to a
comfortable viewing angle to prevent glare or bright light by tilting the screen.
2 Press the power button on the front panel
or on the remote control to turn the display screen on.
Note!
If the backlight flashes three times and then goes out and the device does not start, the vehicle’s battery voltage is too low.
3 Press the S button to select signal
source. Choose one of the following options: • DVD uses the device’s DVD player • LEFT INPUT/RIGHT INPUT
uses the corresponding device’s DVD player or AUX AUDIO/VIDEO INPUT. If there is no signal from the corresponding DVD player, "NO DISC" appears.
Rear Seat Entertainment system EN
DISPLAY
• AUX AUDIO/VIDEO INPUT uses
the connected AUX input.
Settings for display screen
To change display screen settings, open the main menu by pressing the MENU button on the remote control or the MENU button on the front panel.
Settings for brightness, contrast, color and audio etc are made in the DISPLAY MENU.
11
DIMMER MODE
Select between
Dark mode/Normal mode/ Bright mode
DISPLAY MODE
Select FULL SCREEN or 4 : 3 aspect ratio
WIRE VOLUME
Regulates the volume in the wired headsets.
IR POWER CONTROL
Switches the IR transmitter on and off for the wireless headsets.
EN Rear Seat Entertainment system
DISPLAY
Change settings
DISPLAY MENU
Press the navigation buttons on either the remote control or front panel to select the setting you want to change. Use the left/right button to reduce or increase the value for the selected option. If you do not press a button within 7 seconds, the display screen returns to the normal display mode.
BRIGHTNESS
Adjusts the strength of the background lighting.
CONTRAST
Adjusts the contrast.
COLOR
Adjusts the balance between blue, yellow and red.
TINT
Adjusts the intensity of blue, yellow and red.
12
AUDIO (A.I.I.) CONTROL
Rear Seat Entertainment system EN
DISPLAY
LANGUAGE
This setting allows you to decide which
If MUTE (AUDIO OFF) is activated,
Select preferred language for display
DVD player’s audio will be output to
appears on-screen.
menus. English, French, and German
are available.
RESET TO FACTORY SETTINGS
Resets the display screen to factory settings.
the vehicle’s audio system. When both
display screens are switched on, the
default setting is "ON" on the Right side
and “OFF” on the Left side.
If one of the monitor is changed to "ON",
the audio from this monitor is output to
the vehicle’s audio system and the other
monitor automatically switches to "OFF".
When a device is plugged into the vehicle's
AUX input jack in the center console, the
icon appears on the RSE screen and
the Aii output is disabled. When the device
is unplugged, the icon appears and
audio can be output to the vehicle's audio
system.
13
EN Rear Seat Entertainment system
DVD player
Using the DVD player.
Note!
"INCORRECT REGION" appears on-screen if the disc’s region code is not correct.
4 Press the Pause button to pause playback, press once to continue playback.
5 Press the Stop button to stop playback.
Note!
Read this entire chapter before using the DVD player.
The DVD player can play DVD, VCD, audio CD-R/RW and MP3 CD.
Regional coding
Both the DVD player and DVD disc are coded by region. These regional codes must match in order for the disc to play. If the codes do not match, the disc will not play. To change the regional code, please consult your Subaru retailer.
To play a DVD or VCD 1 Press the S button until "DVD" appears. 2 Insert DVD or VCD disc (Label Up), the
disc will automatically load.
3 Press the PLAY button to start playback
of the selected title.
14
Settings for the DVD player To change the settings on the DVD player, press the MENU button on the remote control or the MENU button on the front panel to open the main menu, and then select sub menu "DVD SETUP". In the DVD menu you can make basic settings, adjust the image quality and select different outputs. It is also possible to select language for the text on-screen and the settings menu and restrict playback for children. The icons on the top row symbolize the pages on which settings for the DVD player can be made: • General Setup Page • Audio Setup Page • Preference Page • Password Setup Page
Rear Seat Entertainment system EN
DVD player
Change settings Select the page you want by moving the cursor using the navigation buttons. Press OK to confirm the choice. Press left button repeatedly as necessary to select different settings page. Exit settings and menu by pressing the MENU button again.
General Setup Page
TV display
– Select display settings from the
following options: • Normal/PS (Pan and Scan)
This displays the wide picture on the screen with a portion of the left & right sides removed.
• Normal/LB (Letter-Box)
This display the wide picture with black bands on the upper and lower portions of the screen.
• Wide (16:9)
Widescreen in 16:9 format is shown here. This is a recommended setting.
– Confirm the choice by pressing OK. Angle Mark
When the Angle Mark function is selected,
an icon appears indicating whether a
DVD has double tracks (e.g. commentary
track). Press OK to select this track.
15
Audio Setup Page
– Select loudspeaker and audio settings.
EN Rear Seat Entertainment system
DVD player
Language for the DVD menu (OSD Lang)
Press any button to return to the previous image.
LAST MEMORY
If this function is selected, the DVD that is
playing when the unit is powered off will
resume playback from the same point when power is restored.
– Select the language for this menu
under OSD Lang. Available languages are English, French and German.
– Confirm the choice by pressing OK. Closed Caption
Special function for the hearing impaired where certain audio effects are described with text when Closed Caption is selected.
Screen Saver A screen saver appears when the device is on but no functions are used for 3 minutes.
16
Preference Page
Note!
The menu options Disc Menu, Audio, and Subtitle are not available in this system. Preference page cannot be accessed when a disc is loaded.
TV standard (TV type)
– Select which TV standard the DVD player is to use, available formats are NTSC, PAL and Multi/AUTO. (Multi/AUTO means that the video signal follows the format that is coded on the DVD you are watching.)
– Confirm the choice by pressing OK.
Rear Seat Entertainment system EN
DVD player
Parental control
The Parental Control system has settings to allow you to block access to movies that are encoded with a movie content rating. The movie rating system is operated by the Motion Picture Association of America. – Select setting:
1 KID SAFE (children) 2 G
3 PG
4 PG 13
5 PGR
6 R
7 NC-17 8 ADULT
Note!
The lower the value, the more strict the limitation – Confirm your choice by pressing OK. – Enter the password (6 digits) using the
number buttons, and then press OK.
Note!
The default password is 136900.
17
EN Rear Seat Entertainment system
DVD player
Password Setup Page
Password Mode
When this function is selected, DVD films that are coded with a content classification will be password protected.
Password settings, parental control (password)
– To change the password for parental
control: Enter the old password or the preset password (6 digits) at Old Password. – Enter a new password (6 digits) with
the number buttons at New Password. – Confirm the new password by entering the same password again at Confirm PWD.
– Then navigate to the OK button and press OK to activate the password.
Default values
– Select Default to reset all settings on
the DVD player to default settings.
– Press OK to perform the reset.
Note!
This function does not affect the setting for parental control.
18
Rear Seat Entertainment system EN
Tip Avoid grasping the side of the disc that contains information.
If there are spots on the disc, wipe it carefully using a damp cloth and then with a dry cloth. When a disc is taken from a cold to hot environment condensation can build up on the surface of the disc. If so, wipe dry using a soft, dry cloth before use.
Caution!
Do not write on the unlabeled side.
Note! • Do not use detergents, phenyl, chemical solutions, dispersing solutions, anti-static electricity solutions, or any other kind of solutions to clean a disc.
• Do not attach labels or glue-based
notes on the disk. Do not use discs with any remaining glue or damaged, sticky labels.
• Do not use scratch-preventing
materials or covers.
• Do not place or store discs in the
following environments: – Direct sunlight
– Damp or dusty locations.
– At hot air outlets or other heat
sources.
Handling DVDs
19
EN Rear Seat Entertainment system
Icon display
Icon Display
Aii On
Aii Off
Aii Box Connected
Aii Box Disconnected
Aii Aux Plug Inserted
Aii Aux Plug Removed
Wrong Side Remote Icon
Mute On/ Off
20
Meaning of the icon
The A.I.I function is turned on, and audio output from the selected monitor is started.
The A.I.I function is turned off, and audio output from the selected monitor is halted.
Indicates that the Aii Box has been connected (not seen in normal operation). Indicates that the Aii Box has been disconnected (not seen in normal operation).
Activates a switch in the Aii module whenever a plug is inserted into the vehicle's AUX input jack. Activates a switch in the Aii module whenever a plug is removed from the vehicle's AUX input jack.
Wrong side remote icon is shown if remote is set to one monitor (Left/Right) but pointed at the other when remote buttons are pressed. Mute On icon will display when there is no sound output. Mute Off icon will display when mute is turned off.
"NO SIGNAL" will display in the event of video signal loss. If the PCB voltage is in the range of 10.3 to 9.1v, a three minute countdown is displayed. After the countdown above reached 1 minute, a one minute countdown is displayed in red.