- Download PDF Manual
-
“Are you sure you want to delete this device?” appears on the screen. Touch
(Yes) or
(No).
Yes
No
• After touching “Yes”, when the deletion is complete,
“Completed” appears.
• The cell phone deletion is complete.
NOTE When a cell phone registration is deleted, the outgoing call history, incoming call history and phone book data that are saved in the unit are also deleted.
2 Touch
Connection
(Connection).
46 Introduction
3 Select the cell phone that you want to connect.
• The Bluetooth mark is displayed for cell phones with an active
Bluetooth connection.
Bluetooth mark
NOTE • If the connection fails, “Connection failed” appears on the screen. If this
happens, perform the connection operation again.
Before Use
• Connection is not possible if no cell phones are registered. • On the Connect Phone screen, touch
Add New
(Add New) to register a cell
phone.
• When processing a Bluetooth connection, the Bluetooth Audio may skip.
■ Canceling a cell phone connection 1 On the handsfree screen, touch
Settings
(Settings).
Connect
4 Touch 5 When the connection is complete, “Connection
(Connect).
Completed” appears. • The connection between the cell phone and the unit is
complete. The Bluetooth signal icon, battery level indicator, roaming area icon (only when in a roaming area) and reception indicator appear on the screen.
2 Touch
Connection
(Connection).
Introduction 47
Before Use
3 Select the cell phone with the connection that you want
■ Making a call
to cancel.
WARNING
Do not make a call while driving. Be sure to park the vehicle in a safe location and apply the parking brake before making a call.
You can make calls from the unit by entering a telephone number, using a stored number (phone book or Speed Dial), or calling from the incoming (missed call) or outgoing call history.
Making a call by entering a telephone number 1 On the handsfree screen, touch
and
through
Yes
to enter the telephone number.
• You can enter telephone numbers of up to 24 digits. • Touch
to delete 1 digit from the entered number. Touch
for 1 second or more to delete the digits continuously.
4 Touch
Disconnect
(Disconnect).
•
“Another device is already connected. Do you want to disconnect this device?” appears on the screen. Touch (Yes) or
(No).
No
5 After touching
Yes
(Yes), when the cancelation is
complete, “Connection with the mobile telephone was disconnect.” appears. • The cancelation of the cell phone connection is complete. The Bluetooth signal icon, battery level indicator, roaming area icon (only when in a roaming area) and reception indicator disappear from the screen.
NOTE On the Connect Phone screen, touch phone.
Add New
(Add New) to register a cell
48 Introduction
2 After entering the telephone number, touch • A call is made to the entered telephone number.
2 To call from the incoming call history, touch
Before Use
Incoming Calls call history, touch
(Incoming Calls). To call from the outgoing
Outgoing Calls
(Outgoing Calls).
Calling from call history 1 On the handsfree screen, touch
Contacts
(Contacts).
3 Select the name or telephone number to call from the
history. • Touch
or
to scroll the history list.
Introduction 49
Before Use
4 Touch
• A call is made to the telephone number that you selected from
the history.
Calling from the phone book 1 On the handsfree screen, touch
Contacts
(Contacts).
• Touch
Add to Speed Dial
(Add to Speed Dial) to register the
displayed history item in “Speed Dial”. (See Page 62.)
NOTE The incoming and outgoing call histories can each store 10 calls for each registered cell phone. In the incoming call history, 5 missed calls and 5 other calls can be stored. When 10 calls are stored (5 missed incoming calls and 5 other calls), the oldest call is deleted from the history at the next call.
2 Touch
Phone book
(Phone book).
50 Introduction
3 Select a person (name or telephone number) to call. on the scroll function to scroll the List
• Touch
or
Page of names or telephone numbers.
• Touch
or
on the index function to display in the list
the names or telephone numbers that start with the selected letter or number.
• Touch
Data Transfer
(Data Transfer) to transfer the cell phone's
phone book to the unit. (See Page 59.)
• Touch
Delete All
(Delete All) to delete all the list data in the
•
phone book. If 2 or more telephone numbers are registered for the selected person (name or telephone number), the telephone number selection screen appears. Touch the telephone number that you want to call.
Before Use
4 Touch
• A call is made to the selected person's telephone number.
• Touch
Add to Speed Dial
(Add to Speed Dial) to register the
displayed item in “Speed Dial”. (See Page 62.)
• Touch
Delete phone book.
(Delete) to delete the displayed item from each
Introduction 51
Before Use
Calling from Speed Dial 1 On the handsfree screen, touch
Contacts
(Contacts).
3 Select a person (name or telephone number) to call. to scroll the List Page of names or
• Touch
or
telephone numbers.
2 Touch
Speed Dial
(Speed Dial).
• Touch
Delete All
(Delete All) to delete all the list data in the
Speed Dial.
4 Touch
• A call is made to the selected person's telephone number.
52 Introduction
• Touch
Delete
(Delete) to delete the displayed “Speed Dial”
item.
NOTE For details on “Speed Dial” registration, see “Registering a Speed Dial number” on Page 62.
■ Receiving a call You can receive incoming calls when any source mode is selected. When a call arrives, the Incoming call screen appears automatically. 1 When you hear the ringtone, touch
• You are connected and able to talk. • Touch
to hang up and refuse the incoming call.
Before Use
■ Operations during a call During a call, the outgoing call or incoming call Talking screen is displayed, and you can perform the following operations. • Adjust the volume for phone calls • End the call • Enter numeric keys • Perform call waiting
NOTE You can also receiving calls automatically. See “Auto Answer setting” on Page 57.
Introduction 53
Before Use
Adjust the volume for phone calls 1 On the Talking screen, touch 2 Adjust by touching
or
Mic Level
(Mic Level).
•
Call volume up
Call volume down
• Touch
for 1 second or more to raise the volume
handsfree mode)
Transferring a call (private mode When using a Bluetooth cell phone, you can transfer calls between the unit and the cell phone. The call is switched from a handsfree call to a cell phone call, or from a cell phone call to a handsfree call. Operating with the screen 1 Touch • Touch
(Transfer). (Transfer) again to switch to a handsfree call.
Transfer Transfer
continuously. Touch continuously.
for 1 second or more to lower the volume
Operating with the cell phone You can transfer calls while making a call, while talking, while receiving a call, and while a call is on hold. • Switch from a cell phone call to a handsfree call to enable touch
button operations.
• The transfer method and operations vary depending on the type of
cell phone. For details of operations on the cell phone, see the instruction manual that is supplied with the cell phone.
54 Introduction
NOTE • Calls cannot be transferred while driving. • If a call is transferred on the screen, the transfer may fail and cut off the sound
of the call.
Ending a call On the Talking screen, touch call by hanging up the cell phone .When a call ends, the handsfree screen disappears.
to end the call. You can also end the
Entering numeric keys On the Talking screen for outgoing calls, touch display the Dial Tone screen and enable numeric key input.
Dial Tone
(Dial Tone) to
•
(Send):
Send Send a dial tone that has already been registered in the phone book. Exit Skip the tones.
(Exit):
Before Use
Call waiting If a call arrives from another phone while you are already talking, you can put the current call on temporary hold by using the Talking screen and receive the new incoming call. 1 When you hear the ringtone, touch
on the Talking
screen. • You can put the current call on hold and connect to the new
call.
• To end call waiting, touch
. When call waiting ends, the phone connects to the call that was put on hold and you can continue the previous call. • During call waiting, touch
again to switch between the
callers.
NOTE If a call waiting contract has not been setup for the cell phone itself, you cannot use the call waiting function.
Introduction 55
Before Use Setting and Editing Bluetooth Handsfree
WARNING
Do not set or edit cell phones while driving. Be sure to park the vehicle in a safe location before performing setting or editing operations.
2 On the phone Settings screen, you can perform the
following settings by touching the setting buttons for each item.
■ Handsfree settings You can perform settings for handsfree operation on the phone Settings screen. You can perform settings individually for each registered cell phone. For details on switching the cell phone, see “Connecting a cell phone” on Page 46. 1 On the handsfree screen, touch
(Settings).
Settings
56 Introduction
Item Handsfree Bluetooth Auto Answer Auto Connect
Function Set the handsfree function to on or off. Set the Bluetooth function to on or off. Set automatic call acceptance. Set automatic connection between a registered cell phone and the unit.
Item Auto Phonebook Transfer Initialize
Connection
Volume Settings
Function Automatically transfer the phone book to the unit when a cell phone is registered. Return the settings displayed on the phone Settings screen to their initial values. Display the Connect Phone screen to register a cell phone or perform connection settings. (See Page 46.) Display the Volume Settings screen to perform settings for the ringtone or call volume.
Handsfree setting Set the handsfree function to on or off. • When handsfree is set to “Off”, you cannot be sent a telephone
On
Off
(Off).
(On) or
number from a this unit. 1 Touch Bluetooth setting Set the Bluetooth function to on or off. 1 Touch Auto Answer setting Start the call automatically 5 seconds after the arrival of an incoming call. 1 Touch
(On) or
(On) or
(Off).
(Off).
Off
Off
On
On
Before Use
On
Off
(Off).
(On) or
Auto Connect setting Set automatic connection between a registered cell phone and the unit. 1 Touch Auto Phonebook Transfer setting Automatically transfer the phone book to the unit when a cell phone is registered. 1 Touch Setting initialization Touch Answer”, “Auto Connect” and “Auto Phonebook Transfer” settings to their initial values.
(Initialize) to return the “Handsfree”, “Bluetooth”, “Auto
(On) or
Initialize
(Off).
Off
On
Introduction 57
Before Use
■ Volume setting (handsfree) You can set the handsfree volume on the Volume Settings screen. You can perform settings individually for each registered cell phone. For details on switching the cell phone, see “Connecting a cell phone” on Page 46.
CAUTION
Be sure to set the volume of the audio at an appropriate level. Improper volume setting may result in hearing damage or a traffic accident.
58 Introduction
Call Volume setting You can adjust the call volume. 1 Adjust by touching
or
•
Call volume up
Call volume down
• Touch
for 1 second or more to raise the volume
continuously. Touch continuously.
for 1 second or more to lower the volume
Ring Tone Volume setting You can adjust the volume of the ringtone. 1 Adjust by touching
or
•
Ringtone volume up
Ringtone volume down
• Touch
for 1 second or more to raise the volume
continuously. Touch continuously.
for 1 second or more to lower the volume
Ring Tone Type setting You can set the ringtone. 1 Touch
or
• Tone 1 (cid:81) Tone 2 (cid:81) Tone 3 (cid:81) Tone 1 (cid:81) ...
2 Touch
Phone book
(Phone book).
Before Use
Initializing the settings Touch their initial values.
Initialize
(Initialize) to return the sound settings (handsfree) to
■ Editing the phone book You can register telephone numbers in the phone book of the unit by transferring the phone book that is registered in the cell phone.
Transferring the phone book data from a cell phone You can transfer the telephone numbers (phone book data) that are registered in the cell phone to the unit. In the phone book of this unit, you can register up to 4 telephone numbers for each person in each registered cell phone, and you can register data for up to 1000 persons. 1 On the handsfree screen, touch
(Contacts).
Contacts
Data Transfer
3 Touch 4 When the phone book transfer screen appears, operate
(Data Transfer).
the cell phone to transfer the phone book data. • Perform the transfer operation on the cell phone while the
phone book transfer screen is displayed.
• When the transfer is in progress, wait until the transfer
completed message appears.
• When the transfer is complete, the transfer completed message
appears.
Introduction 59
Before Use
NOTE • Start the engine to prevent the battery from running out during transfer. • This function cannot be used with cell phones that do not support PBAP
(Phone Book Access Profile) or OPP (Object Push Profile).
• Some cell phones are not able to transfer the phone book data. • The method of transferring the phone book data from the cell phone varies
depending on the cell phone. For details, see the cell phone's instruction manual.
• When transferring the phone book data, the following restrictions apply to
the data items. - If 5 or more telephone numbers are registered for 1 person in the phone
book of the cell phone, the top 4 telephone numbers are registered in the order "Mobile", "Home", "Work", and "Other". If the 4 entries have not been filled, the number is registered in the highest available slot.
- Names are also transferred at the same time as the telephone numbers, but symbols may not be transferred by some models, and sometimes not all the characters may be transferred. Also, even if the data is transferred, it may not be displayed correctly.
- Normally, a secret memory cannot be read. (Although it may be possible
depending on the specifications of the cell phone.)
- Group names that are registered in the cell phone are not transferred.
60 Introduction
• In models where batch transfer is possible, the following applies when
transferring the phone book data. - The time taken for the transfer depends on the number of telephone
numbers and the size of the phone book data that are transferred. Depending on the data, it may take 30 minutes or longer.
- You can change to another screen even when the phone book data transfer
screen is displayed. If you do this, the transfer of the phone book data continues.
• Operations when phone book data transfer is in progress are dealt with as
follows. - If there is an incoming call during phone book data transfer, one of the
operations is prioritized depending on the circumstances. When the incoming call is prioritized, the incoming call is taken on the cell phone. In this case, perform the transfer operation again after completing the call.
- If the ignition switch is turned to OFF (LOCK) during the phone book data
transfer, the transfer is canceled. If this happens, start the engine and perform the transfer operation again.
• In the following cases, the phone book data that has already been transferred
is saved in the phone book of the unit. - When the transfer ends partway because the memory capacity of the unit is
reached
- When the transfer is canceled due to some reason
• The phone book of the unit cannot be transferred to a cell phone. • During phone book data transfer, the Bluetooth Audio may skip.
Deleting the phone book data You can delete the phone book data by selecting 1 number from a phone book, or by deleting all the phone book data. 1 On the phone book screen, touch the data item that you
want to delete. • Touch
Delete All
(Delete All) to delete all the phone book data.
•
If 2 or more telephone numbers are registered for the selected person (name or telephone number), the telephone number selection screen appears. Touch the telephone number.
2 Touch
Delete
(Delete).
Before Use
3 Touch
Yes
(Yes).
NOTE • When transferring the ownership of your vehicle, initialize your personal data.
(See Page 34.)
• When “Auto Phonebook Transfer” setting is “On”, the phone book data will be automatically transferred if your cell phone is reconnected even after deleting the phone book data.
Introduction 61
Before Use
■ Registering a Speed Dial number You can register telephone numbers from the phone book or call histories as Speed Dial numbers. You can register up to 5 telephone numbers for each cell phone that is registered on the unit.
Registering a Speed Dial number from the phone book 1 On the phone book screen, touch the data item that you
want to register.
2 Touch
Add to Speed Dial
(Add to Speed Dial).
•
If 2 or more telephone numbers are registered for the selected person (name or telephone number), the telephone number selection screen appears. Touch the telephone number that you want to register.
62 Introduction
3 Touch the number in the Speed Dial list where you want
to register the telephone number. •
“Speed Dial Saved.” appears and the Speed Dial registration is complete.
Registering a Speed Dial number from a history 1 On the history screen, touch the data item that you want
to register.
Before Use
NOTE If Speed Dial data already exists for the number, “Are you sure to overwirte the entry?” appears. To overwrite the existing data, touch
(Yes).
Yes
2 Touch
Add to Speed Dial
(Add to Speed Dial).
Introduction 63
Before Use
3 Touch the number in the Speed Dial list where you want
to register the telephone number. •
“Speed Dial Saved.” appears and the Speed Dial registration is complete.
Registering from “Empty” in the Speed Dial list 1 On the Speed Dial screen, touch the “Empty” item where
you want to register the telephone number.
NOTE If Speed Dial data already exists for the number, “Are you sure to overwirte the entry?” appears. To overwrite the existing data, touch
(Yes).
Yes
2 Touch
Yes
(Yes).
64 Introduction
3 In the phone book or a call history, touch the data item
that you want to register. •
If you touch a data item in the phone book that has 2 or more registered telephone numbers, the telephone number selection screen appears. Touch the telephone number that you want to register. “Speed Dial Saved.” appears and the Speed Dial registration is complete.
•
Before Use
■ Displaying Device Details In the Device Details screen, you can display and set information related to the cell phones that are registered in the unit. The following information items are displayed. • Device Name
This is the name of the cell phone that is displayed on the unit and cannot be changed.
• Device Address
This is the unique address of the device and cannot be changed.
• My Phone Number
The telephone number of the cell phone.
• Connection Method
You can select “From Headunit” or “From Device” as the connection method.
Introduction 65
.
Before Use
1 Press 2 Touch Info 3 Touch
If
•
Info is not displayed, touch
Bluetooth
5 Touch the cell phone for which to display the detailed
information.
4 Touch
Registered Devices
(Registered Devices).
6 Touch
Detail
(Detail).
• The Device Details screen appears.
66 Introduction
• Display Portable Player Status
Before Use
You can set whether or not to display the result of connecting via Bluetooth to a portable player when turning the ignition switch from OFF (LOCK) to ACC or ON. 1 Press 2 Touch Info 3 Touch
Info is not displayed, touch
Bluetooth
If
•
■ Displaying Detailed Bluetooth Settings for the unit In the Detailed Bluetooth Settings screen, you can display and set information related to Bluetooth devices that are registered on the unit. The following information items are displayed.
• Device Name
The name of the unit within the Bluetooth network.
• Device Address
The unique address of the device that is registered on the unit.
• Passcode (passkey)
A number for registering the cell phone. You can change this to any number with 4 to 8 digits. (See Page 68.)
• Display Phone Status
You can set whether or not to display the result of connecting via Bluetooth to a cell phone when turning the ignition switch from OFF (LOCK) to ACC or ON.
Introduction 67
Before Use
4 Touch
Detailed Bluetooth Settings
(Detailed Bluetooth
3 Touch
Bluetooth
Settings). • The Detailed Bluetooth Settings screen appears.
4 Touch
Passcode Settings
(Passcode Settings).
■ Changing the passcode (passkey) You can change the passcode (passkey) for cell phone registration to any number with 4 to 8 digits. 1 Press 2 Touch Info
Info is not displayed, touch
If
•
68 Introduction
5 Enter a number by touching 1 digit at a time, and enter a
number with 4 to 8 digits. If you make a mistake, touch to delete 1 digit at a time. • Touch for 1 second or more to delete the digits continuously.
6 Touch
Done
(Done).
Using the messaging function
Before Use
You can read messages that are received on the cell phone or send messages that are created on the unit. 3 message types can be used on this unit: SMS (Short Message Service), MMS (Multimedia Messaging Service) and e-mail. You can also check received messages through audio playback.
NOTE • Compatible Profiles:
- HFP (Hands Free Profile) Ver.1.0 or later (Conformed Ver.1.5) - MAP (Message Access Profile)
• This function cannot be used with cell phones that do not support HFP
(Hands Free Profile) and MAP (Message Access Profile). For details, see the cell phone's instruction manual.
■ Displaying the Messages screen 1 On the handsfree screen, touch
• The Messages screen appears.
Messages
(Messages).
Introduction 69
•
•
•
(Message Transfer):
Message Transfer Start the transfer of messages from the cell phone to update the message list. Settings Use to perform various settings for the messaging function. (See Page 75.)
(Settings):
Return to the handsfree screen.
NOTE You cannot delete the messages that are received. When 50 messages are stored, the oldest messages is deleted from the account list.
■ Checking received messages 1 On the Messages screen, touch the message that you
want to check.
Before Use
Icon for unread data
Account list
• Touch an account list to display the corresponding message list. • Touch • Touch
or to scroll the pages in the message list. to scroll the addresses and title data. During or to return to the beginning of the
after scrolling, touch data.
•
Advance to the message list of the next account.
Return to the message list of the previous account.
70 Introduction
Attached file icon
•
•
•
•
•
Advance to the next message.
Before Use
(Play):
Return to the previous message. Play Perform audio playback of the message. Reply Display the message reply screen.
(Reply):
If there is telephone number data in the address, you can touch
to call the number.
Return to the Messages screen.
• Touch • Touch
or to scroll the pages in the message list. to scroll the addresses and title data. During or to return to the beginning of the
after scrolling, touch data.
NOTE When a file is attached, an icon is displayed in the message details screen. The contents of the attached file are not displayed. Check them with the cell phone.
Introduction 71
Before Use
■ Replying to a message You can select a reply destination from the Messages list and send a message that you created on the unit. 1 On the Messages screen, touch the message to which
you want to reply.
3 Touch the message that you want to use from the Reply
Messages list.
• Touch
or
to scroll the pages of the Reply Messages
2 Touch
Reply
(Reply).
72 Introduction
(Edit):
list. Edit Edit a registered reply message. (See Page 73.) Free Message Create any message and use it as the reply. (See Page 73.)
(Free Message):
Return to the message details screen.
•
•
•
4 Touch
Send
(Send). • The message is sent.
NOTE 18 messages are registered in Reply Messages in the initial setting.
Editing the Reply Messages list You can edit the messages that are registered in the list. 1 On the Reply Messages screen, touch the message that
you want to change.
4 Touch
Done
(Done).
• The message is registered.
Before Use
NOTE You can enter up to 160 single-byte characters in a reply message.
Sending a Free Message You can create any message and use it as the reply. 1 On the Reply Messages screen, touch
Free Message
(Free
Message).
Edit
2 Touch 3 Touch the keyboard and enter any message.
(Edit).
• For details on entering the characters, see “Entering characters”
on Page 74.
Introduction 73
Before Use
2 Enter a message.
• For details on entering the characters, see “Entering characters”
on Page 74.
Entering characters Touch the following buttons to enter characters.
(1)
(2)
(3) (4)
(5)
3 Touch
Send
(Send). • The message is sent.
NOTE You can enter up to 160 single-byte characters in a free message.
74 Introduction
(1)
(2)
(3)
(8)
(7)
(6)
Return to the previous screen.
Move the cursor. (Previous, next, up, down)
Move the cursor. (Top, end)
Delete 1 character. • Touch for 1 second or more to delete the characters
continuously.
(4)
Input buttons
Touch a button to enter the corresponding character.
(5)
(6)
(7)
(8)
Space (Space)
QWE
Switch between upper case and lower case characters.
Scroll the pages. (Only in the 0-9-% character display) Touch to change the characters in the following order: Latin characters, Umlaut, 0-9-%. Latin characters (cid:74) Umlaut (cid:74) 0-9-% (cid:74) Latin characters (cid:74) ... Enter a blank space.
Switch between keyboard layouts. Alphabet layout (cid:74) QWERTY layout (cid:74) Alphabet layout (cid:74) ...
■ Various message settings You can perform message settings on the Message Settings screen. You can perform message settings individually for each registered cell phone. For details on switching the cell phone, see “Connecting a cell phone” on Page 46. 1 On the Messages screen, touch
(Settings).
Settings
2 On the message Settings screen, you can perform the following settings by touching the setting buttons for each item.
Before Use
• Touch
Initialize
(Initialize) to return the settings in the
message Settings screen to their initial values.
Item Auto Message Transfer New Message Pop-up Auto Readout Message Volume Settings
Function Set messages to be transferred automatically. Set a new message pop-up to be displayed. Set messages to be read out automatically. Display the message volume setting screen to set the various volumes.
Auto Message Transfer setting On the handsfree screen, touch messages from the cell phone automatically. 1 Touch
(On) or
Messages
(Off).
Off
On
(Messages) to transfer
Introduction 75
Before Use
New Message Pop-up setting You can set a new message pop-up to be displayed on the screen when a message is received. 1 Touch
(Off).
Off
On
(On) or
•
•
•
(Read):
Read Display the Messages screen.
If there is telephone number data in the address, you can touch
to call the number.
(Ignore):
Ignore Return to the previous screen.
Auto Readout Message setting You can set messages to be played with audio playback when they are received. 1 Touch
(On) or
(Off).
Off
On
76 Introduction
■ Setting the message volumes You can set the various message volumes on the Volume Settings screen. You can perform message settings individually for each registered cell phone. For details on switching the cell phone, see “Connecting a cell phone” on Page 46.
CAUTION
Be sure to set the volume of the audio at an appropriate level. Improper volume setting may result in hearing damage or a traffic accident. 1 On the message Settings screen, touch
Volume Settings
(Volume Settings).
2 You can perform the following settings by touching the
setting buttons for each item.
• Touch
Initialize
(Initialize) to return the settings in the Volume
Settings screen to their initial values.
NOTE MMS messaging function can not display the picture on the audio screen, only message characters.
On
(On) or
New Message Voice Notification setting You can set a voice notification for when a new message is received. 1 Touch New Message Voice Notification Volume setting You can adjust the volume of the new message voice notification. 1 Touch
(right side):
(Off).
or
Off
•
Before Use
Message Readout Volume setting You can adjust the volume of the message readout. 1 Touch
(right side):
or
•
Volume up
(left side):
Volume down
• Touch
for 1 second or more to raise the volume
continuously. Touch continuously.
for 1 second or more to lower the volume
Volume up
(left side):
Volume down
• Touch
for 1 second or more to raise the volume
continuously. Touch continuously.
for 1 second or more to lower the volume
■ About the messaging function • Supported message standards:
SMS (Short Message Service) MMS (Multimedia Messaging Service) E-mail
• Maximum number of address characters:
256 single-byte characters
• Maximum number of subject characters:
256 single-byte characters
• Maximum number of message characters:
160 single-byte characters
• Maximum receivable message size:
50 KB or less
Introduction 77
Before Use
78 Introduction
Before Using the Navigation System
WARNING
Read this manual first
Read this manual carefully before using the navigation system. We are not liable for accidents or other problems resulting from failure to follow the instructions in this manual.
Follow all road signs and traffic rules
When driving using guidance from the navigation system, be sure to follow the actual road signs and traffic regulations. If road signs and traffic regulations are changed, the data on the SD card may be out of date. Also, the data on the map SD card does not take into account factors such as weather, time zones, and occurrences such as differences in congestion situations and temporary road closures due to construction work. Always give precedence to road signs and traffic rules over instructions from the navigation system. Not following the road signs and traffic rules could lead to injury or traffic violations.
Drive safely • Before following instructions from the navigation system
(changing lanes and so on), check that you can carry out the maneuver safely given the current traffic conditions. Always put safety first before following any instructions. • Do not watch the navigation screen while driving.
Ignoring surrounding traffic could lead to an accident. If you need to look at the screen while driving, make sure you only glance at the screen.
• You should stop the vehicle in a safe place before operating
the navigation system. For safety's sake, some of the navigation system's buttons and functions cannot be used unless the vehicle is stationary.
• When you need to look at the navigation screen, do so for the shortest time possible. Looking away from the road for too long could lead to an accident.
• Make sure this system is installed in a position legally
allowed in the country where you intend to use it. Some countries and regions do not allow video screens to be installed within the driver's line of sight.
80 Navigation
• If you stare at the display too much or operate the buttons of
Never disassemble or modify the system
Before Using the Navigation System
the system while driving, the navigation system could distract your attention from the current traffic conditions. Be sure to enter as much information as possible into the system before departing. Also, be sure to stop your vehicle in a safe place if you need to enter information.
• Buttons on the touch screen that cannot be used have their
colors toned down. Operating the navigation system while driving could cause your attention to be distracted from the current traffic conditions. This could result in a severe or fatal accident. Be sure to follow all the operation descriptions and safety instructions given in this manual.
Volume • Keep the system's volume level low enough for you to be able to hear outside sounds while driving. Otherwise, you may not be able to react appropriately to traffic conditions, resulting in an accident.
CAUTION
Foreign objects
Do not place foreign objects, such as fingers, into the disc insertion slot. If foreign objects enter the system's main unit, it could lead to electric shock or fire. If the system emits smoke or an unusual smell, stop using it immediately and contact the nearest SUBARU dealer.
Never disassemble or modify any parts of the system. Doing so may lead to a fire, an electric shock, or some other type of accident.
Do not continue using the navigation system if it malfunctions If the system shows any sign of malfunctioning (for example, the monitor displays no picture), stop using it immediately and contact the nearest SUBARU dealer. Continuing to use the system could lead to a fire, an electric shock, or some other type of accident.
If the navigation system gets contaminated, or emits smoke or an odd smell, stop using it
If a foreign object gets inside the system, liquid is spilled onto the system, or the system emits smoke or an unusual smell, stop using it immediately and contact the nearest SUBARU dealer. Continuing to use the system could lead to a fire, an electric shock, or some other type of accident.
NOTE In the interest of safety, the use of some functions may be unavailable while driving. Buttons on the touch screen that cannot be used have their colors toned down.
Navigation 81
Information on Warnings and Safety
The navigation system uses a built-in GPS receiver to guide you to your destination. This software does not transmit the GPS position of your vehicle, and cannot be used to track the vehicle.
Do not look at the navigation screen if it is not safe to do so. If the driver is operating the navigation system, we strongly recommend operating the software before you start driving. Program the route before leaving, and stop your vehicle in a safe place if you need to change the route.
Follow all road signs and road conditions. If you deviate from the recommended route while driving, the software updates the route according to your current position.
For details, see “End-user License Agreement” on Page 176.
82 Navigation
Read First
This software is designed for optimum performance when used for car navigation. It does not need a stylus for operation. You can easily use buttons and maps on the screen by touching them with the tip of your finger.
2 The Setup Wizard starts. Touch
Next
(Next) to continue.
When you start the navigation software for the first time, the initial settings screen is automatically displayed. Follow the steps below to use the initial settings screen. 1 Confirm the end-user license agreement. Touch
Accept
(Accept) to continue.
3 Select the language and narrator you want to use for
voice guidance messages. Touch continue. You can change this at any time from Sound and Warnings settings. (See Page 164.)
(Next) to
Next
• When the TTS Voice mode is selected, the voice control
navigation and street guidance can be used. These functions cannot be used when the Natural Voice mode is selected.
Navigation 83
Read First
4 Change the unit settings if necessary. Touch
(Next) to continue. You can change this at any time from Units and Formats. (See Page 173.)
Next
6 This completes the initial setup. Touch
(Finish) to continue. After setting up, you can run the Setup Wizard at any time from the Settings menu. (See Page 163.)
Finish
5 Change the initial route plan settings if necessary. Touch (Next) to continue. You can change this at any time
Next from Route Settings. (See Page 169.)
After the initial setup, the navigation menu is displayed and you can start using the software.
84 Navigation
Navigation Menu When you touch Menu the multi screen, the navigation menu (main menu) appears. You can access all of the software's functions from this menu.
(Menu) on the navigation screen or
Read First
• When you touch
(More), you can set the navigation software operating method, start the tutorial, show a demo route simulation, or start various other auxiliary applications.
More
• Touch
Show Map
(Show Map) to start navigation on the map. The button itself shows the current position, recommended route, and reduces the surrounding area to display on the map being used. Press the button to enlarge the map to full-screen size.
• Touch
to open the Traffic Summary screen.
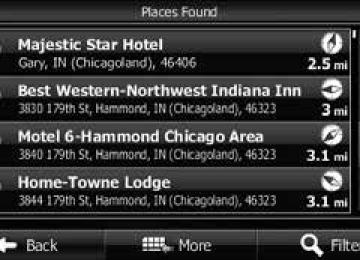
The following options are available. • Touch
Find
(Find), and then select which method to use to reach your destination by entering the address, selecting a favorite spot, selecting a position on the map, or selecting from the destination list. You can also select recent destinations from Smart History, or enter coordinates into the system.
• When you touch
My Route
(My Route), each point on the route, or
a path log on the map is displayed for the entire journey. You can also perform various route related functions such as editing or Canceling the route, setting the route departure point, selecting a different route, avoiding a part of the route, performing a navigation simulation, or adding an entry to the destination list.
Navigation 85
Read First
On-screen Buttons and Other buttons To use this software, you normally have to touch the buttons on the touch screen.
You only need to confirm selections and changes when the application needs to be restarted, when an important setting is changed, or when a section of the user's data/settings may be lost. Other than that, when using the button selected content is saved immediately without requiring confirmation, and the new setting is applied.
Type Button
Example
Button with numbers displayed
Icon
List
Radio button
86 Navigation
Explanation Touch to start a function, open a new screen, and save settings.
Current fields or settings are displayed on the button. Touch this button to change the value. After changing, the value you enter is displayed on the button. Displays status information.
If there are multiple options available, the selection items are displayed as a list.
When there are only a few selection items, you can use the radio buttons instead of a list. Where only one value can be selected.
Use Touch once.
Touch once.
Some icons can also be used as buttons. Touch once.
To view the list, touch and slide your finger up and down. Because the scrolling speed changes depending on the speed of the slide, you can reach the end of the list, with just a small, quick flick of buttons, your finger. Also, when using the touch the number you want to move through the pages. Touch this button to select the new value.
Type Check Box
Example
Virtual keyboard
Explanation If there are only two choices available, you can enable or disable the function by entering a check mark. Keyboard for entering text and numbers.
Read First
Use Touch to turn the switch On or Off.
Each key represents a button on the touch screen.
Navigation 87
Operation Entering numbers and symbols
Explanation
Touch keyboard. Touch keyboard.
to switch to the numbers
to switch to the symbols
Confirm keyboard input (confirm the displayed search results) Set keyboard input (confirm search results list) Set keyboard input (save entry)
Cancel keyboard input (return to main screen)
Touch
Touch
Results
(Results).
Touch
Done
(Done).
Touch
Back
(Back).
NOTE Even if a candidate term is displayed when the keyboard screen appears, you can touch the keyboard and input a new term directly.
Read First Using the Keyboard
This navigation system has been designed to keep the entry of text and numbers to a minimum. However, you can enter text and numbers when necessary by using the full-screen keyboard. You can select the keyboard layout from English, Greek characters, numbers, and so on.
Explanation
More
Touch another keyboard layout from the list.
(More) and select
to delete characters entered
Touch by mistake. Touch & hold (touch the screen and do not remove your finger) to delete a part or all of the entered text.
Press the center of the screen.
button at the bottom
Operation Button keyboard layouts, for example from English to Greek
Correcting entered values using the keyboard
Enter a space between first names and family names, or between address display names
88 Navigation
Screen Operations Other than Single Touch
Normally, you only need to touch the screen once (single touch) to perform an operation. However, you can make use of convenient functions by combining different touch operations on the touch screen. The following touch combinations are available.
Operation Screen Touch & Hold You can call additional functions by performing touch
How to
& hold (touch the screen and do not remove your finger) with the next button. • On the List and Menu screens, touch & hold
Back
(Back) to display the Map screen.
• On the Map screen, touch & hold any of the
buttons to rotate, tilt, enlarge, or
, or reduce the map.
• On the keyboard screen, touch & hold
to quickly
delete multiple characters. • On long lists, touch & hold
through the page.
or
to scroll
Gesturing (drag & drop)
You may need to drag & drop in the following cases. • Scrolling a list: To view the list, touch and slide your
finger up and down. Because the scrolling speed changes depending on the speed of the slide, you can reach the end of the list, with just a small, quick flick of your finger.
• Moving the map in map display mode: Touch the
map and move it in the direction you want.
Read First
Navigation 89
Colored spots are displayed on the circle around the satellite icon in the top left corner. The more spots there are on the circle, the higher the accuracy of the GPS positioning.
When GPS positioning is active, the vehicle marker is displayed in full- color, and the current position is shown.
Read First
Map Screen Navigating on the Map
In the navigation menu startup screen, the currently active map is reduced and displayed in
(Show Map).
Show Map
Show Map
(Show Map) to open the Map
To enlarge the map, touch screen. This map shows the current position (shown as the vehicle marked as a blue arrow), recommended routes (orange lines), and the immediate surrounding area. When GPS positioning is not active, the vehicle marker is clear. The latest confirmed position is displayed.
90 Navigation
Buttons and data fields are displayed on the screen, and you can perform navigation. During navigation, route information is displayed on the screen.
Default data fields when no destination is set while driving
Read First
Field
Time
(Time)
Altitude
(Altitude)
Explanation Shows the altitude of the road currently being driven and measured by the GPS receiver. (There may be a maximum ±50 m of differences depending on the reception status of GPS satellites.) Displays the current time corrected using the time zone offset. Accurate time is acquired from the GPS satellite, while time zone information is acquired form the map. You can also make manual settings in Units and Formats. (Only for the Menu screen, the current time is shown in the bottom left corner of the screen.) Default data fields when performing navigation (you can change the values in fields by using touch & hold):
The data fields display differs when no destination is set during navigation (no orange line is displayed). When performing navigation, the number of the data fields displayed on the screen is three. Up to two data fields can be displayed when no destination is set (no orange line is displayed).
Field
Distance
(Distance)*
Time Left
(Time Left)
Explanation Displays the distance on the route to the final destination. Displays the time left until arrival at the final destination based on the information available for the remainder of the journey. This is calculated according to prior traffic data or traffic patterns when ever available. If a TMC receiver is connected to the main unit and is receiving data, any traffic jams along the route are also factored into calculations. However, the accuracy of these calculations varies greatly.
Navigation 91
Read First
Field
Arrival Time Time)*
(Arrival
Time
(Time)
Altitude
(Altitude)
Explanation Displays the estimated arrival time at the final destination based on the information available for the remainder of the journey. This is calculated according to prior traffic data or traffic patterns when ever available. If a TMC receiver is connected to the main unit and is receiving data, any traffic jams along the route are also factored into calculations. However, the accuracy of these calculations varies greatly.