- Download PDF Manual
-
Foreword This supplement contains explanations and instructions for correctly operating the following systems. • Navigation System • Audio and Visual System • Handsfree System If your vehicle contains one of the systems above, be sure to check the contents of this supplement carefully. If you transfer the ownership of the vehicle to another person, make sure that this supplement is provided with the Owner's Manual inside the vehicle. The information, specifications and illustrations in this supplement are valid at the time of publication. Fuji Heavy Industries reserves the right to change the specifications and design without prior notice, with no obligation to perform the same or equivalent changes to vehicles sold in the past. This Owner's Manual supplement applies to all models, and describes all devices, including manufacturer-installed options. This means that information may be included about devices that are not installed in your vehicle.
FUJI HEAVY INDUSTRIES LTD., TOKYO, JAPAN
is a registered trademark of Fuji Heavy Industries Ltd.
©Copyright 2011, Fuji Heavy Industries Ltd.
Read First The symbols described below are found in this instruction manual as well as on the unit itself to insure its proper and safe usage and to prevent injury or damage to property. Make sure you understand the meaning of these symbols before reading the rest of this manual.
Precautions for Use We recommend that you wait until the positioning stabilizes before starting to drive. •
If you start to drive while the positioning is not complete, the indicated position may differ from the actual vehicle position. We recommend waiting until the GPS indicator displays before starting to drive.
* The screens shown in this manual may differ from the actual screens
depending on the data type or when the map data was created.
Information in this manual that must be observed for the unit, and information that is useful to know is indicated as follows.
WARNING
This sign indicates a situation in which incorrect handling through disregard of written information might result in death or serious personal injury.
CAUTION
This sign indicates a situation in which incorrect handling through disregard of written information might result in personal injury or damage to property.
NOTE Useful Information
• Be sure to read all materials such as manuals and warranties that
come with the product. Fuji Heavy Industries is not responsible for problems that arise due to failure to follow these instructions.
• Changes to product specifications may result in differences between
the content of the manual and the features of the unit.
CAUTION
The touch buttons on the display screen may not operate properly if condensation forms inside them. If this happens, do not attempt to operate the touch buttons until the condensation has disappeared.
Take good care of this manual. If you forcibly spread this manual, or remove pages, you may cause damage to the spine of the book. Handle the manual gently.
Table of Contents
Introduction
Before Use .......................................................................................8
Safety Precautions .......................................................................................... 8
Viewing This Document .............................................................................11
About This Unit ..............................................................................................12
■ Part Names and Operations .......................................................................................................... 12
■ Turning the Power On or Off ........................................................................................................ 14
■ Loading and Unloading a Disc .................................................................................................... 15
■ Loading and Unloading an SD Memory Card .................................................................... 16
■ Connecting (or Disconnecting) the USB Memory .......................................................... 19
■ About the Unit Modes ...................................................................................................................... 20
■ Selecting a Mode ................................................................................................................................. 21
■ Operation Conditions for the Unit ............................................................................................ 23
Unit Settings ...................................................................................................24
■ Various Unit Settings .......................................................................................................................... 24
Screen Adjustment and Setting ..............................................................38
■ Displaying the picture quality adjustment screen .......................................................... 38
Precautions for Using Bluetooth Devices ............................................40
Bluetooth Handsfree Operation ..............................................................42
■ Using Bluetooth Handsfree ........................................................................................................... 42
■ Setting and Editing Bluetooth Handsfree ............................................................................ 56
■ Using the messaging function .................................................................................................... 69Navigation
Before Using the Navigation System ..........................................80
Information on Warnings and Safety .........................................82
Read First ......................................................................................83
Navigation Menu .......................................................................................... 85
On-screen Buttons and Other buttons ................................................. 86
■ Using the Keyboard ............................................................................................................................88
■ Screen Operations Other than Single Touch ......................................................................89
Map Screen ..................................................................................................... 90
■ Navigating on the Map .....................................................................................................................90
■ Position Marker ......................................................................................................................................92
■ Map Objects .............................................................................................................................................93
■ Quick Menu ...........................................................................................................................................101
■ Check Current Position (Where Am I?) .................................................................................103
Navigation ..................................................................................105
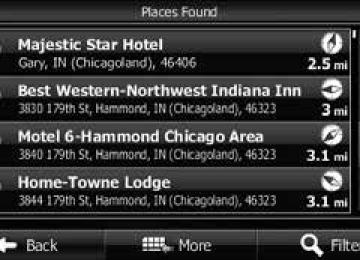
Select route destination ...........................................................................105
■ Enter all or part of the address ..................................................................................................105
■ Selecting the destination from your favorite spots(POI: Point Of Interest) ....................................................................................................................120
■ Selecting a Map Position as the Destination ....................................................................134
■ Selecting the Destination from the Destination List ...................................................135
■ Selecting a Frequently Used Destination (Smart History) ........................................137
■ Selecting a Recent Destination from History ...................................................................138
■ Creating a Route from the Destination List (Route Creator) ...................................140
Displaying the Entire Route on the Map ............................................141
Confirming Route Settings and Calling Route Related Functions .......................................................................................................142
■ Setting the avoidance route .......................................................................................................143Glossary .......................................................................................174
End-user License Agreement ....................................................176
Further Information ...................................................................181
Display Connection Status Information .............................................181
■ Display Connection Status Information ..............................................................................181
Accuracy & error calculation ..................................................................182
■ Regarding Precision Accuracy ...................................................................................................182
■ Regarding the Properties of the GPS Electro-Magnetic Waves andSignal Reception ................................................................................................................................182
■ Regarding Errors in Current Position Display ...................................................................183
■ Regarding Vehicle Position Detection Correction Using Map Matching .......184
■ Regarding the Accuracy of the Current Position and Route Navigation ........184
■ Regarding Roads and Place Name Data .............................................................................186
■ Regarding Route Navigation ......................................................................................................186Changing the Route .................................................................................. 144
■ Selecting a new destination after the route has been set:new route, waypoint, and final destination ......................................................................144
■ Setting a New Starting Point for the Route .......................................................................145
■ Editing the Destination List (Route Editing) ......................................................................147
■ Pausing Route Navigation ............................................................................................................148
■ Canceling Route Navigation .......................................................................................................148
■ Changing the Method for Searching for a Route (Other Routes, etc.) .............149
■ Changing the Road Categories used for the Route Search .....................................150
Saving a Position to the Destination List .......................................... 152
Displaying a Simulation of the Route ................................................. 153
Voice Control Navigation ........................................................................ 155
Reference Data .......................................................................... 157
Feature ........................................................................................................... 157
■ Smart Zoom ..........................................................................................................................................157
■ Switching between Day and Night Screens .....................................................................157
■ Route Search/Search Again .........................................................................................................158
■ GPS Positioning Quality Indicator ............................................................................................159
■ Online Road Information Saved in Route Search ...........................................................159
“More” Menu .............................................................................................. 162
Settings Menu ............................................................................................. 163
■ Sound and Warnings .......................................................................................................................164
■ Customize Quick Menu ..................................................................................................................166
■ Traffic .........................................................................................................................................................168
■ Route Settings ......................................................................................................................................169
■ Map Settings .........................................................................................................................................170
■ Visual Guidance ...................................................................................................................................172
■ Units and Formats .............................................................................................................................173
■ Trip Monitor ...........................................................................................................................................173Using the USB Music File Player ............................................................240
■ Using the USB Music File Player ...............................................................................................240
■ About USB Devices ...........................................................................................................................244
Visual Operations .......................................................................247
Using the USB Video File Player ............................................................247
■ Before Using the USB Video File Player ................................................................................247
■ Using the USB Video File Player ................................................................................................248
■ Displaying DivX VOD code ..........................................................................................................255
■ About USB Devices ...........................................................................................................................258
How to Operate Portable Audio Devices ..................................260
Using the iPod® Player ............................................................................260
■ Using the iPod Player ......................................................................................................................260
■ About the Supported iPods ........................................................................................................266
Using Bluetooth Audio .............................................................................267
■ Before Using Bluetooth Audio ..................................................................................................267
■ Using a Portable Device ................................................................................................................274
■ About the Compatible Bluetooth-Supporting Devices ............................................279
Using AUX .....................................................................................................280
■ Using AUX ..............................................................................................................................................280Audio and Visual
Before Using the Audio and Visual System ............................. 190
Precautions When Using the System ................................................. 190
Precautions for Use ................................................................................... 193
■ About Discs ............................................................................................................................................194
Basic Operation ......................................................................... 198
Switching the Audio Source .................................................................. 198
■ Switching the Audio Source .......................................................................................................198
■ Displaying the Audio Operations Screen ............................................................................199
■ Stopping the Audio Mode ...........................................................................................................199
Source Operations Screen ...................................................................... 200
Volume Control .......................................................................................... 202
■ Main Volume Control ......................................................................................................................202
■ Displaying the Sound Settings Screen .................................................................................203
■ Adjusting the Sound Quality ......................................................................................................204
■ Adjusting the Audio Balance ......................................................................................................205
■ Setting the Source Volume Control .......................................................................................207
■ Setting the Automatic Sound Levelizer ...............................................................................208
Audio Operations ...................................................................... 209
Using the Radio .......................................................................................... 209
■ Using the Radio ...................................................................................................................................209
Using the SAT Radio ................................................................................. 216
■ Using the SAT Radio .........................................................................................................................216
Using the CD Player .................................................................................. 226
■ Using the CD Player ..........................................................................................................................226
Using the MP3/WMA Player ................................................................... 230
■ Using the MP3/WMA Player ........................................................................................................230
■ About MP3/WMA ...............................................................................................................................235
■ Creating and Playing MP3/WMA Files ..................................................................................238Others
Other Operations ....................................................................... 282
Picture Function Operations ................................................................. 282
■ Using the Picture Function ..........................................................................................................282
■ About the Supported Image Data ..........................................................................................285
About Steering Wheel Switches ........................................................... 287
■ Compatibility with Steering Wheel Buttons .....................................................................287
Voice Control System Operations ........................................................ 291
■ About the Voice Control System ..............................................................................................291
■ Using the Voice Control System ...............................................................................................292
■ Displaying the Command List ...................................................................................................293
■ Examples of Using the Voice Control System ..................................................................294
■ Voice Command Lists ......................................................................................................................298
Reference ................................................................................... 324
Useful Information .................................................................................... 324
■ If the Following Messages Appear ..........................................................................................324
■ When You Think There Is a Malfunction ..............................................................................332
■ Glossary ....................................................................................................................................................334
■ About Trademarks .............................................................................................................................3356
Before Use
Safety Precautions
WARNING
• The main unit requires a 12 V DC power supply. The main unit should not be installed in any vehicle which does not have a 12 V power system with a ground-connected negative side. An installation other than the one intended may cause severe damage to the main unit, and electric shock or serious injury to the users.
• Even when using the route guidance of the navigation system, be sure to drive by following the actual traffic regulations. If you drive by following only the route guidance of the navigation system, you may violate the actual traffic regulations and cause a traffic accident.
• To ensure safety, the driver should not operate the
navigation system while driving. Operating the navigation system while driving may result in an accidental steering wheel operation or otherwise cause an accident. Stop the vehicle before operating the navigation system. Also, do not watch the screen while driving. Because doing so is dangerous and may be unlawful. Inattention to road conditions ahead may result in an accident.
• The driver should not perform operations such as volume adjustment while driving. Inattention to road conditions ahead may result in an accident, so be sure to stop the vehicle in a safe place before performing the operation.
8 Introduction
• The driver should not change discs while driving.
Inattention to road conditions ahead may result in an accident, so be sure to stop the vehicle in a safe place before performing the operation.
• The driver should not perform operations such as adding a location or setting the memory while driving. Inattention to road conditions ahead may result in an accident, so be sure to stop the vehicle in a safe place before performing the operation.
• Before viewing a video, be sure to stop the vehicle in a safe place and apply the parking brake. To ensure safety, videos are not displayed during driving.
• To ensure safety, never operate a cell phone while driving. • Do not let foreign objects enter the disc slot or SD memory
card slot. Doing so may result in a fire or electric shock.
• Do not disassemble or modify the unit. Doing so may result
in an accident, fire or electric shock.
• Do not let water or foreign objects enter the internal parts of
the unit. Doing so may result in smoke, fire or an electric shock.
• Do not use the unit when it is malfunctioning, such as when
the screen is not lit or no sound comes out. Doing so may result in an accident, fire or electric shock.
• Always replace fuses with fuses of the same specified
capacity (amperage). Using a fuse with a higher capacity than the specification may result in a fire.
• If a foreign object or water enters the unit, smoke or a
strange odor may be emitted. If such an abnormality occurs, stop using the unit immediately and contact your SUBARU dealer. An accident, fire or electric shock may result if you continue to use the unit under these conditions.
• In a thunderstorm, do not touch the antenna line or the unit.
Lightning may cause an electric shock.
• Do not park or stop in prohibited areas to use the unit. • If direct sunlight shines into the vehicle, light may reflect off
the product. Be very careful while driving.
• Never use headphones or earphones while driving. Driving while not being able to hear sounds from outside the vehicle may result in a traffic accident.
CAUTION
• Although the unit can be used when the ignition switch is
set to either ON or ACC, to protect the battery, start the engine before using the unit.
• Do not use the unit anywhere other than in a vehicle. Doing
so may result in an electric shock or other injury.
Before Use
• While driving, keep the volume low enough for you to hear outside sounds. Driving while not being able to hear sounds from outside the vehicle may result in an accident.
• Be careful of the volume when turning on the power. If a
loud noise is emitted suddenly when you turn on the power, it may damage your hearing.
• Do not apply a strong force to the display. Doing so may
result in a malfunction.
• Do not put your fingers or hands into the disc slot or SD
memory card slot. Doing so may result in an injury.
• Do not touch the hot parts of the unit. The hot parts may
burn you.
• Do not use while there is an abnormality such as sound
breakup or distortion. Doing so may result in a fire.
• Using the unit during extremely high or low temperature
may result in mistaken operation or a malfunction. In particular, the temperature inside the vehicle can often rise to a high level during the summer. Cool the vehicle, for example by opening a window, before using the unit.
• Be careful if metal or water enters the unit, or the unit is
exposed to a strong impact, because it may result in a malfunction.
• The touch buttons on the display screen may not operate
correctly if condensation forms inside them. If this happens, do not attempt to operate the switches until the condensation has disappeared.
Introduction 9
• Note that the following events are not covered by the warranty.
1. Corruption or loss of the data recorded on the “SD memory card” by the
purchaser resulting from failure, incorrect operation or malfunction of the unit, or any problems associated with it, or due to the effects of electrical noise or other influences.
2. Corruption or loss of the map data or basic program stored in the “SD
memory card” resulting from the incorrect use of the unit by the purchaser or a third party.
3. Corruption or loss of data recorded on the “SD memory card” by the
purchaser resulting from the malfunction or repair of the unit.
* Note that by installing or using the unit, you are regarded as having
consented to the points above.
• The unit has been designed to withstand electrical noise from other
electronic devices. However, if an electronic device that emits strong noise is used next to the unit, the unit may show malfunctions such as screen interference or noise. If this happens, stop using the electronic device that you think is causing the problem.
• The liquid-crystal display may be difficult to read when wearing polarized
glasses.
Before Use
NOTE • Fuji Heavy Industries is not responsible for any damages to the purchaser or
third parties that occur from using the map data.
• We do not provide any replacements or refunds for any mistakes there may be
in the map data displays or contents, such as misspelling, omissions or misaligned positions.
• Fuji Heavy Industries makes no guarantee that the functions included in the
map data will be appropriate for the specific objectives of the purchaser. • Functions that cannot be operated while driving have their colors toned down when the vehicle is being driven, and their operation is disabled. Touching a disabled switch may result in the display of an operation prohibited message on the screen.
• During strong vibrations, such as when driving on a poor road surface, the unit may no longer be able to read the data from the disc or “SD memory card”, and it will not operate correctly. When the vibration lessens, normal operation will return after a short time.
• Immediately after turning on the heater when the temperature is low, dew (water drops) may adhere to the lens of the CD reader (condensation). If this happens, leaving the unit for about an hour should remove the condensation and return the unit to normal operation. If the unit does not return to normal operation even after several hours, contact your SUBARU dealer.
• When using the unit for the first time after purchase, or after the battery was removed for a long time, the current position may not be displayed correctly. Wait a short time until the GPS positioning corrects the displayed position.
• This device is precision-engineered equipment and the recorded data can be
lost as a result of static electricity, electrical noise, vibration, or other influences. To protect the device against data loss, we recommend keeping a separate record of the data that you record after purchase.
10 Introduction
Viewing This Document
Item title A title is assigned for each item.
Audio Operations
Using the CD Player Using the CD Player
■ Listening to a CD Insert a CD into the disc slot, and it will start playing. 1 Press 2 Touch
(CD).
CD
Operation title A title is assigned for each operation objective.
NOTE Describes information related to the operation.
(5)
(1)
• The playback starts.
(4)
(3)
(2)
(1) (2) (3) (4) (5)
Title information scroll buttons* Settings button Search button Track up/down and fast forward (fast reverse) buttons AUDIO button
It will be displayed if the length of the information is too long and it cannot be displayed.
NOTE Some of the functions may not be available when vehicle is in motion.
226 Audio and Visual
NOTE • Playback may be intermittent when there is a scratch on the CD or when the
recorded side is dirty.
• If track titles and other data are recorded in the CD-Text format, they can be
displayed.
• It may not be possible to display the CD-Text of CD-R/RW discs. • If no CD-Text data exist in the disc, “No Data” appears in the section where the
track titles and other data are displayed.
Before Use
Section title The section title is displayed here.
Operation procedure Describes the operation. Follow the numerical order.
Operation screen The screen to be operated is displayed.
NOTE In this document, the unit is generally described using the screens which appear when the optional devices are connected. Navigation is mostly described using the Heading - upwards 1 screen. About button display When a panel button should be pressed, button names are shown as When a touch button on the screen should be touched, button names are shown as
or [(cid:99)(cid:99)(cid:99)].
, etc.).
Introduction 11
(1) MAP button (2)
Voice recognition button AUDIO button
POWER/VOL button
EJECT button
Press to display the navigation screen. Press to use voice recognition control.
Press to use the audio or hands free function. Press for 1 second or more to adjust the picture quality or screen brightness. Pressing: Audio Power ON or OFF. Rotating: Adjust the volume. Press to eject the DISC.
Before Use
About This Unit Part Names and Operations
You can operate the unit by pressing the buttons on the panel (panel buttons) or by directly touching the buttons displayed on the screen (touch buttons).
■ Panel buttons Press a panel button to operate it.
(5)
(3)
(4)
(5)
(4)
(3) (2) (1)
12 Introduction
■ Touch Screen Button Touch a button on the screen to operate it.
CAUTION
Touch the touch buttons with your finger. Operating touch buttons with the point of hard objects such as ballpoint pens or mechanical pencils may damage the screen.
Before Use
About touch button operations • Keep touching the touch button until a “beep” is emitted in
response. (When the guide tone is set to ON.)
• To protect the screen, touch the touch button lightly with your
finger.
• When there is no response from a button, remove your finger from
the screen and touch it again.
• Touch buttons that cannot be operated have their colors toned
down.
• When the button function is enabled, the touch button returns to a
brighter color.
Touch Screen Buttons
Introduction 13
Before Use Turning the Power On or Off
This unit switches on automatically at ignition, and when started for the first time, it displays the Navigation setting screen*. When the engine is switched off, the unit also switches off.
* The second and subsequent times that the unit is started, the mode
screen that was last in use is displayed. If the last mode in use was the Navigation screen, then your current position will be displayed. If it was the Audio operation screen, then the audio selection that was last playing will be displayed.
■ Turning on the power 1 The Caution screen is displayed automatically. When you
(I Agree), the “SD Eject” Caution screen
I Agree
touch appears. I Agree • Touch to increase the tone after system startup.
(I Agree) turns down the tone during system startup.
• To select a language, touch
Languages
(Languages) to display
the Languages screen. Touch the language that you want to use from the list. For details, see “Language setting” on Page 36.
2 Touch
OK
(OK) to display the Navigation setting screen.
• To stop the “SD Eject” Caution screen from being displayed
again, touch The message won't be indicated from now onward message won't be indicated from now onward) and then touch OK
(The
(OK).
14 Introduction
<“SD Eject” Caution screen>
NOTE Do not press “I Agree” button on the Caution screen. Otherwise, Navigation commands cannot be used.
(Main Unit/Steering Wheel Switch) without pressing the
■ Turning off the audio
• Press
(POWER/VOL).
NOTE • When the audio power is turned off, on the Source screen, touch the source to which you want to change. For details, see “Switching the Audio Source” on Page 198.
• You cannot turn off the navigation power.
Before Use
Loading and Unloading a Disc
To listen to music, insert a music CD into the slot.
■ Loading a disc 1 Insert a disc into the slot.
• Hold the disc by the center hole and the edges, and insert it
with the label facing upward.
• When the disc is inserted, playback of the music CD or MP3/
WMA starts.
• For disc details, see “About Discs” on Page 194.
Disc
Introduction 15
Before Use
■ Unloading a disc
CAUTION
When removing a disc from the unit, pull it out horizontally. Do not strongly pull up the disc. Also, do not strongly push down the disc while removing it. Doing so may damage the disc or cause the playback to jump. 1 Press
• The disc is ejected automatically.
Loading and Unloading an SD Memory Card
Insert an SD memory card into the slot.
■ Loading an SD memory card
CAUTION
• Position the SD memory card with the
mark at the far
end and insert it until it makes a “click” sound. When it makes contact with the stopper inside, the card cannot be inserted any further. Do not try to forcibly push the card. • Before inserting a miniSD card, microSD card, miniSDHC card or microSDHC card, be sure to attach the card to the special adapter. (If you insert only the miniSD card, microSD card, miniSDHC card or microSDHC card, you may not be able to remove it.)
16 Introduction
1 Insert the SD memory card.
Insert the SD memory card with the label on the left side.
• • Make sure that the SD memory card is fully inserted.
SD memory card
NOTE • Insert the map SD card without locking it. • If you insert an SD memory card that contains image data, you can preview
the images, play a slideshow, or set an image as the Opening screen. (See Page 282.)
About SD memory cards • SD memory cards that are marked as follows can be used.
Before Use
SD Logo is a trademark of SD-3C, LLC.
SDHC Logo is a trademark of SD-3C, LLC.
miniSD Logo is a trademark of SD-3C, LLC.
miniSDHC Logo is a trademark of SD-3C, LLC.
microSD Logo is a trademark of SD-3C, LLC.
microSDHC Logo is a trademark of SD-3C, LLC.
• Multi Media Cards (MMC) cannot be used. • Supported capacities: 512 MB to 8 GB • Supported speed class: Class 2 to Class 10
Introduction 17
Before Use
■ Unloading an SD memory card
CAUTION
• Touch
SD Eject
(SD Eject) before removing the map SD card.
4 After checking the caution screen, touch
Yes
(Yes).
• This screen does not appear if the card is not the specified SD
memory card.
Removing the card without first touching Eject) may damage the data. No compensation will be given for any damaged data.
SD Eject
(SD
• When removing a disc or SD memory card from the unit, pull
it out horizontally. Do not strongly pull to the right side. Also, do not strongly push to the left side while removing it. Doing so may damage the SD memory card.
1 Press 2 Touch Info 3 Touch
If
•
Info is not displayed, touch
SD Eject
(SD Eject).
5 When “Please eject SD card.” appears, remove the SD
memory card. • Press in the SD memory card until you hear it “click”, let go of
the card, and then pull it straight out.
18 Introduction
Connecting (or Disconnecting) the USB Memory
1 Connect (or disconnect) the USB memory.
Before Use
• Leaving the USB memory for a long time in a place exposed to direct sunlight
may result in deformation or discoloration due to the high temperature, or cause a malfunction. In such cases, Fuji Heavy Industries will not give any compensation. When you are not using the USB memory, keep it in a place away from direct sunlight. Further, when leaving the vehicle, do not keep the USB memory inside.
• When the audio source is USB, do not disconnect the USB memory. Doing so
may damage the data in the USB memory. Before disconnecting the USB memory, turn the ignition switch to the Off position or switch the audio source to a source other than USB, and then disconnect it.
NOTE • This unit supports USB memory in the following formats.
- Supported class: Mass storage class - Supported USB Ver.: USB1.0/1.1/2.0 (maximum transfer speed is same as USB
2.0)
- Maximum consumption current: Less than 1.0 A - Supported capacities: 16 MB to 8 GB
• Do not connect USB memory devices other than those conforming to the specifications above. There is a possibility that some USB memory devices that do conform to specifications will not function correctly, due to many variables. We suggest testing your USB device prior to departing to your destination.
• This unit does not support commercially available USB hubs, multi card
readers, external hard discs or portable audio players with USB connectors.
• If the USB memory connection cord of this unit is connected to a USB device
via an extension cord, it may not function correctly.
• If you lose the data in the USB memory while using it with this unit, no
compensation will be given for the lost data. It is always a good practice to back up data, and only access a copy for in-vehicle use.
Introduction 19
Mode Audio
(2)
(3) Multi
Main functions • Receiving AM/FM/SAT radio • CD, MP3/WMA player operations • USB music/video file player operations • AUX display • iPod operations • Bluetooth audio operations • Audio menu display • Audio source selection • Handsfree operation screen display • Info menu display • Navigation screen and Audio operations screen
selection
• Audio source selection • Audio source operations • Navigation screen display and operations
(current position display, destination setting, destination guidance, destination registration, etc.)
• Navigation menu display * Some functions cannot be operated while driving.
Before Use About the Unit Modes
The modes of this unit can be broadly divided into 3 categories: Navigation, Audio and Multi.
(1)
(3)
(2)
Mode Navigation
(1)
Main functions • Navigation screen display and operations
(current position display, destination setting, destination guidance, destination registration, etc.)
• Navigation menu display
20 Introduction
Selecting a Mode
Press the following buttons to select the screens.
■ Navigation screen 1 Press
■ Audio operations screen 1 Press
Before Use
• Displayed while the audio function is operating. For the audio
operations, see “Switching the Audio Source” on Page 198.
• Displayed when the audio function is off.
Introduction 21
Before Use
■ Multi screen You can position the Navigation screen and Audio operations screen on the left and right to display them at the same time. 1 On the Navigation screen, touch
• The Multi screen appears.
■ About the on-screen display If a disc is loaded while the Navigation screen is displayed, an on-screen display appears. After a short time, the on-screen display disappears automatically.
On-screen display
NOTE On the Multi screen, touch
to return to the Navigation screen.
22 Introduction
Operation Conditions for the Unit
The operability of the unit's functions varies according to the following conditions (the ignition switch position).
×: Inoperable
Ignition switch OFF
ACC
×
(cid:99)
ON, vehicle stopped*1
(cid:99)(cid:99): Operable Function
Navigation/ settings and information
Audio function ×
(cid:99)
(cid:99)
Video function
×
(cid:99)
(cid:99)
Handsfree
×
(cid:99)
(cid:99)
*1 When the parking brake is applied. *2 When the navigation safety function is on. *3 Video is not displayed.
ON, vehicle in motion
When the vehicle is in motion, some functions become inoperable for safety reasons*2
When the vehicle is in motion, some functions become inoperable for safety reasons When the vehicle is in motion, some functions become inoperable for safety reasons*3
When the vehicle is in motion, some functions become inoperable for safety reasonsNOTE Buttons that cannot be operated have their colors toned down. Operating a button that is disabled while driving may result in the display of an operation prohibited message on the screen.
Before Use
Introduction 23
Before Use
Unit Settings In addition to settings for navigation and audio operations, the following settings can be performed for the unit.
Various Unit Settings
■ Displaying the Info screen Display the Info screen to perform various settings. 1 Press 2 Touch Info
Info is not displayed, touch
If
•
3 Touch the button that you want to set.
• Bluetooth setting (See Page 25.) Interface Customization (See Page 26.) • • Opening screen setting (See Page 27.) • Clock setting (See Page 28.) • Time display setting (See Page 28.) • Time zone setting (See Page 29.) • Link to Day/Night View setting (See Page 30.) • Voice recognition setting (See Page 32.) • Guide tone setting (See Page 33.) • Deleting Personal Data (See Page 34.) • • Language setting (See Page 36.)
Initializing Settings menu (See Page 35.)
24 Introduction
:
(Settings):
(Software Version):
NOTE Bluetooth Perform the Bluetooth settings. (See Page 25.) Settings Perform the unit settings. (See Page 26 - 35.) Software Version View information such as the map data that is stored on the unit or version information for the audio application. (See Page 37.) DivX(R) VOD Display DivX VOD code. (See Page 255.) System Check Check the sensitivity of the GPS signal reception, or the connection of the parking and reverse signals. (See Page 181.) Language Perform the language setting (See Page 36.) SD Eject Touch to remove the map SD card or the SD memory card that contains the picture data. (See Page 16.)
(System Check):
(DivX(R) VOD):
(Language):
(SD Eject):
Before Use
to perform the various Bluetooth settings.
Bluetooth
■ Bluetooth setting Touch 1 On the Info screen, touch 2 Touch the button that you want to set.
Bluetooth
• Touch
to return to the previous screen.
•
(Connect Phone):
(Registered Devices):
Registered Devices Register or delete a Bluetooth device, or display information for connected devices. (See pages 44, 269.) Connect Phone Register a cell phone or perform the connection settings. (See Page 46.) Connect Portable Player Register a Bluetooth audio device or perform the connection settings. (See Page 271.) Detailed Bluetooth Settings Display or set the detailed Bluetooth information for this unit. (See Page 67.)
(Detailed Bluetooth Settings):
(Connect Portable Player):
Introduction 25
Before Use
Passcode Settings Set the passcode (passkey). (See Page 68.)
(Passcode Settings):
2 Touch the color that you want to use as the skin pattern.
• The setting changes to the color pattern that you touched.
■ Interface Customization You can set the color pattern (Black/Green/Amber/Blue) for the screen. 1 On the Info screen, touch
(Settings).
Settings
NOTE • Touch
Delete Personal Data
(Delete Personal Data) to initialize your
personal data and all settings. (See Page 34.)
• Touch
Initialize their initial values.
(Initialize) to return the settings in the Settings screen to
26 Introduction
■ Opening screen setting You can change the Opening screen to display the image of your choice. You can also display image data imported from an SD memory card as the Opening screen.
Changing the Opening screen You can change the Opening screen of the unit (the screen that is displayed when the power is turned on). 1 On the Info screen, touch
(Settings).
Settings
(Customized) or
Initialize
(Initialize) in
Before Use
2 Touch
Customized Start Up Screen. • Touch
Customized
(Customized) to change to the Opening screen that was set with the picture function. (See Page 282.)
• Touch value.
Initialize
(Initialize) to return Start Up Screen to its initial
NOTE • Touch
Delete Personal Data
(Delete Personal Data) to Initialize your
personal data and all settings. (See Page 34.)
(Initialize) to return the settings in the Settings screen to
• Touch
Initialize their initial values.
Introduction 27
Before Use
■ Clock setting You can turn the clock display on or off, change the time display, and set the time zone. (Only applies to navigation mode) 1 On the Info screen, touch
(Settings).
Settings
■ Time display setting 1 On the Info screen, touch
Settings
(Settings).
2 Touch
On
(On) or
Off
(Off) in Clock.
2 Touch
12:00 am
or
24:00
in Time Display.
NOTE • Touch
Delete Personal Data
(Delete Personal Data) to Initialize your
NOTE • Touch
Delete Personal Data
(Delete Personal Data) to Initialize your
personal data and all settings. (See Page 34.)
(Initialize) to return the settings in the Settings screen to
• Touch
Initialize their initial values.
28 Introduction
personal data and all settings. (See Page 34.)
(Initialize) to return the settings in the Settings screen to
• Touch
Initialize their initial values.
■ Time zone setting 1 On the Info screen, touch
Settings
(Settings).
Before Use
3 Touch • Touch
On On
Off
(On) or (On) in Auto Time Zone to set the time zone
(Off) in Auto Time Zone.
automatically.
• When Auto Time Zone is “Off”, touch
or Time Zone to adjust the time zone manually.
in Manual
• Touch
for 1 second or more to raise the time
continuously. Touch continuously.
for 1 second or more to lower the time
2 Touch
Set
(Set) in Time Zone.
• After configuring the setting, touch
Done setting and return to the previous screen.
(Done) to save the
NOTE • On the Settings screen, touch
Delete Personal Data
(Delete Personal Data)
to initialize your personal data and all settings. (See Page 34.)
• On the Settings screen, touch
Initialize the Settings screen to their initial values.
(Initialize) to return the settings in
Introduction 29
Before Use
■ Link to Day/Night View setting 1 On the Info screen, touch
Settings
(Settings).
•
(Headlight):
Headlight Change to night view when the lights (sidelights, tail lights, license plate lights) are turned on. Time Change to night view or day view at the set times. None Change to night view or day view manually.
(None):
(Time):
2 Touch
Headlight
(Headlight),
Time (None) in Link to Day/Night View. •
If Link to Day/Night View is not displayed, touch change the page.
Day/night view changeover time setting When Link to Day/Night View is set to “Time”, you can set the time at which to change to the day view. 1 On the Settings screen, touch
(Time) in Link to
Time
Day/Night View.
(Time) or
None
to
2 Touch
Time Settings
(Time Settings).
30 Introduction
3 Touch
or
• You can set the “Sunrise” and “Sunset” time for the day view. • After configuring the setting, touch
Done setting and return to the previous screen.
(Done) to save the
Before Use
Changing to the night view or day view When Link to Day/Night View is set to “None”, you can change to the night view or day view manually. 1 On the Settings screen, touch
(None) in Link to
None
Day/Night View.
2 Touch
Day
(Day) or
Night
(Night).
NOTE • On the Settings screen, touch
Delete Personal Data
(Delete Personal Data)
to initialize your personal data and all settings. (See Page 34.)
• On the Settings screen, touch
Initialize the Settings screen to their initial values.
(Initialize) to return the settings in
NOTE • Touch
Delete Personal Data
(Delete Personal Data) to Initialize your
personal data and all settings. (See Page 34.)
• Touch
Initialize their initial values.
(Initialize) to return the settings in the Settings screen to
Introduction 31
Before Use
■ Voice recognition setting You can set the volume of the voice recognition.
CAUTION
Be sure to set the volume of the audio at an appropriate level. Improper volume setting may result in hearing damage or a traffic accident. 1 On the Info screen, touch
(Settings).
Settings
2 Touch
Set
(Set) in Voice Recognition. If Voice Recognition is not displayed, touch page.
•
to change the
3 Touch
•
or
(right side):
Volume up
(left side):
Volume down
32 Introduction
NOTE • On the Settings screen, touch
Delete Personal Data
(Delete Personal Data)
to Initialize your personal data and all settings. (See Page 34.)
• Touch
Initialize their initial values.
(Initialize) to return the settings in the different screens to
■ Guide tone setting You can set the sound for button operations to on or off. 1 On the Info screen, touch
(Settings).
Settings
2 Touch
On
(On) or
Off
(Off) in Guide Tone.
If Guide Tone is not displayed, touch
• to change the page. • When Guide Tone is set to “Off”, button operations do not emit
a sound.
Before Use
NOTE • Touch
Delete Personal Data
(Delete Personal Data) to Initialize your
personal data and all settings. (See Page 34.)
• Touch
Initialize their initial values.
(Initialize) to return the settings in the Settings screen to
Introduction 33
Deleted data • Phone book data • Outgoing call history and incoming call history • Speed Dial data • Bluetooth phone registered data • Unread messages and read messages • Reply Messages list • Settings and edited items related to handsfree
messages
Deleting personal data 1 Touch
Info
•
If the Navigation screen is displayed, change to the Multi screen or Audio operations screen before performing this operation. If
is not displayed, touch
•
Info 2 Touch
Settings
(Settings).
Before Use
■ Deleting Personal Data You can delete the data items that you registered and return them to their factory default values.
Item Handsfree
Deleted personal data items
Deleted data • Navigation settings • Map display setting • Route learning function • Indication setting of facilities • Current position • Clock setting • Language Setting • Guide tone setting • Skin pattern setting, Opening screen setting
(including data registered in “Customized”)
• Screen settings • Day/night view changeover setting • Voice recognition setting (including song data
and phone book data)
• Display settings for the "SD Eject" caution screen • Volume setting • Sound quality setting • Screen setting • AM/FM/SAT preset channels • Parental Lock setting • Bluetooth audio registered data • Settings and edited items related to Bluetooth
audio
Item Navigation
Settings
General audio
Radio
Bluetooth audio
34 Introduction
3 Touch
Delete Personal Data
(Delete Personal Data).
5 Touch
Yes
(Yes).
Before Use
4 Touch • Touch
(Delete).
Delete Do Not Delete
(Do Not Delete) to cancel the Delete
Personal Data.
NOTE Once the information (data) is initialized (deleted), it cannot be restored. Be very careful when performing initialization.
■ Initializing Settings menu You can delete the contents (Skin Pattern, Start Up Screen, Clock, Time Display, Time Zone, Link to Day/Night View, Voice Recognition, Guide Tone) set in the Settings screen and return them to this Unit's initial settings. 1 On the Info screen, touch
(Settings).
Settings
Introduction 35
■ Language setting You can change the navigation and audio display language, and the voice recognition language. 1 On the Info screen, touch
(Language).
Language
2 Touch the language that you want to use.
Before Use
2 Touch
Initialize
(Initialize).
3 Touch
Yes
(Yes).
36 Introduction
3 Touch
Yes
(Yes).
2 Touch
Software Version
(Software Version).
• The Software Version screen appears.
Before Use
■ Checking the Software Version You can check the version of the navigation and audio software.
Displaying the Software Version screen 1 Touch
Info
•
•
If the Navigation screen is displayed, change to the Multi screen or Audio operations screen before performing this operation. If
is not displayed, touch
Info
Introduction 37
Before Use
Screen Adjustment and Setting When Link to Day/Night View on the Settings screen is set to “Headlight” (See Page 30.), day view or night view is selected based on whether the lights (sidelights, tail lights, license plate light) are on or off, to make it easier to view the screen. When “Time” is set (See Page 30.), the view changes at the set time. Also, when set to “None” (See Page 31.), you can manually switch to a day view or a night view screen at any time. Displaying the picture quality adjustment screen
1 Press 2 After completing the adjustment, touch
for 1 second or more.
Done
(Done).
The picture quality adjustment screen has different adjustment items depending on whether it is the operations screen or video screen of the navigation or audio.
38 Introduction
■ Changing to the night view or day view 1 Touch
(Night) (
Night
Day
(Day)) if the day (night) view is
displayed on the image quality adjustment screen. • The view changes between night view and day view each time
you touch the screen.
NOTE When Link to Day/Night View is set to "None" on the Settings screen, (Day) or
(Night) are not displayed.
Night
Day
■ Closing the screen 1 On the picture quality adjustment screen, touch
Off
(Off). • To display the screen again, press
or
Before Use
■ Adjusting the picture quality You can independently adjust the day view and night view. 1 Display the day view or night view.
• For details on changing the view, see “Changing to the night
view or day view” on Page 39.
2 Adjust to the desired picture quality.
• Contrast:
Touch contrast.
to increase contrast and touch
to decrease
• Brightness:
Touch decrease brightness.
to increase brightness and touch
to
• Color (only applies to video screens):
Touch to strengthen red colors.
(G) to strengthen green colors and touch
(R)
• Tone (only applies to video screens):
Touch
to darken colors and touch
to lighten colors.
Introduction 39
CAUTION
• Do not leave a Bluetooth-connected phone inside the
vehicle. (Direct sunlight may cause the vehicle interior to rise to a very high temperature.)
• When using a Bluetooth-connected phone, keep away from
devices inside the vehicle. If you get too close to a device inside the vehicle, the sound or connection quality may drop.
Before Use
Precautions for Using Bluetooth Devices Be careful of the following when using Bluetooth devices.
WARNING
• To ensure safety, the driver should not operate Bluetooth-
connected phones while driving.
• Do not make calls on a cell phone while driving. If you
receive a call on your phone, calmly stop the vehicle in a safe place and then answer the call. If you must answer the call, use the handsfree function to inform the caller that you will call back later. Then, stop the vehicle in a safe place and call back.
• Buttons on the touch screen that cannot be used have their
colors toned down. Operating the navigation system while driving could cause your attention to be distracted from the current traffic conditions. This could result in a severe or fatal accident. Follow the descriptions of all operations and the instructions for safety given in this manual without fail.
• When using a cell phone in a vehicle, be sure to observe the
local laws and regulations.
40 Introduction
• The frequency band used by these devices is the same band
that is used by microwave ovens, wireless devices used in factory production lines for identifying moving objects (license required), special low output wireless devices (license not required), amateur radios (license required), and other industrial, scientific and medical devices. (The 3 types of wireless devices above are hereafter called “other wireless devices”.) When using a Bluetooth-connected phone, check whether “other wireless devices” are used nearby. If the Bluetooth-connected phone causes harmful radio wave interference in “other wireless devices”, immediately move the phone to a different location to stop the wireless interference. The frequency band used by Bluetooth- connected phones is the 2.4 GHz band. The FH-SS modulation scheme is used. The estimated distance in which interference may occur is less than 10 m. The band used by Bluetooth-connected phones is the full band, which helps avoid interference with the band used by devices that identify moving objects.
Before Use
Introduction 41
Before Use
Bluetooth Handsfree Operation Using Bluetooth Handsfree
Bluetooth-supporting cell phones that utilize Bluetooth wireless communication technology can be used with this unit. Connecting to this unit allows you to make calls without touching your cell phone. To use a Bluetooth-supporting cell phone with this unit, it is necessary to perform Bluetooth registration and connection settings. The cell phone connected to this unit must support the following specifications. Be aware that the available functions may vary depending on the type of cell phone. • Supported Bluetooth Specifications
- Bluetooth Specification Ver. 1.1 or higher (Ver. 2.0 + EDR or higher is
recommended)
• Supported Profiles
- HFP (Hands Free Profile) Ver. 1.0
- OPP (Object Push Profile) Ver. 1.1
- DUN (Dial-up Networking Profile) Ver. 1.1
- SYNC (Synchronization Profile) - PBAP (Phone Book Access Profile) - MAP (Message Access Profile)42 Introduction
• Bluetooth is a short-range wireless technology for connecting cell
phones, computers and other such devices.
The Bluetooth® word mark and logos are registered trademarks owned by Bluetooth SIG, Inc. and any of such marks by FUJITSU TEN LIMITED is under license. Other trademarks and trade names are those of their respective owners.
(1) (2) (3) (4)
(1) (2) (3) (4)
Bluetooth signal icon Battery level indicator Roaming area icon Reception indicator
■ Bluetooth signal quality icon Displays the Bluetooth connection status of a cell phone. • When a Bluetooth connection is established, “
” and reception level
are displayed.
NOTE • A Bluetooth communication antenna is embedded in the car display. If a Bluetooth-enabled cell phone is used in the following locations or conditions, the Bluetooth connection status display may turn gray or Bluetooth connection may not be possible. - When the cell phone is hidden from the display (when the cell phone is
behind or under a seat or in the glove box or console box).
- When the cell phone is touching or covered by a metal object. To use a Bluetooth-enabled cell phone, move the phone to a location where the blue display appears.
• When setting the cell phone to power saving mode, the Bluetooth
connection may be automatically disconnected. If this happens, switch off the power saving mode of the cell phone.
■ Battery indicator Displays the battery power remaining for the cell phone. • The battery indicator may not match the battery indicator of the cell
phone. Depending on the model, it may not be possible to display the battery power remaining.
■ Roaming area icon Displayed when connected in the roaming area.
Before Use
■ Reception indicator Displays the reception level. • When "No Service" is displayed, the location is either outside the
service area or cannot be reached by the signal. In such situations, the cell phone itself cannot be used. Move to a location where the "No Service" display is no longer shown.
• Observe the following point when using hands-free operation with a
cell phone. - The reception level may not match the display of the cell phone. Depending
on the model, it may not be possible to display the reception level.
■ Displaying the handsfree screen 1 Press 2 Touch
(Phone).
Phone
• The handsfree screen appears.
Introduction 43
Before Use
■ Registering a cell phone
WARNING
Do not register a cell phone while driving. Be sure to park the vehicle in a safe location and apply the parking brake before registering a cell phone.
4 Touch
Registered Devices
(Registered Devices).
You can register cell phones on this unit. Up to 5 cell phones can be registered on the unit. The order of connection precedence is always 1 to 5. When a cell phone is added or deleted, the order of connection precedence is updated. 1 Press 2 Touch Info 3 Touch
Info is not displayed, touch
Bluetooth
If
•
44 Introduction
5 Touch
Add New
(Add New).
6 Operate the cell phone to enter the passcode (passkey)
of the unit. • The name of the unit is CAR MULTIMEDIA. • The initial setting for the passcode (passkey) is 0000. • Operate the cell phone while the Registered Devices screen is
displayed.
7 When the registration is complete, “Connection
Completed” appears. • The cell phone registration is complete. • After the registration completed message is displayed, “Do you
want to transfer the phonebook from your mobile?” appears. (Yes) or Touch (No). For the procedure when you press (Yes), see step 4 in “Transferring the phone book data from a cell phone” on Page 59.
Yes Yes
No
NOTE • If the registration fails, “Connection failed” appears on the screen. If this
happens, perform the registration operation again.
• For details of operations on the cell phone, see the cell phone's instruction
manual.
• When processing a Bluetooth connection, the Bluetooth Audio may skip.
Before Use
■ Deleting a cell phone registration You can delete cell phones that are registered on the unit. 1 Press 2 Touch Info 3 Touch
Info is not displayed, touch
Bluetooth
If
•
4 Touch
Registered Devices
(Registered Devices).
Introduction 45
Before Use
5 Select the cell phone that you want to delete.
6 Touch
Delete
(Delete).
■ Connecting a cell phone You can connect a cell phone that is registered on the unit. • Make the preparations necessary for connecting to the unit, for example by setting the cell phone's Bluetooth standby to “On”. • For details of operations on the cell phone, see the cell phone's
instruction manual. 1 On the handsfree screen, touch
Settings
(Settings).
•