- 2010 Mercedes-Benz R Class Owners Manuals
- Mercedes-Benz R Class Owners Manuals
- 2006 Mercedes-Benz R Class Owners Manuals
- Mercedes-Benz R Class Owners Manuals
- 2008 Mercedes-Benz R Class Owners Manuals
- Mercedes-Benz R Class Owners Manuals
- 2009 Mercedes-Benz R Class Owners Manuals
- Mercedes-Benz R Class Owners Manuals
- 2007 Mercedes-Benz R Class Owners Manuals
- Mercedes-Benz R Class Owners Manuals
- 2011 Mercedes-Benz R Class Owners Manuals
- Mercedes-Benz R Class Owners Manuals
- Download PDF Manual
-
the objects could get caught between the pedals. You could then no longer brake or accelerate. This could lead to accidents and injury. G Warning On slippery road surfaces, never downshift in order to obtain braking action. This could result in drive wheel slip and reduced vehicle control. Your vehicle's ABS will not prevent this type of loss of control. G Warning It is dangerous to shift the automatic transmission out of parking position P or neutral position N if the engine speed is higher than idle speed. If your foot is not firmly on the brake pedal, the vehicle could accelerate quickly forward or in reverse. You could lose control of the vehicle and hit someone or something. Only shift into gear when the engine is idling normally and when your right foot is firmly on the brake pedal.
! Warm up the engine quickly. Do not use the engine's full performance until it has reached operating temperature. Only shift the automatic transmission to the desired drive position when the vehicle is stationary. Where possible, avoid spinning the drive wheels when pulling away on slippery roads. You could otherwise damage the drive train.
BA 251 USA, CA Edition A 2011; 1; 3, en-US d2sboike
2010-04-16T14:31:55+02:00 - Seite 149
Version: 3.0.3.5Driving 149
SmartKey positions SmartKey
g To remove the SmartKey 1 Power supply for some consumers, such
as the windshield wipers
2 Ignition (power supply for all consumers)
and drive position 3 To start the engine As soon as the ignition is switched on, all the indicator lamps in the instrument cluster light up. The indicator lamps of the low-beam headlamps, high-beam headlamps or the turn signal lamps only light up if the low-beam headlamps, high-beam headlamps or turn signal lamps are switched on. If an indicator lamp does not light up when the ignition is switched on, check it and replace it if necessary. If an indicator lamp does not go out after the engine is started or if it lights up while the vehicle is in motion, see (Y page 236). X Remove the SmartKey when the engine is
switched off. The battery may otherwise discharge.
If you cannot turn the SmartKey in the ignition lock, the vehicle battery may not be charged sufficiently. X Check the vehicle battery and charge if
necessary (Y page 310).
or X Jump-start the vehicle (Y page 311). i The SmartKey can be turned in the
ignition lock even if it is not the correct
SmartKey for the vehicle. The ignition is not switched on. The engine cannot be started.
KEYLESS-GO Vehicles with KEYLESS-GO are equipped with a SmartKey with an integrated KEYLESS-GO function and a detachable Start/Stop button. The Start/Stop button must be inserted in the ignition lock and the SmartKey must be in the vehicle. Pressing the Start/Stop button several times in succession corresponds to the different key positions in the ignition lock. This is only the case if you are not depressing the brake pedal. If you depress the brake pedal and press the Start/Stop button, the engine starts immediately. The Start/Stop button can be removed from the ignition lock. Then you can insert the SmartKey in the ignition lock. i You do not have to remove the Start/Stop
button from the ignition lock when you leave the vehicle. However, you should always take the SmartKey with you when leaving the vehicle. The vehicle can be started with the Start/Stop button and the electrical equipment can be operated while the SmartKey is in the vehicle.
: Start/Stop button ; Ignition lock X Insert Start/Stop button : into ignition
lock ;.
BA 251 USA, CA Edition A 2011; 1; 3, en-US d2sboike
2010-04-16T14:31:55+02:00 - Seite 150
Version: 3.0.3.5150 Driving
i When you insert Start/Stop button :
into ignition lock ;, the system requires a detection time of two seconds before you can use Start/Stop button :.
X Shift the transmission to position P. X Do not press the brake pedal.
Start/Stop button = USA only ? Canada only X Position 0: if Start/Stop button : has not yet been pressed, this corresponds to the SmartKey being removed from the ignition.
X Position 1: press Start/Stop button :.
You can now activate the windshield wipers, for example.
i If you then open the driver's door when in
this position, the power supply is deactivated.
X Position 2 (ignition): press Start/Stop
button : twice.
i If you press Start/Stop button : once when in this position and the driver's door is open, the power supply is deactivated again.
As soon as the ignition is switched on, all the indicator lights in the instrument cluster light up. The indicator lamps of the low-beam headlamps, high-beam headlamps or the turn signal lamps only light up if the low-beam headlamps, high-beam headlamps or turn signal lamps are switched on. If an indicator lamp does not light up when the ignition is
switched on, check it and replace it if necessary. If an indicator lamp does not go out after the engine is started or if it lights up while the vehicle is in motion, see (Y page 236).
Starting the engine Important safety instructions G Warning Inhalation of exhaust gas is hazardous to your health. All exhaust gas contains carbon monoxide (CO), and inhaling it can cause unconsciousness and possible death. Do not run the engine in confined areas (such as a garage) which are not properly ventilated. If you think that exhaust gas fumes are entering the vehicle while driving, have the cause determined and corrected immediately. If you must drive under these conditions, drive only with at least one window fully open at all times.
! Do not depress the accelerator pedal
when starting the engine.
Automatic transmission X Shift the transmission to position P. i The transmission position display in the
multifunction display shows P.
Starting procedure with the SmartKey X To start a gasoline engine: turn the
SmartKey to position 3 in the ignition lock (Y page 149) and release it as soon as the engine is running.
X To start a diesel engine: turn the
SmartKey to position 2 in the ignition lock (Y page 149). The % preglow indicator lamp in the instrument cluster lights up.
X When the % preglow indicator lamp
goes out, turn the SmartKey to position 3
BA 251 USA, CA Edition A 2011; 1; 3, en-US d2sboike
2010-04-16T14:31:55+02:00 - Seite 151
Version: 3.0.3.5Driving 151
(Y page 149) and release it as soon as the engine is running.
i You can start the engine without preglow
if the engine is warm.
Using KEYLESS-GO to start the engine G Warning! As long as the SmartKey is in your vehicle, the vehicle can be started. Therefore, never leave children unattended in the vehicle, as they could otherwise accidentally start the engine. When leaving the vehicle, always take the SmartKey with you and lock the vehicle. Do not leave children unattended in the vehicle, or with access to an unlocked vehicle. A child's unsupervised access to a vehicle could result in an accident and/or serious personal injury.
i The Start/Stop button can be used to
start the vehicle without inserting the SmartKey in the ignition lock. The SmartKey must be in the vehicle.
X The Start/Stop button must be inserted in
the ignition lock.
i To start the engine with the SmartKey instead of with KEYLESS-GO, remove the Start/Stop button from the ignition lock.
X Depress the brake pedal and keep it
depressed.
X To start a gasoline engine: press the Start/Stop button (Y page 149) once. The engine starts.
X To start a diesel engine: press the Start/
Stop button (Y page 149) once. Preglow is activated and the engine starts. i If the engine is warm, the preglow time is
shortened.
Pulling away Automatic transmission G Warning It is dangerous to shift the automatic transmission out of parking position P or neutral position N if the engine speed is higher than idle speed. If your foot is not firmly on the brake pedal, the vehicle could accelerate quickly forward or in reverse. You could lose control of the vehicle and hit someone or something. Only shift into gear when the engine is idling normally and when your right foot is firmly on the brake pedal.
i It is only possible to shift the transmission
from position P to the desired position if you depress the brake pedal. Only then is the parking lock released. If you do not depress the brake pedal, you can move the DIRECT SELECT selector lever but the parking lock remains engaged.
X Depress the brake pedal and keep it
depressed.
X Shift the transmission to position D or R. X Wait until the gear change is completed
before pulling away.
X Release the parking brake (Y page 167). X Release the brake pedal. X Carefully depress the accelerator pedal. ! If a warning tone sounds and the Release Park. Brake message appears in the instrument cluster, the parking brake is still applied. Release the parking brake. i The vehicle locks centrally once you have pulled away. The locking knobs in the doors drop down. You can open the doors from the inside at any time. You can also deactivate the automatic locking feature (Y page 208).
i Upshifts take place at higher engine
speeds after a cold start. This helps the
BA 251 USA, CA Edition A 2011; 1; 3, en-US d2sboike
2010-04-16T14:31:55+02:00 - Seite 152
Version: 3.0.3.5152 Driving
catalytic converter to reach its operating temperature more quickly.
Hill start assist Hill start assist helps you when pulling away forwards or in reverse on an uphill gradient. It holds the vehicle for a short time after you have removed your foot from the brake pedal. This gives you enough time to move your foot from the brake pedal to the accelerator pedal and depress it before the vehicle begins to roll. G Warning Never leave the vehicle when it is held by hill start assist. After approximately one second, hill start assist will no longer brake your vehicle and it could roll away.
X Take your foot off the brake pedal. i Once you have taken your foot off the
brake pedal, the vehicle is held for around one second.
X Pull away. Hill start assist will not function if: Ryou are pulling away on a level road or a
downhill gradient.
Rthe transmission is in position N. Rthe parking brake is applied. RESP® is malfunctioning.
Switching off the engine Important safety instructions G Warning Do not turn off the engine before the vehicle has come to a complete stop. With the engine not running, there is no power assistance for the brake and steering systems. In this case, it is important to keep in mind that a considerably higher degree of effort is necessary to brake and steer the vehicle.
i If you cannot turn off the engine as
described here, see "Emergency engine shut down" (Y page 317).
Vehicles with automatic transmission G Warning! Keep in mind that turning off the engine alone only will shift the automatic transmission into neutral position N automatically. Always shift the automatic transmission into park position P before turning off the engine. Otherwise the vehicle could roll away which could result in an accident and/or serious personal injury.
X Shift the transmission to position P. Using the SmartKey X Turn the SmartKey to position 0 in the
ignition lock and remove it. The immobilizer is activated.
X Apply the parking brake firmly. i If you turn off the engine with the
SmartKey and then remove it from the ignition lock or open a front door, the automatic transmission switches to P automatically.
Using KEYLESS-GO X Press the Start/Stop button (Y page 149). When the driver's door is closed, the Start/ Stop button is in position 1. When the driver's door is opened, the Start/Stop button moves to position 0. This corresponds to removing the SmartKey.
X Apply the parking brake firmly. i If you turn off the engine with the Start/
Stop button and open a front door, the automatic transmission switches to P automatically.
i The engine can be turned off while the
vehicle is in motion by pressing and holding the Start/Stop button for three seconds.
BA 251 USA, CA Edition A 2011; 1; 3, en-US d2sboike
2010-04-16T14:31:55+02:00 - Seite 153
Version: 3.0.3.5Driving 153
If you have started the engine with the Start/ Stop button and it cannot be switched off as described: X remove the Start/Stop button from the
ignition lock.
X insert the SmartKey into the ignition lock.
The engine stops. The ignition lock is in position 0.
BA 251 USA, CA Edition A 2011; 1; 3, en-US d2sboike
2010-04-16T14:31:55+02:00 - Seite 154
Version: 3.0.3.5154 Driving
Problems with the engine Problem The engine does not start. The starter motor can be heard.
Possible causes/consequences and M Solutions RThere is a malfunction in the engine electronics. RThere is a malfunction in the fuel supply. X Turn the SmartKey back to position 0 in the ignition lock before
the next attempt to start with the SmartKey.
The engine does not start. You cannot hear the starter motor.
X Before the next starting attempt with KEYLESS-GO: shut all open
vehicle doors so that the signals from the SmartKey may be better received.
or X Pull the Start/Stop button out of the ignition. X Use the SmartKey to start the engine, (Y page 150) as external
radio signals cause KEYLESS-GO to malfunction. Avoid excessively long and frequent attempts to start the engine as these will drain the battery.
If the engine does not start after several attempts: X Consult a qualified specialist workshop. The on-board voltage is too low because the starter battery is too weak or discharged. X Jump-start the vehicle (Y page 311). If the engine does not start despite attempts to jump-start it: X Consult a qualified specialist workshop. The starter motor was exposed to a thermal load that was too high. X Allow the starter motor to cool down for approximately two
minutes.
X Try to start the engine again. If the engine still does not start: X Consult a qualified specialist workshop.
BA 251 USA, CA Edition A 2011; 1; 3, en-US d2sboike
2010-04-16T14:31:55+02:00 - Seite 155
Version: 3.0.3.5Automatic transmission 155
Problem Vehicles with a gasoline engine: The engine is not running smoothly and is misfiring.
The coolant temperature gauge shows a value above 248 ‡(120 †).
Possible causes/consequences and M Solutions There is a malfunction in the engine electronics or a mechanical component of the engine management system. X Only depress the accelerator pedal slightly. X Have the cause rectified immediately at a qualified specialist
workshop. Otherwise, non-combusted fuel may get into the catalytic converter and damage it.
The coolant level is too low. The coolant is too hot and the engine is no longer being cooled sufficiently. X Stop as soon as possible and allow the engine and the coolant
to cool down.
X Check the coolant level (Y page 281). Observe the warning
notes as you do so and add coolant if necessary.
Automatic transmission Important safety guidelines G Warning It is dangerous to shift the automatic transmission out of parking position P or neutral position N if the engine speed is higher than idle speed. If your foot is not firmly on the brake pedal, the vehicle could accelerate quickly forward or in reverse. You could lose control of the vehicle and hit someone or something. Only shift into gear when the engine is idling normally and when your right foot is firmly on the brake pedal. G Warning! Keep in mind that turning off the engine alone only will shift the automatic transmission into neutral position N automatically. Always shift the automatic transmission into park position P before turning off the engine. Otherwise the vehicle could roll away which could result in an accident and/or serious personal injury.
DIRECT SELECT lever Overview of transmission positions The DIRECT SELECT lever is on the right of the steering column.
P Park position with parking lock R Reverse N Neutral D Drive i The DIRECT SELECT lever always returns
to its original position. The current transmission position P, R, N or D appears in the transmission position display (Y page 156) in the multifunction display.
BA 251 USA, CA Edition A 2011; 1; 3, en-US d2sboike
2010-04-16T14:31:55+02:00 - Seite 156
Version: 3.0.3.5156 Automatic transmission
Engaging park position P X Push the DIRECT SELECT lever in the
direction of the arrow P.
i Vehicles with a production date as of 18
January 2010: if you open the driver's door when the vehicle is stationary or if the speed is very low, the automatic transmission shifts to park position P automatically.! If the engine speed is too high or the
vehicle is moving, do not shift the automatic transmission directly from D to R, from R to D or directly to P. The automatic transmission could otherwise be damaged.
Engaging reverse gear R ! Only shift the automatic transmission to
R when the vehicle is stationary.
X Push the DIRECT SELECT lever up past the
first point of resistance.
Shifting to neutral N X When the vehicle is stationary, depress the
brake pedal.
X Push the DIRECT SELECT lever up or down
to the first point of resistance.
When the engine is switched off, the automatic transmission shifts to N automatically. Remaining in neutral N If you wish to keep the automatic transmission in neutral N, e.g. to wash the vehicle in a car wash with a towing device, observe the following: Using the SmartKey: Rmake sure the ignition is switched on. Rwhen the vehicle is stationary, depress the
brake pedal and keep it depressed.
Rshift to neutral N. Rrelease the brake pedal.
Rif applied, release the parking brake. Rswitch off the ignition and leave the
SmartKey in the ignition lock.
Using KEYLESS-GO: Rmake sure the ignition is switched on. Rwhen the vehicle is stationary, depress the
brake pedal and keep it depressed.
Rshift to park position P. Rrelease the brake pedal. Rremove the Start/Stop button from the
ignition lock.
Rinsert the SmartKey into the ignition lock. Rswitch on the ignition. Rdepress the brake pedal and keep it
depressed.
Rshift to neutral N. Rrelease the brake pedal. Rif applied, release the parking brake. Rswitch off the ignition and leave the
SmartKey in the ignition lock.
Shifting to transmission position D X Push the DIRECT SELECT lever down past
the first point of resistance.
Transmission position display The current transmission position is shown in the multifunction display.
: Transmission position i The arrows in the transmission position
display show how and into which transmission positions you can change using the DIRECT SELECT lever.
BA 251 USA, CA Edition A 2011; 1; 3, en-US d2sboike
2010-04-16T14:31:55+02:00 - Seite 157
Version: 3.0.3.5Automatic transmission 157
Transmission positions B Park position
Do not shift the transmission into position P unless the vehicle is stationary. The parking lock should not be used as a brake when parking. In addition to engaging the parking lock, you must always apply the parking brake to secure the vehicle. In the event of a fault in the vehicle electronics, the transmission can be locked in position P. Have the vehicle electronics checked immediately at a qualified specialist workshop, e.g. an authorized Mercedes-Benz Center.
C Reverse
Only shift the transmission to R when the vehicle is stationary.
A Neutral
Do not shift the transmission to N while driving. The transmission could otherwise be damaged. No power is transmitted from the engine to the drive wheels. Releasing the brakes will allow you to move the vehicle freely, e.g. to push it or tow it. If ESP® is deactivated or faulty: only shift the transmission to position N if the vehicle is in danger of skidding, e.g. on icy roads. ! Driving in neutral N can
damage the drive train.
7 Drive
The automatic transmission changes gear automatically. All forward gears are available.
Gearshifting The automatic transmission shifts to the individual gears automatically when it is in transmission position D. This automatic gearshifting behavior is determined by: Ra shift range restriction, if selected Rthe selected drive program
E/S(Y page 158)
Rthe position of the accelerator pedal Rthe road speed
Driving tips Kickdown Use kickdown for maximum acceleration. X Vehicles for USA: fully depress the
accelerator pedal. The transmission shifts to a lower gear depending on the engine speed.
X Vehicles for Canada: depress the
accelerator pedal beyond the pressure point. The transmission shifts to a lower gear depending on the engine speed.
Rocking the vehicle free Rocking the vehicle free by repeatedly shifting back and forth between transmission positions D and R can help to free a vehicle that has become stuck in mud or snow. The engine management system of the vehicle limits shifting back and forth between transmission positions D and R to a maximum speed of 5 mph (9 km/h). To shift back and forth between transmission positions D and R, move the selector lever up and down beyond the pressure point.
Working on the vehicle G Warning When working on the vehicle, engage the parking brake and shift the automatic
BA 251 USA, CA Edition A 2011; 1; 3, en-US d2sboike
2010-04-16T14:31:55+02:00 - Seite 158
Version: 3.0.3.5158 Automatic transmission
transmission into park position P. Otherwise the vehicle could roll away which could result in an accident and/or serious personal injury.
Trailer towing X When towing a trailer and driving downhill,
shift to a lower gear if the automatic transmission constantly shifts between two gears.
X Engaging a lower gear and reducing the
speed reduces the risk of the engine overheating.
Program selector button
Program selector button E Economy
S Sport
Comfortable, economical driving Sporty driving style
i For further information on "Drive
program" (Y page 158).
X Press program selector button :
repeatedly until the letter for the desired gearshift program appears in the multifunction display.
Steering wheel paddle shifters
: Left-hand steering wheel paddle shifter ; Right-hand steering wheel paddle shifter You can restrict or derestrict the shift range by using the steering wheel paddle shifters.
Automatic drive program Drive program E is characterized by the following: Rthe vehicle pulling away more gently in forward and reverse gears, unless the accelerator pedal is depressed fully
Rincreased sensitivity; this improves driving
stability on slippery road surfaces, for example.
Rthe automatic transmission shifting up
sooner, which results in the vehicle being driven at lower engine speeds and the wheels being less likely to spin In drive program S, the automatic transmission shifts up later.
Shift ranges Introduction When the automatic transmission is in position D, it is possible to restrict or derestrict the shift range (Y page 158). The shift range selected is shown in the multifunction display. The automatic transmission shifts only as far as the selected gear.
BA 251 USA, CA Edition A 2011; 1; 3, en-US d2sboike
2010-04-16T14:31:55+02:00 - Seite 159
Version: 3.0.3.5Automatic transmission 159
Selecting the ideal shift range X Pull the left-hand steering wheel paddle
shifter and hold it in position. The automatic transmission shifts to the gear which allows ideal acceleration and deceleration. To do this, the automatic transmission shifts down one or more gears.
Driving situations = You can use the engine's braking
effect.
5 To use the braking effect of the
engine on downhill gradients and for driving: Ron steep mountain roads Rin mountainous terrain Rin arduous conditions
4 To use the braking effect of the
engine on extremely steep downhill gradients and on long downhill stretches
Restricting the shift range X Pull the left-hand steering wheel paddle
shifter. The shift range is restricted.
i In order to prevent the engine from
overrevving, the automatic transmission does not shift down when the engine speed is too high.
i If the maximum engine speed for the shift
range is reached and you continue to accelerate, the automatic transmission shifts up in order to prevent the engine from overrevving, even if the shift range is restricted.
Derestricting the shift range X Pull the right-hand steering wheel paddle
shifter. The shift range is derestricted.
Clearing the shift range restriction X Pull and hold the right-hand steering wheel paddle shifter until D is shown again in the multifunction display. The automatic transmission shifts from the current shift range directly to D.
BA 251 USA, CA Edition A 2011; 1; 3, en-US d2sboike
2010-04-16T14:31:55+02:00 - Seite 160
Version: 3.0.3.5160 Refueling
Problems with the transmission Problem The acceleration ability is deteriorating. The transmission no longer changes gear.
Possible causes/consequences and M Solutions The transmission is in emergency mode. It is only possible to shift into 2nd gear and reverse gear. X Stop the vehicle. X Shift the transmission to position P. X Switch off the engine. X Wait at least 10 seconds before restarting the engine. X Shift the transmission to position D or R.
If D is selected, the transmission shifts into 2nd gear; if R is selected, the transmission shifts into reverse gear.
X Have the transmission checked at a qualified specialist
workshop immediately.
Transfer case The vehicle has permanent 4-wheel drive (4MATIC). Power is always transmitted to both axles. ! Performance tests may only be carried out on a 2-axle dynamometer. The brake system or transfer case could otherwise be damaged. Contact an authorized Mercedes-Benz Center for a performance test. Mercedes-Benz recommends that you use an authorized Mercedes-Benz Center for this purpose.
! If the parking brake is being tested on a brake dynamometer, the ignition must be switched off (SmartKey or Start/Stop button in position 0 or 1), as ESP® will otherwise automatically intervene. The test must last a maximum of 10 seconds. The brake system could otherwise be damaged.
Refueling Important safety guidelines G Warning! Gasoline and diesel fuels are highly flammable and poisonous. They burn violently and can cause serious injury. Never allow sparks, flames or smoking materials near gasoline or diesel fuel! Turn off the engine before refueling. Whenever you are around gasoline or diesel fuel, avoid inhaling fumes and any skin or clothing contact. Extinguish all smoking materials. Direct skin contact with fuels and the inhalation of fuel vapors are damaging your health. G Warning Overfilling of the fuel tank may create pressure in the system which could cause a gas discharge. This could cause the gasoline to spray back out when removing the fuel pump nozzle, which could cause personal injury.
BA 251 USA, CA Edition A 2011; 1; 3, en-US d2sboike
2010-04-16T14:31:55+02:00 - Seite 161
Version: 3.0.3.5Refueling 161
G Warning! Do not fill diesel tanks with gasoline. Do not mix diesel fuel with gasoline. Otherwise the fuel system and engine could be damaged. In addition, the vehicle could catch fire.
! Do not use gasoline to refuel vehicles with a diesel engine. Do not use diesel to refuel vehicles with a gasoline engine. Even small amounts of the wrong fuel result in damage to the fuel system and engine.
! Do not start the engine if you accidentally refuel with the wrong fuel. Otherwise, the fuel could enter the fuel lines. This would require draining of the fuel tank and fuel lines. Notify a qualified specialist workshop and have the fuel tank and fuel lines drained completely.
Gasoline Fuel grade ! You should only refuel with unleaded premium-grade gasoline as this avoids damaging the catalytic converter. If engine running problems are apparent, have the cause checked immediately and repaired. Excess unburned fuel can otherwise enter the catalytic converter, leading to overheating and possibly causing a fire.
i Only refuel with unleaded premium-grade gasoline with a specified minimum octane number of 91 (average value of 96 RON/ 86 MON). Usually you will find information about the fuel grade on the pump. If you cannot find the label on the gasoline pump, ask the gas station staff. You can find further information under "Fuel" (Y page 352), by consulting an authorized Mercedes-Benz Center or visiting http://www.mbusa.com (USA only).
Diesel Fuel grade ! Only refuel with ULTRA-LOW SULFUR DIESEL FUEL (ULSD, 15 ppm SULFUR MAXIMUM). Using other diesel fuels could result in increased wear and damage to the engine and/or exhaust system. Never refuel with marine diesel or heating oil. Do not mix these fuels with diesel fuels and do not use any special additives, as this may result in damage.
! When refueling using a fuel can, use a
filter or use a clean cloth as a filter. Otherwise, particles from the fuel can may block the fuel lines and/or the diesel injection system.
i Refuel only with ULTRA-LOW SULFUR DIESEL FUEL (ULSD, 15 ppm SULFUR MAXIMUM). Usually you will find information about the fuel grade on the pump. If you cannot find the label on the gasoline pump, ask the gas station staff. You can find further information under "Fuel" (Y page 352), by consulting an authorized Mercedes-Benz Center or by visiting http://www.mbusa.com (USA only).
Low outside temperatures ! Do not use gasoline to refuel vehicles with
a diesel engine. Never mix diesel with gasoline or kerosene, as this may result in damage to the engine or fuel system.
Diesel fuel with improved cold flow properties is available during the winter months. Further information on fuel properties can be obtained from oil companies, e.g. at gas stations.
BA 251 USA, CA Edition A 2011; 1; 3, en-US d2sboike
2010-04-16T14:31:55+02:00 - Seite 162
Version: 3.0.3.5162 Refueling
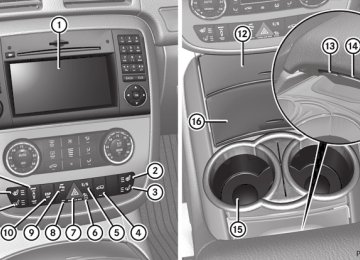
Refueling Fuel filler flap The fuel filler flap is unlocked or locked automatically when you open or close the vehicle with the SmartKey or using KEYLESS- GO. The position of the fuel filler flap is to the rear on the right. The position of the fuel filler cap is displayed in the instrument cluster 8. The arrow next to the filling pump indicates the side of the vehicle.
: To open the fuel filler flap ; To insert the fuel filler cap = Fuel type ? Tire pressure table
Opening X Switch off the engine. i When the engine is running and the fuel filler flap is open, the yellow reserve fuel warning lamp and the ! (USA only) or ; (Canada only) engine diagnostics warning lamp may light up. For further information on warning and indicator lamps in the instrument cluster, see (Y page 242).
X Remove the SmartKey from the ignition
lock. KEYLESS-GO: the driver's door is open. This returns the ignition to position 0, which corresponds to the SmartKey being
removed. The driver's door can be closed again.
X Press the fuel filler flap in the direction of
arrow :. The fuel filler flap opens slightly.
X Open the fuel filler flap. X Turn the fuel filler cap counter-clockwise
and remove it.
X Insert the fuel filler cap into the holder bracket on the inside of filler flap ;.
X Completely insert the filler neck of the fuel
pump nozzle into the tank and refuel. X Only fill the tank until the pump nozzle
switches off.
! Overfilling the fuel tank could damage the
fuel system.
Closing X Replace the fuel filler cap and turn it clockwise. The fuel filler cap audibly engages.
i Close the fuel filler flap before locking the vehicle. A locking pin otherwise prevents the fuel filler flap from closing after the vehicle has been locked. X Close the fuel filler flap.
Emergency fuel filler flap release G Warning! Avoid contact with the vehicle walls as they may contain sharp edges. Otherwise, you could injure yourself while releasing the fuel filler flap.
The emergency release is located behind the side trim panel in the cargo compartment. X Open the tailgate. X Open the right-hand side trim panel
(Y page 125).
BA 251 USA, CA Edition A 2011; 1; 3, en-US d2sboike
2010-04-16T14:31:55+02:00 - Seite 163
Version: 3.0.3.5Refueling 163
X Pull emergency release : in the direction
of the arrow. The fuel filler flap is unlocked.
X Open the fuel filler flap.
BA 251 USA, CA Edition A 2011; 1; 3, en-US d2sboike
2010-04-16T14:31:55+02:00 - Seite 164
Version: 3.0.3.5164 Refueling
Problems with the fuel and fuel tank Problem Fuel is leaking from the vehicle.
Possible causes/consequences and M Solutions G Risk of explosion or fire The fuel line or fuel tank is defective. X Turn the SmartKey to position 0(Y page 149) in the ignition lock
immediately and remove it.
The fuel filler flap cannot be opened.
X Do not restart the engine under any circumstances. X Consult a qualified specialist workshop. The fuel filler flap is not released. or The SmartKey batteries are discharged. X Unlock the vehicle using the mechanical key (Y page 77). X Open the tailgate. X Manually unlock the fuel filler flap using the emergency release
(Y page 162).
The fuel tank in a diesel engine vehicle has been run completely dry and the engine will not start.
The fuel filler flap is released, but the opening mechanism is jammed. X Manually unlock the fuel filler flap using the emergency release
(Y page 162).
X Consult a qualified specialist workshop. There is air in the fuel system. X Refuel the vehicle with at least 5.3 US qt (5 liters) of diesel. X Turn the ignition on for at least 10 seconds. Turn the SmartKey
to position 2(Y page 149) in the ignition lock.
X Start the engine continuously for up to 10 seconds until it runs
smoothly.
If the engine does not start: X Turn the ignition on again for approximately 10 seconds. Turn
the SmartKey to position 2(Y page 149) in the ignition lock.
X Start the engine again continuously for up to 10 seconds until
it runs smoothly.
If the engine does not start after three attempts: X Consult a qualified specialist workshop.
BA 251 USA, CA Edition A 2011; 1; 3, en-US d2sboike
2010-04-16T14:31:55+02:00 - Seite 165
Version: 3.0.3.5Refueling 165
AdBlue® Important notes on use BlueTEC exhaust gas aftertreatment24 must be operated with AdBlue® reducing agent in order to function properly. Adding AdBlue® is one of the tasks performed during maintenance. Under normal operating conditions, a tank of AdBlue® lasts until the next service due date. When the AdBlue® supply has almost run out, the Check Additive – See Operator's Manual message is shown in the multifunction display. When the AdBlue® supply sinks to a minimum level, the Remaining Starts: 20 message is shown in the multifunction display. i When the Remaining Starts: 20
message is shown in the multifunction display, you can start the engine 20 more times. If AdBlue® is not topped up, it is then not possible to start the engine again. Top up the AdBlue® tank with approximately 1 gallon (3.8 l) of AdBlue® or have the AdBlue® tank refilled at a qualified specialist workshop, e.g. an authorized Mercedes-Benz Center.Use the special AdBlue® refill bottle when adding between maintenance intervals. For more information, please contact an authorized Mercedes-Benz Center or Roadside Assistance if applicable (Y page 20). Further information about BlueTEC exhaust gas aftertreatment and AdBlue® is available at any authorized Mercedes-Benz Center.
Adding AdBlue® G Warning! Make sure RAdBlue® does not come into contact with
skin, eyes, or clothing
Rto keep AdBlue® out of the reach of children If you and/or others have come into contact with AdBlue®: RIf AdBlue® has gotten into contact with
eyes, flush with plenty of water immediately and seek medical help.
RClean affected skin immediately with plenty
of water.
RIf AdBlue® was swallowed, rinse mouth
immediately with plenty of water and drink plenty of water. Consult a physician. G Warning! When opening the filler cap of the AdBlue® tank ammonia gas vapors may escape. Refill AdBlue® in a well ventilated area only. Ammonia gas vapors have a pungent odor and are particularly irritating for your skin, mucous membranes, and eyes. Inhaling ammonia gas vapors will cause burning eyes, nose, and throat, as well as coughing and watering eyes.
! Only use AdBlue® that complies with
ISO 22241. Do not add any special additives to AdBlue® and do not thin AdBlue® with water. This could destroy the BlueTEC exhaust gas aftertreatment. ! Rinse surfaces that have come into
contact with AdBlue® immediately with water or remove AdBlue® using a damp cloth and cold water. If the AdBlue® has already crystallized, use a sponge and cold water to clean it. AdBlue® residues crystallize after time and contaminate the affected surfaces.
24 Only on BlueTEC vehicles.
BA 251 USA, CA Edition A 2011; 1; 3, en-US d2sboike
2010-04-16T14:31:55+02:00 - Seite 166
Version: 3.0.3.5166 Refueling
! AdBlue® is not a additive and must not be
added to the diesel tank. If AdBlue® is added to the diesel tank this could damage the engine.
i If you are adding between maintenance intervals, add approximately 1 gallon (3.8 l) of AdBlue® to the AdBlue® tank. 1 gallon (3.8 l) of AdBlue® is approximately 2 AdBlue® refill bottles. Further information about AdBlue®(Y page 353). The AdBlue® filler neck is under the luggage compartment floor. X Switch off the ignition. X Open the tailgate. X Lift the luggage compartment floor
(Y page 294).
X Remove wheel bolt wrench ; and ratchet
ring spanner = if applicable.
X Turn AdBlue® cap : anti-clockwise and
remove it.
X Turn AdBlue® filler cap ; anti-clockwise
and open it. Filler cap ; is secured with a plastic strap. X Turn AdBlue® filler cap ? anti-clockwise
and open it. Filler cap ? is secured with a plastic strap.
X Unscrew the covering cap from AdBlue®
refill bottle A.
X Place AdBlue® refill bottle A on the filler
neck as shown and screw on clockwise hand-tight.
! Only screw on the AdBlue® refill bottle
hand-tight. It could otherwise be damaged.
X Press AdBlue® refill bottle A down.
The AdBlue® tank is filled. This may take up to one minute.
i If the AdBlue® refill bottle is no longer
pressed down, the filling process stops and the partially emptied bottle can be removed.
X Release AdBlue® refill bottle A. X Turn AdBlue® refill bottle A anti-clockwise
and remove it.
X Place AdBlue® filler cap ? on the filler
neck and turn it clockwise.
BA 251 USA, CA Edition A 2011; 1; 3, en-US d2sboike
2010-04-16T14:31:55+02:00 - Seite 167
Version: 3.0.3.5Parking 167
Vehicle movement may result in serious personal injury or damage to the vehicle or vehicle drivetrain. Therefore, always do the following before turning off the engine and leaving the vehicle: RKeep right foot on the brake pedal. REngage the parking brake. RShift the automatic transmission into park
position P.
RSlowly release the brake pedal. RWhen parked on an incline, always turn the
front wheels towards the road curb.
RTurn the SmartKey in the starter switch to position 0 and remove the SmartKey from the starter switch, or press the KEYLESS- GO start/stop button.
RTake the SmartKey with you and lock the
vehicle when leaving.
Parking brake G Warning Engaging the parking brake while the vehicle is in motion can cause the rear wheels to lock up. You could lose control of the vehicle and cause an accident. In addition, the vehicle's brake lights do not light up when the parking brake is engaged. G Warning! When leaving the vehicle, always remove the SmartKey from the starter switch, take it with you, and lock the vehicle. Do not leave children unattended in the vehicle, or with access to an unlocked vehicle. Children could release the parking brake and/or shift the automatic transmission out of park position P, either of which could result in an accident and/or serious personal injury.
X Insert AdBlue® cap : as shown and turn
it clockwise as far as it will go.
X Stow wheel bolt wrench ; and ratchet ring
spanner = again.
X Fold the load compartment floor down. X Close the tailgate. X Drive at a speed above 10 mph (16 km/h). The Check Additive – See Operator's Manual disappears after approximately one minute. i If the Check Additive – See Operator's Manual is still displayed in the multifunction display, top up with another bottle of AdBlue®.
i Then, have the AdBlue® supply checked
and filled completely if necessary. Mercedes-Benz recommends that you use a qualified specialist workshop such as an authorized Mercedes-Benz Center for this purpose.
Parking Important safety guidelines G Warning! Do not park this vehicle in areas where combustible materials such as grass, hay or leaves can come into contact with the hot exhaust system. These materials could be ignited and cause a vehicle fire.
BA 251 USA, CA Edition A 2011; 1; 3, en-US d2sboike
2010-04-16T14:31:55+02:00 - Seite 168
Version: 3.0.3.5168 Driving tips
Driving tips General driving tips Important safety instructions G Warning! Please do not forget that your primary responsibility is to drive the vehicle. A driver’s attention to the road must always be his/her primary focus when driving. For your safety and the safety of others, we recommend that you pull over to a safe location and stop before placing or taking a telephone call. If you choose to use the telephone25 while driving, please use the hands-free device and only use the telephone when road, weather and traffic conditions permit. Some jurisdictions prohibit the driver from using a mobile telephone while driving a vehicle. Only operate the COMAND25 (Cockpit Management and Data System) if road, weather and traffic conditions permit. Otherwise, you may not be able to observe traffic conditions and could endanger yourself and others. Bear in mind that at a speed of just 30 mph (approximately 50 km/h), your vehicle is covering a distance of 44 feet (approximately 14 m) every second.
Drive sensibly – save fuel To save fuel, observe the following notes: X Keep tires at the recommended inflation
pressures.
X Remove unnecessary cargo. X Remove the roof carrier when not in use. X Maintain a low engine speed until the
engine is warm.
X Avoid frequent acceleration and
deceleration.
X Have all maintenance work performed at
the service intervals specified in the
X To apply: depress parking brake ; firmly. When the engine is running, the $ (USA only) or J (Canada only) indicator lamp lights up in the instrument cluster.
X To release: depress the brake pedal and
keep it depressed.
X Pull release handle :.
When the ignition is switched on or the engine is running, the $ (USA only) or J (Canada only) indicator lamp goes out in the instrument cluster.
Parking up the vehicle If you leave the vehicle parked up for longer than four weeks, the battery may be damaged by exhaustive discharge. X Disconnect the battery or connect it to a
trickle charger.
i You can obtain information about trickle
chargers from a qualified specialist workshop, e.g. an authorized Mercedes- Benz Center.
If you leave the vehicle parked up for longer than six weeks, the vehicle may suffer damage as a result of lack of use. X Visit a qualified specialist workshop and
seek advice.
25 Observe all legal requirements.
BA 251 USA, CA Edition A 2011; 1; 3, en-US d2sboike
2010-04-16T14:31:55+02:00 - Seite 169
Version: 3.0.3.5Driving tips
169
Service Booklet or indicated by the service interval indicator.
Fuel consumption is also increased by driving in cold weather, in stop-and-go traffic, on short trips and in mountainous areas.
Drinking and driving G Warning Drinking and driving and/or taking drugs and driving are very dangerous combinations. Even a small amount of alcohol or drugs can affect your reflexes, perceptions and judgment. The possibility of a serious or even fatal accident are greatly increased when you drink or take drugs and drive. Do not drink or take drugs and drive or allow anyone to drive who has been drinking or taking drugs.
Pedals G Warning Make sure absolutely no objects are obstructing the pedals' range of movement. Keep the driver's footwell clear of all obstacles. If there are any floormats or carpets in the footwell, make sure that the pedals still have sufficient clearance. During sudden driving or braking maneuvers, the objects could get caught between the pedals. You could then no longer brake or accelerate. This could lead to accidents and injury.
Coasting with the engine switched off G Warning! There is no power assistance for the steering and the brake when the engine is not running. Steering and braking requires significantly more effort and you could lose control of the vehicle and cause an accident as a result. Do not turn off the engine while the vehicle is in motion.
Exhaust check G Warning Inhalation of exhaust gas is hazardous to your health. All exhaust gas contains carbon monoxide (CO), and inhaling it can cause unconsciousness and possible death. Do not run the engine in confined areas (such as a garage) which are not properly ventilated. If you think that exhaust gas fumes are entering the vehicle while driving, have the cause determined and corrected immediately. If you must drive under these conditions, drive only with at least one window fully open at all times.
Certain engine systems are designed to keep the level of poisonous components in exhaust fumes within legal limits. These systems only work optimally if they are maintained exactly in accordance with the manufacturer's specifications. For this reason, all work on the engine must be carried out by qualified and authorized Mercedes- Benz technicians. The engine settings must not be changed in any circumstances. Furthermore, all specific service work must be carried out at regular intervals and in accordance with the Mercedes-Benz service requirements. Details can be found in the Service Booklet.
Engine oil ! Vehicles with a diesel particle filter:
If the vehicle is mostly driven for short distances, it is possible that malfunctions may occur during the automatic cleaning of the diesel particle filter. This can lead to engine damage. Therefore, if you frequently drive short distances, make sure to drive on highways or country roads for 20
minutes at least every 500 km.BA 251 USA, CA Edition A 2011; 1; 3, en-US d2sboike
2010-04-16T14:31:55+02:00 - Seite 170
Version: 3.0.3.5170 Driving tips
Brakes Important safety guidelines G Warning On slippery road surfaces, never downshift in order to obtain braking action. This could result in drive wheel slip and reduced vehicle control. Your vehicle's ABS will not prevent this type of loss of control. G Warning Make sure that you do not endanger other road users when you apply the brakes.
Downhill gradients ! On long and steep gradients, you must
reduce the cargo on the brakes by shifting to a lower gear in good time. This allows you to take advantage of engine braking and helps you to avoid overheating the brakes and wearing them out excessively. When you take advantage of engine braking, a drive wheel may not turn for some time, e.g. on a slippery road surface. This could cause damage to the drive train. Such damage is not covered by the Mercedes-Benz warranty.
Heavy and light loads G Warning Depressing the brake pedal constantly results in excessive and premature wear to the brake pads. It may also cause the brakes to overheat, seriously impairing their effectiveness. It may then not be possible to stop the vehicle in sufficient time to avoid an accident.
If the brakes have been subjected to a heavy cargo, do not stop the vehicle immediately, but drive on for a short while. This allows the airflow to cool the brakes more quickly.
Wet roads G Warning After driving in heavy rain for some time without applying the brakes or through water deep enough to wet brake components, the first braking action may be somewhat reduced. You have to depress the brake pedal more firmly. Maintain a safe distance from vehicles in front.
After driving on a wet road or having the vehicle washed, brake firmly while paying attention to the traffic conditions. This will warm up the brake discs, thereby drying them more quickly and protecting them against corrosion.
Limited braking performance on salt treated roads G Warning The layer of salt on the brake discs and the brake pads/linings may cause a delay in the braking effect, resulting in a significantly longer braking distance, which could lead to an accident. To avoid this danger, you should: Roccasionally brake carefully, without
putting other road users at risk, when you are driving on salted roads. This helps to remove any salt that may have started to build up on the brake discs and the brake pads/linings.
Rmaintain a greater distance to the vehicle
ahead and drive with particular care.
Rcarefully apply the brakes at the end of a trip and immediately after commencing a new trip, so that salt residues are removed from the brake discs.
Maintenance of the brakes ! If the brake warning lamp lights up in the instrument cluster and you hear a warning tone, even though the parking brake has been released, the brake fluid level may be
BA 251 USA, CA Edition A 2011; 1; 3, en-US d2sboike
2010-04-16T14:31:55+02:00 - Seite 171
Version: 3.0.3.5Driving tips
171
too low. Observe additional warning messages in the multifunction display. The brake fluid level may be too low due to brake pad wear or leaking brake lines. Have the brake system checked immediately. This work should be carried out at an authorized Mercedes-Benz Center.
All checks and maintenance work on the brake system must be carried out at a qualified specialist workshop. Contact an authorized Mercedes-Benz Center. Only install brake pads and use brake fluid recommended by Mercedes-Benz. G Warning If other than recommended brake pads are installed, or other than recommended brake fluid is used, the braking properties of the vehicle can be degraded to an extent that safe braking is substantially impaired. This could result in an accident.
! A function or performance test may only be carried out on a two-axle dynamometer. If you are planning to have the vehicle tested on such a dynamometer, contact an authorized Mercedes-Benz Center to obtain further information first. Otherwise, the drive train or the brake system may suffer damage.
! As the ESP® system operates
automatically, the engine and the ignition must be switched off (SmartKey in position 0 or 1 in the ignition lock or Start/Stop button in position 0 or 1) while the parking brake is being tested on a brake dynamometer (maximum 10 seconds). Braking maneuvers triggered automatically by ESP® may seriously damage the brake system.
If your brake system is only subjected to moderate loads, you should regularly test your brake system's function by forcefully depressing the brake pedal when driving at
high speed. This also improves the brake pads' friction. G Warning Make sure that you do not endanger other road users when you apply the brakes.
You can find a description of Brake Assist (BAS) on (Y page 68).
Parking brake If you drive on wet roads or dirt-covered surfaces, road salt and/or dirt could get into the parking brake. In order to prevent corrosion and a reduction in the braking power of the parking brake, observe the following: Rgently depress the parking brake from time
to time before beginning the journey. Rdrive approximately 110 yd (100 m)
without exceeding a speed of 12 mph (20 km/h). G Warning! While performing this procedure please