- 2011 Jeep Wrangler Owners Manuals
- Jeep Wrangler Owners Manuals
- 2005 Jeep Wrangler Owners Manuals
- Jeep Wrangler Owners Manuals
- 2006 Jeep Wrangler Owners Manuals
- Jeep Wrangler Owners Manuals
- 2004 Jeep Wrangler Owners Manuals
- Jeep Wrangler Owners Manuals
- 2013 Jeep Wrangler Owners Manuals
- Jeep Wrangler Owners Manuals
- 2009 Jeep Wrangler Owners Manuals
- Jeep Wrangler Owners Manuals
- 2008 Jeep Wrangler Owners Manuals
- Jeep Wrangler Owners Manuals
- 2012 Jeep Wrangler Owners Manuals
- Jeep Wrangler Owners Manuals
- 2010 Jeep Wrangler Owners Manuals
- Jeep Wrangler Owners Manuals
- 2007 Jeep Wrangler Owners Manuals
- Jeep Wrangler Owners Manuals
- Download PDF Manual
-
under high pressure. To avoid risk of personal injury or damage to the system, adding refrigerant or any repair requiring lines to be disconnected should be done by an experienced repairman.
Refrigerant Recovery and Recycling R-134a Air Conditioning Refrigerant is a hydrofluorocar- bon (HFC) that is endorsed by the Environmental Pro- tection Agency and is an ozone-saving product. How- ever, the manufacturer recommends that air conditioning service be performed by dealers or other service facilities using recovery and recycling equipment.
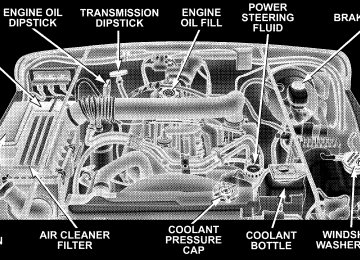
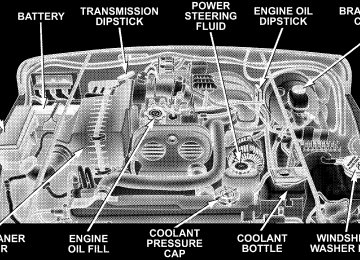
NOTE: Air Conditioning systems found to be contami- nated with A/C System Sealers, Stop Leak Products, Seal Conditioners, Compressor Oil, or Refrigerants not ap- proved by the manufacturer, voids the warranty for the Air Conditioning system. Power Steering Fluid Check Checking the power steering fluid level at a defined service interval is not required. The fluid should only be checked if a leak is suspected, abnormal noises are apparent, and/or the system is not functioning as antici- pated. Coordinate inspection efforts through a certified DaimlerChrysler Dealership.9
WARNING!
Fluid level should be checked on a level surface with the engine off to prevent injury from moving parts, and to insure accurate fluid level reading. Do not overfill. Use only the manufacturer’s recommended fluid.
If necessary, add fluid to restore to the proper indicated level. With a clean cloth, wipe any spilled fluid from all surfaces. Refer to Recommended Fluids, Lubricants, and Genuine Parts for correct fluid type. Driveline And Steering Component Lubrication U-joints (cardan joints) are sealed and do not require lubrication. Prop shafts, yokes, ball joints and other driveline and steering components may be provided with grease fittings for lubrication. Lubrication of these com- ponents at the intervals specified in the appropriate “Maintenance Schedule” in Section 8 is very important, particularly if your vehicle is subjected to off-road or other heavy-duty use. See your authorized dealer for complete service information. Body Lubrication Locks and all body pivot points, including such items as seat tracks, doors, tailgate and hood hinges, should be lubricated periodically to assure quiet, easy operation and to protect against rust and wear. Prior to the appli- cation of any lubricant, the parts concerned should be wiped clean to remove dust and grit; after lubricating excess oil and grease should be removed. Particular
MAINTAINING YOUR VEHICLE 237
attention should also be given to hood latching compo- nents to insure proper function. When performing other underhood services, the hood latch, release mechanism and safety catch should be cleaned and lubricated. The external lock cylinders should be lubricated twice a year, preferably in the fall and spring. Apply a small amount of a high quality lubricant such as Mopart Lock Cylinder Lubricant directly into the lock cylinder. Windshield Wiper Blades Clean the rubber edges of the wiper blades and the windshield periodically with a sponge or soft cloth and a mild non-abrasive cleaner. This will remove accumula- tions of salt or road film. Operation of the wipers on dry glass for long periods may cause deterioration of the wiper blades. Always use washer fluid when using the wipers to remove salt or dirt from a dry windshield. Avoid using the wiper blades to remove frost or ice from the windshield. Keep the blade rubber out of contact with petroleum products such as engine oil, gasoline, etc.
238 MAINTAINING YOUR VEHICLE
Windshield Washers
The fluid reservoir in the engine compartment should be checked for fluid level at regular intervals. Fill the reservoir with windshield antifreeze (not radiator anti- freeze) rated not to freeze at -25°F (-31°C). Operate the system for a few seconds to flush out the residual water.
WARNING!
Commercial windshield washer solvents are flam- mable. They could ignite and burn you. Care must be exercised when filling or working around the washer solution.
Windshield Washer Aiming To change the aim of the windshield washers, place a safety pin into the nozzle opening and move the nozzle slightly. Continue making slight adjustments until you obtain the desired pattern. Exhaust System The best protection against carbon monoxide entry into the vehicle body is a properly maintained engine exhaust system.
If you notice a change in the sound of the exhaust system; or if the exhaust fumes can be detected inside the vehicle; or when the underside or rear of the vehicle is damaged; have an authorized technician inspect the complete ex- haust system and adjacent body areas for broken, dam- aged, deteriorated, or mispositioned parts. Open seams or loose connections could permit exhaust fumes to seep into the passenger compartment. In addition, inspect the exhaust system each time the vehicle is raised for lubri- cation or oil change. Replace as required. Cooling System
WARNING!
You or others can be badly burned by hot coolant or steam from your radiator. If you see or hear steam coming from under the hood, don’t open the hood until the radiator has had time to cool. Never try to open a cooling system pressure cap when the radia- tor or coolant bottle is hot.
MAINTAINING YOUR VEHICLE 239
Coolant Checks Check coolant protection every 12 months (before the onset of freezing weather, where applicable). If coolant is dirty or rusty in appearance, the system should be drained, flushed and refilled with fresh coolant. Check the front of the radiator for any accumulation of bugs, leaves, etc. Clean the radiator by gently spraying water from a garden hose at the back of the core. Check the engine cooling system hoses for condition and tightness of connection. Inspect the entire system for leaks. Any hoses that show cuts or severe abrasion must be replaced. Cooling System — Drain, Flush, And Refill At the intervals shown in the appropriate “Maintenance Schedule,” the system should be drained, flushed, and refilled. If the solution is dirty and contains a considerable amount of sediment, clean and flush with reliable cooling system cleaner. Follow with a thorough rinsing to remove all deposits and chemicals.
240 MAINTAINING YOUR VEHICLE
Engine Coolant Disposal Used ethylene glycol based engine coolant is a regulated substance requiring proper disposal. Check with your local authorities to determine the disposal rules for your community. Do not store ethylene glycol based engine coolant in open containers or allow it to remain in puddles on the ground. Prevent ingestion by animals or children. If ingested by a child, contact a physician immediately. Selection Of Coolant Use only the manufacturer’s recommended coolant, refer to Recommended Fluids, Lubricants, and Genuine Parts for correct coolant type.
CAUTION!
† Mixing of coolants other than the specified HOAT coolant may result in decreased corrosion protec- tion and engine damage that may not be covered under the new vehicle warranty. If a non-HOAT coolant is introduced into the cooling system in an emergency, it should be replaced with the speci- fied coolant as soon as possible. † Do not use plain water alone or alcohol base antifreeze products. Do not use additional rust inhibitors or antirust products, as they may not be compatible with the radiator coolant and may plug the radiator. † This vehicle has not been designed for use with Propylene Glycol based coolants. Use of Propy- lene Glycol base coolants is not recommended.
Adding Coolant When adding coolant, a minimum solution of recom- mended 50% ethylene glycol antifreeze coolant in water should be used. Use higher concentrations (not to exceed 70%) if temperatures below -37°F (-38°C) are anticipated. Use only high purity water such as distilled or deionized water when mixing the water/antifreeze solution. The use of lower quality water will reduce the amount of corrosion protection in the engine cooling system. NOTE: Mixing coolant types will decrease the life of the engine coolant and will require more frequent engine coolant changes. Please note that it is the owner’s responsibility to main- tain the proper level of protection against freezing ac- cording to the temperatures occurring in the area where the vehicle is operated. Cooling System Pressure Cap The cap must be fully tightened to prevent loss of coolant, and to insure that coolant will return to the radiator from the coolant reserve tank.
MAINTAINING YOUR VEHICLE 241
The cap should be inspected and cleaned if there is any accumulation of foreign material on the sealing surfaces.
WARNING!
The warning words DO NOT OPEN HOT on the cooling system pressure cap are a safety precaution. Never add coolant when the engine is overheated. Do not loosen or remove the cap to cool an over- heated engine. Heat causes pressure to build up in the cooling system. To prevent scalding or injury, do not remove the pressure cap while the system is hot or under pressure.
the coolant
Coolant Level The coolant bottle provides a quick visual method for determining that is adequate. The coolant level must be at the FULL mark or above the ADD mark on the bottle. The radiator normally remains completely full, so there is not need to remove the radiator cap unless checking for coolant freeze point or replacing coolant. Advise your
level
242 MAINTAINING YOUR VEHICLE
service attendant of this. As long as the engine operating temperature is satisfactory, the coolant bottle need only be checked once a month. When additional coolant is needed to maintain the proper level, it should be added to the coolant bottle. Do not overfill. Points To Remember NOTE: When the vehicle is stopped after a few miles of operation, you may observe vapor coming from the front of the engine compartment. This is normally a result of moisture from rain, snow, or high humidity accumulat- ing on the radiator and being vaporized when the thermostat opens, allowing hot coolant to enter the radiator. If an examination of your engine compartment shows no evidence of radiator or hose leaks, the vehicle may be safely driven. The vapor will soon dissipate. † Do not overfill the coolant bottle. † Check coolant freeze point in the system.
† If frequent coolant additions are required, or if the level in the recovery bottle does not drop when the engine cools, the cooling system should be pressure tested for leaks. † Maintain coolant concentration at 50% ethylene glycol antifreeze (minimum) in water for proper corrosion protection of your engine that contains aluminum components. † Make sure that the radiator and coolant bottle hoses † Do not change the thermostat for summer or winter install operation. If replacement is ever necessary, ONLY the correct type thermostat. Other designs may result in unsatisfactory cooling performance, poor gas mileage, and increased emissions.
are not kinked or obstructed.
Hoses and Vacuum/Vapor Harnesses Inspect surfaces of hoses and nylon tubing for evidence of heat and mechanical damage. Hard or soft spots, brittle rubber, cracking, tears, cuts, abrasions, and exces- sive swelling indicate deterioration of the rubber.
Pay particular attention to the hoses nearest to high heat sources such as the exhaust manifold. Inspect hose rout- ing to be sure hoses do not touch any heat source or moving component that may cause heat damage or mechanical wear. Insure nylon tubing in these areas has not melted or collapsed. Inspect all hose connections such as clamps and couplings to make sure they are secure and no leaks are present. Components should be replaced immedi- ately if there is any evidence of degradation that could cause failure. Brake System In order to assure brake system performance, all brake system components should be inspected periodically. Refer to the appropriate “Maintenance Schedule” in Section 8 for suggested service intervals.
MAINTAINING YOUR VEHICLE 243
WARNING!
Riding the brakes can lead to brake failure and possibly an accident. Driving with your foot resting or riding on the brake pedal can result in abnormally high brake temperatures, excessive lining wear, and possible brake damage. You wouldn’t have your full braking capacity in an emergency.
Brake and Power Steering System Hoses When servicing the vehicle for scheduled maintenance, inspect surface of hoses for evidence of heat and me- chanical damage. Hard and brittle rubber, cracking, tears, cuts, abrasion, and excessive swelling suggest deteriora- tion of the rubber. Particular attention should be made to examining those hose surfaces nearest to high heat sources, such as the exhaust manifold. Inspect all hose clamps and couplings to make sure they are secure and no leaks are present. Inspection of brake hoses should be done NOTE: whenever the brake system is serviced and every engine oil change.
244 MAINTAINING YOUR VEHICLE
WARNING!
Worn brake hoses can burst and cause brake failure. You could have an accident. If you see any signs of cracking, scuffing, or worn spots, have the brake hoses replaced immediately.
Brake Master Cylinder The fluid level in the master cylinder should be checked when performing under hood services, or immediately if the BRAKE warning light shows system failure
Be sure to clean the top of the master cylinder area before removing the cap. If necessary, add fluid to bring the fluid level up to the requirements described on the brake fluid reservoir. With disc brakes, fluid level can be expected to fall as the brake pads wear. Brake fluid level should be checked when pads are replaced. However, low fluid level may be caused by a leak and a checkup may be needed. Use only manufacturer’s recommended brake fluid, refer to Recommended Fluids, Lubricants, and Genuine Parts for correct fluid type.
WARNING!
† Use of a brake fluid that may have a lower initial boiling point or unidentified as to specification, may result in sudden brake failure during hard prolonged braking. You could have an accident. † Overfilling the brake fluid reservoir can result in spilling brake fluid on hot engine parts and the brake fluid catching fire.
Use only brake fluid that has been in a tightly closed container to avoid contamination from foreign matter. Do not allow petroleum base fluid to contaminate the brake fluid as seal damage will result. Automatic Transmission
Selection of Lubricant It is important that the proper lubricant is used in the transmission to assure optimum transmission perfor- mance. Use only manufacturer’s recommended transmis- sion fluid, refer to Recommended Fluids, Lubricants, and Genuine Parts for correct fluid type. It is important that the transmission fluid be maintained at the prescribed level using the recommended fluid.
MAINTAINING YOUR VEHICLE 245
CAUTION!
Using a transmission fluid other than the manufac- turer’s recommended fluid may cause deterioration in transmission shift quality and/or torque converter shudder. Using a transmission fluid other than the manufacturer’s recommended fluid will result in more frequent fluid and filter changes. Refer to Recommended Fluids, Lubricants, and Genuine Parts for correct fluid type.
Fluid Level Check — 42RLE This fluid level should be checked when the engine is fully warmed up and the fluid in the transmission is heated to its normal operating temperature. Operation of the transmission with an improper fluid level will greatly reduce the life of the transmission and of the fluid. To check the automatic transmission fluid level properly, the following procedure must be used: 1. The vehicle must be on level ground.
246 MAINTAINING YOUR VEHICLE
2. The engine should be running at curb idle speed for a minimum of 60 seconds. 3. Fully apply parking brake. 4. Apply the brakes and shift the transmission into P (Park). 5. The fluid MUST be checked with the transmission in P (Park) to be sure that the fluid level is accurate. 6. Wipe the dipstick clean and reinsert until seated. Remove dipstick and note reading. At normal operating temperature (approximately 180° F (82° C), the fluid level is correct if it is in the HOT region (cross-hatched area) on the oil level indicator. The fluid level indicator should be in the COLD region at 70° F (21° C) fluid temperature. If the fluid level is low, add sufficient fluid to bring to the proper level. Refer to Recommended Fluids, Lubricants and Genuine Parts for correct fluid type. Fluid is added through the dipstick tube.
NOTE: To prevent dirt and water from entering the transmission after checking or replenishing fluid, make certain that the dipstick cap is properly reseated. Special Additives The manufacturer strongly recommends against the ad- dition of any additives to the transmission. The only exception to this policy is the use of special dyes to aid in detecting fluid leaks. The use of transmission sealers should be avoided as they may adversely affect seals. Hydraulic Clutch Fluid — Manual Transmission The clutch hydraulic system is a sealed maintenance free system. In the event of leakage or other malfunction, the system must be replaced. Manual Transmission
Selection of Lubricant Use only manufacturer’s recommended manual trans- mission fluid, refer to Recommended Fluids, Lubricants, and Genuine Parts for correct fluid type.
Fluid Level Check Check the fluid level by removing the fill plug. The fluid level should be between the bottom of the fill hole and a point not more than 3/16” (4.76 mm) below the bottom of the hole. Add fluid, if necessary, to maintain the proper level. Frequency of Fluid Change Under normal operating conditions, the fluid installed at the factory will give satisfactory lubrication for the life of the vehicle. Fluid changes are not necessary unless the lubricant has become contaminated with water. If con- taminated with water, the fluid should be changed im- mediately. Transfer Case
Fluid Level Check The fluid level should be to the bottom edge of the fill hole (A) when the vehicle is in a level position.
MAINTAINING YOUR VEHICLE 247
Adding Fluid Fluid should be added only at filler hole until fluid begins to run out of the hole. Drain First remove fill plug (B), then drain plug (C). Recom- mended tightening torque for drain and fill plugs is 15–25 ft.lbs. (20–34 N·m).
248 MAINTAINING YOUR VEHICLE
CAUTION!
When replacing plugs, do not overtighten. You could damage them and cause them to leak.
Selection of Lubricant Use only manufacturer’s recommended fluid, refer to Recommended Fluids, Lubricants, and Genuine Parts for correct fluid type. Front/Rear Axle Fluid
Fluid Level Check Lubricant should be at bottom edge of the oil fill hole. Adding Fluid Add lubricant only at the fill hole and only to the level specified above. Selection of Lubricant Use only manufacturer’s recommended fluid, refer to Recommended Fluids, Lubricants, and Genuine Parts for correct fluid type. Appearance Care And Protection From Corrosion
Protection Of Body And Paint From Corrosion Vehicle body care requirements vary according to geo- graphic locations and usage. Chemicals that make roads passable in snow and ice, and those that are sprayed on trees and road surfaces during other seasons, are highly corrosive to the metal in your vehicle. Outside parking, which exposes your vehicle to airborne contaminants, road surfaces on which the vehicle is operated, extreme hot or cold weather and other extreme conditions will have an adverse effect on paint, metal trim, and under- body protection.
The following maintenance recommendations will enable you to obtain maximum benefit from the corrosion resistance built into your vehicle. What Causes Corrosion? Corrosion is the result of deterioration or removal of paint and protective coatings from your vehicle. The most common causes are: † Road salt, dirt and moisture accumulation. † Stone and gravel impact. † Insects, tree sap and tar. † Salt in the air near sea-coast localities. † Atmospheric fallout/industrial pollutants. † Bird droppings.
MAINTAINING YOUR VEHICLE 249
lated on your vehicle, wash it as soon as possible.
Washing † Wash your vehicle regularly. Always wash your ve- hicle in the shade using a mild car wash soap and rinse the panels completely with clear water. † If insects, tar, or other similar deposits have accumu- † Use Mopart Auto Polish to remove road film and stains and to polish your vehicle. Take care never to scratch the paint. † Avoid using abrasive compounds and power buffing that may diminish the gloss or thin out the paint finish.
CAUTION!
Do not use abrasive or strong cleaning materials such as steel wool or scouring powder, which will scratch metal and painted surfaces.
250 MAINTAINING YOUR VEHICLE
Appearance Care For Fabric Top Models
CAUTION!
material, as damage may result.
To maintain the appearance of your vehicle’s interior trim and top, follow these precautions: † Avoid leaving your vehicle unattended with the top down, as exposure to sun or rain may damage interior trim. † Do not use harsh cleaners or bleaching agents on top † Do not allow any vinyl cleaner to run down and dry † After cleaning your vehicle’s fabric top, always make † Be especially careful when washing the windows by following the directions for “Care of Fabric Top Win- dows.”
sure it is completely dry before lowering.
on the paint, leaving a streak.
WASHING — Always use mild soap suds, lukewarm water, and a brush with soft bristles. If extra cleaning is required, use a mild foaming cleaner on the entire top, but support top from underneath. RINSING — Be sure to remove all trace of cleaner by rinsing the top thoroughly with clean water. Remember to allow the top to dry before lowering it. Care Of Fabric Top Windows
CAUTION!
Your vehicle’s fabric top has pliable plastic windows which can be scratched unless special care is taken by following these directions:
1. Never use a dry cloth to remove dust. Instead, use a soft cotton cloth moistened with cold or warm, clean water, and wipe across the window, not up and down. 2. When washing, never use hot water or anything stronger than a mild soap. Never use solvents such as alcohol or harsh cleaning agents.
3. Always rinse thoroughly with cold water, then wipe with a soft and slightly moist, clean cloth. 4. When removing frost, snow or ice, never use a scraper or de-icing chemicals. Use warm water only if you must clean the window quickly. 5. Debris (sand, mud/dirt, dust, or salt) from off-road driving will have a major impact on zipper operation. Even normal on-road driving and vehicle washing will eventually impact window zipper operation. To maintain ease of use of the window zippers, each window zipper should be cleaned and lubricated regularly. Use Mopart Soft Top Zipper Cleaner and Lubricant to ease zipper operation. Before applying, make sure the zipper teeth are clear of sand, mud, and other materials. Clean both sides of the zipper, not just one side. Rinse both zipper halves with fresh water and allow to dry. Aggressively work the Mopart Soft Top Zipper Cleaner and Lubricant into the zipper teeth. If a stuck zipper slide is experi- enced, work the Mopart Soft Top Zipper Cleaner and Lubricant into the zipper slide. Several applications may be required before the zipper comes free.
MAINTAINING YOUR VEHICLE 251
6. Never paste stickers, gummed labels or any tape to the windows. Adhesives are hard to remove and may dam- age the windows. Special Care † If you drive on salted or dusty roads or if you drive near the ocean, hose off the undercarriage at least once a month. † It is important that the drain holes in the lower edges of the doors, rocker panels and tailgate must be kept clear and open. † If you detect any stone chips or scratches in the paint, touch them up immediately. The cost of such repairs is considered the responsibility of the owner. † If you carry special cargo such as chemicals, fertilizers, de-icer salt, etc., assure that such materials are well packaged and sealed. † If a lot of driving is done on gravel roads, consider
mud or stone shields behind each wheel.
252 MAINTAINING YOUR VEHICLE
† Use Mopart Touch Up Paint on scratches or chips as soon as possible. Your authorized dealer has touch up paint to match the color of your vehicle. † Aluminum wheels should be cleaned regularly with mild soap and water to prevent corrosion. To remove heavy soil, select a non-abrasive, non-acidic cleaner. Do not use scouring pads or metal polishes. Avoid automatic car washes that use acidic solutions or harsh brushes that may damage the wheels’ protective fin- ish.
Interior Care Use Mopart Fabric Cleaner to clean fabric upholstery and carpeting. Use Mopart Vinyl Cleaner to clean vinyl or leather upholstery. Mopart Vinyl Cleaner is specifically recommended for interior vinyl trim.
WARNING!
Do not use volatile solvents for cleaning purposes. Many are potentially flammable, and if used in closed areas they may cause respiratory harm.
Glass Surfaces All glass surfaces should be cleaned on a regular basis with any commercial household-type glass cleaner. Never use an abrasive type cleaner. Use caution when cleaning inside rear windows equipped with electric defrosters. Do not use scrapers or other sharp instru- ments which may scratch the elements. When cleaning the rear view mirror, spray cleaner on the towel or rag that you are using. Do not spray cleaner directly on the mirror. Carpet Vacuum your carpet regularly to prevent a soil build-up. Shampoo soiled carpet with a reliable upholstery cleaner, using a natural sponge or soft bristle brush. After carpet dries, vacuum it thoroughly.
WARNING!
Only remove the carpet for cleaning purposes. It provides insulation against high floor pan tempera- tures. You or your passengers could be burned if the carpet is not properly in place. Always put the carpet back into the vehicle before driving.
Follow These Steps To Remove The Carpet: 1. Unsnap the front and rear floor carpets. A snap is located on the outboard side of each front seat. 2. Remove the attachment cap from the front footwell area on both the driver and passenger side. The cap is removed by pulling it straight out. 3. Remove the front and rear floor carpets. 4. Remove the cargo floor and wheelhouse carpets. If your vehicle is equipped with an Add-A- NOTE: Trunk™ it must be removed to be able to remove the cargo floor and wheelhouse carpets. For Add-A-Trunk™ removal procedure, refer to “Storage” in Section 3 of this manual.
MAINTAINING YOUR VEHICLE 253
Follow These Steps To Replace The Carpet: 1. Place the front floor carpets in the vehicle. 2. Attach the carpet to the studs in the footwell and press on the attachment caps to secure the carpet. 3. Place rear floor carpet in vehicle and snap rear carpet to front floor carpet. 4. Install wheelhouse carpet followed by the cargo floor carpet. 5. Reinstall Add-A-Trunk™ if so equipped. Seat Belt Maintenance Do not bleach, dye or clean the belts with chemical solvents or abrasive cleaners. This will weaken the fabric. Sun damage will also weaken the fabric. If the belts need cleaning, use a mild soap solution or lukewarm water. Do not remove the belts from the vehicle to wash them. Replace the belts if they appear frayed or worn or if the buckles do not work properly.
254 MAINTAINING YOUR VEHICLE
Maintenance After Off-Road Driving After extended operation in mud, sand or water, or similar dirty conditions, have your brake drums, brake linings, and axle joints inspected and cleaned as soon as possible. This will prevent any abrasive material from causing excessive wear or unpredictable braking action. Following off-road usage, completely inspect the under- body of your vehicle. Check tires, body structure, steer- ing, suspension and exhaust system for damage. Check threaded fasteners for looseness, particularly on the chassis, drivetrain components, steering and suspension. Retighten, if required, to torque values specified in the Service Manual. Also check for accumulations of vegeta- tion or brush that could become a fire hazard, or conceal damage to fuel lines, brake hoses, axle pinion seals, and propeller shafts. Check air conditioning drain tube on the lower dash wall in the engine compartment for mud or debris, and clean as required. A plugged tube will adversely affect air conditioning performance.
CAUTION!
Under frequent heavy-duty driving conditions, change all lubricants, and lubricate body compo- nents and steering linkage more often than in nor- mal service to prevent excessive wear.
FUSE PANEL
Interior Fuses The fuse panel is located behind the glove box.
To access the fuse panel the glove box must be removed. It is removed by slipping the glove box strap off the hook and letting the door roll down off its hinges. To reinstall, position the glove box door at an 8 o’clock orientation, engage the hinge hook formations on the lower edge of the glove box door with the hinge pins on the lower edge of the instrument panel. Tilt the upper edge of the glove box door upward toward the instrument panel enough to reattach the glove box strap to the door. Rotate glove box door to closed position. Open and close to insure proper installation. Cavity
Description
Fuse
20 Amp Yellow Park Lights, Skim
(Sentry Key) 20 Amp Yellow Stop Lights 20 Amp Yellow Subwoofer System 10 Amp Red Door Switch Defeat 10 Amp Red Airbag 20 Amp Yellow Rear Wiper 10 Amp Red
10 Amp Red
Back-Up Lights, Rear Win- dow Defroster Relay, ABS HEVAC
MAINTAINING YOUR VEHICLE 255
Cavity
Fuse
Description
10
11
1213
14
1516
17
18
19
2010 Amp Red 10 Amp Red 10 Amp Red 10 Amp Red
10 Amp Red 10 Amp Red 10 Amp Red
10 Amp Red
Airbag Instrument Cluster Solenoids, DRL Power Distribution Relays, Skim (Sentry Key) Turn Signals Radio HBL (Rear Window De- froster) Switch Headlamp Aim (Export Only) Front Wiper
25 Amp Natu- ral 20 Amp Yellow Cigar Lighter 20 Amp Yellow Spare 20 Amp Yellow Transmission: Manual -
Clutch Interlock Switch By- pass Automatic - Ignition Starter Circuit
256 MAINTAINING YOUR VEHICLE
Underhood Fuses (Power Distribution Center) Your vehicle is equipped with an electrical power distri- bution center located in the engine compartment near the battery. This power center houses plug-in “Cartridge” fuses, ISO relays, and Mini (Micro) fuses.
A label inside the latching cover of the center identifies each component for ease of replacement, if necessary. Cartridge and mini (micro) fuses can be obtained from your authorized dealer.
Center labeled Ignition-Off Draw (IOD).
Center location #11 labeled “IOD Storage.”
VEHICLE STORAGE If you are leaving your vehicle dormant for more than 21
days you may want to take steps to protect your battery. You may: † Remove Cartridge fuse #15 in the Power Distribution † Store the removed IOD fuse in the Power Distribution † Or, disconnect the negative cable from the battery. † Anytime you store your vehicle, or keep it out of service (i.e. vacation) for two weeks or more, run the air conditioning system at idle for about five minutes in the fresh air and high blower setting. This will insure adequate system lubrication to minimize the possibility of compressor damage when the system is started again.REPLACEMENT BULBS — IF EQUIPPED
Interior Lights Bulb Type Auto. Trans. Indicator Light . . . . . . . . . . . . . . . . . 658
Courtesy Lights, Under Dash (1). . . . . . . . . . . . . . 906
Heater Control Lights (2) . . . . . . . . . . . . . . . . . . . 194
Rocker Switch Indicator Light (Rear Window Defogger, and Rear Wash/Wipe). . . . . . . . . . . . . . . ** Soundbar Dome Light . . . . . . . . . . . . . . . . . . . . . 912
** Bulbs only available from authorized dealer.Instrument Cluster Bulb Type Telltale (High Beam) . . . . . . . . . . . . . . . . . . . . . . . 74
Illumination . . . . . . . . . . . . . . . . . . . . . . . . . . . . 103MAINTAINING YOUR VEHICLE 257
Bulb Type Exterior Lights Backup Lights (2). . . . . . . . . . . . . . . . . . . . . . . . 1156
Center High Mounted Stop Light (1) . . . . 921 or W16W Fog Lights. . . . . . . . . . . . . . . . . . . . . . . . . . . . . . H3
Front Park/Turn Lights (2) . . . . . . . . . . . . . . . . . 3157
Front Side Marker Lights (2) . . . . . . . . . . 168 or W3W Headlights (2) . . . . . . . . . . . . . . . . . . . . . . H 6024BL Stop/Tail/Turn Lights (2) . . . . . . . . . . . . . . . . . . 1157
Underhood Light. . . . . . . . . . . . . . . . . . . . . . . . . 561
License Light. . . . . . . . . . . . . . . . . . . . . . . . . . . 1157
NOTE: Numbers refer to commercial bulb types that can be purchased from your local authorized dealer. If a bulb needs to be replaced, visit your authorized dealer or refer to the applicable Service Manual.258 MAINTAINING YOUR VEHICLE
FLUID CAPACITIES
Fuel (Approximate) Engine Oil with Filter
2.4 Liter Engine (SAE 5W-30, API Certified Engine Oil) 4.0 Liter Engine (SAE 10W-30, API Certified Engine Oil)
Cooling System *
2.4 Liter Engine (Mopart Antifreeze/Coolant 5 Year/100,000
Mile Formula)
4.0 Liter Engine (Mopart Antifreeze/Coolant 5 Year/100,000
Mile Formula)
* Includes heater and coolant recovery bottle filled to MAX level.
U.S.
19 Gallons
5 Qts 6 Qts
9 Qts
10.5 Qts
Metric 72 Liters
4.7 Liters 5.7 Liters
8.5 Liters
9.9 Liters
MAINTAINING YOUR VEHICLE 259
RECOMMENDED FLUIDS, LUBRICANTS AND GENUINE PARTS Engine Component Engine Coolant
Engine Oil
Spark Plugs
Oil Filter (2.4L Engine) Oil Filter (4.0L Engine) Fuel Selection
Fluid, Lubricant, or Genuine Part Mopart Antifreeze/Coolant 5 Year/100,000 Mile Formula HOAT (Hybrid Or- ganic Additive Technology) API Certified SAE 5W-30 Engine Oil is recommended for the 2.4L engine. API Certified SAE 10W-30 Engine Oil is recommended for the 4.0L engine. Refer to oil viscosity chart for correct SAE grade meeting DaimlerChrysler Material Standard MS-6395. Refer to the Vehicle Emission Control Information label in the engine compart- ment. Mopart Oil Filter (P/N 4105409) Mopart Oil Filter (P/N 05281090) 87 Octane
260 MAINTAINING YOUR VEHICLE
Chassis Component Automatic Transmission Manual Transmission Transfer Case Axle Differential (front-rear)
Brake Master Cylinder
Power Steering Reservoir Steering Gear & Linkage, Ball Joints, Prop Shafts & Yokes, Wheel Bearings
Fluid, Lubricant, or Genuine Part Mopart ATF+4 Automatic Transmission Fluid. Mopart Manual Transmission Lubricant or equivalent. Mopart ATF+4 Automatic Transmission Fluid. Mopart Hypoid Gear Lubricant (SAE 80W-90) (API GL5) or equivalent. For trailer towing, use a SAE 75W-140 Synthetic Gear Lubricant. Models equipped with Trac-Lok require an additive. Mopart DOT 3, SAE J1703 should be used. If DOT 3, SAE J1703 brake fluid is not available, then DOT 4 is acceptable. Use only recommended brake flu- ids. Mopart ATF+4 Automatic Transmission Fluid. Mopart Multi-Purpose Lubricant NLGI Grade 2 EP, GC-LB
MAINTENANCE SCHEDULES
CONTENTS
m Emission Control System Maintenance . . . . . . 262
m Maintenance Schedules . . . . . . . . . . . . . . . . . . 262N Schedule “B” . . . . . . . . . . . . . . . . . . . . . . . . 265
N Schedule “A” . . . . . . . . . . . . . . . . . . . . . . . . 274M
262 MAINTENANCE SCHEDULES
EMISSION CONTROL SYSTEM MAINTENANCE The “Scheduled” maintenance services, listed in bold type must be done at the times or mileages specified to assure the continued proper functioning of the emission control system. These, and all other maintenance services included in this manual, should be done to provide best vehicle performance and reliability. More frequent main- tenance may be needed for vehicles in severe operating conditions such as dusty areas and very short trip driving. Inspection and service also should be done any time a malfunction is suspected. NOTE: Maintenance, replacement, or repair of the emission control devices and systems on your vehicle may be performed by any automotive repair establish- ment or individual using any automotive part which has been certified pursuant to U.S. EPA or, in the State of California, California Air Resources Board regulations.
MAINTENANCE SCHEDULES There are two maintenance schedules that show the required service for your vehicle. First is Schedule (B(. It is for vehicles that are operated under the conditions that are listed below and at the beginning of the schedule. † Day or night temperatures are below 32°F (0°C) † Stop and go driving † Excessive engine idling † Driving in dusty conditions † Short trips of less than 10 miles (16.2 km) † More than 50% of your driving is at sustained high † Trailer towing † Taxi, police, or delivery service (commercial service) † Off-road or desert driving † If equipped for and operated with E-85 (ethanol)
speeds during hot weather, above 90°F (32°C)
fuel.
NOTE: Most vehicles are operated under the conditions listed for Schedule “B.” Second is Schedule “A”. It is for vehicles that are not operated under any of the conditions listed under Sched- ule “B.” Use the schedule that best describes your driving condi- tions. Where time and mileage are listed, follow the interval that occurs first.
CAUTION!
Failure to perform the required maintenance items may result in damage to the vehicle.
At Each Stop for Fuel † Check the engine oil level about 5 minutes after a fully warmed engine is shut off. Checking the oil level while the vehicle is on level ground will improve the accu- racy of the oil level reading. Add oil only when the level is at or below the ADD or MIN mark.
MAINTENANCE SCHEDULES 263
damage.
† Check the windshield washer solvent, add as required. Once a Month † Check the tire pressure and look for unusual wear or † Inspect the battery and clean and tighten the terminals † Check the fluid levels of the coolant reservoir, brake master cylinder, and transmission, and add as needed. † Check all lights and all other electrical items for correct
as required.
operation.
At Each Oil Change † Change the engine oil filter. † Inspect the exhaust system. † Inspect brake hoses. † Check the coolant level, hoses, and clamps. † Inspect manual
equipped.
transmission fluid level — if
264 MAINTENANCE SCHEDULES
† Rotate the tires at each oil change interval shown on Schedule “A” 6,000 miles (10 000 km) or every other interval shown on Schedule “B” 6,000 miles (10 000
km).† After completion of off-road operation, the underside of the vehicle should be thoroughly inspected. Exam- ine threaded fasteners for looseness.
Schedule “B” Follow this schedule if you usually operate your vehicle under one or more of the following conditions. † Day or night temperatures are below 32°F (0°C) † Stop and go driving † Excessive engine idling † Driving in dusty conditions † Short trips of less than 10 miles (16.2 km) Miles (Kilometers) Change the engine oil and engine oil filter. Inspect the engine air filter element, replace if necessary. Lubricate the steering linkage tie rod ends. Lubricate the steering and suspension ball joints. Inspect the brake linings. Drain and refill the front and rear axle fluid‡
SCHEDULE “B” 265
speeds during hot weather, above 90°F (32°C)
† More than 50% of your driving is at sustained high † Trailer towing † Taxi, police, or delivery service (commercial service) † Off-road or desert driving † If equipped for and operated with E-85 (ethanol)
fuel.
3,000
(5 000)6,000
(10 000)9,000
(14 000)12,000
(19 000)15,000
(24 000)266 SCHEDULE “B”
Miles (Kilometers) Change the engine oil and engine oil filter. Inspect the engine air filter element, replace if necessary. Inspect the PCV Valve, and replace if necessary.L Replace the spark plugs. Lubricate the steering linkage tie rod ends. Lubricate the steering and suspension ball joints. Inspect the brake linings. Drain and refill the front and rear axle fluid‡ Inspect the transfer case fluid, add if necessary.
18,000
(29 000)21,000
(34 000)24,000
(38 000)27,000
(43 000)30,000
(48 000)Miles (Kilometers) Change the engine oil and engine oil filter. Inspect the engine air filter element, replace if necessary. Lubricate the steering linkage tie rod ends. Lubricate the steering and suspension ball joints. Inspect the brake linings. Drain and refill the front and rear axle fluid‡ Inspect the drive belt and replace as needed.
SCHEDULE “B” 267
33,000
(53 000)36,000
(58 000)39,000
(62 000)42,000
(67 000)45,000
(72 000)M
268 SCHEDULE “B”
Miles (Kilometers) Change the engine oil and engine oil filter. Inspect the engine air filter element, replace if necessary. Inspect the PCV Valve, and replace if necessary.L Inspect the ignition cables, and replace if neces- sary (2.4L Only). Replace the spark plugs. Lubricate the steering linkage tie rod ends. Lubricate the steering and suspension ball joints. Inspect the brake linings. Drain and refill the front and rear axle fluid‡ Drain and refill the automatic transmission fluid, and change filter. Inspect the drive belt and replace as needed. Not required if belt was previously. Drain and refill the transfer case fluid.
48,000
(77 000)51,000
(82 000)54,000
(86 000)57,000
(91 000)60,000
(96 000)Miles (Kilometers) Change the engine oil and engine oil filter. Inspect the engine air filter element, replace if necessary. Lubricate the steering linkage tie rod ends. Lubricate the steering and suspension ball joints. Inspect the brake linings. Drain and refill the front and rear axle fluid‡ Inspect the drive belt and replace as needed. Not required if belt was previously replaced.
63,000
(101 000)66,000
(106 000)69,000
(110 000)72,000
(115 000)75,000
(120 000)SCHEDULE “B” 269
M
270 SCHEDULE “B”
Miles (Kilometers) Change the engine oil and engine oil filter. Inspect the engine air filter element, replace if necessary. Inspect the PCV Valve, and replace if necessary.L Replace the spark plugs. Lubricate the steering linkage tie rod ends. Lubricate the steering and suspension ball joints. Replace the timing belt (2.4L Only). Inspect the brake linings. Drain and refill the front and rear axle fluid‡ Inspect the drive belt and replace as needed. Not required if belt was previously replaced. Inspect the transfer case fluid, add if necessary.
78,000
(125 000)81,000
(130 000)84,000
(134 000)87,000
(139 000)90,000
(144 000)Miles (Kilometers) Change the engine oil and engine oil filter. Inspect the engine air filter element, replace if necessary. Lubricate the steering linkage tie rod ends. Lubricate the steering and suspension ball joints. Inspect the brake linings. Drain and refill the front and rear axle fluid‡ Inspect the drive belt and replace as needed. Not required if belt was previously replaced. Flush and replace the engine coolant.
93,000
(149 000)96,000
(154 000)99,000
(158 000)102,000
(163 000)105,000
(168 000)SCHEDULE “B” 271
M
272 SCHEDULE “B”
Miles (Kilometers) Change the engine oil and engine oil filter. Inspect the engine air filter element, replace if necessary. Inspect the PCV Valve, and replace if necessary.L Replace the spark plugs. Inspect the ignition cables, and replace if neces- sary (2.4L Only). Lubricate the steering linkage tie rod ends. Lubricate the steering and suspension ball joints. Inspect the brake linings. Drain and refill the front and rear axle fluid‡ Drain and refill the automatic transmission fluid, and replace main sump filter. Inspect the drive belt and replace as needed. Not required if belt was previously replaced. Drain and refill the transfer case fluid. Inspection and service should also be performed anytime a malfunction is observed or suspected. Retain all re- ceipts.
108,000
(173 000)111,000
(178 000)114,000
(182 000)117,000
(187 000)120,000
(192 000)L This maintenance is recommended by the manufac- turer to the owner, but is not required to maintain emissions warranty.
‡Off-highway operation, trailer towing, taxi, limousine, bus, snow plowing, or other types of commercial service or prolonged operation with heavy loading, especially in
hot weather, require front and rear axle service indicated with a ‡ in Schedule “B”. Perform these services if the vehicle is usually operated under these conditions.
SCHEDULE “B” 273
274 SCHEDULE “A”
Schedule “A” Miles (Kilometers) [Months] Change the engine oil and engine oil filter. Inspect the engine air filter element, and replace if necessary. Replace the spark plugs. Lubricate the steering linkage joints and outer tie rod ends. Lubricate the steering and suspension ball joints. Inspect the brake linings. Inspect the transfer case fluid.
6,000
(10 000)[6]
12,000
(19 000)[12]
18,000
(29 000)24,000
(38 000)30,000
(48 000)[18]
[24]
[30]
SCHEDULE “A” 275
Miles (Kilometers) [Months] Change the engine oil and engine oil filter. Lubricate the steering and suspension ball joints. Lubricate the steering linkage joints and outer tie rod ends. Inspect the brake linings.
36,000
(58 000)42,000
(67 000)48,000
(77 000)[42]
[48]
[36]
54, 000
(86 000)[54]
M
276 SCHEDULE “A”
Miles (Kilometers) [Months] Change the engine oil and engine oil filter. Inspect the engine air filter element, and replace if nec- essary. Inspect the PCV Valve, and replace if necessary.L Replace the ignition cables (2.4L Only). Replace the spark plugs. Lubricate the steering linkage joints and outer tie rod ends. Lubricate the steering and suspension ball joints. Inspect the brake linings. Inspect the drive belt, and replace as needed. Inspect the drive belt, and replace as needed. Not re- quired if belt was previously replaced. Flush and replace the engine coolant at 60 months, re- gardless of mileage. Inspect transfer case fluid.
60,000
(96 000)66,000
(106 000)72,000
(115 000)78,000
(125 000)[66]
[72]
[78]
[60]
SCHEDULE “A” 277
Miles (Kilometers) [Months] Change the engine oil and engine oil filter. Inspect the engine air filter element, and replace if nec- essary. Inspect the PCV Valve, and replace if necessary.L Replace the spark plugs. Lubricate the steering linkage joints and outer tie rod ends. Lubricate the steering and suspension ball joints. Inspect the brake linings. Inspect the drive belt, and replace as needed. Not re- quired if previously replaced. Flush and replace the engine coolant if not done at 60
months. Inspect the transfer case fluid.84,000
(134 000)90,000
(144 000)96,000
(154 000)[84]
[96]
[90]
102, 000
(163 000)[102]
M
278 SCHEDULE “A”
Miles (Kilometers) [Months] Change the engine oil and engine oil filter. Inspect the engine air filter element, and replace if necessary. Replace the ignition cables (2.4L Only). Inspect the PCV Valve, and replace if necessary.L Replace the spark plugs. Lubricate the steering linkage joints and outer tie rod ends. Lubricate the steering and suspension ball joints. Inspect the brake linings. Replace the timing belt (2.4L Only). Inspect the drive belt, and replace as needed. Not required if pre- viously replaced. Drain and refill the transfer case fluid. Inspection and service should also be performed anytime a malfunction is observed or suspected. Retain all re- ceipts.
108,000
(173 000)[108]
114,000
(182 000)[114]
120,000
(192 000)[120]
L This maintenance is recommended by the manufac- turer to the owner, but is not required to maintain emissions warranty.
IF YOU NEED CONSUMER ASSISTANCE
CONTENTS
m Suggestions For Obtaining Service For Your
Vehicle . . . . . . . . . . . . . . . . . . . . . . . . . . . . . . 280
N Prepare For The Appointment . . . . . . . . . . . . 280
N Prepare A List . . . . . . . . . . . . . . . . . . . . . . . . 280
N Be Reasonable With Requests . . . . . . . . . . . . . 280
m If You Need Assistance . . . . . . . . . . . . . . . . . . 280m Warranty Information . . . . . . . . . . . . . . . . . . . 283
m Mopart Parts . . . . . . . . . . . . . . . . . . . . . . . . . 284
m Reporting Safety Defects . . . . . . . . . . . . . . . . . 284
N In Canada . . . . . . . . . . . . . . . . . . . . . . . . . . 284
m Publication Order Forms . . . . . . . . . . . . . . . . . 285280 IF YOU NEED CONSUMER ASSISTANCE
SUGGESTIONS FOR OBTAINING SERVICE FOR YOUR VEHICLE
Prepare For The Appointment If you’re having warranty work done, be sure to have the right papers with you. Take your warranty folder. All work to be performed may not be covered by the warranty, discuss additional charges with the service manager. Keep a maintenance log of your vehicle’s service history. This can often provide a clue to the current problem. Prepare A List Make a written list of your vehicle’s problems or the specific work you want done. If you’ve had an accident, or work done that is not on your maintenance log, let the service advisor know. Be Reasonable With Requests If you list a number of items, and you must have your vehicle by the end of the day, discuss the situation with the service advisor and list the items in order of priority. At many dealers you may obtain a rental vehicle at a
minimal daily charge. If you need a rental, it is advisable to make these arrangements when you call for an ap- pointment.
IF YOU NEED ASSISTANCE The manufacturer and its dealers are vitally interested in your satisfaction. We want you to be happy with our products and services. Your selling dealer is best equipped and most anxious to provide prompt resolution for any warranty issue or related matter that you may experience. The manufactur- er’s dealers have the facilities, factory-trained techni- cians, special tools, and the latest information to assure your vehicle is fixed correctly and in a timely manner. The manufacturer has empowered its dealers to make warranty and repair decisions that ensure you are not inconvenienced. There is no need for you to wait for a decision from the manufacturer. If a special circumstance occurs that requires information from the manufacturer, we have asked the dealer’s service management to make the contact on your behalf.
This is why you should always talk to your dealer’s service manager first. Most matters can be resolved with this process. † If for some reason you are still not satisfied, talk to the general manager or owner of the dealership. They want to know if you need assistance. † If your dealership is unable to resolve the concern, you
may contact the Manufacturer’s Customer Center.