- 2011 Hyundai Elantra Owners Manuals
- Hyundai Elantra Owners Manuals
- 2008 Hyundai Elantra Owners Manuals
- Hyundai Elantra Owners Manuals
- 2010 Hyundai Elantra Owners Manuals
- Hyundai Elantra Owners Manuals
- 2003 Hyundai Elantra Owners Manuals
- Hyundai Elantra Owners Manuals
- 2004 Hyundai Elantra Owners Manuals
- Hyundai Elantra Owners Manuals
- 2006 Hyundai Elantra Owners Manuals
- Hyundai Elantra Owners Manuals
- 2007 Hyundai Elantra Owners Manuals
- Hyundai Elantra Owners Manuals
- Download PDF Manual
-
To move rearward Push the armrest rearward with your palm.
WARNING
Do not grap the front portion of the armrest (1) when moving the arm- rest rearward. It may pinch your fin- gers.
OMD040129
OMD040130
Sunglass holder To open the sunglass holder, press the cover and the holder will slowly open. Place your sunglasses in the compart- ment door with the lenses facing out. Push to close.
Glove box To open the glove box, push the button and the glove box will automatically open. Close the glove box after use.
WARNING
To reduce the risk of injury in an accident or sudden stop, always keep the glove box door closed while driving.
CAUTION
Do not keep food in the glove box for a long time.
Features of your vehicle
WARNING
(cid:129) Do not keep objects except sun- glasses inside the sunglass hold- er. Such objects can be thrown from the holder in the event of a sudden stop or an accident, pos- sibly injuring the passengers in the vehicle.
(cid:129) Do not open the sunglass holder while the vehicle is moving. The rear view mirror of the vehicle can be blocked by an open sun- glass holder.
4 91
Features of your vehicle
OYF049225
Luggage net (holder) (if equipped) To keep items from shifting in the cargo area, you can use the holders located in the cargo area to attach the luggage net.
CAUTION
To prevent damage to the goods or the vehicle, care should be taken when carrying fragile or bulky objects in the luggage compart- ment.
WARNING
Avoid eye injury. DO NOT over- stretch the luggage net, ALWAYS keep your face and body out of the luggage net’s recoil path. DO NOT use when the strap has visible signs of wear or damage.
OMD040131N
Multi box To open the cover (if equipped), move the lever up then the cover will open.
92
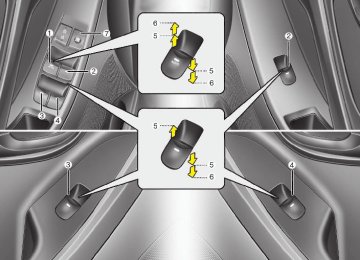
INTERIOR FEATURES Cup holder
■ Front
Features of your vehicle
WARNING - Hot liquids
(cid:129) Do not place uncovered cups of hot liquid in the cup holder while the vehicle is in motion. If the hot liquid spills, you may burn your- self. Such a burn to the driver could lead to loss of control of the vehicle.
(cid:129) To reduce the risk of personal injury in the event of sudden stop or collision, do not place uncov- ered or unsecured bottles, glass- es, cans, etc., in the cup holder while the vehicle is in motion.
WARNING
Keep cans or bottles out of direct sun light and do not put them in a vehicle that is heated up. It may explode.
■ Rear
OMD040134
OHD046089L
Sunvisor Use the sunvisor to shield direct light through the front or side windows. To use a sunvisor, pull it downward. To use a sunvisor for a side window, pull it downward, unsnap it from the bracket (1) and swing it to the side (2). To use the vanity mirror, pull down the visor and slide the mirror cover (3). Adjust equipped) forward or backward (4).
the sunvisor extension
(if
OMD040136
Cups or small beverage cans may be placed in the cup holders.4 93
Features of your vehicle
CAUTION
(cid:129) Always have the switch in the off position when the vanity mirror lamp is not in use.If the sunvisor is closed without the lamp off, it may discharge the battery or damage the sunvisor.
(cid:129) Always use the sunvisor exten- sion, after swing the sunvisor to the side.
WARNING
For your safety, do not obstruct your vision when using the sunvisor.
94
■ Type A
■ Type B
OMD040137
OMD040194N
Power outlet The power outlet is designed to provide power for mobile telephones or other devices designed to operate with vehicle electrical systems. The devices should draw less than 10 amps with the engine running.
CAUTION
(cid:129) Use the power outlet only when the engine is running and remove the accessory plug after use. Using the accessory plug for pro- longed periods of time with the engine off could cause the bat- tery to discharge.
(cid:129) Only use 12V electric accessories which are less than 10A in elec- tric capacity.
(cid:129) Adjust the air-conditioner or heater to the lowest operating level when using the power outlet. (cid:129) Close the cover when not in use. (cid:129) Some electronic devices can cause electronic interference when plugged into a vehicle’s power outlet.These devices may cause excessive audio static and malfunctions in other electronic systems or devices used in your vehicle.
WARNING
Do not put a finger or a foreign ele- ment (pin, etc.) into a power outlet and do not touch with a wet hand. You may get an electric shock.
Features of your vehicle
Hour (1) Pressing the H button with your finger, a pencil or similar object will advance the time displayed by one hour.
Minute (2) Pressing the M button with your finger, a pencil or similar object will advance the time displayed by one minute.
Display conversion To change the 12 hour format to the 24
hour format, press the “H” and “M” but- tons at the same time for more than 5
seconds. For example, if the “H” and “M” buttons are pressed for more than 5 seconds while the time is 10:15 p.m., the display will be changed to 22:15.OMD040196A
Outside thermometer The current outside temperature is dis- played in 1°F (1°C) increments. (cid:129) The outside temperature on the display may not change immediately like a general thermometer to prevent the driver from being inattentive.
4 95
Digital clock (if equipped)
OMD040138
WARNING
Do not adjust the clock while driv- ing. You may lose your steering control and cause an accident that results in severe personal injury or death.
Whenever the battery terminals or relat- ed fuses are disconnected, you must reset the time. When the ignition switch is in the ACC or ON position, the clock buttons operate as follows:
Features of your vehicle
• Temperature conversion
If the battery has been discharged or disconnected, the temperature mode display will reset to Fahrenheit. This is a normal condition. You can switch the temperature mode between Fahrenheit to Centigrade as follows; Press the “H” and “M” buttons at the same time for more than 3 seconds but less than 5 seconds. The display will change from Fahrenheit to Centigrade, or from Centigrade to Fahrenheit.
96
OUN026348
OMD040195N
Clothes hanger (if equipped) To use the hanger, pull down the upper portion of hanger.
CAUTION
Do not hang heavy clothes, because it may damage the hook.
Floor mat anchor(s) When using a floor mat on the front floor carpet, make sure it attaches to the floor mat anchor(s) in your vehicle. This keeps the floor mat from sliding forward.
WARNING
The floor mat must be properly anchored so that it will not interfere with the operation of the accelera- tor pedal. Any interference with the accelerator pedal could cause the accelerator pedal to be unable to return to the idle position. A pedal that cannot return to the idle posi- tion could lead to an accident which may result in severe person- al injury or death.
WARNING
The following must be observed when installing ANY floor mat to the vehicle, so that it will not inter- fere with the pedal. (cid:129) Ensure that the floor mats are securely attached to the vehicle’s floor mat anchor(s) before driving the vehicle.
(cid:129) Do not use ANY floor mat that cannot be firmly attached to the vehicle’s floor mat anchors.
(cid:129) Do not stack floor mats on top of one another (e.g. all-weather rub- ber mat on top of a carpeted floor mat). Only a single floor mat should be installed in each posi- tion.
IMPORTANT – Your vehicle was manufactured with driver’s side floor mat anchors that are designed to securely hold the floor mat in place. To avoid any interference with pedal operation, HYUNDAI recommends that only the HYUNDAI floor mat designed for use in your vehicle be installed.
OMD040140
Aux, USB and iPod® port If your vehicle has an aux and/or USB(universal serial bus) port or iPod port, you can use an aux port to connect audio devices and a USB port to plug in a USB, or use the HYUNDAI accessory ipod cable the plugs into both ports to connect an ipod.
✽✽ NOTICE When using a portable audio device connected to the power outlet, noise may occur during playback. If this happens, use the power source of the portable audio device.
❈ iPod® is a trademark of Apple Inc.
Features of your vehicle
Navigation system (if equipped) The navigation system ascertains the present position of your vehicle by using information from satellites and guides you to the place you assign as the desti- nation. Detailed information for the navigation system is described in a seperate manual.
Bluetooth hands-free (if equipped) You can use the phone wirelessly by using the Bluetooth. Detailed information for the Bluetooth hands-free is described in the “Audio section” in this chapter or in the manual supplied separately.
4 97
Features of your vehicle
AUDIO SYSTEM ✽✽ NOTICE If you install an after market HID (high intensity discharge) head lamp, your vehicle's audio and electronic device may malfunction.
CAUTION
(cid:129) Do not clean the inside of the rear window glass with a cleaner or scraper to remove foreign deposits as this may cause dam- age to the antenna elements.
(cid:129) Avoid adding metallic coatings such as Ni,Cd,and so on.These can disturb receiving AM and FM broadcast signals.
OMD040161
Antenna Glass antenna (if equipped) When the radio power switch is turned on while the ignition key is in either the “ON” or “ACC” position, your car will receive both AM and FM broadcast signals through the antenna in the rear window glass.
98
Type A
1.VOLUME (VOL+/-) (cid:129) Push the lever upward (+) to increase the
volume.
(cid:129) Push the lever downward (-) to decrease
the volume.
2.PRESET/SEEK ( The SEEK/PRESET button has different functions based on the system mode. For the following functions the button should be pressed for 0.8 second or more.
RADIO mode It will function as the AUTO SEEK select button.
CD/USB/ iPod mode It will function as the FF/REW button.
If the SEEK/PRESET button is pressed for less than 0.8 second, it will work as follows in each mode.
Type B
OMD040139N
OMD040139
Steering wheel audio control (if equipped) The steering wheel may incorporate audio control buttons.
CAUTION
Do not operate audio remote con- trol buttons simultaneously.
Features of your vehicle
RADIO mode It will function as the PRESET STATION buttons.
CD/USB/ iPod mode It will function as TRACK UP/DOWN button.
3.MODE Press the button to change audio source. - FM(1~2)➟AM➟SAT(1~3)➟CD➟USB
AUX(iPod) FM...
4.MUTE (if equipped) (cid:129) Press the button to mute the sound. (cid:129) Press the button to turn off the micro-
phone during a telephone call.
Detailed information for audio control buttons are described in the following pages in this section.
4 99
AM radio reception
When a strong radio signal has reached your vehicle, the precise engineering of your audio system ensures the best pos- sible quality reproduction. However, in some cases the signal coming to your vehicle may not be strong and clear. This can be due to factors such as the dis- tance from the radio station, closeness of other strong radio stations or the pres- ence of buildings, bridges or other large obstructions in the area.
JBM002
AM broadcasts can be received at greater distances than FM broadcasts. This is because AM radio waves are transmitted at low frequencies. These long, low frequency radio waves can fol- low the curvature of the earth rather than travelling straight out into the atmos- phere. In addition, they curve around obstructions so that they can provide bet- ter signal coverage.Features of your vehicle
FM radio reception
JBM001
D300800AHM How vehicle audio works AM and FM radio signals are broadcast from transmitter towers located around your city. They are intercepted by the radio antenna on your vehicle. This signal is then received by the radio and sent to your vehicle speakers.
100
FM radio station
Features of your vehicle
JBM003
FM broadcasts are transmitted at high frequencies and do not bend to follow the earth's surface. Because of this, FM broadcasts generally begin to fade at short distances from the station. Also, FM signals are easily affected by build- ings, mountains, or other obstructions. These can result in certain listening con- ditions which might lead you to believe a problem exists with your radio. The fol- lowing conditions are normal and do not indicate radio trouble:JBM004
(cid:129) Fading - As your vehicle moves away from the radio station, the signal will weaken and sound will begin to fade. When this occurs, we suggest that you select another stronger station.(cid:129) Flutter/Static - Weak FM signals or large obstructions between the trans- mitter and your radio can disturb the signal causing static or fluttering nois- es to occur. Reducing the treble level may lessen this effect until the distur- bance clears.
JBM005
(cid:129) Station Swapping - As a FM signal weakens, another more powerful sig- nal near the same frequency may begin to play. This is because your radio is designed to lock onto the clear- est signal. If this occurs, select another station with a stronger signal.(cid:129) Multi-Path Cancellation - Radio signals being received from several directions can cause distortion or fluttering. This can be caused by a direct and reflect- ed signal from the same station, or by signals from two stations with close frequencies. If this occurs, select another station until the condition has passed.
4 101
Features of your vehicle
Satellite radio reception You may experience difficulties in receiv- ing XM™ satellite radio signals in the fol- lowing situations.
(cid:129) If you are driving on a mountain road where is the signal blocked by moun- tains.
NOTE: There may be other unforeseen cir- cumstances leading to reception prob- lems with the XM™ satellite radio sig- nal.
SATELLITE2
(cid:129) If you are driving in an area with tall trees that block the signal (30 ft. /10m or more), for example on an road that goes through a dense forest.
(cid:129) The signal can become weak in some areas that are not covered by the XM™ repeater network.
SATELLITE1
(cid:129) If you are driving in a tunnel or a cov-
ered parking area.
(cid:129) If you are driving beneath the top level
of a multi-level freeway.
(cid:129) If you drive under a bridge. (cid:129) If you are driving next to a tall vehicle (such as a truck or a bus) that blocks the signal.
(cid:129) If you are driving in a valley where the surrounding hills or peaks block the signal from the satellite.
102
Using a cellular phone or a two-way radio When a cellular phone is used inside the vehicle, noise may be produced from the audio equipment. This does not mean that something is wrong with the audio equipment. In such a case, use the cellu- lar phone at a place as far as possible from the audio equipment.
CAUTION
When using a communication sys- tem such a cellular phone or a radio set inside the vehicle, a separate external antenna must be fitted. When a cellular phone or a radio set is used with an internal antenna alone,it may interfere with the vehi- cle's electrical system and adverse- ly affect safe operation of the vehi- cle.
WARNING
Do not use a cellular phone while driving. Stop at a safe location to use a cellular phone.
Care of disc (cid:129) If the temperature inside the car is too high, open the car windows for ventilation before using your car audio.
(cid:129) It is illegal to copy and use MP3/WMA files without permission. Use CDs that are created only by lawful means.
(cid:129) Do not apply volatile agents such as benzene and thinner, normal cleaners and magnetic sprays made for ana- logue disc onto CDs.
(cid:129) To prevent the disc surface from get- ting damaged. Hold and carry CDs by the edges or the edges of the center hole only.
(cid:129) Clean the disc surface with a piece of soft cloth before playback (wipe it from the center to the outside edge).
(cid:129) Do not damage the disc surface or attach pieces of sticky tape or paper onto it.
(cid:129) Make sure on undesirable matter other than CDs are inserted into the CD player (Do not insert more than one CD at a time).
Features of your vehicle
(cid:129) Keep CDs in their cases after use to
protect them from scratches or dirt.
(cid:129) Depending on the type of CD-R/CD- RW CDs, certain CDs may not operate normally according to manufacturing companies or making and recording methods. In such circumstances, if you still continue to use those CDs, they may cause the malfunction of your car audio system.
✽✽ NOTICE - Playing an
Incompatible Copy Protected Audio CD Some copy protected CDs, which do not comply with the international audio CD standards (Red Book), may not play on your car audio. Please note that if you try to play copy protected CDs and the CD player does not perform correctly the CDs maybe defective, not the CD player.
4 103
Features of your vehicle
■■ CD Player : PA710MD
❋There will be no
logo if the Bluetooth® feature is not supported.
MD_USA_RADIO
104
SEEK
2. (cid:129) When the
Button TRACK
is pressed, it will automatically tune to the next lower station.
(cid:129) When the
is pressed, it will automatically tune to the next higher station.
SEEK
3. PRESET Buttons (cid:129) Press
(cid:129) Press
buttons less than 0.8 seconds to play the station saved in each button.
buttons more than 0.8 seconds or longer to save the cur- rent station to the respective button with a beep.
Using RADIO, SETUP, VOLUME and AUDIO CONTROL
MD_USA_RADIO
FM/AM
Button
1. The FM/AM button toggles between FM and AM. Listed below are the paths as the system switches from FM to AM and back to FM. (cid:129) FM/AM : FM1➟FM2➟AM➟FM1...
Features of your vehicle
MD_USA_RADIO
Button
DISP
4. Turn ON/OFF when
the LCD Display & Backlight
DISP
button press.
SCAN
Button
5. (cid:129) When the button is pressed, it auto- matically scans the radio stations upwards.
(cid:129) The SCAN feature steps through each station, starting from the initial station, for 5 seconds.
SCAN
(cid:129) Press the
button again to stop the scan feature and to listen to the currently selected channel.
4 105
Features of your vehicle
(cid:129) MAIN Select this item to enter the Scroll and SDVC setup.
SDVC (Speed Dependent Volume Control) Select this item to turn the SDVC feature On or Off. If it is turned ON, volume level is adjusted automatically according to the vehicle speed.
MD_USA_RADIO
SCROLL Select whether long file names are scrolled continuously (On) or just once (Off).
(cid:129) MEDIA Select default display of MP3 play infor- mation. “Folder/File” or “Artist/Title” can be selected.
6. Knob (cid:129) Turns the audio system on/off when
Button &
VOL
the ignition switch is on ACC or ON.
(cid:129) If the knob is turned clockwise/counter- clockwise, the volume will increase /decrease.
SETUP
Button
7. Press this button to enter SETUP mode, If no action is taken for 8 seconds, it will return to previous mode.
In “SETUP” mode, rotate the knob to move the cursor between items, and push the
button to select.
ENTER
VOL
106
(cid:129) XM Select default display of XM mode. “Cat./Ch.” or “Artist/Title” can be selected.
(cid:129) P.BASS (PowerBass) This function creates virtual sound effects and allows adjustments to the Bass level. Off ➟ Low ➟ Mid ➟ High ➟ Off... ❈ AM Mode is not supported.
(cid:129) PHONE Select this item to enter BLUETOOTH setup mode. Refer to “BLUETOOTH PHONE OPERATION” for detailed information.
section
(cid:129) AUDIO Select the item to change the BASS, MIDDLE, TREBLE, FADER and BAL- ANCE tune mode. Press the ENTER button to select each mode and rotate the knob clockwise or counter- VOL clockwise.
BASS Control To increase the BASS, rotate the knob clockwise, while to decrease the BASS, rotate the knob counterclockwise.
Features of your vehicle
MIDDLE Control To increase the MIDDLE, rotate the knob clockwise, while to decrease the MID- DLE, rotate the knob counterclockwise.
TREBLE Control To increase the TREBLE, rotate the knob clockwise, while to decrease the TRE- BLE, rotate the knob counterclockwise.
FADER Control Turn the control knob clockwise to empha- size rear speaker sound (front speaker sound will be attenuated). When the con- trol knob is turned counterclockwise, front speaker sound will be emphasized (rear speaker sound will be attenuated).
BALANCE Control Rotate the knob clockwise to emphasize right speaker sound (left speaker sound will be attenuated). When the control knob is turned counter clockwise, left speaker sound will be emphasized (right speaker sound will be attenuated).
4 107
Features of your vehicle
Using CD Player
MD_USA_CD
CD/AUX
Button (CD)
1. If the CD is loaded, turns to CD mode. If no CD, it displays “No Media” for 3 sec- onds and returns to the previous mode.
Button (RANDOM)
2. Press this button for less than 0.8 sec- onds to activate ‘RDM’ mode and more than 0.8 seconds to activate ‘ALL RDM’ mode. (cid:129) RDM : Only files/tracks in a folder/disc are played back in a random sequence. (cid:129) ALL RDM (MP3/WMA Only) : All files in a disc are played back in the random sequence.
108
Button (REPEAT)
3. Press this button for less than 0.8 seconds to activate 'RPT' mode and more than 0.8
seconds to activate 'FLD RPT' mode. (cid:129) RPT : Only a track (file) is repeatedlyplayed back.
(cid:129) FLD RPT (MP3/WMA Only) : Only files in a folder are repeatedly played back.
TRACK
4. (cid:129) Press
Button
TRACK
button for less than 0.8
seconds to play from the beginning of current song. TRACKbutton for less than 0.8 seconds and press again within 1 second to play the previous song.
(cid:129) Press
(cid:129) Press
TRACK
button for 0.8 seconds or longer to initiate reverse direction high speed sound search of current song.
(cid:129) Press
SEEK
button for less than 0.8
seconds to play the next song.
(cid:129) Press
SEEK
button for 0.8 seconds or longer to initiate forward direction high speed sound search of current song.
CAUTION
Do not insert a CD if CD indicator is lit.
5. CD Eject Button (cid:129) Press
button to eject the CD. This button works regardless of ignition switch status.
6. CD Slot Insert a CD label side up and gently push in while ignition switch is on ACC or ON. The audio automatically switches to CD mode and begins to play the CD. If the audio was turned off, audio power will automatically turned on as the CD is inserted. (cid:129) This audio only recognizes 12cm-size, CD-DA (Audio CD) or ISO data-CD (MP3 CD).
(cid:129) If UDF data-CD or non-CD (e.g. DVD) is inserted, "Reading Error" message will be displayed and the disc will be ejected.
FLDR
9. (cid:129) Press
Button (FOLDER)
CAT
button to move to child folder of the current folder and display the first song in the folder. buttons to move Press to the folder displayed. It will play the first song in the folder.
FLDR
CAT
(cid:129) Press
FLDR
button to move to parent folder of the current folder and display the first song in the folder. Press to the folder displayed.
buttons to move
FLDR
CAT
MD_USA_CD
SCAN
Button
7. Play each song in the CD for 10 seconds. To cancel SCAN Play, press this button again.
INFO
Button
8. Displays the information of the current song. (cid:129) Audio CD : Disc Title/Artist, Track Title
/Artist, Total Track.
(cid:129) MP3 CD : File Name, Title, Artist, Album, Folder, Total Files (Not dis- played if the information is unavailable on the CD or file.)
Features of your vehicle
MD_USA_CD
TUNE
10. Search Button Press the button to display the songs next to the currently played song. press the button to display the songs before to the currently played song.
FILE
ENTER
11. Press the select song.
Button ENTER
button to play the
4 109
Features of your vehicle
NOTE: Order of playing files (folders) : 1. Song playing order :
to
sequen-
tially.
2. Folder playing order : ❋ If no song file is contained in the
folder, that folder is not displayed.
110
CAUTION IN USING USB DEVICE
(cid:129) To use an external USB device, make sure the device is not con- nected when starting up the vehi- cle. Connect the device after starting up.
(cid:129) If you start the engine when the USB device is connected, it may damage the USB device. (USB flashdrives are very sensitive to electric shock.)
(cid:129) If the engine is started up or turned off while the external USB device is connected,the external USB device may not work.
(cid:129) It may not play inauthentic MP3 or
WMA files. 1) It can only play MP3 files with the compression rate between 8Kbps~320Kbps.
2) It can only play WMA music files with the compression rate between 8Kbps~320Kbps.
(cid:129) Take precautions for static electrici- ty when connecting or disconnect- ing the external USB device.
(Continued)
(Continued) (cid:129) An encrypted MP3 PLAYER is not
recognizable.
(cid:129) Depending on the condition of the external USB device,the con- nected external USB device can be unrecognizable.
(cid:129) When the formatted byte/sector setting of External USB device is not either 512BYTE or 2048BYTE, then the device will not be recog- nized.
(cid:129) Use only a USB device formatted
to FAT 12/16/32.
(cid:129) USB devices without USB I/F authentication may not be recog- nizable.
(cid:129) Make sure the USB connection terminal does not come in contact with the human body or other objects.
(cid:129) If you repeatedly connect or dis- connect the USB device in a short period of time, it may break the device.
(cid:129) You may hear a strange noise when connecting or disconnect- ing a USB device.
(Continued)
Features of your vehicle
(Continued) (cid:129) If you disconnect the external USB device during playback in USB mode,the external USB device can be damaged or may malfunction. Therefore,disconnect the external USB device when the audio is turned off or in another mode.(e.g, Radio,XM or CD)
(cid:129) Depending on the type and capac- ity of the external USB device or the type of the files stored in the device,there is a difference in the time taken for recognition of the device.
(cid:129) Do not use the USB device for pur- poses other than playing music files.
(cid:129) Use of USB accessories such as rechargers or heaters using USB I/F may lower performance or cause trouble.
(cid:129) If you use devices such as a USB hub purchased separately, the vehicle’s audio system may not recognize the USB device.In that case, connect the USB device directly to the multimedia termi- nal of the vehicle.
(Continued)
4 111
(Continued) (cid:129) Please avoid using USB memory products which can be used as key chains or cellular phone accessories as they could cause damage to the USB jack. Please make certain only to use plug type connector products as shown below.
Features of your vehicle
(Continued) (cid:129) If the USB device is divided by logical drives,only the music files on the highest-priority drive are recognized by car audio.
(cid:129) Devices such as MP3 Player/ Cellular phone/Digital camera can be unrecognizable by standard USB I/F can be unrecognizable.
(cid:129) Some non-standard USB devices
(METAL COVER TYPE USB) can be unrecognizable.
(cid:129) Some USB flash memory readers (such as CF,SD,microSD,etc.) or external-HDD type devices can be unrecognizable.
(cid:129) Music files protected by DRM (DIGITAL RIGHTS MANAGEMENT) are not recognizable.
(cid:129) The data in the USB memory may be lost while using this audio. Always back up important data on a personal storage device.
(Continued)
112
Features of your vehicle
3. (cid:129) Press this button for less than 0.8 sec-
Button (REPEAT)
onds to repeat current song.
(cid:129) Press this button for 0.8 seconds or longer
to repeat all songs in current folder.
(cid:129) To cancel REPEAT, press this button
again.
MD_USA_USB
TRACK 4. (cid:129) Press the
Button TRACK
button for less than 0.8 seconds to play from the beginning of the current song. Press the button for less than 0.8 sec onds and press it again within 1 sec- ond to move to and play the previous song. Press the button for 0.8 seconds or longer to play the song in reverse direction in fast speed.
(cid:129) Press the
SEEK
button for less than 0.8 seconds to move to the next song. Press the button for 0.8 seconds or longer to play the song in forward direction in fast speed.
Using USB device
MD_USA_USB
CD/AUX
1. Button (USB or AUX) If the auxiliary device is connected, it switches to AUX or USB mode to play the sound from the auxiliary player. If there is no auxiliary device, then the message “No Media” will become displayed on the LCD for 3 seconds and returns to previ- ous mode.
2. (cid:129) Press this button for less than 0.8 seconds
Button (RANDOM)
to play songs randomly in current folder.
(cid:129) Press this button for 0.8 seconds or longer to play songs randomly in entire USB device.
(cid:129) To cancel RANDOM play, press this
button again.
SCAN
Button
5. Plays each song in the USB device for 10
seconds. To cancel SCAN Play, press this button again.INFO
Button
6. Displays the information of the file cur- rently played in the order of FILE NAME ➟ TITLE ➟ ARTIST ➟ ALBUM ➟ FOLDER ➟ TOTAL FILE ➟ NORMAL DISPLAY ➟ FILE NAME… (Displays no information if the file has no song information.)
CAT
7. (cid:129) Press
Button (CATEGORY)
CAT
button to move to child folder of the current folder and display the first song in the folder. Press ENTER
button.
(cid:129) Press
FLDR
button to move to parent folder display the first song in the fold- er. Press
button.
ENTER
4 113
Features of your vehicle
MD_USA_USB
TUNE
8. Search Button Press the button to display the songs next to the currently played song. press the button to display the songs before to the currently played song.
FILE
9. ENTER Press the select song.
Button ENTER
button to play the
114
✽✽ NOTICE FOR USING THE
iPod® DEVICE
• Some iPod models might not sup- port the communication protocol and the files will not be played. Supported iPod models: - iPod Mini - iPod 4th(Photo) ~ 6th(Classic) generation - iPod Nano 1st~4th generation - iPod Touch 1st~2nd generation
• The order of search or playback of songs in the iPod can be different from the order searched in the audio system.
• If the iPod disabled due to its own malfunction, reset the iPod. (Reset: Refer to iPod manual)
• An iPod may not operate normally
on low battery.
• Some iPod devices, such as the iPhone, can be connected through the Bluetooth® interface. The device must have audio Bluetooth® capabili- ty (such as for stereo headphone Bluetooth®). The device can play, but it will not be controlled by the audio system.
CAUTION IN USING THE iPod® DEVICE
(cid:129) The Hyundai iPod Power Cable is needed in order to operate iPod with the audio buttons on the audio system.The USB cable pro- vided by Apple may cause mal- function and should not be used for Hyundai vehicles. ❋ The Hyundai iPod Power Cable may be purchased through your Hyundai Dealership.
(cid:129) When connecting iPod with the iPod Power Cable,insert the con- nector to the multimedia socket completely. If not inserted com- pletely, communications between iPod and audio may be interrupted. (cid:129) When adjusting the sound effects of the iPod and the audio system,the sound effects of both devices will overlap and might reduce or distort the quality of the sound.
(cid:129) Deactivate (turn off) the equalizer function of an iPod when adjust- ing the audio system’s volume, and turn off the equalizer of the audio system when using the equalizer of an iPod.
(Continued)
Features of your vehicle
(Continued) (cid:129) When the iPod cable is connected, the system can be switched to AUX mode even without iPod device and may cause noise.Disconnect the iPod cable when you are not using the iPod device.
(cid:129) When not using iPod with car audio,detach the iPod cable from iPod.Otherwise,iPod may remain in accessory mode, and may not work properly.
4 115
Features of your vehicle
MD_USA_iPod
Using iPod® ❋ iPod® is a trademark of Apple Inc.
CD/AUX
Button (iPod)
1. If iPod is connected, it switches to the iPod mode from the previous mode to play the song files stored in the iPod. If there is no iPod connected, then it dis- plays the message "No Media" for 3 sec- onds and returns to the previous mode.
TRACK 2. (cid:129) Press the
Button TRACK
button for less than 0.8 seconds to play from the beginning of the song currently played. Press the button for less than 0.8 sec- onds and press it again within 1 second to move to and play the previous track. Press the button for 0.8 seconds or longer to play the song in reverse direction in fast speed.
116
(cid:129) Press the
SEEK
button for less than 0.8 seconds to move to the next track. Press the button for 0.8 seconds or longer to play the song in forward direc- tion in fast speed.
Button (CATEGORY)
5. Moves to the upper category from cur- rently played category of the iPod. To move to (play) the category (song) displayed, MENU You will be able to search through the lower category of the selected category.
INFO
Button
6. Displays the information of the file cur- rently played in the order of TITLE ➟ ARTIST ➟ ALBUM ➟ NORMAL DISPLAY ➟ TITLE... (Displays no informa- tion if the file has no song information.)
MD_USA_iPod
Button (RANDOM)
3. (cid:129) Press this button for less than 0.8 sec- onds to shuffle order of all songs in current category. (Song Random)
(cid:129) Press this button for 0.8 seconds or longer to shuffle order of albums in cur- rent category. (Album Random)
(cid:129) To cancel RANDOM Play, press this
button again.
4. Repeats the song currently played.
Button (REPEAT)
Features of your vehicle
MD_USA_iPod
TUNE
7. Search Button Press the button to display the songs next to the currently played song. press the button to display the songs before to the currently played song.
FILE
8. ENTER Press the select song.
Button ENTER
button to play the
4 117
Features of your vehicle
MD_USA_XM
Using XM satellite Radio Your vehicle is equipped with 3 months complimentary period of XM Satellite Radio. XM provides access to over 130
channels of music, information, and entertainment programming.XM
Button
1. Turns to XM Satellite Radio Mode. XM mode toggles in order to XM1➟XM2➟ XM3➟XM1... when the button is pressed each time.
118
SEEK
2. (cid:129) Push
Button
TRACK
button for less than 0.8
second to select previous channel.
(cid:129) Push
TRACK
button for 0.8 second or longer to continuously move to previ- ous channel.
(cid:129) Push
SEEK
button for less than 0.8
second to select next channel.
SEEK
(cid:129) Push
button for 0.8 second or longer to continuously move to next channel. (cid:129) Radio ID : Seek or Tune to XM channel
0 to display the Radio ID.
3. PRESET Buttons Push buttons less than 0.8 second to play the channel saved in each button. Push Preset button for 0.8
second or longer to save current channel to the respective button with a beep.MD_USA_XM
SCAN
Button
4. Press to hear a brief sampling of all channel. To cancel the scan mode, press the button once again.
INFO
Button
5. Displays the information of the current channel in the order of Artist/Song title➟ Category/Channel name➟Current Play Channel➟Artist/Song title➟Category/ Channel name... when the button is pressed each time. The complete text information is not displayed, rotate the tune button to see the next page.
CAT 6. (cid:129) Press
Button (CATEGORY)
CAT
FLDR
buttons to enter
the Category List Mode. The display will indicate the category items, highlight the category that the current channel belongs to.
(cid:129) In the Category List Mode, press these
buttons to navigate category list.
Features of your vehicle
(cid:129) Press
ENTER
button to select the low-
est channel in highlighted category.
(cid:129) If channel is selected by selecting cat- egory "CATEGORY" Icon is displayed at the top of the screen.
MD_USA_XM
TUNE
7. Search Button Press the button to display the songs next to the currently played song. press the button to display the songs before to the currently played song.
FILE
8. ENTER Press the select song.
Button ENTER
button to play the
4 119
(continued) (cid:129) Do not place the phone near or inside metallic objects,otherwise communications with Bluetooth® system or cellular service sta- tions can be disturbed.
(cid:129) While a phone is connected through Bluetooth® your phone may discharge quicker than usual for additional Bluetooth®-related operations.
(cid:129) Some cellular phones or other devices may cause interference noise or malfunction to audio system. In this case, storing the device in a different location may resolve the situation.
Features of your vehicle
CAUTION IN USING BLUETOOTH® CELLULAR PHONE
(cid:129) Do not use a cellular phone or perform Bluetooth® settings (e.g. pairing a phone) while driving.
(cid:129) Some Bluetooth®-enabled phones may not be recognized by the system or fully compatible with the system.
(cid:129) Before using Bluetooth® related features of the audio system, refer your phone’s User’s Manual for phone-side Bluetooth® opera- tions.
(cid:129) The phone must be paired to the audio system to use Bluetooth® related features.
(cid:129) You will not be able to use the hands-free feature when your phone (in the car) is outside of the cellular service area (e.g.in a tunnel, in a underground, in a mountainous area,etc.).
(cid:129) If the cellular phone signal is poor or the vehicles interior noise is too loud,it may be difficult to hear the other person’s voice during a call.
(Continued)
120
BLUETOOTH® PHONE OPERATION (if equipped)
1.
2. 3. 4. 5.
VOLUME er volume. MUTE
button : Raises or lowers speak-
: Mute the microphone during a call. button : Activates voice recognition. button : Places and transfers calls. button : Ends calls or cancels func-
tions.
■ What is Bluetooth®? Bluetooth® is a wireless technology that allows multiple devices to be connected in a short range, low-powered devices like hands-free, stereo headset, wireless remocon, etc. For more information, visit the Bluetooth® website at www.Bluetooth.com
■ General Features (cid:129) This
audio
system
supports Bluetooth® hands-free and stereo- headset features. - HANDS-FREE feature: Making or receiving calls wirelessly through voice recognition.
- STEREO-HEADSET feature: Playing music from cellular phones (that sup- ports A2DP feature) wirelessly.
(cid:129) Voice
recognition engine of
the Bluetooth® system supports 3 types of languages:
English Canadian French US Spanish
✽✽ NOTICE • The phone must be paired to the sys- tem before using Bluetooth® features. • Only one selected (linked) cellular phone
can be used with the system at a time.
• Some phones are not fully compatible
with this system.
• The Bluetooth® word mark and logos are registered trademarks owned by Bluetooth® SIG, Inc. and any use of such marks by HYUNDAI is under license. A Bluetooth enabled cell phone is required to use Bluetooth® wireless technology.
Features of your vehicle
■ Receiving a Phone Call When receiving a phone call, a ringtone is audible from speakers and the audio system changes into telephone mode. When receiving a phone call, “Incoming call” message and incoming phone num- ber (if available) are displayed on the audio.
button on the steering wheel.
(cid:129) To Answer a Call: - Press (cid:129) To Reject a Call: - Press (cid:129) To Adjust Ring Volume: - Use VOLUME buttons on the steering
button on the steering wheel.
wheel.
(cid:129) To Transfer a Call to the Phone (Secret
Call):
- Press and hold
button on the steering wheel until the audio system transfers a call to the phone.
4 121
■ Bluetooth® Audio Music Streaming The audio system supports Bluetooth® A2DP (Audio Advanced Distribution Profile) and AVRCP (Audio Video Remote Control Profile) technologies. Both profiles provide steaming of music via compatible “PAIRED” Bluetooth® Cellular phone. To stream music from the Bluetooth® cel- lular phone, play your music files on your cellular phone according to your cellular phone user’s manual and press the button on the audio system until CD/AUX “MP3 play” is displayed on the LCD. The audio system head unit displays ‘MP3 MODE’.
Features of your vehicle
■ Talking on the Phone When talking on the phone, “Active Call” message and the other party’s phone number (if available) are displayed on the audio.
(cid:129) To Finish a Call - Press
button on the steering wheel.
✽✽ NOTICE In the following situations, you or the other party may have difficulty hearing each other: 1. Speaking at the same time, your voice may not reach each other parties. (This is not a malfunction.) Speak alternate- ly with the other party on the phone.
2. Keep the Bluetooth® volume to a low level. High-level volume may result in distortion and echo.
3. When driving on a rough road. 4. When driving at high speeds. 5. When the window is open. 6. When the air conditioning vents are
facing the microphone.
7. When the sound of the air condition-
ing fan is loud.
122
NOTE: (cid:129) In addition to streaming MP3 files, all music and sound files your cellu- lar phone supports can be played by the audio system.
(cid:129) Bluetooth®
cellular phones must include A2DP and AVRCP capabilities.
compatible
(cid:129) Some A2DP and AVRCP compatible Bluetooth® cellular phones may not play music through the audio sys- tem initially. These cellular phones may need to have the Bluetooth® streaming enabled, for example; i.e : Menu➟Filemanager➟Music➟ Option➟Play via Bluetooth
(cid:129) Please refer to User’s Guide for your cellular phone for more information. To cancel Bluetooth® cellular phone music streaming, stop music play- back on the cellular phone or change the audio mode to AM/FM, XM, CD, iPod, ect.
■ Phone Setup All Bluetooth® related operations can be performed in PHONE menu. 1) Push the
button to enter
SETUP
SETUP mode.
2) Select “Phone” item by rotating the ENTER
knob, then push the
VOL button.
3) Select desired item by rotating the ENTER
knob, then push the
VOL button.
(cid:129) Pairing a phone Before using Bluetooth® features, the phone must be paired (registered) with the audio system. Up to 5 phones can be paired with the system.
NOTE: • The pairing procedure of the phone varies according to each phone model. Before attempting to pair phone, please see your phone’s User’s Guide for instructions.
• Once pairing with the phone is com- pleted, there is no need to pair with that phone again unless the phone is deleted manually from the audio system (refer “Deleting a Phone” section) or the vehicle’s information is removed from the phone.
SETUP
button to enter SETUP
➀ Press mode.
menu.
➁ Select “Phone”, then “Pair” in PHONE
➂ The audio displays “Device : [Name]
passkey: 0000”
➃ Search and select the device name in your mobile phone to starting the pair- ing process.
Features of your vehicle
NOTE: • If the phone is paired with two or more vehicles of the same model, some phones may not handle Bluetooth® devices of that name correctly. In this case, you may need to change the name displayed on your phone. For example, if the vehicles' name is HMC CAR, you may need to change the name displayed on you phone from HMC_CAR to JOHNS_CAR or HMC CAR_1 to avoid ambiguity. Refer to your phone User’s Guide, or contact your cellular carrier or phone manufacturer for instructions.
(cid:129) Connecting a phone When the Bluetooth® system is enabled, the phone previously used is automati- cally selected and re-connected. If you want to select different phone previously paired, the phone can be selected through “Select Phone” menu. Only a selected phone can be used with the hands-free system at a time.
SETUP
button to enter SETUP
➁ Select “Phone”, then “Select” in PHONE
➀ Press mode.
menu.
4 123
Features of your vehicle
➂ Select desired phone name from the list
shown.
➃ The Bluetooth® icon appears on the upper side of audio display when a phone is connected.
(cid:129) Changing Priority If several phones are paired with the audio system, the system attempts to connect the Bluetooth® system is enabled: 1) “Priority” checked phone. 2) Previously connected phone 3) Gives up auto connection.
following order when
SETUP
button to enter SETUP
➁ Select “Phone”, then “Priority” in PHONE
➀ Press mode.
menu.
124
➂ Select desired phone name from the
list shown.
SETUP
(cid:129) ADVANCED Menu After pressing the button, select “Phone” menu. while in PHONE menu, select the “Advanced” menu to make Bluetooth® Phone settings. (The ADVANCED menu may differ accord- ing to audio specifications.)
(cid:129) Deleting a Phone The paired phone can be deleted. - When the phone is deleted, all the infor- mation associated with that phone is also deleted (including phonebook).
- If you want to use the deleted phone with the audio system again, pairing proce- dure must be completed once more.
SETUP
button to enter SETUP
➁ Select “Phone”, then “Delete” in PHONE
➂ Select desired phone name from the list
➀ Press mode.
menu.
shown.
Incoming Volume (Bluetooth® call vol- ume adjustments) While in ADVANCED menu, select “In Vol.” Use the knob key to set the desired volume and press the ENTER button.
Contacts Sync (Automatic Phonebook download setting) While in ADVANCED menu, select “Contacts” To automatically save the con- tacts and call history in your mobile phone each time you connect a mobile device, select ON. If you do not wish for automatic download, select OFF. It’s not available to make a phone call by bluetooth audio system while the phone- book is being downloaded.
Language of Bluetooth® voice recognition While in ADVANCED menu, press “Language”. To change the language, select the desired language and press the
button.
ENTER
Bluetooth® system off While in ADVANCED menu, select “BT Off” to turn off the Bluetooth® System.
Features of your vehicle
■ Menu tree The menu tree identifies available voice recognition Bluetooth® functions.
Call [Name] Ex) Call John (at Home)
Dial [Number]
Ex) Dial 911
Call
By name
By number
Redial
Call Back
Phonebook
Add entry
By voice